ABM BiWaze Clear System User manual

a breath of fresh care
™
A Patient Guide to
BiWaze®Clear System

When airways become inamed and weak, mucus can build up and enable
bacteria to grow, leading to infections that can cause damage to the airways.
Over time, airways can become so damaged they aren’t able to properly
move air in and out of the lungs. This is referred to as the vicious cycle of
lung infections. If the vicious cycle continues, the damage to the airways can
become irreversible, leading to chronic respiratory failure and other serious
health complications.
Airway clearance techniques (ACTs) loosen thick, sticky mucus so it can be
cleared from your lungs by coughing. The goal is to reduce the likelihood of
infections and help you breathe easier.
Many ACTs use percussion (clapping) or a wearable vest externally to loosen
mucus so it can be cleared out of the lungs by coughing. Other ACTs use lung
expansion and high frequency oscillations internally to loosen mucus.
Why is airway clearance important?
1 A Patient Guide to BiWaze® Clear System

BiWaze® Clear System provides oscillating lung expansion
(OLE) therapy to help loose mucus, decrease inammation
and open airways so you can breathe easier.
BiWaze Clear expands and clears the airways through a
combination therapy in just 10 minutes. Lung expansion
therapy expands the airways, high frequency oscillation
therapy mobilizes secretions and aerosol therapy delivers a
medication deep into the lungs. Alternating therapies of lung
expansion and high frequency oscillation combined with
aerosol helps maximize therapy effectiveness.
Visit our website to learn more: www.abmrc.com
How does BiWaze®Clear
help with airway clearance?
A Patient Guide to BiWaze® Clear System 2

3 A Patient Guide to BiWaze® Clear System
2
3
1
4
5
6 7
8
9
1110
Overview of BiWaze®Clear
TOP AND FRONT PANEL
1. Touch Screen Allows you to view
settings, system status information,
therapy settings, and logs. You can also
modify settings from the touch screen.
2. Device Mode LED Light Provides
different color code lights.
Green = Manual Mode
Blue = Auto Mode
Red = Error or Shutdown Mode
3. Patient Port Connection point for the
Dual Lumen Breathing Circuit.
SIDE PANEL
4. Air Inlet Filter Filters air being brought
into the control unit.
5. Cooling Fan Cools the main control board.
BACK PANEL
6. Power Switch Turns the control unit
on and off.
7. AC Power Inlet Connection port
for the AC power cord to power the
control unit and charge the battery.
The red light to the right of the
connection port indicates if the power
cord is fully connected in the port.
8. Handle Allows easy carrying of
the control unit.
SIDE PANEL
9. Aerogen®Power Port Connection port
for the Aerogen controller cable which
powers the Aerogen Solo nebulizer.
10. HDMI Port Allows external display of
the touch screen through an HDMI cable.
11. USB Ports Connection port for USB
ash drives and SpO2 external sensors.
Caution: Do not attach any unapproved devices.
Failure to do so may damage the system.

A Patient Guide to BiWaze® Clear System 4
Dual Lumen Breathing Circuit Setup
1. BiWaze Clear Main therapy
control unit.
2. Coaxial Bacterial/Viral Filter
designed to ftiler bacterial and viral
particles from owing in and out of
the control unit.
3. Coaxial Breathing Tube seperates
the inhalation (outer path) from
the exhalation (inner path).
4. Aerogen®Power Cable powers
Aerogen Solo nebulizer
5. Aerogen®Solo Nebulizer
vibrating mesh nebulizer for
prescribed medication
6. Handset provides a comfortable
grip for therapy delivery and a
spacer for the nebulizer.
7. Patient Interface there are three
patient interface options available;
face mask, mouthpiece, and a
exible trach adapter.
1
3
4
2
5
6
PATIENT INTERFACES
Leaks in the patient interface can decrease the effectiveness of the therapy.
Some people may need to have their head supported from behind to prevent leaks
when using a face mask.
When using a mouthpiece, you may need to use a nose clip to prevent leaks.
Note: Always follow the prescribed therapy protocol from your physician.
7

SYSTEM SETUP
1. Assemble the Dual Lumen Breathing Circuit.
2. Switch on the power at the back of the control unit and plug in the
AC power cable to the control unit if necessary.
Note: During each startup the control unit self-calibrates.
3. The screen will display the last therapy completed. You may
have different therapy options as pre-programmed therapies
in the drop-down list under Auto.
4. Position the control unit on a rm, at surface within arm’s
length of the patient. The control unit should be placed below
elbow level for the best visibility of the screen.
Note: Make sure that the air inlet areas on the left and right
of the control unit are not blocked. Air must ow freely around
the control unit.
5 A Patient Guide to BiWaze® Clear System
Prepare for Therapy

When the BiWaze Clear system powers on the screen will
display the last therapy completed. Below are the components
of the therapy screen.
A. Lock icon (blue is locked and grey is unlocked)
B. Patient Name or ID (optional)
C. Therapy Modes:
• Auto Mode: pressures and times are preprogrammed
• Manual Mode: pressures are set and the therapy time is
controlled by the user. (Mode may be hidden)
D. WIFI allows data transmission to Arc Connect and data/time
synchronization with the BiWaze Clear control unit’s physicial
location local time zone
E. Battery status
F. Date and Time
G. Pressure Manometer (may be hidden)
H. Peak Pressure (may be hidden)
I. Progress Circles to track current phase and next phase of therapy
J. Start or Pause icon
K. Settings
L. Edit Therapy (may be hidden)
M. Therapy Time
Note: BiWaze Clear has a lock feature which can be set by the
healthcare team. When the system is locked, some therapy
components may be hidden.
Therapy Screen
A Patient Guide to BiWaze® Clear System 6

7 A Patient Guide to BiWaze® Clear System
Run Therapy
AUTO THERAPY
1. Select Auto on the top menu bar. You may have pre-programmed
therapy options to chose from in the drop-down list under Auto.
2. Ensure the patient interface is securely in place.
•
Face mask—tightly, but comfortably, cover the mouth and
nose of the patient. Make sure the narrow end of the mask
is over the patient’s nose.
• Mouthpiece—put the mouthpiece lightly in the patient’s
mouth. Make sure that the patient maintains a tight seal
on the mouthpiece during the therapy.
• Flexible tracheostomy adapter—if the patient has a
tracheostomy tube or endotracheal tube, use the exible
tracheostomy adapter to connect the tracheal tube to
the breathing tube.
3. Press Start to begin therapy.
4. Use the therapy timer (A) and phase circles (B) on the screen to
follow along with the therapy.
5. To Halt therapy press Pause
6. Press RESUME THERAPY to continue the therapy or END NOW
to stop the therapy.
Note: The therapy will remain in a pause state for 5 minutes
before automatically ending.
7. When the therapy is complete, you’ll see a therapy completed
ribbon across the screen. The ribbon contains details of the
therapy delivered and can be closed by pressing the X.

A Patient Guide to BiWaze® Clear System 8
TYPICAL THERAPY
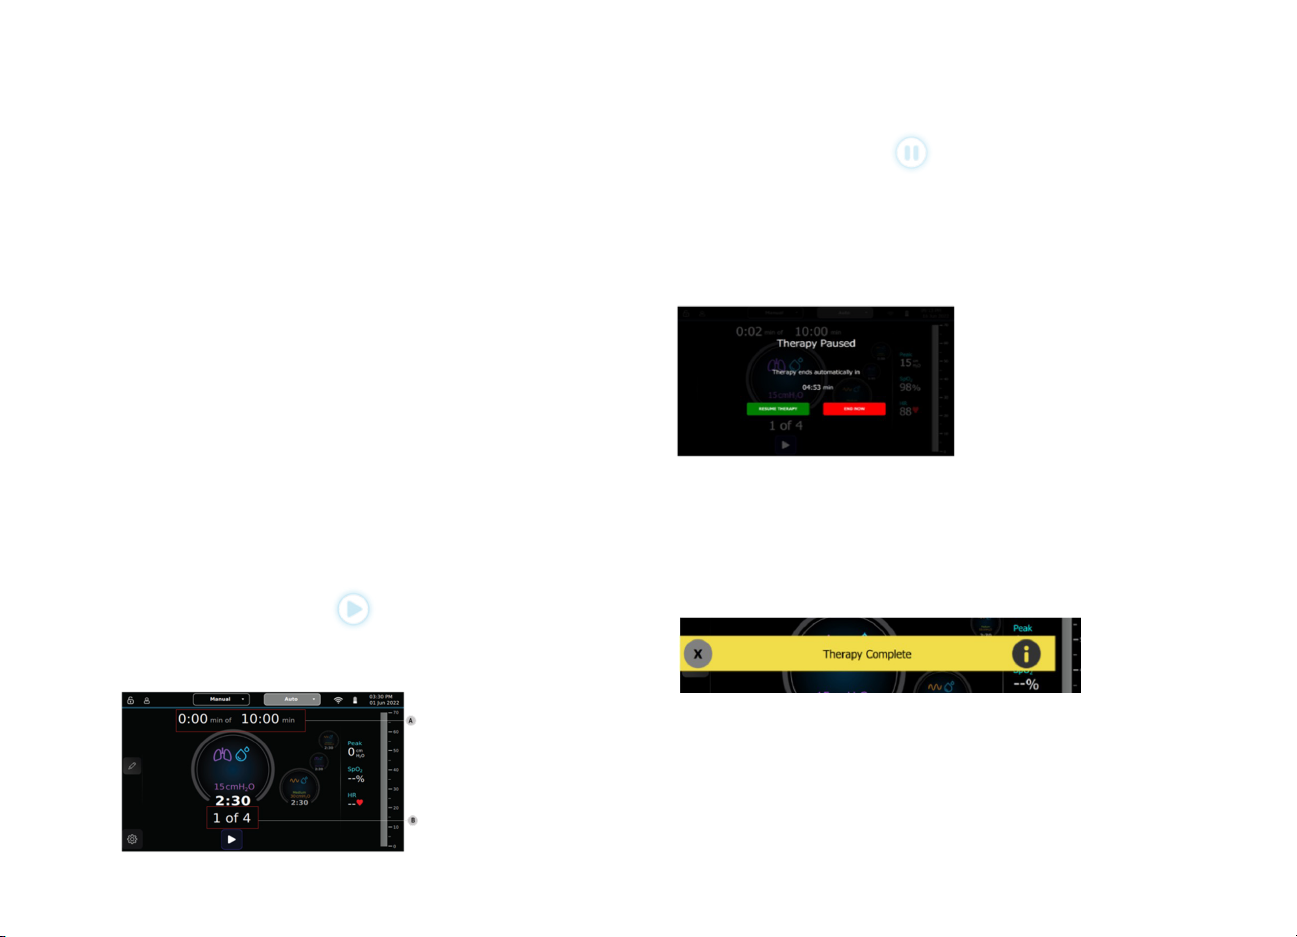
A therapy is typically a 10-minute session with the goal of expanding
the airways and moving secretions from the lower lobes to the upper
airways so they can be coughed out.
The 10-minute therapy is composed of 2.5 minutes of PEP (positive
expiratory pressure), 2.5 minutes of OSC (high frequency oscillation),
and these two therapies are repeated for the same amount of time to
complete the 10-minute session.
Note: The Aerogen® Solo can only be run with saline while using it with
BiWaze® Clear.
INSPIRATORY TRIGGER
Your clinical team may have enabled ‘allow user adjustments’ on your
system which allows changes to be made to the programmed therapy
proles while the device is locked. If enabled, therapy pressure can be
adjusted up to 5 cmH20 per phase, depending on what your clinical
team congured. When a therapy is adjusted, the prole will reset to the
original saved therapy prole settings after the therapy is run.
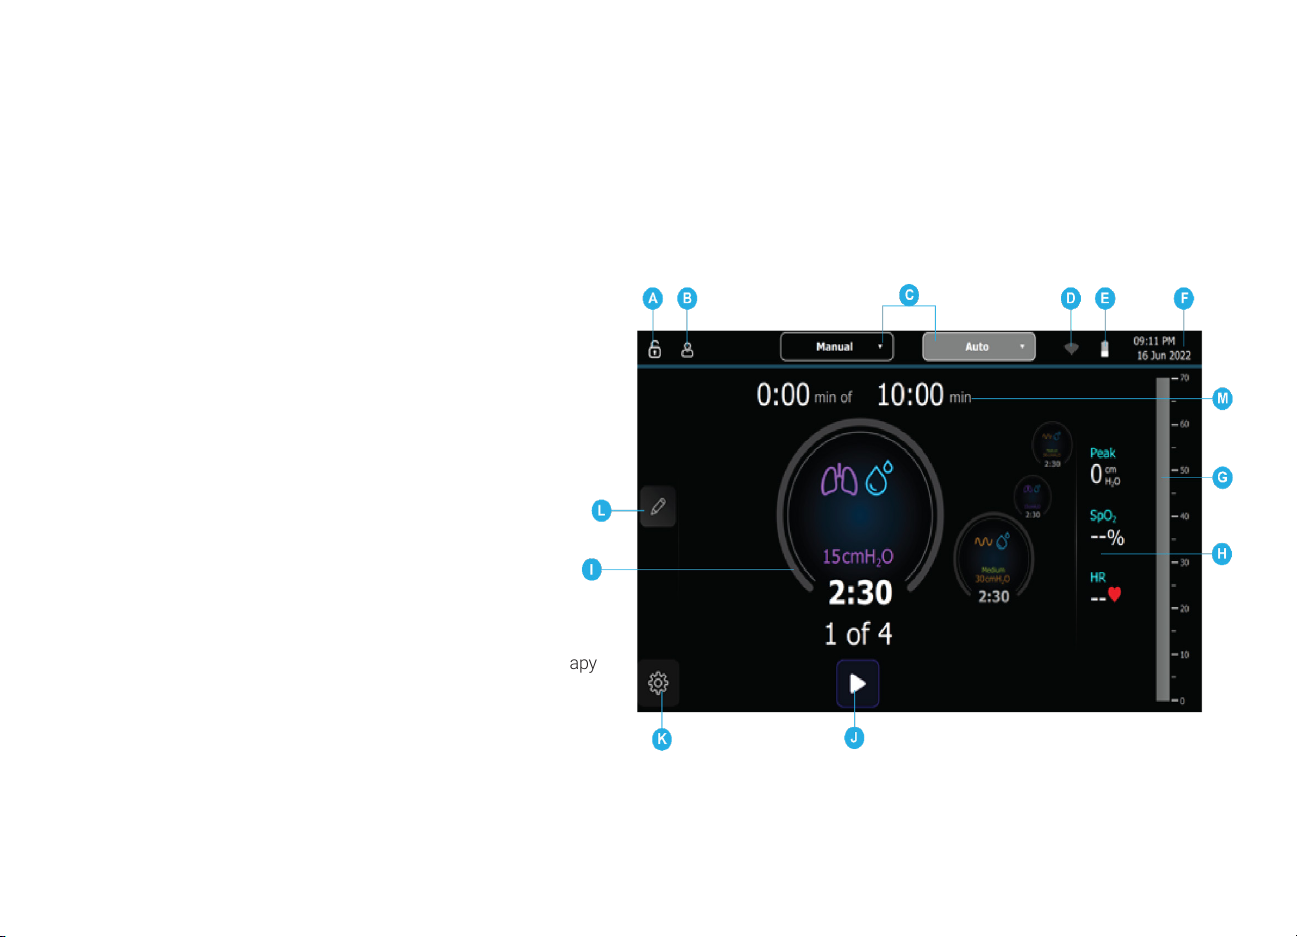
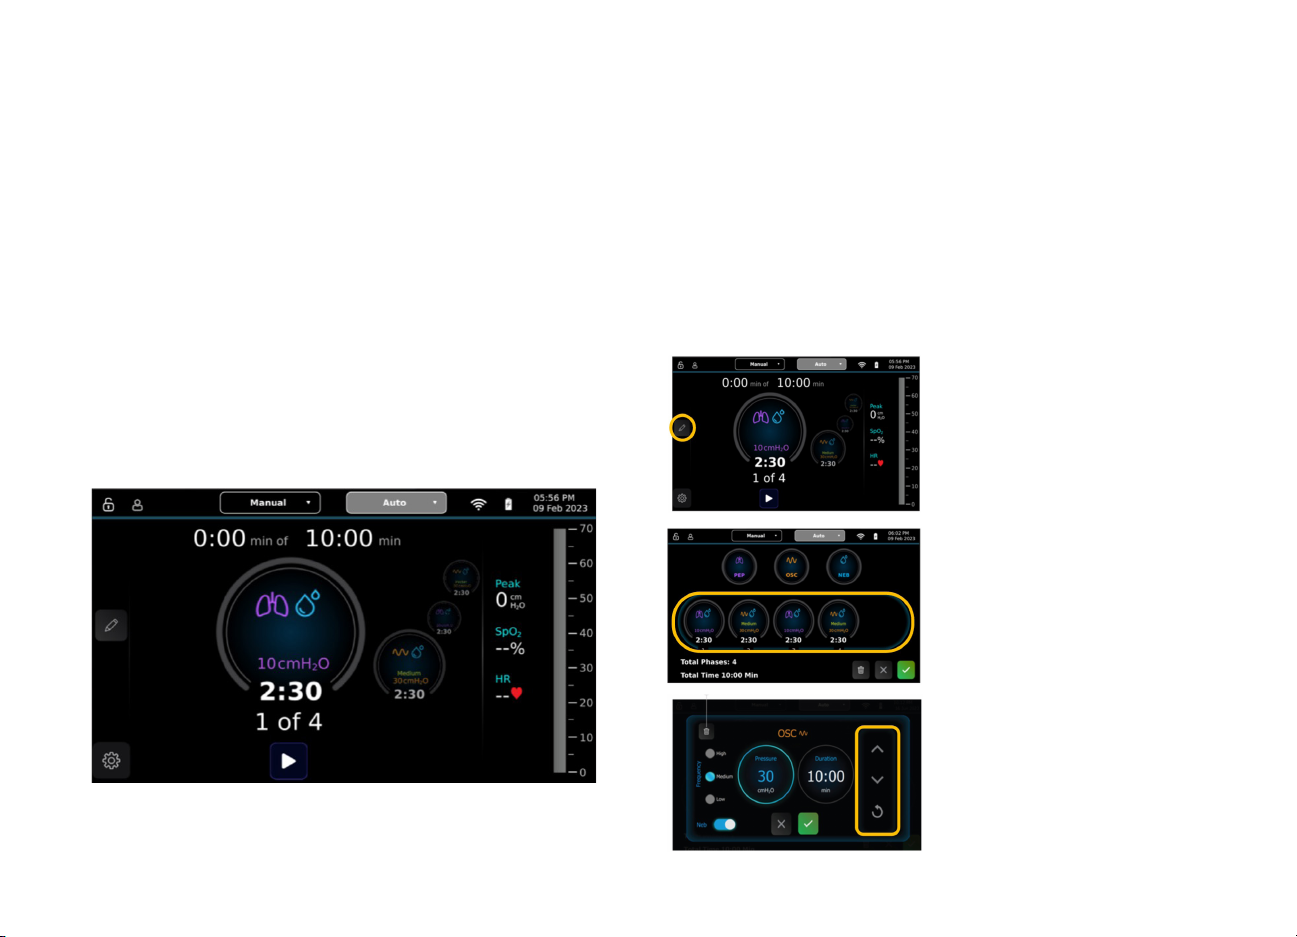
If the ability to adjust pressure is
enabled, the pen icon will be visible.
Press the pen icon to open the thera-
py settings.
From the therapy settings screen you
can edit the therapy phases in the
therapy line. Press on a phase you
want to edit.
The edit phase settings box will
appear and you can change pressure
based upon what has been enabled
by your clinician. Press the arrow to
edit the pressure and press the green
check mark to save the updated
pressure.

Cleaning and Maintenance
CONTROL UNIT AND BREATHING
CIRCUIT
1. Switch off the power at the back of the control unit and
unplug the power cord.
2. Disconnect the breathing circuit from the control unit.
3. Wipe the exterior of the control unit, the patient port adapter,
and power cord with an approved cleaning agent (see the
BiWaze Clear User Manual BK0381 for a list of approved
cleaning agents).
Note: Allow the device to completely dry before plugging in
the power cord.
4. Disconnect all the components of the Dual Lumen Breathing
Circuit including the coaxial viral/bacterial lter, coaxial
breathing tube, handset and patient interface.
5. Examine the coaxial viral/bacterial lter and discard if it is
damaged by sputum or trapped moisture. If it is not damaged,
gently wipe the exterior with an approved cleaning agent and set
aside. Do not wash the coaxial viral/bacterial lter.
6. The coaxial breathing tube, handset, and patient interface should
be washed thoroughly with liquid dishwashing soap and warm
water.
7. Let the components air dry completely before reuse.
Note: Replace the breathing circuit after 30 days or 90 therapy
cycles, whichever comes rst.
PREVENTATIVE MAINTENANCE
BiWaze Clear does not require routine servicing. The system performs
a self-calibration upon every startup.
9 A Patient Guide to BiWaze® Clear System

AIR INLET FILTER
Under normal usage, you should clean the inlet air lter at least
once every month and replace it with a new one every six months.
If BiWaze Clear is used in an environment with animal hair or
high amount of dust, it is recommended to clean the air inlet lter
more frequently.
1. Switch off the power at the back of the control unit and
unplug the power cord.
2. Remove the lter from the enclosure by pinching it with
your ngers.
3. Examine the lter for integrity. Replace the lter if it is torn
or damaged.
4. Wash the lter in warm water with a mild detergent like liquid
dish soap.
5. Rinse thoroughly to remove all detergent residue.
6. Reinstall the lter after it is completely dry.
Note: Only Air Inlet Filters (BC21274) from ABM Respiratory
Care should be used as replacement lters. The lter package
includes 3 lters but only use one lter at a time.
STORAGE AND TRANSPORTATION
Store in a dust free location outside the reach of children.
Use the carrying bag provided with the system to protect the
control unit and the accessories. When traveling, the carrying bag
is for carry-on luggage only. The carrying bag will not protect the
system if it is put through checked baggage. Do not place other
baggage on top of the system.
Air Inlet Filter
A Patient Guide to BiWaze Cleatr System 10

BiWaze®and ABM Respiratory Care®are registered trademarks of ABMRC, LLC.
©2023 ABMRC, LLC. ALL RIGHTS RESERVED. BK386 Rev. 2.0 MAR-2023 ENG US
For further information about this product or a service, visit our webpage:
www.abmrc.com or call customer support: 1-877-ABM-RC01 (877-226-7201)
This Patient Guide contains information extracted from the BiWaze Clear user
manual (BK381). For complete instructions for use please refer to the BiWaze
Clear user manual.
If you have questions about your BiWaze Clear system or therapy, please contact
your local Home Health Equipment company or healthcare team.
Table of contents
Popular Respiratory Product manuals by other brands

Sundstrom
Sundstrom SR 520 Instructions for use

Drive Medquip
Drive Medquip AIRIAL MEDNED MQ5600 Instruction guide

CleanSpace
CleanSpace CleanSpace2 User instructions

SATA
SATA Air star C operating instructions

DeVilbiss Healthcare
DeVilbiss Healthcare Traveler 6910P-DR Instruction guide

Drive Medical
Drive Medical Airial Voyager MQ5500 owner's manual