ABOX V63 User manual

User Manual
Model: V63
Vacuum Sealer
www.aboxtek.com
01 02 03 04 05
06 07 08 09 10 11 12 13
14 15 16 17 18 19 20 21
22 23 24 25 26 27 28 29
30 31 32 33 34 35 36 37
38 39 40 41 42 43 44 45
46 47 48 49 50 51 52 53
54 55 56 57 58 59 60 61
62 63 64 65 66 67 68 69
70 71 72 73 74 75

01 02 03 04 05
06 07 08 09 10 11 12 13
14 15 16 17 18 19 20 21
22 23 24 25 26 27 28 29
30 31 32 33 34 35 36 37
38 39 40 41 42 43 44 45
46 47 48 49 50 51 52 53
54 55 56 57 58 59 60 61
62 63 64 65 66 67 68 69
70 71 72 73 74 75

01 02 03 04 05
06 07 08 09 10 11 12 13
14 15 16 17 18 19 20 21
22 23 24 25 26 27 28 29
30 31 32 33 34 35 36 37
38 39 40 41 42 43 44 45
46 47 48 49 50 51 52 53
54 55 56 57 58 59 60 61
62 63 64 65 66 67 68 69
70 71 72 73 74 75
01 ~ 12
13 ~ 25
26 ~ 38
39 ~ 51
52 ~ 64
65 ~ 75

Safety Precautions
Introduction
Thank you for purchasing ABOX Vacuum Machine. For your safe use of the
product, please carefully read this manual, especially the important safety
precautions before using it. And please properly use the product as instructed.
This manual includes necessary information regarding warranty services.
Please properly keep this manual for future reference.
1. Please read the User Manual before using this product.
2. The product is designed for household use only.
3. The product is not applied to people with disabilities or mental health issues,
or people who lack relevant experience and knowledge, which include children
, unless there is a person who is in charge of their safety to supervise or guide
their use of the product and ensure their safety.
4. Children should be kept from playing with the product.
5. The product should be placed on a flat, firm and heat-proof surface when
being used.
6. When the product is plugged in, do not leave it unattended.
7. When the sealing procedure is completed, do not immediately touch the heat
sealing strip in case getting burnt by the remaining heat.
8. When you are not using the product, please unplug it.
9. Do not pull the electric wire to unplug the product.
10. If the plug, the electric wire, or the product itself is damaged, please
immediately stop using the product in order to avoid danger. The product
should be repaired by the manufacturer, or one of its designated agents, or a
similar professional. Do not try to repair it by yourself.
11. The product is designed for indoor use. Do not use it outdoor or in a damp
environment.
12. Power strip is not recommended. If needed, the power strip must be e
xamined by a professional to make sure its technical indexes match the
product.
01 02 03 04 05
06 07 08 09 10 11 12 13
14 15 16 17 18 19 20 21
22 23 24 25 26 27 28 29
30 31 32 33 34 35 36 37
38 39 40 41 42 43 44 45
46 47 48 49 50 51 52 53
54 55 56 57 58 59 60 61
62 63 64 65 66 67 68 69
70 71 72 73 74 75

Product Structure
13. Please keep the product and electric wire away from high-heat and wet
places.
14. The product does not require lubrication. Organic solvents must not be
used to clean the product.
15. When finished using the product, do not keep the lock catch on either side
of the top lid locked in case the sealing sponge gets squeezed for too long
leading to a shortened service life.
16. Do not let the electric wire hang outside the edges of the table or the
working surface in case the product falls down.
17. The interior vacuum tube of the product cannot be cleaned. If you want to
preserve any food that contains lots of water or any item from which lots of
liquid can be squeezed out , please put them in a sealed container before
putting them in a preservation bag for vacuum sealing. This is to prevent the
liquid from getting into the machine and thus damaging the product.
18. Do not press working buttons after opening the lid to avoid injury when
plugged in.
8
9
10
01 02 03 04 05
06 07 08 09 10 11 12 13
14 15 16 17 18 19 20 21
22 23 24 25 26 27 28 29
30 31 32 33 34 35 36 37
38 39 40 41 42 43 44 45
46 47 48 49 50 51 52 53
54 55 56 57 58 59 60 61
62 63 64 65 66 67 68 69
70 71 72 73 74 75

1. Control Panel
2. External Suction Hose
3. Sealing Sponge
4. Welding Bar
5. Lid Unlock
6. Vacuum Chamber (detachable)
7. Sealing Element
8. Bag Roll Holder (width adjustable)
9. Cutter
10.Anti-skid Pad
Vacuum Sealer Machine Function Button
1. STOP
Stop function - It's used to stop working when vacuuming, single sealing and
outside container vacuuming.
1
2
3
4
5
67
654321
01 02 03 04 05
06 07 08 09 10 11 12 13
14 15 16 17 18 19 20 21
22 23 24 25 26 27 28 29
30 31 32 33 34 35 36 37
38 39 40 41 42 43 44 45
46 47 48 49 50 51 52 53
54 55 56 57 58 59 60 61
62 63 64 65 66 67 68 69
70 71 72 73 74 75

2. The DRY / WET
DRY/WET - Vacuum function switch button. Green light indicates DRY. Red
light indicates WET.
DRY - It is suitable for food without any liquid moisture.
WET - It is suitable for food or goods with little moisture, such as fresh fish,
raw meat.
3. NORMAL VAC
Vacuuming in conventional mode. It is when the vacuum is pumped, the
vacuum degree reaches -55kpa, suitable for those who need large suction
force or pump the vacuum bag tightly, such as cereal etc.
4. SOFT VAC
Vacuum degree is between - 15Kpa and - 25Kpa when the vacuum is pumped,
which is lower vacuum degree and smaller pumping force compared with
Normal VAC. It is suitable for soft food, such as bread etc.
5. SEAL ONLY
Press the "Seal Only" button, the machine will then start operation. The
operation time for single sealing is around 7 seconds.
6. OUTSIDE VAC
Press this button to start or stop vacuuming an external preservation
canister/container.
The vacuum will automatically stop in 5 minutes because some
bags/containers have a large capacity. In emergency situations, the ongoing
vacuuming can be stopped by pressing the stop button.
Operating Guide
How to use a roll or sealing film to make a preservation bag?
1. Adjust the bag roll holder to appropriate width and place the vacuum sealer
bag roll on.
2. Lift the cutting knife and pull the bag under the cutting rod.
3. Pull out the appropriate length of the vacuum bag to ensure that the food is
completely packaged. Then press down the cutting rod, slide the cutter from one
end to the other, and geta pass-through pouch that opens at both ends.
01 02 03 04 05
06 07 08 09 10 11 12 13
14 15 16 17 18 19 20 21
22 23 24 25 26 27 28 29
30 31 32 33 34 35 36 37
38 39 40 41 42 43 44 45
46 47 48 49 50 51 52 53
54 55 56 57 58 59 60 61
62 63 64 65 66 67 68 69
70 71 72 73 74 75

4. Put any side of the bag under the sealing element, press down the lid and
press the "SEAL ONLY" button. When it stops flashing, press the “Lid Unlock”
button, then take the finished vacuum bag out.
NOTE
■The width of the bag shall not exceed 30CM.
■Please choose the special bag with textures or folded sides for vacuum use.
Common smooth flat bag with texture or fold sides is only for sealing use.
Vacuum sealing will postpone their expiration date but cannot prevent them from
decomposing.
Vacuum Sealing Fresh-Keeping Bag?
1. Take out a bag (or make a bag based on the above method).
2. Put the item into the vacuum bag. Make sure there is at least some space
between the item and the bag mouth.
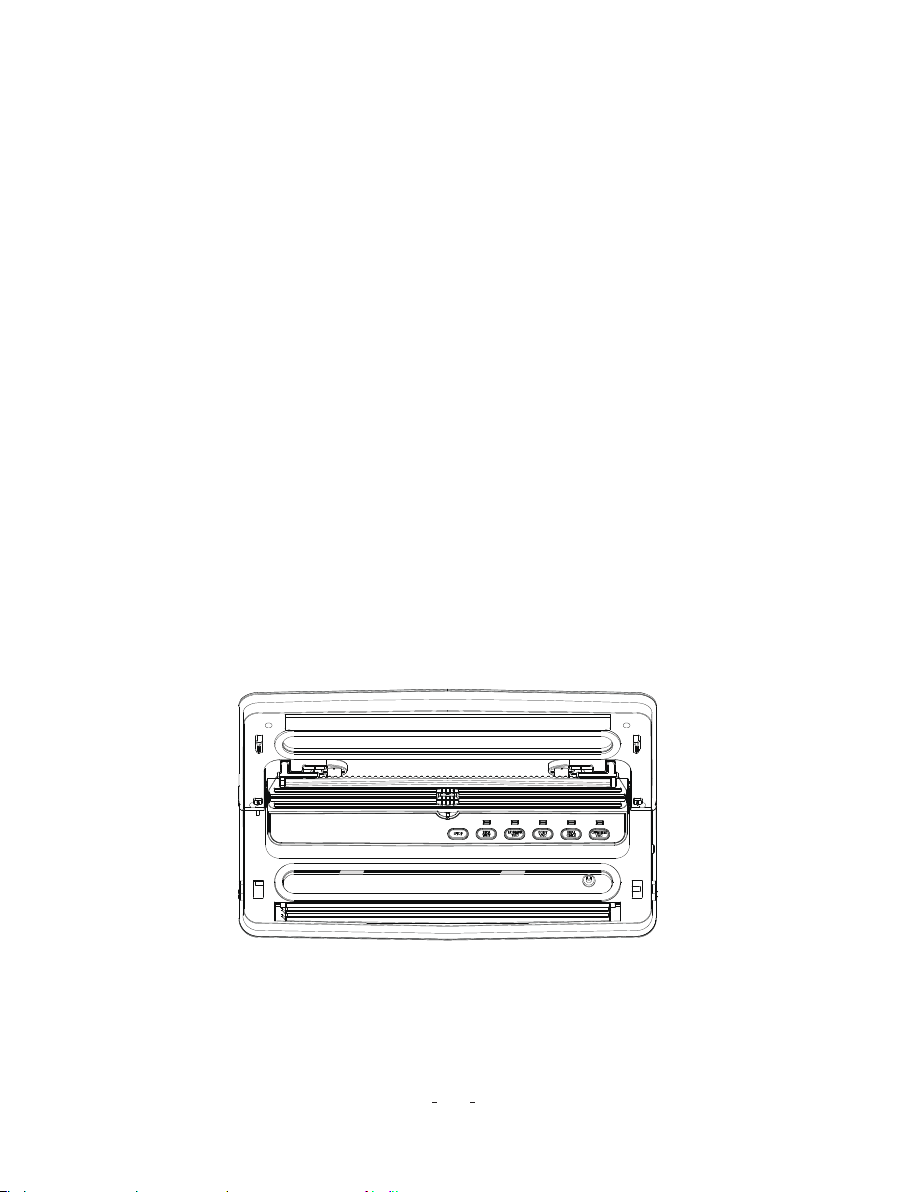
3. Put the bag mouth into the vacuum chamber and press flat.
4. Press down the lid and make sure the lock buckle is firmly locked. Then
choose the dry mode or wet mode according to the food properties. (DRY
corresponds to green light. WET corresponds to red light. One click to switch
mode).
5. After choosing DRY/WET mode, choose "NORMAL VAC" or "SOFT VAC" for
vacuum sealing according to food properties.
06. When it stops flashing, press the “Lid Unlock” button at both sides, then take
the finished vacuum bag out.
How to vacuum a preservation canister/container, etc?
1. Put the item into the vacuum container.
2. Connect the vacuum hose between the machine and container.
3. Press “OUTSIDE VAC” button, the machine will vacuum the preservation
container/jar. The indicator light goes off when vacuuming is finished.
4. Press the air lock buckle, and disconnect the vacuum hose. When the lid of
the container/jar cannot open anymore, it means that the food in the tank is
vacuumed. Vacuuming is completed.
5. The maximum vacuuming time of external container is 5 minutes. If 5 minutes
is not enough to complete the vacuuming of large capacity
bag/container, it is necessary to continue vacuuming again.
01 02 03 04 05
06 07 08 09 10 11 12 13
14 15 16 17 18 19 20 21
22 23 24 25 26 27 28 29
30 31 32 33 34 35 36 37
38 39 40 41 42 43 44 45
46 47 48 49 50 51 52 53
54 55 56 57 58 59 60 61
62 63 64 65 66 67 68 69
70 71 72 73 74 75

NOTE
■It is required to wait for 30 seconds before the next operation when proceeding
vacuum sealing/single sealing/external vacuum sealing. Continuous operation is
not allowed in order to avoid machine overheating.
Starting to use the Product
First Time Use
When you are starting to use the product for the first time, please remove all of
its packaging, protective films, etc.
Notes and Suggestions for Use
Improper use of vacuum sealer machine will lead to damage.
1. Make sure the vacuum sealer bag is unused and clean.
2. Do not vacuum and seal liquids.
3. Make sure the seal element is dry before sealing. If it is wet, it may affect the
sealing effect or the sealing is not firm.
4. Note that the vacuum bag should not cover the air holes in vacuum chamber.
It should be aligned with the baseline of the vacuum chamber so as not to hinder
the vacuum suction.
5. If you vacuum wet food, please regularly clean up the liquid in the vacuum
chamber, and be careful not to spill on the machine.
6. Clean the vacuum bag mouth to make sure it is free of wrinkles or dust or it will
cause sealing difficulty or air leakage.
01 02 03 04 05
06 07 08 09 10 11 12 13
14 15 16 17 18 19 20 21
22 23 24 25 26 27 28 29
30 31 32 33 34 35 36 37
38 39 40 41 42 43 44 45
46 47 48 49 50 51 52 53
54 55 56 57 58 59 60 61
62 63 64 65 66 67 68 69
70 71 72 73 74 75

7. When working continuously, it is recommended to wait for 30 seconds in the
interval of every sealing or vacuuming to cool down the heater seal strip
sufficiently. The program is designed to protect your products and ensure the
sealing effect is best.
8. When the sealing procedure is completed, do not immediately touch the heat
sealing strip in case getting burnt by the remaining heat.
9. You should pay attention to the actual condition of the vacuum. Press the
"Stop" button when you feel it is in a proper situation. (Prevent some foods or
items from being extruded and lose shape).
10. Do not try to vacuum-seal objects with sharp shapes. Placing it in a
container instead of a bag is recommended.
11. For perishable food, please put them in cold or frozen storage right after
vacuum sealing. Vacuum sealing will postpone their expiration dates, but
cannot prevent them from decomposing (Green vegetables are easy to decay.
It is recommended to eat as soon as possible after vacuum sealing).
Starting to use the Product
V63
120VAC(US) 220-240VAC(UK)
60HZ(US) 50HZ(UK)
165W±10%
Vacuum degree-55±3KPa、-20±3KPa
≤300mm
398.8×164.8×81(mm)
1.315kg
Green (DRY), Red (WET)
-60KPA
Model
Rated voltage
Rated frequency
Rated power
Vacuum switch
Cutter width
Machine size
Machine weight
LED display
Vacuum pump
01 02 03 04 05
06 07 08 09 10 11 12 13
14 15 16 17 18 19 20 21
22 23 24 25 26 27 28 29
30 31 32 33 34 35 36 37
38 39 40 41 42 43 44 45
46 47 48 49 50 51 52 53
54 55 56 57 58 59 60 61
62 63 64 65 66 67 68 69
70 71 72 73 74 75

Vacuum sealer machine with cutter, bag
roll holder, heating wire
Stop/Dry Wet/NORMAL VAC/ SOFT VAC/ SEAL
ONLY/ OUTSIDE VAC
Adjustable between 65-310mm width and
length no more than 5m
DRY 8~12s, WET 10-15s (If the bag is too large,
the vacuum seal time will be extended accordingly.)
When opening lid, safety switch-off and
heating wire cannot work.
Machine features
Machine function
Bag roll holder
Vacuum seal time
Safety protection
-55kpa
-15kpa - -25kpa
300mm
300mm
<70db
Heating wire
NORMAL VAC
SOFT VAC
Maximum seal width
Maximum cutter width
Noise
Heating type
Preservation Time of Vacuum-Sealed Food
Strong vacuum, No germs.
Remove internal air to prevent oxidation and prevent bacterial infection.
Frozen Storage
(-16±20℃)
Meat
Preserved in Normal
Preservation Boxes
6 months
Vacuum-Sealed
15-20 months
01 02 03 04 05
06 07 08 09 10 11 12 13
14 15 16 17 18 19 20 21
22 23 24 25 26 27 28 29
30 31 32 33 34 35 36 37
38 39 40 41 42 43 44 45
46 47 48 49 50 51 52 53
54 55 56 57 58 59 60 61
62 63 64 65 66 67 68 69
70 71 72 73 74 75

Bread 1-2 days 6-8 days
Tea leaves
Dry Fruits
Room Temperature
(-16±20℃)
Rice&Flour
3 months
2 months
Preserved in Normal
Preservation Boxes
6 months
12 months
12 months
Vacuum-Sealed
12 months
Eggs
Cooked meat
Cold Storage
(5±3℃)
Vegetables
10-15 days
3-5 days
Preserved in Normal
Preservation Boxes
1-3 days
30-50 days
18-20 days
Vacuum-Sealed
7-10 days
General Safety Rules for Food
Scientifically speaking, following the safety rules can make food safer and get
the more ideal effect for vacuum preservation.
Coffee beans
Seafood&fish
8 months
6 months
18-24 months
10-12 months
01 02 03 04 05
06 07 08 09 10 11 12 13
14 15 16 17 18 19 20 21
22 23 24 25 26 27 28 29
30 31 32 33 34 35 36 37
38 39 40 41 42 43 44 45
46 47 48 49 50 51 52 53
54 55 56 57 58 59 60 61
62 63 64 65 66 67 68 69
70 71 72 73 74 75

1. Unplug the machine before cleaning it.
2. Do not sink the machine or its electric wire in water or other liquid for cleaning.
3. After use, wait for the machine to completely cool down, then use a wet
sponge or cloth to clean the vacuum chamber and surface.
4. Do not use a brush to scrub the machine, otherwise it will leave scratches.
5. Use a tissue or cloth to clean food residue or liquid inside the vacuum
chamber.
(Before you turn on the machine, please make sure the interior and exterior of it
are all completely dried.
Cleaning and Maintenance of the Vacuum Sealer
1. Before vacuum packing, wash hands and other cutting tools.
2. For perishable food, it is best to refrigerate immediately after vacuum sealing.
3. Vacuum-sealing dried goods, such as beans and grain, will postpone their
expiration dates. But if kept in indoor temperature or dark places, they are likely
to be oxidized or sprout.
4. When vacuum-sealed and kept in cold storage, vegetable, such as cabbage
and broccoli, will let out some gases. Make sure they are wrapped and have
been kept in cold storage before you try to vacuum seal them.
1. If perishable food is heated or defrosted, it should be eaten as soon as
possible.
2. Once a vacuum-sealed bag is opened, you can follow the same instruction
to vacuum-seal it again.
3. The best way to unfreeze a frozen bag is to put it in cold storage and let it
slowly unfreeze, instead of sinking it in hot water or heat it by e.g., microwave.
4. If seasoned food is vacuum-sealed or preserved by other hypoxemia methods
and has been kept in indoor temperature for a few hours, do not eat it as it could
potentially be toxic.
5. To quickly freeze a bag of food, place it evenly flat to the freezer.
For Bulk Food Vacuum Packaging,
Recommendations are as follows
01 02 03 04 05
06 07 08 09 10 11 12 13
14 15 16 17 18 19 20 21
22 23 24 25 26 27 28 29
30 31 32 33 34 35 36 37
38 39 40 41 42 43 44 45
46 47 48 49 50 51 52 53
54 55 56 57 58 59 60 61
62 63 64 65 66 67 68 69
70 71 72 73 74 75

6. After use, please put the support card back between the upper and lower shell
of the machine, so as not to affect the use of sealing sponge under pressure
deformation.
Cleaning the Preservation Bag
1. A used preservation bag can be cleaned by warm water. An appropriate
amount of edible detergent can be added to the water. Wash clean with fresh
water and dry it before re-use. Discarding it after three times of re-use is
recommended.
2. Turn the interior of the bag out, and then it can be put on the upper level of a
dishwasher for cleaning.
The Vacuum Sealer Not Operating
1. Check whether there is a power outage or whether the machine is properly
plugged in.
2. Check the electric wire, the plug, and the machine itself to see if there is any
damage, and if there is, do not use it.
Insufficient Air Suction or Failure of Automatic Heat Sealing
1. Check whether the opening end of the bag is entirely placed in the vacuum
chamber.
2. Check whether the sealing sponge is loosened.
3. Check whether there is something on the heat sealing bar or on the sealing
sponge, or whether the heat sealing bar is properly installed.
4. Check whether the top lid of the machine is fully locked.
5. Check whether the preservation bag has air leakage, by filling the bag with
air, sinking itin the water, and pressing on it. If there are bubbles, indicating air
leakage, the bag will need to be replaced.
The Vacuum-Sealed Bag taking in Air
1. This would happen if there are folds, grease, liquid, or other substances on
the sealed end of the bag. Please open the bag. Clean the opening end of the
bag, and then flatten it and place it on the heat sealing strip for re-sealing.
01 02 03 04 05
06 07 08 09 10 11 12 13
14 15 16 17 18 19 20 21
22 23 24 25 26 27 28 29
30 31 32 33 34 35 36 37
38 39 40 41 42 43 44 45
46 47 48 49 50 51 52 53
54 55 56 57 58 59 60 61
62 63 64 65 66 67 68 69
70 71 72 73 74 75

2. Once the bag is vacuum-sealed, check the food in it for moisture or liquid. If
there is, open the bag for re-sealing, or change to a new bag. If the food
contains too much water, freezing it before packaging is recommended.
Heat Sealing not working properly
1. The overheating sealing strip will lead to melting the sealed end of the
preservation bag. Please open the top lid and wait a few minutes for the
sealing strip to cool down.
2. This could happen if there are folds, grease, liquid, or other substances on
the sealed end of the bag.
3. After a previous sealing procedure, there is a 30 seconds pause before you
can press the “VAC” buttons or the “sealing only” button to execute another
sealing procedure.
WarrantyandService
1. The warranty is limited to production defects and damage caused before
use.
2. We offer a 12-month warranty for entire machine after the original purchase
date.
3. Part cost and maintenance fee will be charged for damage caused by
improper use or other non-product quality problems.
01 02 03 04 05
06 07 08 09 10 11 12 13
14 15 16 17 18 19 20 21
22 23 24 25 26 27 28 29
30 31 32 33 34 35 36 37
38 39 40 41 42 43 44 45
46 47 48 49 50 51 52 53
54 55 56 57 58 59 60 61
62 63 64 65 66 67 68 69
70 71 72 73 74 75

Sicherheitanweisung
Lieber Kunde
Vielen Dank,dass Sie für das ABOX Vakummiergerät entschieden haben.Bitte
lesen Sie diese Bedienungsanleitung aufmerksam durch und bewahren Sie sie
für zukünftige Referez gut auf.
1. Bitte lesen Sie die Bedienungsanleitung, bevor Sie dieses Produkt
verwenden.
2. Dieses Produkt ist nur für den Heimgebrauch bestimmt.
3. Dieses Produkt ist nicht für Personen mit Behinderungen oder psychischen
Problemen oder Personen gedacht, die über einschlägige Betriebserfahrungen
und -kenntnisse verfügen, einschließlich Kinder. Wenn Sie jemanden
verwenden müssen, der sich mit diesem Produkt auskennt, sollten Sie ihn
beaufsichtigen oder führen und sicherstellen, dass es sicher ist.
4. Dieses Produkt ist nicht für Kinder zum Spielen geeignet.
5. Stellen Sie das Produkt bei der Verwendung auf eine flache, stabile,
hitzebeständige Arbeitsfläche.
6. Der Benutzer darf nicht gehen, während das Produkt eingeschaltet ist.
7. Berühren Sie den Heißsiegelstreifen nach dem Abschluss des
Siegelvorgangs nicht sofort mit der Hand, um Verbrennungen zu vermeiden.
8. Wenn Sie das Produkt nicht verwenden, ziehen Sie das Netzkabel heraus.
9. Ziehen Sie nicht am Netzkabel, um das Produkt vom Netz zu trennen.
10. Wenn der Stecker, das Netzkabel oder das Produkt selbst beschädigt ist,
stellen Sie die Verwendung sofort ein, um eine Gefährdung zu vermeiden, und
muss vom Hersteller oder seiner zuständigen Wartungsabteilung oder einem
ähnlichen Fachmann repariert werden. .
11. Dieses Produkt ist für die Verwendung in Innenräumen bestimmt.
Verwenden Sie es nicht im Freien oder an einem feuchten Ort.
12. Es wird empfohlen, keine Verlängerungskabel zu verwenden.Verwenden
Sie bei Bedarf professionelle Verlängerungen mit entsprechenden technischen
Indikatoren.
01 02 03 04 05
06 07 08 09 10 11 12 13
14 15 16 17 18 19 20 21
22 23 24 25 26 27 28 29
30 31 32 33 34 35 36 37
38 39 40 41 42 43 44 45
46 47 48 49 50 51 52 53
54 55 56 57 58 59 60 61
62 63 64 65 66 67 68 69
70 71 72 73 74 75

Product Structure
13. Halten Sie das Produkt und das Netzkabel von hohen Temperaturen, Hitze
und Feuchtigkeit fern.
14. Für dieses Produkt sind keine Schmiermittel oder Schmiermittel erforderlich.
Das Abwischen mit organischen Lösungsmitteln ist verboten.
15. Verriegeln Sie nach Gebrauch der Maschine nicht die Schlösser an beiden
Enden der Maschine, um ein längeres Verschließen der luftdicht verschlossenen
Watte zu vermeiden.
16. Lassen Sie die Drähte nicht an der Tischkante oder außerhalb der
Arbeitsfläche hängen, damit das Produkt nicht herunterfällt.
17. Da der Vakuumschlauch im Inneren des Produkts nicht gereinigt werden
kann, verwenden Sie keine großen Mengen Feuchtigkeit oder andere
Gegenstände, die bei Verwendung der Vakuumfunktion eine große
Flüssigkeitsmenge ausdrücken können, um eine Beschädigung des Produkts zu
vermeiden.
18. Drücken Sie nicht auf die Vakuumdichtung, nachdem die Maschine mit
Strom geöffnet wurde, um Verletzungen zu vermeiden.
8
9
10
01 02 03 04 05
06 07 08 09 10 11 12 13
14 15 16 17 18 19 20 21
22 23 24 25 26 27 28 29
30 31 32 33 34 35 36 37
38 39 40 41 42 43 44 45
46 47 48 49 50 51 52 53
54 55 56 57 58 59 60 61
62 63 64 65 66 67 68 69
70 71 72 73 74 75

1.Systemsteuerung
2.Externe Schnittstelle
3.Schweißleiste
4.Schwamm
5.Entsperren
6. Vakuumkammer(abnehmbar)
7.Schweißelement
8.Vakuumbeutelhalter (verstellbare Breite)
9.Schneider
10.Anti-Rutsch-Matte
Funktionstaste vom Vakuumiergerät
1. STOPPEN
Drücken Sie diese Taste im Betrieb,um das Gerät sofort stoppen zu lassen.
654321
1
2
3
4
5
67
01 02 03 04 05
06 07 08 09 10 11 12 13
14 15 16 17 18 19 20 21
22 23 24 25 26 27 28 29
30 31 32 33 34 35 36 37
38 39 40 41 42 43 44 45
46 47 48 49 50 51 52 53
54 55 56 57 58 59 60 61
62 63 64 65 66 67 68 69
70 71 72 73 74 75

2. TROCKEN / FEUCHT
Trockene/feuchte Vakuumierungschalter, Rote Anzeiger ist für feucht und grün
Anzeiger ist für trocken.
Trocken:Es ist für Lebensmittel ohne jegliche Flüssigkeit geeignet.
Freucht:Es ist für feuchtes oder saftiges Essen geeignet.(z.B Fisch)
3. NORMALE VAKUUMIERUNG
Das Vakuum kann bis zu -55 kPa beim Saugen erreichen, ist für harte
Lebensmittel geeignet und erfordert ein starkes Vakuum. Zum Beispiel Getreide.
4. SOFTE VAKUUMIERUNG
Beim Staubsaugen liegt das Vakuum zwischen -15 kPa und -25 kPa. Im
Vergleich zum normale Modus ist das Vakuum geringer und eignet sich für
weiche und zerbrechliche Lebensmittel, z.B Kekse, weiches Brot usw.
5. NUR VERSIEGELN
Nachdem die Taste drücken,wird das Gerät arbeiten und dauert 7 Sekunden.
6. EXTERNE VAKUUMIERUNG
Es eignet sich zum Vakuumierung von Vakuumtanks und
Aufbewahrungsbeuteln, die maximale Vakuumierungszeit beträgt 5 Minuten und
stoppt automatisch nach 5 Minuten.
Bedienungsanleitung
Wie Vakuumierbeutel machen?
1. Stellen Sie den Vakuumrollenhalter auf die entsprechende Breite ein und
legen Sie die Vakuumrolle auf den Ständer.
2. Heben Sie das Messer an und ziehen Sie den Beutel unter die
Schneidstange.
3. Ziehen Sie den Vakuumbeutel in der entsprechenden Länge heraus, um
sicherzustellen, dass das Lebensmittel vollständig gelegen werden kann,
01 02 03 04 05
06 07 08 09 10 11 12 13
14 15 16 17 18 19 20 21
22 23 24 25 26 27 28 29
30 31 32 33 34 35 36 37
38 39 40 41 42 43 44 45
46 47 48 49 50 51 52 53
54 55 56 57 58 59 60 61
62 63 64 65 66 67 68 69
70 71 72 73 74 75

senken Sie die Schneidleiste ab, schieben Sie den Schneider von einem Ende
zum anderen und schneiden Sie ab.
4. Platzieren Sie ein offenes Ende des Beutels unter dem Heißsiegel, drücken
Sie die Abdeckung und drücken Sie die Taste „Only Seal“.Nach Verschließen
können Sie ein Vakuumierbeutel bekommen.
Hinweis
■Die Breite des Vakuumierbeutel darf 30 cm nicht überschreiten
■Verwenden Sie zum Verschließen mit Vakuum den Flachbeutel mit
Faltwinkel auf beiden Seiten oder Körnung. Der normale Flachbeutel kann nur
versiegelt und nicht vakuumiert werden. Eine Vakuumverpackung kann die
Haltbarkeit des Produkts verlängern,aber kann den Verfall der Nahrung nicht
aufhalten.
Wie zu vakuumieren?
1. Wählen Sie zuerst den geeigneten Vakuumbeutel entsprechend der Größe
der Lebensmittel aus. (Oder machen Sie einen Vakuumbeutel nach obiger
Methode).
2. Legen Sie die Lebensmittel in einen Vakuumbeutel und vergewissern Sie
sich, dass sich zwischen dem Lebensmittel und dem Beutelmund eine
bestimmte Länge befindet.
3. Platzieren Sie das offene Ende des Vakuumbeutels auf seinem Heizelement.
Nun sollte die Beutelöffnung in die Vakuumkammer gezogen und flach
gehalten werden.
4. Drücken Sie auf die Abdeckung, um sicherzustellen, dass die
Verriegelungen auf beiden Seiten geschlossen sind. Wählen Sie dann
entsprechend den Lebensmitteleigenschaften "DRY / WET" (DRY ist trockene
Modus, die Kontrollleuchte leuchtet grün; WET ist der leuchte Modus, die
Kontrollleuchte ist rot)
5. Nachdem Sie trocken oder feuchte gewählt haben, wählen Sie "NORMAL
VAC" oder "SOFT VAC" zum Vakuumieren gemäß den
Lebensmittelbedürfnissen.
6. Wenn die grüne Anzeige des ausgewählten Funktionsmodus aufhört zu
blinken und erlischt, drücken Sie die Entriegelungstaste auf beiden Seiten und
nehmen Sie den fertigen Vakuumbeutel heraus.
01 02 03 04 05
06 07 08 09 10 11 12 13
14 15 16 17 18 19 20 21
22 23 24 25 26 27 28 29
30 31 32 33 34 35 36 37
38 39 40 41 42 43 44 45
46 47 48 49 50 51 52 53
54 55 56 57 58 59 60 61
62 63 64 65 66 67 68 69
70 71 72 73 74 75
Table of contents
Languages:
Other ABOX Kitchen Appliance manuals