Acard AEC-6710S User manual

PCI SCSI Adapter
AEC-6710S/6712S
© Copyright ACARD Technology Corp.
User’ s Manual
Ver:1.0
Ver:1.0.19990521.6712-12s

Contents
Chapter 1 Introduction ............................................................................ 3
1.1 Introduction ........................................................................................ 3
1.2 Features .............................................................................................. 3
1.3 Specifications ..................................................................................... 4
1.4 Board layout ....................................................................................... 4
1.5 Jumper Description ............................................................................. 4
Chapter 2 Installation ............................................................................... 5
2.1 Hardware Installation ......................................................................... 5
2.1.1 Installing the Host Adapter into your system ................................ 5
2.1.2 Installing Internal Drives ................................................................ 6
2.1.3 Installing External Drives ................................................................ 7
2.1.4 Installing Both External and Internal Drives ................................... 8
Chapter 3 Software Configuration ........................................................... 9
3.1 Introduction ........................................................................................ 9
3.2 Device Driver Installation ................................................................. 11
3.2.1 DOS Environment ....................................................................... 11
3.2.2 WINDOWS 3.X Environment ....................................................... 13
3.2.3 Windows 95/98 Environment ........................................................ 14
3.2.4 Windows NT Environment ........................................................... 21
3.2.5 Linux Environment ........................................................................ 25
Appendix 1 ............................................................................................. 26

1.1 Introduction
TheAEC6710S/6712SisahighperformancePCIbusFastSCSI-2/Ultra
SCSI-3 adapter. With full features of the PCI 32-bit bus master transfer
capability and PCI enhanced data transfer commands (133MB/s). It offers
real PCI Plug and Play, and Scatter/Gather function to improve
performanceformulti-taskingOS.
TheAEC6710S/6712Ssupportsperipheraldeviceswhichconformwith
SCSI-1,SCSI-2,FastSCSI-2andUltraSCSI-3includingHarddiskdrive,
Removabledevice,CD-ROMdrive,MOdiskdrive,Opticaldisk,WORM,
TapeDrive,CD-R/RW,Scanner,etc.
1.2 Features
32-bitPCIBusMasterAdapterFASTSCSI-2/UltraSCSI-3.
Synchronoustransfer rateup to10MB/s(6710S),
20MB/s(6712S).
Asynchronous transfer rate up to 7MB/s.
Powerful advanced setup function.
Supportsdisk capacityover 8.4GB.
Supportsmulti-threadedandmulti-taskingOS.
SupportsScatter/Gatheroperation.
AutomaticFIFOthresholdselection.
Autoterminatorcontrol(6712Sonly).
Devicesupports: Harddiskdrive, Removabledevice,
Opticaldisk,CD-ROM,CD-R/RW,TapeDrive,etc.
Operation system supports:
DOS,Windows3.x,Windows95/98,WindowsNT,
Netware,SCOUNIX,SCOOpenDesktop,OS/22.x,
OS/2WARP,Linux ...etc.
Chapter 1 Introduction
3
1.3 Specifications
PowerRequired - Voltage 5V+/-5%
Current 1.8A
Environment - Temperature
Operating 0
o
C to 70
o
C
Storage -65
o
C to150
o
Humidity - 15%to90%
Dimensions - Length: 12cm
Width: 8.4cm
Connector - 8-bit, 50-pininternalconnector
8-bit,50-pinhigh densityexternal connector
Terminator - Passive(6710S),Active(6712S)
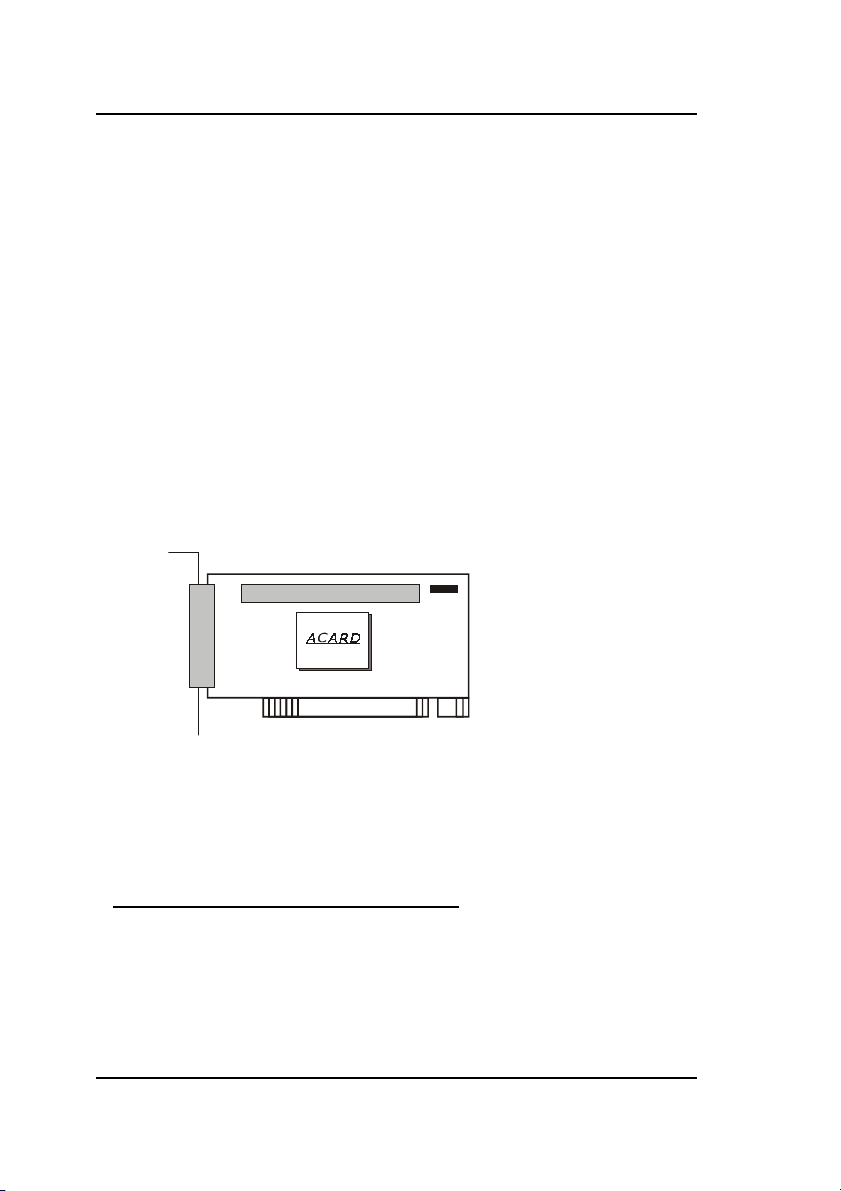
1.4 Board layout
1.5 Jumper Description
CN1: 50-pinSCSI-3externalconnector
CN2: 50-pinSCSI-3internalconnector
JP1: LED
CN1: Connect to the 50-pin SCSI pin type round cable to
connect the SCSI devices.
CN2: Connect to the 50-pin SCSI flat cable to connect the SCSI
devices.
JP1: ThisjumperperformstheSCSILED.
4
Chapter 1 Introduction
CN2
JP1
CN1
Chapter 2 Installation
2.1 Hardware Installation
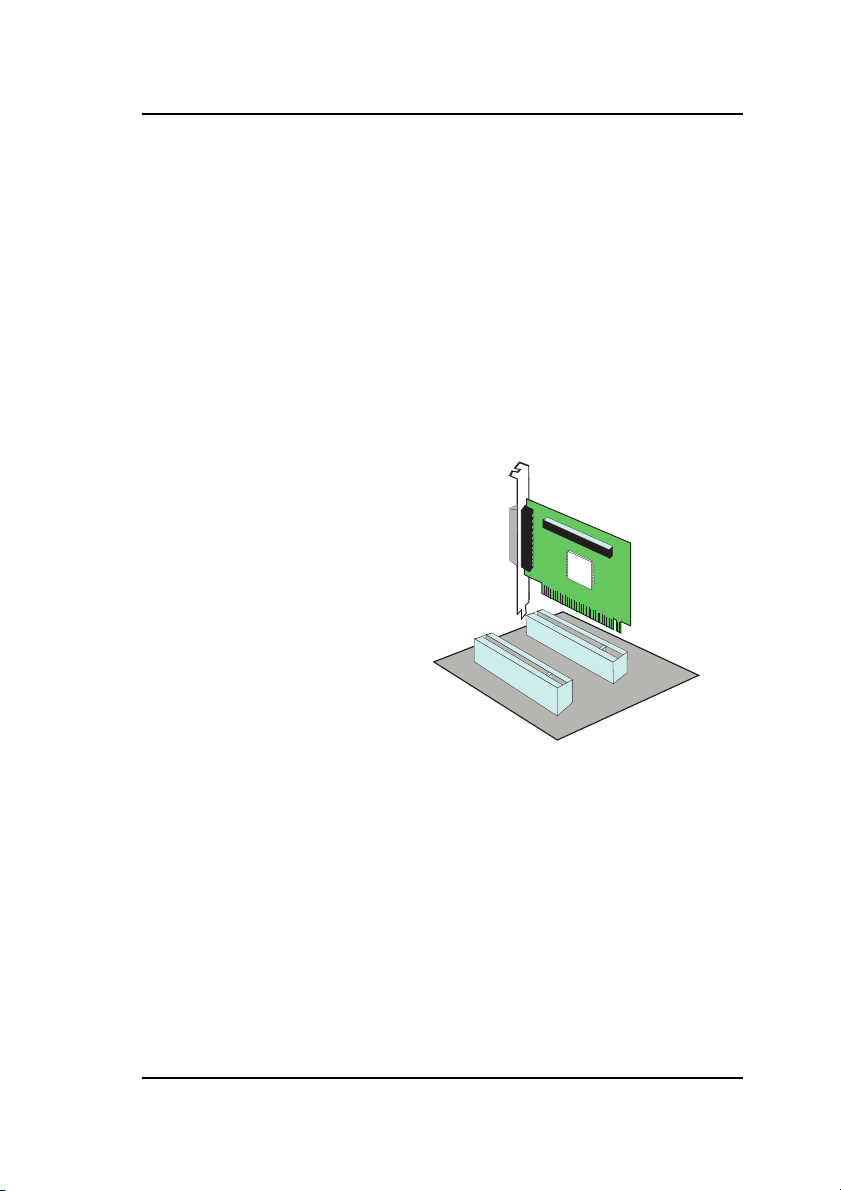
2.1.1 Installing the Host Adapter into your system
Step 1: Turn off your computer
Step 2: Plug out the power core and all the connection of
external devices from your system.
Step3: Please refer to your original case manufacturer to see
how to open your computer case.
Step 4: Select an unused PCI
expansion slot of your
computer.Unscrewthe
slot cover and remove it.
Step 5: Use tool, which can remove static charge,
e.g. your hands, to discharge your computer and adapter from
metal portion. Handle your SCSI host adapter on themetal
2Step6:Plugyour AEC6710S/6712Sadapter cardinto the
unused PCI slot with bottom edge carefully, then push it
into slot slowly. Try to fit adapter’s bracket on case frame
just like a slot cover.
5
bracket part from anti-static bag.

2.1.2 Installing Internal Drives
3
1/2
”drive or 5
1/4
”drive?
Most of hard drives have size of 3
1/2”
and CD-ROM/CD-R/W have size of
5
1/4”
”. You need to check to see if there is a suitable space for new device.
If there is no more 3
1/2”
of space available, you might need a mounting kid
to fit your 3
1/2”
device to 5
1/4”
frame. Please refer to your original case
supplier to select a suitable space for your device.
Power Connection
For internal devices, connect DC power core directly from power supply
to device.
Cable Connection
For internal connector
Step 1: Please identify the number of pins on connectors, either
adapter or device. Then, prepare a ribbon cable whose
connectors match your need, e.g. 50-pin to 50-pin, 68-pin
to 68-pin, or 68-pin to 50-pin.
Step 2: Find out pin-1 of connectors on cable and host adapter.
Connect one end of SCSI cable to the connector of host
adapter aligning with pin-1 to pin-1.
Note: Usually, there is a color line on edge of cable indicating
pin 1 of connector. Also, there a mark 1 printed on
adapter board indicating pin 1 of adapter.
Step 3: Find out pin 1 of connector on your device.
Step 4: Select one available connector on cable, then plug it
into your internal device connector aligning with
pin-1to pin-1.
Step 5: If you have two or more devices, please repeat Step 2
and Step 3 to install your remaining devices.
Chapter 2 Installation
6

Step 6: Please terminate the last SCSI device on this cable.
Note: For terminating your internal SCSI device, please
refer to your original SCSI devices supplier or
manufacture.
Step 7: Identify your devices number, that is, you have to set
all your internal SCSI devices an unique number to
avoidhardwareconflict.
2.1.3 Installing External Drives
Power Connection
For external SCSI devices, you need to connect the power core to turn on
your external device. Please refer the graph below to see how to connect
your power core to your external device.
Cable Connection
Let’ s discuss two different ways to make external cable connection by
number of devices, only one device connected and more than one devices
connected.
1. Connecting only one device
Step 1: Please identify the number of pins on connectors,
either adapter or device. Then, prepare a external
cable whose connectors match your need,
e.g.50-pinto 50-pin,68-pin to 68-pin,or 68-pin to50-pin.
Step 2: Plug one end of the high-density external SCSI cable
into the host adapter’s D-Sub connector.
Step 3: Plug the other end of this SCSI cable into one
connector on the SCSI device you are going to connect.
Step 4: Enable the terminator on device.
Chapter 2 Installation
7

2. Connecting more than one device
You can connect two or more devices one after one to your host SCSI
adapter serially. That is one of SCSI’s features.
Step 1: First of all, of course, check your external SCSI cable to
match pin number of external connectors on SCSI adapter
and devices.
Step 2: Plug one end of the high-density external SCSI cable into
the host adapter’s external connector.
Step 3: Plug the other end of this external SCSI cable into one of
connectors on the SCSI device you are going to connect.
Step 4: Take another external SCSI cable and plug it into the rest
connector of previous device. Connect the other end of
this external cable to the next SCSI device you are going
to connect.
Step 5: Again, take another external SCSI cable and connect the
remaining device you are about to use with the same way.
Step 6: Disable all terminators of these SCSI devices except the end
one, whose terminator needs to be enabled.
2.1.4 Installing Both External and Internal Drives
You can install both external and internal devices with only one adapter
at the same time.
ForAEC6710S/6712S,
you can connect
maximum 7 devices
to both internal and
external connectors
totally. Please note
that you have to
terminate the last
device on both
external and
internal cables.
Chapter 2 Installation
8
Terminator SCSI host adapter
Internal Chain
External Chain
Terminator
CD-RW
The last device in
both internal and
external chain must
be terminated
Hard Disk
Scanner CD-RW
CD-ROM

3.1 Introduction
You may need the additional device driver to use all of the features or
work in the other’soperation system. That’s described by the following.
Disk 1
ROOT
Readme.txt: A quick installation guide for usingsetup32.exefile
Setup32:Automatic setupprogram
Windows 95/98 Directory (Directory of Win95/98)
AEC671x.MPD:ForWindows95/98SCSIdevicedriver
AEC671x.INF:InstallInformation
Windows NT Directory (Directory of Winnt)
AEC671x.SYS:ForWindowsNT3.xSCSIdevicedriver
TXTSETUP.OEM
OEMSETUP.INF
Disk 2
ROOT
INSTALL.EXE:PC-ATDOSdriversinstallprogram
INSTALLV.BAT:DOS-VenvironmentDOSdriversinstallprogram
INSTALL98.BAT:PC-98environmentDOSdriversinstall program
DOSDirectory (DirectoryofDOS)Drivers description
ASPI671x.SYS: ACARDDOSSCSI-3ASPI(AdvancedSCSI
ProgrammingInterface)driver.
ASPICD.SYS: ACARDDOSSCSI-3ASPICD-ROMdriver.
ASPIUDD.SYS: ACARDDOSUniversal disk(Harddiskand
Opticaldisk orremovabledisk)driver.
Chapter 3 Software Configuration
9

Chapter 3 Software Configuration
DosUtilities description
ASPITLDS.EXE: UtilityforPC-ATDOS
ASPITLV.BAT: UtilityforPC-ATDOS-V
ASPITL98.BAT: UtilityforPC-98DOS
SETUPV.BAT: Used forsetup PC-ATDOS-V afterinstall
SETUP98.BAT: Used for setup PC-98 DOS after install
CHGROM.EXE: ChangeNewversion SCSIBIOS and setup
Utility
Usage: type “chgrom” or chgrom/? for help.
Netware 3.1x, 4.x Directory (Directory of Netware)
AEC671x.DSK:ForNetware3.1xand4.xSCSIdevicedriver
OS/2 2.x, OS/2 Warp Directory (Directory of Os/2)
OS2671x.ADD:ForOS/22.xandWarpSCSIdevicedriver
SCO UNIX Directory (Directory of Scounix)
AEC671x.TAR:ForSCOUNIXSCSIdevicedriver
Windows 3.x Directory (Directory of Windows)
README.WIN- Read-mefileforwindows
WINASPI.DLL- driversforwindows
ASPITLWNEXE- UtilityforPC-ATWindows
WINTOOLJ EXE- Utility for PC-AT Japanese Windows
(includesPC-98)
10
This manual suits for next models
1
Table of contents
Other Acard Adapter manuals

Acard
Acard AEC-6712TU User manual

Acard
Acard AEC-6885MLP User manual

Acard
Acard AEC-67162M User manual

Acard
Acard AEC-67160D User manual

Acard
Acard AEC-7730A User manual

Acard
Acard AEC-6290 User manual

Acard
Acard AEC-6290M User manual

Acard
Acard AEC-6293 User manual

Acard
Acard AEC-6293M User manual

Acard
Acard Mirror Smart Ultra160 User manual


