Accom dveous/mx Owner's manual

Quick Contents
Section 1:
Introduction to Dveous/MX
• Introduction
• Manual Conventions
• Twin Channel Power
• Control Panel Navigation
• Key Signal Paths
• System Description

1-2
Section 1: Introduction to Dveous/MX
Start Here
Index
Contents
Introduction
This manual is primarily a reference manual for the Dveous/MX user. However,
Sections 2 through 9 contain various “how-to’s” that may be used as a tutorial
for less experienced users.
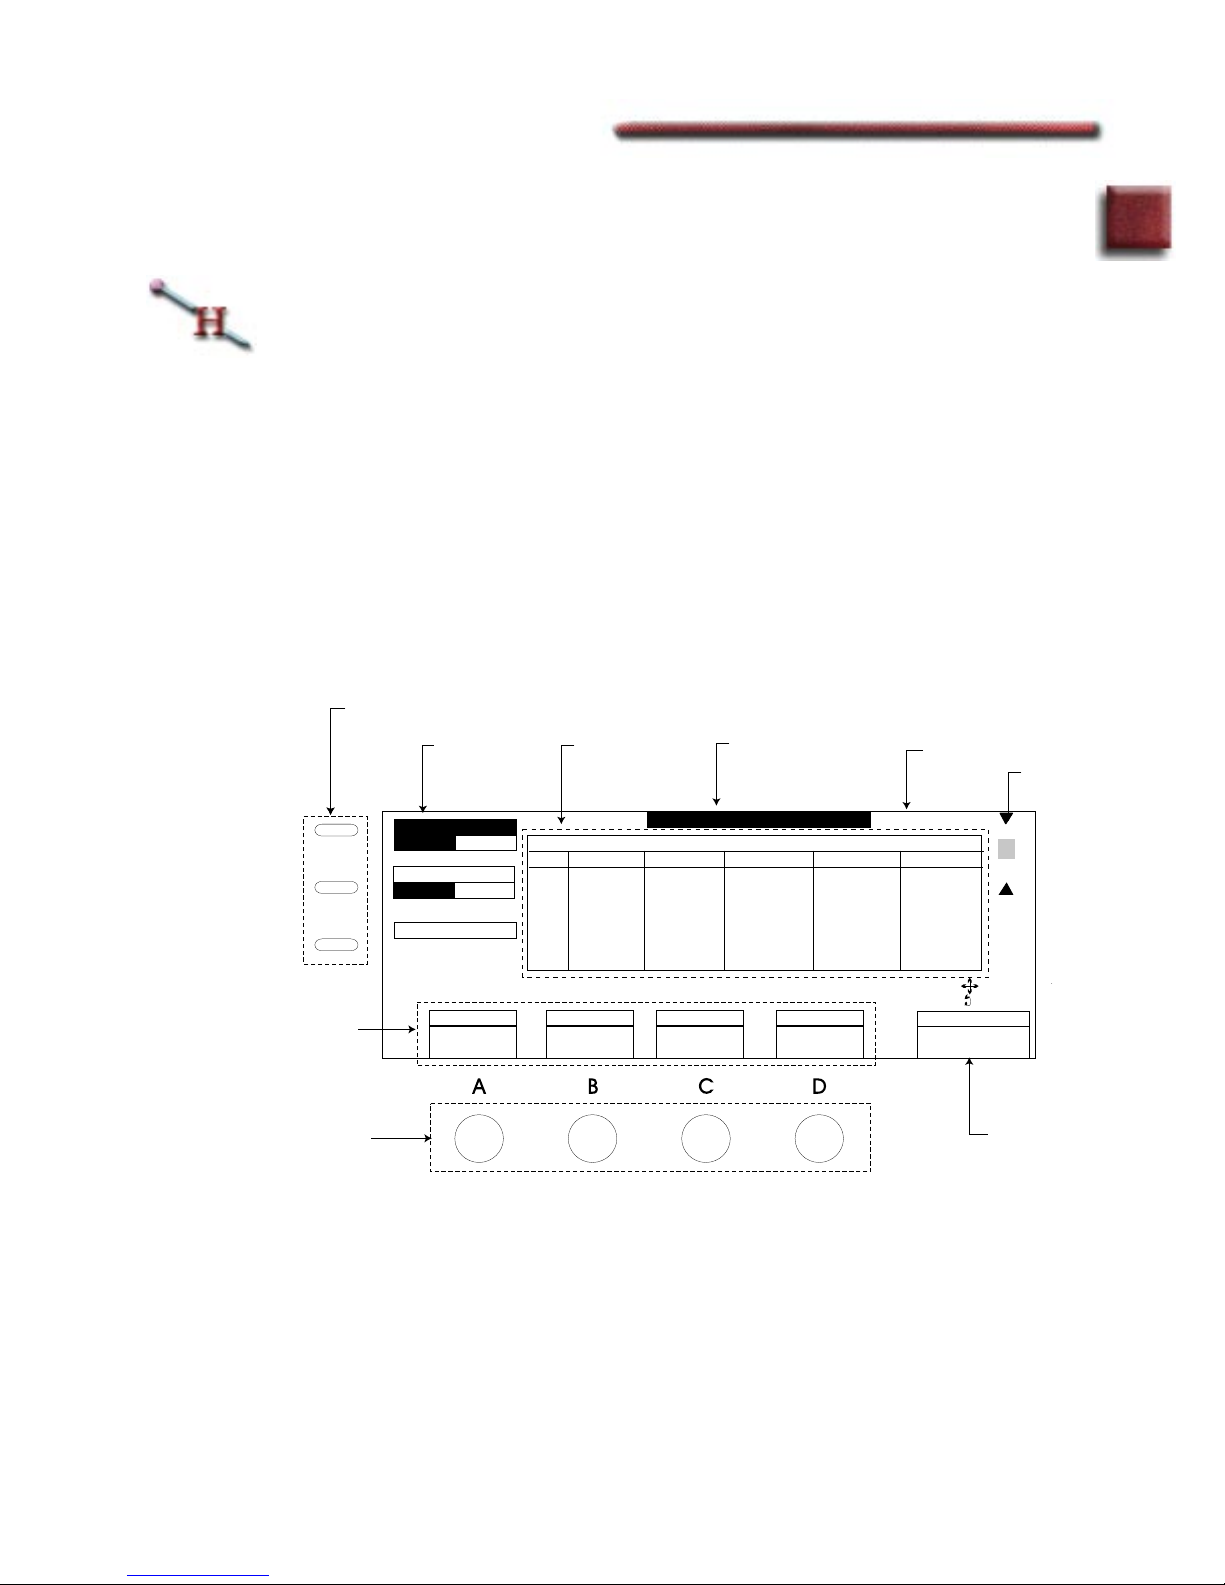
As an introduction to the Dveous/MX, Section 1 describes in general terms the
function of each Control Panel element including the buttons, softkeys, soft-
knobs, numeric keypad, LEDs, joystick and the user interface (menus).
In Section 2 you will learn how to start up on the Dveous/MX, select sources,
delegate and configure channels, use the joystick effectively and how to create a
simple effect.
Section 3 introduces DVE transforms. It explains the upstream/downstream
hierarchy of the transform groups.
Section 4 contains explanations of the functions on all the menus displayed by
the channel menu buttons. This includes 2D and 3D Transforms, Border/Crop,
Color Corrector which includes Color Modify, Corner Pinning, Input, Key,
Light Source, Multi, Motion Detect, Output, Texture and UltraWarp.
Section 5 describes the functions controlled through the Global Menu buttons,
i.e. functions that are not specific to the local (1A, 1B, 2A, 2B) channels.
Section 6 discusses effect and timeline concepts. It details using the Timeline
Control buttons and TimeFrame
™
Effects Editor to create and run timeline
effects.
Section 7 explains how Dveous/MX can be set up to make transitions from one
keyframe to the next and thereby modify the look of an effect.
Section 8 discusses the saving and recalling of effects that have been created
using Dveous/MX. It also contains information on Disk Menu functions.
Section 9 explains the use of OrbitalFX
™
, a Dveous/MX feature which provides
a creative method for altering Dveous/MX parameters.
This manual assumes that you have a properly installed and configured system,
and some basic knowledge of the purpose of a digital effects system in a produc-
tion environment. See the Dveous/MX Technical Guide, P/N 9100-0402-00,
for a detailed description of setup procedures and configurations.

Abekas Dveous/MX-Manual Conventions
1-3
1
Start Here
Index
Contents
Manual Conventions
■
Control Panel keys are called “buttons” to avoid confusion with the video
keying process.
■
Names of Control Panel buttons appear in bold capital letters: the
3D
TRANS
button, the
RUN
button, etc.
■
Menu names are capitalized: the Warp menu, the Input menu, etc.
■
Menu functions are noted in bold upper and lower case italicized letters: the
Locate
function, or simply
Locate
.
■
Names of function parameters are noted in bold upper and lower case let-
ters:
H Loc
. or
Z Rot.
If a parameter can only be changed by turning its
associated softknob, it is noted by the parameter name and the word “soft-
knob”: the
Loop
softknob. Otherwise, softknobs appear in left to right
order as softknob A, softknob B, softknob C, and softknob D.
■
“Select” means to highlight a menu item for use by pressing or toggling its
menu softkey.
■
A sequence of button presses is noted by long dashes (—) separating the but-
tons:
MODIFY
—
ALL
—
ENTER
. Holding one button down and press-
ing another appears with a plus (+). For example, holding
CLEAR
and
pressing the
3D TRANS
button appears as
CLEAR + 3D TRANS
.
■
Depending on your input and channel configurations, a channel can process
a video signal, a key signal or a drop shadow. This manual uses the word
image
generically to indicate the channel's source (video, key, or shadow).

1-4
Section 1: Introduction to Dveous/MX
Start Here
Index
Contents
Twin Channel Power
Historically, the term
channel
has been used to describe the input/output of the
video processing path and the key processing path. Since the key signal only
exists to identify where the active, manipulated video is located, its processing
path is taken for granted. Therefore, the term
channel
in this kind of system
only refers to the number of video images involved. So, for example, a two
channel system or two channel effect would mean that two video images are
involved.
Dveous/MX channels
Channels in Dveous/MX are not limited only to video, but can process video,
key or drop shadow. This flexibility comes from Dveous/MX’s
twin channel
pro-
cessing ability that gives you the power of two DVEs in a single twin system.
A Dveous/MX system comes in three configurations depending on the number
of HD channels present—dual twin, single twin system or one channel. All sys-
tems are dual twin in SD mode. In the one channel system, the only channel
(1A) takes in a full bandwidth video signal; the second channel (1B) is not avail-
able. In the single twin system, the main channel (1A) takes in full bandwidth
video. The second channel (1B), called the twin, can process one of three
paths—a video signal, a key signal or a drop shadow.
The dual twin system contains an additional channel pair: one for video (2A),
and the second (2B) for video, key or drop shadow processing. This configura-
tion that gives you the power to rotate and warp a drop shadow, or fly it around,
completely independent of its key signal and the main video.
Dveous/MX twin channel configurations
Whether you work in the single twin channel configuration or the dual twin
configuration, the channel configuration remains the same. The A channel is
the video channel, and B is the twin channel. You can use these channels in
three different modes:
A =Video,B =Video
The transform boards independently process two video
sources. All transform, warp, and lighting effects are adjustable separately on
each video channel. The DVE processor internally generates the key signals
associated with these signals. The key signals are full screen “white” with adjust-
able opacity and edge softness.

Abekas Dveous/MX-Twin Channel Power
1-5
1
Start Here
Index
Contents
A =Video,B = Key
The transform boards independently process one video
and one key source. All transforms are available to the key signal indepen-
dently from the video. The key signal also has clip, gain, and phase controls.
A =Video & Key,B = Shadow
In this mode, the transform boards derive a
full bandwidth drop shadow from the key input. It processes the video and key
(which are tied together) in one path, with independent control of the shadow
in the other path.
Dveous/MX Single channel configuration
In the single (1) channel configuration of the HD mode, only the A channel is
active. There is no B or twin channel. Therefore, certain functionality is not
available in this HD configuration and is so noted throughout this manual.
A=Video, B=not available
The transform board processes a video source. All
transforms, warps and lighting effects are adjustable for this video channel. the
DVE processor internally generates the key signal associated with this signal.
The key signal is full screen “white” with adjustable opacity and edge softness.

1-6
Section 1: Introduction to Dveous/MX
Start Here
Index
Contents
Control Panel Navigation
On the illustration below, you will see that the buttons on the Control Panel are
grouped by functionality. The buttons are also color coded, to help you visually
connect the button with its function. Generally speaking, green is for menus,
blue for keyframes and timelines, and red for control functions. These buttons
will be described in more detail later.
LED Lights
Each channel select button and menu button has an LED light to tell you what
channel(s) are in use and in which menus you've adjusted values. Also, all the
On-Air buttons have LEDs to tell you instantly what is in use.
Menu Buttons
By pressing the menu buttons you bring up the menus which make it possible
to create effects: warps, rotations, sizing, borders, etc. There are two groups of
menu buttons: the Channel Menu buttons and the Global Menu buttons.
■
Channel buttons let you transform your image in either the Source or Target
plane.
MX
MX
Function Softkeys
Softknobs
Graphic
Buttons System
Buttons Joystick
The Menu Display
On-Air
Buttons
Timeline
Control
Buttons
Channel
Select
Buttons
Quick
Keyframe
Buttons
Channel
Menu
Buttons
Timeframe
Effects Editor
Buttons
Global
Menus
Buttons
Effects
Buttons Numeric
Numeric
Keypad
Keypad
Accom

Abekas Dveous/MX-Control Panel
1-7
1
Start Here
Index
Contents
■
Global buttons let you transform the effect in Global space. We'll talk about
three dimensional spaces later, because understanding nested 3D space is
the key to making the effects you want.
Hint: You can adjust the menu to display in black on white (Normal) or white on black
(Inverted). To do so, go to the Engineering menu. Toggle the
Setup
function to
Panel
. Then
adjust the
Display
softknob to Normal or Inverted. This Engineering menu also contains the
panel backlight and bias controls for adjusting display brightness and contrast.
Working In a Menu
Look at the
Menu Display Example
illustration below. Here, the Border/Crop
menu is shown as a typical menu display. Each of the items called out in the
illustration either lets you adjust menu values or tells you information about
the status of Dveous/MX.
MenuTitle
Tells you where you are (in which menu).
BORDER
Edge Soft
LEFT
-0.5000
LN
RIGHT
0.5000
LN
BORDER/CROP Ch 1A
COLOR
KEYPAD
CURRENT TIME: 0:00 CURRENT EFFECT: WorkSpace REMAINING KFs: 300
KF# LEFT RIGHT TOP
Gb
1A
1B
2A
2B
BOTTOM
LN
-0.3750
BOTTOM
TOP
LN
0.3750
CROP
Edge Soft
Function Softkeys
Menu Functions Menu Title Master
Channel Channel
Delegation
Status
Keypad
Buffer
Workspace
Display
Parameter
Softknobs
Function
Parameters
Position
Border Size

1-8
Section 1: Introduction to Dveous/MX
Start Here
Index
Contents
Menu Functions and Function Softkeys
Each menu function on the menu display has a button next to it called a
softkey
.
Press the softkey to activate a function and/or to toggle through any function
options related to it. In the Border/Crop illustration, the black highlight indi-
cates that Border function is selected and its Edge option is activated.
Function Parameters and Parameter Softknobs
Determine the look of each function you select by adjusting the values in the
Function Parameters at the bottom of the menu display. There are three ways to
change values for the parameters:
■
Using the Softknobs – Twist the Parameter Softknobs associated with the
function. Use this method to interactively see how adjusting that parameter
affects the image. Using the softknob adjusts the values slowly and with
incremental control. You can twist the softknob until the image looks good
to you and leave it.
■
Using the Joystick
– Twist the joystick and/or moving it horizontally or verti-
cally, to change a parameter and thus modify an effect.
■
Entering Values into the Keypad
– Enter values in the numeric keypad, then
press A, B, C or D to place those values into the associated parameter field.
Use this method if you know specifically what values you need to use to cre-
ate your effect.
Example:
In the Border/Crop example, since the Border Edge is active, twist-
ing one of the four softknobs would adjust values for either the left, right, top or
bottom of the border edge. For example, you could twist the B softknob to
adjust the Right border edge to .5000 or you could enter
.
5 in the keypad, then
press B.
Note: In HD mode the numbering system is based on 16 x 9 and in SD it is based on 1 x .75.
These different numbering systems can affect the softknob ranges differently.
Keypad Buffer
The keypad buffer information tells you what you have entered in the numeric
keypad. It can display any of the following information:
■
Empty buffer
– this is the default state of the buffer. No information is wait-
ing to be entered into any parameter.

Abekas Dveous/MX-Control Panel
1-9
1
Start Here
Index
Contents
■
A number
– this value is waiting to be entered into a parameter by pressing
A,B,C or D.
■
The word
Clear
– y
ou pressed Clear in the keypad to erase, or clear, the
value you had entered into the buffer. Or Clear has been used to reset default
values for one or more parameters.
■
The word
Align
plus a value
– you pressed Align to set a parameter value.
■
The +/- symbol
– displays when inverting a value.
■
The message
Set Path
and a list of the motion path types
– you pressed
Path. The motion path types that you can apply to keyframeable effects
appear: JP (jump), LN (linear), SL (smooth linear), T1 (TCB1), T2 (TCB2)
and SM (smooth).
TheWorkspace Display
The workspace display gives you information about the currently selected
menu effect. Although the appearance of the display can vary from menu to
menu, most are similar to the one in Border/Crop.
■
Current Time
– Gives the current position on the effect's timeline, noted in
seconds:frames. Dveous/MX also transmits this timecode value to an edit
controller if Offset (in the
Remote Setup
menu) is set to 0:00
■
Current Effect
– Shows the number of the effect that has been copied off the
register and placed into the Workspace for viewing. When you power up or
reboot Dveous/MX, the default effect, Workspace, will show as the current
effect until you recall or save an effect.
■
Effect KFs
–
Shows the number of remaining keyframes in use by the current
effect. There is a maximum of 300 keyframes available per effect.
■ KF# – Indicates the keyframe (KF) number in the effect timeline. Up to
seven keyframes can be displayed at a time. Parameter values for each key-
frame are listed in the columns to the right of the KF#. Column headings
echo the Function Parameters in the current menu.
■ Editing Commands – When you press one or more of the TimeFrame Effects
Editor Buttons, you are giving Dveous/MX an editing command.
Dveous/MX prints those commands as a string of text at the bottom of the
Workspace display. If Dveous/MX recognizes the command string, it
confirms by displaying OK at the end of the string after you press ENTER. If
it does not, an error message appears after the unrecognized sequence.
The Master Channel
The available channels are determined by the Dveous/MX configuration and
mode (SD or HD). In SD mode you will have four (1A, 1B, 2A and 2B) chan-

1-10
Section 1: Introduction to Dveous/MX
Start Here
Index
Contents
nels that are affected by menu settings. In HD mode you will have either one
(1A) or two (1A and 1B) or four (1A, 1B, 2A and 2B) channels that are affected
by menu settings. Because it can get confusing moving around channels, the
Master Channel tells you at a glance which channel's menu settings you are
looking at. By default, Dveous/MX assigns 1A as the Master and in one channel
HD mode, 1A is always the Master channel.
The Master Channel does not have any greater importance than any of the oth-
ers, but exists for display purposes only. You can designate any channel as the
Master, depending on whose menu settings you want to know. For example, if
2A is the Master Channel, any menu you press shows the settings for 2A.
However, whatever changes you make to the Master Channel affect all other
delegated channels, with all offsets between channels being maintained when
you enter the new value.
To make another channel the Master Channel, quickly double press that chan-
nel's button. Its number now appears in the menu display as the Master Chan-
nel and all menu setting will reflect it.
Note: The Master channel display does not appear when you are using the Global menus, since
then all channels are being affected equally and the Global channel is, in effect, the Master
channel.
Channel Delegation Status
This part of the menu display tells you which channels (including the GLOBAL
button) you have delegated, or selected for activity. The delegated channel(s) are
highlighted black.
Non-standard Mode Indicators
If one or more non-standard modes are in use, Dveous/MX tells you by display-
ing its mode in the menu display. The five non-standard modes are as follows.
■ Joystick Lock – Locks the joystick to the controls of a menu. When you go
another menu, after pressing JOYSTICK LOCK, the joystick adjusts param-
eters from the previous menu, giving you twice the control over affecting an
image.
■ NoXpnt – Tells Dveous/MX to ignore the inputs originally programmed for
an effect and run it using the currently selected inputs.

Abekas Dveous/MX-Control Panel
1-11
1
Start Here
Index
Contents
■ Frozen – One or more On-Air Freeze buttons is on. On-Air freezes override
any timeline effect freeze. The channel input stays frozen no matter what
effects you recall or run.
■ Dissolve – The On-Air Dissolve mode is on. Transitions are from the current
DVE setup to the first keyframe of the current effect.
■ Delegated – Only delegated channels move when you run an effect. This
mode is selected in the PERSONALITY menu (under Misc.) by adjusting
Run Mode.
The Joystick
The joystick gives you immediate visual feedback about how a menu's settings
affect the image. By moving the stick you can instantly move or resize an
image, or see what different border color or warp values will do, for example.
Joystick control directional controls are indicated in the menu display.
Up/down arrows indicated vertical movement, left/right arrows indicated hori-
zontal movement, while a circular arrows means twist the stick.
Channel Select Buttons
The five Channel Select buttons delegate, or select, channels for transforms. You
can have more than one channel delegated at a time except, of course, in single
(1) channel HD mode where 1A is the only channel used.
■ 1A and 1B – delegate the single twin channel number pair.
■ 2A and 2B – delegate the second dual twin channel pair.
■ GLOBAL – delegates the Global channel, which affects every channel
equally.
The LED displays above and below the “A” Channel Select buttons read
VIDEO to indicate that these channels are video channels. The displays above
and below the “B” Channel Select buttons read either VIDEO or KEY, to let
you know how you have configured your channels in the KEY menu Setup
mode.

1-12
Section 1: Introduction to Dveous/MX
Start Here
Index
Contents
For detailed information about delegating and configuring channels, see Dele-
gating Channels and Configuration in Section 2 – Getting Started.
Quick Keyframe Buttons
The four Quick Keyframe buttons only affect the current keyframe (the one
that the effect is currently on). These are “single press” buttons that need only to
be pressed once to carry out a keyframe command. (Other command buttons
allow multiple presses for different functions.)
■ INSERT NEXT – inserts a keyframe after the current keyframe.
■ DELETE – removes the current keyframe, including its duration, from the
timeline.
■ MODIFY – changes the current keyframe to reflect any parameter changes.
■ UNDO KF EDIT – “undoes” the last keyframe edit you made.
VIDEO KEY
VIDEO VIDEO
MX
MX
Accom
GLOBAL
1A 1B
2B2A
Accom
INSERT
NEXT DELETE
MODIFY UNDO
KF EDIT
MX
MX

Abekas Dveous/MX-Control Panel
1-13
1
Start Here
Index
Contents
Channel Menu Buttons
The 13 Channel Menu buttons access menus that affect the delegated channel
images on the Local Source and Local Target planes.
■ 3D TRANS – affects the image in three dimensional space. Position the
image in Source or Target space, then resize it, rotate it or moves its axis.
■ 2D TRANS – affects the image in two dimensional space. Use this menu to
change horizontal and vertical size and to position the image upstream (Pre
controls) or downstream (Post controls) of all 3D controls.
■ BORDER/CROP – adds borders to the image and adjusts their color and
size. Or, you can crop the image edges.
■ MULTI – gives your images a mosaic quality or tiles them. Use this button
for accessing motion detect.
■ COLOR CRCTR – gives you independent color correction for RGB and
YUV components. Includes adjustments for gain, gamma and knee.
■ COLOR MODIFY – allows special effect coloring such as solarizing, luma
tinting and chrominance and luminance inversion.
■ INPUT – selects the video source for the delegated channel, chooses the vid-
eos placement on the near or far side of the channel and allows you to inverts
freeze or blur the source.
■ WARP – adds “Salvador Dali-like” effects: ripples, swirls, rings, page turns,
etc.
■ LIGHT SOURCE– adds realistic lighting effects to your image. Dual color
lighting can be positioned in 3D space. Choose flood, bar or spotlight
effects.
3D
TRANS 2D
TRANS BORDER
CROP MULTI COLOR
CRCTR MODIFY
COLOR
WARP LIGHT
SOURCE TEXTURE KEY CORNER
PIN
INPUT
OUTPUT
MX
MX

1-14
Section 1: Introduction to Dveous/MX
Start Here
Index
Contents
■ TEXTURE – adds surface textures that combine beautifully with light sourc-
ing and warps for realistic effects. Add textures from incoming video or from
the internal texture framestore.
■ KEY – Sets the configuration for the B (or twin) channel to process video,
key or shadow. You can also adjust key and shadow clip and gain settings.
This is not applicable in the single (1) channel HD mode.
■ CORNER PIN – contains two functions. The Corner Pinning controls lets
you pick up and tack any or all corners of the image into any four cornered
position. Great for effects like placing video into a billboard. The AutoCube
function prepares Dveous/MX to build any polygonal shape: cube, slab, etc.
■ OUTPUT – selects the transparency and key priority of the A channel over
the B channel.
TimeFrame Effects Editor Buttons
The 14 blue TimeFrame Effects Editor buttons perform editing commands.
Pressed alone, or in sequence, they insert, delete, edit, and copy keyframes in
effects.
■ INSERT – inserts a keyframe into the current time.
■ DELETE – deletes a keyframe and moves the next keyframe to current time.
■ REMOVE – removes a keyframe not effecting the timeline.
■ COPY - copies specified keyframe to another location.
■ MODIFY - replaces current keyframe with the contents of the Workspace.
■ NORMAL – returns Dveous/MX to various default conditions through sin-
gle or multiple presses. For detailed information about Normal settings, see
Getting Back to Default in the Getting Started section.
Dveous
Dveous
INSER
INSER
TDELETE
DELETE
REMOVE
REMOVE
COPY
COPY
MODIFY
MODIFY
STARTST
ST
AR
AR
TTO
TO
END
END
THIS
THIS
ALL
ALL
(REW)
(REW)
(FF)
(FF)
TRIM
TRIM
NORMAL
NORMAL
ENTER
ENTER
Accom
CHANNEL
CHANNEL
COPY
COPY
MX

Abekas Dveous/MX-Control Panel
1-15
1
Start Here
Index
Contents
■ COPY CHANNEL – copies current attributes, specific keyframes and
entire timelines from one channel to another.
■ START (REW) – Moves current time to 0:00.
■ TO – moves current time to the start of keyframe number (designated after
the TO) in the master delegated timeline.
■ END (FF) – moves current time to last keyframe (end of effect).
■ THIS – moves current time to the beginning of the current keyframe in the
master timeline.
■ ALL – selects all
■ TRIM – allows you to maintain the relative offset of parameter values
between keyframes
■ ENTER – tells Dveous/MX to perform the command(s) you just pressed.
For example, to delete a keyframe, you press DELETE–ENTER. To copy
all keyframes, press COPY–ALL–ENTER.
Graphics Buttons
■ CURSOR – displays cursors and channel identifications on the Dveous/MX
output so that you can see the center of rotation for the selected 3D space.
There are separate cursors for Source and Target space, as well as for Global
space. Each channel's cursors are a unique color for easy identification.
■ ORBITAL FX – accesses the OrbitalFX menu. OrbitalFX provides a method
to continuously alter selected Dveous/MX parameters. See the OrbitalFX
section for details.
■ JOYSTICK LOCK – dedicates, or locks, the joystick to the current menu
control. This control is handy, for example, if you want to continue using the
joystick for 3D positioning of the image while at the same time using the
softknobs in the Warp menu.
Accom
CURSOR ORBITAL JOYSTICK
LOCK
FX TM
MX

1-16
Section 1: Introduction to Dveous/MX
Start Here
Index
Contents
Global Menu Buttons
The six Global Menu menus control functions that are not specific to the indi-
vidual DVE channels 1A, 1B, 2A, 2B.
Note: In order to save effects created in these menus, you must delegate the GLOBAL channel.
■ GLOBAL TRANS – locates, rotates and resizes all delegated channels as if
they were tied together as one unit. Transformations applied here happen
downstream of any Local Source or Local Target Transforms.
■ COMBINER – sets a background source and adjusts its priority with the
foreground video. Also sets the key priority between the Target Framestore
and, if you have a dual twin system, between the two twin channel proces-
sors.
■ TARGET FRAMESTR – used in the creation of effects such as decays, spar-
kles, smears and composite montages.
■ DEFOCUS – lets you soften any input, which you can then route through
the Color Corrector, background or directly into the channels.
■ SUPER MATTE – creates two-color washes or backgrounds. The Super-
Matte patterns can be used to generate a key signal that is fed to the B side of
a twin channel, or used to simulate a wipe pattern. When multiplied, the
patterns can also be used to create textures. Spiral FX parameters are accessed
here.
■ SOLID BUILDER – quickly builds a slab or cube. It uses 3 channels, 1A, 1B
and 2A to create six-sided solids.
Accom
COMBINER
GLOBAL
TRANS TARGET
FRAMESTR
DEFOCUS SUPER
MATTE SOLID
BUILDER
MX
MX

Abekas Dveous/MX-Control Panel
1-17
1
Start Here
Index
Contents
Effects Buttons
These six buttons access menus that set controls for the effect as a whole.
■ TIMELINE – gives you a visual representation of the timeline and sets the
duration of effects and keyframes.
■ EVENTS – triggers one of the four GPI outputs.
■ PATH – used to adjust the user path settings (TCB1, TCB2).
■ DISK – saves to and copy from a floppy disk or hard drive.
■ SAVE EFFECT – lets you quickly save an effect by number.
■ RECALL EFFECT – lets you recall and browse existing effects, name or
delete them. Set Loop and Protect flags here as well.
Accom
TIMELINE EVENTS PATH
DISK SAVE
EFFECT RECALL
EFFECT
MX

1-18
Section 1: Introduction to Dveous/MX
Start Here
Index
Contents
System Buttons
The System buttons access menus to setup the Dveous/MX inputs, outputs,
remote setups, and enables.
■ INPUT SETUP - controls blanking adjustments for input video as well as
Matte enables for each input.
■ REMOTE ENABLE - controls 232/422 protocol and setup for each of the
three remote ports.
■ OUTPUT SETUP - controls output timing and blanking. Also configures
SD/HD format, reference and video select to each of the six Dveous/MX
outputs.
■ REMOTE SETUP - sets up GPI input and output configurations.
■ NO XPOINT – tells the system to ignore the inputs originally programmed
for an effect and run it using the currently selected inputs.
■ ENG – You can adjust the menu to display in black on white (Normal) or
white on black (Inverted). To do so, press the ENG button to go to the Engi-
neering menu. Toggle the Setup function to Panel. Then adjust the Display
softknob to Normal or Inverted. You can also turn the Bkgd on or off. Also
controls First Birthday (ram reset) as well as software install parameters.
■ PERSONALITY - controls anamorphing, axis mode, run mode and field
dominance settings.
■ ACQUIRE - used in multiple control panel systems to delegate which panel
is the “master” control panel.
Accom
INPUT
SETUP
OUTPUT
REMOTE
ENABLE
NO
XPOINT
ENG PERSON-
ALITY
ACQUIRE
SETUP
REMOTE
SETUP
MX
MX

Abekas Dveous/MX-Control Panel
1-19
1
Start Here
Index
Contents
Note: See Technical Guide for more information on all system buttons.
Numeric Keypad
Use the numeric keypad to enter effect numbers, keyframe numbers, parameter
values, etc.
■ A, B, C, and D – enters values into their corresponding softknob settings.
For example, to enter the value 17 in softknob A, enter 17 on the keypad,
then press A.
■ +/- – inverts existing softknob values or lets you enter a negative number.
■ PATH – toggles the available motion paths and lets you assign one to a func-
tion parameter. Also used to select individual files under Disk Menu.
■ ALIGN – adjusts parameter values to their nearest one-eighth of the range
for that parameter. Also used to select all files under Disk Menu.
■ TRIM – trims parameter values by the amount entered in numeric keypad.
■ CLEAR – erases the contents of the keypad buffer, the contents of the key-
frame edit dialog, or resets entire softkeys or menus to default.
For complete details on entering values, see The Numeric Keypad in the Section
2: Getting Started.
+/- 0
.
A B CD
7 8 9
45 6
123
Accom
PATH
ALIGN
TRIM
CLEAR
MX

1-20
Section 1: Introduction to Dveous/MX
Start Here
Index
Contents
Timeline Control Buttons
The six Timeline Control Buttons let you run through an effect.
■ PREVIOUS and NEXT step through keyframes of the Master channel one
at a time, either forward (NEXT) or back (PREVIOUS).
■ STOP NEXT pauses the effect at the next keyframe.
■ RUN ll
ll runs the effect forward.
■ RUN kk
kk runs the effect backward.
■ PAUSE pauses the effect when pressed. To continue running the effect, press
RUN ll
ll or RUN kk
kk.
Accom
PREVIOUS STOP
NEXT
RUN PAUSE
→
←
NEXT
RUN
MX
MX
Table of contents