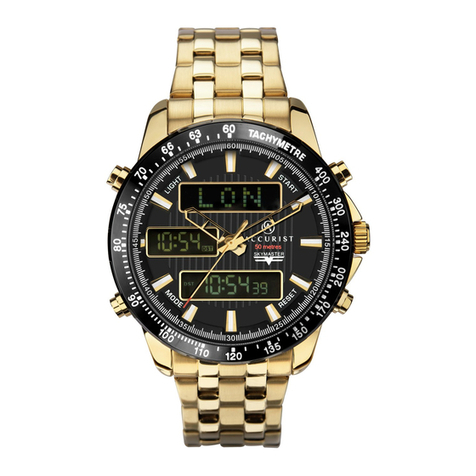
Accurist CR60, CP00 Operating manual

MEAN TIME
Multi Function Chronograph with duo display
Setting Instructions
For: CR60 & CP00
Perforation
Folding
Accurist Helpline
020 7447 3945
Further information or instructions can e o tained
from the Accurist Helpline during office hours Monday to Friday.
PURCHASED FROM
DATE OF PURCHASE MODEL NO
OWNERS NAME
ADDRESS

Contents
How to use these instructions 3
CR60 Operating Instructions 5
CPOO Operating Instructions 17
Care of your watch 29
Bracelet Adjustment 33
International Service A ents 35
Resistance to water 39
Accurist Quartz Guarantee 2
After Sales Service
Payment & Posta e Instructions 5
2

Caseback markin s
3
w
MB 119
CAL 0T10
SR927W
Accurist Watches Logo
Model Number
Calibre Number
Battery Number

How to use these instructions
This booklet contains setting instructions for the Accurist Multi Function
Chronograph with duo display series of watches. Each section describes a
particular calibre (also called watch movement) which offers a unique set of
functions and features. As such, it is necessary to identify the correct calibre of
your watch before proceeding to the appropriate section (see diagram opposite).
Further information
The latest setting instructions, technical manuals and interactive instructions
are available from our web site at www.accurist.co.uk
When on the web site please refer to ‘After sales service/download manuals’
The Accurist technical helpline is also available during office hours:

Position A
Digital display
Bottom Right (BR)
Digital Display
Bottom Left (BL)
Mode Display
Top Left (TL)
Position B
CR60 Operatin Instructions
5

Displayin the time and calendar of cities worldwide:
1. Press TL Button to select the ‘TME’ or ‘CAL’ mode.
2. Press BL Button to select city’s names and its time and
calendar.
Analo ue time settin :
1. When second hand moves to the 0 position, pull the crown to position B.
2. Turn crown either way to correct time.
3. Push in crown to position A.
6

CR60 Operatin Instructions continued...
Di ital time settin
1. Press TL Button to select Time (TME) mode.
2. Press BL Button to display the city whose time you want to adjust.
3. Press and hold BL Button for 2 or more seconds to select summertime (S.T)
either ‘ON’ or ‘OFF’.
4. Press BR Button to select summertime ‘ON’ or ‘OFF’
5. Press BL Button to select between summertime, seconds, minutes, hour and
12/2 hour sequence.
6. Press BR Button to adjust the flashing figures.
Press and hold BR Button to quick change the flashing figures.
7. Press TL Button to return to normal time display.
7

Note: When in the 12-hour mode, be sure to select morning (A) and afternoon (P)
The set flashing mode (step 6) will automatically revert to the normal display if left
for two minutes with no input.
To set the calendar/date:
Adjusting the calendar for one of the 30 cities and UTC time will automatically
adjust the calendar for the remaining cities.
1. Press TL Button to select Calendar (CAL) mode.
2. Press BL Button to display the city whose calendar you want to adjust.
3. Press and hold BL Button for 2 or more seconds, to set the ‘month’
4. Press the BR Button to adjust the month.
continued...
8

CR60 Operatin Instructions continued...
To set the calendar/date continued . . .
5. Press the BL Button to select the ‘month’, ‘day’ and ‘year’ sequence.
6. Press the BR Button to adjust the flashing figures.
Press and hold BR Button to quick change the flashing figures.
7. Press TL Button to return to normal time display.
Press and hold BR Button for 2 or more second to switch between city display
(e.g. LON) and day display (e.g. SAT).
9

To set the alarms:
Setting the operation of Alarm 1 and Alarm 2 are the same, only the sound of
the alarms is different. Once you turn the alarm on, it will sound for 20 seconds
at the same time each day.
1. Press TL Button to select the <AL1> or <AL2> mode.
2. Press BL Button to select the city for alarm setting.
3. Press and hold BL Button for 2 or more seconds, the ‘hour’ display will start
flashing. The flashing ‘hour’ display can be adjusted by pressing the BR Button.
(Press and hold BR Button to quick change the flashing figures)
4. Once hour is set, press BL Button to set the ‘minute’ display. Press BR Button
to adjust the ‘minutes’ alarm.
5. Press TL Button to return to the normal alarm display.
continued...
10

CR60 Operatin Instructions continued...
To set the alarms continued . . .
Notes: Press the BR Button while in the alarm mode (AL1 or AL2) to switch
alarm either ‘ON’ or ‘OFF’.
To test the alarm sound, while in the alarm mode (AL1 or AL2). Press and hold
BR Button. (Alarm sound monitor function)
When in the 12-hour mode, be sure to select morning (A) and afternoon (P).
To set the time and time zone:
When the time is set for one of the 30 cities and UTC (Universal time
coordinated) time, the remaining city’s and their ‘times’ are automatically set.
11

Chrono raph measurement:
1. Press BL Button to select Chronograph mode (CHR).
2. Each time the BR Button is pressed, the chronograph is switched between ‘start’
and ‘stop’.
3. Press the BL Button to reset while the chronograph is stopped.
Chrono raph split time measurement:
1. Press BL Button to select Chronograph mode (CHR).
2. Press BR Button to start chronograph.
3. Press BL Button to display the split time for approximately ten seconds.
(The ‘SPL’ indicator will flash while the split time is displayed)
Each time BL Button is pressed, the newest split time is displayed.
4. Press BL Button to reset while the chronograph is stopped.
continued...
12

CR60 Operatin Instructions continued...
Chrono raph split time measurement continued . . .
Note: Even if the TL Button is pressed and the mode is switched while the
chronograph is measuring, the measurement will continue. When you return to
the <CHR> mode the measured time is again displayed.
Usin the timer <TMR>:
You can set the time for a number of whole minutes up to 99 in one minute
decrements. When the timer has elapsed, an alarm will sound for five seconds
and the watch will return to timer set mode.
13

Usin the timer <TMR> continued . . .
1. Press TL Button to select Timer mode (TMR).
2. Press BL Button to adjust timer in one minute decrements.
(Press and hold BR Button to quick change the flashing figures)
3. Press BR Button to start and stop the timer.
4. Press BL Button to revert to set timer mode, when the timer has stopped.
Note: If the BL Button is pressed while the timer is running, the time will reset
to the set timer mode and commence timing automatically. Even if the TL
Button is pressed and the mode is changed while the timer is running, the timer
countdown will continue. When you return to the <TMR> mode, the countdown
time is again displayed.
1

CR60 Operatin Instructions continued...
Usin the zone settin <SET>:
In the zone setting mode you can select the cities that you want to display from
among the 30 cities and UTC time that this watch is capable of displaying, also you
can set summertime for each of these cities. This allows you to easily recall and
display only the cities that have been set (to ON) in any mode.
1. Press TL Button to select Set mode (SET)
2. Press BL Button to recall the city that you want to set.
3. Press and hold BL Button for 2 or more seconds, the ‘ON’ or ‘OFF’ and the ‘City
name’ will blink.
4. Press BR Button to select whether the city should be displayed (ON) or not (OFF).
15

Usin the zone settin <SET> continued . . .
5. Press BL Button to display the Summertime (S.T) setting for selected city.
6. Press BR Button to select either summertime on (‘ON’ S.T) or summertime off
(‘OFF’ S.T).
7. Press BL Button to select and set modes for other cities.
Please follow procedures 3 to 6 for set up.
8. When all desired cites have been set, press TL Button to return to normal zone
setting display.
All Reset:
1. Gently pull out crown to Position B.
2. Press TL, BL and BR Buttons simultaneously. (While pressed, there will be no display)
3. Release the buttons. (Display segments will re-appear)
4. Push crown in to Position A.
16

2 Hour
Indicator
Dial
Mode Indicator dial
Bottom Right (BR)
Bottom Left (BL)
Top Left (TL) Top Right (TR)
KEY TO DIAGRAM
UTC dial - shows universal coordinated time (UTC)
in 2 hour format. UTC (or GMT) is the standard
from which all time zones are calculated.
24 hour dial - shows main hand time in 2 hour
format. This can be used to determine the correct
a.m. and p.m settings.
Mode indicator dial - shows main hand time in
2 hour format. This can be used to determine
the correct a.m and p.m. settings.
Mode indicator dial - shows the mode that the
watch is in - TME (time), CAL (calendar),
AL-1, 2 or 3 (alarm 1, 2 or 3), CHR (chronograph),
TMR (timer), SET (set)
Main di ital display - shows the digital time,
calendar, alarms, chronograph or timer depending
on which mode chosen.
Button function displays - indicates the function
of each button at any moment, as shown in the
diagram opposite. >
Main
Digital
Display
UTC Dial
CPOO Operatin Instructions
17

To set the time:
1. Push the bottom right hand button until the mode hand
indicator points to TME.
2. Press and hold the upper left button for three seconds. The hour and minute
hand will retract to the 12 O’clock position.
3. Select the time zone on the digital display by pressing the upper right button
or the lower left button.
4. Pull the bottom right button out one click. The bottom part of the digital
display will start flashing. Press the bottom left button to adjust for daylight
saving time.
5. Press the upper right button. You will see the seconds flashing on the lower
half of the digital display. Press the lower left button to reset the seconds to 00.
18
Top Left Button
Bottom Left Button
Top Right Button
Bottom Right Button

CPOO Operatin Instructions continued . . .
To set the time continued . . .
6. Press the upper right button. You will see the minutes
flashing. Press the lower left button to set the minutes to your current time.
7. Press the upper right button. You will see the hours flashing. Press the lower
left button to set the hours to your current time.
8. Press the upper right button. You will see 12H or 2 H
flashing. Press the lower left button to switch between 12 hour and 2 hour.
9. Push the lower right button back in one click.
19

To set the calendar:
1. Push the bottom right hand button until the mode hand
indicator points to CAL.
2. Press and hold the upper left button for three seconds. The hour and minute
hand will retract to the 12 O’clock position.
3. Select the time zone on the digital display by pressing the upper right button
or the lower left button.
4. Pull the bottom right button out one click. You will see the month flashing on
the digital display. Press the lower left button to change the month.
5. Press the upper right button and the date will begin flashing. Press the lower
left button to change the date.
6. Press the upper right button. You will see the year flashing. Press the lower left
button to change the year.
7. Push the lower right button back in one click.
20
This manual suits for next models
2
Table of contents
Other Accurist Watch manuals

Accurist
Accurist 8N24 Operating manual

Accurist
Accurist Calibre CP00 Operating manual

Accurist
Accurist Calibre CP00 User manual

Accurist
Accurist MB916 Operating manual

Accurist
Accurist MS612B Manual
Accurist
Accurist IA03 Manual

Accurist
Accurist IA04 Manual

Accurist
Accurist IA04 Manual

Accurist
Accurist Watch User instructions

Accurist
Accurist 7024474 Manual