manuals.online logo
Brands
  1. Home
  2. •
  3. Brands
  4. •
  5. Acoustic Signature
  6. •
  7. Music Equipment
  8. •
  9. Acoustic Signature TA-5000 NEO User manual

Acoustic Signature TA-5000 NEO User manual

PICK-UP ARM / TONARM
INSTRUCTION MANUAL
BEDIENUNGSANLEITUNG
TA-5000 NEO
2
Dear Acoustic Signature custo er,
many thanks for your confid nc in our product, th
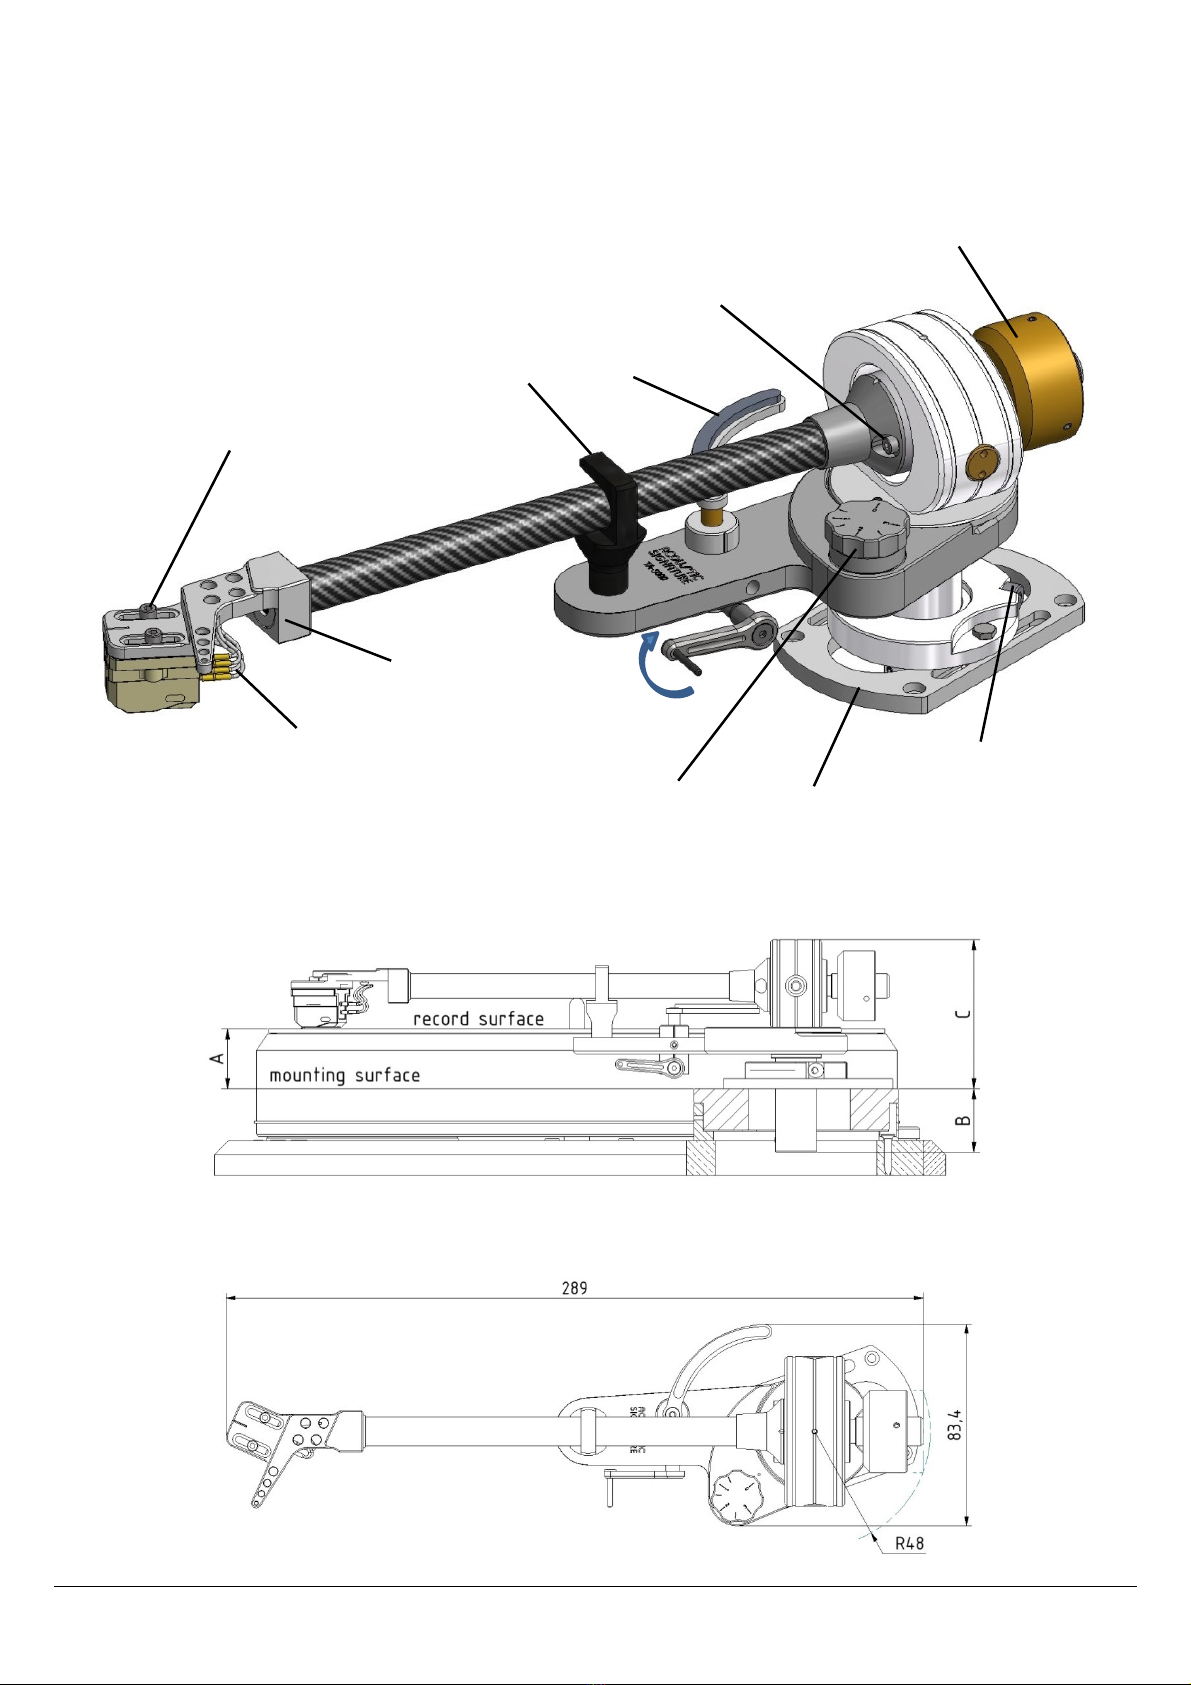
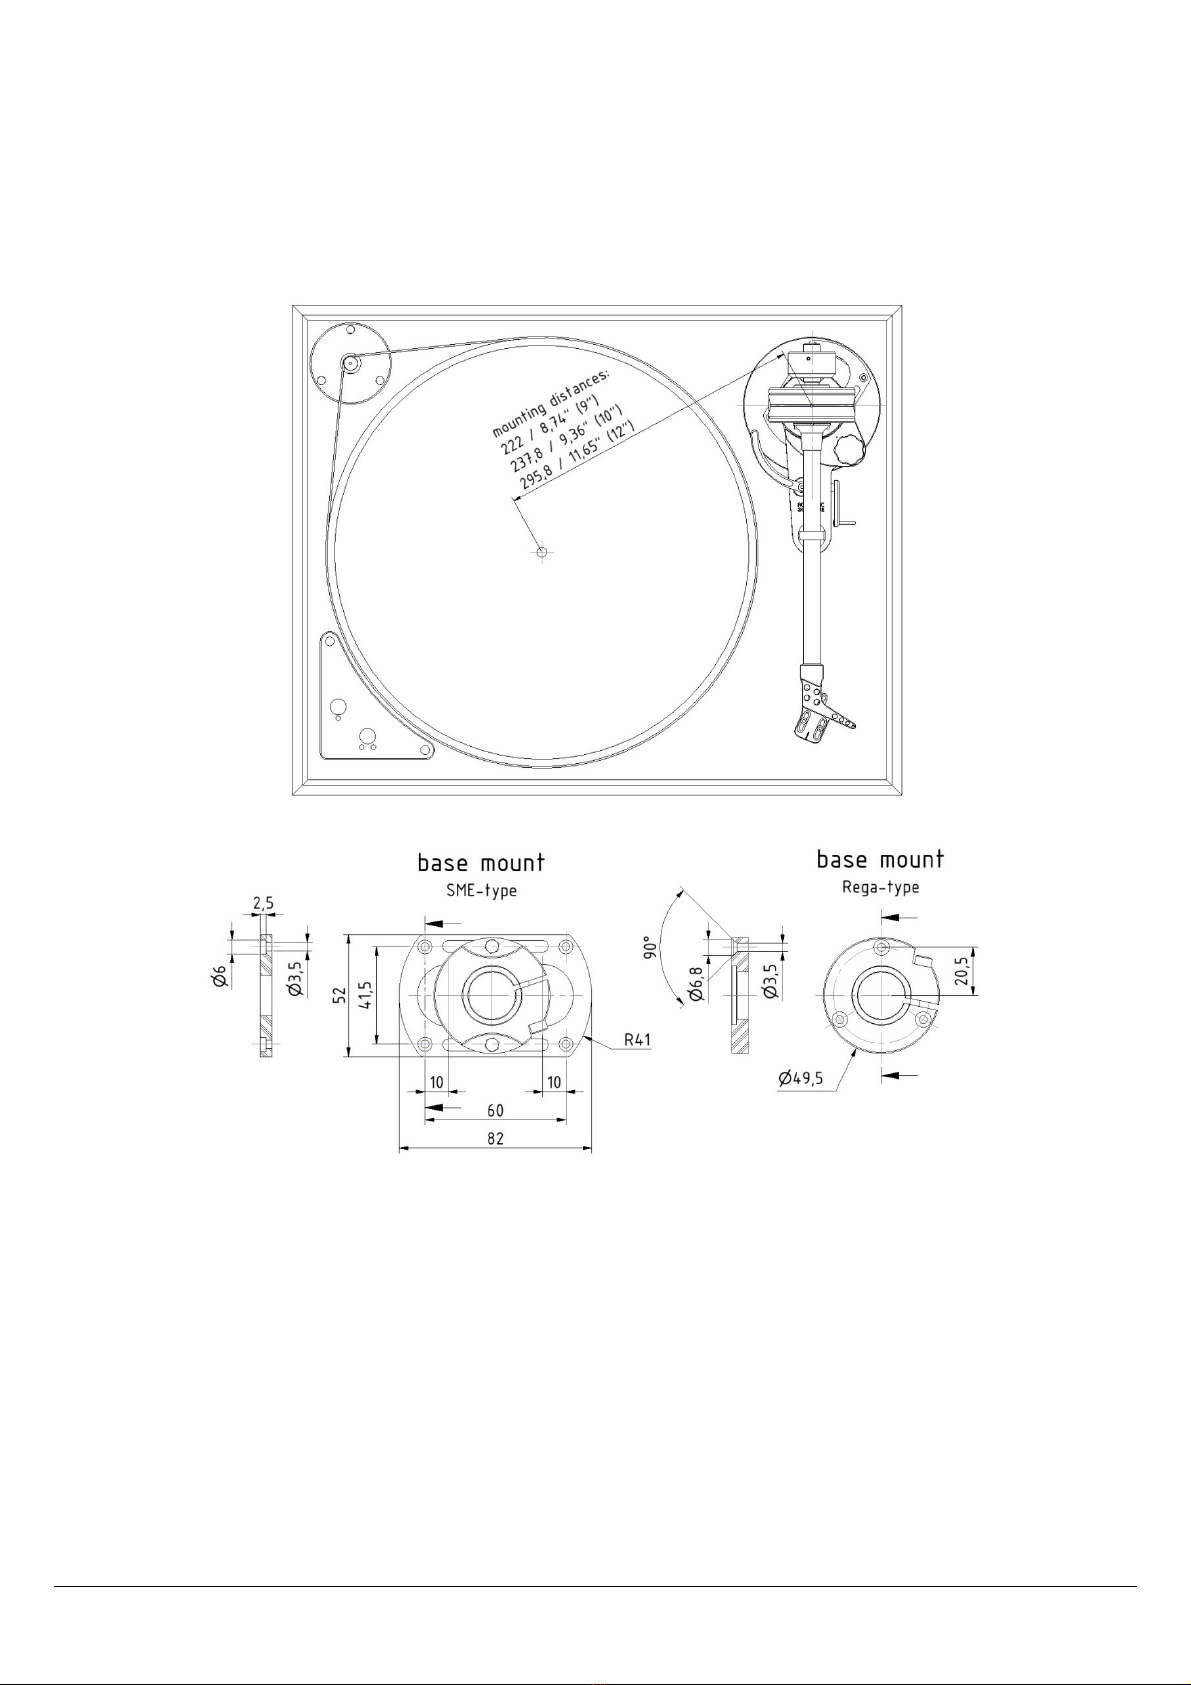
ton arm TA-5000 Neo. With th purchas of your
ton arm you acquir d a pr cision instrum nt for th
playback of r cords. To mak it sound p rf ct, th r
is som att ntion n c ssary for s tup and handling.
Th manufacturing of this ton arm and its ass mbly
tak s plac compl t ly in G rmany at th high st
ngin ring standards - this still guarant s high st
quality aft r y ars. Und rstandably you want to start
imm diat ly as possibl with list ning to music. W
kindly ask you how v r to r ad this guidanc b for
th first us att ntiv ly, so that you can us your
ton arm optimally.
W tri d to put all th n c ssary information into this
manual. If you still should hav qu stions, which ar
not answ r d h r , th n f l fr to contact us dir ct-
ly at www.acoustic-signatur .com or with -mail:
[email protected]
Your t am of Acoustic Signatur
Product/Warranty registration
PRODUCT REGISTRATION
ACOUSTIC SIGNATURE is introducing an xt nd d
warranty of 15 y ars for ACOUSTIC SIGNATURE
turntabl s / 5 y ars for ACOUSTIC SIGNATURE
ton arms (appli s xclusiv ly to NEO products
manufactur d from Octob r 2020). By introducing th
xt nd d warranty you will b n fit from our constantly
optimiz d quality control proc ss.
REGISTRATION ONLINE
To apply for th xt nd d warranty you hav to
r gist r your product including s rial numb r and
som purchas information on th ACOUSTIC
SIGNATURE w bsit at www.acoustic-
signatur .com/ n/product-warranty-r gistration/. Th
r gistration has to occur no lat r than on month
aft r th dat of purchas . Th r gistration proc ss is
only on th w bsit .
WARRANTY GUIDELINES
Mor information and our Warranty Guid lin s can b
found on our w bsit at www.acoustic-
signatur .com/ n/product-warranty-r gistration/
Sehr geehrter Acoustic Signature Kunde,
h rzlich n Dank für Ihr V rtrau n in uns r Produkt,
d n Tonarm TA-5000 Neo. Mit d m Kauf di s s Ton-
arms hab n Si in Präzisionsinstrum nt zur Wi d r-
gab von Schallplatt n rworb n, das um s in r Auf-
gab g r cht zu w rd n, mit Sorgfalt b hand lt und
ing richt t w rd n muss. Di F rtigung di s s Ton-
arms und di Montag rfolg n kompl tt nach höchs-
t n Qualitätsstandards in D utschland.
V rständlich rw is woll n Si möglichst sofort mit
d m Musikhör n losl g n. Wir bitt n Si j doch di -
s Anl itung vor d m rst n G brauch aufm rksam
durch zu l s n, damit Si d n Tonarm optimal nutz n
könn n und lang Fr ud daran hab n.
Wir hab n uns b müht, all s Notw ndig und Wis-
s nsw rt in di s r Anl itung unt rzubring n. Sollt n
Si noch Frag n hab n, di hi r nicht b antwort t
w rd n, so w nd n Si sich dir kt an uns üb r
www.acoustic-signatur .com od r p r E-Mail: in-
[email protected] .
Ihr T am von Acoustic Signatur
Produkt-/Garantieregistrierung
PRODUKTREGISTRIERUNG
ACOUSTIC SIGNATURE führt in v rläng rt
Garanti von 15 Jahr n für ACOUSTIC SIGNATURE-
Platt nspi l r / von 5 Jahr n für ACOUSTIC
SIGNATURE-Tonarm in (gilt ausschli ßlich für
Produkt d r N o S ri - h rg st llt ab Oktob r 2020).
Hi rdurch profiti r n Si von uns r n ständig
optimi rt n Proz ss n zur Qualitätskontroll .
REGISTRIERUNG ONLINE
Um sich für in V rläng rung d r Garanti zu
b w rb n, müss n Si Ihr Produkt mit d r
S ri nnumm r und inig n w it r n Information n
zum Kauf auf d r ACOUSTIC SIGNATURE-W bsit
r gistri r n unt r www.acoustic-signatur .com/d /
produkt-garanti -r gistri rung/. Di R gistri rung
muss spät st ns in n Monat nach Kaufdatum rfolgt
s in. Di R gistri rung rfolgt auf d r W bsit .
GARANTIEBEDINGUNGEN
W it r Information n und uns r Garanti b dingun-
g n find n Si auf uns r r W bsit unt r
www.acoustic-signatur .com/d /produkt-garanti -
r gistri rung/
3
Setup
Parts
1 Adjustm nt t mplat (2 parts)
2 TA-5000 Neo ton arm
3 Count rw ight
4 Tools t
5 Scr ws
6 Additional w ight
7 Cabl
8 Manual (not shown)
Getting started
Pl as switch off all compon nts of your syst m
b for conn cting th ton arm to your Hifi-
syst m. Pl as follow now th mounting and
adjustm nt st ps, as d scrib d.
Aufbau
Teile
1 Einst llschablon , 2-t ilig
2 TA-5000 Neo Tonarm
3 G g ng wicht
4 W rkz ugsatz
5 Schraub nsatz
6 Aufsatzg wicht
7 Kab l
8 B di nungsanl itung (nicht darg st llt)
Zu Beginn
Bitt schalt n Si vor d m Anschluss d s Ton-
arms all Kompon nt n Ihr r HiFi-Anlag aus.
Folg n Si anschli ss nd d n hi r b schri b n n
Schritt n zum Einbau und Anschluss.
4
Parts identification
Mounting di ensions
For Dim nsions A, B and C s last pag .
Teilebenennung
Einbauab essungen
Abm ssung n A, B und C si h l tzt S it .
Arm r st
Armablag
Arm lift
count rw ight
G g ng wicht
Cartridg locking scr ws (2x)
Halt schraub n Tonabn hm r
Audio cabl s
Kab l für Tonabn hm r
H adsh ll
VTA locking scr w
Kl mmschraub
VTA-V rst llung
Bas mount (SME)
Basis (SME)
Anti-skating knob
Anti-Skating-Knopf
lift
h b n
Azimut scr w
Azimut Schraub
5
Tonear ounting
Preparing the ar ounting board
To mount th TA-5000 Neo ton arm with th
R ga-typ bas mount your turntabl n ds to
hav a 24mm thru hol combin d with 3x M3
thr ads around it at a Radius of 20.5 mm.
Th pivot to spindl distanc s ar 222 mm
/237,8 mm/295,8 mm (s drawing abov ) ac-
cording to th ton arm l ngth.
For mounting th TA-5000 N o with th SME-
typ bas mount you n d to provid 4 M3
thr ads and a cutout as shown in th pictur
b low.
Tonar -Montage
Tonar -Montageplatte vorbereiten
Zur Montag d s TA-5000 Neo mit d r R ga-
Basis b nötigt ihr Platt nspi l r in 24mm
Durchgangsloch mit dr i M3-G wind n im Ab-
stand von Radius 20,5 mm um das Durchgangs-
loch.
D r Abstand Dr hpunkt Tonarm zu T ll rmitt
b trägt ntspr ch nd d r v rw nd t n Tonarm-
läng 222mm/237,8mm/295,8mm (si h Z ich-
nung ob n).
Zur Montag d s TA-5000 N o mit d r SME-
Basis b nötigt ihr Platt nspi l r 4 M3-G wind
6
und in durchg h nd Aussparung wi unt n
darg st llt.
Fitting the tonear
Tak th provid d ith r 3x M3x20 count rsunk
scr ws or 4x pan h ad scr ws M3x12 and ins rt
th m into th mark d appropriat hol s of th
mounting flang (s pictur abov ).
Us th provid d All n k y to tight n th scr ws.
To g t asi r acc ss to th hol s, it might b
h lpful to turn th compl t ton arm within th
mounting flang so th hol s ar fr . Or you can
tak out th ton arm and ass mbl th mounting
flang first.
Tonar einbauen
N hm n Si ntw d r di b ig l gt n 3x M3-
S nkschraub n od r 4x M3x12 Zylind rkopf-
schraub n und st ck n Si di s in di ntspr -
ch nd n Bohrung n d s Montag flansch s.
Mit d m mitg li f rt n Inbus-Schlüss l zi h n
Si di Schraub n f st.
Zum infach r n Zugang zu d n B f stigungs-
schraub n kann s hilfr ich s in, d n g samt n
Tonarm im Montag flansch zu v rdr h n, sodass
di Löch r fr ili g n. Alt rnativ könn n Si d n
Tonarm kompl tt h rausn hm n und zu rst d n
Montag flansch b f stig n.
7
Mounting the cartridge
Note: b for mounting th cartridg
pl as mak sur that th stylus
prot ction cov r is in position
Color code for cartridge wire:
R d = signal right chann l
Gr n = ground right chann l
Whit = signal l ft chann l
Blu = ground l ft chann l
Pl as tak a look at th ass mbly drawing
abov to mount your cartridg to th ton arm.
You can ith r us th provid d scr ws of th
cartridg or th 2 pcs. M2.5 scr ws w supply
with th ton arm.
Th n conn ct th audio cabl pins to your car-
tridg . Tak car for th corr ct color.
Adjusting the cartridge
B for w start aligning th cartridg w n d to
pr adjust th tracking forc and th h ight of
th ton arm.
Adjusting the vertical tracking force (VTF)
Tracking forc will b adjust d by moving th
count rw ight forward (mor w ight) or back-
ward (l ss w ight). S arch th manual of your
cartridg for th right valu and adjust it by us-
ing a w ight scal (not provid d).
Tonabneh er einbauen
Hinweis: bitt acht n Si vor Montag d s Ton-
abn hm rs darauf, dass d r Nad lschutz richtig
aufg s tzt ist.
Farbcode für Tonabneh er-Kabel:
Rot = Signal r cht r Kanal
Grün = Mass r cht r Kanal
W iss = Signal link r Kanal
Blau = Mass link r Kanal
Für di Montag b acht n Si bitt di vorst -
h nd Abbildung.
Si könn n ntw d r di d m Tonabn hm r b i-
g fügt n Schraub n od r di b id n M2.5-
Schraub n, di wir d m Tonarm b il g n, v r-
w nd n.
Anschli ss nd v rbind n Si di Audiokab l mit
d m Tonabn hm r. Acht n Si dab i auf di rich-
tig Zuordnung d r Kab l.
Einstellen des Tonabneh ers
B vor wir mit d r Ausrichtung d s Tonabn hm rs
b ginn n, müss n wir zu rst di Auflag kraft und
di Höh d s Tonarms inst ll n.
Auflagekraft (VTF) einstellen
Di Auflag kraft lässt sich durch B w g n d s
G g ng wichts v ränd rn. Dr h n Si das G -
g ng wicht nach vorn (höh r Auflag kraft)
od r zurück (ni drig r Auflag kraft). Im Hand-
buch Ihr s Tonabn hm rs find n Si d n richti-
g n W rt für di Auflag kraft. St ll n Si di s n
mit Hilf in r Tonarmwaag in (nicht mitg li -
f rt).
H adsh ll
Cartridg locking scr ws
Halt schraub n Tonabn hm r
8
Aft r adjusting th VTF pl as tight n at l ast
on th 3 scr ws in th count rw ight.
For h avy cartridg s you can mount th nclos d
additional w ight onto th normal count rw ight.
Us th d liv r d count rsunk scr ws M3 x 10.
Adjusting the arm height
Adjust th arm h ight with cartridg fitt d, so
that th arm tub is ith r parall l or slightly
low r at th front nd.
You can do this by op ning th VTA locking scr w
with th provid d All n k y siz 3. Op n it car -
fully and adjust th n d d h ight and tight n
th scr w softly. Ch ck if h ight is ok - if not r -
do th adjustm nt.
Note: B awar , that wh n op ning th VTA
locking scr w, th arm might fall down
Kl mm n Si nach d m Einst ll n d r VTF das
G g ng wicht mit mind. in r d r 3 radial n
Schraub n.
Für schw r Tonabn hm r könn n Si das b ili -
g nd Aufsatzg wicht am G g ng wicht monti -
r n. V rw nd n Si hi rfür di b ig fügt n S nk-
schraub n M3 x 10.
Tonarmhöhe einstellen
St ll n Si di Tonarmhöh b i ing baut m
Tonabn hm r so in, dass das Tonarmrohr paral-
l l zum T ll r od r vorn minimal ti f r ist.
Zur Einst llung lös n Si di Kl mmschraub d r
VTA-V rst llung mit d m b ig fügt n Inbus-
Schlüss l SW3 inst ll n. St ll n Si nun di r-
ford rlich Höh in. Kl mm n Si anschli ss nd
di Schraub wi d r l icht. Prüf n Si di Höh .
Ggf. wi d rhol n Si di Einst llung.
Hinweis: Acht n Si darauf, dass b im Öffn n
d r Schraub d r Tonarm nicht nach unt n fällt!
9
Adjusting the cartridge
Assembling the template
This is don by using th provid d adjustm nt
t mplat . Tak th two parts of th t mplat and
ass mbl it, as shown in th pictur abov , and
plac it on th platt r.
Th tip of th c nt r pin must fac downwards.
Aligning the te plate
Put th t mplat on th platt r using th bor for
th d sir d ton arm l ngth.
Mov th ton arm forward or backward, so that
th c nt ring fits into th drill d marking on top
of th ton arm. Tight n th ton arm with ith r
its 3 scr ws (R ga bas mount) or its 2 h xagon
h ad scr ws (SME bas mount) in th round
mounting flang , wh n th position fits. This n-
sur s th corr ct angl and distanc of th t m-
plat for adjusting th cartridg .
Tonabneh er einstellen
Einstellschablone zusammenbauen
Di Einst llung rfolgt mit d r b ig l gt n Ein-
st llschablon . Füg n Si di b id n T il d r
Schablon g mäß obig m Bild zusamm n. L g n
Si di s dann auf d n Platt nt ll r.
D r Z ntri rpin muss mit s in r Spitz nach un-
t n z ig n.
Schablone ausrichten
S tz n Si di Schablon mit d r zur Tonarmlän-
g pass nd n Bohrung auf d n Platt nt ll r auf.
B w g n Si d n Arm vor od r zurück, bis d r
Z ntri rstift in di kl in vorg bohrt Marki rung
auf d r Ob rs it d s Tonarm-Lag rg häus s
passt. Fixi r n Si d n Tonarm mit d n 3
Schraub n an d r R ga-Basis bzw. d n b id n
S chskantschraub n an d r SME-Basis. Di s
st llt sich r, dass di Schablon im richtig n
Wink l und Abstand für di Einst llung d s Ton-
abn hm rs sitzt.
10
Adjusting the angle and position
Lift down th cartridg and plac th diamond tip
of th cartridg on th r f r nc point of th ad-
justm nt t mplat and mak sur that th dg s
of th cartridg ar parall l to th marking lin s
print d on th t mplat .
For prop r adjustm nt it is important to look
p rp ndicularly on top of th ton arm and th
t mplat .
Anti-skating
To adjust th Anti-skating us th Anti-skating
adjustm nt knob and adjust th corr ct valu by
slowly turning th knob, starting with 0.
W r comm nd using a t st r cord.
Aft r th adjustm nt pl as r duc th d t r-
min d valu slightly, b caus modulation of t st
r cords is much high r than that of normal vinyl
r cords.
Einstellen des inkels und Abstands
S nk n Si d n Tonabn hm r auf di Schablon
ab und platzi r n Si di Nad lspitz auf d n
R f r nzpunkt d r Schablon . St ll n Si sich r,
dass di G häus vord rkant d s Tonabn hm rs
parall l zu d n Marki rungslini n d r Schablon
v rläuft.
Für di richtig Einst llung ist s wichtig, s nk-
r cht von ob n auf d n Tonarm und di Schablo-
n zu schau n.
Anti-Skating
Zum Einst ll n d s Anti-Skating dr h n Si d n
Anti-Skating-Knopf langsam von 0 b ginn nd bis
d r richtig W rt rmitt lt ist.
Wir mpf hl n di V rw ndung in r T stplatt .
Bitt r duzi r n Si anschli ss nd d n rmitt l-
t n Einst llw rt g ringfügig da normal Schall-
platt n im Durchschnitt nicht so hoch ausg st u-
rt w rd n wi T stplatt n.
Anti-skating knob
Anti-Skating-Knopf
11
Connecting the tonear
Looking from th bottom of your TA-5000 Neo
you can s th 5 pin plug and its alignm nt. Th
conn ctor has a small Phillips scr w on its cylin-
d r. This scr w must fac towards th cartridg
wh n b ing ins rt d in th plug.
Pl as ins rt th conn ctor car fully; oth rwis
th pins might b damag d.
Finally conn ct th RCA-conn ctors and th
ground conn ctor to th matching input plugs of
your phono pr -amplifi r
Tonar anschliessen
W nn Si von unt n auf Ihr n TA-5000 Neo
schau n, rk nn n Si d n 5 polig n Einbaust -
ck r und s in Ausrichtung.
D r zug hörig St ck r hat auf d r Mant lfläch
in Kr uzschraub . Di s muss b im Einst ck n
in Richtung Tonabn hm r schau n.
S tz n Si d n St ck r vorsichtig in, damit di
St ck rpins nicht b schädigt w rd n.
Zum Schluss v rbind n Si di Cinch-St ck r und
d n Mass st ck r mit d n ntspr ch nd n Ein-
gangsbuchs n Ihr s Phono-Vorv rstärk rs.
12
Technical data TA-5000 Neo Technische Daten
F atur Valu / W rt M rkmal
Cartridg balanc w ight
4
g
–
16
g
Justi rbar s Tonabn hm rg wicht
Null point
-
inn r radius
6
6
mm / 2,
6
in
Inn r r Nullpunkt
-
Radius
Null point
-
out r radius
121
mm /
4,78
in
Äuss r r Nullpunkt
-
Radius
Mat rial Signal cabl
Silv r
/
Silb r
Mat rial Signalkab l
Ov rhang
1
7,3
mm / 0,
68
in
(9“)
13,2 mm / 0,52 in (12“)
Üb rhang
Eff ctiv l ngth
23
9,3
mm / 9,
42
in
(9“)
309 mm / 12,16 in (12“)
Eff ktiv
Tonarmläng
Mounting distanc (from pivot to
c nt r of platt r)
222
mm / 8,74
in
(9”)
295,8 mm / 11,64 in (12”)
Montag abstand (von Tonarm
-
lag r
zu T ll rachs )
Tilt angl (d p nds on cartridg )
2
3,9° (9“)
18,1° (12“)
Kröpfungswink l (abhängig vom Ton-
abn hm r)
Eff ctiv mass
1
2,4
g
(9“)
14,4 g (12“)
Eff ktiv Mass
W ight
5
73
g
(9“)
687 g (12“)
G wicht
Ton arm mounting v rsions
R ga styl / SME styl
Tonarmmontag variant n
Output
5
-
pin plug / 5
-
pol. St ck r
Ausgang
A = h ight from mounting
surfac to
r cord surfac
21mm
–
46mm /
0,83in – 1,8in
A = Höh von Montag fläch Flansch
zu Platt nob rs it
B = d pth from mounting surfac to
nd of pivot housing
5mm
–
35mm /
0,2in – 1,38in
B = Ti f von Montag fläch zu
Unt rkant Lag rg häus
C = h ight from mounting surfac to
high st point
98mm
–
128mm /
3,86in – 5,04in
C = Höh von Montag fläch Flansch
zu höchst m Punkt
For dim nsions A, B and C s pag 4 / Für Abm ssung n A, B und C si h S it 4.
Acoustic Signatur
Mad by AS-Distribution GmbH
Hill nbrandstrass 10
D-73079 Süss n / G rmany
T l: +49 7162 20797-0
www.acoustic-signature.com
E-Mail: info@as-distribution.d
R l.:
3
/
20
2
1
-
0
4
/ HCF

Other Acoustic Signature Music Equipment manuals

Acoustic Signature TA-700 User manual

Acoustic Signature

Acoustic Signature TA-700 User manual

Acoustic Signature TA-9000 User manual

Acoustic Signature

Acoustic Signature TA-9000 User manual

Acoustic Signature ASCONA NEO User manual

Acoustic Signature

Acoustic Signature ASCONA NEO User manual

Acoustic Signature TA-500 NEO User manual

Acoustic Signature

Acoustic Signature TA-500 NEO User manual

Acoustic Signature TA-7000 NEO User manual

Acoustic Signature

Acoustic Signature TA-7000 NEO User manual

Acoustic Signature TANGO Mk3 User manual

Acoustic Signature

Acoustic Signature TANGO Mk3 User manual

Acoustic Signature TA-1000 NEO 9 User manual

Acoustic Signature

Acoustic Signature TA-1000 NEO 9 User manual

Acoustic Signature GRIP S User manual

Acoustic Signature

Acoustic Signature GRIP S User manual

Popular Music Equipment manuals by other brands

Revox Re:system M10 owner's manual

Revox

Revox Re:system M10 owner's manual

Viscount CM-100 user guide

Viscount

Viscount CM-100 user guide

Korg nanoKEY Studio EFGSJ 3 quick start guide

Korg

Korg nanoKEY Studio EFGSJ 3 quick start guide

Pulsar Modular Siren P565 user guide

Pulsar Modular

Pulsar Modular Siren P565 user guide

Rolls RDB104 owner's manual

Rolls

Rolls RDB104 owner's manual

YORKVILLE DJM806 owner's manual

YORKVILLE

YORKVILLE DJM806 owner's manual

Palmer PLI 04 USB quick start guide

Palmer

Palmer PLI 04 USB quick start guide

Crumar Eleven user manual

Crumar

Crumar Eleven user manual

Eventide Harmonizer H910 instruction manual

Eventide

Eventide Harmonizer H910 instruction manual

assemblage DAC-3 Consctruction and operating manu a l

assemblage

assemblage DAC-3 Consctruction and operating manu a l

EMG 35P4 manual

EMG

EMG 35P4 manual

SPL EQ Rangers manual

SPL

SPL EQ Rangers manual

Gemini MDJ-1000 Operation manual

Gemini

Gemini MDJ-1000 Operation manual

Glyph GPM-216 brochure

Glyph

Glyph GPM-216 brochure

ColorVerse Broadcast xlr Operation manual

ColorVerse

ColorVerse Broadcast xlr Operation manual

thomann Millenium RW500 owner's manual

thomann

thomann Millenium RW500 owner's manual

Rishabh RISH LM 1340 operating manual

Rishabh

Rishabh RISH LM 1340 operating manual

Hotone NANO LEGACY Series owner's manual

Hotone

Hotone NANO LEGACY Series owner's manual

manuals.online logo
manuals.online logoBrands
  • About & Mission
  • Contact us
  • Privacy Policy
  • Terms and Conditions

Copyright 2025 Manuals.Online. All Rights Reserved.