ACOUSTIC SOLUTIONS DSI033 User manual

1-001 REV 1.1
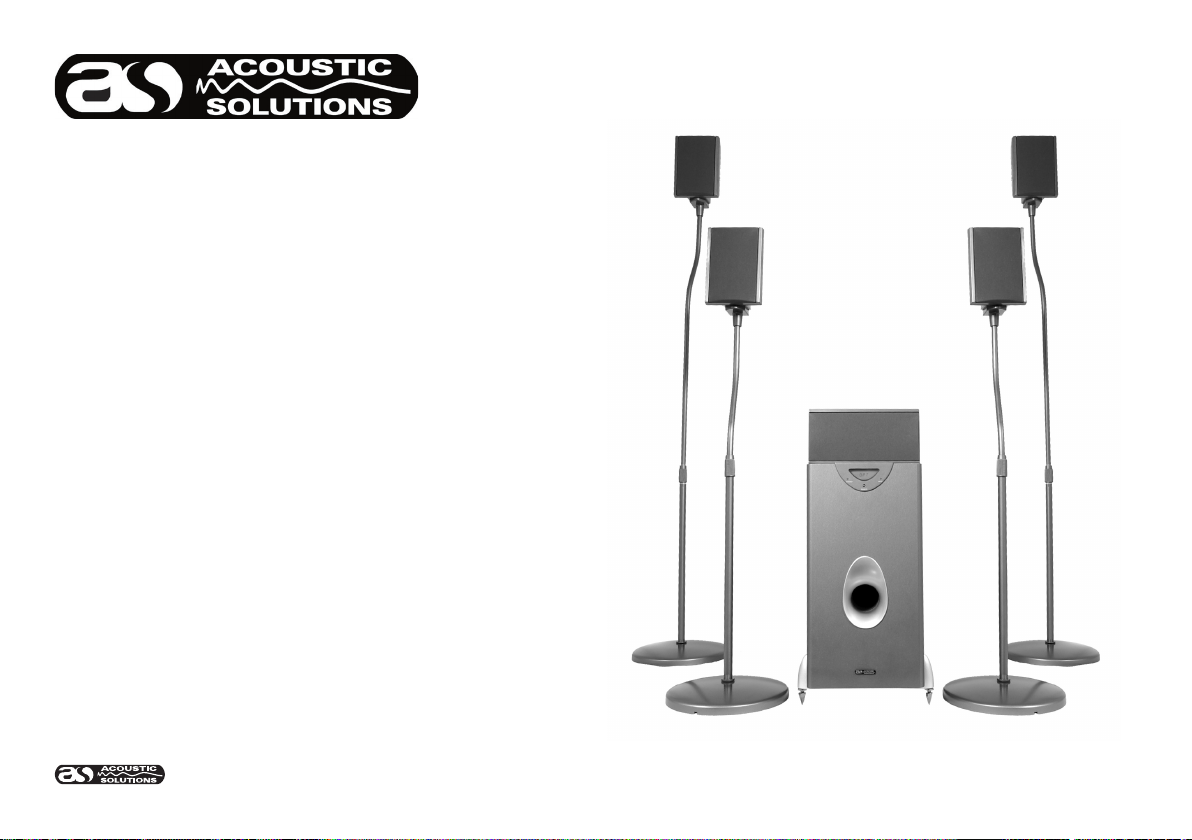
DS1033 INSTRUCTION MANUAL
May we take this opportunity to thank you for purchasing this
DS1033 Home Theatre System. Please note the listed precautions and
take time to study the operating instructions, this will ensure that you
gain maximum enjoyment from the DS 1033.
Manufactured under license from Dolby Laboratories. “DOLBY”,
“AC-3”, “PRO LOGIC” and the double-D symbol are trademarks of
Dolby Laboratories.
Condential unpublished works 1992-1997 Dolby Laboratories Inc.
All rights reserved.
CONTENTS
©
P1 Welcome
P2 Safety instructions
P3 Main features
P4 Remote control features
P5 System connection
P6 Loudspeaker connection
P7 Fixing of optional speaker stands
P8 System function and operation
P9 Troubleshooting
1

CAUTION: To reduce the risk of electric shock, do not remove any
cover. No user-serviceable parts inside. Refer any servicing to
qualied service personnel.
IMPORTANT SAFETY INSTRUCTIONS
• Read and keep these instructions available for future reference.
• For indoor use only.
• The unit must only be connected to a suitable mains power supply
using the mains power lead provided.
• To reduce the risk of re or electrical shock, do not expose this
unit to rain or moisture.
• Unplug the unit from the wall socket during lightning storms and
when it is not going to be used for a long period of time.
• When the system is not going to be used for some time, remove
the batteries from the remote control to avoid damage caused by
battery leakage or corrosion, and unplug the unit.
• Take care that foreign objects do not enter, or liquids are not
spilled, into the enclosure through any openings. If this should
happen, refer to qualied service personnel before attempting to
use.
• Ensure adequate ventilation - do not cover the sub woofer unit with
curtains, etc.
• Do not install near any heat source, such as radiators, or other
equipment that produces heat.
• Protect the mains power cable from being damaged.
• Use only the satellite speakers and remote control provided.
• The DS 1033 system is double insulated, when servicing only use
identical replacement parts.
SAFETY INSTRUCTIONS
UK MAINS PLUG DETAILS
For your convenience a mains plug with a fuse (5 Amp) has been
tted to this appliance. For your safety please observe the following
information.
The DS1033 is designed to operate on AC mains supply between 220
and 240 volts, 50 Hz.
The wires in the mains lead are coloured in accordance with the
following code:
BLUE NEUTRAL
BROWN LIVE
Under no circumstances should the Neutral or Live wires be connected to
the ‘E’ (Earth) terminal.
CAUTION
RISK OF ELECTRIC SHOCK!
DO NOT OPEN!
2
• Built-in 5.1 Dolby Digital AC-3 decoder for direct connection with
any DVD featuring digital audio output to give full cinema
surround sound experience.
• Built-in six channel power amplier.
• Full function remote control, including channel levels and tone
controls.
• System features microcomputer processing, producing high-
denition audio clarity from digital technology.
• Dolby Digital special effects to enhance listening pleasure.
• LCD status display
• Matching satellite speakers for wall or stand mounting, centre
speaker designed for horizontal positioning.
• All speakers are magnetically-shielded, and will have no inuence
on the TV picture.
• Sub Woofer mounted on spiked feet to prevent oor resonance.
MAIN FEATURES
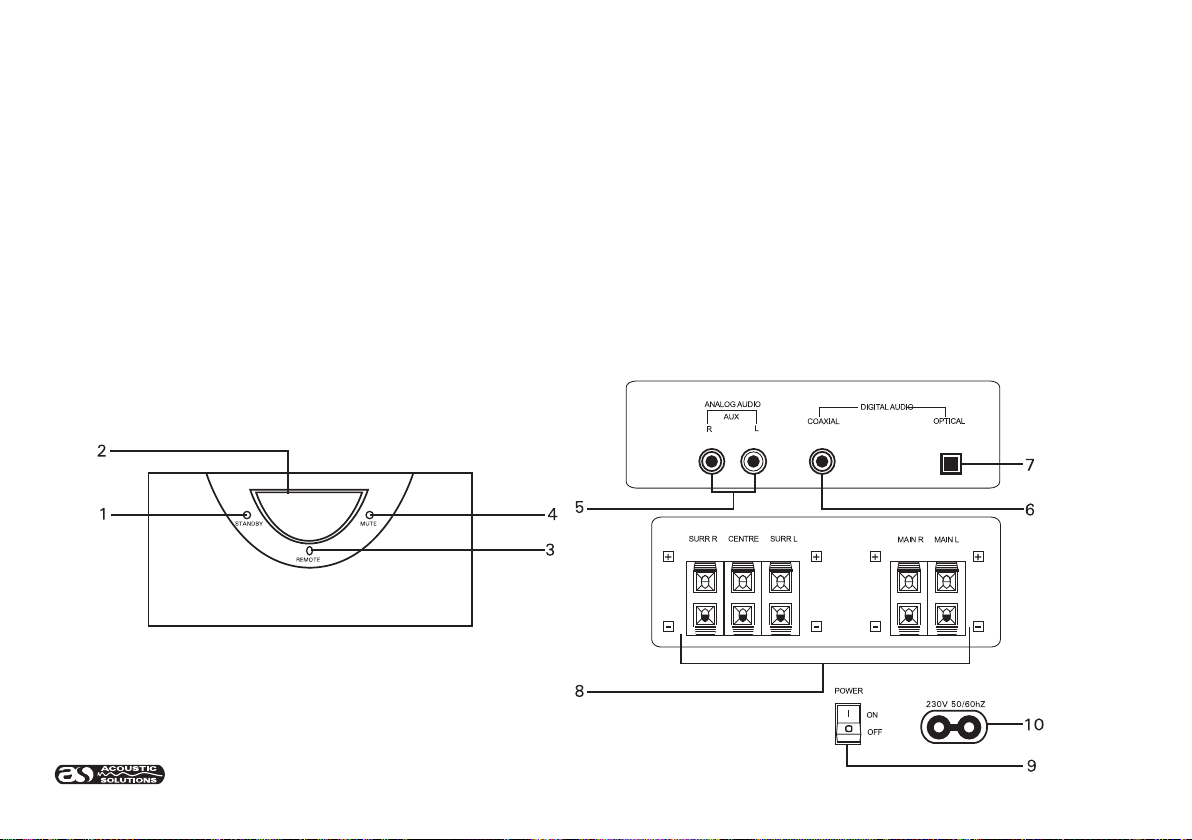
FRONT PANEL FEATURES AND REAR PANEL LAYOUT
1. Standby LED
2. LCD status display panel
3. Remote control receiver
4. Mute LED
5. AUX input connectors (RCA Phono)
6. Coaxial input connector
7. Optical input connector
8. Satellite speaker connection terminals
9. Power switch
10. AC power socket
REAR PANELFRONT PANEL
®
3
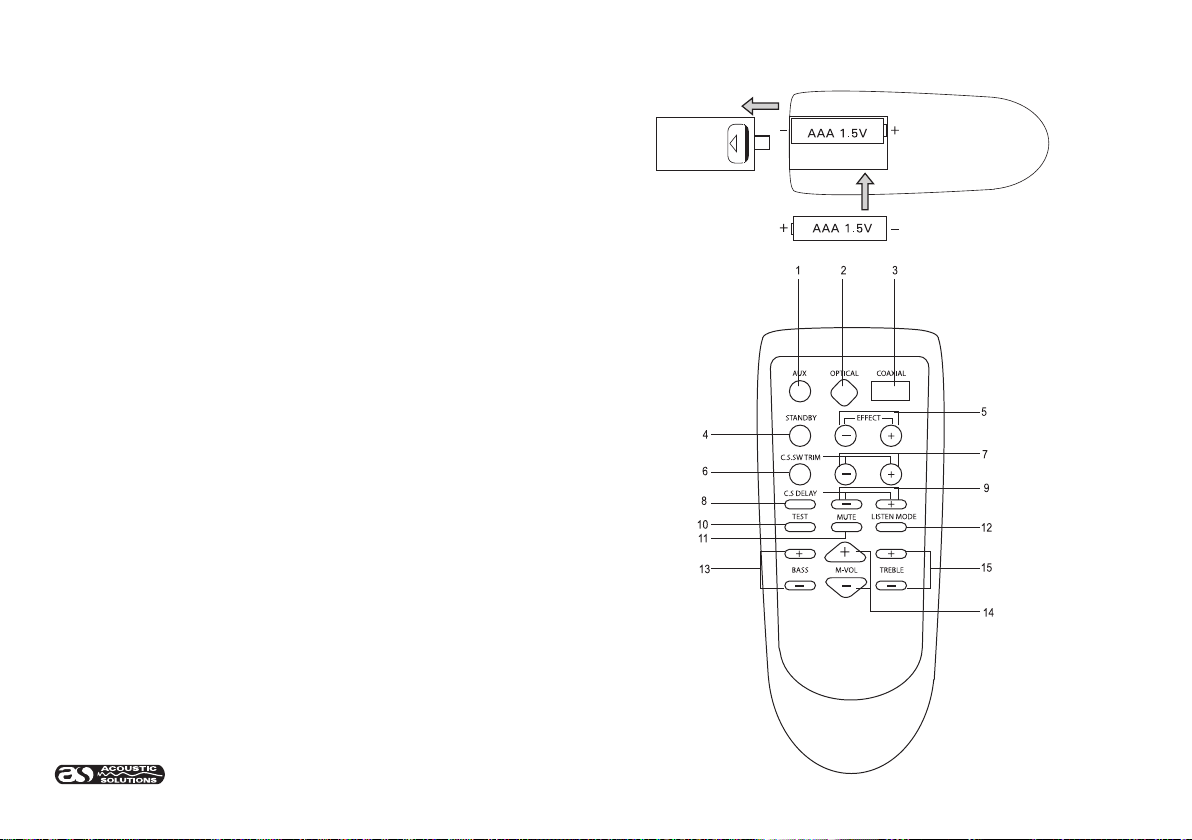
Insert the batteries observing the correct (+) and (-) polarities as
illustrated.
NOTE: If the remote control unit only works when operated near to
the DS 1033, replace the batteries. Use AAA-sized batteries only. Do
not use rechargeable batteries.
1. AUX (auxiliary) input selector
2. Optical input selector
3. Coaxial input selector
4. Standby
5. Digital Effects selection
6. Centre, surround & subwoofer channel levels selection
7. Centre, surround & subwoofer channel levels adjustment
8. Centre & surround time delay selection
9. Centre & surround channels time delay adjustment
10. White noise test selection
11. Mute
12. Listening mode selection
13. Bass level adjustment
14. Master volume adjustment
15. Treble level adjustment
Note: Do not place objects between the remote control unit and the
remote control receiver (see front panel features). Operating this remote
control unit while simultaneously operating the remote control unit of
another piece of equipment may cause interference.
REMOTE CONTROL FEATURES
4

It is recommended that the mains power is OFF until all connections have been made and checked.
A. Connection to a stereo sound source (CD player, TV, Tuner, etc). Use the provided RCA phono lead to connect to the
RIGHT and LEFT channels of the stereo sound system.
B. Digital input from a DVD player. Use either the provided digital lead (yellow) to the coaxial input socket (6 on rear panel) or
a suitable optical lead (not supplied) to the optical connector (7 on rear panel).
B
A
SYSTEM CONNECTION
5

LOUDSPEAKER CONNECTIONS
Ensure the correct polarity (+) and (-) of all speaker leads. Check to make sure there are no wires touching on the speaker terminals, and that all
wires are rmly clamped into the terminals.
6

7
FIXING OF OPTIONAL SPEAKER STANDS
If your DS1033 system has speaker stands please follow these instructions.

1. First make sure that all connections are correctly made:
• Connect the power plug to a suitable mains socket and switch the
DS 1033 system ON using the power switch (9). After about ten
seconds the LCD display will illuminate and the unit will operate.
2. Select the desired input:
• Select AUX (1) on the remote control unit to listen to the analogue
stereo sound source connected to the AUX inputs on the rear
panel (5).
• Select COAXIAL (3) on the remote control unit to listen to the digital
audio source connected to the COAXIAL input connector on the rear
panel (6).
• Select OPTICAL (2) on the remote control unit to listen to the digital
audio source connected to the OPTICAL input connector on the rear
panel (7).
3. Listening mode selecting:
• Depending on the type of input selected, pressing the EFFECT
buttons (3) allows you to select one of the Dolby Digital listening
modes “THEAT” (theatre), “MATRX” (Matrix), “LIVE”, “CHUR”
(Church), “ STADU” (Stadium), “SIMUL” (Simulated), “HALL” or
“CHORU” (Chorus), according to personal preference.
• According to the type of digital input, pressing LISTEN MODE (12)
allows you to select the Dolby Digital decoding options of PRO
LOGIC, STEREO or PHANTOM (Simulated surround sound from stereo
input). The DS 1033 automatically detects the type of signal being
input from a DVD player, and highlights “Dolby Digital” if a 5.1 Dolby
Digital signal is input, “PRO LOGIC” if the input signal is Pro Logic,
or “Stereo” if a stereo signal is being input. The LCD display shows
which channels are working - for example 2/0 indicates the front left
and right speakers only are working, 3/2 indicates the front left and
right, centre and surround speakers are working.
NOTE: Many DVD discs support multi-soundtrack options, so the
digital signal input to the DS 1033 will be determined by the DVD
player settings. The DS 1033 stores the last settings when
switched off, and will restore these settings when next switched on.
SYSTEM FUNCTION AND OPERATION
4. Adjusting the delay time of the Centre and Surround channels:
• Depending on the type of digital input being decoded, it is possible
to change the delay time of the signals heard in the centre (dialogue)
channel and the rear (surround) speakers. Pressing CS DELAY (8)
allows you to select the centre or surround channels, and using the
+ and - buttons (9) allows you to set the delay time of each channel
(centre channel delay time from 0 to 5 ms (milli-seconds), and the
surround channel from 15 to 30 mS.)
NOTE: The delay time setting is also dependent on the type of
soundtrack being input, and decoding option setting.
5. Adjusting the volume levels:
• The volume of the Centre, Surround (rear) and Sub Woofer channels
can be individually set according to personal preference and room
conditions.
• Selecting TEST (10) outputs a white noise signal to facilitate setting
the volume levels the Centre, Surround and Sub Woofer channels.
• Using C S TRIM (6) to select each channel, the +/- buttons (7) allow
you to set the sound level of each channel.
6. Tone adjustment:
• The system tone can be adjusted using the BASS +/- buttons (13)
and TREBLE +/- buttons (14) in the range of +/- 10 dB.
7. Standby:
• If the DS 1033 is not going to be used for a while, selecting
STANDBY (13) switches the system into standby (power save) mode,
indicated by the STANDBY LED (1) on the front panel. Reselecting
STANDBY (13) restores the system to normal operation, with all
previous settings.
NOTE: If the DS 1033 is not going to be used for a period of time, it is
recommended to switch OFF the system with the power switch.
8. Mute:
• To temporarily mute the sound output of the DS 1033, select MUTE
(11). The MUTE LED (4) on the front panel indicates the system is
muted. To restore the system to normal operation, reselect MUTE
(11).
8

TROUBLESHOOTING
System does not switch on:
• Check mains lead securely tted to a working mains outlet socket.
No sound from one or more channels:
• There is a 10 second delay after switching on before system starts
functioning.
• Check all speakers connections are correct and all leads are
secured.
• Check all input leads are correctly wired and all connectors are
securely tted.
• Check the settings of the input device (DVD player, etc.)
• Check channel volume settings.
• Check that the MUTE function is not selected.
Volume level low:
• Check master volume setting (maximum setting value 60).
• Check individual channel volume settings (maximum value +
10 dB).
Sound distortion:
• Check all inputs are correctly wired up.
• Check input device settings.
• Check that the volume level is not set too high.
Remote control not operating correctly:
• Check the batteries, if the remote controller only works when close
to the DS1033, the batteries are getting low - replace with suitable
AAA sized batteries.
• Do not use rechargeable batteries.
• Check there is nothing obscuring the remote signal sensor on
the front panel.
• Check the sub woofer unit is not in direct sunlight, as this can
reduce the effectiveness of the remote controller.
In event of any problem not covered above, or if assistance is needed
connecting or using your DS1033 system, please contact either the
product retailer or the Acoustic Solutions Helpline on 01327 340601.
This line is manned from 9:00am until 4:30pm, Monday to Friday.
9
Other ACOUSTIC SOLUTIONS Speakers manuals

ACOUSTIC SOLUTIONS
ACOUSTIC SOLUTIONS 4244051 User manual

ACOUSTIC SOLUTIONS
ACOUSTIC SOLUTIONS KW-TB001 User manual

ACOUSTIC SOLUTIONS
ACOUSTIC SOLUTIONS Q08S User manual

ACOUSTIC SOLUTIONS
ACOUSTIC SOLUTIONS 4144845 User manual

ACOUSTIC SOLUTIONS
ACOUSTIC SOLUTIONS B100 User manual

ACOUSTIC SOLUTIONS
ACOUSTIC SOLUTIONS 8994754 User manual

ACOUSTIC SOLUTIONS
ACOUSTIC SOLUTIONS DS 222 User manual

ACOUSTIC SOLUTIONS
ACOUSTIC SOLUTIONS DX 333 User manual

ACOUSTIC SOLUTIONS
ACOUSTIC SOLUTIONS DR-120 User manual

ACOUSTIC SOLUTIONS
ACOUSTIC SOLUTIONS 150 User manual


