ACOUSTIC SOLUTIONS SP110 User manual

Congratulations on purchasing this Acoustic Solutions DAB tuner, you have chosen to become one of the early adoptors of digital radio in the UK, which will
set the standard for radio quality in the near future. The SP110 DAB tuner has been developed following an extensive research and development program
that has culminated in what we regard as an exceptional mid-range hi- product.
Our aim when designing this product was to produce a visually appealing product which would look comparable to higher priced products, and give an
exceptional performance to match.
We trust that this product will give you hours of listening pleasure, and provide years of unparalleled performance. As with any new electrical product please
be patient and allow at least 36 hours use before all components have acclimatized themselves with your surroundings, and found their optimum working
temperature.
WHAT IS DAB?
DAB radio will change the way that people listen to radio over the next few years. You will probably be aware that digital radio will become mandatory in the
future as the terrestrial radio frequencies which you currently listen to will be re allocated for other uses such as emergency services.
This means that today you are one of the pioneers using this technology, however in a short space of time everybody will benet from clear digital radio
INTRODUCTION
1
1
3
4
5
6
7
8-13
14
14
15
16
17
CONTENTS PAGE No.
Introduction
Safety instructions
Front panel controls
Rear panel connections
Installation and position
Fixing the antenna
Using the DAB tuner
Using the headphones
Care and maintenance
Trouble shooting
Specications
Contact details
DAB Digital Audio Broadcasting
DLS Dynamic Label Segment
DRC Dynamic Range Control
LED Light Emitting Diode
GLOSSARY
MMI Man Machine Interface
RDI Receiver Data Interface
SNR Signal to Noise Ratio
S/PDIF Sony/Phillips Digital Interface Format
HI-FI SEPARATES
SP110 DAB TUNER
2
Digital Radio is like analogue FM radio but even better. Digital radio offers an abundance of new digital only stations, improved sound quality, no frequencies
to remember as stations are displayed using names, which makes it very easy to tune. The audio quality of DAB is near that of a CD with no interference and
no retuning, and the introduction of text, data and even pictures will enhance DAB in the future .
The BBC was the pioneer of digital radio, beginning transmissions in September 1995. Digital One, the national commercial radio multiplex operator began
broadcasting in November 1999. There has been a growth in the number of digital radio stations throughout the UK and both the BBC and Digital One are
committed to extending their coverage. Digital One currently covers 80% of the UK population, soon to increase to 85%, and the BBC covers 65% with the aim
of increasing coverage to 80% by 2003.
To nd out about digital radio coverage in the UK, check out the following websites:
BBC: www.bbc.co.uk/digitalradio
National Commercial Radio: www.ukdigitalradio.com
DRDB: www.drdb.org
Your Acoustic Solutions SP110 DAB tuner will receive programs broadcast on Band 3 digital radio (174-240MHz), there are 41 channels within this range
numbered 5A to 13F, the number of channels you can receive will be dependant on your location and signal strength. The UK has been allocated seven
multiplexes by the Radio Authority - in the spectrum 217.5-230.0 MHz, which are numbered 11B to 12D.
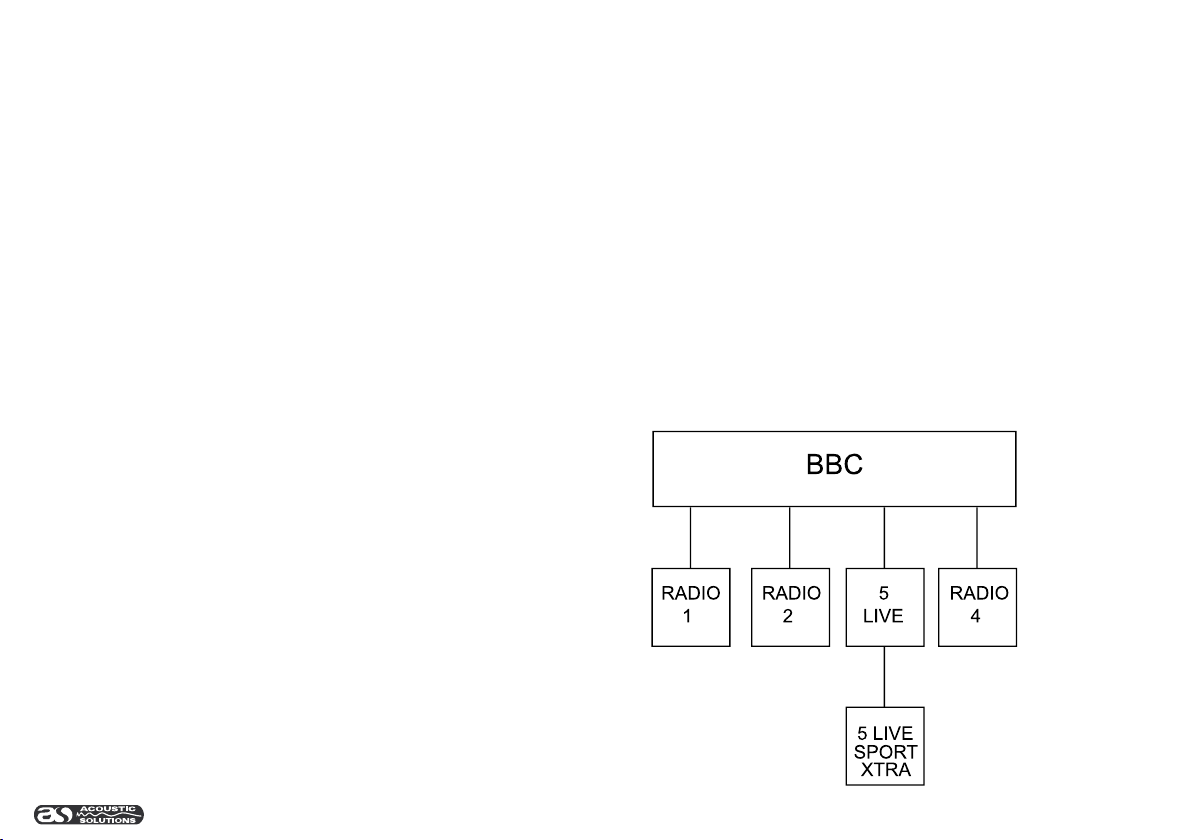
A multiplex is a broadcaster such as BBC or Digital One who will provide a host of different stations within their multiplex. If we consider the BBC as an
example, the following diagram shows how the BBC multiplex may work.
The multiplex name is BBC (also sometimes referred to as an ensemble)
Also shown is channel and carrier frequency although it is not
necessary to know this as the BBC is known by name rather than
frequency.
Below the main multiplex provider name will be a host of primary stations.
These are labelled as the station name again rather than the frequency.
This allows you to tune SP110 by station name, which is easier than
trying to recall frequencies.
Sometimes a secondary service station may be provided by the
broadcaster, for instance this is sometimes used when an
alternative commentary is provided on a sporting match or event.
These secondary service stations are not permanent and may not
always be used for broadcast. When a secondary station is available
below the primary station, the following symbol will be shown
on the display of the SP110; >>.
Details on how to use the SP110 are covered in the following pages.
CAUTION: To reduce the risk of electric shock, do not remove any cover. NO USER-SERVICEABLE PARTS INSIDE, REFER ANY SERVICING TO QUALIFIED
SERVICE PERSONNEL.
IMPORTANT SAFETY INSTRUCTIONS
• Read and keep these instructions available for future reference.
• For indoor use only.
• The unit must only be connected to a suitable mains power supply using the mains power lead provided.
• To reduce the risk of re or electrical shock, do not expose this unit to rain or moisture.
• Unplug the unit from the wall socket during lightning storms and when it is not going to be used for a long period of time.
• Take care that foreign objects do not enter, or liquids are not spilled, into the enclosure through any openings. If this should happen, refer to qualied service
personnel before attempting to use.
• Ensure adequate ventilation - do not cover this unit with curtains, etc.
• Do not install near any heat source, such as radiators, or other equipment that produces heat.
• Protect the mains power cable from being damaged.
• The SP110 system is double insulated and does not require an earth connection in the UK mains plug.
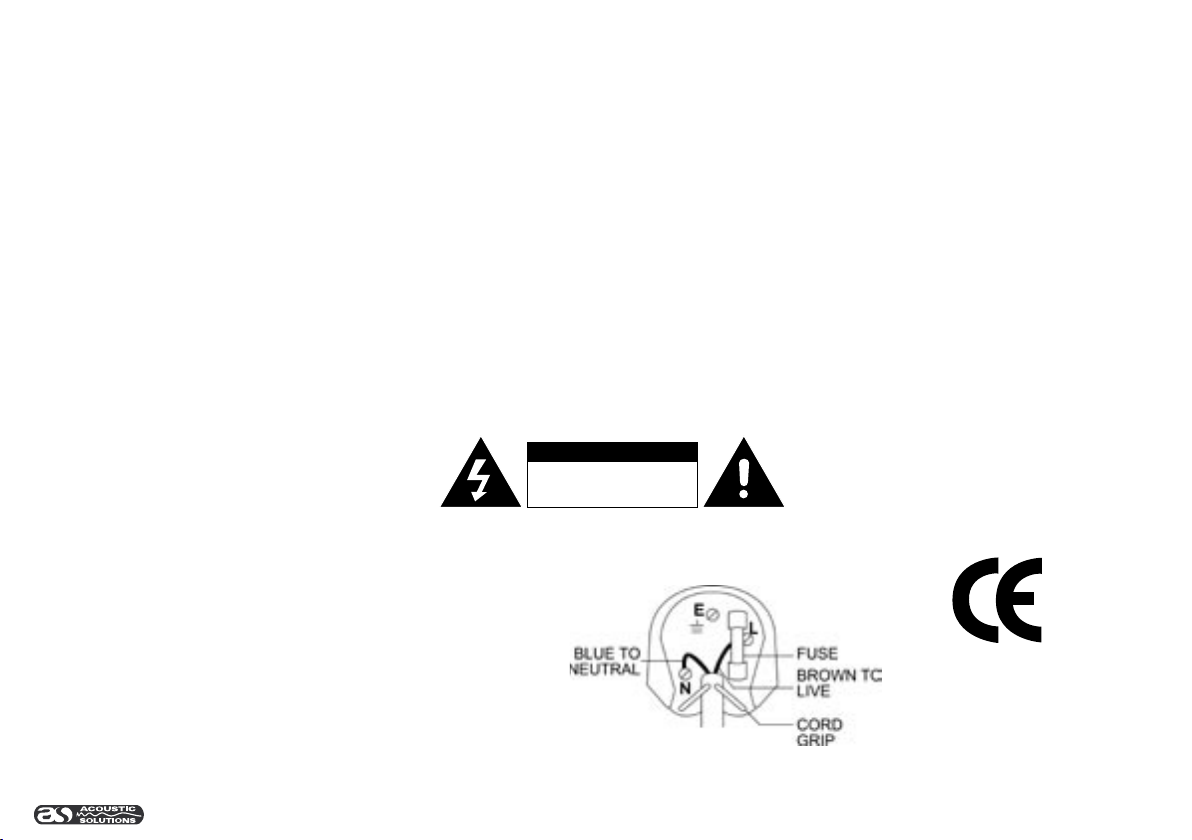
UK MAINS PLUG DETAILS
For your convenience a mains plug with a fuse (3 Amp) has been tted to
this appliance. For your safety please observe the following information.
• The SP110 is designed to operate on AC mains supply between 220
and 240 volts, 50 Hz.
• The wires in the mains lead are coloured in accordance with the
following code:
BLUE - NEUTRAL
BROWN - LIVE
• Under no circumstances should the Neutral or Live wires be connected
to the ‘E’ (Earth) terminal.
CAUTION
RISK OF ELECTRIC SHOCK!
DO NOT OPEN!
SAFETY INSTRUCTIONS
The exclamation point within an equilateral
triangle is intended to alert the user to important
operating and maintenance instructions in the
service literature relevant to this appliance.
The lightning ash symbol with the arrowhead within
an equilateral triangle is intended to alert the user
to the presence of uninsulated ‘dangerous voltage’
within the product’s enclosure that may be sufcient
to constitute a risk of electric shock to persons
This product complies
with European low voltage
(73/23/EEC) and elec-
tromagnetic compatibility
(89/336/EEC) directives.
3

FRONT PANEL CONTROLS
1. LCD display, indicates the station on line 1, and displays dynamic text below on line 2 , which also display other menu features as
described on page 8-13.
2. Preset channel 1 button-selects preset station 1.
3. Preset channel 2 button-selects preset station 2.
4. Preset channel 3 button-selects preset station 3.
5. Preset channel 4 button-selects preset station 4.
6. IR receptor, this can be used with the optional 3 in 1 remote control. This controls the Hi-Fi Amplier, DAB Tuner and CD player
from one controller.
7. Info buttons changes the text content on line 2 of the display, to show; DLS (Dynamic label segment, info text supplied by each radio station),
Program type (classication give by the radio station ie: Pop music or Rock), Multiplex name (name of multiplex broadcaster), Time & date,
or Channel and frequency.
8. Auto tune button, press to activate auto location of all available DAB services. Press once for UK services or, hold for longer than 2 secs to activate an
international search (when SP110 unit is being used in other band 3 areas).
9. Function button, activates features such as; station order, manual tune, DRC value, SW version indication, signal error rate. Hold for 2 seconds to activate
factory reset, this will erase all memory locations and multiplex listings, and instigate re tuning.
10. Rotary control knob, allows adjustment of parameters such as changing stations. Pressing the control knob selects the displayed station. Also operates the
commands in the function menus. Press once to show signal strength, press again to remove signal strength display.
11. Headphone volume control
12. Headphone socket, stereo 6.4mm jack suitable for use with most headphones
13. LED power indicator light will show green to indicate that the SP110 is on. It will show red if the SP110 is in stand by mode as set by the
optional remote control.
14. Power button, switches mains power on/off, however please note that mains power is still applied to this unit even though this switch may be off.
4

1. Warning labels, please observe that this unit contains high voltages, and should not be opened, please refer to page 2 of this manual.
2. Mains cable inlet position, please ensure that this cable strain relief bush is intact and has not been damaged.
3. Analogue audio outputs for connection to line input sockets on ampliers.
4. Optical S/PDIF output for connection to audio ampliers with digital inputs.
5. Antenna connection.
REAR PANEL CONNECTIONS
5
INSTALLATION AND POSITION
This tuner should be positioned on a at stable surface. We would recommend that the position of your hi- equipment should be chosen carefully to provide
adequate protection for this device, and also provide an attractive showcase for your investment. Hi- equipment is not designed for continuous movement,
therefore it is recommended that a permanent home for your hi- be achieved as soon as possible.
This tuner is tted with a mains transformer, it is not recommended that sensitive audio equipment such as turntables or cassette decks be placed immediately
next to this item. Do not place this product in areas where direct sunlight is present, nor place it adjacent to a radiator or other heating appliances.
Like all electrical devices this tuner will generate a modest amount of heat. The cooling of this device is reliant upon the ow of air within the case. Care should
be taken not to cover this unit with such items as rugs, covers or curtains which will restrict this air ow and may cause over heating.
Never allow the tuner to come into contact with water or liquids, and ensure that small objects do not fall through the ventilation grills. In the event of this hap-
pening, disconnect the wall plug form the mains supply immediately, and contact your local dealer for service advice.
Do not position the power cable such that it can be walked upon, or damaged by regular trafc. Ensure that all other interconnect cables are stowed safely
behind the unit, and cannot be easily snagged or kicked thus causing possible damage to the unit.
Ensure that all interconnection cables have been made correctly, and that polarity has been maintained.
6
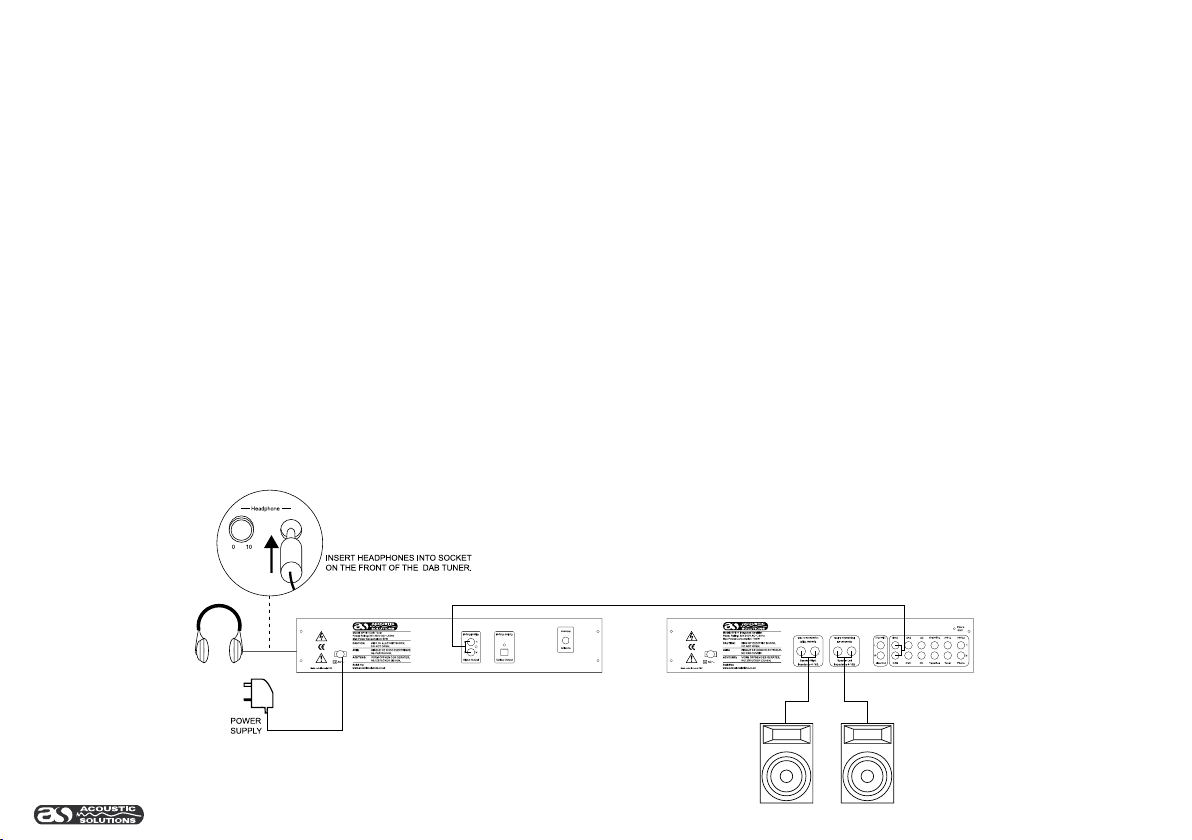
MAKING THE CONNECTIONS
It is necessary to connect this DAB tuner to an external amplier and loudspeaker set up, (It is not possible to connect loudspeakers directly to this DAB tuner).
It is possible to listen to the DAB tuner without external amplication equipment, through headphones only.
Please see the following diagrams which detail required connections:
HI-FI AMPLIFIER SP100
7
FIXING THE ANTENNA
As with any radio receiver, the quality of the output signal will be directly determined by the strength of the input signal that it receives.
Obviously the location of the tuner in relation to the transmitter will have a direct in uence on the quality of the available signal, however it is important to pro-
vide the best possible antenna to the tuner to provide the best signal conditions possible.
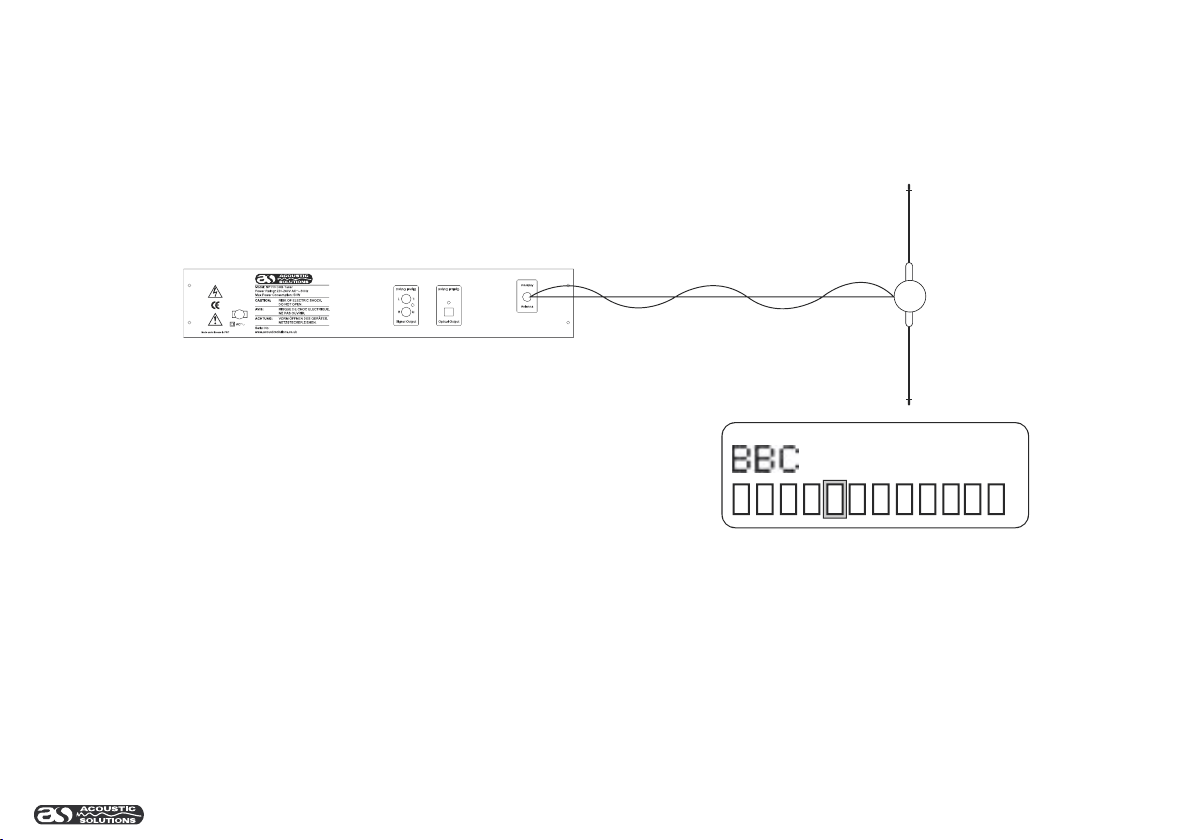
We have provided with this DAB tuner a simple wire dipole antenna which is designed for internal use. Please see the following diagram for correct installation
procedure:
ANTENNA ADVICE
It is possible to display the signal strength as a bar graph on the LCD display by pressing the
rotary control knob once, this will show the following window:
The signal strength is determined by the number of bars which are illuminated towards the right , the stronger the signal, the more bars that will be filled. The 5th segment is shown with a
square outline, this determines the minimum reference point for adequate signal strength, and any signal below this point will be affected by poor or interrupted audio quality.
It is possible to adjust the signal strength by changing the position of the antenna, and by using the visual bar graph display it is possible to position the antenna for maximum signal strength.
Further enhancements can be made to the reception quality by purchasing a better quality aerial, available from most hi-fi retailers.
For best reception, we would recommend an external or loft mounted DAB antenna. There are two main types available, a) Dipole, b) 4-element aerial.
Diploe - for use in marginal signal areas, this type of antenna is omnidirectional and should increase the strength of all DAB stations being received.
4-element aerial - also for use in marginal or poor signal areas. This type is directional and has a high gain. Like a TV or FM aerial, this type of antenna needs to point at a transmitter. Installa-
tion requires someone to move the aerial whilst you monitor the signal strength. If you can receive signals from multiple transmitters you should point your aerial at the one which gives you the
best signal for the services which you want to listen to.
It is possible to use a TV or FM aerial with your DAB tuner as this is normally mounted externally. This may give a stronger signal than a simple internal aerial, however it would not be tuned
specifically for DAB reception. You would need to change the plug on your TV/FM aerial to an ‘F’ type, and it may also be necessary to use a signal booster to enhance the signal.
Fix to a wall in a
vertical direction

USING THE DAB TUNER
Following this the tuner will then enter the auto tune mode as the DAB tuner locates
digital radio stations within your area.
It is not possible to interrupt this sequence as the tuner needs to have at least one
digital station to build a station list, and it will continue to scan until at least one
service has been located.
The display will read ‘Autotuning’ and you will see a moving bargragh on line 2
which indicates the progression of this tuning operation. As this process completes
a number will be shown in the top right hand corner of the display showing the
number of stations located.
If no services are located, please check that the antenna connection is correct. At
this point the function menu can be selected which allows manual tuning to try and
locate services in your area (see page 3 for information on manual tuning).
Following manual tuning, if no DAB radio stations can be received, please check
that adequate DAB coverage exists in your area (see page 2 on checking for
coverage information).
8
When you unpack the tuner from the box, all settings will be at default values. These can be altered according to your listening tastes; new settings will be
retained within the memory of the tuner and will remain set even after switching the system off.
Once you have made all the necessary connections to the DAB tuner, you are now ready to start listening to the DAB radio experience.
When you turn on the tuner, the display will show the following messages for 4 seconds:
1)
2)

BUILDING A STATION LIST
Following the initial autotune upon power up, the SP110 will build a station list of services that
exist in your area.
The default way in which these stations will be displayed on the LCD panel is in alphanumeric
order (to change this see page 12 ), recognising numbers before letters, therefore stations such
as 6 Music from the BBC will be listed rst.
To change which station you are listening to, simply turn the rotary function control knob
clockwise to scan up through the alphabetical stations list, or anticlockwise to scan down.
This changing list will be shown on line 2 of the LCD display, with line 1 showing the current
station which your are listening to. To select a new station from the scrolling list, push the
function control knob to make your selection. (Note it is only necessary to press this button once
to make your selection). The DAB station will change to your new selection.
(Note: by pressing the function control knob again, the signal strength will be shown on line 2
of the display, it will then be necessary to push this knob again to remove the signal strength
display from line 2 of the LCD).
Once the SP110 has built a station list, it will retain this list in memory unless you decide to
reset it. Sometimes it may be the case that a particular DAB station is not available in your
area, however the station still exists in the memory of the SP110. This may occur if the DAB
tuner has been moved, and is now being operated in a different location. It may also be that
secondary level DAB stations (as described on page 2 ) are not being broadcast, thus leaving
this channel inoperative.
In this situation the LCD display will show a ‘?’ in front of the station name to indicate that
service is not available. If you decide to select this station, the display will read ‘Station not
available’ and will revert back to the previous service.
To clear the station list from the memory of the SP110, it is possible to operate a factory reset
function. To do this hold down the function button for a period longer than 2 seconds, the LCD
display will ask you to conrm this operation, press the rotary control knob to accept.
It is also possible to ‘tidy’ the station list to remove stations which are in the memory, but have
no service provided, this procedure is described on page 12 in the station order menu of the
function control.
9
Turn rotary control knob clockwise to
scan up through alphabetical stations
list, or anticlockwise to scan down
the list.
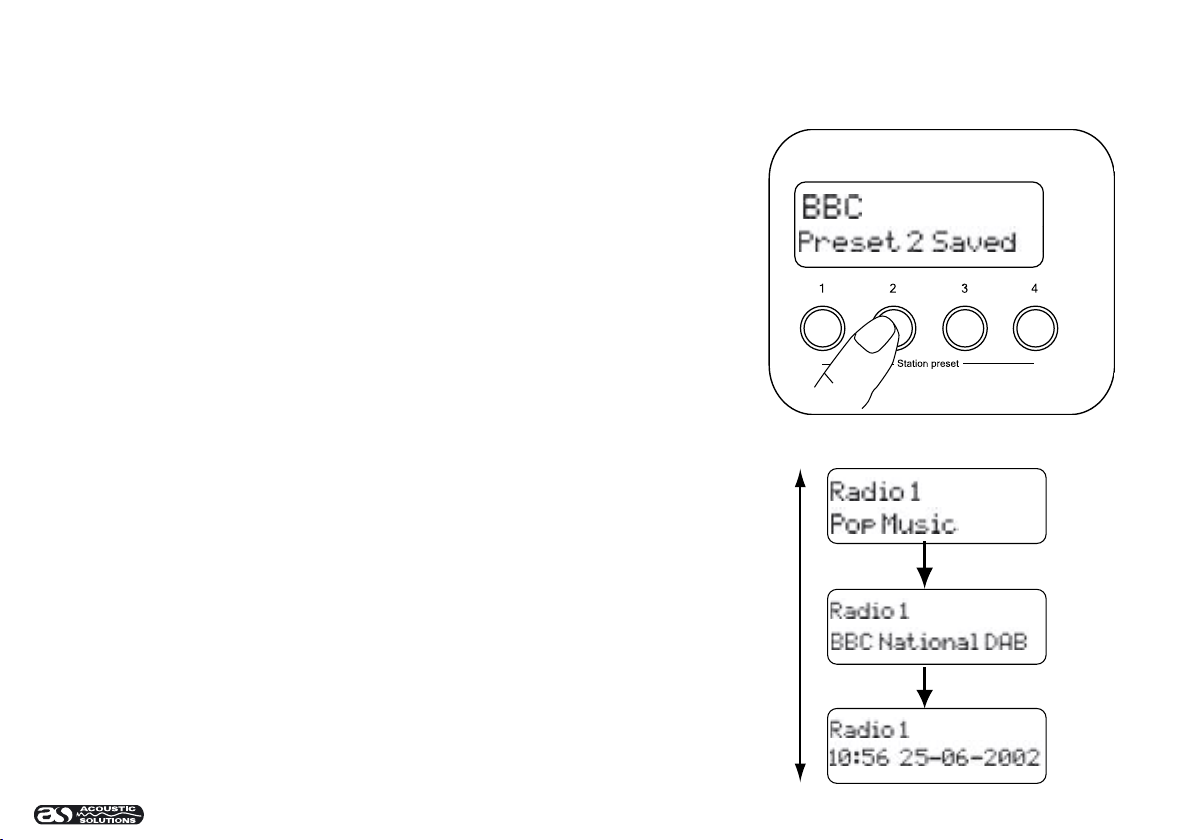
SETTING PRESETS
10
The SP110 is tted with 4 preset buttons which can store DAB stations of your choice for one-
button recall operation.
Please note that if you decide to store a secondary level DAB station, there is a possibility that
this station will only be broadcast periodically, and may not have station content when you return
to this preset in the future. If this is the case the LCD display will read ‘Station not available’, and
it will be necessary to retune to an alternative station.
To store a preset: 1) Tune the SP110 to the station required.
2) Decide which preset you want to store this station on.
3) Hold down this preset for a period longer than 2 seconds.
4) LCD display will read ‘Preset saved’
If a preset does not have a station allocated to it, the LCD will read ‘Empty preset’ if this button
is pressed.
Please also refer to page 12 for instructions on using the favourite station setting to in uence
the preset locations.
CHANGING THE INFO SETTINGS
It is possible to change the information which is displayed on line 2 of the LCD display when
listening to a DAB station.
The options are as follows;
a) DLS: Dynamic Label Segment, this is scrolling text information supplied by the
radio station. This may be information on music titles or details regarding the program
or station, and is provided by the broadcaster.
b) Program type: this is a description of the type of broadcast provided by the radio
station, e.g.: Pop music or Rock music. This is also provided by the broadcaster.
c) Multiplex name: this will show the multiplex which is broadcasting the program you
are listening to.
d) Date and time: This will display a constant time/date signal provided by the
broadcaster, this is not an internal clock and should always be accurate.
To change the info settings, press the info button.

USING THE AUTO TUNE FEATURE
11
The current setting will be displayed on line 1 of the LCD display.
Line 2 will show the options which are available.
Use the function control knob to scroll up/ down through the options available.
When you have located the info option you require, push the function control knob once to activate this change.
Line 2 of the LCD display will change to display the new info setting.
Line 1 of the LCD display will revert back to show the station name.
The nature of DAB radio means that service line ups are changing constantly as more secondary order stations become available.
If you are happy listening to your chosen radio stations, there may never be the need to establish if any new primary or secondary stations have become
available.
It is possible to instigate returning of your SP110 tuner to redene the service list of stations in your area.
To do this simply press the Autotune button, this will activate a local search for stations on band 3 in the UK only. As band 3 contains channels not allocated
to the UK, to include a process to scan for all of these would only add unnecessary time to this function. A search in the UK should take approx 10 seconds. If
your SP110 is being used in an area operating on band 3 outside of the UK, then the available channels can be scanned by holding down the Autotune button
for a period longer than 2 seconds. This search will take approx 20 seconds but will build a station list including these other band 3 channels.

USING THE FUNCTION CONTROL
12
The function control allows the user to utilize some of the system options available within the SP110.
The function key operates a menu structure which has the following sections:
1) Station order, allows the user to dene how the stations are arranged when scrolling up or down the stations list using the function control knob.
2) Manual tune, allows manual tuning if the autotune facility is unable to locate channels effectively, or if antenna adjustment is required..
3) DRC, Dynamic Range Control allows the SP110 to add or remove a degree of compression to compensate for the wide differences in the dynamic ranges
between radio stations, ie the vast difference in sound levels between Radio 1 and Radio 4
4) SW version, allows a visual check of the software version installed on your SP110.
5) Signal error rate, a numeric value which indicates the level of correction the SP110 is applying to a DAB signal to maintain audio quality.
To access these commands press the function key once to display the available choices, these will be shown on line 2 of the LCD display. Use the function
control knob to scroll through the menu to select which function you require.
A summary of each is as follows;
1) Station order. When this mode is selected you are presented with 4 options which will affect the way the SP110 displays the station order list.
a) The rst option is Favourite station. This will use the internal memory of the SP110 to constantly monitor which stations you listen to, and will build a list of
those you listen to the most.
As you scroll though the station list you will see that a heart shape will appear at the end of line 1 of the display. This shows that this station appears in your list
of favourites.
The SP110 will list your top 10 favourite stations at the start of the station order list so that it is not necessary to scroll through the entire list to nd the stations
which you listen to most often.
(Note) because the SP110 builds a favourite list from the station order list, it will remove that particular station from its normal position within the station order
list, and place it at the top of the list. This means that it does not appear twice within the list.
Whilst in favourite station mode, it is possible to activate a sub menu called, ‘Add fav to presets’. This will allow the SP110 to rebuild your preset buttons with
the top 4 of your most listened to stations. This will allow you to access your favourite stations instantly when you switch on the SP110, by pressing one of the
preset keys.
To activate this function whilst in favourite mode, press the function key to activate the menu. Select ‘station order’ from this list and scroll through the station
order menu, you will notice after the favourite station feature an additional choice is now available, ‘add fav to preset’. Press the function control knob once to
select this feature.
b) The second option is ‘alphanumeric’. This is the default setting, and will arrange the service order list to be displayed numerically rst, followed by
alphabetically. From the station order menu, scroll through the sub menu options until ‘alphanumeric’ is displayed on line 2. Press the function control knob
once to select this option.
c) The third option is an ‘active station’ list. This will allow the station order list to show the DAB stations in your area which can be received, at the top of the
list, and those which appear on the list, but have no service in your area, to be at the end of the list. From the station order menu, scroll through the sub menu
options until ‘active station’ is displayed on line 2. Press the function control knob once to activate this option.

13
d) The fourth option from the ‘station order menu’ is ‘Tidy stations’. This allows the station list to be sorted, and those DAB stations within the list which
cannot be received within your area can be removed. From the ‘station order menu’, scroll through the sub menu options until ‘Tidy stations’ is displayed on
line 2. Press the function control knob to select this option.
2) Manual tune. It is possible to manually tune SP110 to a specic channel allowing this multiplex to be added to the service order list. This feature can be
used to assist positioning an antenna to gain optimum reception for a specic channel.To activate this mode, press the function key to display the menu
options on line 2. Scroll up/down until ‘manual tune’ is displayed. Press the function control knob to select this feature. Scroll up/down to choose a specic
channel and frequency from the list. When you have located the specic channel you require, press the function control knob to select this channel. On line 1
the signal strength bar graph will be displayed. As the antenna is moved this bar graph will alter, and when the minimum signal threshold is reached, the name
of the multiplex will be added to the station order list. Press the function control knob again to resume normal service.
3) DRC value. Radio stations generally use signal compression to reduce the gap between the high and low volumes of audio material, and to reduce the
difference in dynamics between music and microphone links. Some stations (such as Radio One) are heavily compressed as the music format is generally
popular music with the emphasis on a constantly high listening level. Other radio stations (such as Radio 4) use little or no compression and work on the
premise that its listeners require all the highs and lows in music to dene detail. This type of radio station would probably be broadcasting music such as
classical which benets from wide dynamics.
The SP110 is tted with 3 levels of dynamic range control which apply compression to an audio signal in an attempt to reduce the difference in levels between
these stations. This means that when changing between radio stations, large volume changes can be avoided.
To activate this mode, press the function key to display the menu options on line 2. Scroll up/down until ‘DRC value’ is displayed. Press the function control
knob to select this feature.
Use the function control knob to scroll up and down through the 3 numerical values available.These are: 0- Which is zero compression (DRC off), 1/2 -
medium compression or 1 for maximum compression.
For listeners of mainly classical music or speech programs that contain wide dynamics to emphasise content, a DRC value of 0 is recommended. However
please be aware that other radio stations may be far louder, and care should be taken that amplication levels are not set too high when changing radio
stations.
4) SW (software) Version. This is provided as a reference when servicing may be necessary. It allows an engineer to determine a fault quicker if this
information is available.
To activate this mode, press the function key to display menu options on line 2. Scroll up/down until ‘SW version’ is displayed. Press the function control knob
to select this feature, the software version installed on this product will then be displayed.
5) Signal error rate. Because of the nature of digital radio, the SP110 will apply an amount of correction to an audio signal if parts of the transmission are
affected. The amount of signal correction can be shown as a numeric value between 0 (no correction) and 99 (maximum correction). This is obviously directly
proportional to the strength of signal in your area and the quality of your antenna.
To display the amount of signal error rate being applied, press the function key to display menu options on line 2. Scroll up/down until ‘Signal error’ is
displayed. Press the function control knob once to select this feature. A numerical value will be shown, and as a guide any value up to 50 is deemed
acceptable. For values above this please check the quality of antenna connections and positioning.

14
CARE AND MAINTENANCE
To clean the SP110 tuner, wipe the case with a slightly moist, lint-free cloth. Do not use any cleaning uids containing alcohol, ammonia or abrasives. Do not
spray an aerosol at or near the tuner.
Always use original packaging if it is necessary to transport the unit at any time.
If this unit is used in a dusty environment, it may be necessary to have the unit serviced at your local dealer periodically. It is not advisable to allow large
deposits of dust to accumulate within the unit as it may prevent adequate cooling. Similarly dust deposits which become damp can sometimes lead to electrical
problems which may cause severe damage to the delicate electronics within this unit.
The SP110 has been tted with a headphone amplier to allow discreet listening. Plug a 6.4mm stereo headphone jack in to the socket (12) provided.
Adjust the volume of the headphones using the headphone volume knob (11). Turn clockwise to increase the volume in your headphones, and anticlockwise to
decrease.
The headphones amplier works independently from the output sockets on the rear of the SP110. Connecting the headphones does not disconnect the main
output signal. The headphone level control does not affect the output level of the main output sockets.
LISTENING WITH HEADPHONES

15
TROUBLE SHOOTING
I cant get any sound from my SP110 Connection leads to amplier not made correctly.
Speakers not connected to amplier.
Power of SP110 or connected amplier not turned on.
Ensure that the SP110 has been able to locate DAB stations
Display says ‘no services available’ Check that antenna is connected.
Ensure that DAB coverage exists in your area.
I can’t access secondary services At the time of publishing this manual not many secondary services are
available, this will increase as more DAB stations start broadcasting.
If a secondary service station is available, the secondary indicator >> will
be displayed next to the station name.
Display has gone blank or says ‘service off air’ This may occur if a broadcaster changes the label of a service or removes
a label whilst you are listening to it. The SP110 will try to retune to this
station, or alternatively follow the procedure for auto tune on page 11.
I can’t hear the station I have selected Ensure you have pressed the function control knob when you have made
your selection. The station you are currently listening to will be displayed
on line 1 of the LCD display, as you scroll through the station order list
line 2 will show other station options. Press the function control knob to
activate your choice.
I hear a burbling sound on some stations DAB like other digital media is good at producing quality audio from a
low level signal, however if this signal level is too low
a ‘burbling’ sound can sometimes be heard. To reduce this try
repositioning your antenna to gain maximum signal strength, alternatively
you may wish to purchase an antenna booster to enhance the level
available to the SP110.
Problem Possible cause

SPECIFICATIONS
16
RF Section Band III, 174MHz-240MHz
Input: 50R,nominal
Max signal: -3dBm typ
Sensitivity: -96dBm typ
Adjacent Channel Rejection: 35dB typ
Display 2 line by 16 character LCD
LED backlight
Presets 4
Audio Output Stereo, 2.5V P-P
48kHz sample rate
16 bit sample resolution
Optical S/PDIF IEC60958 Compliant
48kHz sample rate
24 bit sample resolution
Power 220-240V AC
20W
Operating Temp 0 to 50 deg C

CONTACT DETAILS
We trust you are completely satised with this product from Acoustic Solutions Limited, however please feel free to contact us if you experience any difculties,
or if you would like to express your views regarding our products
Please write to:
Acoustic Solutions Limited.
Grand Union Buildings
54 High Street
Weedon Bec
Northampton
NN7 4QD
United Kingdom
Telephone +44 (0)1327 340601
Fax: +44 (0)1327 342298
www.acousticsolutions.co.uk
email: [email protected]
Through the process of continuous improvement, Acoustic Solutions Limited reserves the right to change or alter specications without prior notice. E&OE
BBC Digital Radio Digital Radio Development Bureau Digital One
Room 5661 The Radio Centre 20 Southampton Street
Broadcasting House 77 Shaftesbury Avenue London
Portland Place London WC2E 7QH
London, W1A 1AA W1D 5DU
Tel 08700 100 123 Tel 020 7306 2630 Tel 020 7288 4600
www.bbc.co.uk/digitalradio www.drdb.org www.digitalradio.com
17
OTHER USEFUL ADDRESSES

REV: 1/026/1.0
Table of contents
Other ACOUSTIC SOLUTIONS Speakers manuals

ACOUSTIC SOLUTIONS
ACOUSTIC SOLUTIONS 4144845 User manual

ACOUSTIC SOLUTIONS
ACOUSTIC SOLUTIONS KW-TB001 User manual

ACOUSTIC SOLUTIONS
ACOUSTIC SOLUTIONS Q08S User manual

ACOUSTIC SOLUTIONS
ACOUSTIC SOLUTIONS DS 222 User manual

ACOUSTIC SOLUTIONS
ACOUSTIC SOLUTIONS B100 User manual

ACOUSTIC SOLUTIONS
ACOUSTIC SOLUTIONS DX 333 User manual

ACOUSTIC SOLUTIONS
ACOUSTIC SOLUTIONS WJ-202 User manual

ACOUSTIC SOLUTIONS
ACOUSTIC SOLUTIONS DSI033 User manual

ACOUSTIC SOLUTIONS
ACOUSTIC SOLUTIONS 8994754 User manual

ACOUSTIC SOLUTIONS
ACOUSTIC SOLUTIONS 150 User manual


