ACOUSTIC SOLUTIONS DR-120 User manual

INSTRUCTION MANUAL
BEFORE ATTEMPTING TO CONNECT, OPERATE OR ADJUST THIS PRODUCT,
PLEASE READ THIS MANUAL COMPLETELY.
REV:4/083/1.0
GENERAL INFORMATION
This manual is designed to give all necessary information and instructions
for the successful operation of your Compact Disc Player. If you are
installing the unit yourself, please pay careful attention to the section on
connecting the CD player to other units in your sound system. Complete
instructions are given on the following pages.
Your CD player is designed to be insensitive to temperature and voltage
changes under normal conditions. For longer service life and operating
safety, the CD player should not be placed near sources of heat (close
to heating units, radiators or in direct sunlight) or areas of high humidity.
Voltage uctuations greater than ±10% can lead to poor performance
or breakdown. Should you have any questions on these points, please
consult your DEALER for further information.
Before using your CD player, the output cable has to be connected to the
amplier and the power cable has to be plugged into an AC outlet.
Follow the connection and operating instructions carefully step-by-step.
Within a short time, you will have gained all the knowledge needed for
successful operation of your CD player.
Before the unit is switched on for the rst time, please check that all
connections and installation requirements have been completed. The
volume control on the amplier should be set to the minimum position.
Thank you for choosing our compact disc player DR-120. Before you operate
it, we ask you to read this entire manual to familiarise yourself with the
important precautions, operational procedures and features of the DR-120.
This will help you avoid possible damage and ensure that the product's superb
performance will be yours to enjoy for many years to come.
DR-120 INSTRUCTION MANUAL
1
CONTENTS P1 General information
P2 Safety instructions
P3 For safe and efcient operation
P4 Remote control
P5 Features and controls: Main unit
P6 Compact discs
P7 Control and operation
P11 Trouble shooting
P12 Specications
Contact details
SAFETY INSTRUCTIONS
WARNING:UNDER NO
CIRCUMSTANCES MUST THE
LIVE OR NEUTRAL WIRES BE
CONNECTED TO THE EARTH
TERMINAL IN A 3-PIN MAINS
PLUG.
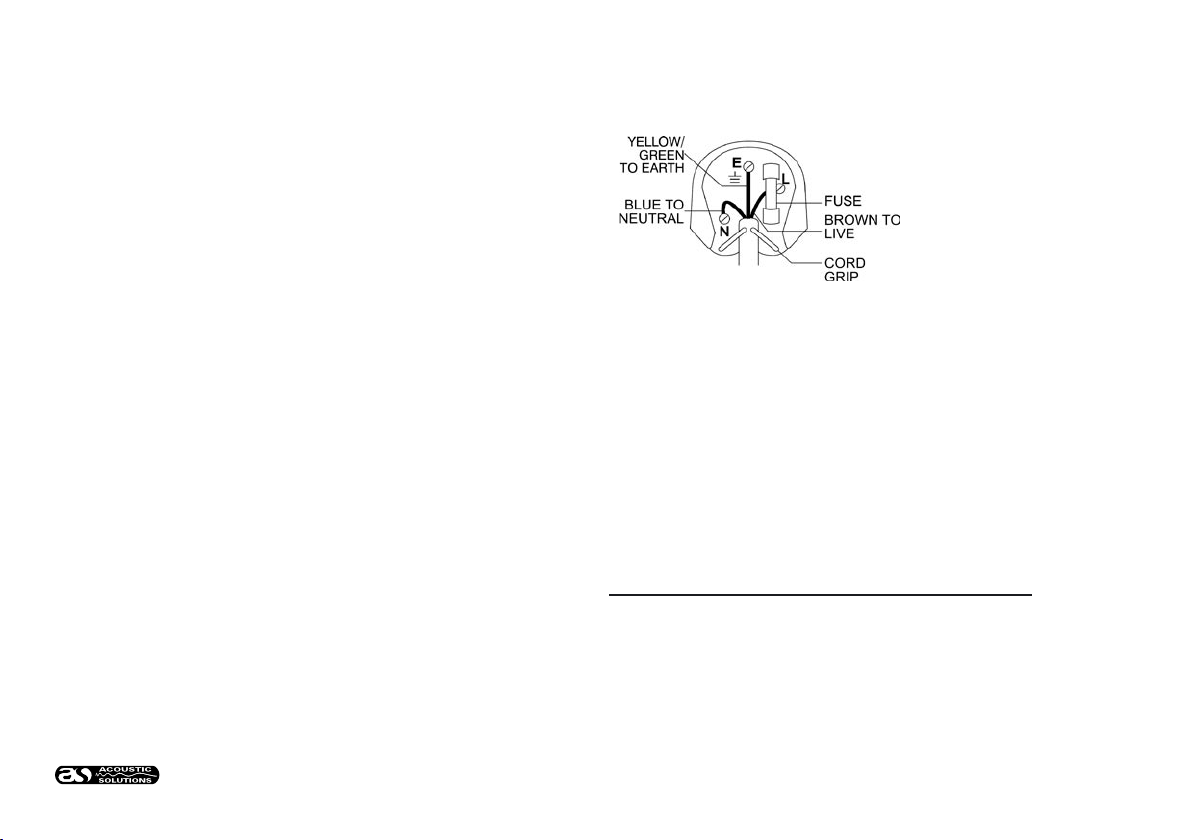
PLUG FITTING INSTRUCTIONS
(UK ONLY)
AC POWER
For your convenience a mains plug with a fuse has been tted to this
appliance. For your safety please observe the following information.
• Should the fuse fail in the plug remove the plug from the wall socket
and replace the fuse with a 3 Amp ASTA approved BS1362 fuse.
• Never use the plug without the cover tted. Replacement covers are
available from your dealer.
• If the mains plug is cut off the cable, rewire a replacement plug in
accordance with the instructions given in this manual.
• CAUTION: Under no circumstances should a discarded plug be
inserted into a mains socket. To prevent a shock hazard, carefully
dispose of discarded plugs. Do not leave plugs lying around where
children might nd them.
CAUTION: DANGEROUS VOLTAGES EXIST INSIDE THIS UNIT. DO NOT
REMOVE COVER (OR BACK). NO USER SERVICEABLE PARTS INSIDE.
REFER SERVICING TO QUALIFIED SERVICE PERSONNEL.
DISCONNECT FROM MAINS SUPPLY WHEN NOT IN USE.
• The wire which is coloured blue must be connected to the terminal
which is marked with the letter 'N' or coloured black.
• The wire which is coloured yellow and green must be connected to the
terminal which is marked with the letter E.
• The wire which is coloured brown must be connected to the terminal
which is marked with the letter 'L' or coloured red. Only a 3 Amp fuse
should be tted in the plug or a 5 Amp fuse at the distribution board.
2
This equipment has been designed and manufactured to meet the highest
international standards. However, with any electrical apparatus that is
operated at mains voltage, care must be taken if you are to obtain the
best results, and for safety to be assured.
DO
• Read the operating instructions before you attempt to use the
equipment.
• Ensure that all electrical connections (including the mains plug,
extension leads and interconnections between pieces of equipment)
are properly made and are in accordance with the manufacturer’s
instructions. Check that the mains fuse rating is correct.
• Always call in you dealer if you are ever in doubt about the installation,
operation or safety of your equipment - he is the best person to advise
you.
DO NOT
• Obstruct the necessary all-round ventilation: Take care not to stand
the set close to curtains or on soft furnishing such as carpets. Over-
heating can cause unnecessary damage and shorten the life of the CD
player.
Remember that to obtain the best performance and lasting satisfaction
from your equipment, have it regularly maintained by a reliable service
organization and ensure that it is correctly used by all the family.
ABOVE ALL
• Never let children push anything into holes or slots in the case - this
could result in an electric shock.
• Never guess or take chances with electrical equipment of any kind - it
is better to be safe than sorry!
WARNING
• To prevent re or shock hazard do not expose this appliance to rain or
moisture.
• Always remove the mains plug from the wall socket when not in use or
before any service operation.
• No user serviceable parts inside. Refer servicing to qualied servicing
personnel. Never remove covers unless qualied to do so. This unit
contains dangerous voltages.
FOR SAFE AND EFFICIENT OPERATION
• Select the installation location of your unit carefully. Avoid placing it in
direct sunlight. Also avoid locations subject to vibration and excessive
dust, heat, cold or moisture. Keep away from sources of electrical
noise, such as transformers or motors.
• Do not use this compact disc player where there are extreme
temperatures (below 41°F/ 5°C or exceeding 95°F/35°C).
• Do not open the case as this might result in damage to the CD player
or electrical shock.
• Be sure your hands are clean when handling discs. Never insert a disc
that has a crack on its surface.
• When disconnecting the power cord from the AC outlet always grasp it
by the plug. Never pull the cord.
• Do not use force when operating switches and buttons.
• Before moving the CD player, be sure to disconnect the power cord
and all connecting cables.
• To keep the laser pick-up clean, always close the disc tray.
• Do not attempt to clean the unit with chemical solvents as this might
damage the surfaces. Use a clean, dry cloth.
• Keep this manual in a safe place for future reference.
• If the unit malfunctions, do not open the cabinet and attempt to repair it
yourself. Always request service by an authorized service centre.
CAUTION
USE OF CONTROLS OR ADJUSTMENTS OR PERFORMANCE OF
PROCEDURES OTHER THAN THOSE SPECIFIED HEREIN MAY
RESULT IN HAZARDOUS RADIATION EXPOSURE.
THE COMPACT DISC PLAYER SHOULD NOT BE ADJUSTED OR
REPAIRED BY OTHER THAN QUALIFIED SERVICE PERSONNEL.
IMPORTANT
The compact disc player was developed to give you many years of
enjoyment. Please read the following instructions carefully. They have
been prepared to assist you during the initial set-up procedure and to
assure you of optimum performance at all times. WARNING
UNAUTHORIZED RECORDING OF COPYRIGHT MATERIAL MAY VIOLATE
APPLICABLE COPYRIGHT LAWS. DISTRIBUTOR ASSUMES NO RESPONSIBILITY
FOR THE UNAUTHORIZED DUPLICATION. USE OR OTHER ACTS WHICH
INFRINGE UPON THE RIGHTS OF COPYRIGHT OWNERS.
SAFETY CERTIFICATION
WARNING
TO AVOID THE HAZARDS OF FIRE OR
ELECTRICAL SHOCK. DO NOT EXPOSE
THIS APPLIANCE TO RAIN OR OTHER
MOISTURE.
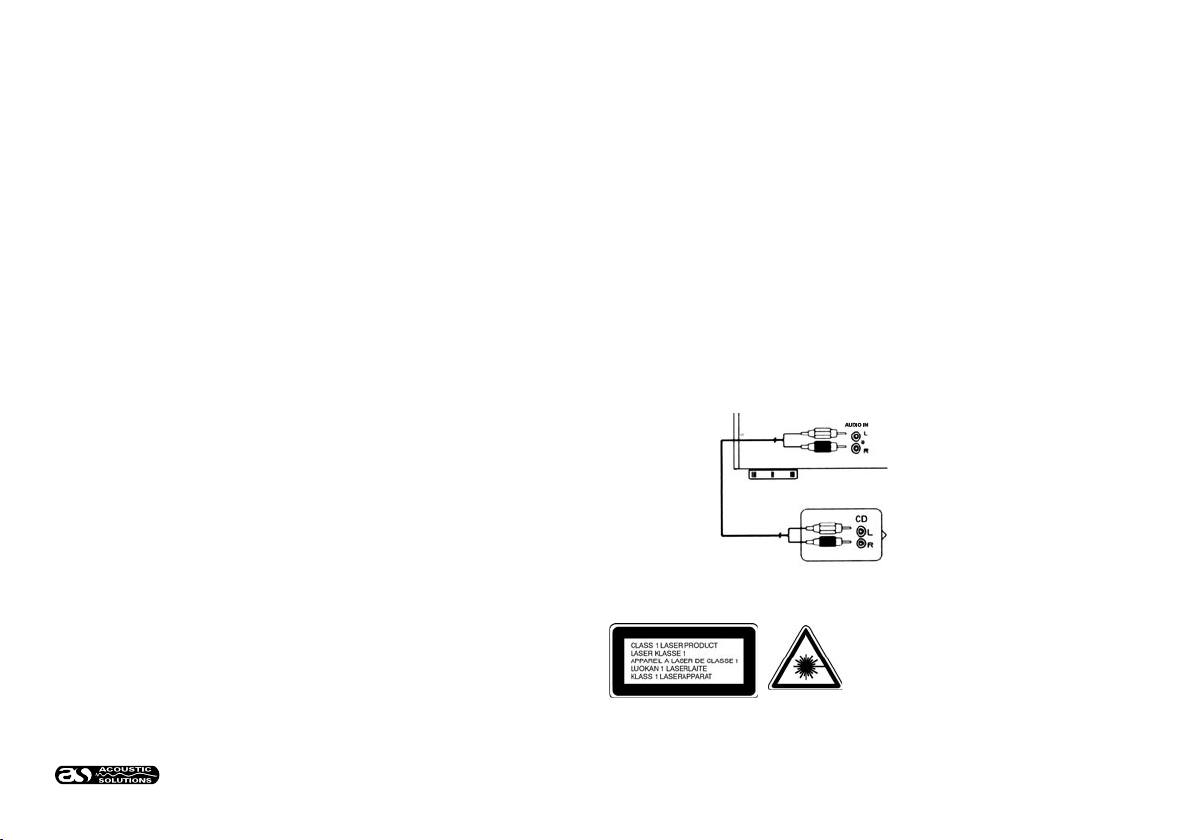
Amplier
Compact Disc
CONNECTING THE COMPACT DISC PLAYER - CAUTION:
• Before connecting or disconnecting a unit from an audio system, be
sure to switch off the power to each part of the system.
• Be sure to make the correct connections paying attention to the L (left
channel) and R (right channel) marks. Plug the cables in securely.
Loose connections will result in unsatisfactory sound reproduction or
cause noise problems.
• If this unit interferes with a tuner, switch off the unit during tuner
operation.
• AUDIO OUT CONNECTORS
Connect one end of the supplied RED/WHITE output cable to the unit's
AUDIO OUT sockets and the other end to the input sockets labeled
CD, DAT, AUX, TAPE PLAY, TV, TUNER, etc, on your amplier. Do not
connect it to the amplier's PHONO turntable connectors.
3
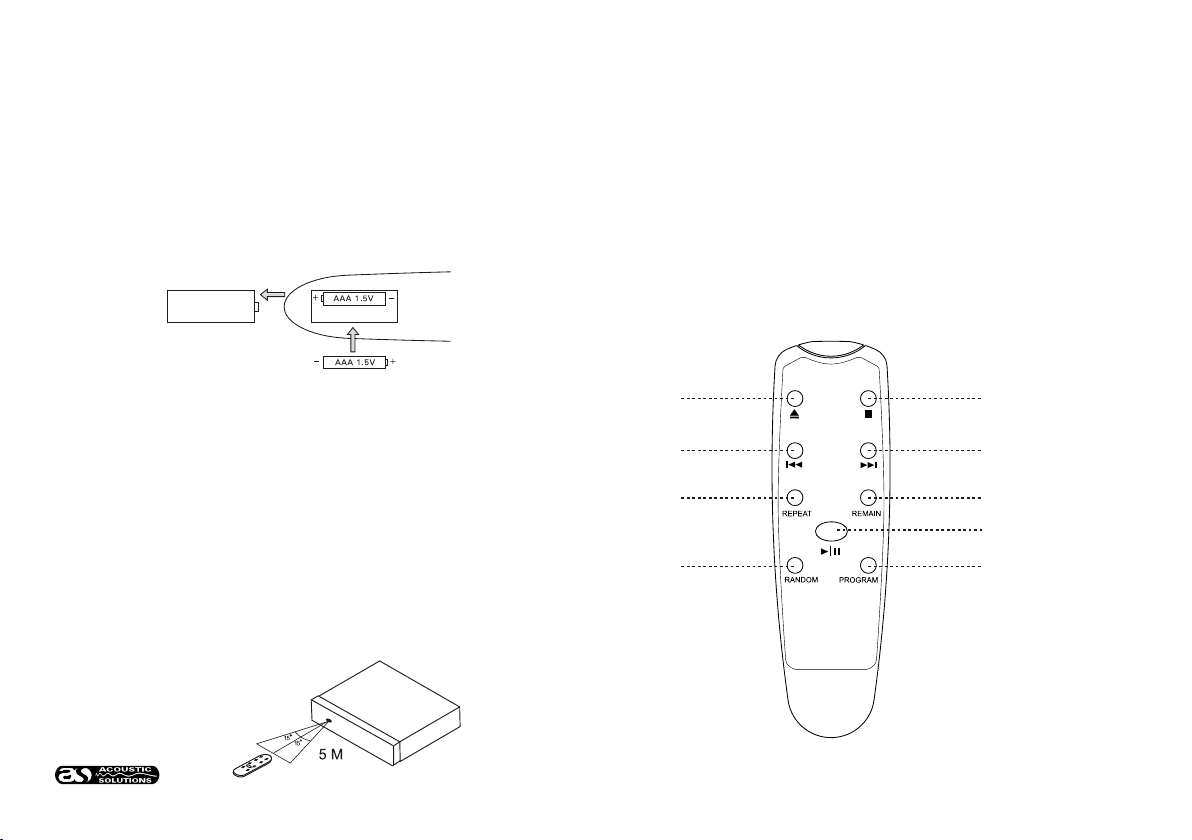
LOCATION OF CONTROLS: REMOTE CONTROL UNIT
A. OPEN/CLOSE button
B. SEARCH/SKIP BACK
C. REPEAT
D. RANDOM
E. STOP / CLEAR
F. SEARCH/SKIP FORWARDS
G. REMAIN
H. PLAY / PAUSE
I. PROGRAM
USING THE REMOTE CONTROLLER CORRECTLY
• Point the Remote Controller at the REMOTE SENSOR located to
the right of the CD display window. Press the button required where its
function is the same as the corresponding control on the main unit.
• When there is a strong ambient light source, the performance of
the infrared REMOTE SENSOR may be degraded, causing unreliable
operation.
• The recommended effective distance for remote operation is up to 5
metres (19 feet).
NOTE:
If the Remote Controller is not to be used for a long time, remove the
batteries to prevent possible damage through battery leakage.
Do not mix different types of battery, or old batteries with new ones.
Effective
range
INSTALLING THE BATTERIES
1. Remove the battery cover.
2. Insert two AAA 1.5V batteries making sure the polarity (+ or -) of each
battery matches the polarity marks inside the unit.
3. Close the battery cover.
Remove batteries when they are exhausted or if the remote control is
not used for a long time.
When batteries become weak, the operating distance of the Remote
Controller is greatly reduced indicating that you need to replace the
batteries.
REMOTE CONTROL
4
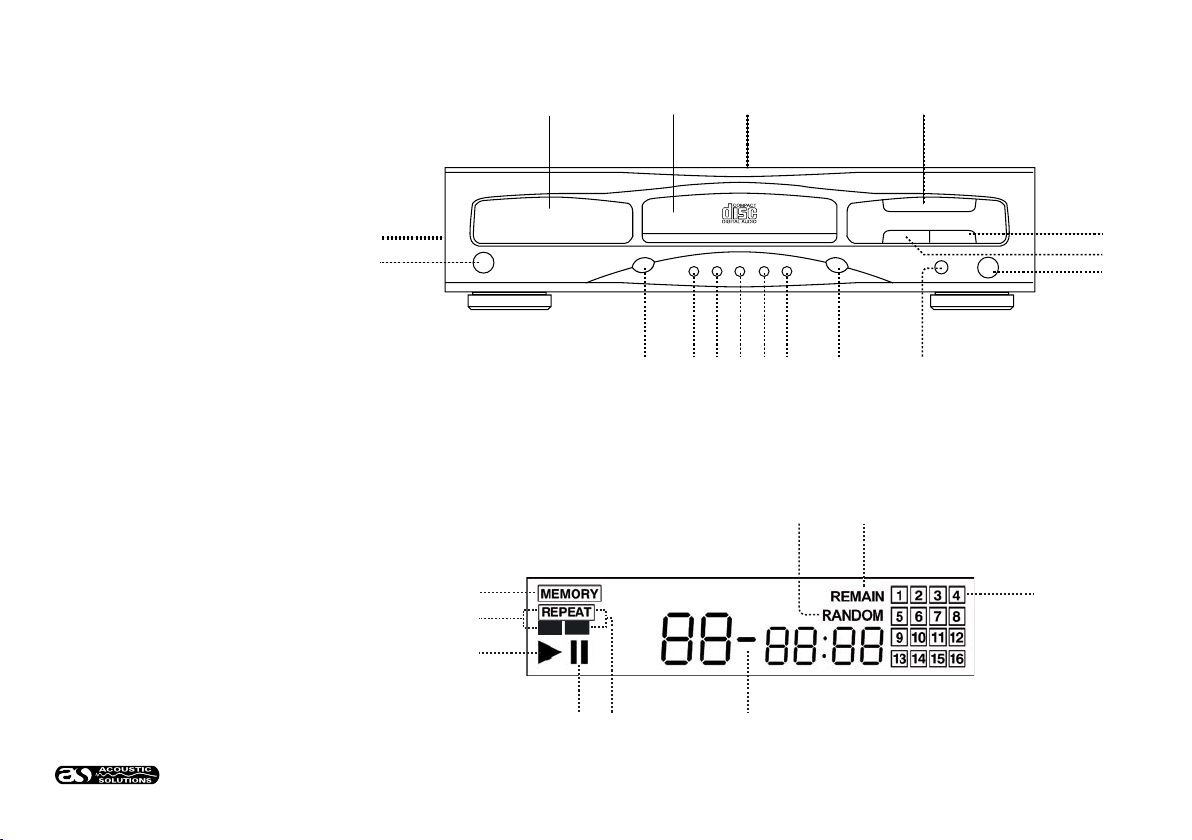
FEATURES AND CONTROLS: MAIN UNIT
DISPLAY WINDOW
1. POWER SWITCH button
2. AC Mains Lead
3. DISPLAY Window
4. DISC Tray
5. AUDIO Output Socket
6. PLAY/PAUSE button
7. STOP button
8. PROGRAM button
9. HEADPHONE volume
10. HEADPHONE jack
11. OPEN/CLOSE button
12. SEARCH FORWARD / SKIP TRACK FORWARD
13. SEARCH BACKWARDS / SKIP TRACK BACK
14. REPEAT button
15. RANDOM button
16. REMAIN button
17. REMOTE SENSOR
1. PLAY indicator
2. REPEAT ONE indicator
3. MEMORY indicator
4. RANDOM indicator
5. REMAIN indicator
6. MUSIC CALENDAR
7. PROGRAM/TRACK NUMBER/TIME indicator
8. REPEAT ALL indicator
9. PAUSE indicator
5

COMPACT DISCS
LOADING AND UNLOADING DISCS
8 cm disc Label surface
Disc tray
12 cm disc Label surface
Disc tray
If the disc tray is blocked while opening, the tray will stop and close
automatically after a few seconds.
3. When the disc tray has opened fully, remove a 12cm disc from its case
and place it carefully in the tray with the label side facing up, or remove
an 8 cm disc from its case and place it correctly in the inner groove of
the tray with the label side facing up.
NOTE:
Only load one disc at a time into the disc tray.
The side opposite the label is the signal side. Handle the disc carefully to
avoid leaving ngerprints on the disc surface.
4. To close the disc tray, press the OPEN/CLOSE button again. When the
tray with a correctly loaded disc is fully closed, the disc will start turning
automatically, and the total number of tracks will be read. The disc will
then stop and the TRACK display will change from "00" to indicate
the total number of tracks. The MUSIC CALENDAR will display the
total number of tracks (to a maximum of 16) and the TIME display will
show the total playing time of the disc in minutes and seconds. The CD
player will be set to the disc play standby mode.
5. The disc tray can be opened at any time by pressing the OPEN/
CLOSE button. Remove the disc only after the tray has fully opened.
CAUTION:
• Do not put anything except a compact disc into the tray. Foreign
objects can damage the mechanism.
• Do not force the tray by hand during the opening and closing
operations.
• To avoid dirt and dust entering the mechanism, keep the disc tray
closed when the CD player is not in use.
• Never load more than one disc into the disc tray.
This unit has been designed to play 8cm or 12cm compact discs bearing
the identication logo below. No other discs can be played.
• Always place the compact disc in the disc tray with the label facing
upward. Compact discs can be played on one side only.
• To remove a disc from its storage case, press down on the centre of
the case and lift the disc out, holding it carefully by the edges.
• Fingerprints and dust should be carefully wiped off the disc's signal
surface (glossy side) with a soft cloth. Unlike conventional records, the
compact disc has no grooves to collect dust and microscopic debris so
gently wiping with a soft cloth should remove most particles. Wipe with
a straight motion, from the inside to the outside of the disc. Small dust
particles and light stains will have absolutely no effect on reproduction
quality.
• Never use such chemicals as record cleaning sprays, antistatic sprays
or uids, benzene or thinners to clean compact discs. Such chemicals
would irreparably damage the disc's plastic surface.
• Discs should be returned to their cases after use to avoid serious
scratches that could cause the laser pickup to skip.
• Do not expose discs to direct sunlight, high humidity, or high
temperatures for extended periods. Long exposure to high
temperatures can warp a disc.
• Do not stick paper or write anything with a ball-point pen on the disc
surface.
HANDLING THE DISCS
1. Press the POWER switch.
(If the disc tray is already open, it will close automatically.)
2. Press the OPEN/CLOSE button. The disc tray will open.
The correct way to
handle a CD
6

CONTROL AND OPERATION
NORMAL DISC PLAY
Before playing a disc, check the CD player's power cord and output cable
connections (refer to the section CONNECTING THE COMPACT DISC
PLAYER).
1. Switch on the amplier and set its input selector to the correct position
for the CD player, or plug the headphones into the headphones socket.
Adjust the headphones volume control to minimum.
2. Press the POWER switch.
3. Press the OPEN/CLOSE button to open the disc tray, and load a disc.
4. Press the OPEN/CLOSE button again to close the disc tray.
5. Press the PLAY button. Disc play will start from the beginning of the
This section describes the compact disc player's controls in the order in
which you would normally use them. Follow the instructions step-by-step
and in a very short time you will master complete operation of the unit.
If the disc is correctly loaded, the following information will be displayed.
EXAMPLE: There are 8 tracks on the disc.
The disc has a total playing time of 48 minutes and 54 seconds. The CD
player will be set to the standby mode.
NOTES:
• After the disc tray is fully closed, "NO" may be displayed. This means
that the disc is improperly loaded (most likely upside down). To check,
open the disc tray again and reload the disc correctly.
• If the disc tray is blocked while closing, the tray will stop and open
automatically after a few seconds. If this happens, check the disc tray.
Remove any obstacle before closing the tray again.
rst track. If the desired track has been selected by or button
before pressing the PLAY button, disc play will start with the selected
track when the PLAY button is pressed. Adjust the headphones volume
control to a desired listening level when using the headphones.
6. When the last track has nished playing, the CD player will return to
the standby mode.
NOTES:
If a disc is seriously scratched, or too dirty, disc play may not start.
If an improperly centered disc is played, noise can be heard in the
mechanism. The use of such discs should be avoided.
NORMAL OPERATION
When switching on the power, the TRACK display will show "_ _" for 5
seconds
If there is a disc, the display will show the total number of tracks and total
playing time.
If there is no disc, the display will show " no "
7

TO INSERT A DISC
Press OPEN/CLOSE button, the display will show "1 0.00".
TO START PLAY
Press the PLAY button. Disc play will start. The display will show the PLAY
indicator, track number and the elapsed time of the track being played, and
the MUSIC CALENDAR will display the total number of tracks ready to play
(maximum 16 tracks).
TO STOP DISC PLAY
Press the STOP button. Disc play will stop, the PLAY indicator will go off,
the TRACK display will show the total number of tracks, MUSIC CALENDAR
will display the numbers of tracks on the disc (total 16 tracks only), and the
TIME display will show the total playing time.
TO TEMPORARILY STOP DISC PLAY
Press the PLAY/PAUSE button. Disc play will stop at the current play position.
The PAUSE indicator will display and the track number will ash. Press the
PLAY/PAUSE button again to resume disc play from the pause mode. The
PAUSE indicator will go off.
TO LISTEN TO DESIRED TRACKS
Press the SKIP buttons to select the desired track. The number
of the selected track will be shown on the TRACK display.
TO SKIP TO THE NEXT TRACK
Example: To skip ahead to the beginning of track 5 while track 4 is
playing:
Press the button once.
Disc play starts with track 5.
The CD player will skip ahead to the next track each time when the
button is pressed. Advance to the track that you want to hear. The CD
player can be advanced to the last track in this way. Once the beginning of
the last track is reached, the CD player will not advance any further if the
button is pressed. Disc play will start at the beginning of the last track
when the button is released.
TO SKIP BACK TO THE PREVIOUS TRACK
Example:
To skip to the beginning of track 3 while track 4 is playing...
Press the button once, the player will skip to the beginning of current
track (track 4).
8

Press the button again, the player will then skip "to the beginning of
previous track (track 3)".
TO SEARCH FOR A PARTICULAR POINT QUICKLY
During disc play mode, press the or for fast-forward or fast-
reverse play through a track.
During disc play mode
When or button is being pressed, the sound will be attenuated to
about 1/4 of the normal disc play volume level.
During the pause mode
No sound will be heard during the search operation.
TO CHECK THE DISC REMAINING PLAY TIME
During normal disc play, when the REMAIN button is pressed once, the
REMAIN indicator will display and the remaining number of tracks and
remaining playing time of this track will be shown on the display. When
this button is pressed again, the TIME display will return to the elapsed
time of the track being played, and the REMAIN indicator will go off.
NOTE:
If the track playing is beyond the 32nd track, and the REMAIN button is
pressed, " " will show on the TIME display.
PROGRAMMED DISC PLAY
It is not possible to enter programs during disc play. Press the STOP
button rst, then enter a program.
ENTERING A PROGRAM
1. Press the STOP button.
2. Press the PROGRAM button, the MEMORY indicator will display, the
TRACK display will show "Pr" and the TIME display will show "P:01".
Select a track number using or buttons.
3. Press PROGRAM button, the rst selected track is now stored in the
program memory. TIME display will show "P:02". Select subsequent
track numbers using or buttons.
4. Repeat step 3 until all the desired tracks are programmed in the
memory (up to a total of 21). If more than 16 selections are entered,
they will not all be shown on the MUSIC CALENDAR.
NOTES:
When a track nishes during disc play, the nished track will automatically
disappear from the MUSIC CALENDAR.
To modify a program, press the STOP button and restart from step 2.
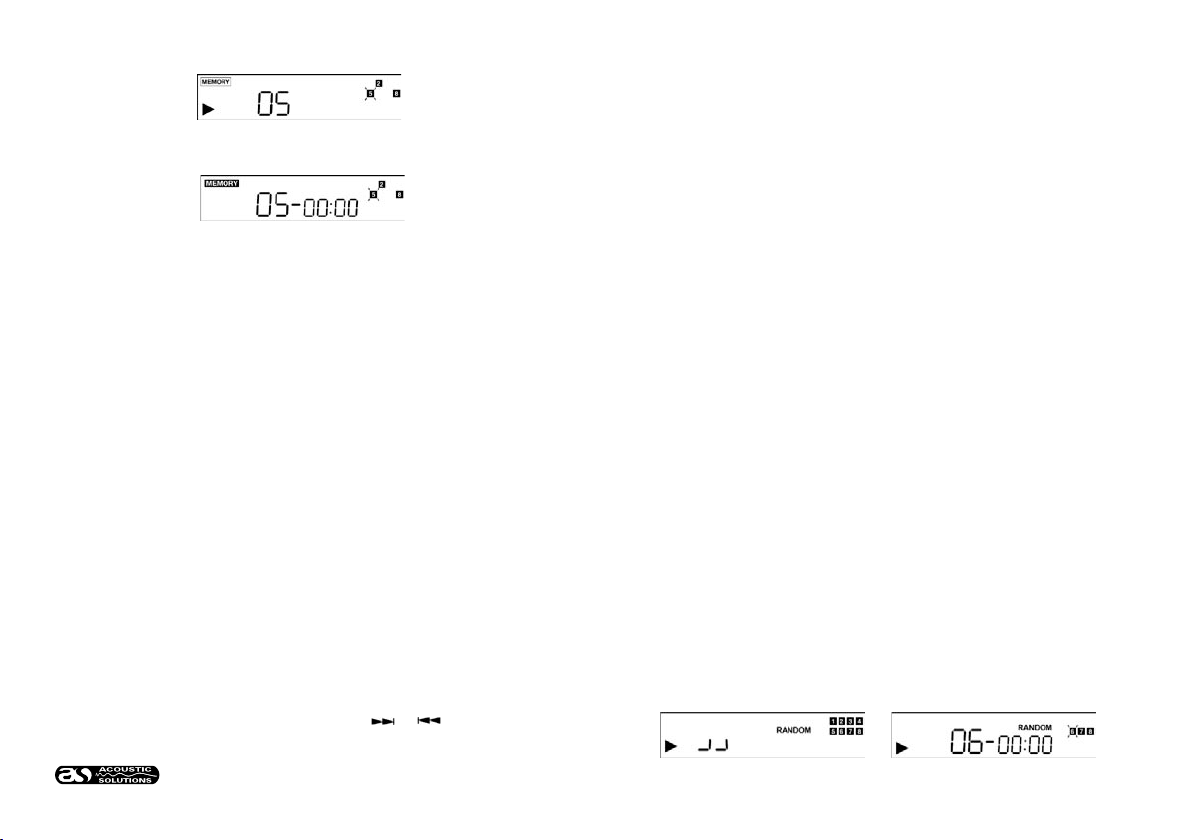
EXAMPLE
To play track 5, track 2 and track 8 in programmed sequence.
a) Select the rst program track 5 using button.
b) Press PROGRAM button, select the second program track 2, using
button.
c) Press PROGRAM button, select the third program track 8 using
button.
9
TO REVIEW THE PROGRAM CONTENTS
1. Press the STOP button once during programmed disc play.
2. Press the PROGRAM button. All the track numbers stored in
the program memory will automatically be shown on the MUSIC
CALENDAR (up to 16 tracks can be shown).
TO CLEAR THE PROGRAM MEMORY
1. During programmed disc play, press the STOP button once to return
the CD player to the standby mode.
2. Press the STOP button again, the program memory will be cleared.
NOTE:
The program memory will also be cleared if the CD player’s power is
switched off.
REPEAT DISC PLAY
Use the REPEAT button for the repeated playing of one track, all the
tracks on the disc, or to repeat all programmed tracks.
FOR REPEATED PLAYING OF ONE TRACK
1. Press REPEAT button once, the REPEAT ONE indicator will display.
2. Select the desired track for playing using or buttons. The track
number will be shown on the TRACK display.
d) Press the PLAY button.
e) The rst programmed track starts to play.
f). When all of the programmed tracks have nished playing, the LCD
display will show the total number of tracks and total playing time.
3. Press the PLAY button, the PLAY indicator will display.
4. The selected track will be played through to its end, and the CD player
will automatically return to the beginning of the track. Repeat disc play
will continue until the STOP button is pressed.
5. If the REPEAT button is pressed twice (the REPEAT ONE indicator will
go off), repeat play will end, and the normal disc play will continue from
that point.
6. When the last track has nished playing, the CD player will return to the
stop mode, and the PLAY indicator will go off.
FOR REPEAT DISC PLAY OF ALL THE TRACKS ON A DISC
1. Press the REPEAT button twice, the REPEAT ALL indicator will
display.
2. Press the PLAY button, the PLAY indicator will display.
3. The disc will be played through to the end of the last track, and the CD
player will automatically return to the beginning of the rst track. Repeat
disc play will continue until the STOP button is pressed.
4. If the REPEAT button is pressed once (the REPEAT ALL indicator will
go off), repeat play will end, and normal disc play will continue from that
point.
5. When the last track has nished playing, the CD player will return to the
stop mode, and the PLAY indicator will go off.
Repeat play function can be activated during program playing.
RANDOM
The CD player can play tracks in random order.
1. Press the RANDOM button.
2. Press the PLAY button, an indication appears on the TRACK display
while the player is randomly selecting
the tracks.
3. After a track is chosen, disc play starts.
NOTE:
If RANDOM button is pressed during play, random play starts from the end
of that track.
10
TROUBLESHOOTING
If you have followed the instructions, but are having difculty operating your compact disc player, locate the SYMPTOM
in the left column below. Check the corresponding POSSIBLE CAUSE and CORRECTIVE ACTION columns to locate
and remedy the problem.
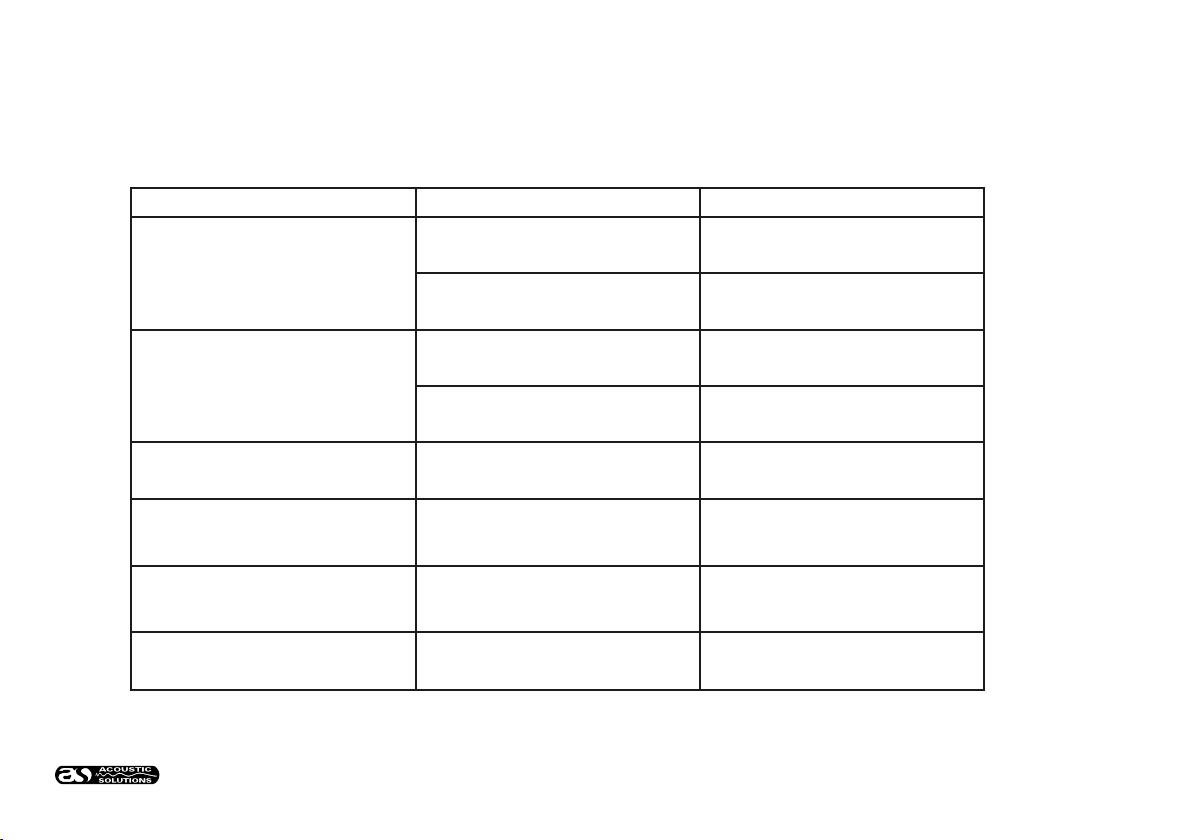
SYMPTOM POSSIBLE CAUSE CORRECTIVE ACTION
No power when the POWER switch is
set to ON.
Poor power plug connection at the
AC outlet.
Insert the power plug rmly into the
AC outlet.
Blown fuse (for UK plug). Check or replace 3A plug fuse (for
UK plug).
Disc play does not start. The disc is loaded upside down. Reload the disc with the label side
up.
The disc is dirty. Clean the disc.
No sound. Improper output cable connections Make sure that the amplier controls
are set properly.
Sound skips. The CD player is subject to vibrations
or physical shock.
Change the installation location.
Programmed disc play will not
function
The CD player is in the normal disc
play mode.
Press the STOP button, and then
program the tracks.
Hum. Loose cable connections. Firmly connect all audio plugs.
11

SPECIFICATION
POWER SUPPLY
AC : 220-240V/50Hz AC, non-switchable single
voltage (for exact voltage, please refer to
the rating information on the back-plate).
GENERAL
Power Consumption : 15 Watts (AC)
Dimensions : 420(w)x280(d)x80(h)mm
Net Weight : 3.5kg
We trust you are completely satised with this product from Acoustic Solutions Limited, however please feel free to contact us if you experience any
difculties, or if you would like to express your views regarding our products.
Acoustic Solutions Limited
Grand Union Buildings
54 High Street
Weedon Bec
Northampton
NN7 4QD
United Kingdom
Telephone +44 (0)1327 340601
Fax: +44 (0)1327 342298
www.acousticsolutions.co.uk
email: [email protected]
Through the process of continuous improvement, Acoustic Solutions Limited reserves the right to change or alter specications without prior notice.
E&OE
CONTACT DETAILS
CD PLAYER
Pick up : 3-beam, semiconductor laser
Encoding : 16 bits linear
Frequency response : 20 Hz - 20 kHz ±1dB
Total harmonic distortion : <0.08 (1 kHz)
Signal-to-noise ratio (S/N) : >90dB
Channel separation : > 70 dB (1 kHz)
Wow and utter : Below measurable limit
12
Other ACOUSTIC SOLUTIONS Speakers manuals

ACOUSTIC SOLUTIONS
ACOUSTIC SOLUTIONS SP110 User manual

ACOUSTIC SOLUTIONS
ACOUSTIC SOLUTIONS 8994754 User manual

ACOUSTIC SOLUTIONS
ACOUSTIC SOLUTIONS 4144845 User manual

ACOUSTIC SOLUTIONS
ACOUSTIC SOLUTIONS B100 User manual

ACOUSTIC SOLUTIONS
ACOUSTIC SOLUTIONS DX 333 User manual

ACOUSTIC SOLUTIONS
ACOUSTIC SOLUTIONS Q08S User manual

ACOUSTIC SOLUTIONS
ACOUSTIC SOLUTIONS KW-TB001 User manual

ACOUSTIC SOLUTIONS
ACOUSTIC SOLUTIONS WJ-202 User manual

ACOUSTIC SOLUTIONS
ACOUSTIC SOLUTIONS DS 222 User manual

ACOUSTIC SOLUTIONS
ACOUSTIC SOLUTIONS 4244051 User manual


