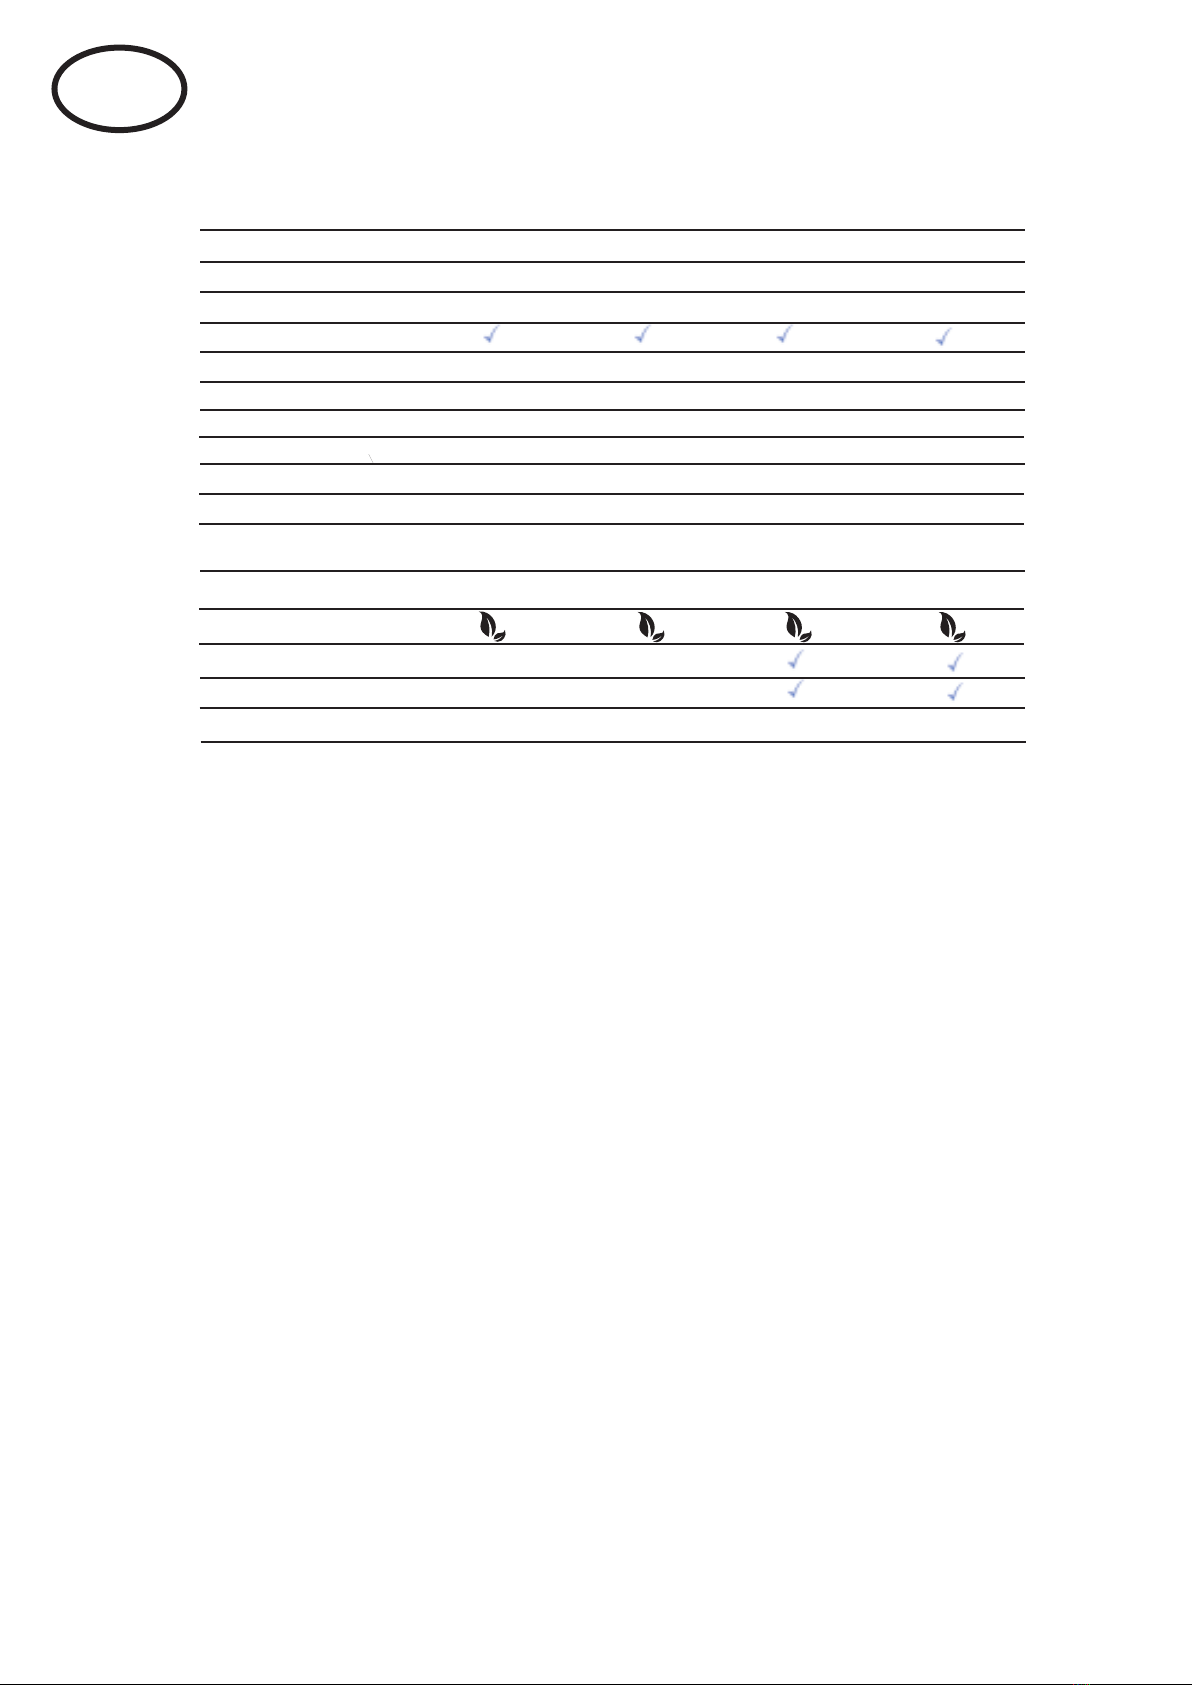
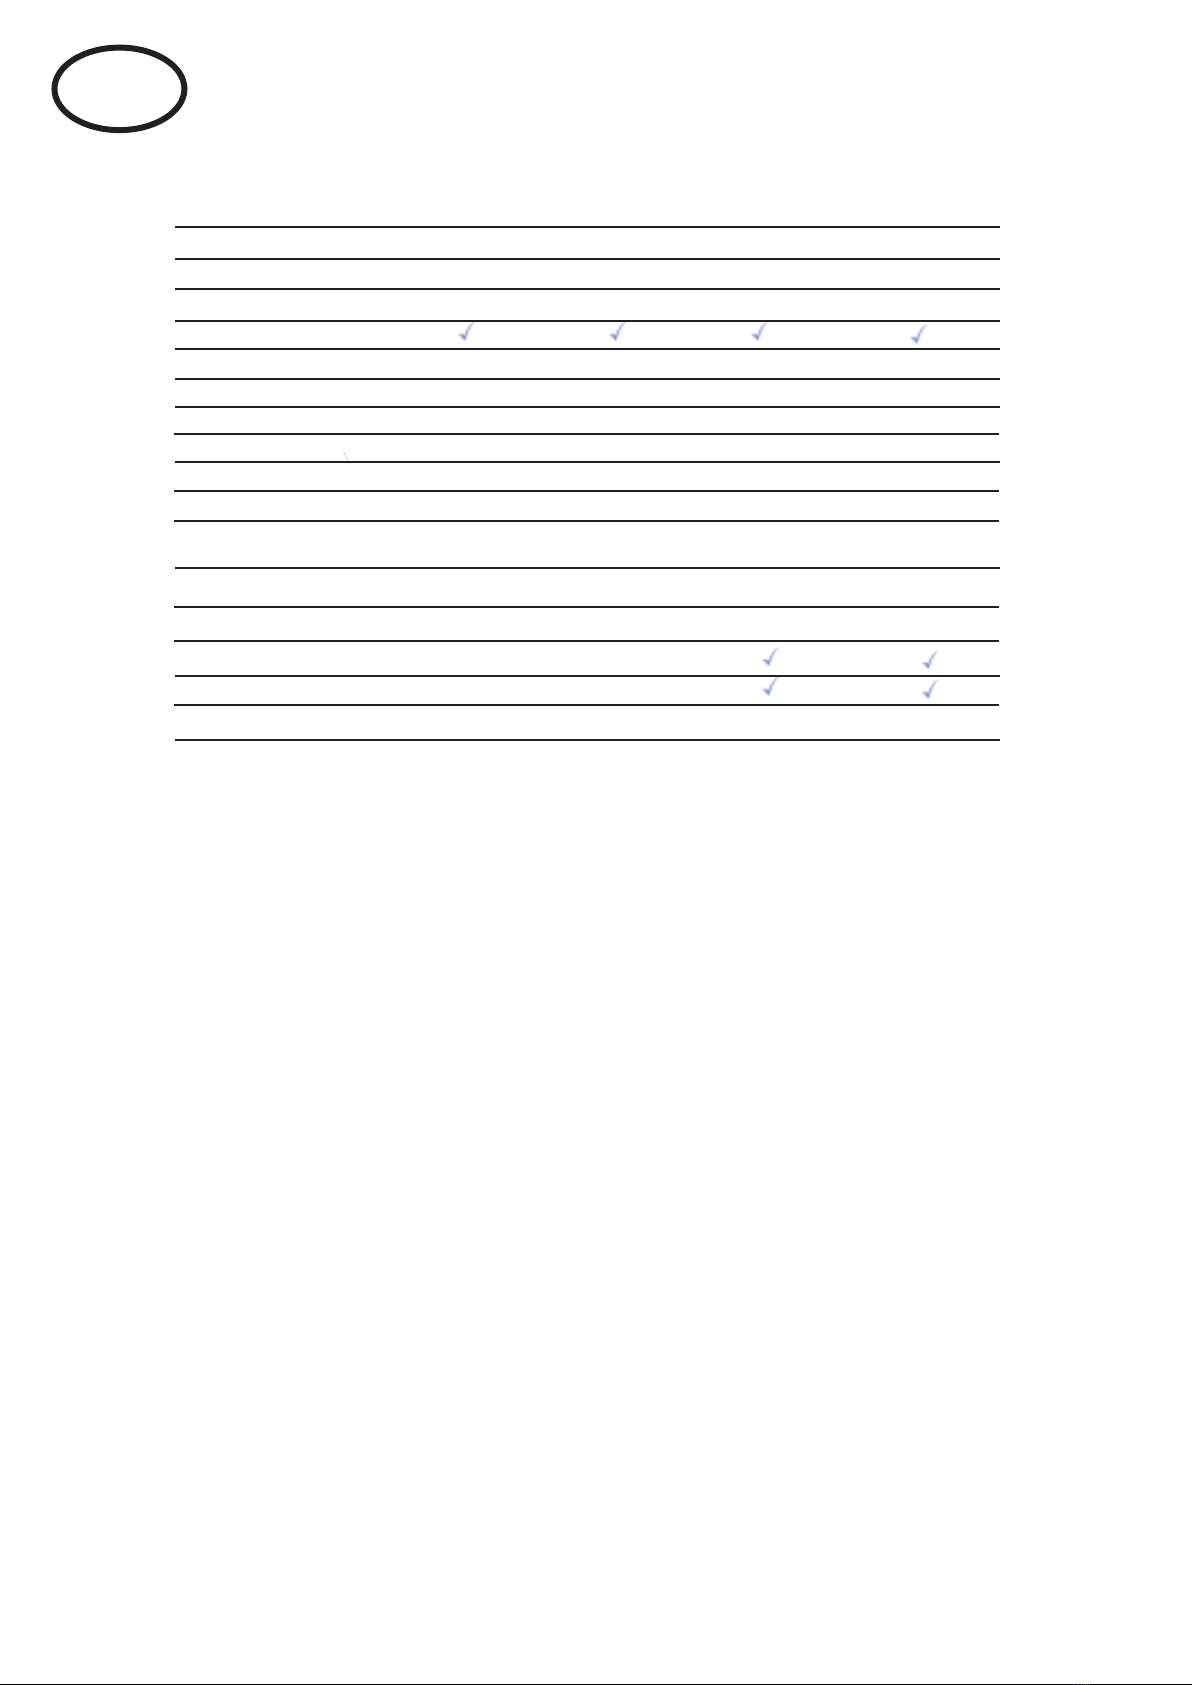
acropaq AL420 User manual

Handleiding
Lamineermachines AL420 (A4)
NL
ORIGINAL
POUCHES
SCAN TO VIEW
Or visit website:
www.acropaq.com/LP
AL320 (A3)
Lamineersets AL490 (A4)
AL390 (A3)
starters-kit

NL Handleiding AL420-AL320-AL490-AL390 pag 1
43
1 2
4
3
5
610
7
4 3 2
4 3 2
19
19
19
20
26
29
8 9
43
1 2
4
3
5
AL420 / AL320 AL490 / AL390
1Ready indicator
2Invoeropening lamineerfolie (backloader!)
3ON/OFF schakelaar
4ABS hendel (antiblokkeersysteem)
5Uitvoeropening lamineerfolie
6Snijlineaal
7Snijhoofd (in startpositie)
8Geleiderail
9Meetinstrument
10 Hoeksnijder
11 Inbegrepen lamineerhoezen
starters-kit
11
11
AL420 (starterskit - 80mic) AL320 (starterskit - 80mic) AL490 (80mic) AL390 (80mic)
5x A4
5x A5
5x formaat 54x86mm
5x A3
5x A5
5x formaat 54x86mm
50x A4
50x A5
50x A6
50x formaat 54x86mm
50x A3
50x A4
50x A5
50x formaat 54x86mm

NL
Technische Eigenschappen
Handleiding AL420-AL320-AL490-AL390 pag 2
Veiligheidsinstructies
1. Gelieve deze aanwijzingen aandachtig door te lezen, en ze op te volgen als u
uw ACROPAQ laminator gebruikt
2. Dit document dient bijgehouden te worden voor toekomstig gebruik
3. Voorkom schade aan de stekker en kabel, gebruik de laminator niet mochten deze
beschadigd geraken
4. Gebruik deze laminator niet op hete oppervlakten of in vochtige omgevingen.
Bescherm uw ACROPAQ laminator voor stof en direct zonlicht
5. Gebruik geen solventen of agressieve reinigingsmiddelen
6. Plastifieer NOOIT metalen objecten
7. Laat nooit uw kind ALLEEN de laminator gebruiken
8. Als de machine niet in gebruik is, gelieve de stekker uit de stopcontact te trekken.
9. In geval van rook of geur de stekker ONMIDDELlJK uit de stopcontact trekken.
10. De stekker NOOIT met natte handen aanraken.
11. De schakelaar dient in positie "OFF" te staan vooralleer de machine wordt aangezet
12. Gebruik enkel originele ACROPAQ lamineerhoezen om een goed resultaat te behalen.
Voor AL320/AL390 max A3 formaat, en AL420/AL490 max A4 formaat.
13. Nooit warmtegevoelig of ander thermisch-gevoelig papier plastificeren
14. Het lamineren van een vochtig blad resulteerd in een slecht resultaat
15. Als de machine warm is, nooit koud-Iamineerhoezen invoeren
16. De hoezen mogen niet worden geknipt vooraleer ze in de machine worden ingevoerd
17. Losse kledingsdelen, lang haar, sieraden, stropdassen en andere losse objecten
mogen niet in de buurt van de machine komen
18. Enkel in een gesloten en droog ruimte gebruiken.
AL420 AL320 AL490 AL390
Gebruik Thuis & Kantoor Thuis & Kantoor Thuis & Kantoor Thuis & Kantoor
Ar
Type Warm Warm Warm Warm
2 2 2
Opwarm
ECO
- -
Hoeksnijder - -
Afme

NL
Uitsluiting van aansprakelijkheid
Wij aanvaarden geen aansprakelijkheid voor de juistheid van deze gebruiksaanwijzing
of de informatie die betrekking heeft op technische eigenschappen van het product.
Het in deze documentatie beschreven product en de bijbehorende accessoires worden
voortdurend verder ontwikkeld en verbeterd. Daarom behouden wij ons het recht voor
om componenten, accessoires, technische specificaties en deze gebruiksaanwijzing
zonder voorafgaande aankondiging op elk gewenst moment te wijzigen.
Handleiding AL420-AL320-AL490-AL390 pag 3
Veiligheidsaanwijzing
De contactdoos moet in de buurt van de apparaat aangebracht en eenvoudig
toegankelijk zijn. Op deze wijze kunt u in geval van nood de apparaat snel van
het net scheiden.
Kenmerken
Bescherming en veredeling van uw documenten. Lamineert foto's, documenten,
grafieken, pasjes enzovoort .Het apparaat werkt met 2 verwarmingsrollen,
heeft een korte opwarmtijd, een snelle doorvoertijd en is tot wel 75% efficiënter dan
- Thermo-lamp geeft de bedrijfstoestand „Ready“ aan
- Automatische uitschakeling bij oververhitting
- Hoogwaardig verwarmingssysteem voorkomt vorming van rimpels of bellen
- Opwarmtijd slechts 1.5-2 minuten
- Afkoeltijd op kamertemperatuur ca. 15 minuten.
- Dikte van de folie minimaal 80 mic en maximaal 125 mic
soortgelijke lamineertoestellen.

NL Handleiding AL420-AL320-AL490-AL390 pag 4
Voorgeschreven gebruik
Met dit lamineerapparaat kunnen heetlamineerfolies en koudlamineerfolies worden
bewerkt. Er kunnen foto's, kaarten, documenten, papier enzovoort tot een totale dikte
van 0,5 mm worden gelamineerd. Elk ander gebruik is in strijd met de voorschriften.
Eigenmachtige wijzigingen of ombouw zijn niet toegestaan.
WARM/HEET lamineren
1. Steek de netstekker in een goed bereikbaar stopcontact.
Let op: Controleer of de voedingsspanning die op het apparaat vermeld staat
overeenkomt met die van het elektriciteitsnet (220 – 240 V, 50Hz).
2. Schakel de Aan/Uit-schakelaar aan de rechterbovenkant van het
apparaat in: ‘ON’
3. De aandrijfmotor voor de transportrollen start. Na ongeveer 1.5-2 minuten is
de juiste bedrijfstemperatuur bereikt en kleurt het indicatielampje rood.
4. Leg het te lamineren voorwerp zodanig in het lamineerhoesje dat aan alle
kanten 3 à 5 mm afstand tot de folierand overblijft.
Opmerking: Gebruik uitsluitend heetlamineerfolies.
5. Steek de folie samen met het te lamineren voorwerp in de invoeropening van
het lamineerapparaat. De gesloten kant van de folie moet het eerst in het
apparaat worden ingevoerd.
Opmerking: Om vouwen in de lamineerfolie te voorkomen
mag nooit de open kant van de lamineerfolie als eerste in de
invoeropening van het lamineerapparaat worden gestoken.
Bij het invoeren van de folie beslist de instructies op de
invoeropening opvolgen. Het lamineerproces verloopt automatisch.
Let op: De eruit komende folie is na het lamineren zeer heet
en zacht. Daarom voorzichtig omgaan met de gelamineerde folie.
TIP: Om het gelamineerde voorwerp plat te maken kan het onder
een boek of ander zwaar voorwerp worden gelegd.
5
4 3 2
4 3 2
191919 20 2629
AL490 - AL390

NL Handleiding AL420-AL320-AL490-AL390 pag 5
Probleemoplossing
Klem zittende folie losmaken
Het lamineerapparaat is uitgerust met de functie „ABS Jam Release“,
om vastgelopen folie snel weer te kunnen verwijderen.
1. Schakel het apparaat uit als de folie blokkeert en duw de « ABS »-hendel
aan de achterkant van het apparaat naar links.
2. Houd het lamineerapparaat vast en trek de folie samen met het te lamineren
voorwerp uit de invoeropening van het lamineerapparaat.
3. Vervolgens moet het apparaat waarschijnlijk enkele malen worden gereinigd,
zoals beschreven onder het kopje 'Verzorging en reiniging'.
4. Als de folie voortdurend klem komt te zitten of klem zittende folie niet meer
uit het lamineerapparaat kan worden getrokken, betekend dit dat er een andere
lamineerfolie reeds in uw machine vast zit. Het verwijderen hiervan kan
onmogelijk zijn.
TIPS:
1. Zorg er altijd voor dat de hoes recht in de machine wordt gestoken
2. Een lamineerhoes moet ook altijd zo volledig mogelijk worden gevuld
Zo kunnen half gevulde hoezen vaak problemen geven
Lamineer dezelfde folie nogmaals om het lamineerresultaat te verbeteren.
Als u dikkere folie (100 μm, 125 μm) gebruikt, moet u het apparaat langer
laten opwarmen.
Gelamineerde folie is niet volledig transparant
Verzorging en reiniging
Aangekoekt materiaal en lijmresten op de transportrollen kunnen het lamineerresultaat
verslechteren. Daarom moeten de transportrollen regelmatig na gebruik worden
schoongemaakt: Die doe je door een gewoon gevouwen blad papier in de
invoeropening te steken als de machine warm is (moet zeker 10min eerst opstaan!).
Lijmresten worden door het eruit komend papier meegenomen. Deze handeling
enkele malen herhalen. Voor het vochtig afwissen van het apparaat altijd de stekker
uit het stopcontact trekken. Indien nodig kan de buitenkant worden afgewassen met
een doek die in milde zeep en schoon water is gedrenkt. Gebruik geen oplosmiddelen
of agressieve reinigingsmiddelen.

Klantendienst:
Dienst-na-verkoop telefoon:
Dienst-na-verkoop website:
Dienst-na-verkoop adres:
e-mail:
TRAAKEITNARAG
Laminator AL420-AL320-AL420-AL490
Gelieve deze garantiekaart in te vullen
en bij de machine te steken, tesamen
met uw aankoopbewijs.
Klantgegevens:
Straat, Huisnummer:
Postcode, Gemeente: Land:
Telefoonnummer, met landnummer (vb Belgie = +32):
E-mail:
Probleemomschrijving:
Aankoopsdatum:
Datum, Handtekening:
Opmerking:
Als u aanspraak maakt op de garantie, moeten de garantiekaart en het aankoopbewijs worden
bijgevoegd met de machine en waar mogelijk een gedetailleerde beschrijving van de storing.
Garantiekaarten die daarna afzonderlijk worden verzonden, worden niet geaccepteerd
+32 2 531 00 00
http://rma.acropaq.com
NL Handleiding AL420-AL320-AL490-AL390 pag 6
Naam, Voornaam:

Notice d’utilisation
FR
ORIGINAL
POUCHES
SCAN TO VIEW
Or visit website:
www.acropaq.com/LP
Plastifieuses AL420 (A4)
AL320 (A3)
Plastifieuses 4-en-1 AL490 (A4)
AL390 (A3)
starters-kit

FR
(COLD) / à chaud (HOT)
Notice d’utilisation AL420-AL320-AL490-AL390 pg 1
43
1 2
4
3
5
610
7
4 3 2
4 3 2
19
19
19
20
26
29
8 9
43
1 2
4
3
5
AL420 / AL320 AL490 / AL390
1Indication ‘READY’ --> appareil prêt à fonctionner
2Fente d’insertion (backloader!)
3Interrupteur ON/OFF
4Levier “ABS”: Éliminer le bourrage de pochette
5Fente de sortie
6Règle de coupe
7Tête de coupe (en position de départ)
8Rail de guidage
9Instrument de mesure
10 Arrondisseur d'angles
11 Pochettes de plastification incluses
starters-kit
11
11
AL420 (kit de démarrage) AL490 (80mic) AL390 (80mic)
5x A4
5x A5
5x formaat 54x86mm
5x A3
5x A5
50x A4
50x A5
50x A6
50x format 54x86mm
50x A3
50x A4
50x A5
AL320 (kit de démarrage)
50x format 54x86mm
50x format 54x86mm

FR
Données Techniques
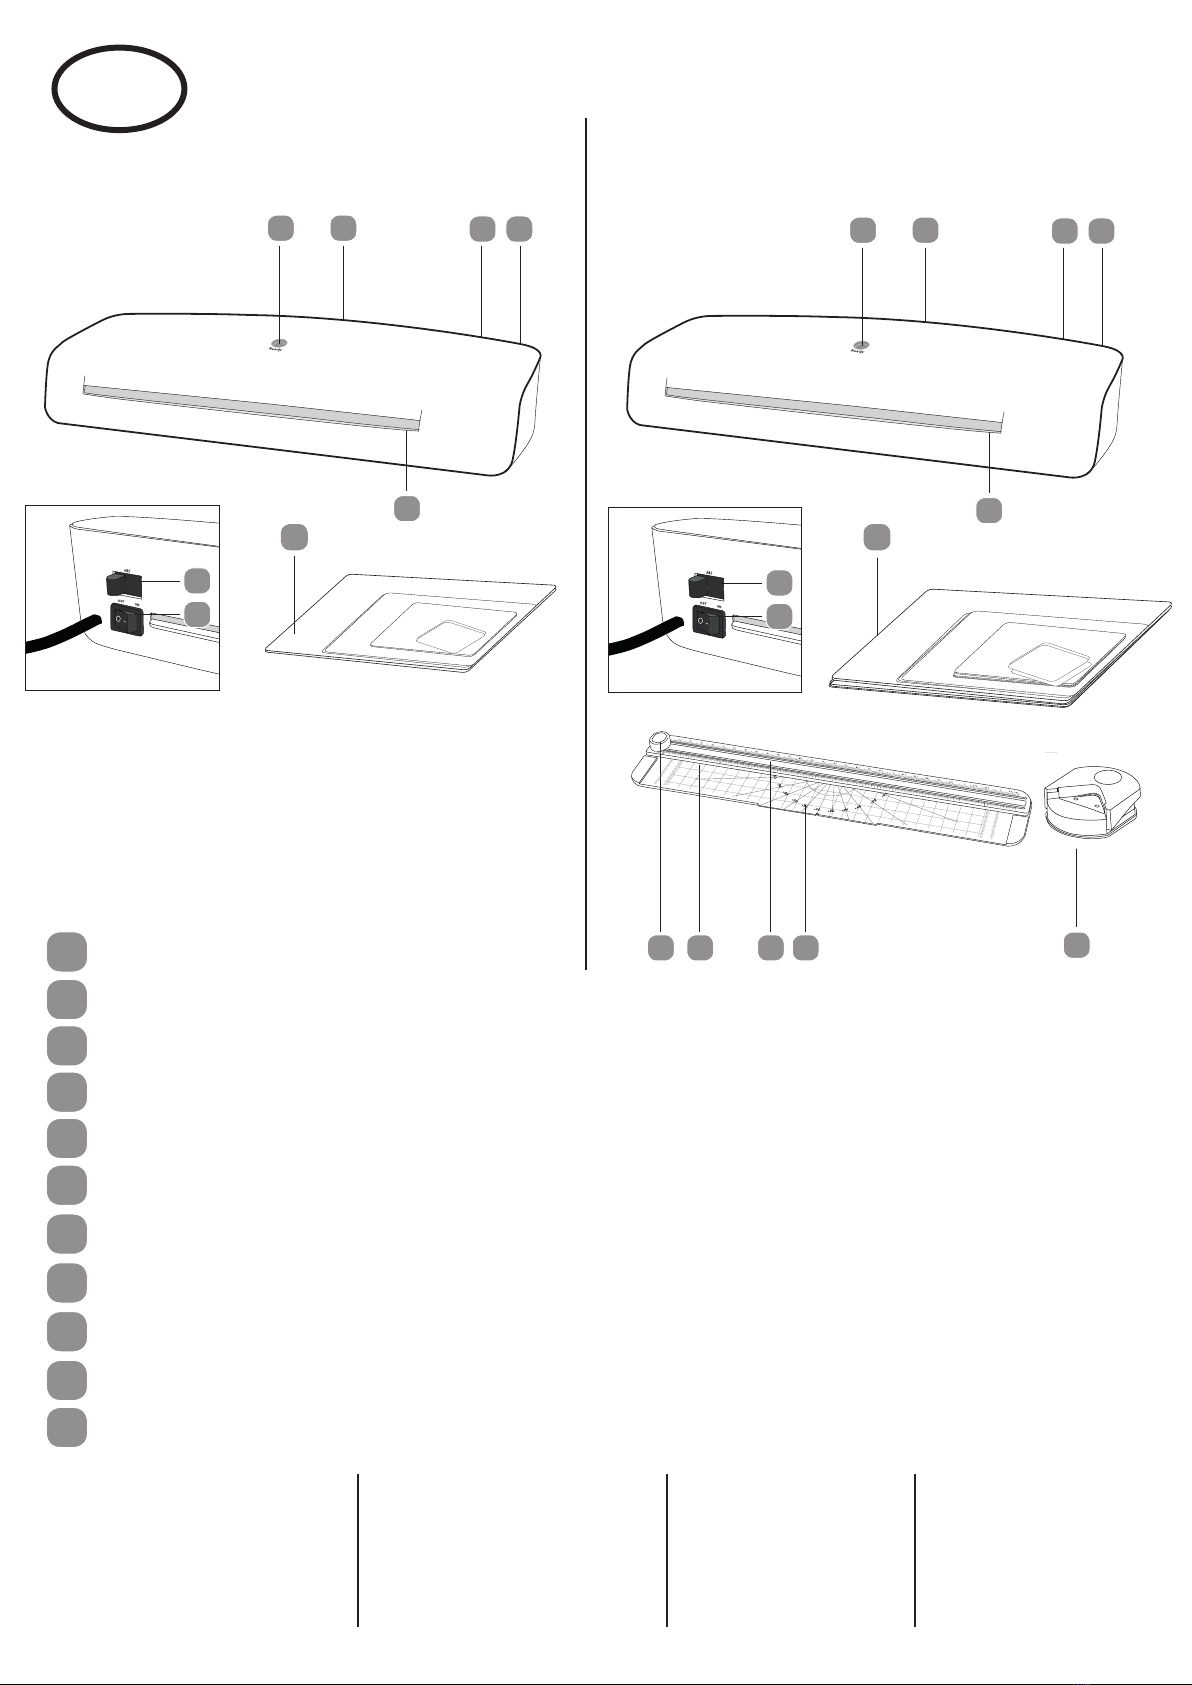
Notice d’utilisation AL420-AL320-AL490-AL390 pg 2
Consignes de sécurité
1. Veuillez lire attentivement ces instructions et en tenir compte lors de I'usage
de votre plastifieuse
2. Veuillez garder ce document
3. Evitez I'endommagement de la prise electrique ou du câble. Ne jamais torsader le
câble. Ne jamais utiliser la machine si le câble ou la prise electrique sont endommagés
4. Ne jamals utlliser la plastifieuse sur une surfaces chaude ou dans un environnement
humide. Protegez la plastifieuse contre des rayons de soleil et evitez la poussiere
5. Avant de nettoyer la plastifieuse, veuillez la retirer de la prise du courant
6. Ne jamais utiliser des dissolvant ou d'autres nettoyants aggressives
7. Ne jamais plastifiez des objets metalliques
8. Ne jamais laissez utiliser vos enfants la machine toute seule!
9. Retirez la machine de la prise quand elle n'est pas en marche
10. IMMEDIATEMENT debrancher la plastifieuse en cas d'odeur forte
11. Ne jamais toucher avec les mains humides
12. Avant de brancher la plastifieuse, mettez le bouton "marche / arret" sur "OFF".
13. Utilisez uniquement des pochettes de plastification originales ACROPAQ
Pour AL320/AL390 max A3, et pour AL420/AL490 max A4
14. Ne jamais plastifier du papier qui est thermique-sensitive
15. Le resultat de la plastification d'une feuille de papier humide n'est pas idéal
16. Ne jamais utiliser des pochettes de plastification a froid, quand la machine est chaufée
17. Ne jamais couper les pochettes avant la plastification
18. Gardez loin de la plastifieuse toutes parties de vêtement qui trainent, cravates,
cheveux, bijoux, etc. RISQUE DE BLESSURES I!!
19. A utiliser a l’interier
AL420 AL320 AL490 AL390
Usage Maison & Bureau Maison & Bureau Maison & Bureau Maison & Bureau
Ar
Levier ABS

FR
Exclusion de la garantie
Nous n'assurons pas de garantie en ce qui concerne l'exactitude des informations
qui se rapportent aux propriétés techniques ainsi qu'à la présente documentation.
Le produit décrit dans cette documentation et, le cas échéant, ses accessoires sont
soumis à une amélioration et à un perfectionnement technique constants. Pour cette
raison, nous nous réservons le droit de modifier, à tout moment et sans annonce
préalable, les composants, les accessoires, les spécifications techniques ainsi que
la documentation présente du produit.
Notice d’utilisation AL420-AL320-AL490-AL390 pg 3
Remarque de sécurité
La prise de courant devra se trouver près de l’appareil et devra être
facilement accessible. En cas de nécessité vous pourrez ainsi facilement
débrancher l’appareil.
Caractéristiques de performance
Protection et façonnage de vos documents. Plastifie photos, documents, graphiques,
papiers d'identité etc. d'une taille A4 max. L'appareil travaille avec 2 rouleaux
chauffants, a un temps d’échauffement rapide, a une vitesse de plastification rapide
- Un indicateur (READY) indique l’étape d'opération „Ready“
- Mise hors service automatique en cas de surchauffe
- Un système de chauffage de grande qualité empêche la formation de
vagues et de bulles
- Temps de mise en température d'env. 1.5-2 minutes
- Temps de refroidissement à température ambiante environ 15 minutes
- Epaisseur de la feuille de plastique d'au moins 80mic et de 125mic max
et a 75% d'économie d'énergie en plus par rapport aux plastifieuses équivalentes

FR Notice d’utilisation AL420-AL320-AL490-AL390 pg 4
Utilisation conforme aux prescriptions
Cette machine à plastifier permet de traiter des feuilles de plastification à chaud et
des feuilles de plastification à froid. Des images, des cartes, des documents, du
papier etc. d'une épaisseur totale de 0,5 mm max. peuvent être plastifiés. Tout autre
utilisation est considérée comme non conforme à son usage. Il n'est pas permis
d'apporter des modifications et des transformations sans concertation préalable.
Plastification à CHAUD
1. Branchez le câble électrique dans une prise de courant standard facile d'accès.
Attention: Contrôlez si les données relatives à la tension de l'appareil
correspondent bien à celles de votre réseau (220 - 240 V, 50 Hz).
2. Mettre en marche l'interrupteur Marche/Arrêt se trouvant sur le côté
droit de l'appareil: „ON“ .
3. Le moteur d'entraînement pour les rouleaux de transport se met en marche.
Au bout de 1.5-2 minutes, la température de service correcte est atteinte et
l’indicateur ‘READY’ devient rouge.
4. Introduisez le matériau à plastifier dans la poche de plastique de manière
à ce que de tous les côtés, il y ait une marge d'env. 3 à 5 mm par rapport
au bord de la feuille de plastique.
Remarque: N'utilisez que des feuilles à plastifier à chaud.
5. Introduisez la feuille de plastique avec la feuille à plastifier dans la fente
d'introduction de la machine à plastifier. Introduire ici en premier le côté
fermé de la pochette de plastification
Remarque: Afin d'eviter que la feuille de plastique forme un pli,
n'introduisez jamais le côté ouvert de la feuille de plastique dans
la fente d'introduction de la machine. Tenez compte des instructions
données au niveau de la fente d'introduction quand vous introduisez
la feuille de plastique. L'opération de plastification se fait
automatiquement.
Attention: La feuille de plastique sortante est très chaude et
molle après la plastification. C'est pourquoi il faut manier
prudemment le produit plastifié.
CONSEIL: Afin d'aplanir le produit plastifié, on peut presser
celui-ci sous un livre ou sous un autre objet plat et lourd.
4 3 2
4 3 2
191919 20 2629
AL490 - AL390

FR Notice d’utilisation AL420-AL320-AL490-AL390 pg 5
Elimination d'erreurs
Elimination de bourrage de feuille:
L'appareil de plastification est équipéie de la fonction „ABS Jam Release“
permettant d'éliminer rapidement les bourrages de feuille.
1. En cas de blocage de la feuille, mettre l´appareil hors circuit et pousser vers
la gauche le levier «ABS» se trouvant sur la face arrière droite de l'appareil.
2. Maintenez fermement la machine à plastifier et tirez la feuille de plastique
avec le document à plastifier hors de la fente d'introduction de la machine.
3. Ensuite, l'appareil doit vraisemblablement être nettoyé plusieurs fois,
comme décrit au point „Entretien et nettoyage“.
4. Si les bourrages par les feuilles de plastique se répètent continuellement,
cela signifie q'une feuille est restée coincée dans votre machine.
L'enlèvement d'une feuille tout à fait coincée peut être impossible.
CONSEILS:
1. Assurez-vous que la poche de plastique a été introduite bien
droite dans l'appareil.
2. Une pochette de plastification doit également toujours être
remplie aussi complètement que possible. Les pochettes à
moitié remplies peuvent causer des problèmes
Plastifiez cette feuille une nouvelle fois pour améliorer le résultat de la
plastification. En cas d’utilisation d’une pellicule plus épaisse (100 μm, 125 μm),
faire chauffer l’appareil un peu plus longtemps
La feuille plastifiée n'est pas parfaitement transparente
Entretien et nettoyage
Des dépôts et des restes de colle sur les rouleaux de transport peuvent influencer
le résultat de la plastification. C'est pourquoi les rouleaux de transport doivent être
nettoyés périodiquement après l'emploi: A cet effet, introduire une feuille de papier
pliée dans la fente d'introduction. Les restes de colle seront emportés par le papier
sortant. Répéter plusieurs fois l'opération. Retirez toujours la prise de secteur avant
d'effectuer un nettoyage humide de l'appareil. Si nécessaire, le boîtier peut être
nettoyé avec un savon doux et un chiffon trempé dans de l'eau claire. N'utilisez
jamais de solvants ou de produits d'entretien agressifs.

SAV:
Service hotline:
Service website:
SAV adresse:
e-mail:
eitnaragedetraC
N‘oubliez pas de joindre à l‘appareil le ticket
de caisse ainsi que cette carte de garantie
rempliee !
Coordonnées client :
Rue, n° d‘immeuble :
Code postal, Ville Pays:
Numéro de téléphone avec indicatif national (par example pour la Belgique --> +32):
Adresse e-mail :
Type de panne :
Date d‘achat :
Date/signature:
Note:
En cas de recours aux prestations de la garantie, joindre impérativement à l‘appareil défectueux la
détaillée du défaut.
+32 2 531 00 00
http://rma.acropaq.com
FR Notice d’utilisation AL420-AL320-AL490-AL390 pg 6
Nom, prénom :
FREE
PLASTIFIEUSE AL420-AL320-AL490-AL390

User Manual
EN
ORIGINAL
POUCHES
SCAN TO VIEW
Or visit website:
www.acropaq.com/LP
Laminators AL420 (A4)
AL320 (A3)
Laminator sets AL490 (A4)
AL390 (A3)
starters-kit

EN User Manual AL420-AL320-AL490-AL390 pg 1
43
1 2
4
3
5
610
7
4 3 2
4 3 2
19
19
19
20
26
29
8 9
43
1 2
4
3
5
AL420 / AL320 AL490 / AL390
1Ready indicator
2Laminator pouch infeed slot (backloader!)
3ON/OFF switch
4ABS switch (antiblocking system)
5Laminating pouch output slot
6Cutting ruler
7Blade head (in starting position)
8Guide rail
9Measuring gauge
10 Corner rounder
11 Included laminating pouches
starters-kit
11
11
AL420 (starterskit - 80mic) AL320 (starterskit - 80mic) AL490 (80mic) AL390 (80mic)
5x A4
5x A5
5x formaat 54x86mm
5x A3
5x A5
5x formaat 54x86mm
50x A4
50x A5
50x A6
50x format 54x86mm
50x A3
50x A4
50x A5
50x format 54x86mm

EN
Technical Data
User Manual AL420-AL320-AL490-AL390 pg 2
Safety Information
1. Please read this manual and observe the instructions and information when
operating this laminator
2. Preserve this manual for future reference
3. Prevent damage to the plug and cable. Do not operate this laminator if the cable
or plug is damaged
4. Do not use this laminator on hot surfaces or in humid environments and keep
away from direct sunlight and dust
5. Before cleaning unplug the laminator.
6. Never use any solvents or aggressive cleaning products
7. Never laminate metallic objects
8. Never let your children operate the device by their own!
9. Unplug when not in use
10. IMMEDIATELY unplug in case of smoke or strong smell
11. Never touch the plug with wet hands
12. Before plugging the laminator, make sure the switch is in position "OFF"
13. Only insert original ACROPAQ laminating pouches. For AL320/AL390 max A3,
14. Never laminate thermal paper, or other heat sensitive materials
15. Laminating a wet sheet of paper leads to poor results
16. Never use cold-laminating-foils, what machine is warm
17. Never cut the pouch before lamination
18. Keep loose clothing, ties, jewelry, long hair and other loose objects away from
the entry opening. Risk of injury!
19. Only for inside use in dry environment
and for AL420/AL490 max A4
AL420 AL320 AL490 AL390
Ar
Type Hot Hot Hot Hot
mm (A3)
ECO
- -

EN
Exemption From Liability
We cannot guarantee that the information on the technical properties and that
contained in this document is correct. The product and, where applicable, its
accessories, described in this document are subject to constant improvement
and further development. For this reason, we reserve the right to modify
components, accessories, technical specifications and related documentation
of the product at any time without notification.
User Manual AL420-AL320-AL490-AL390 pg 3
Safety note
The power socket must be located close to the equipment and
be easily accessible. This enables the equipment to be disconnected from
the power supply quickly in an emergency.
Features
Protection and refinement of your documents. Laminate photographs,
documents, graphics, identity cards etc. up to A4 size. The unit operates
using 2 heating rollers, has a quick warm-up phase, a quick laminating speed and
has 75% more Energy saving compared to equivalent laminators!
- An indicator shows the operating state "Ready"
-
- Automatic switch-off in the event of overheating
- High quality heating system prevents smudging and blistering
-
Warm-up phase about 1.5-2 minutes
Time for cooling down to room temperature, approx. 15 minutes
- Foil thickness, minimum 80 and maximum 125 micron

EN User Manual AL420-AL320-AL490-AL390 pg 4
Intended Use
This laminator has been conceived for use processing hot and cold
laminating foil. It is possible to laminate pictures, maps, documents, paper
etc. up to a total thickness of 0.5 mm. Any other use is considered
unintended use. Unauthorised modifications or reconstructions are not
permitted.
HOT Laminating
1. Connect the power cable to an easily accessible, standard electrical
socket. Caution: Check that the voltage specifications of the unit
correspond to that of your power supply network (220 - 240 V, 50 Hz).
2. Use the on/off switch on the right of the appliance to switch on:
"ON"
3. The drive motor for the transport rollers starts up. The correct
operating temperature is reached after about 1.5-2 minutes and the
‘READY’-indicator becomes red.
4. Insert the document to be laminated in the pouches so that there is
a margin of approx. 3 - 5 mm to the edge of the foil on all sides.
Caution: Only use foil intended for hot laminating.
5. Insert the foil containing the document in the laminator's insertion
slot. Insert the ready closed side of the pouch first.
Note: To prevent the laminating foil from creasing, never insert the
open end of the foil pocket in the insertion slot of the laminator first.
When inserting the foil, observe the instructions on the insertion slot.
The laminating process occurs automatically.
Caution: The foil is very hot and soft when ejected following lamination.
Therefore, handle the laminated product with extreme care.
TIP: To flatten the laminated product, place a book or similar heavy,
flat object, on it.
5
4 3 2
4 3 2
19
19
1920 262 9
AL490 - AL390

EN User Manual AL420-AL320-AL490-AL390 pg 5
Problem solving
Eliminating a foil jam
L'appareil de plastification est équipéie de la fonction „ABS Jam Release“
permettant d'éliminer rapidement les bourrages de feuille.
1. In the foil is blocked, switch the appliance off and press the « ABS »
lever on the back of the machine at the top right-hand side to the left.
2. Hold the laminator firmly and pull the foil together with the document to
be laminated out of the laminator's insertion slot.
3. It will probably be necessary to then clean the unit several times as
described in the Section "Cleaning and Servicing".
4. If foil jams occur repeatedly or jammed foil cannot be removed from the
laminator, it means that another foil is blocked in the machine.
In this case a repair might be impossible.
TIPS:
1. Ensure that the pouch has been inserted correctly in the unit.
2. A laminating pouch should also always be filled in as completely
as possible. The pouches half full can cause problems
Laminate the same foil again to improve the lamination result .
If thicker foil is used (100mic, 125mic), please allow the device to heat up longer.
Laminated foil is not completely transparent
Cleaning and Servicing
Deposits and residual adhesive on the transport rollers can influence the
results of the laminating process. Therefore, the transport rollers must be
cleaned periodically after use: To do this, insert a folded piece of paper in the
insertion slot. Residual adhesive is removed and taken up by the paper
when ejected. Repeat the process several times. Disconnect the power plug
before starting to clean the unit with a damp cloth. If necessary, the housing
can be cleaned using a cloth moistened with clean water with a little mild
soap applied. Never use any solvents or aggressive cleaning agents.
This manual suits for next models
3
Table of contents
Languages:
Other acropaq Laminator manuals