ACS A1040 MIRA User manual

A1040 MIRA 3D
Operation manual
Acoustic Control Systems – ACS Group
Saarbrücken, Germany 2021
This instruction manual contains essential information on how to use this ACS product safely and effectively.
Before using this product, thoroughly review this instruction manual. Use the product as instructed.
Revision 1.1.0
Ultrasonic low-frequency tomograph

2
A1040 MIRA3D ©2021 Acoustic Control Systems –ACS Group
1. Cover Page Back 4
2. Cover Page Front 5
3. Important basic information 6
4. Abbreviations 8
5. Lables, position and content 9
6. Scope of Delivery 11
6.1 A1040 MIRA 3D ............................................................................................................. 11
6.2 A1040 MIRA 3D PRO .................................................................................................... 12
7. Main Components 16
8. Keys and system LEDs 19
9. Rechagreable Battery of the Main Device 22
10. Rechargeable Battery of the Control Unit 25
11. Device usage and Limitations 29
12. Safety 32
13. Maintenance and Repair 34
14. Technical Specification 37
15. Operation 38
16. Trouble shooting 42
17. CE Certificate 46
18. B-Scan 47
18.1 Main parameters .......................................................................................................... 47
18.2 Display parameters ...................................................................................................... 48
18.3 File manager ................................................................................................................. 50
19. MAP 54
19.1 Main parameters .......................................................................................................... 54
19.2 Display parameters ...................................................................................................... 55
19.3 File manager ................................................................................................................. 55

3
A1040 MIRA3D ©2021 Acoustic Control Systems –ACS Group
19.4 MAP manager ............................................................................................................... 55
20. C-Det 57
21. A-Scan 59
21.1 Farm View: A1048 MIRA 3D ......................................................................................... 61
21.2 Farm View: A1048 MIRA 3D PRO ................................................................................. 64
22. Reporting 65
23. Setup 68
23.1 Instrument configuration ............................................................................................ 71
23.1.1 A1040 MIRA 3D ...................................................................................................... 71
23.1.2 A1040 MIRA 3D PRO .............................................................................................. 73
23.2 Automatic transducer testing ..................................................................................... 75
23.2.1 A1040 MIRA 3D ...................................................................................................... 75
23.2.2 A1040 MIRA 3D PRO .............................................................................................. 77
24. Powering 79
25. Connectivity 82
25.1 WiFi Hotspot ................................................................................................................. 82
26. Getting started 85
26.1 App installation ............................................................................................................ 85
26.2 App activation .............................................................................................................. 86
26.3 Preparation for work ................................................................................................... 88
26.4 Update .......................................................................................................................... 89
27. Licensing 92
28. File format 95
28.1 File list ........................................................................................................................... 95
28.2 Modes ........................................................................................................................... 98
0
Index

4
A1040 MIRA3D © 2021 Acoustic Control Systems – ACS Group
Cover Page Back
Cover Page Back
1 Cover Page Back
Service Address: ACS-Solutions GmbH
Science Park 2
66123 Saarbrücken
Germany
Phone: +49 (0) 681 9659 2270
Fax: 49 (0) 681 9659 2280
E-Mail: info@acs-international.com
Web: acs-international.com

5
A1040 MIRA3D ©2021 Acoustic Control Systems –ACS Group
Cover Page Front
Cover Page Front
2 Cover Page Front
A1040 Mira 3D
ULTRASONIC LOW-FREQUENCY TOMOGRAPH
User Manual
This manual contains important information about the correct and safe use of the
device.
Read this manual carefully before using the device for the first time and use the
device only in the intended manner.
Always keep this manual in the vicinity of the device.
Revision: 1
Issued: November, 18 th 2020
Make sure the manual on hand corresponds with the currently installed firmware
and control software release on your system.
Check the firmware and control software release that is currently installed on your
system (for further information see chapter "Setup")
With every firmware and control software update the functionality of the device will
change. It is possible that formerly described functions are not available any more,
new functions are added or pictograms and/or procedures change. These changes
will be documented in the latest, online available manual.
Check page for available manuals and software updates.
68
89

6
A1040 MIRA3D ©2021 Acoustic Control Systems –ACS Group
Important basic information
3 Important basic information
Read this manual carefully before using the device to ensure safe and proper use.
Intended use:
The A1040 MIRA3D device is intended for the ultrasonic inspection of constructions
made of concrete, reinforced concrete and stone with one-sided access. The design
is for manual operation. For positioning purposes, the device is equipped with 4
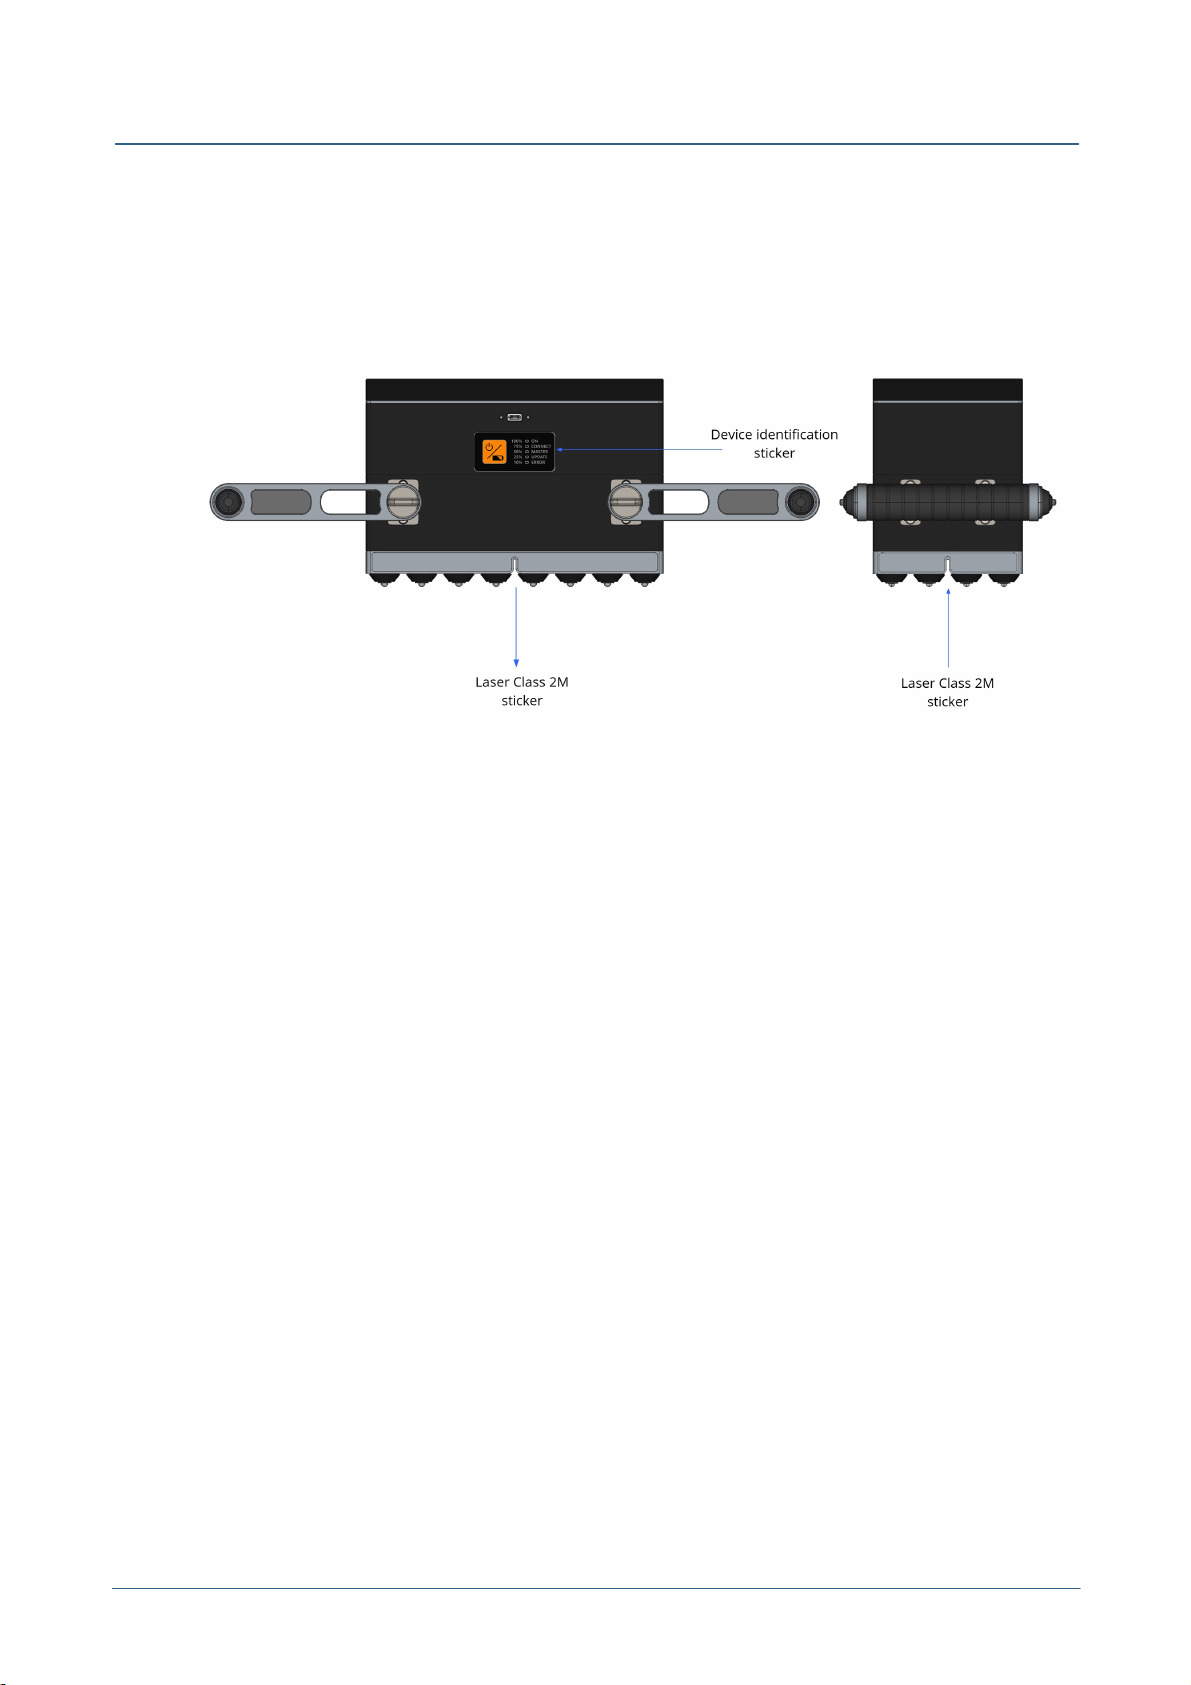
positioning Laser-LEDs class 2M.
Never Use the device for any other purposes than stated above. Never use the
device on humans or animals. Never look into the Lasers. For further Safety
instructions see chapter Safety
The A1040 MIRA3D device must be connected via hotspot to a Control Unit. Only
use Control Units approved by ACS for this purposes.
A1040 Mira 3D is normally equipped with a tablet device as Control Unit that is
seated in a specially developed housing. The Control Units provided by ACS are
selected to guarantee a save and reliable operation of the all over system. Please do
not try to open the provided Housing for the control unit. If the control Unit is
damaged or malfunctioning, please contact your ACS support.
Do not try to control the A1040 Mira 3D with other mobile devices that are not
specified and provided by ACS, even if the connectivity and capability of executing
the control software seems given. This may result in unexpected behavior,
personal injury, and / or equipment damage including impairment of safety. ACS is
not liable for any damage or loss (whether contractually or unauthorized, including
negligence) caused by not following this warning.

7
A1040 MIRA3D ©2021 Acoustic Control Systems –ACS Group
Important basic information
This A1040 Mira 3D is CE-certified according to 2014/30/EU (EMC).
Liquid ingress protection and solid particle protection of the casing is in conformity
with level IP53 (standard EN 60529), so the equipment is splash proof and
protected against dust.
Despite the IP classification, it is possible that the device will be damaged in certain
situations.
Follow the instructions below to maintain water resistance and dust protection.
·
Never immerse the equipment into water.
·
After contact with clear water, wipe it thoroughly with a clean soft cloth.
·
Contact of the device with liquids other than water may adversely affect the
performance and appearance of the device.
·
Dropping the device may affect the device protection.
·
The device should never be opened by untrained personnel.
Safety symbols used in this Manual:
Symbol
Description
Indicates a potential threat. Failure to avoid it
can result in death or serious injury.
Indicates a potential threat. Failure to avoid it
may result in minor injury.
Indicates a potentially harmful situation. If it is
not avoided, the device or something in its
vicinity may be damaged.

8
A1040 MIRA3D ©2021 Acoustic Control Systems –ACS Group
Abbreviations
Abbreviations
4 Abbreviations
Geben Sie hier den Text ein.

9
A1040 MIRA3D ©2021 Acoustic Control Systems –ACS Group
Lables, position and content
5 Lables, position and content
Labels are safety related and must be present at all time when the device is in use.
Labels are positioned according the Figures ?,? below.

10
A1040 MIRA3D © 2021 Acoustic Control Systems – ACS Group
Lables, position and content
Description
Content
device
identification
Sticker
Device Name: A1040 MIRA 3D
Manufacturer: Acoustic Control Systems-ACS Group
Manufacturer Homepage Address: ACS-Interantiona.com
Country of origin: Made in Germany
CE: Conformity declaration for applicable European Directives
FCC: Conformity declaration for requirements of the Federal
Communications Commission (FCC) -relevant for delivery,
sales and import to USA.
Sign or "Read manual first"
WEEE symbol that the product contains batteries. These
must be collected and disposed of separately according the
regional laws.
S/N: Serial number of the Device beginning with 120 followed
by 5 digits.
Laser class 2 M
Warning sign placed on the exiting points of all 4 Laser-
Diodes. Please see chapter "Safety" for further Detail

11
A1040 MIRA3D © 2021 Acoustic Control Systems – ACS Group
Scope of Delivery
Scope of Delivery
6 Scope of Delivery
The following two sections describe the scope of delivery and assembly instructions
for A1040 MIRA 3D and A1040 MIRA 3D PRO.
6.1 A1040 MIRA 3D
A1040 MIRA 3D Scope of delivery
Part
Amount
Location
Electronic unit A1040 MIRA 3D with
32 x A-DPC® transducers
1
u
Adjustable handle
2
v
Tablet-PC with protective case
1
w
Reference block for functional tests
1
x
Exchangeable Li-Ion accumulator
6
inside of the electronic unit
Power charger
1
y
Interchangeable power plugs
(US/UK/EU)
3
in the pocket z, 2xUS, 2xUK
and 2xEU
Power USB-C cable
1
in the pocketz
USB-A to USB-C cable
1
in the pocket z

12
A1040 MIRA3D © 2021 Acoustic Control Systems – ACS Group
Scope of Delivery
Scope of Delivery
Screwdriver Hex-Plus 4.0
1
{
Screwdriver Hex-Plus 2.0
1
|
Сardboard box for documentation
1
}
Warranty certificate
1
inside of cardboard
Operating Manual
1
inside case ~
Hard case with custom foam inlay
1
~
6.2 A1040 MIRA 3D PRO
Figure 1: Scope of delivery
A1040 MIRA 3D PRO Scope of delivery
Part
Amount
Location
Electronic unit A1040 MIRA
3D with 32 x A-DPC®
transducers
2
u
Adjustable handle
2
v
Tablet-PC with protective
case
1
w

13
A1040 MIRA3D © 2021 Acoustic Control Systems – ACS Group
Scope of Delivery
Scope of Delivery
Reference block for
functional tests
1
x
Exchangeable Li-Ion
accumulator
12
inside the electronic unit
Power charger
2
y
Interchangeable power
plugs (US/UK/EU)
6
inside the pocket z, 2xUS, 2xUK and
2xEU
Power USB-C cable
2
inside the pocket z
USB-A to USB-C cable
1
inside the pocket z
Screwdriver Hex-Plus 4.0
1
{
Screwdriver Hex-Plus 2.0
1
|
Сardboard box for
documentation
1
}
Warranty certificate
1
inside the cardboard box }
Operating Manual
1
inside the case ~
H-Fastener
2
refer to von Figure 3
A2 M6x10 stainless screw
4
refer to uon Figure 3
Hard case with foam inlay
1
~
Electronic units
The A1040 MIRA 3D PRO has two electronic units. These are the master
(also called primary unit) and the slave (also called a secondary unit).
The serial number of the master is less than then the serial number of the slave.
Use the master and slave according to the licensing policy .
Assemble the A1040 MIRA 3D PRO
The A1040 MIRA 3D PRO tomograph leaves the factory fully assembled. Follow up
the given procedure to prepare a master to work as a stand-alone tomograph.
·
Put the A1040 MIRA 3D PRO on the flat stable surface. The transducers lay on the
surface.
·
Detach the Tablet-PC
·
Unscrew four screws uon the both sides of the tomograph, use the screwdriver
Hex-Plus 4.0 for unscrewing.
92

14
A1040 MIRA3D © 2021 Acoustic Control Systems – ACS Group
Scope of Delivery
Scope of Delivery
Figure 2: Assembly
·
Dismount two h-fasteners v. Pus the screws and fasteners into the case
pocket.
·
Unscrew four handle bolts won both sides of the tomograph
·
Detach the handles from the secondary unit.
·
Put the secondary unit in to the case
·
Attach the handles to the primary unit
·
Fasten the bolts won
Assemble the A1040 MIRA 3D PRO in the reverse order.

15
A1040 MIRA3D © 2021 Acoustic Control Systems – ACS Group
Scope of Delivery
Scope of Delivery
Remove and mount the handles very carefully. Avoid deformation of the handle
elements and housing damaging.

16
A1040 MIRA3D © 2021 Acoustic Control Systems – ACS Group
Main Components
Main Components
7 Main Components

17
A1040 MIRA3D © 2021 Acoustic Control Systems – ACS Group
Main Components
Main Components

18
A1040 MIRA3D © 2021 Acoustic Control Systems – ACS Group
Main Components
Main Components

19
A1040 MIRA3D © 2021 Acoustic Control Systems – ACS Group
Keys and system LEDs
8 Keys and system LEDs
The A1040 Mira 3D Has two key -Types
Type One is the key for the operational preparation of the system and to run status
checks. This KEy is found on the Main Keypad
Figure 3: Keypad position
The Keypad has three basic functionalities. Switching the device on/off and start the
battery charging status. Detailed Information in given in the table below.
Figure 4: Keypad with LEDs
Key name
Functions
Power Key [1]
Press and hold the POWER Key for 3 seconds to activate the
device
Power Key [1]
Press and release the POWER Key for the checking the battery
status
Power Key [1]
Press and hold the POWER Key for 3 seconds to deactivate the
device
Power Key [1]
Update procedure initiation (see chapter system update)
Type two is are the four trigger keys for the start of the acquisition during the
system operation.

20
A1040 MIRA3D © 2021 Acoustic Control Systems – ACS Group
Keys and system LEDs
Key name
Functions
Trigger Key [2]
Data acquisition
Trigger Key [2]
Update initiation function when using WIFI as access point
The system LEDs have two basic functionalities, displaying the procedure mode and
the charging status.
Normal operation mode
LED Name
Functions/Meaning
ON [2]
Not lit when device is turned off
Flashing green during hardware initialization and booting
Constant green glow when the device is ready for operation
CONNECT [3]
Not lit when device is turned off
Flashing green with 1 Hz frequency until a connection is
established with the access point of the control device.
Flashing green with 2 Hz frequency until the connection with
the control program is established.
Constant green glow when the Main Device is connected to
the control program and ready for operation
Other manuals for A1040 MIRA
2
This manual suits for next models
1
Table of contents
Other ACS Medical Equipment manuals
Popular Medical Equipment manuals by other brands

Orliman
Orliman THERA GO TGO490 INSTRUCTIONS FOR USE, STORAGE AND WARRANTY

Easylife
Easylife EL6012 instruction manual

Levoit
Levoit Kana manual

Otto Bock
Otto Bock Genium Instructions for use

UV MEDICO
UV MEDICO UV222 Technical and installation manual

Velopex
Velopex AQUACUT QUATTRO Installation, operation and maintenance manual