Acson international AFF10A User manual

1
OPERATION MANUAL
FOLDABLE FLOOR FAN
AFF10A

2

3
CONTENTS
1.0
Introduction
3
2.0
Product Overview
4
3.0
Operation Guideline
7
4.0
Safety Instruction
13
5.0
Maintenance
15
6.0
Troubleshooting
17
DISCLAIMER
In complying with the policy for continuous improvement of Acson
Malaysia Sales & Service Sdn Bhd (herein after referred to as
“Acson”), the information contained in this document is subjected to
change without prior notice.
While Acson makes no commitment to update or provide current
information automatically to the manual owner, that information (if
applicable) can be obtained by contacting the nearest Acson office,
distributors or dealers network.
It is the responsibility of the operator or service personnel to verify the
applicability of these documents, then prior to working on the
equipment. They should verify with the owner whether the equipment
has been modified and if current literature is available.
Any and/ or all colours depicted in the marketing materials for this
product are onlyrepresentation of the product and should not betaken
as accurate. Whilst every effort is made to ensure product
consistency, we could not be held responsible for variations between
batches.

4
INTRODUCTION
Acson foldable floor fan helps to circulate the air of your space and
provide ventilation within its proximity.
Product
Foldable Floor Fan
Model Name
AFF10A
Power Supply
220-240V, 50/60Hz
Rated Voltage
DC12V, 1A
Rated Power
14 W
Number of Blade
9 blades
Speed Control
8 levels
Battery Capacity
6600 mAh
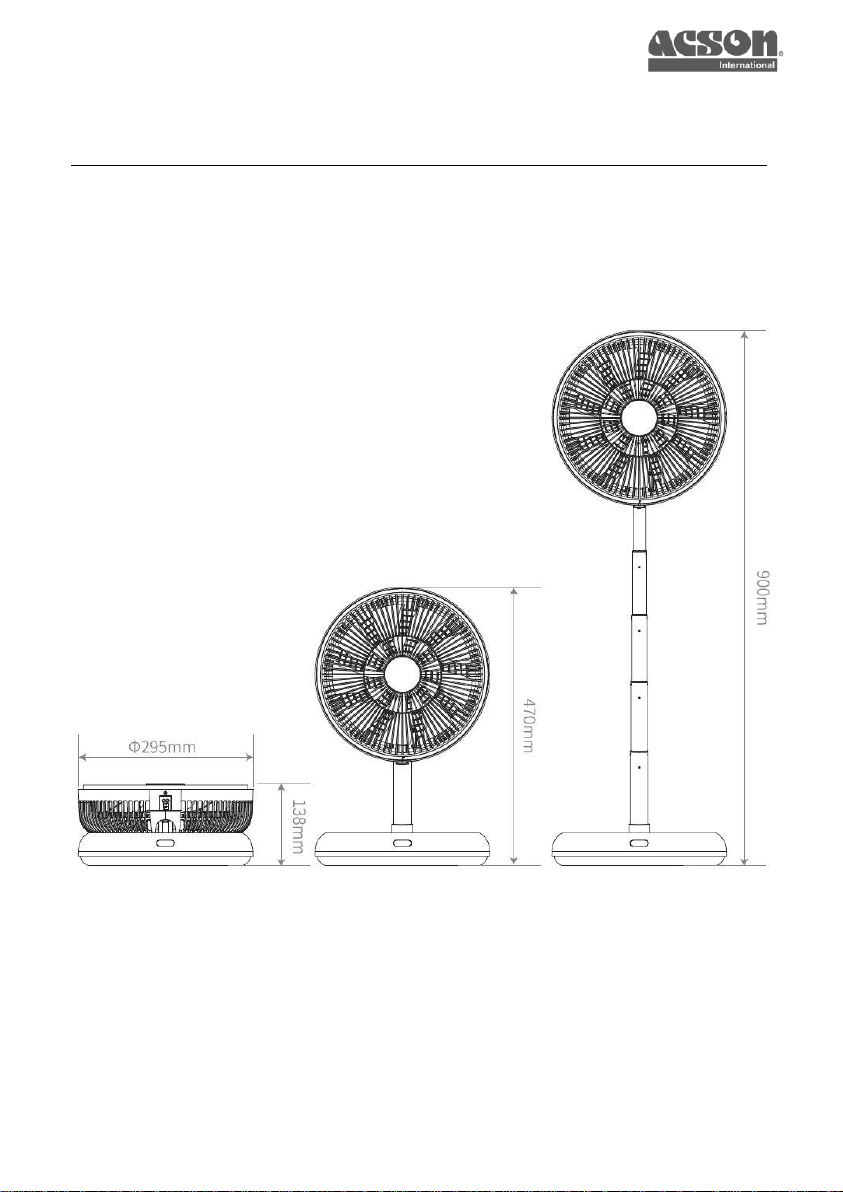
Unit Dimension
(HxWxD)
138 x 300 x 295 mm (Folded)
470 x 300 x 295 mm (Table Fan)
900 x 300 x 295 mm (Floor Fan)
Net Weight
2.1 kg
Material
ABS
5
PRODUCT OVERVIEW
6
Remote Control
Adapter
1
2
3
4
5
6
7
8
9
10
11
12
13
Display Panel
14
15
16
17
18

7
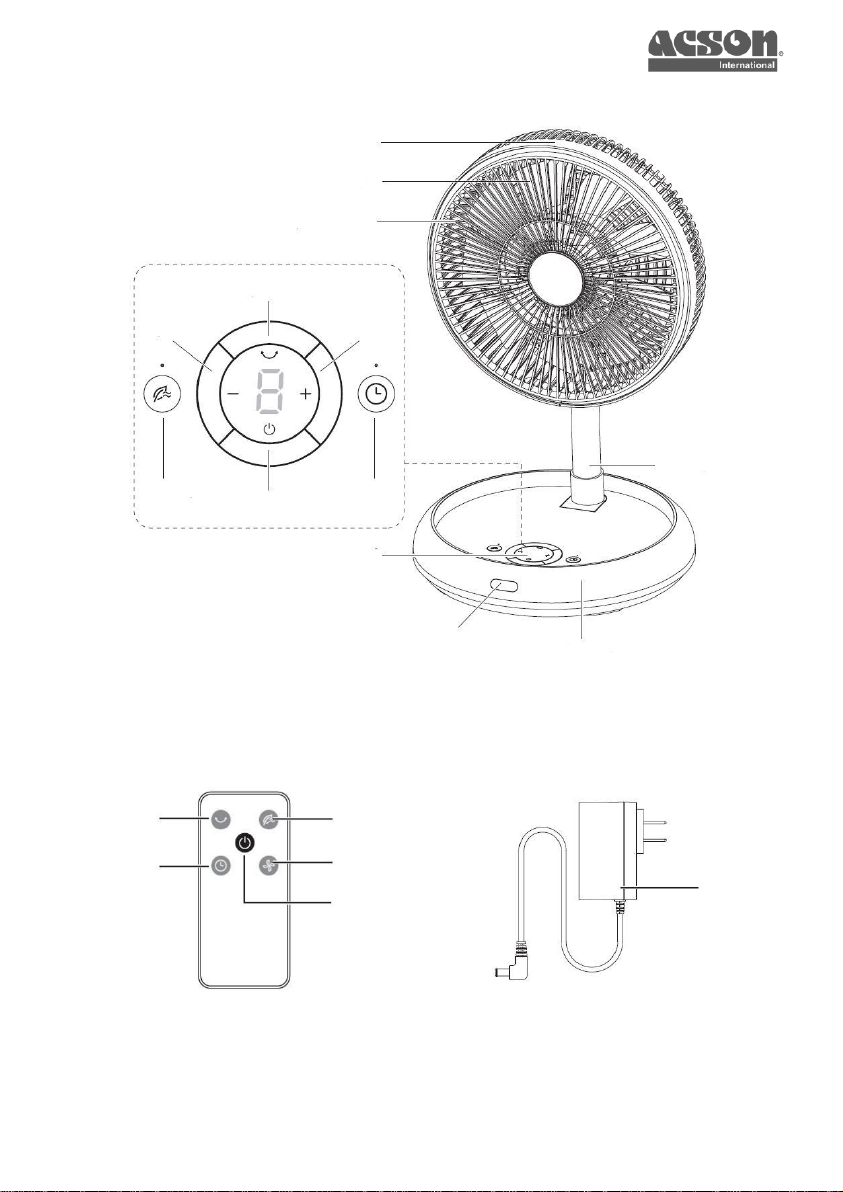
PRODUCT OVERVIEW
8 levels of airflow control powered by DC brushless motor which
provide high airflow and low noise operation.
1
Front grille (detachable)
2
Fan blade
3
Rear grille
4
Telescopic rod
5
Display panel
6
Infrared receiver
7
Rotating base
8
Swing
9
Fan speed (-)
10
Fan speed (+)
11
Nature Breeze Mode
12
On / Off button
13
Timer
14
Swing
15
Timer
16
Nature Breeze Mode
17
Fan speed
18
On / off button
⚠WARNING: For first time use, please pull out the battery insulation
sheet attached at the back of remote control. Please only use the default
adapter for this fan.

8
OPERATION GUIDELINE
The control panel of this fan is located at the rotating base panel.
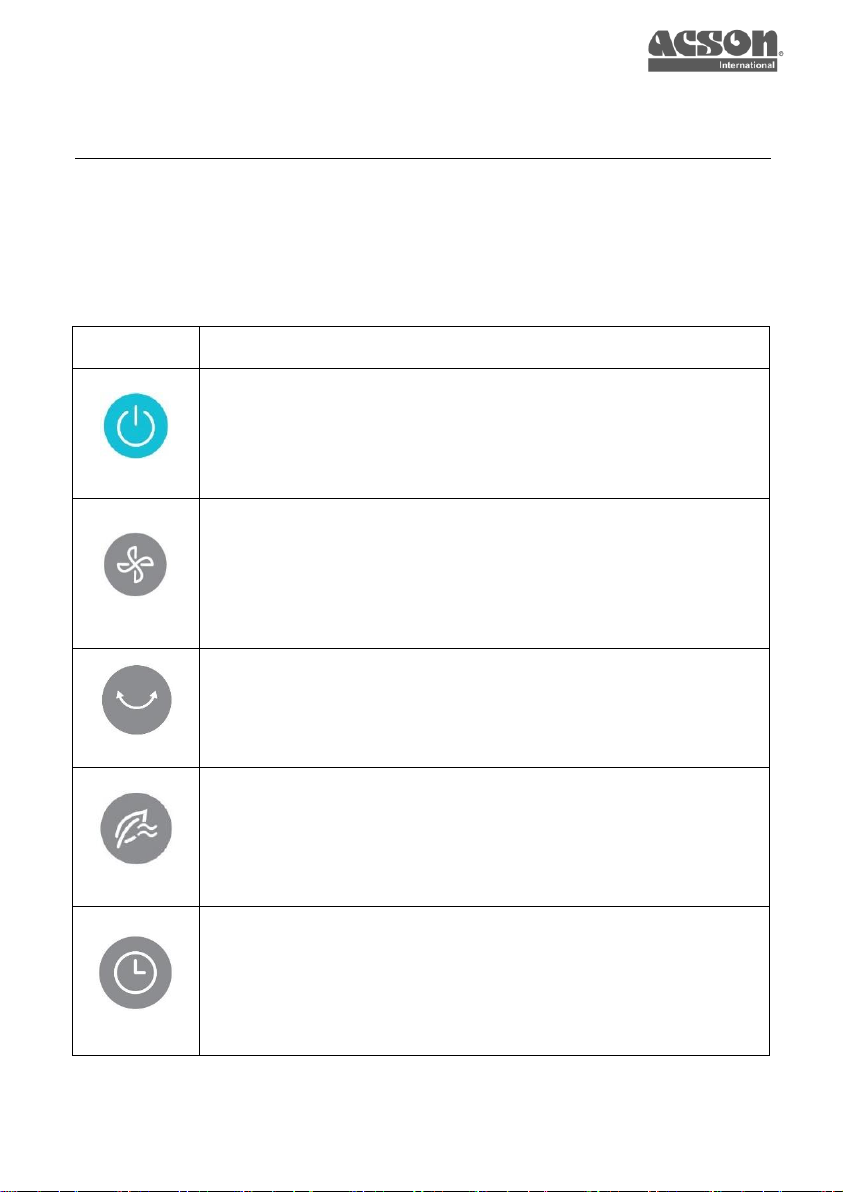
For display panel located on the fan:
Button
Function
On/Off Button
Press this button to turn on the fan.
The fan will automatically run at previous fan speed.
Press again to turn off the fan.
Fan Speed
Press “+/-”to adjust the fan speed by one level.
The display panel will show the corresponding fan
speed based on your selection from 1st to 8th level.
Swing
When the fan is operating, press this button to enable
swing function.
Press again to disable swing function.
Nature Breeze Mode
Press this button, LED lights up indicating Nature
Breeze Mode.
Press again to exit this mode. The fan will return to
its original fan speed.
Timer
Press this button to activate timer.
Press the “+/-” to adjust the timer setting by 1 hour.
The display panel will show the corresponding timer
setting based on your selection from 1 to 8 hours.
When reaching its maximum (8 hours), press this
button to disable timer.
9
OPERATION GUIDELINE
The remote control which come together with this fan serve as an
option to control the fan conveniently.
For remote control:
Button
Function
On/Off Button
Press this button to turn on the fan.
The fan will automatically run at previous fan speed.
Press again to turn off the fan.
Fan Speed
Press each time to increase the fan speed by one
level.
When the fan reached 8th level (highest fan speed),
press again to return to 1st level (lowest fan speed).
Swing
When the fan is operating, press this button to enable
swing function.
Press again to disable swing function.
Nature Breeze Mode
Press this button, LED lights up indicating Nature
Breeze Mode.
Press again to exit this mode. The fan will return to
its original fan speed.
Timer
Press each time to increase the timer setting by one
hour.
When reaching its maximum (8 hours), press again
to turn off timer function.

10
OPERATION GUIDELINE
Before operating this floor fan, please make sure the unit is placed on
a flat surface.
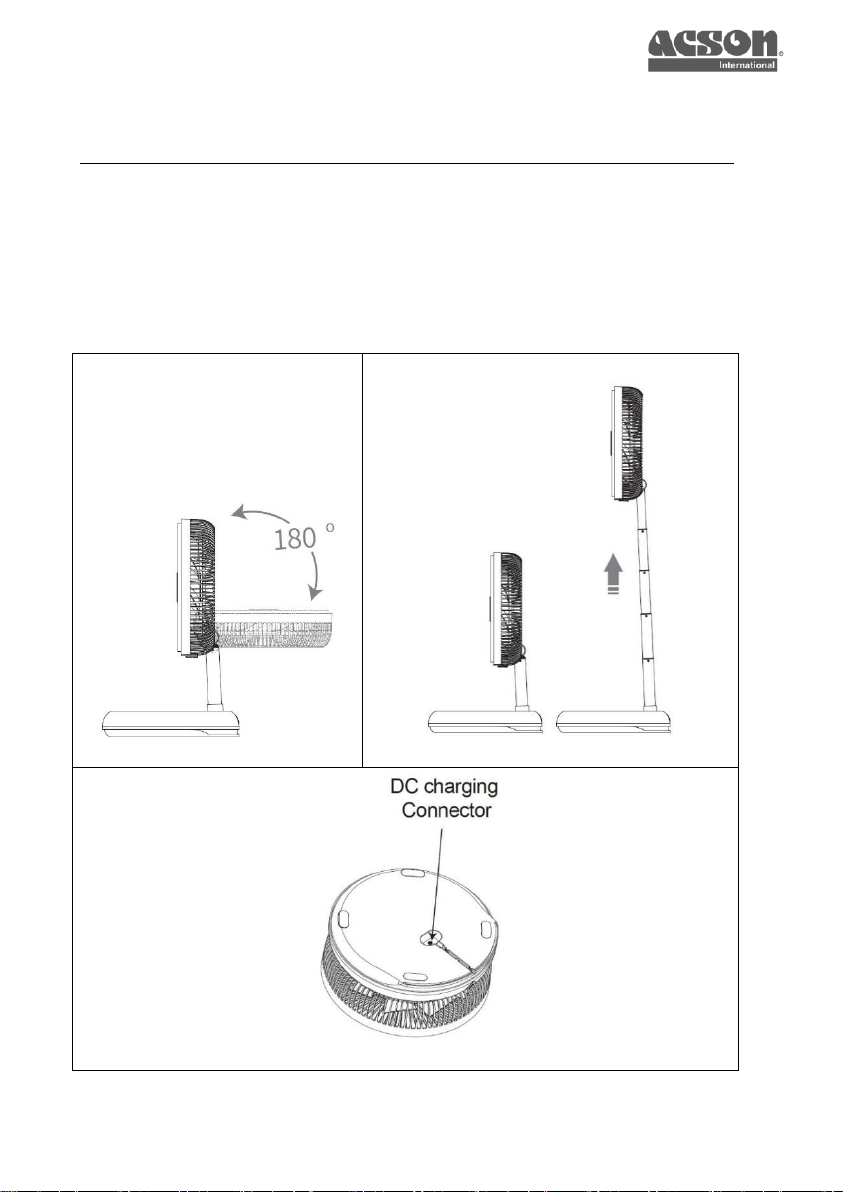
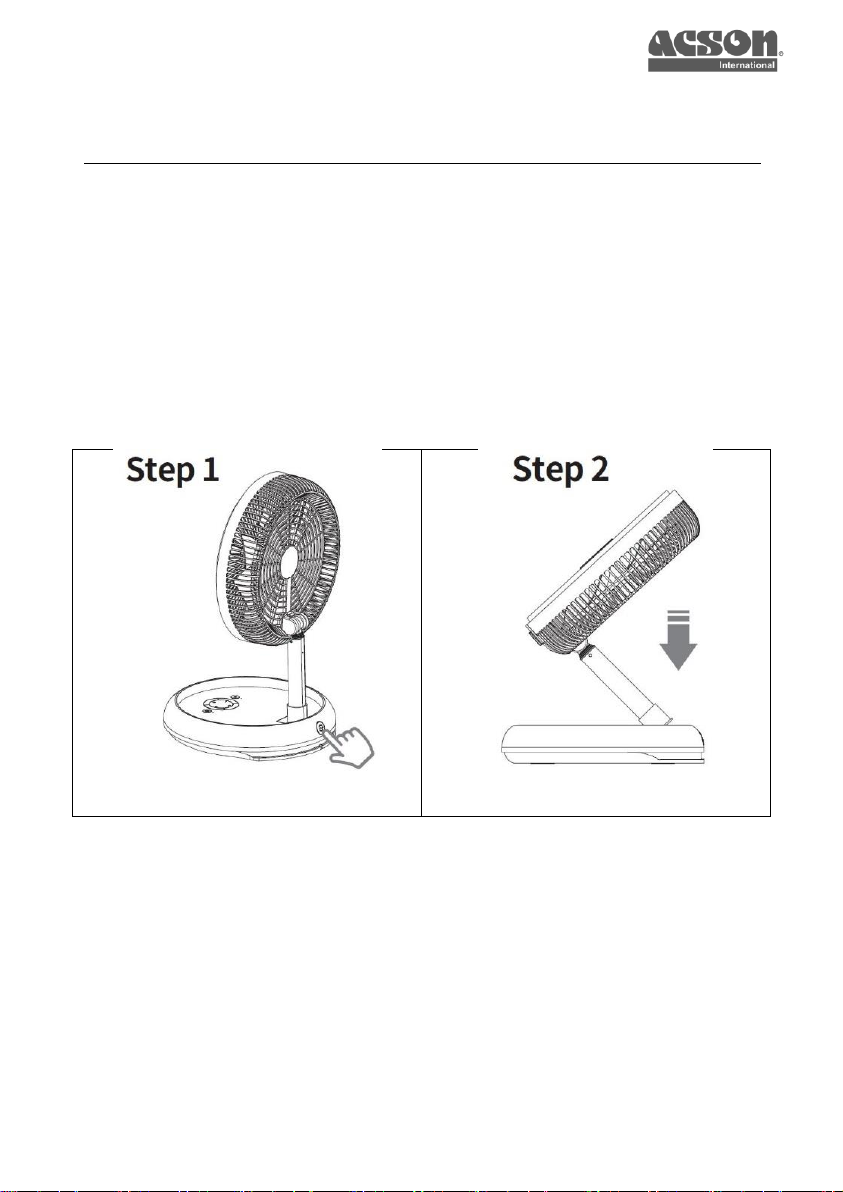
How to setup the fan:
The fan is in a folding state by default.
Open the fan vertically from the head (Figure 1).
Pull the fan head according to the direction of arrow (Figure 2).
When the fan grille reach 180° and parallel to the telescopic
rod, the rod is locked automatically by indicating a click sound
(Figure 3).
You can now start to turn on your fan.
Figure 1
Figure 2
Figure 3

11
OPERATION GUIDELINE
How to operate the fan:
Connect thefan topower supply. Disconnect it when theunit
is fully charged.
Press the On/Off button to turn on the fan.
Press the fan speed button to adjust the airflow. Press “+”
increase the airflow, while press “-” to decrease the airflow.
How to adjust the height and swing angle:
The vertical swing angle of this fan can be adjusted
manually by pulling up and down, maximum 180° (Figure 4).
The vertical height of this fan could be adjusted by pulling
up the telescopic rod or the neck (Figure 5).
How to charge the fan:
The indicator light at the display panel will blink when it is in
low battery stage. This will affect the fan speed by either
lower fan speed or completely cease the operation.
Please do not attempt to turn on the fan at low battery stage.
The charging could not be perform when the fan is
operating. You need to turn off the fan and connect to power
supply to charge it.
There is an alphabet F blinking on display panel when you
charge the fan. When the battery is fully charged, the F will
stop blinking.
When the F not blinking, please turn off the power supply
and unplug the adapter.

12
OPERATION GUIDELINE
3 Operating Conditions:
(a) When the fan is operating & connect with power supply
(Normal Mode):
The internal battery is not charging and storing
electrical energy.
The fan is operating based on the electricity directly
from power supply.
(b) When the fan is not operating & connect with power supply
(Charging Mode):
The built-in battery is undergo charging with ‘F’
blinking on display panel.
‘F’ will stop blinking once battery is full.
(c) When the fan is operating & not connecting with power
supply (Cordless Mode):
The fan will operate utilizing the electrical energy
from built-in battery.
The fan will have different operating time based on
different fan speed setting.
The higher the fan speed setting, the faster the fan
will stop operation.
13
OPERATION GUIDELINE
⚠WARNING: Please do not manually adjust the direction of neck
when the fan is swinging. If possible, please turn off the swing
function and turn off the unit before you adjust the vertical swing
angle of this fan.
Figure 4
Figure 5
Figure 6
14
OPERATION GUIDELINE
How to fold the fan:
Hold the fan and press the button to unlock (Figure 7), then
fold the fan accordingly (Figure 8).
The operating range for automatic horizontal swing angle of
this floor fan is 55°, while manual vertical swing angle is 180°.
Please do not twist the neck of fan more than the
recommended operating range.
Figure 7
Figure 8

15
SAFETY INSTRUCTION
⚠WARNING: Please pay particular attention to the following safety
instructions to reduce the risk of electrical shock, fire or injury to users.
Do not insert fingers or foreign objects into thefan blade while unit
is operating.
Do not operate the unit if the plug is damaged or the connection
to the power supply is loosened.
Do not touch the plug or intend to operate the fan with wet hands.
Please disconnect the power supply before cleaning the fan to
avoid electric shock resulting from poor insulationorfire fromshort
circuit.
Please do not damage the plug as it might cause electric shock,
excess heat or fire.
Do not operate the unit near or on hot object such as stove or
heater or where it may come into contact with steam or fire.
Avoid operating the unit in location where grease or oily smoke is
generated such as kitchen.
Do not operate when using aerosol insecticides or in rooms where
there is oily residue, incense, sparks from lit cigarette, chemical
fumes in the air or in high humidity conditions such as a toilet and
bathroom.
Do not use corrosive cleanser to clean the fan as it may damage
the surface.
If the plug or charging port are damaged, it must be replaced by
Acson authorized personnel.
Do not dismantle and alter the spare parts of this fan. If the unit is
not working, please contact Acson authorized personnel for
assistance.

16
SAFETY INSTRUCTION
Only Acson authorized technicians should be appointed to service
this fan. Please contact the nearest Service Centre for
maintenance or repair.
Please locate the unit on flat and stable surface. If you place the
unit on a heavily carpeted area, the unit might slightly vibrate.
Avoid operating the unit in location where the unit is exposed to
condensation or drastic temperature change.
Please keep the unit under room temperature and away from
direct sunlight exposure.
Please shut down the power supply and turn off the unit during
emergency or evacuation.
This fan can be operated by children aged 10 years and above.
Persons with reduced physical, sensory or mental capabilities or
lack of experience couldoperate theunit under proper supervision
concerning use of the unit in a safe way and understand the
hazards involved.

17
MAINTENANCE
How to detach the front grille:
It is recommended to clean the unit regularly after using for 2 to 3
months depending on the frequency of usage.
Locate the screw at lower part of fan grille and remove it with a
Philips head screwdriver. Hold the front grille and turn
anticlockwise to dismantle it (Figure 9).
After the front grille is opened, grip and turn the cap in a clockwise
direction to release the fan blade (Figure 10).
The front grille and fan blade could be dismantle for cleaning
purpose (Figure 11), please do not wash it directly under the tap.
How to install the front grille:
Align the front and rear grille by attach them together around
10mm of effective distance (Figure 12), then rotate it until the front
grille is tight (Figure 13).
Fix the screw back to its original position.
Cleaning:
When the unit surface is dirty, please wipe it with damp cotton
swab or soft cloth. The watertemperature should lower than 40°C.
Please disconnect the power supply prior to any cleaning action.
Do not wash the unit directly under water tap. Do not immerse the
unit in water.
Do not use volatile liquid nor detergent to wipe the unit, else it
might lead to electric shock or damage on surface.

18
Figure 9
Figure 10
Figure 11
Figure 12
Figure 13

19
TROUBLESHOOTING
If the unit could not perform normally, please check the following
troubleshooting guidelines.
Problem
Possible Reason
Solution
The fan not
working.
The adapter is
loosen or not insert
properly.
Pull out the adapter and
plug again.
Abnormal power
supply.
Relocate the unit and
connect to appropriate
power supply.
Low battery or no
battery.
Please charge the fan.
Remote control no
battery.
Please replace the battery
of remote control or use the
control panel at the fan
instead.
Adapter is damaged.
Contact Acson authorised
personnel for assistance.
Abnormal
noise
Fan blade crack.
Motor damage.
The front grille
could not be
detached.
The screw located at
the bottom of grille is
not removed.
Remove the screw with a
Philips head screwdriver.
Display panel
keep blinking.
Low battery.
Please charge the fan.
The fan could
not be
charged.
Charging could not
be performed when
the fan is turned on.
Please turn off the fan
before charging.

20
目录
1.0
产品介绍
19
2.0
产品概述
20
3.0
操作指南
23
4.0
安全指引
29
5.0
保养说明
31
6.0
故障排除
33
声明
为了遵守 Acson Malaysia Sales & Service Sdn Bhd (以下简称
“Acson”) 的持续改进政策,本文档中包含的信息若有更改,恕不另
行通知。
虽然 Acson 不承诺自动更新或向手册拥有者向其提供当前信息,但可
联系临近的 Acson 办事处、经销商或经销商网络,获取该信息 (若适
用)。
在操作设备之前,操作员或维修人员有责任核实这些文件的适用性。
他们应与所有者核实设备是否已改装,以及是否有最新资料。
该产品的市场营销材料中描绘的任何造型或颜色仅供参考。尽管努力
确保产品的一致性,但我们不对批次之间的差异负责。
Table of contents
Languages:
Other Acson international Fan manuals

Popular Fan manuals by other brands

NuAire
NuAire XBOXER Installation and Maintenance

Vortice
Vortice CA-V0 Instruction booklet

Hunter
Hunter 45022-01 Owner's guide and installation manual

Hunter
Hunter 42856-01 Owner's guide and installation manual

Monte Carlo Fan Company
Monte Carlo Fan Company Rockland 4RKR60 D Series Owner's guide and installation manual

Marley
Marley RE-VENTI MS125E DC Operating & assembly instructions

Hunter
Hunter Seawall installation manual

NuAire
NuAire MRXBOXAB-ECO-LP2B-OH installation manual

Trox
Trox TJN installation manual

Vent-Axia
Vent-Axia Lo-Carbon Response 7 HTP Installation and wiring instructions

Kichler Lighting
Kichler Lighting Sola 330151 Instruction manua

Proline
Proline VS23 instruction manual


