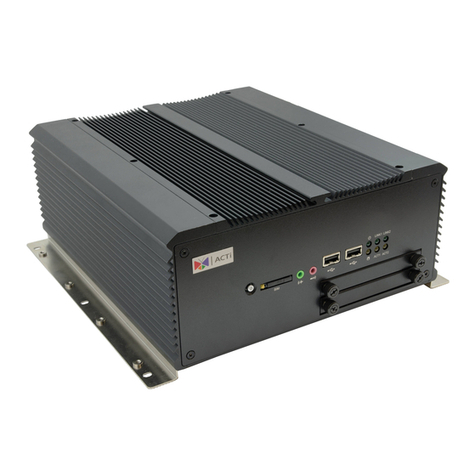
ACTi INR-410 User guide

INR-410
INR-420
System Administrator’s Manual
2013/12/23
For Version 3.0.08

www.acti.com
INR-410/420 System Administrator’s Manual
2
About This Manual
Target Audience
This manual is intended for System Administrators who are responsible for installing and
setting up ACTi INR-410/420 surveillance system. The reader is expected to know the
fundamentals of IP surveillance system integration and to own the administrative privileges to
achieve all the tasks.
You may also check http://www.acti.com/product/detail/Standalone_NVR/INR-410 or
http://www.acti.com/product/detail/Standalone_NVR/INR-420 for updates or release
information about this software and document.
Content Overview
This manual provides information needed for planning the installation, installing, setting up the
system and configuring the video streaming devices. Its main content consists of the following
three sections:
Getting Started provides the preparatory knowledge you should study before starting
installation, such as license registration and backup/restore procedures.
Log in to the System explains how to log in to the system right after a successful
installation.
System Setup gives instructions on the tasks such as adding devices to the system,
configuring the device settings, scheduling the recordings, managing events, managing
storage, managing groups/users and setting up Live View. For each major task, you will be
given a brief introduction of operation principles, step-by-step instructions, and a simple
method to check if you have done it correctly.

www.acti.com
INR-410/420 System Administrator’s Manual
3
Related Documentation
Since this manual focuses on how to accomplish the tasks for system installation and
configurations, there is very limited information about operation-wise directions for End Users
who will be operating the NVR server system. To obtain the instructions on use of the NVR
applications such as monitoring and playback, please download the latest ACTi INR-410/420
User’s Manual from ACTi Corporation website.
Technical support
If you have any questions during system installation, please feel free to contact our engineers
via our Customer Help Desk platform at http://www.acti.com/CHD.
Conventions Used in This Manual
The following are typographic conventions used in this manual:
Bold indicates keywords, major functions of NVR, or a title of a section/column.
Italic is used for a filename or location path.
Underlined is used for a document name or hyperlink.
“Bold”indicates the name of a button, a menu or a choice item.
Some notices are placed within the following boxes; each type of the box indicates different
purposes or levels of importance for system:
Important Notice
Tip
The content within this box is a tip. A tip gives you an alternative method to easily or quickly
achieve an objective, usually for specific conditions.
The content within this box is an important notice. This notice is important for you to get certain
functions to work properly, or to prevent from certain potential problems that may damage your
system. Make sure you read this notice and follow the instructions.
Note
The content within this box is a note. A note is some necessary information you need to know
about the action you are currently taking, like what will happen after you follow or don’t follow
certain procedure.

www.acti.com
INR-410/420 System Administrator’s Manual
4
Legal Notice
Disclaimer
The information contained in this document is intended for general information purposes.
ACTi Corporation shall not be liable for errors contained herein or for incidental or
consequential damages arising from the furnishing, performance, or use of this manual.
The information contained herein is subject to change without notice.
The English version of this document is the official one for all purposes. All the translated
versions are provided as a convenience. Any discrepancies or differences created in the
translations of any other languages are not legally binding.
Copyright
Copyright ©2003-2013 ACTi Corporation All Rights Reserved.
Trademarks
ACTi Connecting Vision and its logo are registered trademarks of ACTi
Corporation.
Microsoft® and Windows® are registered trademarks of Microsoft Corporation.
All other product or company names mentioned in this document may be trademarks or
registered trademarks of their respective owners.

www.acti.com
INR-410/420 System Administrator’s Manual
5
Regulatory Compliance Information
Federal Communications Commission Statement
This equipment has been tested and found to comply with the limits for a
Class B digital device, pursuant to Part 15 of the FCC Rules. These
limits are designed to provide reasonable protection against harmful
interference in a residential installation. This equipment generates, uses
and can radiate radio frequency energy and, if not installed and used in accordance with the
instructions, may cause harmful interference to radio communications. However, there is no
guarantee that interference will not occur in a particular installation. If this equipment does
cause harmful interference to radio or television reception, which can be determined by turning
the equipment off and on, the user is encouraged to try to correct the interference by one or
more of the following measures:
- Reorient or relocate the receiving antenna.
- Increase the separation between the equipment and receiver.
- Connect the equipment into an outlet on a circuit different from that to which the receiver is
connected.
- Consult the dealer or an experienced radio/TV technician for help.
WARNING: Changes or modifications to the equipment that are not expressly approved by the
responsible party for compliance could void the user’s authority to operate the equipment.
European Community Compliance Statement
This product has been tested and found to comply with the limits for
Class B Information Technology Equipment according to European
Standard EN 55022 and EN 55024. In a domestic environment, this
product may cause radio interference in which cause the user be
require to take adequate measures.

www.acti.com
INR-410/420 System Administrator’s Manual
6
Table of Contents
1 About This Manual 2
Target Audience........................................................................................2
Content Overview.....................................................................................2
Related Documentation ...........................................................................3
Technical support.....................................................................................3
Conventions Used in This Manual..........................................................3
2 Legal Notice 4
Disclaimer .................................................................................................4
Copyright ..................................................................................................4
Trademarks ...............................................................................................4
Regulatory Compliance Information.......................................................5
3 Table of Contents 6
4 Overview 12
Product Overview...................................................................................12
Server / Client Architecture ...................................................................13
5 Getting Started 14
What’s in the Box....................................................................................14
At a Glance..............................................................................................15
Rackmount the Unit................................................................................17
Hard Disk Installation.............................................................................17
Step 1: Remove the Tray .............................................................17
Step 2: Mount the Disk.................................................................18
Step 3: Install the Tray .................................................................18
Step 4: Attach the Front Cover.....................................................19
Connect the Devices ..............................................................................20
Start the Unit...........................................................................................21

www.acti.com
INR-410/420 System Administrator’s Manual
7
Enter Windows........................................................................................22
Definitions of LED Indicators ................................................................23
Turn Off the Unit .....................................................................................23
Get the Hard Disks Ready for Recording .............................................24
Observe Disk Status...............................................................................33
6 System Installation Check List 34
7 Getting Started 36
License and Activation...........................................................................36
Online Activation ..........................................................................37
Offline Activation ..........................................................................37
Step-by-step Activation Process ..................................................38
Online Activation SOP 38
Offline Activation SOP 39
Verify Your License ......................................................................40
8 Log In to the System 41
Access the NVR Server via NVR3 Workstation....................................41
Local Workstation Client Login.....................................................42
A. Enter Account & Password 42
B. Choose the Initial Page 42
C. Language 42
D. Remember Login Information and Auto Login 42
E. Retrieve the Forgotten Password 43
Remote Workstation Client Login.................................................43
A. Server IP & Server Port 43
B. Enter Account & Password 43
C. Choose the Initial Page 43
D. Language 44
E. Remember Login Information and Auto Login 44
F. Retrieve the Forgotten Password 44
G. Server Name/Server Sites List 44
Access the NVR Server via Internet Explorer ......................................46
Accept ActiveX Controls Installation Requests 46

www.acti.com
INR-410/420 System Administrator’s Manual
8
Log in Failure Troubleshooting.....................................................46
Condition 1: Why can’t I access NVR server via web browser? 46
Condition 2: Why can’t I install Active X controls after logging in? 48
Login............................................................................................50
A. Enter Account & Password 50
B. Change UI language 50
C. Remember Account/Password 50
D. Retrieve the Forgotten Password 50
9 Set up the System 51
Setup Wizard...........................................................................................51
System Settings...........................................................................52
Storage ........................................................................................52
NVR Main Screen....................................................................................54
Live View......................................................................................54
Playback ......................................................................................54
Setup............................................................................................54
Add Devices............................................................................................55
Search Devices Within Local Area Network.................................56
Search Devices Within Local Area Network with ONVIF..............57
Add Devices on WAN or Other Local Area Networks...................58
Basic Settings Attributes 59
Device Status...............................................................................60
Status Icon Description 61
Add Non-ACTi Cameras ..............................................................62
Manage Multiple Devices.......................................................................64
Modify Basic Connection Settings................................................64
Delete Devices.............................................................................64
Copy Settings Across Devices .....................................................65
Add Video Streams from a Multi-channel Device.........................66
Configure Device Settings.....................................................................67
Configure Video Format...............................................................67
Video Settings Attributes 67
Save Storage by Setting Event Recording Frame Rate...............68
Schedule Recording 68
Event Recording 68
Event Recording with Frame Rate Adjustment 69

www.acti.com
INR-410/420 System Administrator’s Manual
9
How to Make Use of Event Recording with Frame Rate Adjustment 69
Fine-tune the Image.....................................................................70
Video Adjustment Attributes 71
Configure Motion Settings............................................................73
Adjustment Attributes 74
Configure PTZ Device..................................................................75
Adjustment Attributes 76
How to Do Live PTZ Operation 77
Set PTZ Preset Points..................................................................79
Set PTZ Preset Tour.....................................................................80
Configure Fisheye Cameras ........................................................ 81
Schedule Recordings.............................................................................85
Configure the Recording File Properties......................................85
Attributes Explanation 85
Set the Schedule..........................................................................86
Use Time Setting Quick Buttons to Set the Time in One Click 87
Lock Specific Days 88
Copy an Existing Schedule to Others ..........................................89
View the Entire Recording Schedule............................................90
Event Management.................................................................................91
How Does NVR Handle Events....................................................91
How to Edit an Event Rule...........................................................92
Manage the Event Rules..............................................................96
View the Event Rules 96
Delete the Event Rules 97
How to Setup SMTP Settings for Event Rules .............................97
How to Setup FTP Settings for Event Rules ................................98
System Log.............................................................................................99
Define Search Time ...................................................................100
Choose Log Type.......................................................................100
Read the Log .............................................................................101
Export the Log............................................................................102
Storage Management...........................................................................103
Change Recordings Folder Name..............................................103
Set System Log Lifecycle...........................................................103
Set Hard Drives for the Recorded Files Deletion Rule...............104
Manage User Groups/ Users ...............................................................105
Overview....................................................................................105

www.acti.com
INR-410/420 System Administrator’s Manual
10
User Groups...............................................................................106
Add Users..................................................................................108
Domain Users Management ...................................................... 110
Customize Views..................................................................................111
Step 1: Create a New View........................................................ 112
Step 2: Enter Edit Mode............................................................. 112
Step 3: Select a Layout.............................................................. 112
Step 4: Add Video Source.......................................................... 113
Step 5: Add a Map ..................................................................... 113
Step 6: Add Devices to the Map................................................. 115
Step 7: Adjust the Channel Size & Layout.................................. 116
Step 8: Save the View................................................................ 117
Step 9: Set Default View............................................................ 117
Step 10: Set Default Hotspot Channel (Optional)....................... 117
Step 11: Set Fisheye Camera Mode .......................................... 117
Manage the Views...................................................................... 119
Set View Link .............................................................................120
Set View Patrol ..........................................................................120
Tips to Enhance Live View Performance....................................122
Customize System Language..............................................................124
System Languages List..............................................................124
Display Configurations ........................................................................127
Video & Snapshot Export Configurations ..........................................128
Joystick.................................................................................................129
Joystick Configurations..............................................................129
NVR System Upgrade...........................................................................130
Install the Software ....................................................................130
Workstation Installation and Upgrade................................................134
Install or Upgrade the Software..................................................134
Back Up System Data...........................................................................136
Step 1: Back up System Settings...............................................136
Step 2: Back up Recording Files Folder (Optional)....................137
Step 3: Back up Recording Files Index Folder (Optional) ..........137
Step 4: System Log (Optional)...................................................137
Restore System Data............................................................................138
Advanced Administrative Tasks..........................................................139
NVR Server Status.....................................................................139
Change Server Port ...................................................................139
Change Authentication Method..................................................140

www.acti.com
INR-410/420 System Administrator’s Manual
11

www.acti.com
INR-410/420 System Administrator’s Manual
12
Overview
Product Overview
INR-410/420 is a compact and reliable multi-channel standalone NVR. It contains a
pre-installed Windows operating system, and ACTi NVR 3.0 video management software
along with client software.
This unit is composed of:
Computer
A PC, with Microsoft ® Windows Embedded Standard 7 Professional operating system
pre-installed.
NVR 3.0 Server System
A video management software that allows this PC to become a server, where the system
administrator performs the administrative tasks and NVR server services (event handling,
schedule recording, media streaming, etc) take place.
NVR 3.0 Client Application
The dedicated client application of the NVR 3.0 system - NVR3 Workstation, allowing the
user to directly access the NVR 3.0 system interface. A remote client can also access this
system via network.
Microsoft ® Windows Embedded
Standard 7 Professional
NVR 3.0
Server
NVR 3.0
Workstation

www.acti.com
INR-410/420 System Administrator’s Manual
13
Server / Client Architecture
NVR 3.0 is a typical web-based server/client system. In a video surveillance system
architecture, the Server serves as a video management service provider, aimed to run 24/7
offering non-stop services for clients. A Client makes requests of monitoring video streams or
playback recordings to Server, which can reside on the same computer with server program
(as from local) or on another computer (as from remote). Server starts automatically as soon
as the Server computer (where it is installed) boots up, and operates in the background
without requiring login by administrator. It would provide services over the TCP/IP network to
multiple Clients upon request through HTTP Protocol.
There are two types of Clients in NVR 3.0 system: Web Client and Workstation Client. A
user, connecting from whether web browser or workstation, will enjoy the same user interface
and NVR functions.
Web Client: the web version of interface to access the NVR server without need of installing
any client program to become a client. Logging in the NVR server is as simple as visiting a
website through IE browser.
Workstation Client: the client application accessing the NVR server free from the use of
browser .The workstation includes a set of programs that provide interface between users
and the NVR server.

www.acti.com
INR-410/420 System Administrator’s Manual
14
Getting Started
What’s in the Box
This product package includes the following items:
1
INR-410/420 x1
2
3
4
5
6
Quick Installation Guide x 1
Front Cover x 1
Warranty Card x 1
Power Cord x1
Removable Hard Disk Bays x8
(Installed on the unit)
HDD Tray Keys x 4
8
7
Adapter Converter x1
HDD Screw Pack x 1
9

www.acti.com
INR-410/420 System Administrator’s Manual
15
At a Glance
Front Panel
No.
Description
No.
Description
Disk Bays
USB Ports
System Disk
(DO NOT REMOVE)
Buttons and
System Status LEDs
HDD Status LEDs
HDD Status LEDs
Buttons and System Status LEDs
*The LED icon on the front cover also represents Overheat Alert LED indicator.
Power Button
Reset Button
Power Failure
Overheat Alert
System Power
LAN 2 Connection
LAN 1 Connection
System Activity
*
HDD Activity
HDD Power

www.acti.com
INR-410/420 System Administrator’s Manual
16
Rear Panel
No
Description
No.
Description
AC Power Connector
Power Switch
PS/2 Connector
USB Ports
VGA Ports
LAN 1 Port
HDMI Ports
LAN 2 Port
USB Ports
eSATA Port(s)
INR-410: 2 Ports ; INR-420: 1 Port

www.acti.com
INR-410/420 System Administrator’s Manual
17
Rackmount the Unit
To make system maintenance easier, you may want to put INR-410/420 into the rack. To
rackmount INR, you will need to install INR Sliding Rail Kit, offered as an optional accessory,
on INR and make sure there is 2U space in your rack. For detailed installation instructions,
please refer to Rackmount Installation Guide packed with the sliding rail kit.
Hard Disk Installation
For video recordings, you should install at least ONE certified 3.5-inch SATA hard disk. Be sure
to use the hard disk models ACTi has tested to be compatible with INR-410/420, and it is
strongly recommended that you use hard disks of the same model and capacity. You may find
the certified models via http://www.acti.com/hddselector.
The actual necessary space depends on the number of devices, recording and event rules
settings. To get an approximate value, you may use ACTi software tool Bandwidth & Storage
Calculator at http://www.acti.com/storagecalculator.
You can install up to 7disks in to Storage Disk Bays. During the installation, please avoid
removing the System Disk Bay.
Step 1: Remove the Tray
Slide the Key Lock aside, the Latch Lever
will pop out by itself.
Hold the Latch Lever to pull out the tray.

www.acti.com
INR-410/420 System Administrator’s Manual
18
Step 2: Mount the Disk
Loosen the two screws on the Tray to remove the dummy disk.
Secure the hard disk on the Tray with the disk screws provided, and make sure the disk
connector faces towards the SATA contacts inside the unit.
Step 3: Install the Tray
Press on Key Lock, push the tray into the Bay until it stops.
Press on the Latch Lever until it clicks into place.
Repeat Step 1~3 to finish installing all the storage disks.

www.acti.com
INR-410/420 System Administrator’s Manual
19
Step 4: Attach the Front Cover
Align the left end hooks of the cover to the holes on the left handle.
Press the latch and push the right end toward the right handle until it clicks into place.

www.acti.com
INR-410/420 System Administrator’s Manual
20
Connect the Devices
Follow the procedures to connect the devices. These devices are supposed to get connected
in the sequence shown below.
Step
Description
Connect the VGA monitor to INR.
Connect the USB keyboard and mouse to INR.
Finish setting up your eSATA storage device if needed (e.g. RAID configuration for
multiple disks), connect it to INR and power it on. INR will recognize it as a normal
single hard disk.
Connect the network switch to INR via one of the LAN ports.
Plug the power adapter into INR and electricity outlet.
Connect INR to the Internet if remote management via the Internet is required.
6
Internet
Tip
GNR-3000 supports iSCSI NAS. For detailed information on how to use iSCSI NAS with
GNR-3000, please refer to our article on Using iSCSI NAS with NVR.
Other manuals for INR-410
1
This manual suits for next models
1
Table of contents
Other ACTi Security System manuals