actifio CDS Generation 5 User manual

Actifio CDS Generation 5 Installation
Actifio CDS
Generation 5
Installation
For Internal Actifio Use Only

ii | actifio.com |
Actifio CDS Generation 5 Installation
Copyright, Trademarks, and other Legal Matter
Copyright © 2009 - 2019 Actifio, Inc. All rights reserved.
Actifio®, AnyIT®, Dedup Async®, OnVault®, Enterprise Data-as-a-Service®, FlashScan®, AppFlash DEVOPS
Platform®, Copy Data Cloud®, and VDP®are registered trademarks of Actifio, Inc.
Actifio Sky™, Actifio One™, and Virtual Data Pipeline™ are trademarks of Actifio, Inc.
All other brands, product names, goods and/or services mentioned herein are trademarks or property of their
respective owners.
Actifio, Inc., is a provider of data protection and availability products. Actifio’s technology is used in products sold
by the company and products and services sold and offered by its commercial partners. The current list of Actifio
patents is available online at: http://www.actifio.com/patents/
Actifio believes the information in this publication is accurate as of its publication date. Actifio reserves the right
to make changes to information published in this document, including without limitation specifications and
product descriptions, at any time and without notice. This document supersedes and replaces all information
supplied prior to the publication hereof.
THE INFORMATION IN THIS PUBLICATION IS PROVIDED “AS IS.” ACTIFIO, INC. MAKES NO
REPRESENTATIONS OR WARRANTIES OF ANY KIND WITH RESPECT TO THE INFORMATION IN THIS
PUBLICATION, AND SPECIFICALLY DISCLAIMS IMPLIED WARRANTIES OF MERCHANTABILITY OR FITNESS
FOR A PARTICULAR PURPOSE.
This software and the associated documentation are proprietary and confidential to Actifio. Use, copying, and
distribution of any Actifio software described in this publication requires an applicable software license. Any
unauthorized use or reproduction of this software and the documentation may be subject to civil and/or criminal
liability.
Actifio strives to produce quality documentation and welcomes your feedback. Please send comments and

| actifio.com | Actifio CDS Generation 5 Installation v
Contents
Preface ....................................................................................................................................... vii
Audience...........................................................................................................................................................................vii
Actifio Appliances ............................................................................................................................................................vii
The ActifioNOW Customer Portal ...................................................................................................................................vii
Actifio Support Centers ...................................................................................................................................................vii
Chapter 1 - Racking the Appliance ........................................................................................... 1
Planning the Rack ..............................................................................................................................................1
Unpacking the Components .............................................................................................................................1
Racking the Units...............................................................................................................................................3
Installing the optional cable management arm assembly for the Actifio CDS Generation 5......................................6
Chapter 2 - Wiring the Appliance .............................................................................................. 9
Wiring Power to the Nodes ..............................................................................................................................9
Keyboard-Video-Mouse remote access.........................................................................................................10
Wiring the 10Gb Copper and Optical Ethernet Ports.................................................................................... 11
Wiring the Fibre Channel................................................................................................................................12
Chapter 3 - Configuring the Appliance ................................................................................... 15
Install Requirements .......................................................................................................................................15
Pre-configuration.............................................................................................................................................15
Initial System Configuration...........................................................................................................................16
Creating the Appliance....................................................................................................................................18
Appliance Installer...........................................................................................................................................18
Chapter 4 - Fibre Channel ......................................................................................................... 21
NetApp SANtricity Discovery .........................................................................................................................22
Creating a zone for the Appliance to Storage ...............................................................................................23
Creating Volumes using NetApp SANtricity Storage Manager ...................................................................25
Defining Hosts on Created Volumes LUNs (optional)...................................................................................27
Discovering Storage on the CDS Generation 5.............................................................................................28
Appendix A - Specifications for the CDS Generation 5 Appliance ...................................... 29
Appendix B - Installing the Lantronix SpiderDuo KVM ........................................................ 31
Pre-Installation.................................................................................................................................................31

vi | actifio.com |
Actifio CDS Generation 5 Installation
Setting a Static IP for the SpiderDuo KVM .................................................................................................................... 31
KVM Installation ..............................................................................................................................................34
Accessing the KVM Console (Accessing the CDS Generation 5 remotely)................................................36
Accessing the CDS Generation 5 via SSH.....................................................................................................36
Appendix C - IPv4 & WWPN Worksheet .................................................................................. 37
WWPNS ...........................................................................................................................................................39

| actifio.com | Actifio CDS Generation 5 Installation vii
Preface
This guide provides instructions on how to install Actifio hardware products: the Actifio CDS Generation 5 systems,
Fibre Channel switches, and storage controllers.
This PDF file includes printable worksheets at the end. If you print the worksheets, then you can record useful
information during the installation process.
Audience
This document is intended for use by Actifio employees and authorized third party installers.
Actifio Appliances
Unless otherwise specified, all features and functions described in this document apply to all Actifio appliances.
The ActifioNOW Customer Portal
During the configuration and initialization of your Actifio appliance your Actifio representative provided you with a user
name and password for the ActifioNOW customer portal.
From the ActifioNOW customer portal you can obtain detailed reports about your Actifio appliance, access the Actifio
product documentation, including release notes, and search the knowledge base for answers to specific questions.
To log into the ActifioNOW customer portal:
1. G o t o : https://now.actifio.com.
2. When prompted, enter the user name and password provided by your Actifio representative.
Actifio Support Centers
To contact an Actifio support representative, you can:
• Call:
From anywhere: +1.315.261.7501
US Toll-Free: +1.855.392.6810
Australia: 0011 800-16165656
Germany: 00 800-16165656
New Zealand: 00 800-16165656
UK: 0 800-0155019

viii | actifio.com |
Actifio CDS Generation 5 Installation

1
| actifio.com | Actifio CDS Generation 5 Installation 1
Racking the Appliance
This chapter describes the best practices to rack and mount two CDS Generation 5 nodes to form an Actifio CDS
Appliance.
Racking the appliance includes:
•Planning the Rack on page 1
•Unpacking the Components on page 2
•Racking the Units on page 3
Before You Begin:
Prior to installation, allocate:
• 4U of rack space. A single node is 2U high.
• 4 power connections per cluster. Use two separate power connections on each node.
• DNS servers
• NTP servers
• Netmask
•Gateway
• 4 IPv4 addresses (minimum)
o Appliance IP
o Node IP x 2
o iSCSI IP x 2 (1 of these is optional)
• KVM (optional)
Note: A KVM is required for remote access to the CDS Generation 5.
Planning the Rack
An Actifio CDS Generation 5 appliance operates in an Active-Active pairing. The Primary node has 4 drives,
Secondary Node has 2 drives. For recommended setup, place the Primary node on the top of the cluster and the
Secondary node on the bottom.
Commonly, equipment arranges in the rack with the appliance in the top of the rack, and the fibre channel switches on
the middle of the rack, the storage controller on the bottom of the rack.
IPv4 configuration, found in Chapter 3, Configuring the Appliance, must occur from Primary (the node stacked on
top). Once IPv4 configuration is completed, the Primary becomes the Config node from which most operations of
the cluster take place. The Secondary node becomes used for failover and write capabilities.

2 | actifio.com |
Actifio CDS Generation 5 Installation
Unpacking the Components
The node comes with rails, power cables, management arm, and product safety datasheets.
Retain the product safety datasheets after installation for future use.
Note: Always refer to the safety information found in the included datasheets. Follow outlined safety rules and
guidelines prior to and during installation of a CDS Generation 5 appliance.
Parts provided for the Actifio CDS Generation 5 hardware installation in a rack
The components outlined:
1. Actifio CDS Generation 5 node
2. Actifio CDS Generation 5 support rails
3. Actifio CDS Generation 5 cable-management arm assembly
Note: Two Actifio CDS Generation 5 nodes must be installed to form an Actifio appliance.
Unpacking
Unpack the boxes containing the rail and management arm, and move them to another location for immediate future
use. Next, remove the top cardboard layer to reveal the Generation 5 node. Unpack the packing materials and remove
the CDS Generation 5 node from its box. Retain the packing materials in case you have to move the node to a new
location.
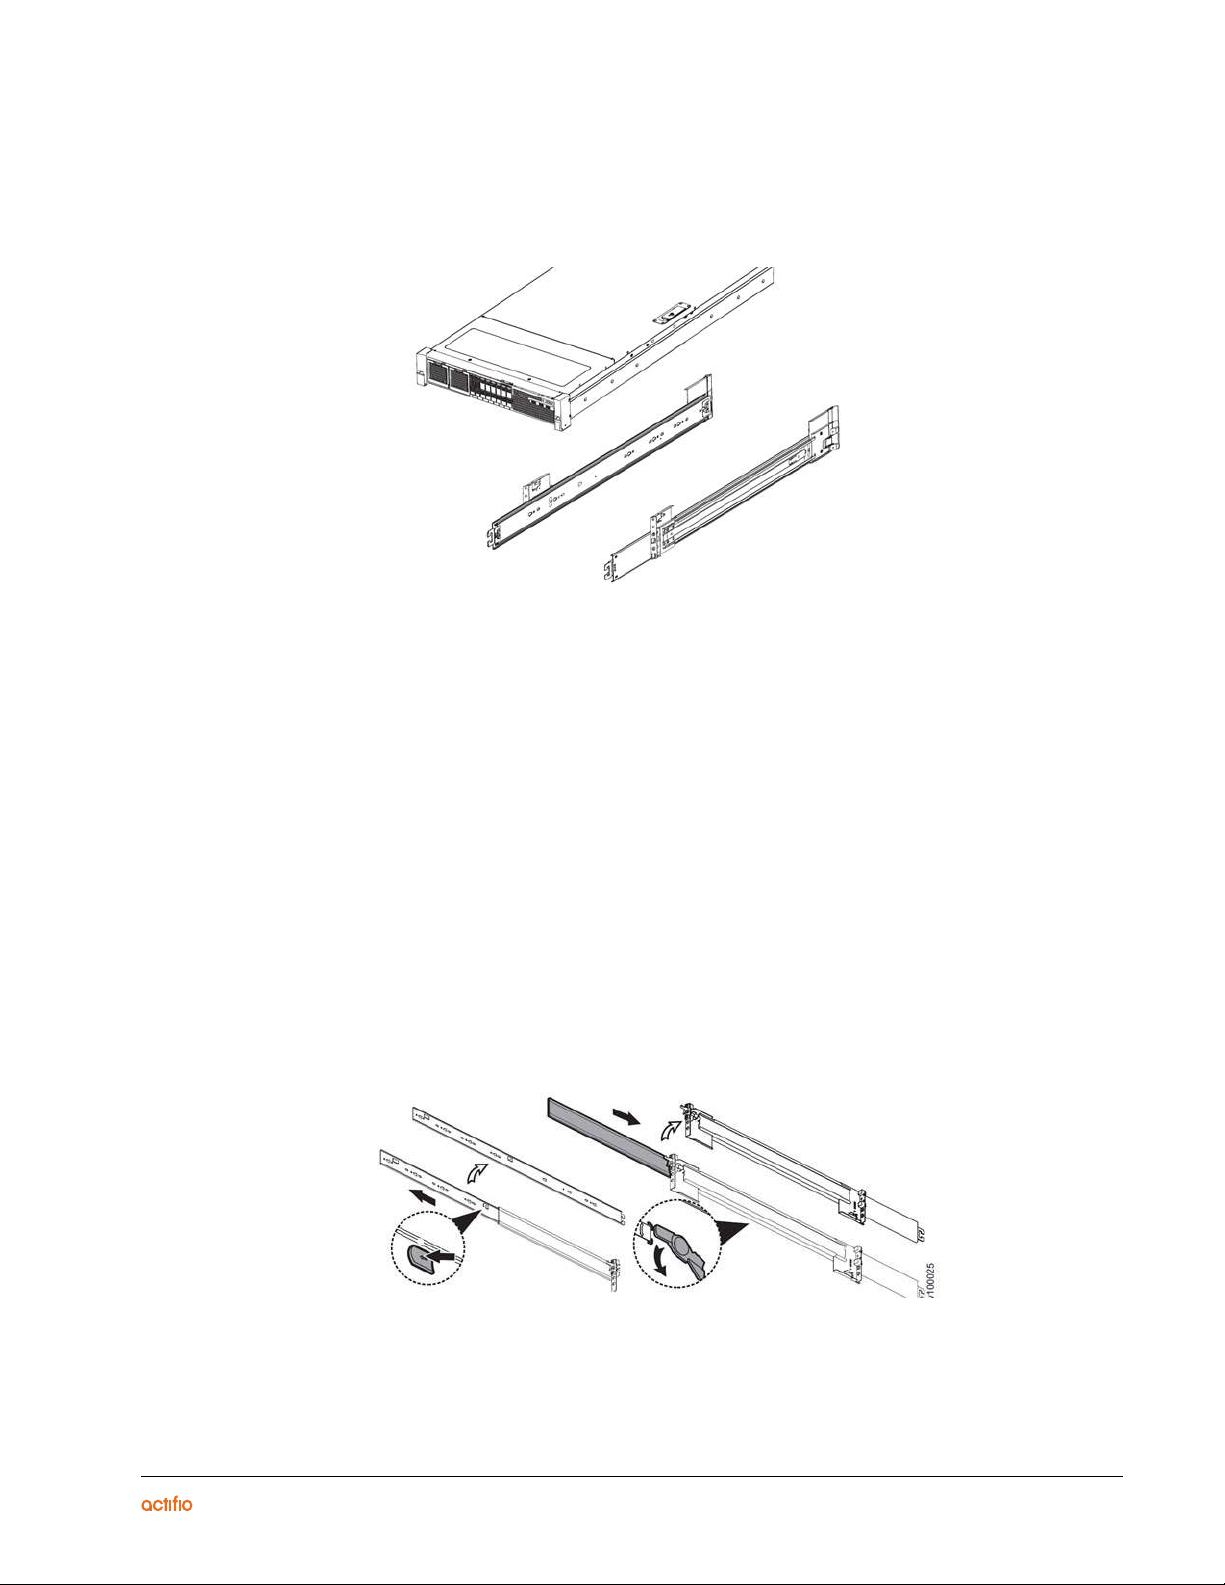
| actifio.com | Actifio CDS Generation 5 Installation 3
Racking the Units
Identifying the rail kit contents
The Actifio CDS Generation 5 uses the IBM SAN Volume Controller 2145-SV1 rail kit.
Components
The sliding rail assembly includes:
• 2 sliding rails (one left side rail, on right side rail)
• 4 M6 screws
• 4 M6 washers
Installing the rails
To install the rails:
1. Ready the hardware used to install the rails, including rail-mounting pins, M5 screws, and M5 washers. Set
the hardware aside for use later in the installation process.
2. Select an available 2U space in the rack to install your node.
3. Detach the inner section of one three-part rail
o Extend the inner part of the rail to its maximum length.
o Pull the inner white tab to remove the rail from its original component.
Fr
Detaching the inner rail section
4 | actifio.com |
Actifio CDS Generation 5 Installation
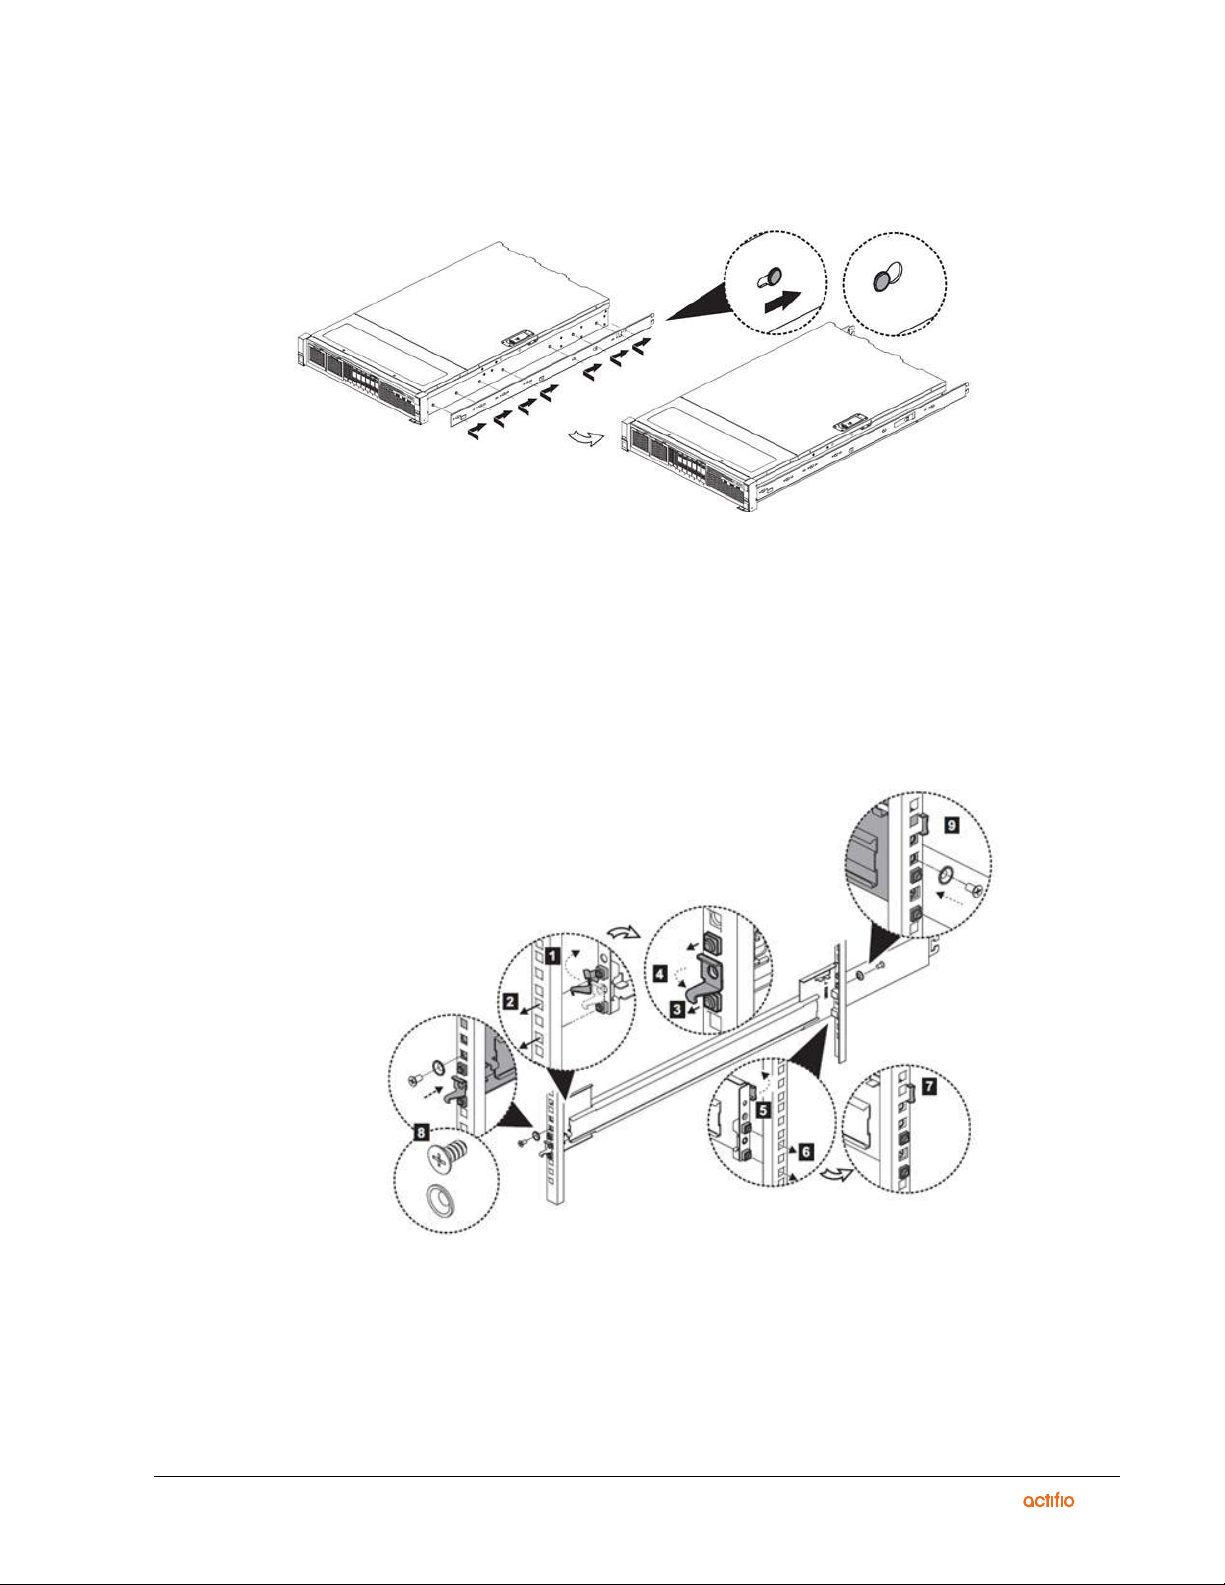
4. Install the inner section of the rail onto the chassis. No screws are required. Fit the holes in the inner rail
section over the heads of the pins on the side of the appliance, then slide the rail toward the rear of the
appliance to lock.
Attach inner rail section to chassis
5. Repeat steps 3 and 4 for the opposite rail.
6. Install the outer section of the rail to the rear frame. Refer to the image below for the numbered parts.
o Open the rear latch hook (5).
o Click the rear bracket into place on the rear frame (6).
7. Close the rear latch hook (7).
8. Install the outer section of the rail to the front frame.
Install the bracket to the frame
o Open the front latch hook (1).
o Fit the tool-less rail-mounting pin to the front rack post (2).
o Click the rail-mounting pin into place (3).
o Close the front latch hook (4).

| actifio.com | Actifio CDS Generation 5 Installation 5
9. Using an M5 x 10 mm screw and M5 washer, anchor the front bracket to the front frame (8).
10. Using an M5 x 10 mm screw and M5 washer, anchor the rear bracket to the rear frame (9).
11. Repeat steps 6 through 10 for the opposite rail.
Installing the CDS Generation 5 into the rack
To install the CDS Generation 5 node into the rack, reattach the rail members to insert the chassis.
Insert the chassis into the rack
Caution: Racking nodes requires two persons.
1. Fully extend the middle member from the outer member on both sides and lock in place.
2. Make sure that the ball bearing retainer is located at the front of the middle member.
3. With the help of two or more persons, lift the chassis until the inner member (attached to the chassis) is
aligned with the outer member (1).
4. Insert the chassis and inner member into the middle member until it stops (2, 3).
5. Pull or push the blue release tab to unlock (4), and then retract the chassis into the rack.
6. If you will ship the rack with the chassis attached, tighten the shipping screws in the front of the chassis
before you sip the rack(5).
7. Push the node inward until the lock levers click into place. There should be no extraneous space between
the front rack and black front-side latches.
6 | actifio.com |
Actifio CDS Generation 5 Installation
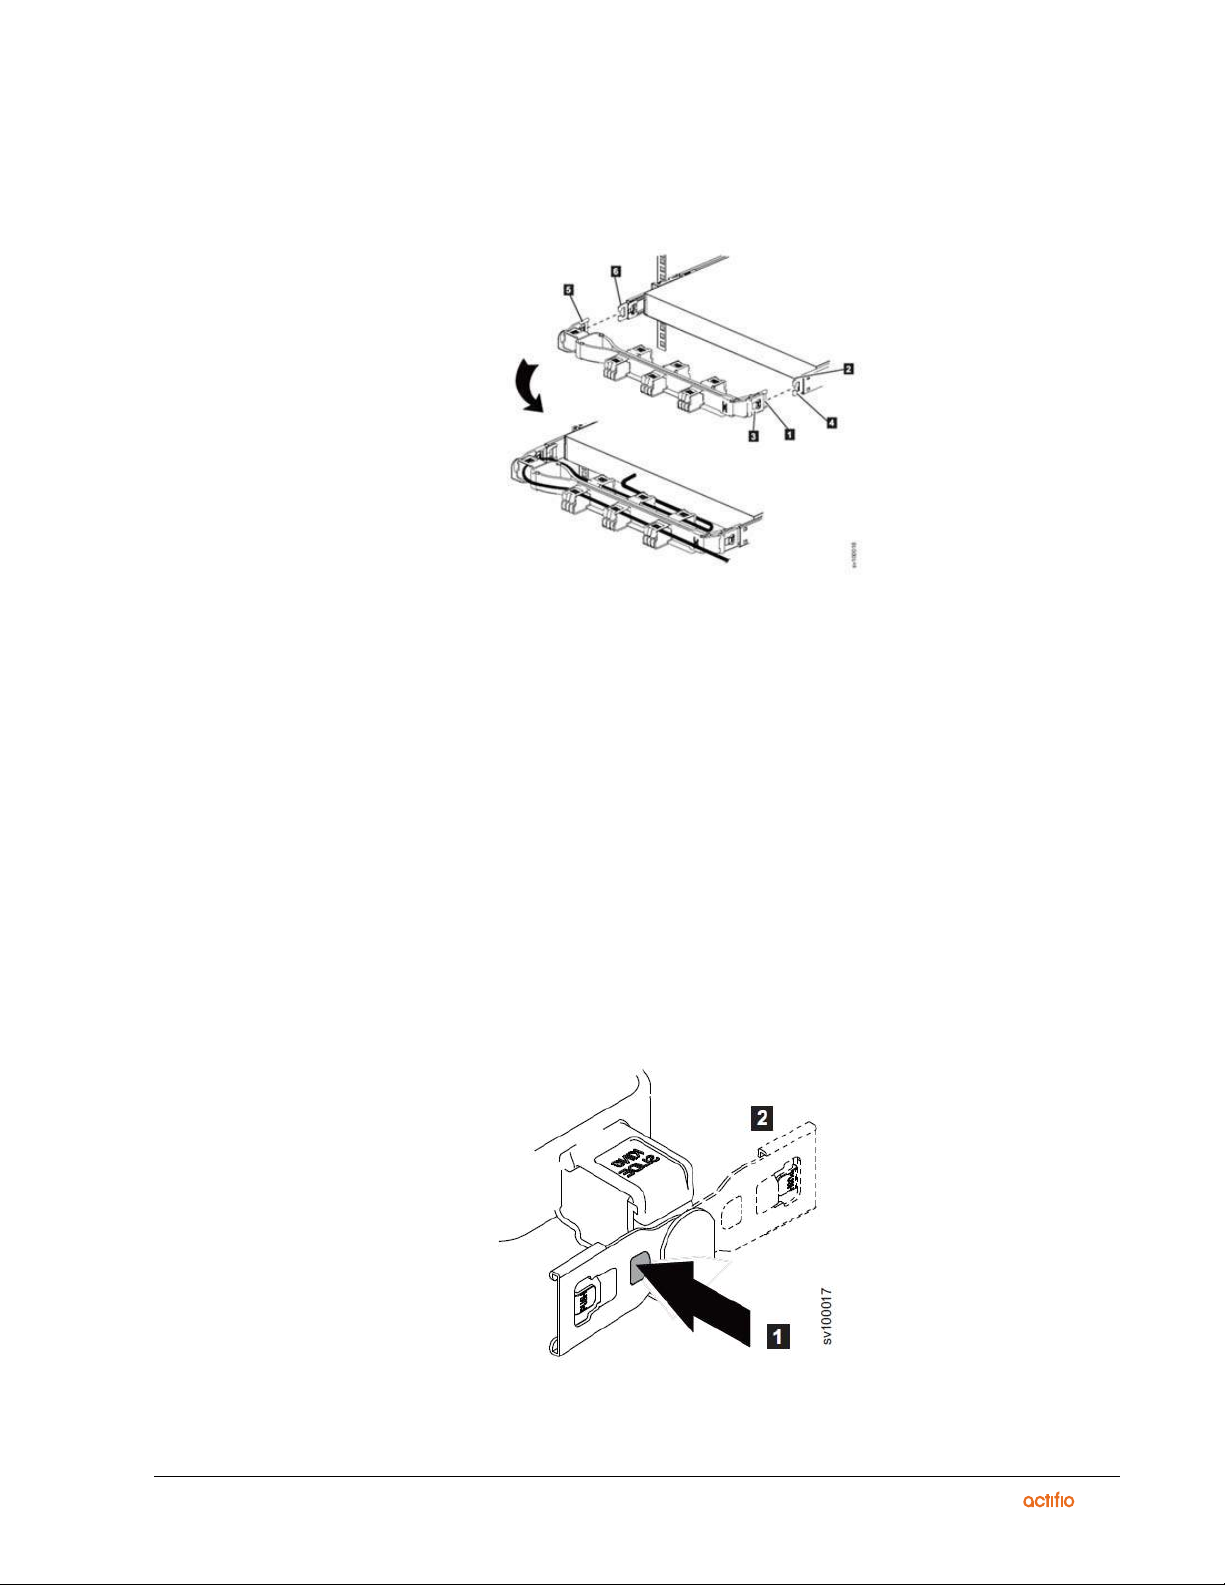
Installing the optional cable management arm assembly for the Actifio CDS Generation 5
The Actifio CDS Generation 5 use a cable management arm (CMA) assembly to route and secure power and data
cables.
Part for installing the CDS Generation 5 CMA assembly
1. CMA inner connector
2. CMA connector base on inner member
3. CMA outer connector
4. CMA connector base on outer member
5. CMA connector beside the center body
6. CMA connector base on outer member
Procedure
To install the CMA assembly, complete the following steps:
1. Optional: You may need to reverse the left-right orientation of the CMA to accommodate the routing of
cables leading to the node. To reverse the orientation of the arm, complete the following steps:
o Press the button marked “PUSH”.
o Turn the connector 180 degrees.
Reverse the orientation of the assembly
| actifio.com | Actifio CDS Generation 5 Installation 7
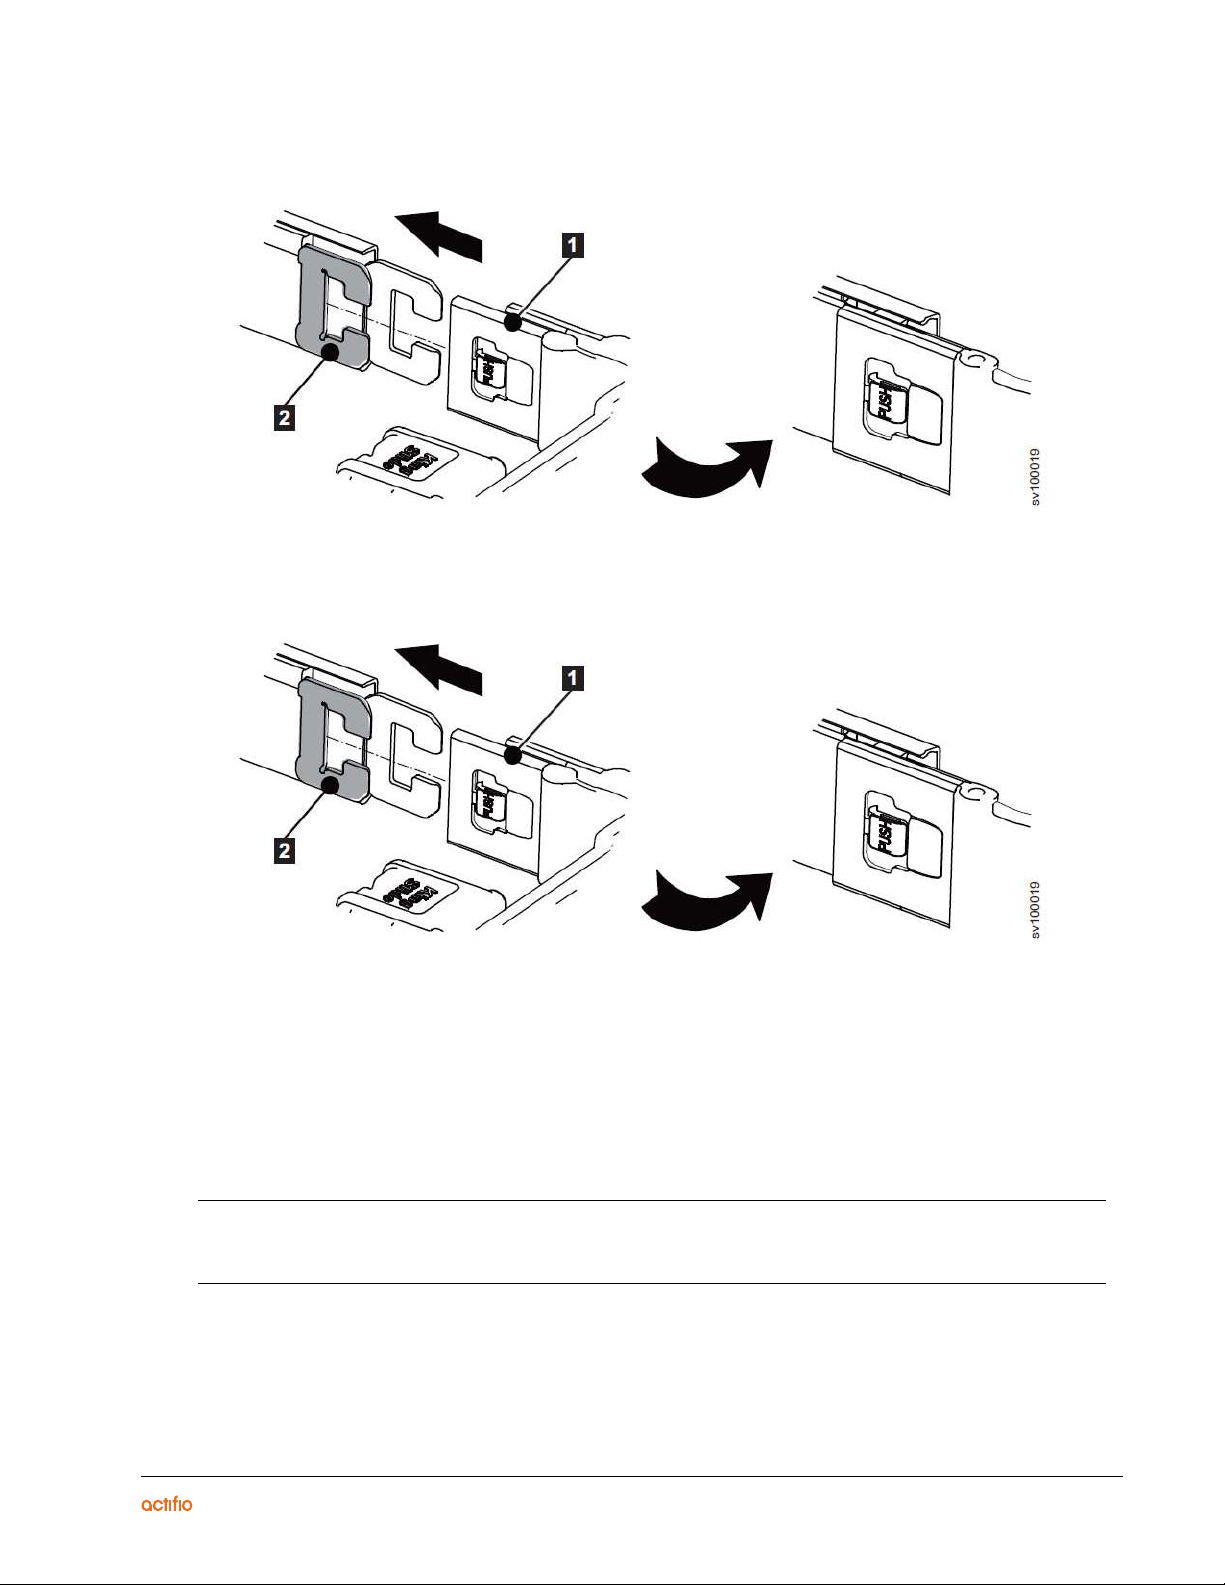
2. Install the CMA inner connector (1) onto the CMA connector base on the inner (2) member.
Install the inner member
3. Install the CMA outer connector (3) onto the CMA connector base on the outer member (4).
Install the outer member
4. Install the opposite CMA connector (5) to the opposite outer CMA connector base (6) as shown in the
following figure.
5. Connect and route the cables.
o Connect the power cords and other cables to the rear of the node.
o Route the cables and power chords on the CMA and secure them with cable ties or hook-and-loop
fasteners
Note: Location of the cable straps can vary in different systems.
Use the cable straps that are provided on the rear of the system to retain the cables and prevent them from sagging
Allow slack in all cable to avoid tension in the cables as the CMA moves.

8 | actifio.com |
Actifio CDS Generation 5 Installation

2
| actifio.com | Actifio CDS Generation 5 Installation 9
Wiring the Appliance
This chapter describes Actifio best practices for wiring the CDS Generation 5 two-node cluster.
Wiring a two node cluster requires:
•Wiring Power to the Nodes on page 9
•Wiring the 10Gb Copper and Optical Ethernet Ports on page 11
•Wiring the Fibre Channel on page 12
Wiring Power to the Nodes
CDS Generation 5 backpanel
Before wiring the Ethernet and fibre channel ports to create a fabric, connect the included power cables to each CDS
Generation 5 node. For maximum redundancy, use two separate power connections for each appliance.
Power Channels

10 | actifio.com |
Actifio CDS Generation 5 Installation
Wiring the network fabric requires the following ports and networks:
Keyboard-Video-Mouse remote access
Attach your KVM to the VGA and USB ports. Follow the individual KVM installation procedure from the manufacturer.
VGA and USB ports
Note: You can use your own or the customer’s KVM, or the Lantronix SpiderDuo KVM available from Actifio. For
instructions on installing it, see Installing the Lantronix SpiderDuo KVM on page 31.
Ports and Network Usage
Quantity Ty p e o f Po r t Use in Network
416Gbs fibre channel ports Fibre channel switches for data protection,
availability, and storage.
410G optical Ethernet Ports Customer environment specific.
310/1G copper Ethernet Port eth0 must be used for Management.
Otherwise customer environment specific.
VGA and
USB
keyboard
Network KVM For remote access of the CDS Generation 5, a
Network KVM must be attached through the VGA
and keyboard USB ports.

| actifio.com | Actifio CDS Generation 5 Installation 11
Wiring the 10Gb Copper and Optical Ethernet Ports
1G/10G copper & 10G optical port locations with numbering
10G/1G Copper Ethernet ports
The management port must be used with eth0, the first (leftmost) port.
The fourth port on the quad 10G/1G card is not used.
When wiring the ports for both nodes:
Minimum installation requirements for a CDS Generation 5 cluster requires both nodes have eth0 attached to
network.
1. Locate the quad 10G/1G ports at the bottom-right of the backpanel, located to the right of the VGA and USB
ports.
2. Connect the 10G/1G copper ports of each node to its corresponding switch.
o The ports (from the left) are labeled Port 1,Port 2, Port 3,and correspond to eth0, eth1, eth2,
respectively.
10G/1G port location

12 | actifio.com |
Actifio CDS Generation 5 Installation
10G Optical Port
When wiring the ports for both nodes:
1. Locate the quad 10G optical ports on the upper-right of the backpanel.
2. Connect 10G optical ports of each node to their corresponding switch.
o The ports from left to right are ordered Port 5,Port 6,Port 7,Port 8, and correspond to eth4,
eth5,eth6,eth7, respectively.
10G Optical port location
Wiring the Fibre Channel
Fibre Channel port location
Wiring the Storage Controller Fibre Channel (SAN Fabric)
Wire all 4 fibre channel ports to 2 separate fibre channel switches for multipathing and redundancy.
When wiring the storage controller:
1. On the primary (top) node, attach 4 x 16Gb to the quad fibre channel card in the top-center of the backpanel
2. The fibre channel cards should be wired to the following switches for maximum redundancy:
Note: Minimum of 2 fibre channel ports required per node.
3. Connect each switch to each SAN storage.
Node to Switch Table
Primary Node
FC HBA 1 FC HBA 2 FC HBA 3 FC HBA 4
FC Switch A FC Switch B FC Switch A FC Switch B
Secondary Node
FC HBA 1 FC HBA 2 FC HBA 3 FC HBA 4
FC Switch A FC Switch B FC Switch A FC Switch B
3
| actifio.com | Actifio CDS Generation 5 Installation 15
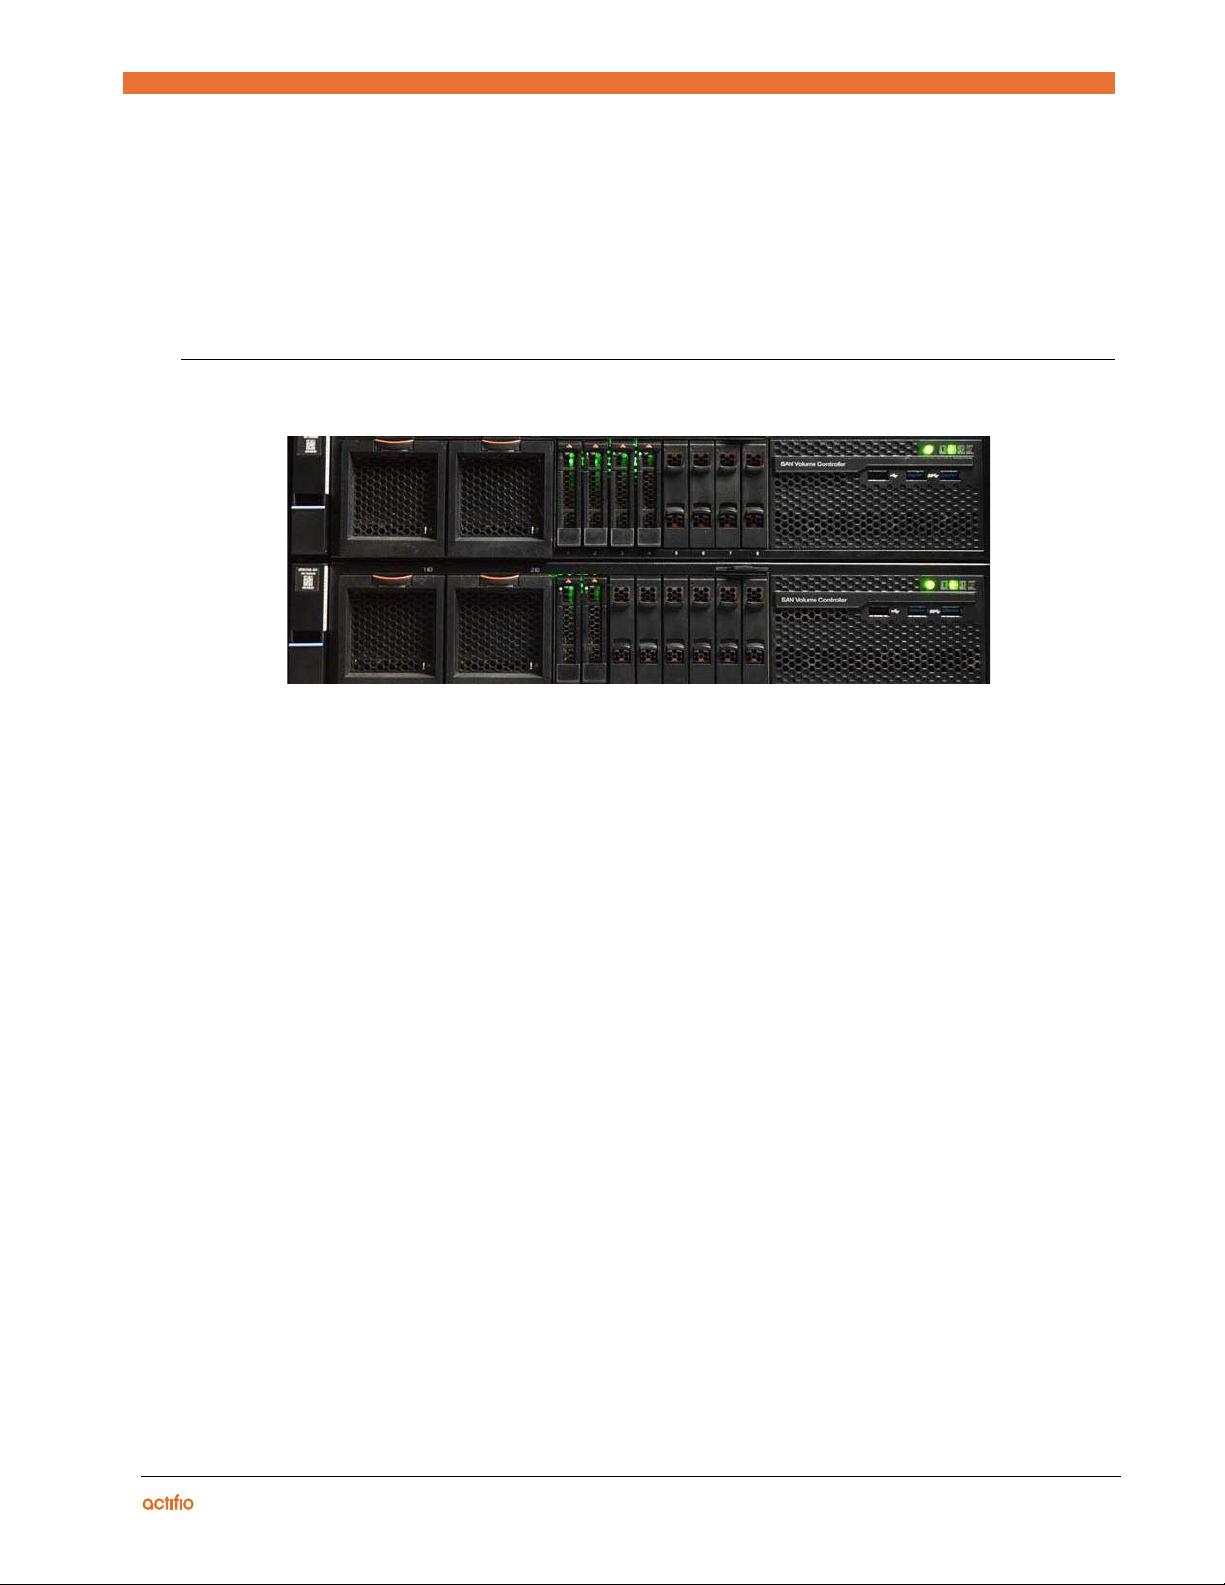
Configuring the Appliance
This chapter describes how to boot, configure, and join two CDS Generation 5 nodes to form an Actifio appliance.
CDS Generation 5 appliance
Configuring the Actifio CDS Generation 5 appliance involves mapping IPv4 addresses allocated by the network
administrator.
Use the IPv4 & WWPN Worksheet on page 37 to record IPv4 addresses and WWNNs.
Configuration procedure includes:
•Install Requirements on page 15
•Pre-configuration on page 15
•Initial System Configuration on page 16
•Appliance Installer on page 18
Install Requirements
The high-level fabric recommended by Actifio requires allocation of IPv4 addresses for:
o Each node
o The Appliance (both nodes together)
o iSCSI for the first node
Worksheets to record the IPv4 addresses allocated by the network admin are found on IPv4 & WWPN Worksheet.
Pre-configuration
After racking, wiring, and recording the allocated IPv4 addresses, map the IPv4 addresses to the appliance using the
front panel. Then, find the WWPNs of each node. After, make the backend storage discoverable, and zone the
appliance with the storage to pair both nodes. Finally, form an appliance cluster, and use the appliance IP to access the
Appliance Installer to allocate IPv4s and storage.

16 | actifio.com |
Actifio CDS Generation 5 Installation
First, confirm both nodes system BIOS are initialized to the factory Actifio settings.
1. Turn on both nodes by pressing the power button( )located on the upper-right-hand side of the node. The
power button is to the left of the status LEDs.
2. Connect to the system console by attaching a VGA monitor and USB keyboard, or remotely through KVM.
Initial System Configuration
Note: You will need two zones: one zone for the nodes and another zone with the nodes and storage.
1. Set the IPv4s for the nodes and appliance, then create the appliance. Set IP: On the primary node via the
front panel (ALT+F3), select Configure Networking.
Front Panel
2. Select Configure Network Port 1.
Configure Network Port 1
3. Set the IPV4 Address, Netmask, and Gateway.
Configure Network Port Panel
4. Repeat steps 1 - 3 for the Secondary node.
Table of contents


