ACTION ELECTRONICS P110 User manual

ACTION ELECTRONICS
P110 Operating Instructions
1. Quick Start Guide
Your P110 comes fully programmed & ready to go, there is no set-
up required – although for more detailed setup refer to section 2.
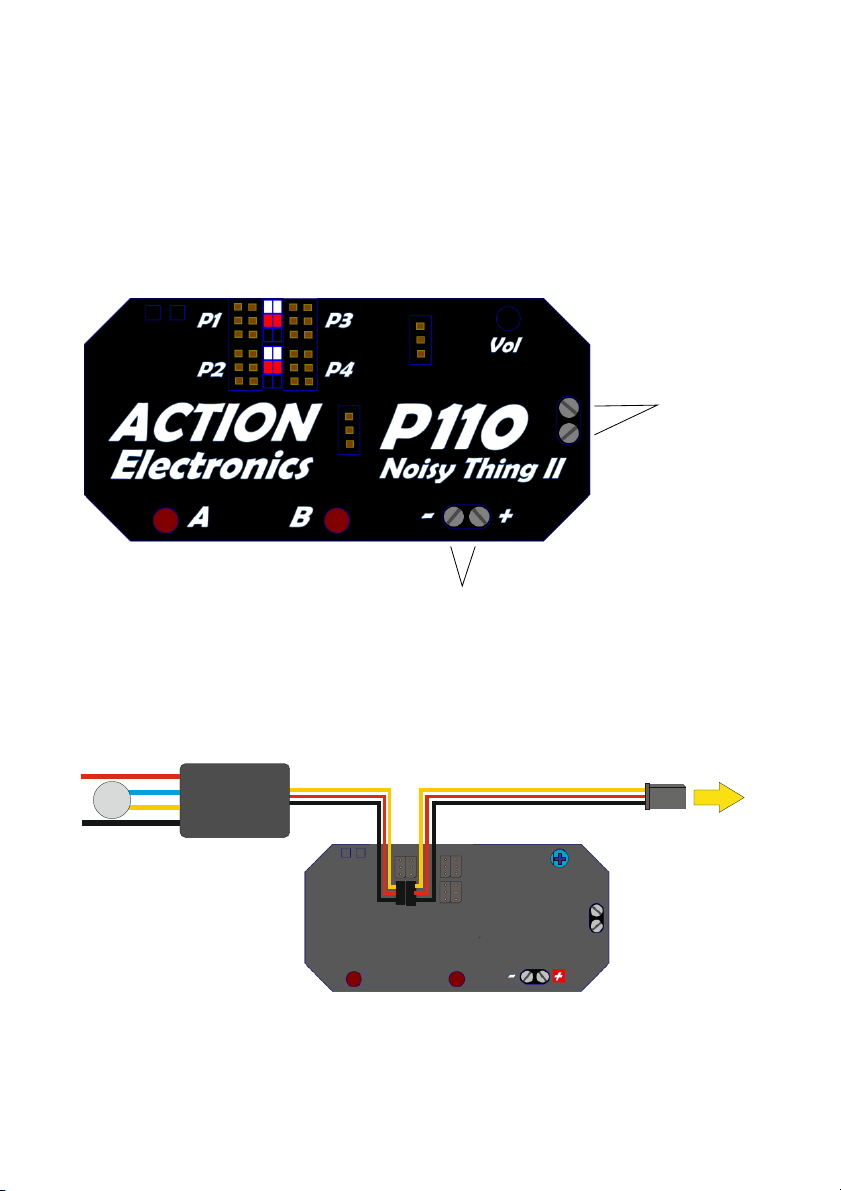
Installation
Speaker
connection
Power input
Sample wiring diagrams:
P1 P3
SW1
VOLUME
SD CARD
SW2
+-
P4
P2
SPEAKER 4-16 Ohms
Rx Throttle channel
Electronic speed controller
Brushed or Brushless, to suit motor
PO ER SUPPLY (8-24VDC)
Mo t o r
SINGLE MOTOR WITH NO ADDITIONAL SOUNDS

P1 P3
SW1
VOLUME
SW2
+-
P4
P2
SPEAKER 4-16 Ohms
Rx Throttle channel
Rx Sounds channel
P1 P3
SD CARD
P4
P2
POW ER SUPPLY 12-24VD C)
Mo tor
SINGLE MOTOR WITH ADDITIONAL SOUNDS
P1 P3
SW1
VOLUME
SW2
P4
P2
SPEAKER 4-16 Ohms
Rx Throttle channel #1
Rx Throttle channel #2
Rx Sounds channel
Electronic speed controller #1
Electronic speed controller #2
SD CARD
+-
PO ER SUPPL Y (12-24VDC)
Mo tor
Mo to r
TWIN INDEPENDENT MOTORS WITH ADDITIONAL SOUNDS

There are four inputs to the P110 (P1 – P4) which control sounds as follows:
P1 Individual sounds 1 – 1
P2 Engine sound #1
P3 Individual sounds 1 – 1
P4 Engine sound #2
Each of the inputs has two 3-pin headers which will accept a standard
Futaba or JR/Hitec servo lead. The P110 is supplied with four male-male
servo leads for connection to a receiver. Where the P110 is connected in-
line between the receiver and ESC connect the male-male lead to one
header & the lead to the ESC to the other. It doesn’t matter which lead is in
which position.
The P110 has two groups of control inputs – P1/P2 & P3/P4 and is capable
of playing two sounds simultaneously, providing it is one sound from each
group. i.e. it will play an engine sound from P2 & individual sounds on P3. If
P1 & P2 are used, the engine sound will stop when an individual sound is
played.
When connecting servo leads to the P110 the signal wire (white, orange or
yellow depending on servo lead type) should go to the closest pin to the
edge of the P110, however no damage will be caused if the connection is
made incorrectly, but the P110 will not respond until the connector is put in
the right way round.
Power should be supplied directly from the main battery. It is
recommended that the system is run from 12V to 24V. Operation from a
battery of more than 24V is not recommended and may cause damage to
the P110. The P110 can operate down to 8V though the output volume will
be reduced. The main circuits of the P110 will operate down to 4.8V but an
external amplifier would need to be connected to the stereo output
connection – see Section 2. Advanced Features for more details. A separate,

external voltage booster can also be used to provide the P110 with a 12V
input where the battery used is below 8V.
The amplifier will output up to 25Watts, but it is recommended that the
power is kept to 10W to minimise heating within the unit. The speaker can
be either 4 or 8 ohm. The output volume is set using R18. Set the volume as
high as required without distorting the sound.

Power up
When the system is powered up, it performs a set of diagnostics to ensure
the system is able to run. The status is indicated by the LEDs:
A rapidly flashing red LED indicates that either no SD card is inserted or the
write protect is set. Insert the SD Card after ensuring the write protect is
disabled.
If the SD card with the write protect set off is detected, the LEDs change to
rapidly alternating red and green. The P110 stays in this state until it
detects a valid signal from the receiver on one or more of its input.
Once a servo signal is detected the LEDs change to a slow alternating red
and green. After a few seconds the LEDs switch off and the P110 is ready for
normal operation.
Operation
Once the system has started up, the engine sounds can be started by
pushing the appropriate throttle lever past the neutral position in either
direction. This will play the engine start sound followed by the run sound. If
the throttle is left in the neutral position for more than 0 seconds, the
P110 will play the engine stop sound and silence the engine sound. The
other sounds can still be played

If there are switched sounds on the SD-Card (sounds sound1.wav to
sound1 .wav), they are selected using switched channel P1 and switched
channel P3. Sounds 1 to 8 are selected by pushing the stick forward and
back to the neutral position the appropriate number of times. To make
selection easier for the higher numbered sounds, pushing the stick
backwards and back to neutral once will play sound 9, twice will play sound
10 and so forth up to 8 times will play sound 1 . If a switched sound is
playing it can be ended by selecting another sound to play.
Inputs P1 & P3 both access the same sound files, so you can play all 1
sounds from just one channel of your transmitter, however, if you use two
channels of your transmitter you can then access different sounds at the
same time.
Sounds 1 to 8 play once and then stop. Sounds 9 to 1 play continuously
once selected – they can only be stopped by selecting another sound to
play. Selecting a switched sound to play while another is playing will make
the system play the second sound once the first one has finished. If multiple
sounds are selected while one is playing, only the last one selected will be
played once the first sound has finished. To stop a looped sound from
playing without playing another sound, you need to select a sound which
has not been setup (does not have a corresponding sound file). This will
stop the looping sound playing once the sound has reached the end.
Selecting the non-setup sound will have no effect on a non-looping sound
(sounds 1 to 8)

2. Advanced Features
Adjusting idle & ull speed sounds
Setup
Only enter the setup if you need to change the idle &/or full throttle
speeds.
First of all make a backup of the files on the SD memory card supplied with
your P110. The file that is changed in the setup process is “settings.fil”
copying this file back to the memory card from your backup will restore
your P110 to its default setting.
Setup requires a receiver to be connected to the Channel 1 throttle input
(P2), the SD card inserted, & there needs to be a “run.wav” file holding the
engine sound.
Power up the P110 in the normal way, but as the LEDs are flashing Pressing
either button A or B & the P110 will enter setup. If no button is pressed the
LEDs are switched off and the P110 starts normal operation.
The P110 flashes the green LED slowly. Set the throttle to the maximum
position and press button A to confirm the maximum position has been set
on the throttle. The LED changes to alternating red and green
Press button B to move onto the next stage. If you wish to change the
maximum throttle position, set the stick accordingly and press button A
again then press button B to move to the next stage.

The green LED flashes twice rapidly with a gap between. Set the throttle to
the neutral position. Press button A to confirm the neutral position has
been set on the throttle. The LED changes to alternating red and green
Press button B to move onto the next stage. If you wish to change the
neutral throttle position, set the stick accordingly and press button A again
then press button B to move to the next stage. If there is a “run.wav” sound
on the SD-CARD the P110 starts to play it.
The P110 flashes the red LED slowly. Adjust the throttle stick to set the idle
speed of the engine sound and press button A to confirm the idle speed
has been set. The LED changes to alternating red and green
Press button B to move onto the next stage. If you wish to change the idle
speed , set the stick accordingly and press button A again then press button
B to move to the next stage.
The red LED flashes twice rapidly with a gap between. Adjust the throttle
stick to set the maximum throttle speed of the engine sound and press

button A to confirm the maximum speed has been set. The LED changes to
alternating red and green
Press button B to move onto the next stage. If you wish to change the
maximum engine speed , set the stick accordingly and press button A again
then press button B to end the setup and enter normal operation.
Creating Sound Sets
Individual sounds should be created as Microsoft compatible WAV files. The
P110 supports 8, 1 and 24 bit mono or stereo data. The sample rate
should be 22,100Hz if you want to play two samples simultaneously. You
can use CD quality wave files (44KHz sample rate) but the P110 will only be
able to play one sample at a time. For engine sounds, the sample rate
should be kept as low as possible while maintaining a good quality idle
sound.
There are three distinct files for the engine – a start sound, a run sound and
a stop sound. These should all be at the same sample rate. Also to prevent
an audible click as the sounds transition from one to another, they should
all start and finish at zero amplitude. This is easily achieved with a wave
editing tool such as Audacity.
The sounds for a sound set should be copied to the root directory of the SD-
Card and titled as followed:
•sound1.wav – Sound number 1
•sound2.wav – Sound number 2
•sound3.wav – Sound number 3

•sound4.wav – Sound number 4
•sound5.wav – Sound number 5
•sound .wav – Sound number
•sound7.wav – Sound number 7
•sound8.wav – Sound number 8
•sound9.wav – Sound number 9
•sound10.wav – Sound number 10
•sound11.wav – Sound number 11
•sound12.wav – Sound number 12
•sound13.wav – Sound number 13
•sound14.wav – Sound number 14
•sound15.wav – Sound number 15
•sound1 .wav – Sound number 1
•start.wav – Engine start sound
•run.wav – Engine running sound
•stop.wav – Engine stop sound
The P110 will not recognise sounds with other names. If a sound is not
present on the SD-Card, the unit will skip playback if it is selected. This
includes the engine sounds. For example if there is no engine start sound,
the engine run sound will play as soon as the throttle stick is moved from
the neutral position.
Sounds 1-8 will each play just once, whereas sounds 9-1 will play
continuously until stopped – by selecting a different sound. It is
recommended that you omit one sound file, say sound 9, which can then be
easily selected to stop a repeating sound (if there is no file stored as sound9
the P110 will simply stop whichever sound was looping) This will not
interfere with the engine sound.

Memory Card
The P110 is supplied with an SD type memory card with a set of sounds
already stored on it. For the P110 to play other sounds you simply need to
copy the files you need to any standard SD memory card & name them as
per the previous table.
Further Advanced Features
The P110 can read stereo files, however these are converted to mono for its
internal amplifier, the P110 can be connected to a separate stereo amplifier
if desired.
Table of contents


