ActiveAid 202 User manual

• StainlessSteelFrames–3yearwarranty
• Brakemechanisms,lockingmechanisms,wheelsandcasters–1yearwarranty
• Othermetalandstructuralpartsnotofstainlesssteel--1yearwarranty
• Upholsteredcomponents,plasticpads,rubberparts,paintedsurfaces,bearingsandotherpartsnot
specicallyidentiedabove–6monthswarranty
ACTIVEAID’sSOLEOBLIGATIONANDYOUREXCLUSIVEREMEDYUNDERTHISWARRANTYSHALLBE
LIMITEDTOSUCHREPAIRAND/ORREPLACEMENT.Thiswarrantydoesnotincludeanylaborcharges
incurredinreplacementpartsinstallation.Forwarrantyservice,pleasecontacttheauthorizedsupplierfrom
authorization.
LIMITATIONSANDEXCLUSIONS:Theforegoingwarrantyshallnotapplytoserialnumberedproductsifthe
serialnumberhasbeenremovedordefaced.Productssubjecttonegligence,abuse,misuse,improper
thatevaluationwillbesolelydeterminedbyActiveAid.ProductsmodiedwithoutActiveAid’sexpresswritten
consent(includingbutnotlimitedto,modicationthroughtheuseofunauthorizedpartsorattachments)arenot
originalequipmentspecicationsareaddedtoanActiveAidproduct.
THEFOREGOINGWARRANTYISEXCLUSIVEANDINLIEUOFALLOTHEREXPRESSWARRANTIES.
ACTIVEAIDSHALLNOTBELIABLEFORANYCONSEQUENTIALORINCIDENTALDAMAGESWHATSOEVER.
specications,andpriceswithoutpriornotication.CheckwithActiveAidforlatestinformation.
101ActiveaidRoad•RedwoodFallsMN56283USA
800•533-5330•PH(507)644-2951•FAX(507)644-2468•customerservice@activeaid.com
OWNER’S MANUAL
202
right to change features, specications, and prices without prior notication. Check with ActiveAid for latest information. FORM 202MAN 121819 REV A
Copyright © 2019 ActiveAid, llc. All rights reserved. Printed in the U.S.A.
LimitedWarranty
Please ensure the Owner’s Manual stays with the unit at all times.

Maintenance
•ItisnecessarytoinspectyourShower/Commodechairatleastweeklytoensureitisinsafeoperatingcondition.
•Checkallfasteners(snapbuttons,screws,nuts,bolts,clips,pullpins,handles,etc.)toensuretheyarepresent
•Checkupholsteryfortearsandcracks.
•Checkbeltsforfraying,cuts,tears,broken/wornstitchingandbucklesforcracksordamage.
•Checksuctioncupsandcrutchtipsforatspots,cracks,andwear.
•Replacedamagedorworncomponents.ContactyourSupplierforrepair/replacementofsaidpartsbefore
•UseonlyrecommendedActiveAidreplacementparts;useofanyotherpartsmayvoidyourwarrantyandcause
•Aftereachshoweruse,rinsethedevicewithwatertoremovesoapresidue.Usingasoftnon-abrasiveclothor
•Whencleaningtheunit,useamilddetergentwithasoftnon-abrasiveclothorsponge.Donotuseharsh
•Upholsterypadsmaybecleanedwithanon-abrasive,non-alcohol-basedsoaporsanitizedusingableach
dilutionofupto1:10.Note,manyanti-bacterialanddisinfectantproductscontainalcoholandshouldnotbe
usedontheupholstery,duetothedryingeectofthealcohol.Chooseanon-alcohol-basedsanitizer.
GermicidalwipesthatareratedtokillC-dicilesporesmaybeusedontheupholsteryandtheepoxycoated
•UrethaneCoatedFabricsmaybecleanedwithaspongeordampclothtowipethesurfacecleanwithwarm
Whenaskingyoursuppliertoorderreplacementparts,pleasespecifytheserialnumberofthe202unit.
YourSupplierwillcontactActiveAidCustomerServicetoobtainthenecessaryitemsforyourspecicunit.
Ifyouhaveanyquestions,pleasecontactyourlocalsupplierorcallActiveAid,LLCat1-800-533-5330or
1-507-644-2951.
PartsReplacement
DATE OF MANUFACTURE
SEE INSTRUCTIONS FOR USE
MANUFACTURER
SYMBOL LEGEND
!
!
CAUTION/ATTENTION
SERIAL NUMBER
SN
Please be environmentally responsible and
recycle this product through your recycling
facility at its end of life.
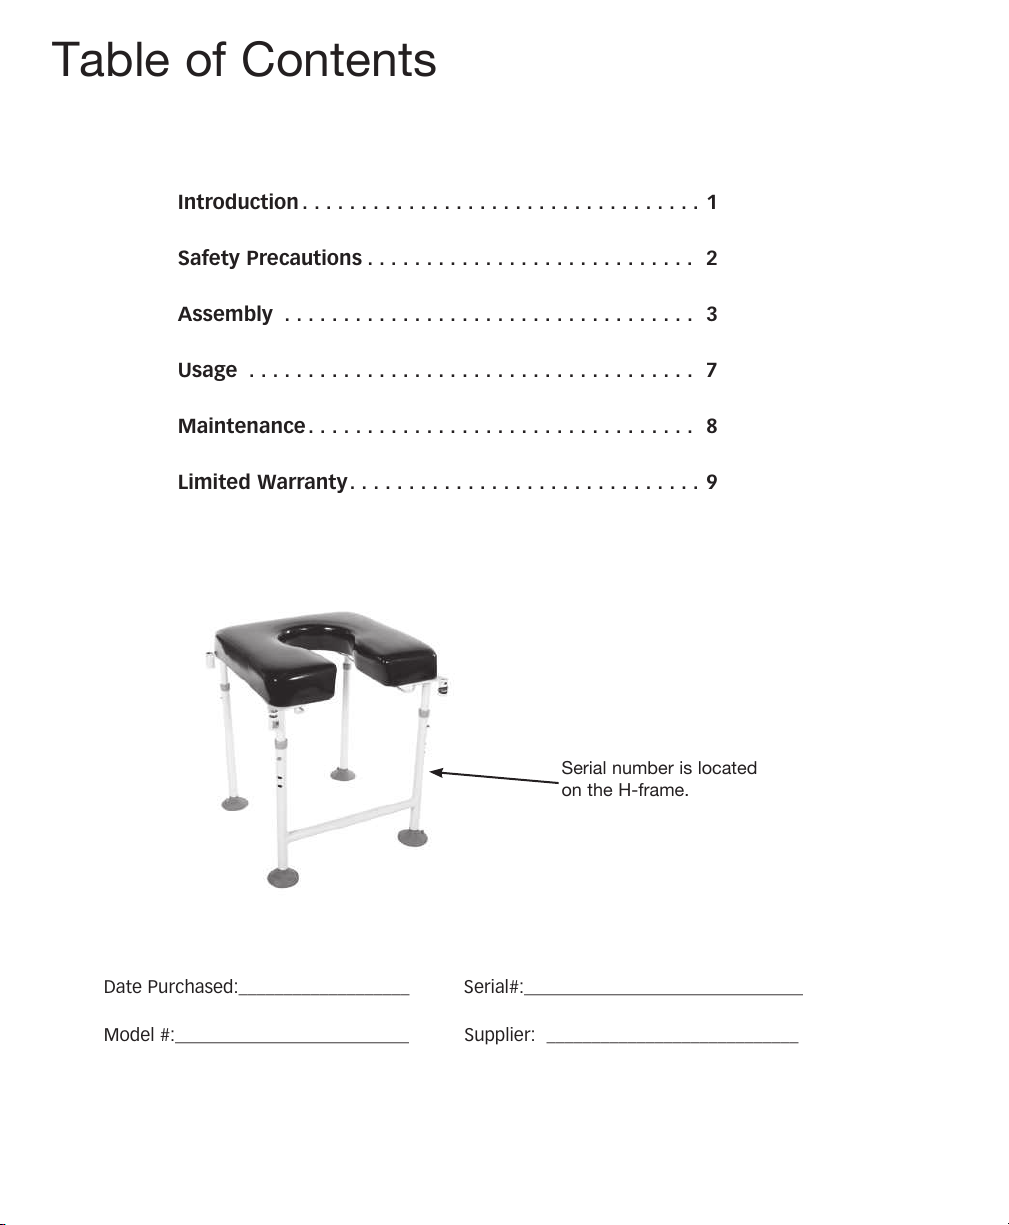
Introduction ..................................1
Safety Precautions ............................ 2
Assembly ................................... 3
Usage ...................................... 7
Maintenance................................. 8
Limited Warranty..............................9
Date Purchased:___________________ Serial#:_______________________________
Model #:__________________________ Supplier: ____________________________
Table of ContentsUsage
Toadjusttheheight,depressthesnapbuttonandslidethelegextensionsandH-framelegassemblyup
Rinseanddrythesuctioncupspriortousetoremoveanydust,etc.Clean,rinseanddrythesmooth
atooringsurfacewhichtheyareintendedtostickto(removinganymineraldeposits,soapscum,etc.)
Presseachindividualsuctioncupintothesmoothooringsurface.Tomovetheunitwithsuctioncup
option,breakthesealofthesuctioncuprstbyliftingonthelipofthecuptoallowairtogetintoit.
Toadjustthetransferbenchsupportextensions,rotateupordown.
Makesurebothareadjustedtothesameheight.
Toadjustheightofthetransferbench,onthesupportextensionsdepressthesnap
Makesurebothareadjustedtothesameheight. Serialnumberislocated
ontheH-frame.
Introduction
CONGRATULATIONS!Youhaveselectedoneofourmanynemobilityproducts.YourShower/CommodeChair
has been carefully designed and fabricated focusing on customer needs.
Shower/Commode Chair Description
ActiveAid shower and commode products are intended for individuals who are able to transfer independently or
with assistance from a caregiver. They are a useful tool for rehabilitation or home use. ActiveAid shower and
commodeproductscanbeindividuallyconguredtomeetthespecicneedsofanindividual.
Indications for Use
The Shower/Commode Chair is indicated for most individuals weighing up to 350 lbs.(158kg).
Intended Use
ActiveAid shower and commode products are intended to assist disabled individuals in performing activities of
daily living (toileting and bathing).
This device is designed and intended for shower/commode use in accessibility compliant environments.
Accessibilitycompliantenvironmentsgenerallyoutlinethatooringsurfacesaretobestable,rmandslip
resistant.Ifgroundandoorsurfacesareencounteredthatarenotwithintheappropriateaccessiblestandards,
the area in question should be brought within the code for disability accessibility before using the device.
This manual is an integral part of your Shower/Commode Chair product and should be read completely and
thoroughly by anyone that will be operating the unit. This will ensure the product is assembled properly and
usedinthemostbenecialmanner.
The ActiveAid 202 should only be used under the guidance of a physician or therapist. Consult your physician or
therapist for proper transfer techniques.
Shouldanyproblemarisethatyoucannotsolvebyreadingthismanual,pleasecontactyourlocalsupplierorcall
ActiveAid,LLC
ItisnecessarytoinspectyourShower/Commodechairatleastweeklytoensureitisinsafeoperatingcondition.
Adjustmentsthatarelistedintheproductowner’smanualcanbemadebytheoperatorbyfollowingthe
instructionsforuse.Afteranadjustmentismade,inspecttheunittoensureallhardwareandadjustable
componentsareproperlysecuredpertheinstructionsforuse.Replacementofwornparts,majoradjustments,
oranyotherimportantcorrectionsshouldbehandledbyanauthorizedsupplier.OnlyActiveAid,LLCapproved
replacement parts should be used to ensure safety and performance.
THANKYOUFORBUYINGANACTIVEAIDPRODUCT!
IftheB-Otransferbenchwasordered,setbench
upsidedown(withlegsupinair).Placeeachtransfer
intopositionandsnapbuttonin,toremoveipleveron
1

SafetyPrecautions
•Pleasereadandunderstandallsafetyprecautionsanduserinstructionspriortouse.
•TheShower/Commode chair is designed to accommodate most individuals up to 350 lbs. (158kg).
•Theexpectedservicelifeofa202productis3yearsundernormaluseconditions.Note: this may vary based on
frequency of use.
•ActiveAidproductsarespecicallydesignedtobeusedwithActiveAidaccessoriesandoptions.Unless
otherwise noted, accessories and options from other manufacturers have not been tested by ActiveAid and are
not recommended for use with ActiveAid products.
•Productmodicationsmadewithoutexpresswrittenconsent(includingbutnotlimitedto,modicationthrough
theuseofunauthorizedpartsorattachments)arenotrecommendedandwillvoidtheproductwarranty.
•Thisequipmentisdesignedtoaccommodatearangeofusers;therefore,theunithasvariousadjustmentslots
andholes.Avoidplacingngersorotherbodypartsinanyoftheseareas.
•Pleasedisposeofpackagingmaterialsproperly.Keepplasticbagsawayfromchildren.
•Donotmakeheightadjustmentswhileseated.
•ActiveAidshower/commodechairsaredesignedforindooruseonly.
•Donotsubmergetheshower/commodechair.
•Extrememovementslaterallyorfronttobackmaycausetheunittotip.Thesemovementswillcauseachange
to the normal center of gravity of the chair.
•Whentransferringensurethattheswingawayarmsarelockedintoposition.
•Donotliftthechairbyremovable(detachable)components.
•Caution: Check all fasteners before operating.
•Caution: It is necessary to periodically check all fasteners (snap buttons, screws, nuts, bolts, clips, pull pins,
handles, etc.) to ensure they are secure.
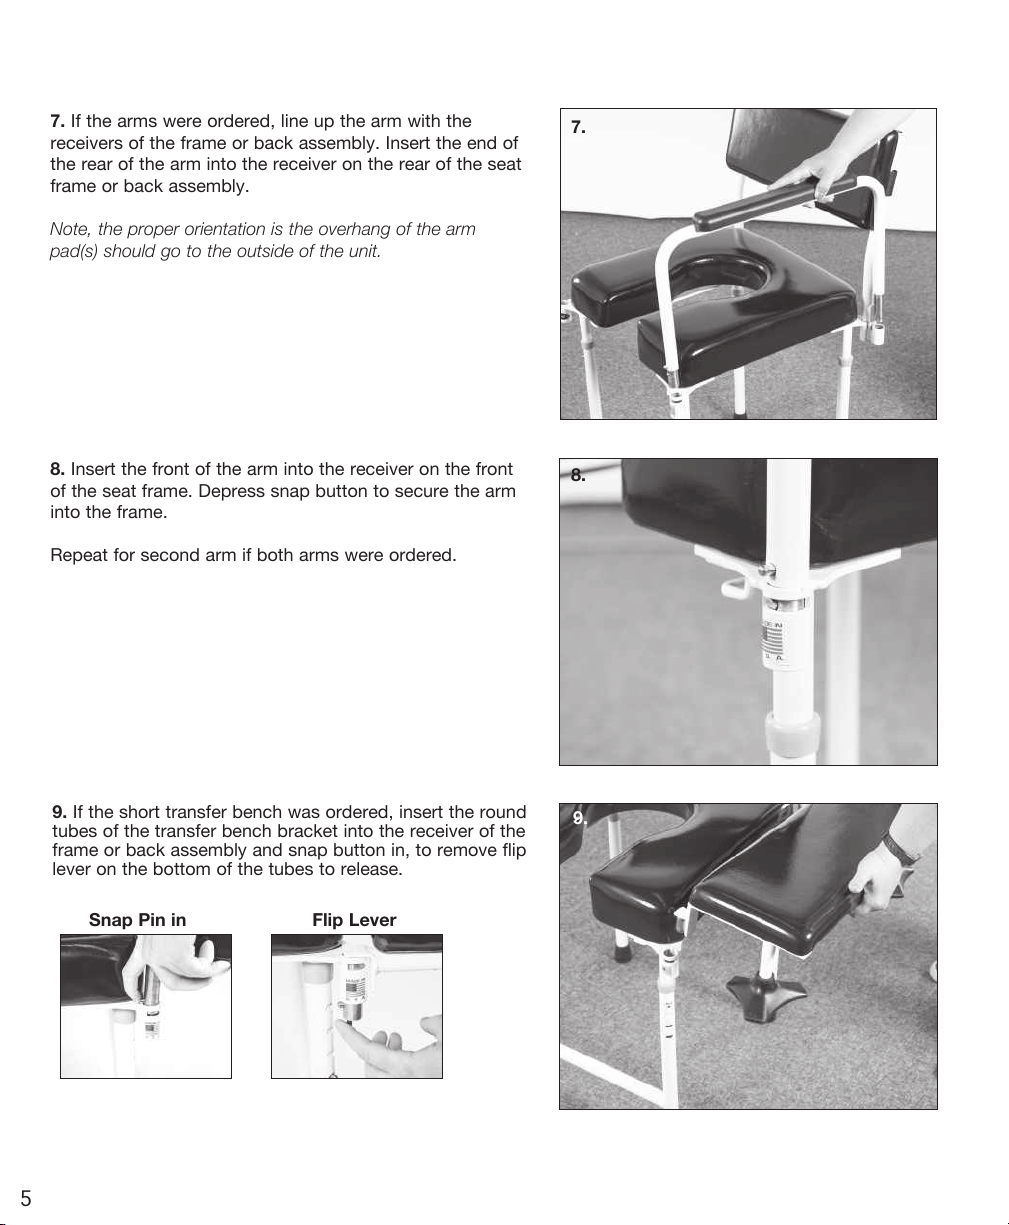
Repeatforsecondarmifbotharmswereordered.
frameorbackassemblyandsnapbuttonin,toremoveip
2

3
Assembly
1. Removeallpartsfromtheshippingcontainer(s).
Removeallpackingmaterialfromtheparts.Recycle
shipping and packing materials in accordance with the
recycling codes of your location.
Placethebaseupsidedownontotheoor(seattopon
oor,framelegsupinair).
2. ChoosetheH-framelegassemblyandlineupwith
twoframelegs.ActiveAidrecommendstheH-frameleg
assembly is used across the seat opening side of the unit.
3. DepressthesnapbuttonsandslidetheH-frameleg
assembly onto the frame.
Note: The H-frame assembly goes with two frame legs on
the same side of the unit, not opposite corners.
1.
2.
3.
No tools are required for setup
Repeatforsecondlegextension.
through the receivers and hold the back from coming o.

Removeallpartsfromtheshippingcontainer(s).
Removeallpackingmaterialfromtheparts.Recycle
Placethebaseupsidedownontotheoor(seattopon
oor,framelegsupinair)
ChoosetheH-framelegassemblyandlineupwith
twoframelegs.ActiveAidrecommendstheH-frameleg
DepressthesnapbuttonsandslidetheH-frameleg
4
4. Choose one leg extension and line up with one of the
remaining frame legs. Depress the snap button and slide
the leg extension onto the frame.
Repeatforsecondlegextension.
Note: Make sure that all leg extensions and H-frame
assembly are adjusted to the same height and the snap
buttons are engaged into the holes ensuring the leg
extensions are locked into place.
5. Turn unit upright.
6. If the back option was ordered, depress the double
latch snap button on the back tubes. Insert the back
tubes into the frame receivers until the double latch snap
buttons “click” and lock in place.
Note: Be sure the double latch snap buttons protrude
through the receivers and hold the back from coming o.
4.
5.
6.
SafetyPrecautions
•Pleasereadandunderstandallsafetyprecautionsanduserinstructionspriortouse.CallActiveAidat
1-800-533-5330or507-644-2951withquestionsorconcerns.
•The
•Theexpectedservicelifeofa productis3yearsundernormaluseconditions.
•ActiveAidproductsarespecicallydesignedtobeusedwithActiveAidaccessoriesandoptions.Unless
•Productmodicationsmadewithoutexpresswrittenconsent(includingbutnotlimitedto,modicationthrough
theuseofunauthorizedpartsorattachments)arenotrecommendedandwillvoidtheproductwarranty.
•Thisequipmentisdesignedtoaccommodatearangeofusers;therefore,theunithasvariousadjustmentslots
andholes.Avoidplacingngersorotherbodypartsinanyoftheseareas.
•Pleasedisposeofpackagingmaterialsproperly.Keepplasticbagsawayfromchildren.
•Donotmakeheightadjustmentswhileseated.
•ActiveAidshower/commodechairsaredesignedforindooruseonly.
•Donotsubmergetheshower/commodechair.
•Extrememovementslaterallyorfronttobackmaycausetheunittotip.Thesemovementswillcauseachange
•Whentransferringensurethattheswingawayarmsarelockedintoposition.
•Donotliftthechairbyremovable(detachable)components.
•
•
7. If the arms were ordered, line up the arm with the
receivers of the frame or back assembly. Insert the end of
the rear of the arm into the receiver on the rear of the seat
frame or back assembly.
Note, the proper orientation is the overhang of the arm
pad(s) should go to the outside of the unit.
8. Insert the front of the arm into the receiver on the front
of the seat frame. Depress snap button to secure the arm
into the frame.
Repeatforsecondarmifbotharmswereordered.
9. If the short transfer bench was ordered, insert the round
tubes of the transfer bench bracket into the receiver of the
frameorbackassemblyandsnapbuttonin,toremoveip
lever on the bottom of the tubes to release.
7.
8.
9.
5
Snap Pin in Flip Lever

CONGRATULATIONS!Youhaveselectedoneofourmanynemobilityproducts.YourShower/CommodeChair
commodeproductscanbeindividuallyconguredtomeetthespecicneedsofanindividual.
Accessibilitycompliantenvironmentsgenerallyoutlinethatooringsurfacesaretobestable,rmandslip
resistant.Ifgroundandoorsurfacesareencounteredthatarenotwithintheappropriateaccessiblestandards,
usedinthemostbenecialmanner.
Shouldanyproblemarisethatyoucannotsolvebyreadingthismanual,pleasecontactyourlocalsupplierorcall
ActiveAid,LLCat1-800-533-5330or1-507-644-2951.
ItisnecessarytoinspectyourShower/Commodechairatleastweeklytoensureitisinsafeoperatingcondition.
Adjustmentsthatarelistedintheproductowner’smanualcanbemadebytheoperatorbyfollowingthe
instructionsforuse.Afteranadjustmentismade,inspecttheunittoensureallhardwareandadjustable
componentsareproperlysecuredpertheinstructionsforuse.Replacementofwornparts,majoradjustments,
oranyotherimportantcorrectionsshouldbehandledbyanauthorizedsupplier.OnlyActiveAid,LLCapproved
THANKYOUFORBUYINGANACTIVEAIDPRODUCT!
10. IftheB-Otransferbenchwasordered,setbench
upsidedown(withlegsupinair).Placeeachtransfer
bench support extension onto each bench frame leg.
Depress the snap button and slide the support extension
onto the frame.
11. Turn bench upright and insert ends into the receiver of
the frame or back assembly (as applicable), place tubes
intopositionandsnapbuttonin,toremoveipleveron
the bottom of the tubes to release.
12. If the pan hanger was ordered, slide the pan onto the
pan hanger.
Snap Button in
6
Flip Lever

Usage
Leg Extensions
Toadjusttheheight,depressthesnapbuttonandslidethelegextensionsandH-framelegassemblyup
or down to obtain correct height.
Note: Make sure that all leg extensions and the H-frame assembly are adjusted to the same height and the
snap buttons are engaged into the holes ensuring they are locked into place.
Suction Cups
Rinseanddrythesuctioncupspriortousetoremoveanydust,etc.Clean,rinseanddrythesmooth
atooringsurfacewhichtheyareintendedtostickto(removinganymineraldeposits,soapscum,etc.)
Presseachindividualsuctioncupintothesmoothooringsurface.Tomovetheunitwithsuctioncup
option,breakthesealofthesuctioncuprstbyliftingonthelipofthecuptoallowairtogetintoit.
Back
To remove the back, depress the double latch snap button on the back tubes and pull upward.
Armrests
To remove the arms, depress snap button on the arm(s) and pull upward.
Benches
Short Transfer Bench:Toadjustthetransferbenchsupportextensions,rotateupordown.
Makesurebothareadjustedtothesameheight.
Ensure they contact the tub edge surface to provide weight bearing support when sliding across during
transfers.
B-O Transfer Bench:Toadjustheightofthetransferbench,onthesupportextensionsdepressthesnap
button and slide support extension either up or down to obtain correct height.
Makesurebothareadjustedtothesameheight.
Turn bench upright and insert ends into the receiver of the frame or back assembly (as applicable).
7
Serialnumberislocated
ontheH-frame.

8
Maintenance
•ItisnecessarytoinspectyourShower/Commodechairatleastweeklytoensureitisinsafeoperatingcondition.
•Checkallfasteners(snapbuttons,screws,nuts,bolts,clips,pullpins,handles,etc.)toensuretheyarepresent
and secure.
•Checkupholsteryfortearsandcracks.
•Checkbeltsforfraying,cuts,tears,broken/wornstitchingandbucklesforcracksordamage.
•Checksuctioncupsandcrutchtipsforatspots,cracks,andwear.
•Replacedamagedorworncomponents.ContactyourSupplierforrepair/replacementofsaidpartsbefore
continuing use of the shower/commode chair.
•UseonlyrecommendedActiveAidreplacementparts;useofanyotherpartsmayvoidyourwarrantyandcause
damage to your device.
•Aftereachshoweruse,rinsethedevicewithwatertoremovesoapresidue.Usingasoftnon-abrasiveclothor
sponge, wipe the device down to remove water accumulation and product build up. Allow to dry completely
before storing.
•Whencleaningtheunit,useamilddetergentwithasoftnon-abrasiveclothorsponge.Donotuseharsh
cleaning solvents or an abrasive cleaning agent.
•Upholsterypadsmaybecleanedwithanon-abrasive,non-alcohol-basedsoaporsanitizedusingableach
dilutionofupto1:10.Note,manyanti-bacterialanddisinfectantproductscontainalcoholandshouldnotbe
usedontheupholstery,duetothedryingeectofthealcohol.Chooseanon-alcohol-basedsanitizer.
GermicidalwipesthatareratedtokillC-dicilesporesmaybeusedontheupholsteryandtheepoxycoated
stainless steel.
•UrethaneCoatedFabricsmaybecleanedwithaspongeordampclothtowipethesurfacecleanwithwarm
water. As needed, they may be hand washed using warm water and a mild detergent. Do not use bleach. Line
dry. Do not iron. Do not dry clean.
Cleaning/Disinfecting
Whenaskingyoursuppliertoorderreplacementparts,pleasespecifytheserialnumberofthe202unit.
YourSupplierwillcontactActiveAidCustomerServicetoobtainthenecessaryitemsforyourspecicunit.
Ifyouhaveanyquestions,pleasecontactyourlocalsupplierorcallActiveAid,LLC
PartsReplacement

This warranty is extended only to the original purchaser/customer (or supplier non consumer who does not buy
or resell). ActiveAid, LLC, warrants the 202 against defects in materials and workmanship as listed below.
• StainlessSteelFrames–3yearwarranty
• Brakemechanisms,lockingmechanisms,wheelsandcasters–1yearwarranty
• Othermetalandstructuralpartsnotofstainlesssteel--1yearwarranty
• Upholsteredcomponents,plasticpads,rubberparts,paintedsurfaces,bearingsandotherpartsnot
specicallyidentiedabove–6monthswarranty
The warranty period commences on the original ship date from ActiveAid. Any product proven to ActiveAid’s
satisfaction to be defective and within warranty period shall be repaired or replaced at ActiveAid’s option.
ACTIVEAID’sSOLEOBLIGATIONANDYOUREXCLUSIVEREMEDYUNDERTHISWARRANTYSHALLBE
LIMITEDTOSUCHREPAIRAND/ORREPLACEMENT.Thiswarrantydoesnotincludeanylaborcharges
incurredinreplacementpartsinstallation.Forwarrantyservice,pleasecontacttheauthorizedsupplierfrom
whom you purchased your ActiveAid product. In the event you do not receive satisfactory warranty service,
please contact ActiveAid at the address below. Do not return products to our factory without prior
authorization.
LIMITATIONSANDEXCLUSIONS:Theforegoingwarrantyshallnotapplytoserialnumberedproductsifthe
serialnumberhasbeenremovedordefaced.Productssubjecttonegligence,abuse,misuse,improper
maintenance, improper storage, or damages beyond ActiveAid’s control are not covered by this warranty, and
thatevaluationwillbesolelydeterminedbyActiveAid.ProductsmodiedwithoutActiveAid’sexpresswritten
consent(includingbutnotlimitedto,modicationthroughtheuseofunauthorizedpartsorattachments)arenot
covered by this warranty. The warranty shall not apply to problems arising from normal wear or failure to follow
instructions. The warranty will be void if parts not manufactured by ActiveAid or parts not complying with
originalequipmentspecicationsareaddedtoanActiveAidproduct.
THEFOREGOINGWARRANTYISEXCLUSIVEANDINLIEUOFALLOTHEREXPRESSWARRANTIES.
ACTIVEAIDSHALLNOTBELIABLEFORANYCONSEQUENTIALORINCIDENTALDAMAGESWHATSOEVER.
ActiveAid maintains a policy of continual product improvement and reserves the right to change features,
specications,andpriceswithoutpriornotication.CheckwithActiveAidforlatestinformation.
ActiveAid, LLC.
ActiveAid products should only be used under the guidance of a physician. ActiveAid maintains a policy of continual product improvement and reserves the
right to change features, specications, and prices without prior notication. Check with ActiveAid for latest information. FORM 202MAN 121819 REV A
Copyright © 2019 ActiveAid, llc. All rights reserved. Printed in the U.S.A.
LimitedWarranty
9
Please ensure the Owner’s Manual stays with the unit at all times.
Table of contents
Other ActiveAid Wheelchair manuals


