manuals.online logo
Brands
  1. Home
  2. •
  3. Brands
  4. •
  5. Additel
  6. •
  7. Water Pump
  8. •
  9. Additel 918 User manual

Additel 918 User manual

Pneumatic Pressure Test Pump User Manual's
Warnings and cautions
Low pressure gauges can very easily be over pressured if not
careful.
Please take caution when applying pressures.
Do not exceed the safety limit of 1500 psi (100 bar) for 917 or
2000 psi (140 bar) for 918.
Do not switch between pressure and vacuum mode under
pressure. Open the vent valve and isolation valve before
switching between positive to vacuum pressures.
Over tightening connectors may cause damage. Light hand
tightening is sufficient.
Store the pump in a dry non-corrosive environment.
Additel is not responsible for problems or damage resulting from
improper use or operation of the equipment.
All moisture and contaminants should be cleaned out of the liquid
isolator before creating a vacuum. This is accomplished by
venting the pump when at high pressure.
For the least risk in contamination of the reference gauge, the
DUT should be installed to the pressure port which is closest to
the vent valve.
Specification
Configuration & Air routine
Troubleshooting
Remark:If local atmosphere pressure is 1 bar, the vacuum can reach to -0.95 bar;
If local atmosphere pressure is P, the vacuum can reach to - 0.95P.
917/918
[Version number:1407V02]
Pressure range:
Temperature:
Humidity:
:
Maximum pressure:
Pressure media:
Size:
Weight:
917: 95% vacuum to 1000 psi ( 70 bar )
8
0~50
< 85%RH
10 Pa ( 0.1 mbar )
917: 1500 100
: 2000 psi ( 140 bar )
Air
Height: 5.5'' ( 140 mm );
Base: 12.4'' ( 315 mm ) x 7.8'' ( 198 mm )
5.7 lb ( 2.6 kg )
91 : 95% vacuum to 1500 psi ( 100 bar )
)℃
psi ( bar )
918
(
Adjustment resolution
3 - Quick connector
7
6
1
8
4
!
31
4
5
8
2
67
Under Vacuu
3
Air routine
1 - Hand pump
2 - Transport handle
7 - Isolation valve (Bypass valve)
(Isolated the calibration volume from the hand pump,
piston, and check valve)
8 - Fine adjust handle
(clockwise to increase pressure)
6 - Pressure/vacuum (P/V) selector
(
DO NOT switch under pressure or vacuum to
avoid damage)
Positive pressure: pull it out; vacuum: push it in
5 - P/V selector lock
4 - Vent valve
(clockwise to close/ counterclockwise to open)
Problem Cause Solution
Hand pump will not generate pressure
It is difficult to increase pressure
Hard to use the fine adjust
It is difficult to turn the quick connector
The isolation valve is not open
B. The O-ring seal is loose or damaged.
A. The isolation valve is not closed
C. The O-ring seal is damaged.
E. The connector type mismatched to the gauge pressure port.
A. Too much force was previously applied.
.
.
A. Vent valve is not closed.
C. P/V selector is in the wrong position
B. The gauges are not tightened.
D. The thread surface is not smooth.
F. Dust or contaminants are blocking the pressure flow
B. The threads have no lubrication
.
.
Open the isolation valve
Replace O-ring seal
Close the isolation valve
Use the correct adapter
Secure the quick connect valves with less force.
.
.
.
Replace the O-ring seal.
.
Close the vent valve.
Pressure: pull the P/V selector out; Vacuum: push the P/V selector in.
Tighten the reference gauge or the gauge under test
Use Teflon tape on the thread and turn it in tight
Pressurize the pump several times and then suddenly vent which will push any
contaminants out.
Apply lubrication to the threads
.
.
DIGITAL PRESSURE CALIBRATOR
Units
A
0255075100
A
Connection
Basic Operation
B
Vent C
Pre-pressure D
Pressurizing process
and fine adjustment
Remarks:
A Additel has made a concerted effort to provide complete and current
information for the proper use of this equipment. The product
specifications and other information contained in this manual are
subject to change without notice.
B
:
:Above pictures are just for reference.
SW V mA COM 24VSW V mA COM 24V
SW V mA COM 24V
dial gauge pressure switch pressure transmitter flexible hose
k
Pressure GaugePressure Gauge
Zeroing should
be operated
under this
condition only.
E
Decrease pressure process F
Vacuum process G
Vacuum and
fine adjustment
H
Decrease vacuum process
Additel Corporation, USA
www.additel.com
open
Pressure GaugePressure Gauge
DIGITAL PRESSURE CALIBRATOR
Units
A
0255075100
pressure position is shown.
push in for vacuum.
Must vent before switching between
vacuum and positive pressure.
!
open
①
DIGITAL PRESSURE CALIBRATOR
Units
A
0255075100
③
Pressure Gauge
④push down to
pre pressurize
to desired value
or until hard to
push down
-
open
②
set it to the
mid position
of its travel
close,do not
use too much
force
Pressure Gauge
DIGITAL PRESSURE CALIBRATOR
Units
A
0255075100
②pressurize to
higher pressure by
turning the handle and
make fine adjustment
①close,do not
use too
much
force
Pressure Gauge
Pressure Gauge
DIGITAL PRESSURE CALIBRATOR
Units
A
0255075100
①
open it slowly
to get the
desired value,
and close!
⑤
Units
0255075100
A
DIGITAL PRESSURE CALIBRATOR
0
0.02
0.04
0.06
0 8.00 8.0
-0.1
Vacuum Gauge
Vacuum Gauge
③
push in,select the vacuum position
m②
③
ake sure to complete the step
before operating step .
④
②
!
①
open
open
close
operate it
to get the
desired
value
Units
0255075100
A
DIGITAL PRESSURE CALIBRATOR
0
0.02
0.04
0.06
0 8.00 8.0
-0.1
Vacuum Gauge
Vacuum Gauge
①close,do not
use too
much
force
②fine adjustment
Units
0255075100
A
DIGITAL PRESSURE CALIBRATOR
0
0.02
0.04
0.06
0 8.00 8.0
-0.1
Vacuum Gauge
Vacuum Gauge
②
①
close open it slowly
to get the
desired value,
and close!
③
fine adjustmentt
②fine adjustment

This manual suits for next models

1

Other Additel Water Pump manuals

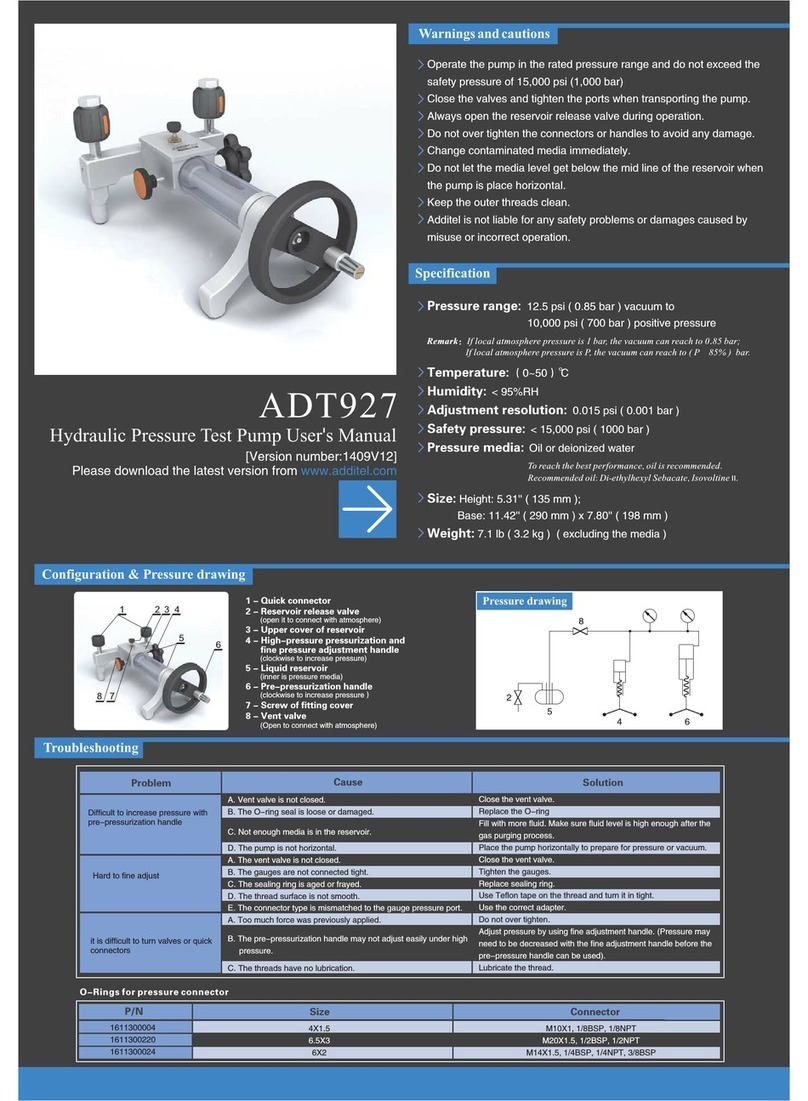
Additel ADT927 User manual

Additel

Additel ADT927 User manual

Additel ADT927 User manual

Additel

Additel ADT927 User manual

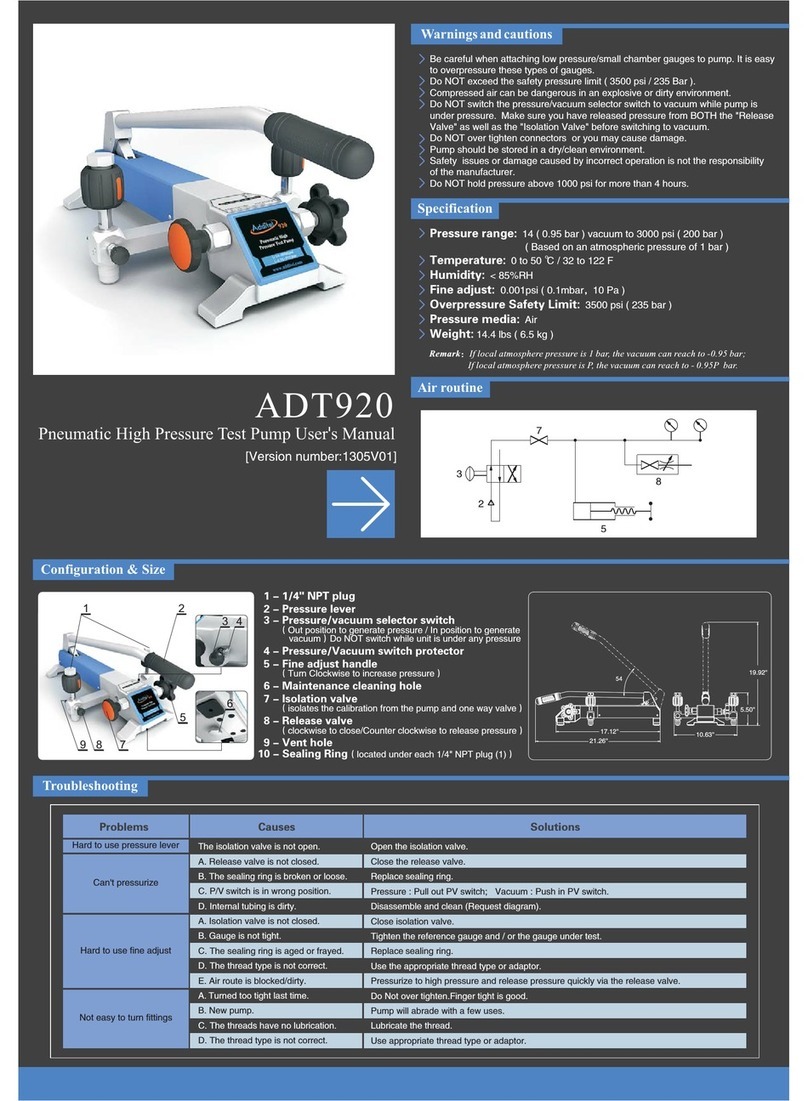
Additel ADT920 User manual

Additel

Additel ADT920 User manual

Additel ADT920 User manual

Additel

Additel ADT920 User manual

Additel 949 User manual

Additel

Additel 949 User manual

Popular Water Pump manuals by other brands

Wilo Wilo-Plavis-C Series Installation and operating instructions

Wilo

Wilo Wilo-Plavis-C Series Installation and operating instructions

Homa C80 Original instruction manual

Homa

Homa C80 Original instruction manual

Fountain TECH FT-40 user guide

Fountain TECH

Fountain TECH FT-40 user guide

Ulvac UTM2300 Series instruction manual

Ulvac

Ulvac UTM2300 Series instruction manual

Lavor EG-M 3800 instruction manual

Lavor

Lavor EG-M 3800 instruction manual

Truper BOS-1SM manual

Truper

Truper BOS-1SM manual

Zodiac Polaris PB4-60 manual

Zodiac

Zodiac Polaris PB4-60 manual

Vallfirest Black Hawk BH1-4H user manual

Vallfirest

Vallfirest Black Hawk BH1-4H user manual

SAER Elettropompe CB Series Use and maintenance manual

SAER Elettropompe

SAER Elettropompe CB Series Use and maintenance manual

Graco ProConnect 19Y298 Repair

Graco

Graco ProConnect 19Y298 Repair

VERDER VERDERAIR VA-EH50 repair parts

VERDER

VERDER VERDERAIR VA-EH50 repair parts

Salamander Pumps CT Force installation guide

Salamander Pumps

Salamander Pumps CT Force installation guide

Seepex BW 10 Operating and maintenance instructions

Seepex

Seepex BW 10 Operating and maintenance instructions

vacuubrand RC 6 Instructions for use

vacuubrand

vacuubrand RC 6 Instructions for use

Wilo Atmos GIGA-NF Installation and operating instructions

Wilo

Wilo Atmos GIGA-NF Installation and operating instructions

Bosch 0 986 580 943 installation instructions

Bosch

Bosch 0 986 580 943 installation instructions

Nexto X-PUMP quick start guide

Nexto

Nexto X-PUMP quick start guide

Graco 25T818 Instructions, Repair and Parts

Graco

Graco 25T818 Instructions, Repair and Parts

manuals.online logo
manuals.online logoBrands
  • About & Mission
  • Contact us
  • Privacy Policy
  • Terms and Conditions

Copyright 2025 Manuals.Online. All Rights Reserved.