Adel System CBI60 User manual

Via Luigi Barchi 9/B –Reggio Emilia 42124 –Italy
Tel. +39 0522 345518 –Fax +39 0522 345551 –www.adelsystem.com
Instruction Manual CBI60_4
Page 1
DC Ups CBI60 “All in One”
CBI6012A and CBI6024A
Instruction Manual
Thank you for having chosen one of our products for your work.
We are certain that it will give the utmost satisfaction and be a notable
help on your job and application.
Product Description
New revolutionary product, with Ethernet on Board provided with protocol
connections: HTTPS, SNMPv3, ModBus TCP. The device also features
the ADELBus protocol for connecting other ADELSystem devices.
Thanks to “All In One” CBI series of DC-UPS, it will be possible to
optimize the power management of your system with one single,
extremely compact and cost-effective device, connected directly to the
mains. The available power is automatically distributed between load and
battery giving priority to the load. Battery can supply the load even with
mains so the output power to the load can be twice the nominal power if
required (Power Boost). When mains failure occurs, the load continues
to be supplied by the battery in backup mode. It is also possible to switch
on the device with no mains directly from battery. The “Battery Care”
algorithm performs rapid and automatic charging, continuous battery
charge optimization, flat batteries recovery and real time diagnosis during
installation and operation. Temperature compensation is possible by
connecting the temperature sensor probe. The real time auto-diagnostic
system monitors battery faults such as sulphated battery, shorted cells,
accidental reverse polarity connection or disconnection of the battery.
Each fault is signaled by a blink code of Diagnosis Led or via Modbus in
order to be easily detected and removed during the installation and after
sales. The continuous monitoring of battery efficiency reduces the risk of
battery damage and allows a safe operation in a permanent connection.
Predefined curves can be selected on the front panel to optimize the
charge of different battery types: Open Lead Acid, AGM and Gel Lead
Acid; Ni-Cd, Li-Ion are rechargeable using the same device. Charging
curves can be customized via Modbus. Output contacts are used to
signal both backup and fault conditions. A rugged casing with bracket for
DIN rail or Wall mounting.
Main Characteristics
•Universal input voltage: single-phase 100–277 Vac
•Load output:24 Vdc 2.5 A; 12 Vdc 5 A
•Battery output:24 Vdc 2.5 A; 12 Vdc 5 A
•“All In One” solution: power supply + battery charger + backup
module in one single device connected directly to the mains
•Suited for different battery types: Open Lead Acid, Sealed
Lead Acid, AGM and Gel Lead Acid; Ni-Cd and Li-ion. 5-stage IUoU
(Recovery, Bulk, Absorption, Float, Refresh Battery) plus Recovery
stage for deeply discharged batteries
•Automatic diagnosis of battery status and battery Life Test
function (Battery Care)
•Switching technology with high efficiency
•Protected against short circuit, overload and inverted polarity
•Solid state output contact for signaling Low Battery or Battery
Replacement and Fault system.
•IP20 protection degree
•Space saving on DIN rail
Safety and warning notes
To safely operate this Device please read and follow all
instructions carefully before attempting to unpack, install,
or operate.
WARNING –Explosion Hazard: do not disconnect
equipment unless power has been switched off or the area
is known to be non-hazardous.
WARNING –Explosion Hazard. Replacement of components may impair
suitability for class I, Division 2.
WARNING –Switch off the system before connecting the module. Never
work on the machine when it is live. The device must be installed
according to EN61010 or EN62368-1. The device must have a suitable
isolating facility outside the power supply unit, via which it can be
switched to idle. Danger of fatal injury!
WARNING –The device is equipped whit an internal fuse. If the internal
fuse blows up (fails opens), it is most probable that there is a fault in the
device. If this failure occurs, the device must be returned to the factory.
How to Install
Mounting
Fig. 1 –Mounting of the CBI60
Din Rail or Panel Mounting
Fig. 1 shows how to install the CBI60. It is possible to mount the device
on DIN rail or on a panel and fix it by 4 screws 2.9x8-16. There is no limit
for the panel thickness.
Device Connection (Fig.2)
Fig. 2 –Connection terminal
Reference
Description
1
Battery
2
Load
4
System fault –Rectifier alarm
5
Mains –Backup
6
Mains –Backup LED
7
Battery fault –System fault LED
8
Diagnosis LED
9
Configuration –Start from Battery
10
Input Vac
11
Aux1: RJtemp –DPY353
12
Start from Battery: (close to negative load)
Via Luigi Barchi 9/B –Reggio Emilia 42124 –Italy
Tel. +39 0522 345518 –Fax +39 0522 345551 –www.adelsystem.com
Instruction Manual CBI60_4
Page 2
19
Battery Config - Life test –Fast Charge –UPS Disabling-
Time Buffering
20
Aux4: Ethernet
21
Network Communication LED
22
ADELBus (CAN)
23
Rectifier Alarm
24
PE for Aux4 “Shield”
Connection terminal and wiring
The following cable cross-sections may be used:
Solid
(mm2)
Stranded
(mm2)
AWG
Torque
(Nm)
Stripping Length
In:
0.2–2.5
0.2–2.5
24 –14
0.5–0.6
7 mm
Out:
0.2–2.5
0.2–2.5
24–14
0.5–0.6
7 mm
Signal:
AMP Modu II
Screw type terminals, 2.5 mm2. Wiring shall be marked to indicate the
proper connection for the power supply. Use copper cables only; for
power connections use wires suitable for at least 75°C
Input and Output Battery connection
Input AC Port L –N:
No.10: Single phase Switching Power Supplies L, N, PE
Battery Connection and Load Connection
Battery Connection Port:
No.1:
-Connect the battery between: terminal 3 (–) and 4 (+)
-One battery (12 Vdc) for CBI12xx;
-Two battery (12 Vdc) connected in Series for CBI24xx;
Output Load:
No.2: Connect this output to the load, terminal 1 (–) and 2 (+).
Drive and Monitoring
Fault - Status conditions
STATUS: Mains or Backup: Input Mains On/Off.
•No.5 Output Open Collector Contact: 1
•No.6: LED
Fault Battery or Fault System
•No.4 Output Open Collector Contact: 2
•No.7: LED
•No.8: Led DIAGNOSIS: Diagnosis of the system through
“blinking code” light signal
Fault Internal Rectifier
•No.23 Output Open Collector Contact: 3
Driver Contact open drain:
Open drain referred to the Load
negative terminal; requires an external
DC power source (max 48Vdc) –drain
current: 20 mA Nom ; 40 mA Max for 3
sec
Mains/Back-Up
Battery or System fault
Port N°5
Led N°6
Port N°4
Led N°7
Mains Input Vac
ON
Closed
■- led off
Closed
■- led off
OFF
Open
■- led On
Closed
■- led off
Battery SOC
less than 30%
YES
Open
■- led On
Open
■- led On
NO
Open
■- led On
Closed
■- led off
Battery or
system Fault?
YES
■- led off
Open
■- led On
NO
■- led off
Closed
■- led off
Charging Mode Status
Status
Diagnosis (No.8)
Battery fault (No.7)
Charging Type
Float
1 Blink/2 sec
OFF
Absorption
1 Blink/sec
OFF
Bulk
2 Blink/sec
OFF
Recovery
5 Blink/sec
OFF
Faulty Battery / Faulty System
Auto Diagnosis System
Reverse polarity or high battery Voltage
(over 32.5Vdc for CBI 24xxA)
1 Blink/pause
Battery not connected
2 Blink/pause
Battery element in Short Circuit
3 Blink/pause
Overload or short circuit on the load
4 Blink/pause
Bad battery; Internal impedance Bad or Bad battery wire connection
5 Blink/pause
Life test not possible
6 Blink/pause
Rectifier Alarm
7 Blink/pause
Boost condition; battery discharge after 4 min. of overload.
8 Blink/pause
Low battery (under 18.5Vdc for CBI 6024A) Only if started from
battery, no mains input
10 Blink/pause
Mains detector failure
12 Blink/pause
Device over-temperature Alarm
14 Blink/pause
Calibration error
16 Blink/pause
Start from Battery No Input Mains Vac
No. 9: Push-button, max 3 sec., in the front panel to switch ON
the system without the “Mains input Vac” but only the battery
connected. Same function for additional external Button by
connection of pin N°12 (SB). The other side of the external
button must be connected to Negative Load.
Load ON/Off
It is possible to Drive the output Load On/Off by Ethernet connection. This
function allows to switch On/Off the load output for many application as,
Reset PLC, staircase light timer control, emergency light controls, etc…
Charging Current limiter:
In order to protect the battery from excessive
charging currents, the device allows to limit the
maximum charge current by Push Button. Press
button (9) for 2 sec., after that in 20 step it is
possible to select the limit current. Press for
more than 2 sec. to store the selection in
permanent memory.
CBI6024A: from 0 –3A ; 20 step; 1 step 150mA
CBI6012A: from 0 –5A ; 20 step; 1 step 250mA
It is possible set the limiting current also by the internal Web Server,
please refer to the Ethernet section.
Battery Care
The Battery Care philosophy is based on algorithms that implement rapid
and automatic charging, battery charge optimization during time, flat
batteries recovery and real time diagnostic during installation and
operation. Elements in short circuit, accidental reverse polarity
connection, disconnection of the battery, can easily be detected and
removed by help of Blink Code of Diagnosis Led, during the installation
and after sale. Each device is suited for all battery types, it is possible to
set predefined curves for Open Lead Acid, Sealed Lead Acid, Gel, Ni-Cd,
Li-Ion. They guarantee battery reliability over time by continuously testing
the internal impedance status, avoiding any possible risk of damage and
granting a permanent, reliable and safe connection of the battery to the
power supply. The system includes a battery stimulation circuit and
sophisticated algorithms to recognize sulphated batteries or batteries
with a short-circuited element. Battery Test: Automatic. battery
connection check: every 60 seconds. Battery efficiency test: every 220
minutes in float charge. Battery Faults can be monitored by relay and led
blinking.
Battery Charge in Temperature compensated
environment
No. 11 Auxiliary Output “AUX 1”
It is possible to connect the Temperature sensor probe and apply it on
the battery.The function of the probe is for temperature battery
compensation. With this it is possible to meet the requirements of the
EN54- fire certification.

Via Luigi Barchi 9/B –Reggio Emilia 42124 –Italy
Tel. +39 0522 345518 –Fax +39 0522 345551 –www.adelsystem.com
Instruction Manual CBI60_4
Page 3
Battery Temperature Compensation Charge
Connecting the cable RJTEMP (supplied separately) to Auxiliary Output
AUX1, the CBI will adjust the battery charging voltage in relation to the
Battery temperature:
Fast Charge: Open Lead, AGM, Gel
Float charge: Open Lead, AGM, Gel
+/- 5mV/°C x n. of Cells from -8°C to +60°C
+140 ÷ -200 mV/Cell compared to the value at
20°C
+/- 3mV/°C x n. of Cells from -20°C to +60°C
+120 ÷ -120 mV/Cell compared to the value at 20°C
Fast Charge: Ni-Cd
Float charge: Ni-Cd
+/- 2.5 mV/°C x n. of Cells from -20°C to +60°C
+100 ÷ -100 mV/Cell compared to the value at
20°C
+/- 2.5 mV/°C x n. of Cells from -20°C to +60°C
+100 ÷ -100 mV/Cell compared to the value at 20°C
The device stops charging the battery if the temperature is below -20°C
or above +60°C. The sensor placed on cable RJTEMP must be applied
on the battery.
Device Configurations
Completely automatic, all devices are suitable to charge most batteries
types thank to User Selectable charging curves. They can charge open
lead acid, sealed lead acid, Gel, Ni-Cd and Li-Ion. It is possible to change
or add other charging curves connecting the web server device to a PC.
Configurations
Note: it is also possible to configure the device via Web server
In normal operation the LED bargraph (No.19 in sect.7) gives an
indication of the current (0 to 100% of In) as follows:
•In charge mode with mains:
battery charge current with solid light
•In backup mode without mains: battery discharge current with
blinking light
•In boost mode with mains: battery discharge current with
flickering light
To display the current device configuration on the LED bargraph press
the Config/Start button (No.9 in sect.7) briefly (< 1 sec). The display
returns to normal operation after 10 seconds. Please refer to the pictures
at the end of this section.
To change the device configuration, complete the procedure below (note:
if the procedure is not completed no settings are saved; the procedure is
aborted if no command is given for 60s).
With battery disconnected:
•press the Config/Start button (No.9 in sect.7) for more than 2
seconds, until the first led starts blinking
•press briefly the button to cycle through the battery types as
shown by LEDs 1,2,3 (please refer to the pictures at the end of
this section) then confirm with a long press until the 4th LED starts
blinking
•LED 4: Config Mode: ON/OFF
•Long press to enable a complete configuration via Web Server,
Modbus/SNMP and APY351/ADELViewSystem (Led ON).
•Short press to configure basic parameters from the device front
panel or from the web server System page (Led OFF)
•If Config Mode was selected, the procedure terminates here
•LED 5: Option: not used: continue with a short-press
•LED 6: Life Test; long press to enable the function (Led ON), short
press to disable
•LED 7: Fast Charge; long press to enable the function (Led ON),
short press to disable
•LED 8: UPS Disable; long press to disable the UPS function (Led
ON), short press to keep it enabled
•LED 9: Buffering time: press briefly the button to select the max
backup duration, then confirm with a long press. The current
selection is shown with other LEDs blinking together with LED 9
as follows:
•Led 1: 30 sec; Led 2: 120 sec; Led 3: 300 sec; Led 4: 10 min; Led
5: 15 min; Led 6: 20 min; Led 7: 30 min; Led 8: 45 min; All leds:
Infinite time
•Note: the last selection (infinite time) is confirmed automatically
also with a short press
•More values can be selected by Web Server, Modbus, SNMP and
with DPY351 or ADELVIEWSystem
•End Programming: the device shows the selected configuration
for 10 seconds then resumes normal operation,
With battery connected:
•press the Config/Start button (No.9 in sect.7) for more than 2
seconds, until the 5th led starts blinking
•follow the procedure above from step “LED 5: Option” (Battery
Type and Config Mode can be changed only when the battery is
not connected).
Data and Communication
ADELBus connection
Remote device connection by terminals 22. This device features the
ADELBus communication protocol for the connection of other devices on
CAN bus, for monitoring, configuring, driving and updating them(fig.3).
Battery Type chemistry Selection
LED Config
(Size 5)
Float charge
(Volt/Cell)
Fast charge
(Volt/Cell)
Open Lead
2.23
2.40
(AGM) Low
2.25
2.40
Gel Battery
2.30
2.40
Ni-Cd
1.4V/cell
(12V:10 cells)
(24V:20 cells)
(48V:40 cells)
1.45V/cell
(12V:10 cells)
(24V:20 cells)
(48V:40 cells)
Li-Ion (4)
LiFePo4
3.45V/cell
12Vfield: 13.8V
24Vfield: 27.6V
48Vfield: 55.2V
3.65V/cell
12Vfield: 14.6V
24Vfield: 29.2V
48Vfield: 58.4V
Config Mode (5)
Configure with ADELViewSystem or Web
Server for CBI60
Functional Setting
Battery Life
test ON
Life test enabled
Fast Charge
Enable (3)
Fast Charge enabled.
UPS Disabling
UPS function enabling. Use terminal 12 for
connection to external Contact.
Time Buffering
1 blink => 0.5, 2 blink => 1,
3 blink => 5, 4 blink => 10,
5 blink => 15, 6 blink => 20,
7 blink => 30, 8 blink => 45 min
9 Solid => ∞infinite”
(Time = minute)
“Start from
Battery” (No
Input Mains)
System switch ON from battery without
mains. For connection to external Push
button use terminal 12

Via Luigi Barchi 9/B –Reggio Emilia 42124 –Italy
Tel. +39 0522 345518 –Fax +39 0522 345551 –www.adelsystem.com
Instruction Manual CBI60_4
Page 4
Fig. 3 –Connection to DC Ups
Fig. 4 –Connection RTConn cable
For the ADELBus connection, please connect the cable RTConn to AUX1
on the device as shown in Fig.4 and connect the other side of the cable
to the CAN terminals L (Brown) and H (White) of the CBI60, with a line
termination (LT) resistor 120 Ohm, present inside the cable kit.
Ethernet Configuration
Configuration of the Ethernet interface by HTTP server via the Web
browser:
Connect HTTP server for the first time
Connect the device to the network with a standard CAT5e or better LAN
cable plugged into the Aux4 connector (RJ45) on the bottom of the unit,
as shown in section 4.3. The CBI60 is factory-configured to operate with
a fixed IP address (192.168.1.100) on the standard HTTP port (number
80).
A different static IP address can be assigned to the CBI60 or a dynamic
IP address can be assigned using the DHCP protocol. The network
configuration can be carried out using the internal webserver. Type the
IP address of the CBI60 into any browser’s address bar (as an example
"192.168.1.100") then the login page appears requesting the username
and the password.
To access the internal webserver, at the login page, the following
credentials must be used:
Username: admin
Password: password
Note: after 20 minutes of inacticity the login credentials must be entered
again.
Customizing the ethernet interface and services
Select “Configuration” and then “Network” to display the following groups
of parameters and other information:
•Account
•Generic configuration
•TCP/IP Configuration
•HTTP(s) Configuration
•SNMP
Account:
The Account group (Fig. 6) allows the customization of the data for the
HTTP server login page. Any changes must be confirmed with the
confirm button at the bottom of the page.
Fig. 6 –Account settings
Generic and TCP/IP Configuration
Fig. 7 shows the TCP/IP Configuration group with parameter default
values. They allow unique identification of the unit in the network.
Fig. 7 –IP settings
If “Dynamic (DHCP)” is selected, the IP address is automatically
assigned by a DHCP server, that must be active on the network; in this
case the System IP, Subnet Mask and Gateway textboxes show the
assigned values and are not editable.
The CBI60 supports access using the Virtual LAN protocol. In the case
“VLAN ID” checkbox is not selected the CBI60 will not operate in the
VLAN. If “VLAN ID” checkbox is selected then a “VLAN ID” textbox will
appear and should be populated with an ID in the range 1 to 4094,
matching the one of the VLAN the unit is operating in.
Any changes must be confirmed with the confirm button at the bottom of
the page.
HTTP(s)
The CBI60 supports HTTP and HTTPs protocols. If the client system
supports multicast DNS (mDNS) the device can be accessed by its name
(as set under Generic Configuration) followed by “.local”.
HTTP Port allows redirecting the HTTP traffic to a port different than the
standard HTTP port 80. In that case, access to the HTTP server from a
browser must be made using the syntax http://ipaddress:portnumber.
As an example, if the IP address is 192.168.1.100 and the selected HTTP
port is 5678 then the following IP string should be entered in the browser
http://192.168.1.100:5678.
Secure HTTP (HTTPS) can also be selected, using an internal certificate
or a certificate provided by the customer.
Fig. 8 –HTTP(s) configuration
SNMP
The CBI60 can act as SNMP server. An ADELsystem MIB table file is
provided which consists of a list of parameters that can be remotely read,
or read-written through the SNMP protocol. Each parameter (OID) is
mapped one-to-one to a Modbus RTU holding register. Refer to the
document “Adelsystem parameter table”for the description of each
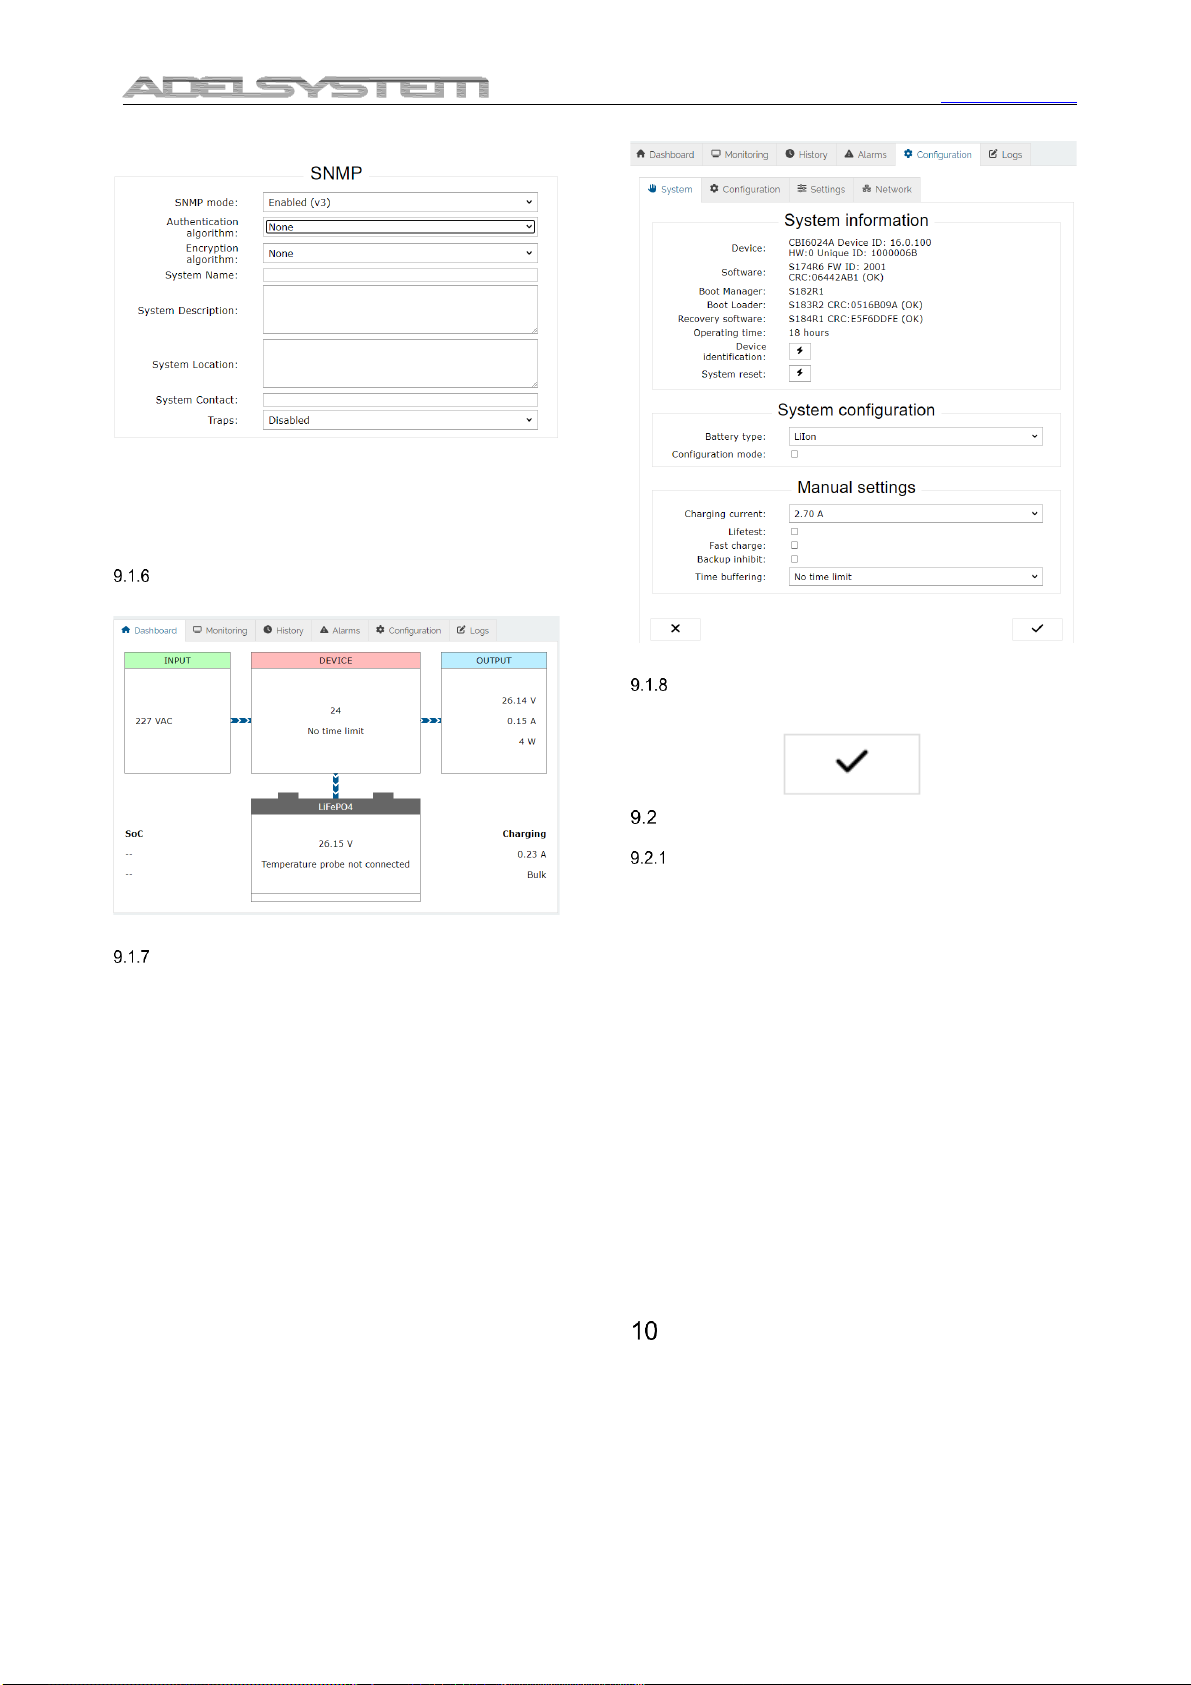
Via Luigi Barchi 9/B –Reggio Emilia 42124 –Italy
Tel. +39 0522 345518 –Fax +39 0522 345551 –www.adelsystem.com
Instruction Manual CBI60_4
Page 5
parameter.
Fig. 9 –SNMP settings
All the fields in the SNMP group of settings allow a maximum of 31
characters, except “System Description” and “System Location”, which
allow 255 characters maximum. The actual content of the page depends
on the SNMP version selected (v1, v2c or v3).
Any changes must be confirmed with the confirm button at the bottom of
the page.
Device status
The Dashboard pageshows the main operating parameters of the
device.
Fig. 10 –Device status
System settings
The System page under Configuration shows detailed information on the
device and installed software, to be communicated to the service
technician if requested. Fig. 11 shows example information: the actual
values will be different.
The “device identification” button allows to locate the CBI60 by emitting
a beep and turning on all leds in sequence.
The “System reset” button allows to reboot the device remotely, only if no
battery connected. Current settings will be maintained. Any changes not
saved with the confirm button will be lost.
“System configuration”and “Manual settings”replicate the settings also
accessible on the CBI60 front panel by pressing the CONFIG button
(refer to the relevant section of this manual). Any changes must be
confirmed with the confirm button at the bottom of the page.
“Battery type” selects the battery chemistry from a drop-down list.
If “Configuration mode” is selected Led 4 ON, the following parameters
(Lifetest, Fast charge, UPS enable and Buffering time) cannot be
changed as they are controlled remotely via Modbus or SNMP.
If “Configuration mode” is not selected Led 4 OFF, the following settings
are available: “Lifetest”, “Fast charge”, “UPS disable” and “Time buffering
time”.
The “Charging current” sets the battery charge current limit.
Fig. 11 –Device settings
Saving the customized parameters
To save the changes into the CBI60 non volatile memory press the
confirm button at the bottom of the page.
How to restore default values in the device
(Customer service)
Resetting the customized parameters to their
default values
In case the login user name or password was forgotten, or the TCP/IP
configuration was set incorrectly and the device is no longer reachable,
please follow this procedure to restore the default settings:
•Turn OFF the device
•Press the CONFIG button on the front panel and keep it pressed
•Turn ON the device and continue to keep the button pressed (all
the 9 configuration LEDs will stay ON during this time)
•After 5 seconds the 4 top configuration LEDs (n. 6 to 9) will blink
alternatively in pairs and the LED 1 will blink slowly showing
“Option 1”
•Release the button
•Now click briefly on the button to select one of 4 options, as shown
by the config LEDs 1 to 4. The options are:
-1: forces Dynamic (DHCP) IP Addressing Mode
(DHCP) until reboot; the TCP/IP configuration must
be changed on the HTTP server in order to make this
setting permanent.
-2: system recovery application, only to be used if
instructed by customer service
-3: restore login credentials, TCP/IP and SNMP
settings to factory default
-4: restore the complete device to factory settings –
WARNING: all user’s settings and logs will be lost,
including the battery type selection.
-Confirm the choice by keeping the CONFIG button pressed
for 5 seconds until LEDs 6 to 9 stop blinking.
Technical Data
Please Refer to Data Sheet product
This manual suits for next models
2
Table of contents
Other Adel System UPS manuals


Popular UPS manuals by other brands


CyberPower
CyberPower OR1500LCDRTXL2U user manual

INFOSEC UPS SYSTEM
INFOSEC UPS SYSTEM Zenergy Station 2000 user guide

Kraun
Kraun 1KVAS user manual

inform
inform DSP FLEXIPOWER SERIES user manual

Huawei
Huawei UPS5000-E-****-FM series user manual

Alpha Technologies
Alpha Technologies Sentra 1000 Operator's manual


