Adesso TP-446 User manual

INSTRUCTION
MANUAL
TP-446
PROFESSIONAL FM TRANSCEIVER
* Please carefully read before use

iii
In order to make you fully understand the equipment, please
read this user manual before using.
Thank you for purchasing our hand held FM transceiv-
er. This model is novel designed with stable perfor-
mance and we want to develop this model to be a por-
table equipment, also easy to operate with a variety
of sophisticated functions, so we are using the most
advanced technology. We deeply condent that its
quality and functionality would make you feel satised!

viv
PRECAUTION
The transceiver is a product with good design and advanced tech-
nology. The following suggestions will help you perform the obliga-
tions of warranty cause, understand and realize the security of us-
ing transceivers.
1. Put transceiver and all its parts and accessories in place out of
children’s reach.
2. Do not try to disassemble transceiver as non-professional’s treat-
ment to the transceiver may cause damage.
3. Please use our company’s assorted battery pack and charger,
avoid damage to transceiver.
4. Please use our company’s assorted antenna, to prevent shorten
communication distance.
5. Do not expose transceiver to sunlight for a long time or in the
overheated areas.
6. Do not put transceiver in dusted or wet areas.
7. Do not clean transceiver with strong chemicals, cleaning agents
or strong lotion.
8. Do not transmit unless the antenna has been installed.
9. If you discover the transceiver giving o odor or smoke, please
immediately turn o the power of transceiver, remove battery
pack from transceiver and contact with dealers.
ANNOUNCEMENT
» All the proposals above are equally applicable to your transceiver
and its accessories. If they can not work properly, please contact
with dealers promptly.
» If you use accessories which are not produced or sold by our
company, We will not guarantee the safety and operability of the
transceiver.
CONTENTS
UNPACKING AND CHECKING EQUIPMENT.............. 1
Assorted Accessories .....................................................1
PREPARATION ............................................................. 2
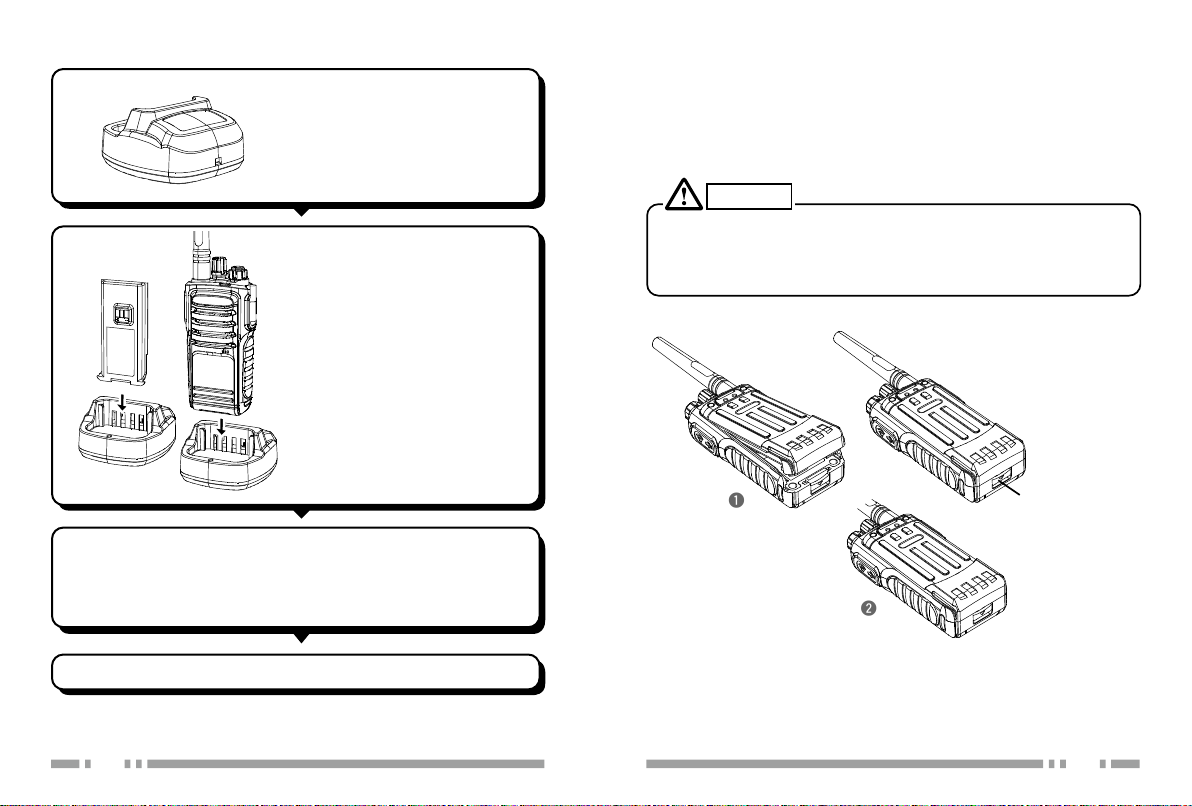
Charging the Battery Pack ..............................................2
Installing/Removing the Battery Pack..............................4
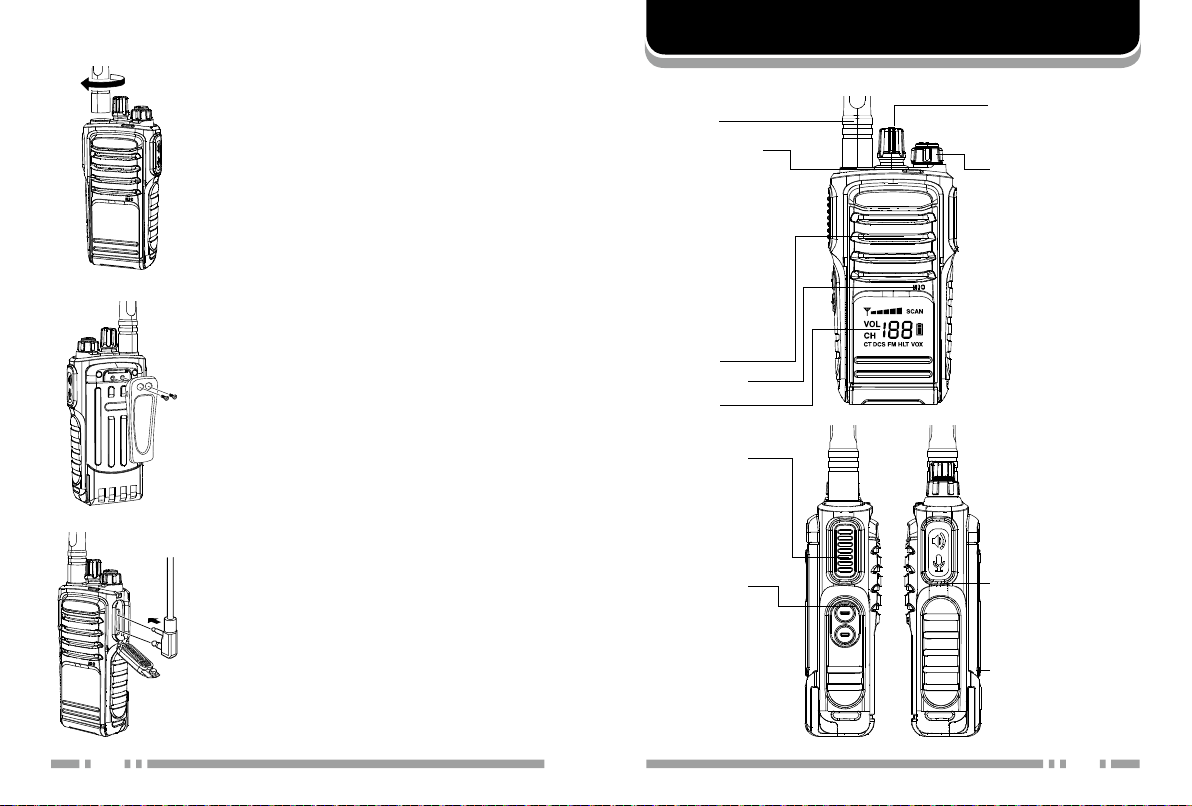
Installing the Antenna .....................................................5
Installing the Belt Clip .....................................................5
Installing the Optional Speaker/Microphone ...................5
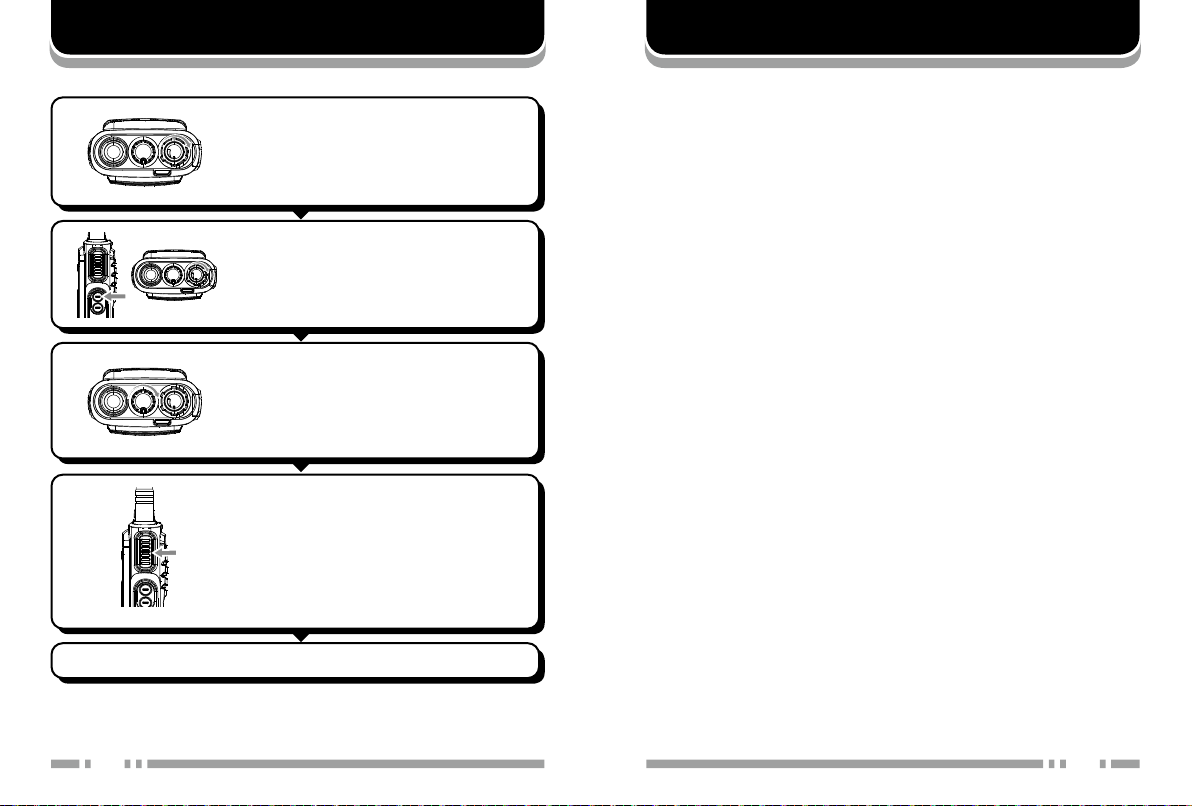
GETTING ACQUAINTED.............................................. 6
OPERATION.................................................................. 7
AUXILIARY FUNCTIONS.............................................. 8
Time-out Timer................................................................8
Battery Power Save.........................................................8
Low Power Warning ........................................................8
Monitor............................................................................9
Quiet Talk (QT) and Digital Quiet Talk (DQT) ...................9
SPECIFICATIONS....................................................... 10
TROUBLESHOOTING GUIDE.................................... 11
FREQUENCY CHART................................................. 12

21
UNPACKING AND CHECKING EQUIPMENT
Please take the transceiver from the package carefully. We suggest
that you should check the following accessories before throwing
away the package. If any items is lost or damaged when transporta-
tion, please submit a claim to the delivery man immediately.
Assorted Accessories
Item Qty.
Antenna 1
Charger 1
Battery 1
Belt Clip 1
Screw Set 1
User Manual 1
Adaptor 1
PREPARATION
Charging the Battery Pack
The battery pack is not charged at the factory; Please charge it be-
fore using.
After purchasing or long time storage (more than two months), the
battery can not reach its normal capacity when charge at the rst
time. After charging 2-3 times then the capacity reach the normal
one.
Do not recharge the battery pack if it is already fully charged.
Otherwise, the battery life will be shorten or damaged.
After recharging the battery pack, disconnect it from the char-
ger. Charging the battery pack more than 5 days may reduce
the battery pack life due to overcharging.
CAUTION
NOTE:
The ambient temperature should be between 42 and 104°F (5 to
40°C) while charging is in progress. Charging outside this range
may not fully charge the battery.
Always switch OFF the transceiver equipped with a battery pack
before charging. Using the transceiver while charging will inter-
fere with correct charging.
Even after completely correct charge, the using time still not in-
creases, then the battery life is over, please replace the battery.

43
Plug the Charger power cable
into an AC outlet.
Insert the battery pack or
transceiver with a battery pack
into the charger.
Make sure the battery pack
contact with the charging ter-
minals correctly.
The charger LED lights on
and charging begins.
After charging the assorted battery pack for 4~8 hours, take
the battery or the transceiver with battery from the charger.
The charge completes when charging light turns green.
Unplug the AC adaptor from the AC outlet.
Installing/Removing the Battery Pack
The average using time of the supplied battery pack is 8 hours. Av-
erage times is calculated by using 5% transmit time, 5% receive
time, and 90% standby time.
Do not make the battery terminals short circuit or dispose the
battery into re.
Do not try to remove the shell from the battery pack.
CAUTION
q
w
Battery Latch
Pull the latch
downward to
remove the
battery pack.

65
Installing the Antenna
Hold the antenna base and screw the anten-
na clockwise into the antenna connector at
the top of the transceiver, until tighten.
NOTE: Don’t hang keys, speaker or micro-
phone on the antenna. Otherwise the
antenna will be damaged or perfor-
mance of the radio will be degraded.
Installing the Belt Clip
If necessary, can use two 3 x 8mm screws in
the package to x the belt clip.
NOTE:
If not install the belt clip, its installation lo-
cation will get hot in the hot environment
or in the continuous communication.
You must remove the belt clip before re-
moving the battery pack.
Installing the Optional Speaker/
Microphone
Outward apart the moisture-proof rubber of
the headphone mouth, Insert the speaker/
microphone plugs into the speaker/micro-
phone jacks.
NOTE: The transceiver is not fully waterproof
while using the speaker/microphone.
GETTING ACQUAINTED
Antenna Channel selector
Rotate to select
channels 1~199.
Power switch/
Volume control
Turn clockwise
to switch ON the
transceiver. To
switch OFF the
transceiver, turn
counterclockwise
until a click sounds.
Rotate to adjust the
volume level.
PTT (Push-To-
Talk) Switch
Press, then
speak into the
microphone to
call. Release to
receive.
Monitor key
Press and hold to
turn the squelch
OFF.You will
hear background
noise. Release to
turn the squelch
ON.
Speaker/
Microphone
jacks
Battery pack
LED indicator
Lights red while
transmitting.
Lights green while
receiving a signal.
Purple light ashing
when transmit with
low battery power.
Speaker
Microphone
Channel

87
OPERATION
Switch ON the transceiver by turning
the Power switch/Volume control
clockwise.
A beep sounds.
Adjust the volume by rotating the Vol-
ume control.
Rotates the Channel switch to select
channel.
When you receive an appropriate signal,
you will hear audio from the speaker.
To make a call, press and hold the
PTT switch, then speak into the mi-
crophone using your normal speaker
voice.
Keep the microphone approximately
1.5 inches (3 to 4cm) from your lips.
Release the PTT switch to receive signal.
NOTE: If the battery voltage gets low, transmit will stop, status light will
ashing red.
AUXILIARY FUNCTIONS
Time-out Timer
The purpose of the Time-out Timer is to prevent any person from
using a channel for an extended period of time.
If you continuous transmitting 60 seconds, transceiver will stop
transmitting and beep sound comes out.
To stop the beep sound, release PTT button. Press the PTT button
again then can transmit regain.
Battery Power Save
Power saving function is to reduce the power consumption when
not receive signal or not operation (no press buttons or switch on/
o the power. )
If the channel is not busy or not operation more than 10 minutes,
the battery power saving function ON. When receive signal or dur-
ing operation, the battery power saving function automatically OFF.
Low Power Warning
Low Battery Warning alerts you when the battery needs to be re-
charged.
If the battery low to the preset value when you are transmitting, the
red lights will ash. If the beep sound comes out, transmit will stop.
Please replace the battery or charge.

109
Monitor
If no signal occurs, the transceiver squelch circuit will automatically
make the speaker silence, so you will not hear background noise.
To manually turn o the squelch circuit, hold the Monitor button.
This operation is helpful for you to adjust the volume level or receive
a weak signal.
The LED indicator lights green while the Monitor button is
pressed.
Quiet Talk (QT) and Digital Quiet Talk (DQT)
Some channels may have preset QT/DQT tones. A QT/DQT tone is
a subaudible tone which allows you to ignore (not hear) calls from
other parties who are using the same channel.
When you receive a signal that has a tone dierent from the one set
up in you transceiver, you will not hear the signal. Likewise, signals
that you transmit will only be heard by parties whose QT/DQT tone
matches the tone set up in your transceiver.
NOTE: Although using channels set up with QT/DQT tones relieves
you from listening to unwanted calls, it does not mean your
calls will be private.
SPECIFICATIONS
Unity Section
Frequency range 446MHz
Rated voltage DC 7.4V (Li-ion battery)
Memory channel 16 channels
Antenna disposition inductively loaded antenna
Antenna impedance 50Ω
Working manner
same frequency single opera-
tion or dierent frequency sin-
gle operation
Dimension 125×65×35mm
Launching Parts
Modulation mode frequency modulation
Maximum frequency deviation ≤ ±5kHz
Remanent radiation < -60dB
Modulation mode (W/N) 16KØF3E,11KØF3E
Emission current ≤ 1000mA
Receiving Parts
Sensitivity < 0.16 µV(12dB SINAD)
Squelch sensitivity < 0.2 µV
Intermodulation Rejection 50dB
Audio frequency power ≥ 300mW
Receiving current ≤ 100mA
Squelch Standby 20mA

1211
TROUBLESHOOTING GUIDE
Problem Solution
No power
Battery may run out of power, please
update the battery or recharge the
battery.
The battery pack may not be in-
stalled correctly. Remove the battery
pack and install it again.
Battery power o
shortly after charging
The battery pack life is over. Replace
the battery pack with a new one.
Can not talk to or hear
other members in
your group
Make sure you are using the same
frequency and Quiet Talk tone as the
other members in your group.
Other group members may be too
far away. Make sure you are within
the working range of the transceiv-
ers.
Other voices (besides
group members) are
present on the chan-
nel
Change the Quiet Talk tone. Be sure
to change the tone on all transceiv-
ers in your group.
FREQUENCY CHART
Model Name: ________________________________________
Serial Number: _______________________________________
Channel Transmit
Frequency
Receive
Frequency QT/DQT
1
2
3
4
5
6
7
8
9
10
11
12
13
14
15
16

Please cut along with this line
Model Number:
Serial Number:
Purchasing Date:
Dealer: Telephone:
User’s Name: Telephone:
Address: Post Code:
REMARKS:
1. This guarantee card to be kept by the user, no replen-
ishment if lost.
2. This guarantee card to be lled & chopped by the deal-
er, or it is invalid.
3. Don’t alter the guarantee card, please conrm the se-
rial number on the guarantee card is same as that on
the machine.
4. One-year guarantee, BUT charger, battery, ear-phone,
antenna and can cable are not under guarantee.
5. The user can get repairing service from the following
ways:
a. Go to the shop where you buy the machine.
b. Our local repairing agent.
c. Send to us or visit our company.
GUARANTEE CARD

INSTRUCTION
MANUAL
TP-446
PROFESSIONAL FM TRANSCEIVER
* Please carefully read before use
Table of contents
Other Adesso Transceiver manuals