ADOR Croco User manual
Gear Train Door Opener
IVECO DAILY
FIAT DUCATO 240; 250
FORD TRANSIT
TOYOTA HIACE
GASELLE, BARGUZIN, SOBOL
PEUGEOT BOXER / CITROEN JUMPER
MERCEDES SPRINTER 906 / VOLKSWAGEN CRAFTER
OPERATIONS MANUAL

1
ADDRESS TO THE OWNER
We congratulate you upon the acquiring of CROCO sliding door drive! We
hope that its operation will bring you in a good mood.
If you have any questions concerning maintenance and repair, please contact
authorized representatives of the manufacturing plant ADOR Ltd. If you have
other questions or suggestions, please contact us on AdorUSA@gmail.com
NOTE!
The drive has undergone safety tests according to All-Union State
Standard R 41.107-99.
Inattentive using of the drive can represent a danger. A moving door
can injure a passenger, especially a child.
A minibus’s driver bears responsibility for inattentive using of the
drive.
Information stickers must be positioned in prescribed places (picture
3), inscriptions on the stickers must be seen clearly.
Read information about your actions in case of an accident or opera-
tion failure of a drive. This is a guarantee of your and your passen-
gers’ safety.
IMPORTANT!
Open and close the door only in a completely motionless state of a
minibus. The violation of this rule is DANGEROUS for passengers and
can lead to premature wear and damage of the door drive.

2 BASIC CHARACTERISTICS
CROCO drive is designed for opening and closing doors in minibuses working
as taxi buses. The models of the buses are listed on the manual cover.
Basic characteristics
Power consumption (nominal) 70 W
Power consumption (maximum) 250 W
Time of door opening (depends on the width set-
tings) ~2 sec.
Time of door closing (depends on the width settings) ~2 sec.
External temperatures -25 - +40
Maximum allowed angle of bus ascent when the
door will close 10°
Speed of door opening ~0.3 m/sec
Speed of door closing ~0,3 м/сек.
Resource
Not less than
150 000
opening/closing
cycles

ELECTRIC NETWORK
K-red
s-green
'-I-black
c/6 -grey-and-white
,-blue
c/Y -grey-and-black
6/K -white-and-red
,/y -blue-and-black
>Ki, -yellow-and-blue
Additional
control button
Fuse
Battery
as a power supply
Main control button
Controller
r
1-'-
1-
I I
I
I I
I I
I I
I I
I I
I I
I I
I I
I I
I I
I I
I I
T
Latch actuators
Fiat Ducato
Peugeot Boxer
Ring Promaster
Ford Transit
Mercedes Sprinter
Volkswagen Crafter
Toyota Hice
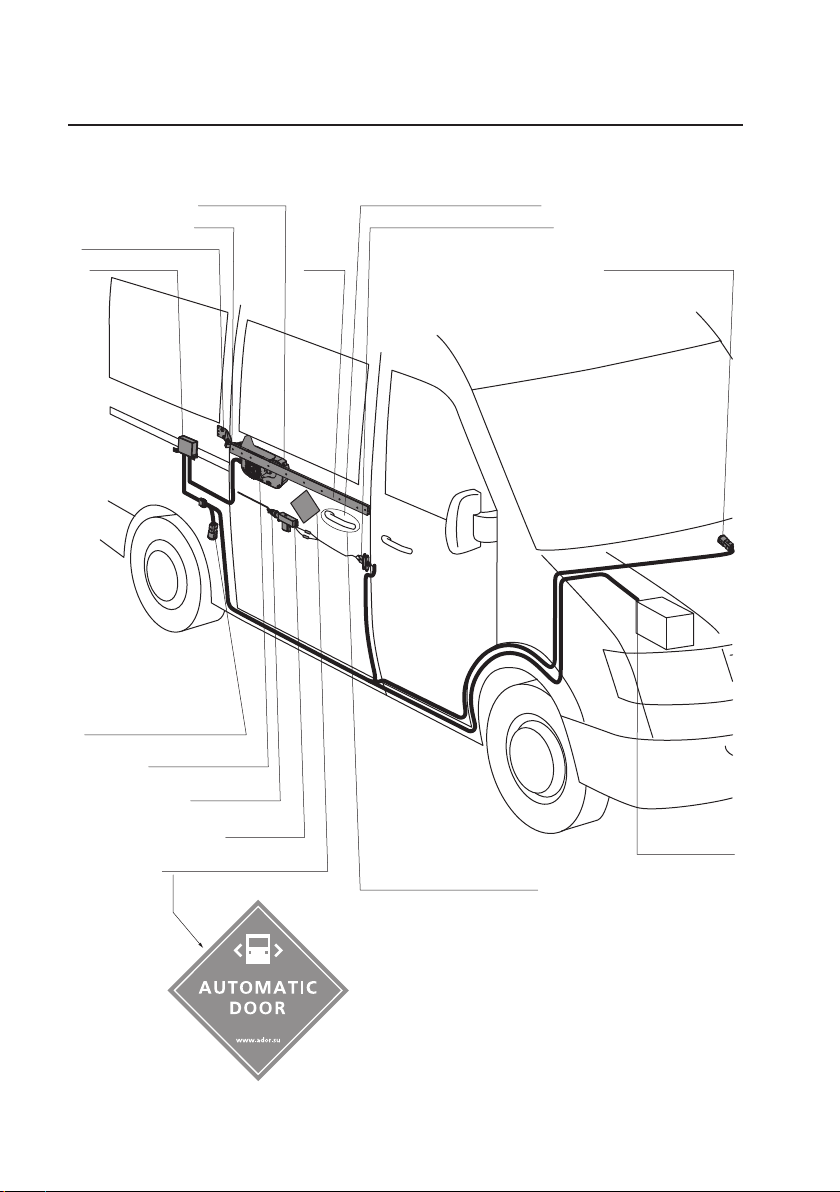
3DISPOSITION OF THE DRIVE IN A MINIBUS
Lock drive
Information sticker
Sliding door contacts
Bearing support
Link
Rack
Main harness
External door handle
Door drive
Control buttonController
+12V/30A
Additional button
(not included)
Activator
Rapidly wearing parts
• Sliding door contacts
• Control button
Internal door handle

4DRIVE FUNCTIONS, DESCRIPTION OF OPERATION
OPENING AND CLOSING THE DOOR
Press the control button for ~0.5 sec. The door will start moving after you re-
lease the button.
AUTOMATIC ROLL-BACK
If the door pushes against an obstacle while it is closing, it will stop automati-
cally and roll back.
STOPPING THE DOOR
Press the control button one time to stop the door while it is moving.
ADJUSTMENT OF THE WIDTH OF DOOR OPENING
Open the door. Move it to the required position by hand. Press the control but-
ton for ~10 sec. until you hear 2-times sound signal. Release the button. Now
the drive will automatically remember the adjusted width of the opening.
SLIDING DOOR FIXING
The drive can operate in 2 modes:
with fixing (factory settings) picture 4).
without fixing (picture 3).
To change the mode to operating without fixing press the control button for
~15 sec. until you hear 3 long sound signals. Release the button.
NOTE
Operating mode without fixing is used if there is a lock drive. Emer-
gency opening of the door from the outside is possible in this operat-
ing mode.
RETURN TO FACTORY SETTINGS
Press the control button for ~20 sec. until you hear 4-times sound signal. Re-
lease the control button. All drive settings will return to factory settings.
NOTE
The drive settings will automatically return to factory settings in
case of power outage.

5DRIVE FUNCTIONS, DESCRIPTION OF OPERATION
Pic. 3 Pic. 4
Operating mode without fixing Operating mode with fixing
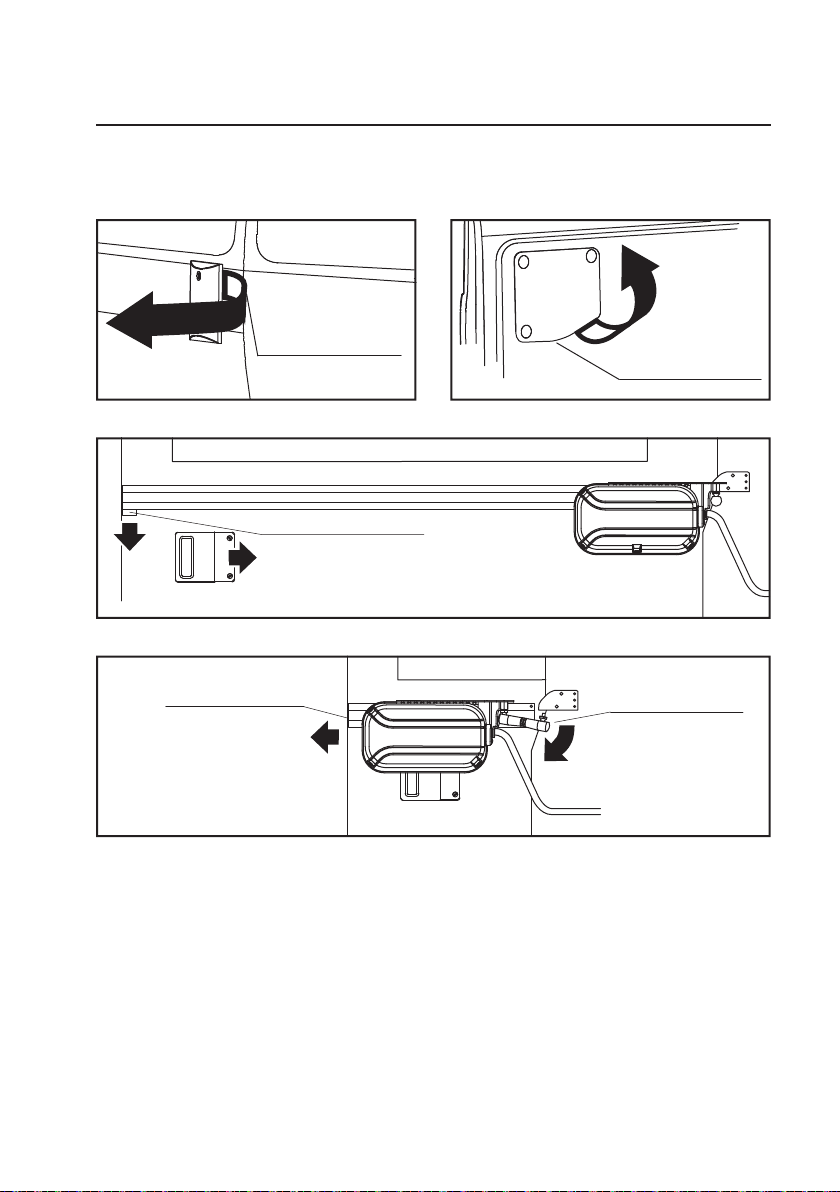
EMERGENCY DOOR OPENING FROM THE INSIDE
EMERGENCY DOOR OPENING IN THE OPERATING MODE WITHOUT FIXING
1
2
Pic. 2
2) Open the door by
the operational
handle
1) Pull the back side
of the door
Pic. 1
1) Turn the door handle and hold it
2) Move the drive 10 cm to the left
3) Open the door by hand
1
2
3
6DRIVE FUNCTIONS, DESCRIPTION OF OPERATION
CHANGING TO MANUAL OPERATING MODE
Pic. 6
Remove the internal
handle cover
Pic. 7
1)Remove the index pin
2)Open the door by the handle
Pic. 5
Remove the external
handle cover
1) Unscrew the link
2) Remove the drive
off the rack
Pic. 8

7MAINTENANCE
To ensure long-term operation of the drive you have to undergo regular main-
tenance at ADOR authorized representatives’ workshops in accordance with
table 1. The minibus’s owner has to do self-maintenance in accordance with
table 2.
MAINTENANCE AT ADOR REPRESENTATIVES’ WORKSHOPS Table 1
№ Description of work 1
month 4
months 8
months 12
months
Further
mainte-
nance
1
General examination of parts
and assemblies of the drive
and sliding door
+ + + + every 2
months
2
Checking wear of sliding door
contacts (replacement if nec-
essary)
- + + + every 2
months
3Tightening of fixation screws
of the rack to the door + + + + every 2
months
4
Checking the sliding door
against its frame (adjustment
if necessary)
+ + + + every 2
months
5
Checking electric connections
of the wire harness of the
drive
- + + + every 2
months
6Checking length of the link
(adjustment if necessary) + + + + if necessary
7Checking fixation of the back
bearing support + + + + every 2
months
8
Checking working condition
of the drive belt (adjustment
of tension or replacement if
necessary)
+ + + + every 2
months
9
Checking clearance between
the rack and the pinion (ad-
justment if necessary)
+ + + + every 4
months

8
SELF-MAINTENANCE Table 2
№ Description of work Frequency
1 Cleaning and greasing the rack (WD-40) every week
2Cleaning and greasing the rack guide and
door carriage rollers (WD-40) every week
3 Greasing sliding door contacts (picture 9) every week
4Checking wear and replacement of sliding
door index pins (picture 9) every 4 months
MAINTENANCE
9MAINTENANCE
Maintenance in ADOR authorized representatives’ workshops requires pay-
ment. It is carried out in accordance with the schedule and the representative’s
rates. During the maintenance the owner must show a warranty certificate.
IMPORTANT!
The first check-up is carried out in 1 month after installation.
After the check-up a specialist makes a note about performance of work on
page 12.
IMPORTANT!
If drive operation is accompanied by knocks, clicks, scraping, door
vibration, please contact ADOR authorized representatives imme-
diately.
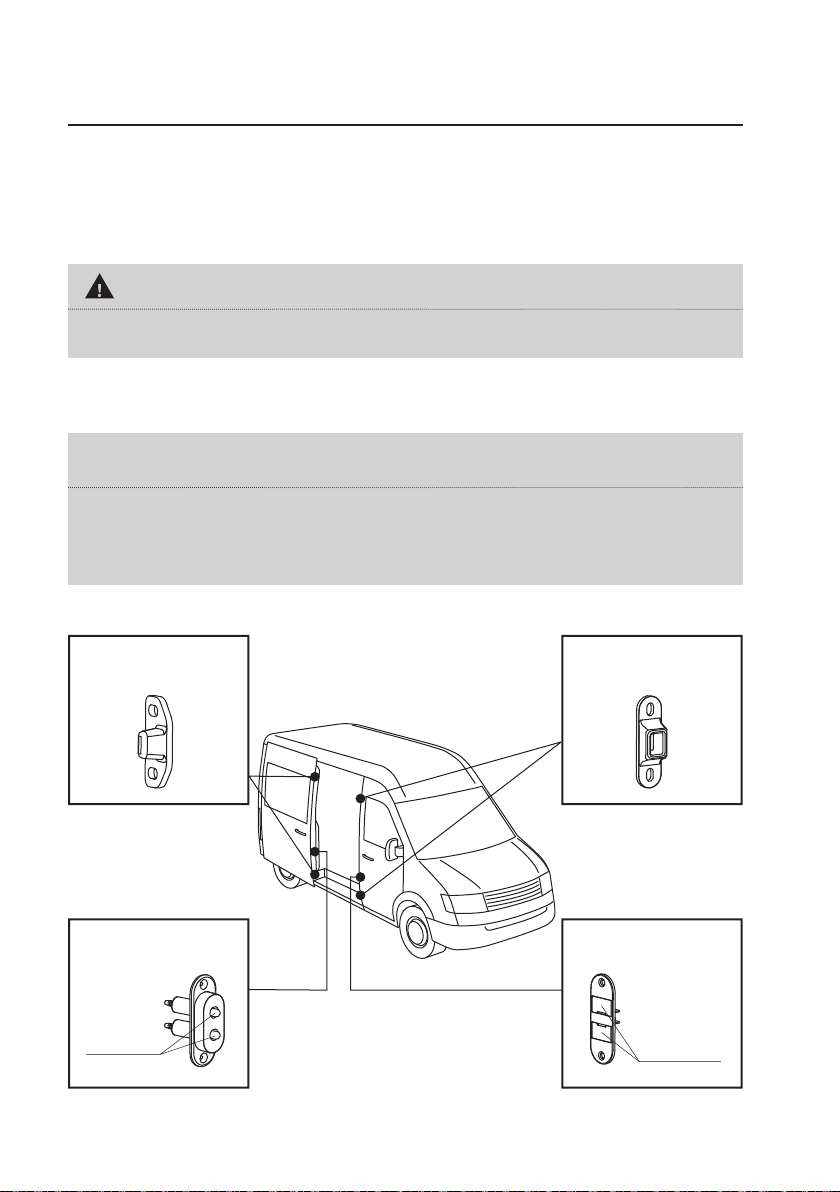
DISPOSITION OF SLIDING DOOR INDEX PINS AND CONTACTS
Tenon of the sliding
door index pin
Movable
contacts group
Places for
applying
grease
(WD-40)
Mortise of the sliding
door index pin
Fixed contacts group
Places for
applying
grease
(Lietol-24)

10
MANUFACTURER’S GUARANTEE OBLIGATIONS
ADOR gives guarantee for this drive for 12-month period or 150,000 opening/
closing cycles in a minibus working as a taxi bus.
The guarantee does not cover rapidly wearing parts:
• Sliding door contacts (operating life 6 months);
• Control button (operating life 6 months).
THE GUARANTEE IS NOT GIVEN IN THE FOLLOWING CASES:
• If the drive is installed not by ADOR authorized representative;
• If there is no warranty certificate or warranty certificate is filled in incor-
rectly. The serial number on the sticker in the warranty certificate and on the
parts is damaged;
• If you did not do the check-up or you missed the term of a regular check-up
at ADOR authorized representative’s workshop;
• If the drive is damaged due to its incorrect servicing and / or operation;
• If unauthorized connection to the electric diagram of the device is revealed,
as well as self-made installation of additional equipment influencing drive op-
eration. The exception in this case is installation of the equipment carried out
by ADOR authorized representative and a proper note made on a servicing
page.
•If signs of self-made repair are revealed as well as drive damages due to a
car accident.

11WARRANTY CERTIFICATE
(VIN)
Drive installation date
Guarantee period is 12 month starting from the installation date.
Installation carried out by /Name / Signature/
Installation checked by /Name / Signature/
Address and phone number of the installing company
Hereby I acknowledge that I do not have any complaints about quality of the
product and its installation. I have read and understood the rules of drive use
and guarantee obligations of the installing company as well as the warning of
potential danger of the device on page 1.
(Buyer’s signature)
(Stamp of the installing company)

12
SERVICING PAGE
Check-up
date
Description of work and list of spare parts
Work carried out by / Name / Signature

13
SERVICING PAGE
Check-up
date
Description of work and list of spare parts
Work carried out by / Name / Signature

14
SERVICING PAGE
Check-up
date
Description of work and list of spare parts
Work carried out by / Name / Signature

15
SERVICING PAGE
Check-up
date
Description of work and list of spare parts
Work carried out by / Name / Signature

CONTACTS
#
DEAR CUSTOMER!
if you have any questions concerning warranty, post warranty
maintenance service and parts,
please contact us at:
http://www.adorusa.com
Email: [email protected]
Phone number: +1 (216) 214-0828 (USA)
Please, make pictures/video of failed part, issue with installation or
operation of device.
Text or email.
Ador Tech support will reply shortly with solution.
Table of contents
Popular Automobile Accessories manuals by other brands


ULTIMATE SPEED
ULTIMATE SPEED 279746 Assembly and Safety Advice

SSV Works
SSV Works DF-F65 manual

ULTIMATE SPEED
ULTIMATE SPEED CARBON Assembly and Safety Advice

Witter
Witter F174 Fitting instructions

WeatherTech
WeatherTech No-Drill installation instructions

TAUBENREUTHER
TAUBENREUTHER 1-336050 Installation instruction