manuals.online logo
Brands
  1. Home
  2. •
  3. Brands
  4. •
  5. ADURO
  6. •
  7. Wood Stove
  8. •
  9. ADURO 3 User manual

ADURO 3 User manual

Version 2
Aduro 3
User Manual
Ecolabel - Sintef 110-0234 - EN 13240
www.aduro.dk
- 2 -
Good luck wit your new wood burning stove!
In order to get the best possible pleasure and benefit from your new Aduro wood burning stove, it is
important that you read this User Manual thoroughly before you install your wood burning stove and start to
use it.
1.0 General
1.1 Compliance
Aduro 3 omplies with the EN 13240 European standards, as well as the NS 3058 Norwegian standard and
is thereby approved for installation and use in Europe. The produ t do umentation for Norway has Sintef
number 110-0234 and an be downloaded from our website at www.aduro.no or from www.nbl.sintef.no. At
the same time, the manufa turing pro ess is subje t to external quality ontrol. Aduro 3 also arries the
Nordi Swan E o-label, whi h guarantees that the wood burning stove omplies with the most stringent
environmental requirements and has been manufa tured in an environmentally orre t manner.
1.2 Tec nical data
Nominal power: 5 kW
Chimney draught 12 Pa
Maximum ombustion amount per hour:
- Wood approx. 2.4 kg
Heat rating in buildings with:
Optimum insulation: 130 m
2
Average insulation: 90 m
2
Inadequate insulation: 50 m
2
Flue outlet, diameter: 150 mm
Weight: Aduro 3 with drawer 95 kg and Aduro 3 with wood tray 88 kg.
1.3 Transportation
When taking your wood burning stove home, please ensure that it travels in an upright position. If you wish
to lay it flat, it is important that you remove loose parts from the ombustion hamber ( ast iron grate and
loose fireproof tiles) and remove the ash drawer. Alternatively you ould also fill the ombustion hamber
with ex ess pa kaging so the parts are kept in pla e.
1.4 Serial number
The wood burning stove has a serial number on the rating plate on the ba k of the stove. Please write this
number in the spa e below. For the purposes of the guarantee and for other enquiries, it is important that
you are able to quote this number.
Serial number
- 3 -
2.0 Installation of t e wood burning stove
You are wel ome to install your wood burning stove yourself – but we strongly re ommend that you onsult
your himney sweep before you begin the installation. Your dealer an also provide you with installation
advi e. It is important to ensure that all lo al rules and regulations, in luding ones relating to national and
European standards, are omplied with when installing this devi e.
Please note: You may not begin to use the wood burning stove until it has been inspe ted and approved by
your lo al himney sweep.
2.1 Position of t e stove/distance requirements
The new wood burning stove must be installed in a suitable and physi ally possible position. You need to be
sure that the position omplies with lo al regulations. Distan e requirements will only apply if the wood
burning stove is to be pla ed lose to flammable materials. The Aduro 3 should be installed at a distan e of
20 m from flammable materials at the rear and at a distan e of 30 m from the side. All furniture must be
kept at least 85 m away from the front of the stove. If the stove is installed with an insulated pipe then you
may redu e the distan e behind the stove to 10 m. See illustration below.
If the stove is positioned against a bri k wall or other non-flammable material, there is no minimum distan e
requirement. To fa ilitate leaning and for the best use of the onve tion air, we re ommend that you leave a
distan e of approximately 5–10 m to the wall. The Aduro 3 is built as a onve tion stove. This means that
air from the room ir ulates between the inner stove and the outer overing. As a result, the heated air is
distributed evenly throughout the room.
Behind stove
85
3030
20/10*
* When using an insulated pipe
Please note: that the Aduro 3 must be installed on a floor with the adequate load-bearing apa ity. If the
existing onstru tion does not meet this requirement, appropriate adaptation measures must be taken (e.g. a
load-distributing plate).
If the wood burning stove is to be pla ed lose to flammable material, su h as a wooden floor or arpet, it
must be pla ed on a non-flammable base. The floor plate should extend for at least 30 m in front of the
wood burning stove, and 15 m on ea h side.
2.2 Connection to a brick c imney
If the stove is being onne ted to a bri k himney, a urved flue pipe should be used via the top outlet. After
measurement, a hole is made in the himney in whi h the pipe sleeve is pla ed and firepla e mortar is used
to seal it in pla e. The stove is pla ed in position and the flue pipe is put in pla e. A thin gasket is pla ed
- 4 -
between the flue pipe and the pipe sleeve to seal the joints. The flue pipe should protrude 5–10 m into the
pipe sleeve, but must not blo k the opening in the himney (see the illustration below).
The wood burning stove an be onne ted to a himney to whi h other heat sour es are onne ted.
3.0 Lig ting a fire in t e wood burning stove
3.1 Important safety information
• The wood burning stove will be ome warm during use and therefore it should be treated with all
ne essary aution.
• Never keep easily ombustible fluids su h as petrol in the vi inity of the wood burning stove – and
never use easily ombustible fluids to light the fire in the wood burning stove.
• Never empty the ash drawer when the wood burning stove is warm. Embers may still be found in the
ash drawer for up to 24 hours after the fire has gone out. Please wait to empty the ash drawer until
you are sure that there are no embers in the ash.
• The door should be kept losed while the wood burning stove is in use. While lighting the fire, the
door an stand ajar for the first few minutes.
• In the event of a himney fire: Close all the dampers on the wood burning stove and all the fire-
fighting servi e.
3.2 Recommended fuels?
We re ommend the use of split hardwood that has been stored outdoors under over for at least 1 year.
Wood that has been stored indoors has a tenden y to be ome too dry and will burn too qui kly. The
wood should preferably be felled in the winter, when a lot of the moisture in the wood will have been
drawn down into the roots. In order to a hieve optimum ombustion, the wood’s moisture level should not
ex eed 18 %, whi h roughly orresponds to storing the wood under over outdoors for one year. The
moisture level of the wood an be measured using a moisture meter or by applying washing up liquid to
one end of the log and blowing air in the other end. If the wood is dry enough, soap bubbles will appear.
The wood should be hopped into logs with a diameter of approx. 10 m and a log length of max. 32 m.
Corre t firing provides optimal heat output and maximum e onomy. At the same time, orre t firing
prevents environmental damage in the form of smoke and malodorous fumes and also redu es the risk of
himney fires. Well seasoned wood fuel is essential for orre t use. Make sure your fuel is kept dry. If the
fuel is wet, a large proportion of the heat will be used to vaporize the water, and this energy will
disappear up the himney. It is learly not only une onomi al to fire with wet fuel but also, as mentioned
above, in reases the risk of produ ing soot, smoke and other environmentally damaging by-produ ts.
Burning varnished wood, impregnated wood, hipboard, paper and other waste is stri tly forbidden. Burning
these materials will damage the environment, the wood burning stove and your own health.
3.3 How do I lig t a fire in t e wood burning stove?
The fire lighting method is very important for starting ombustion qui kly and effi iently.
1) Open the primary air intake/damper under the door and open the se ondary air intake on the door.
The primary damper is used at the start to get the fire going, while the se ondary air intake keeps
X
- 5 -
the fire burning evenly. The se ondary air intake is losed when the damper is pushed all the way to
the right and open when the damper is pushed to the left. To open the primary air intake the damper
should be pulled out. The illustration below shows the stove seen from the front with the dampers
indi ated.
2) Pla e a log of wood rosswise in the ombustion hamber and put 2 firelighters lose to the log.
Light the firelighters and qui kly put a new log lose to the firelighters and several small logs at an
angle above it. Air must be able to rea h the firelighters, but the logs should be tou hing to “warm”
ea h other.
3) Keep the door approx. 1 m ajar, until the glass is too hot to tou h. Then lose the door. When there
are distin t, visible flames and the fire has taken hold, lose the primary air intake/damper.
Important: The ontrol handle will get warm when the wood burning stove is being used. Please use the
glove provided when you operate the wood burning stove.
3.4 T e first time a fire is lit
The first few times the wood burning stove is used, there may be some smoke and unpleasant odours from
the wood burning stove, whi h is fairly normal. This is aused by the heat-resistant paint hardening. Make
sure there is suffi ient ventilation during this stage. It is also important not to let the fire burn too fier ely the
first 2–3 times, so that the wood burning stove has time to expand slowly. You should also be aware that the
stove may make li king sounds as it heats up and ools down – rather like pouring boiling water into a sink.
These are aused by the great differen es in temperature to whi h the materials are being exposed.
During the first firing, whi h should be arried out using approximately 1 kg of wood, the stoking door must
be left slightly open and must not be losed until the stove is old. This is to prevent the sealing rope sti king
to the stove.
3.5 How s ould I use my wood burning stove?
The wood burning stove is intended for intermittent ombustion. This means that ea h stoking should burn
down to embers before new logs are added.
In order to obtain the best possible ombustion, you should regulate the effe t/heat output with the fuel.
Burning small logs provides more powerful ombustion than burning large logs as the surfa e area is greater
and more gas is released. The amount of wood in the ombustion hamber is another fa tor that affe ts
ombustion. In normal ir umstan es, you should not pla e more than two logs in the stove. If you want an
Secondary air intake
Primary air intake
Open - closed
- 6 -
enhan ed effe t, you an add more logs. The nominal heat output is rea hed by burning approx. 2 kg per
hour.
3.6 Secondary damper
The se ondary damper on the door should always be open while the wood burning stove is in use. This
damper allows you to adjust the wood burning stove to the himney draft and the heat output you require. In
normal ir umstan es, the wood burning stove should be working with this damper open between 60 % and
100 %. You should never lose the air intake so far that the flames are extinguished. There should always be
visible flames in order to a hieve lean and effi ient ombustion.
Aduro Key: provides easier ontrol of the
se ondary damper. The key is fitted onto the ontrol
handle, so you an more easily adjust the airflow
from side to side. Turning to the right de reases the
airflow, and turning to the left in reases the airflow.
When the key is not in use, it an hang on the edge
of the drawer.
3.7 Primary damper
When you add a new log, the primary air intake/damper should be opened until the fire is burning properly. In
order to utilize the fuel to the fullest extent, the embers should have burnt for so long that it is ne essary to
open the primary air intake for approx. 2 minutes to get the new log to burn.
In order to redu e the risk of ash falling from the stove when the door is opened to add more fuel, it is a good
idea to open the primary air intake/damper for approx. 1 minute before the door is opened. This in reases
the draught through the stove and redu es the risk that ash will drop on the floor.
Please note: if you overload the wood burning stove and burn more than approx. 2.5 kg wood/hour, there is
a risk that the la quered surfa e of the stove will be ome dis oloured and eventually fall off. The stove an
be resurfa ed, but this is not overed by the manufa turer’s guarantee. In the same way, any other damage
to the stove aused by overloading will not be overed by the guarantee.
3.8 Aduro-tronic
The patent-applied Aduro-troni is designed to operate the stove for you. All you have to
do is put dry wood in the stove, and a tivate the ontrol system - Aduro-troni does the
rest, leaving you to enjoy the flames and the benefits of effi ient ombustion. Aduro-troni
is a patent-applied me hani al solution, whi h works without the use of ele tri ity.
Please note: Use of dry wood of the right size is important to a hieve optimum
ombustion.
3.8.1 How to operate Aduro-tronic
When lighting
When lighting a fire in the wood burning stove for the first time, the maximum
amount of primary air will be needed to light the fire. For that reason, the
primary damper an be kept “for ibly open”. This is done by pulling the
primary damper forward as far as possible and then fixing it with the Aduro
Key. When the stove is warm and a layer of embers has been reated on the
bottom of the ombustion hamber, the Aduro-troni an be set to the
automati position, i.e. the Aduro Key an be removed.
Alternatively, you an leave the door ajar the first minutes during lighting the
fire (without the key).
When stoking
Ea h time fresh wood is put in the stove, a pre ise amount of primary air will be allowed in for the first few
minutes. What’s more important is that the primary air is not allowed in for too long. This is to ensure
optimum ombustion. The Aduro-troni ontrol will ensure intake of primary air at the right tempo. The
Aduro Key
- 7 -
automati is a tivated by pulling the primary damper out ea h time fresh wood is put in the stove. The
automati loses then the primary air gradually.
Regulation of the Aduro-troni ontrol
The ontrol is pre-set to allow primary air intake for the first 5 minutes. This setting has been used during
testing at the Danish Te hnologi al Institute using ‘standard’ sized logs and with optimum moisture ontent
of 17-20%. Standard size logs are approx. 30 m long and 10 x 10 m in thi kness. A standard himney was
also used for testing. In pra ti e, su h ir umstan es an differ, whi h is why the Aduro-troni ontrol an be
adjusted to your ir umstan es. If you want a slower intake of primary air: (e.g. for a slower flue draught,
larger sized wood or for longer intervals between stoking) Adjust the s rew on the front of the ontrol level
using a small s rewdriver to slow losure rate. If the s rew is turned to the right losing time is in reased and
if turned to the left losing time is redu ed.
3.9 Ventilation/fres air supply
In order for the wood burning stove to fun tion at optimum effi ien y, air is needed for the ombustion
pro ess. There must be suffi ient fresh air oming into the room ontaining the wood burning stove. In very
well-insulated houses, or houses with powerful ooker hoods and/or air onditioning systems, a va uum an
be reated around the stove, leading to smoke leakage and poor ombustion. In these ir umstan es, it
might be ne essary to open a window to provide air for ombustion and to equalize the va uum.
Alternatively, you ould fit an air vent in the room ontaining the wood burning stove.
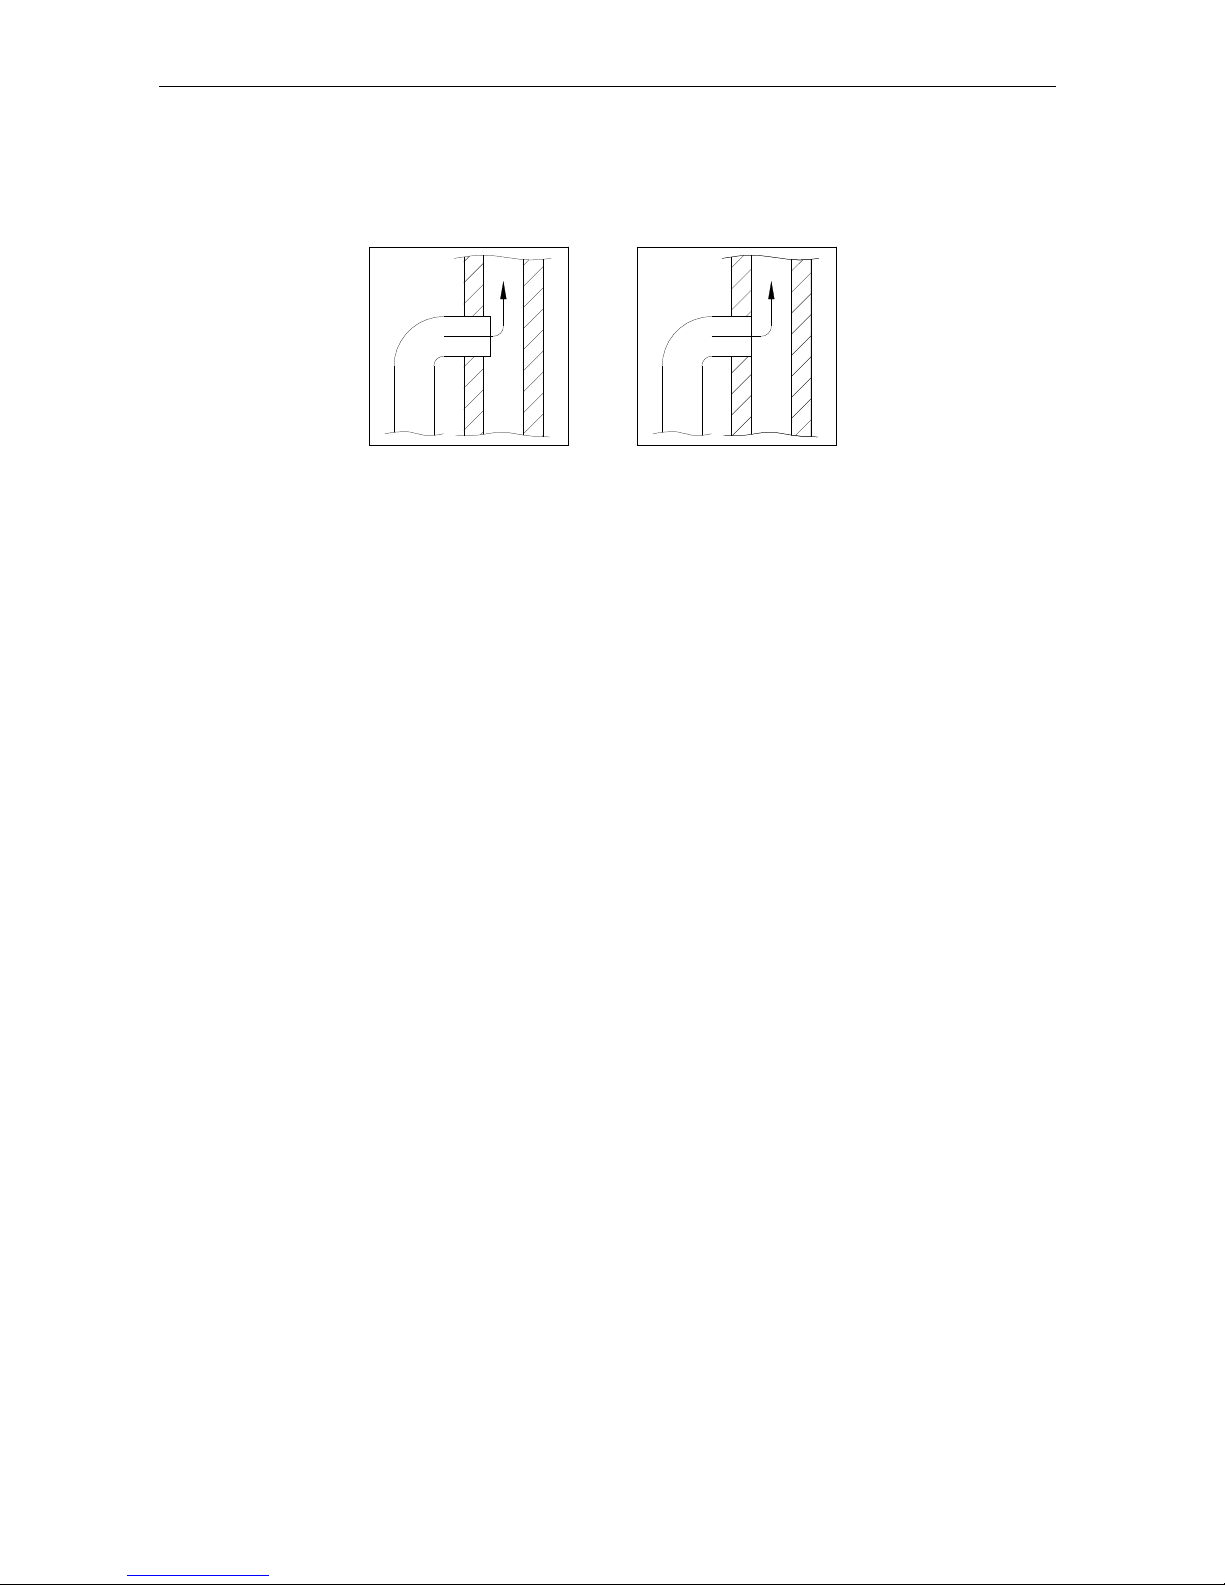
4.0 T e c imney
Data for himney al ulation:
Wood
Flue temperature at [20 °C] 367
Chimney draught at testing power
[mbar]/[Pa] 0.12/12
Flue gas mass flow [g/s] 4,0
The optimum ombustion is a hieved at a onstant himney draught of 0.10 to 0.14 mbar measured in the
flue pipe above the stove. There are many fa tors that affe t the himney draught, in luding the outside
temperature, wind strength and surrounding buildings. If it is impossible to establish a suffi iently natural
himney draught, the himney an be fitted with a smoke extra tor. If the himney draught is too strong, a
damper an be fitted to regulate the himney draught. Conta t your lo al himney sweep for more advi e.
4.1 Inadequate draug t in t e c imney
If the himney is too short, leaks or is inadequately insulated, there may be problems with the himney
draught (let the himney sweep assess this). The draught should be approx. 0.10–0.14 mbar in order to
provide satisfa tory ombustion and prevent smoke leakage.
If the himney sweep judges the draught to be satisfa tory, but you still have problems lighting a fire, try
extending the fire lighting phase/using more thin pie es of kindling, so that the himney gets thoroughly
warm. The himney will not draw at optimum effe t until it is warm. The fire lighting phase an be prolonged
by using a lot of kindling and 1-2 firelighters. When a layer of embers has been formed, add 2–3 dry logs.
5.0 Maintaining and cleaning your wood burning stove
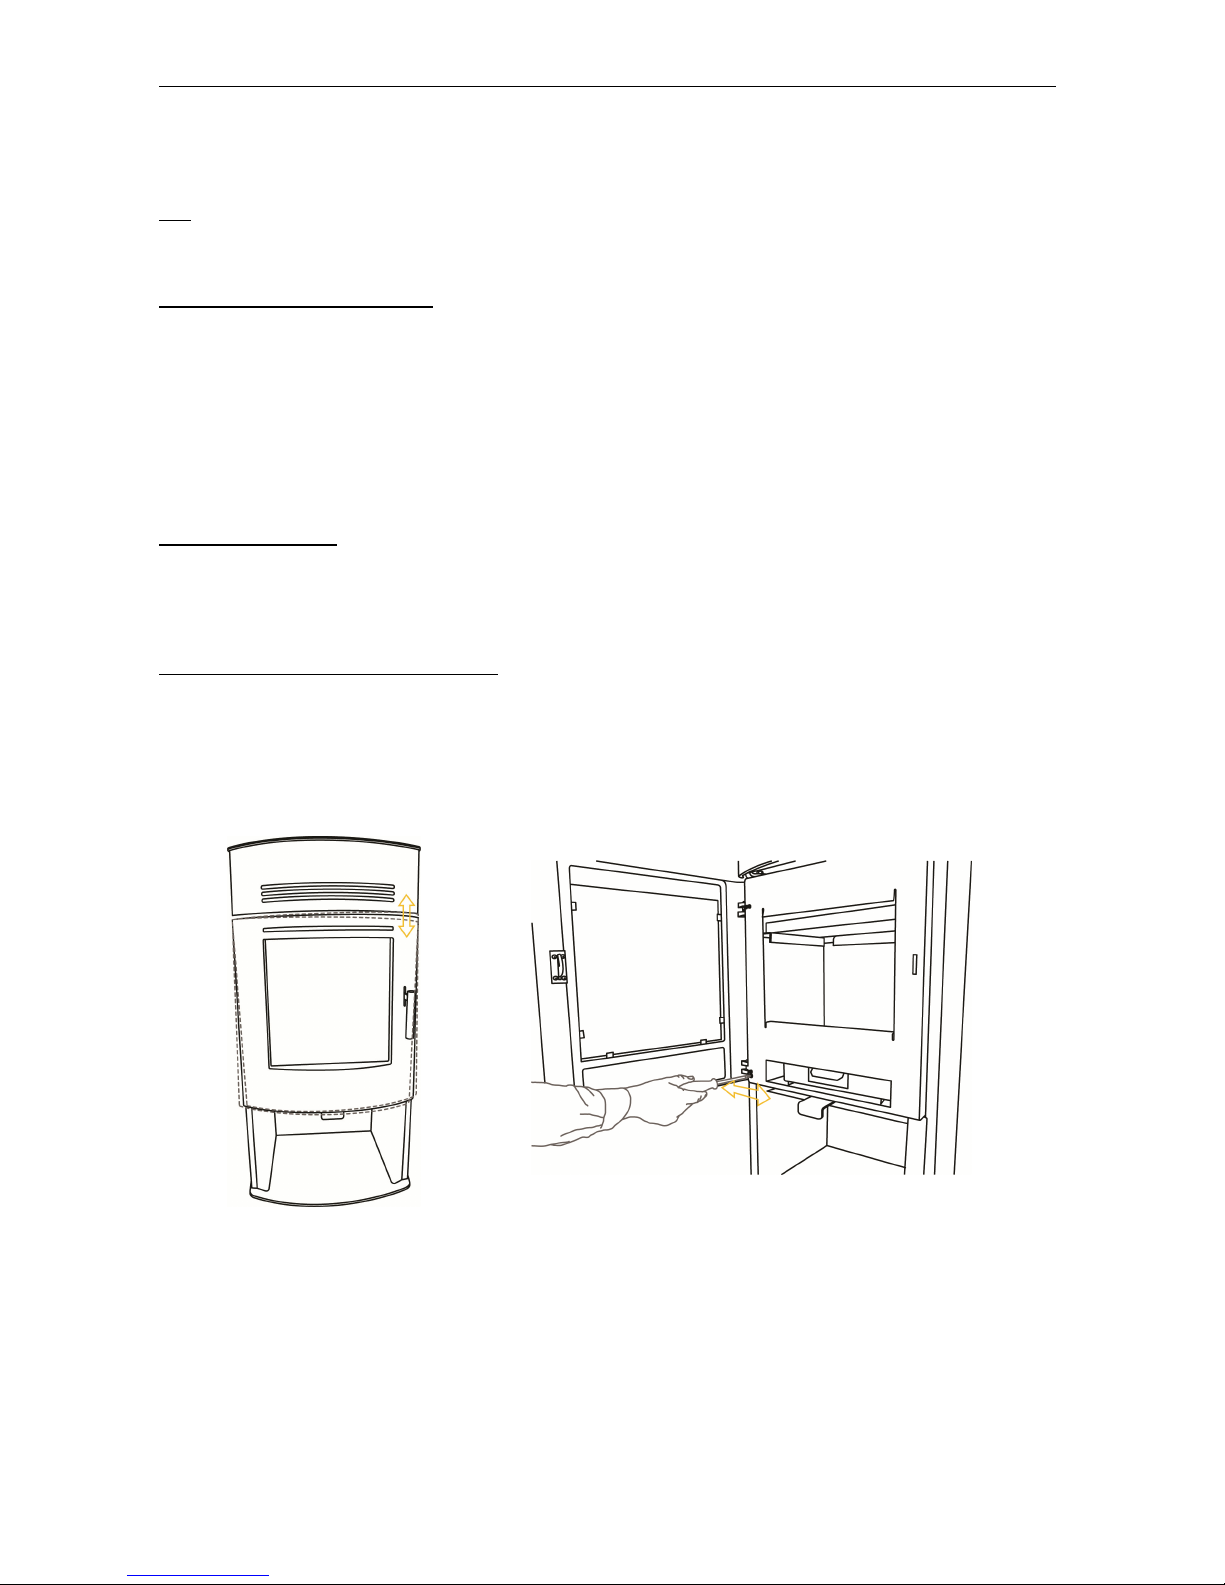
Gaskets
With time, the gaskets will wear, and, in order to avoid wild ombustion, they must be repla ed as required.
Glass
If the wood you burn is too moist, you will get soot stains on the glass pane. They an be easily removed
using a damp loth that you dip in old ash and rub on the sooty glass. Spe ial leaning agents are also
available to remove soot from glass.
Combustion hamber
The yellow tiles in the ombustion hamber eventually wear out and they should be repla ed when the
ra ks are more that 0.5 m. The durability of the tiles will depend on how often and how intensively the
- 8 -
stove is used. You an hange the tiles yourself. They are available as a ready-to-use set. You an also buy
one-pie e tiles that you an ut to the size of the worn plates yourself. Please onsult your dealer.
Ash
Empty the ash drawer before it be omes ompletely full. Always leave a layer of ash on the bottom of the
stove, as this insulates the ombustion hamber and makes lighting a fire easier.
Cleaning the wood burning stove
The stove’s surfa e is treated with a heat-resistant Senotherm® paint, whi h will stay at its best just by being
va uumed with a small, soft mouthpie e or dusted with a soft, dry loth. Do not use spirit or other solvents
whi h will remove the paint.
The inside of the wood burning stove and the flue pipe an be leaned via the door and the leaning
aperture in the flue pipe/ himney. The upper fireproof tile (the exhaust defle tor) an be removed, allowing
a ess to the top of the wood burning stove. Cleaning of the inside of the wood burning stove and the flue
pipe should be undertaken at least on e a year, or more frequently if ne essary, depending on how often the
wood burning stove is used. This work an also be arried out by the himney sweep.
Repairing the surfa e
If the surfa e of your wood burning stove gets s rat hed or worn, it an easily be refa ed/renewed using the
original Senotherm® paint in an aerosol an. It is available in bla k or grey from your lo al dealer.
Please note: All maintenan e and leaning of the wood burning stove should be arried out when it is old.
Spare parts and unauthorized alterations
You may only use original spare parts in the wood burning stove. Consult your dealer for advi e and when
pur hasing spare parts. All forms of unauthorized alterations to the wood burning stove are stri tly forbidden,
as the wood burning stove will no longer omply with the approved spe ifi ations.
6.0 Adjustment of t e door
7.0 Accessories
There is a wide produ t range of a essories for Aduro stoves:
•
••
• Companion sets
•
••
• Firebaskets in felt and bonded leather
•
••
• Firewood bu kets
•
••
• Briquette bu ket and ashbu ket
•
••
• Firepla e hearth fen e
- 9 -
•
••
• Glass and steel floor plates
•
••
• Flue pipes
8.0 Product liability and warranty
In a ordan e with the Danish Sale of Goods A t, produ t liability will exist for two years from the date of
pur hase of the wood burning stove. The dated re eipt will be suffi ient proof. Produ t liability will not over
damage aused by in orre t installation and use of the wood burning stove. Likewise, produ t liability will not
over loose parts and wear parts (fireproof tiles, glass, gaskets, rails, ast iron grate and ontrol), as they are
worn by ordinary use. These parts an be pur hased as spare parts.
8.1 Free online warranty registration
Aduro will give you the opportunity to extend the above warranty on your wood burning stove from two to five
years. All you need to do is to a ess our website at www.aduro.dk and register your new wood burning
stove in our warranty database. The warranty will only ome into for e on e you have entered the required
information in all the data fields. The deadline for registering your wood burning stove is one month from the
date of pur hase.
9.0 FAQ
If you need more information, please go to www.aduro.dk.
Enjoy your stove!

Other manuals for 3

2

This manual suits for next models

5

Other ADURO Wood Stove manuals

ADURO 12 User manual

ADURO

ADURO 12 User manual

ADURO 3 User manual

ADURO

ADURO 3 User manual

ADURO 9-4 Guide

ADURO

ADURO 9-4 Guide

ADURO 12 User manual

ADURO

ADURO 12 User manual

ADURO 22 Series User manual

ADURO

ADURO 22 Series User manual

ADURO H3 LUX User manual

ADURO

ADURO H3 LUX User manual

ADURO 1-1 Limestone User manual

ADURO

ADURO 1-1 Limestone User manual

ADURO 132-50301 User manual

ADURO

ADURO 132-50301 User manual

ADURO 14 User manual

ADURO

ADURO 14 User manual

ADURO 9-2 User manual

ADURO

ADURO 9-2 User manual

ADURO 13-1 User manual

ADURO

ADURO 13-1 User manual

ADURO 8 User manual

ADURO

ADURO 8 User manual

ADURO 15 User manual

ADURO

ADURO 15 User manual

ADURO 1.1 Series User manual

ADURO

ADURO 1.1 Series User manual

ADURO 5-1 User manual

ADURO

ADURO 5-1 User manual

ADURO 22-3 User manual

ADURO

ADURO 22-3 User manual

ADURO 1 User manual

ADURO

ADURO 1 User manual

ADURO 12 User manual

ADURO

ADURO 12 User manual

ADURO 14 User manual

ADURO

ADURO 14 User manual

ADURO H1 User manual

ADURO

ADURO H1 User manual

ADURO 9 air User manual

ADURO

ADURO 9 air User manual

ADURO 9.7 Lux User manual

ADURO

ADURO 9.7 Lux User manual

ADURO 9 Lux Series User manual

ADURO

ADURO 9 Lux Series User manual

ADURO 6 User manual

ADURO

ADURO 6 User manual

Popular Wood Stove manuals by other brands

Kozi 1200 owner's manual

Kozi

Kozi 1200 owner's manual

Panadero CAPRI 3V Usage and maintenance instructions

Panadero

Panadero CAPRI 3V Usage and maintenance instructions

HWAM Autopilot IHS 3640 user manual

HWAM

HWAM Autopilot IHS 3640 user manual

Firenzo Lady Kitchener Instructions for installation

Firenzo

Firenzo Lady Kitchener Instructions for installation

Napoleon S20 quick start guide

Napoleon

Napoleon S20 quick start guide

Charnwood Cove 2B Operating & installation instructions

Charnwood

Charnwood Cove 2B Operating & installation instructions

Drolet Pyropak DB03180 Installation and operation manual

Drolet

Drolet Pyropak DB03180 Installation and operation manual

Vogelzang International TR001 DEFENDER owner's manual

Vogelzang International

Vogelzang International TR001 DEFENDER owner's manual

Dovre 225CB Installation instructions and operating guide

Dovre

Dovre 225CB Installation instructions and operating guide

Osburn 1600 owner's manual

Osburn

Osburn 1600 owner's manual

Palazzetti NICOLE PRODUCT TECHNICAL DETAILS

Palazzetti

Palazzetti NICOLE PRODUCT TECHNICAL DETAILS

pleasant hearth VFS-PH20DT manual

pleasant hearth

pleasant hearth VFS-PH20DT manual

Morsø S81-91 Instructions for installation and use

Morsø

Morsø S81-91 Instructions for installation and use

Firenzo Viking RU WET manual

Firenzo

Firenzo Viking RU WET manual

Palazzetti NANCY PRODUCT TECHNICAL DETAILS

Palazzetti

Palazzetti NANCY PRODUCT TECHNICAL DETAILS

Capital fireplaces CONTOUR Series manual

Capital fireplaces

Capital fireplaces CONTOUR Series manual

Drolet Savannah DB03020 Technical data

Drolet

Drolet Savannah DB03020 Technical data

RAIS RONDO user manual

RAIS

RAIS RONDO user manual

manuals.online logo
manuals.online logoBrands
  • About & Mission
  • Contact us
  • Privacy Policy
  • Terms and Conditions

Copyright 2025 Manuals.Online. All Rights Reserved.