Advocate SPBP-04 User manual
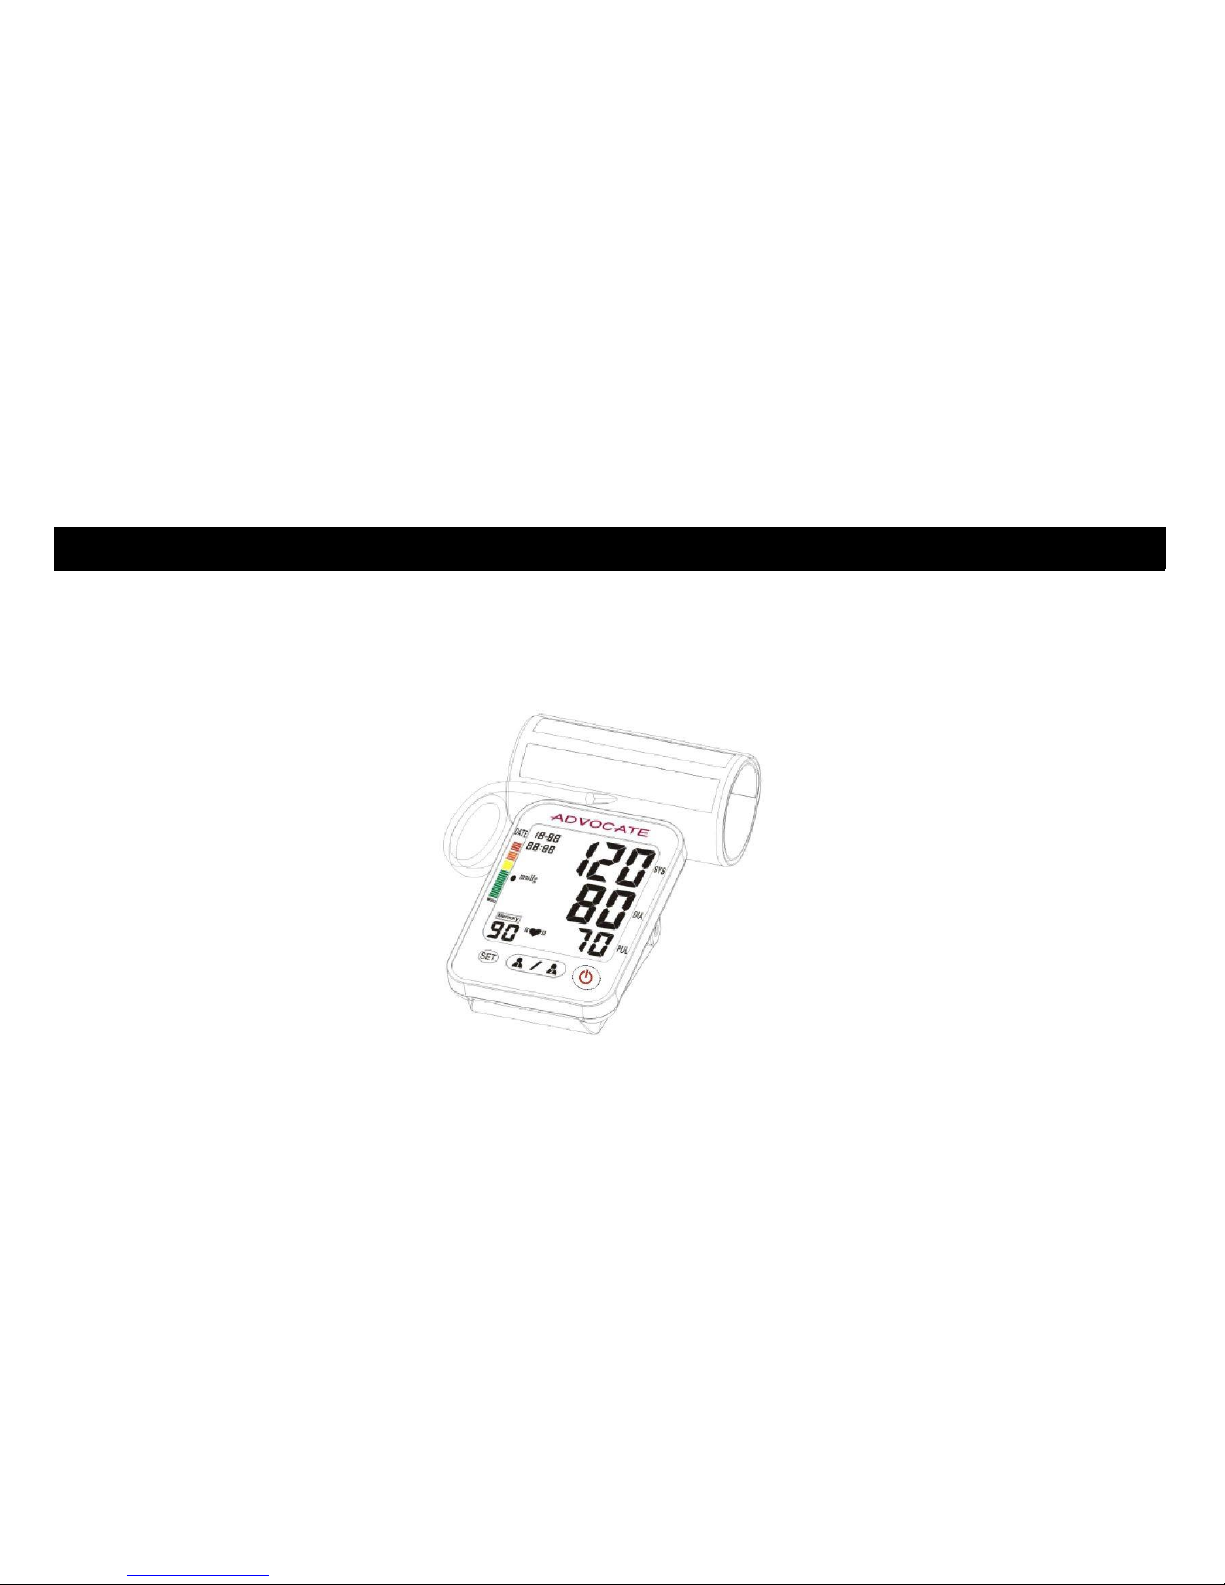
AUTOMATIC BLOOD PRESSURE MONITOR
(Arm Cuff Type)
INSTRUCTION MANUAL
Model:
SPBP-04
English Instruction Guide

Thank you for choosing Advocate® as your monitor of choice.
The first, most important part of using your new Advocate®
monitor is to register your monitor with us online. When you
register your monitor you are assured that:
1. We can notify you about any important updates or changes to your meter.
2. Registering confirms the full warranty period of your Advocate® meter.
3. Registering provides you peace of mind that you are protected.
To register your new Advocate® Monitor:
Go to: www.advocatemeters.com
Click on WARRANTY REGISTRATION in the QUICK LINKS section.
Enter your information and meter serial number. That's it!
Thank you!

Tableof Contents
IMPORTANT INFORMATION……...…………...…4 IRREGULAR HEARTBEAT INDICATOR………...........11
PRECAUTION FOR USE ...………………………...…5 DISPLAYING AVERAGE OF THREE MOST RECENT
BEFORE YOU START ...……………..…………...…5 RESULTS AND MEMORY RESULTS (AVG)……..…12
MONITOR COMPONENTS ...……………………...…6 DELETING MEASUREMENT FROM THE MEMORY...12
LCD DISPLAY…………...…………………………....7 ASSESSING BLOOD PRESSURE FOR ADULTS…....13
TIPS FOR BLOOD PRESSURE MONITORING……..8 CLASSIFICATION OF BLOOD PRESSURE……….…...13
TAKING A MEASUREMENT………………..…..8, 9 SPECIFICATIONS ……………………………….……..14
PROGRAMMING DATE AND TIME…………….....10 TROUBLESHOOTING………………………………..15, 16
TWO PERSON MEASUREMENT AND RESULT LIMITED WARRANTY POLICY…….……..…...……..17
STORAGE…………………………………..……….11 3BLOOD PRESSURE RECORD………………….………..18
3

IMPORTANT INFORMATION
Please read this instruction manual thoroughly so that you completely
understand the operations, cautions, performance and limitations with this monitor. After
reading this manual, please keep it for future reference.
You should not use this blood pressure monitor for self-diagnosis, self-
treatment or to change medication without consulting your physician or other health care
professional. Should you have any doubt or question about your blood pressure
measurements, you should consult your physician or other health care professional.
This device contains high-precision parts; therefore, avoid exposing it to extreme
temperature or humidity or to direct sunlight, shock and dust. Advocate guarantees the
accuracy of this monitor only when it is stored and used properly.
Do not attempt to calibrate or repair this monitor. If you have any questions
regarding the function or operation of this monitor, please contact our technical support
agent so we can provide you with accurate information.
Should the monitor or cuff need cleaning, use a dry, soft cloth or a cloth
dampened with water and a mild detergent. Never use alcohol, benzene, thinner or
other harsh chemicals to clean the monitor or cuff.
Remove and replace the batteries if the monitor is not used for more than 6 months.
Alkaline batteries recommended.
4
PRECAUTION FOR USE
The Advocate Arm Automatic Blood Pressure Monitor is designed to be operated by
anyone who is eighteen years and older or by medical professionals to monitor blood
pressure (systolic and diastolic) and pulse rate.
BEFORE YOU START
Please make sure you have installed 4 AA (1.5 volt) batteries (alkaline batteries are
recommended) or use the optional AC-DC Adapter. Always attach the cuff to the monitor
before turning it on. To install batteries or replace them if the “Low Battery” symbol
appears on display, proceed as follows:
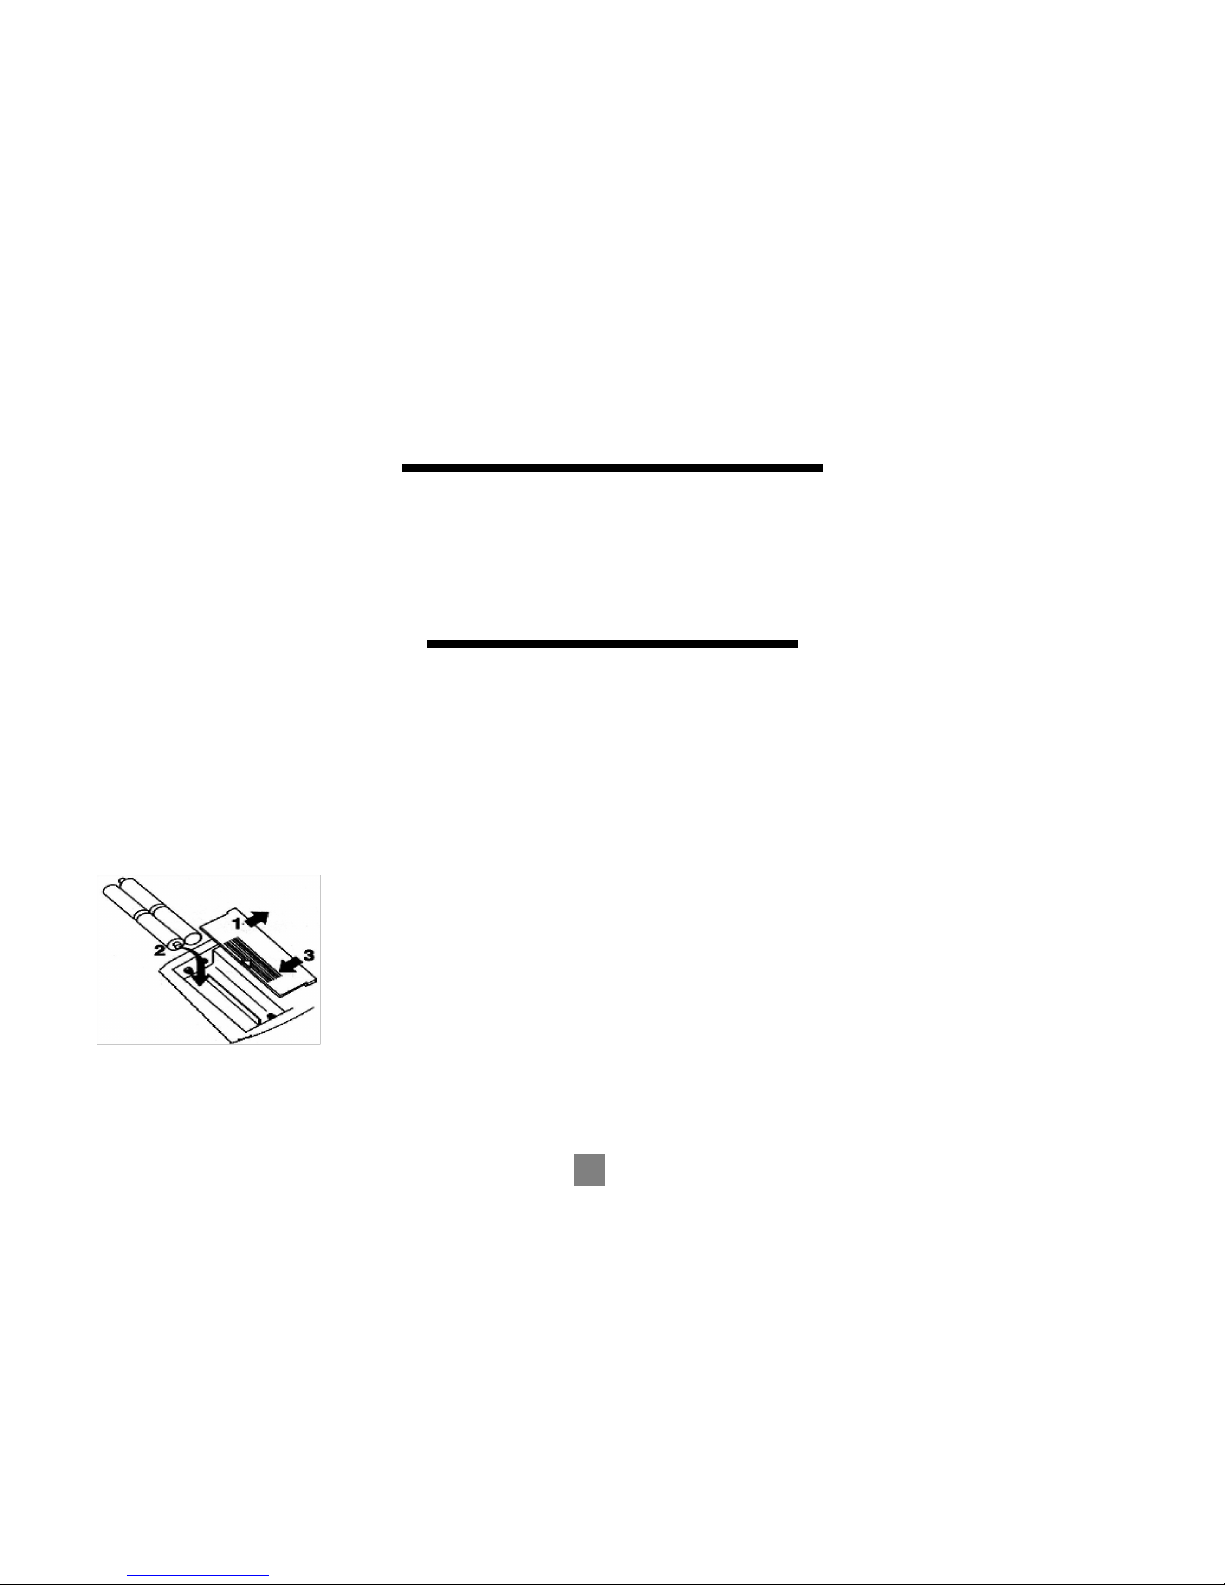
■Battery Loading
1. Remove the battery compartment cover by gently pushing down
on arrow and sliding cover forward.
2. Place batteries with positive “+” and negative “-“ terminals into
compartment and make sure they match the indicated terminals in
the compartment.
3. Close the battery cover by gently sliding it into the compartment
and pressing it into place.
5
Note:
★When the LCD display shows “Low Battery” signal ,the batteries
must be replaced for accurate readings.
★Do not use rechargeable batteries
(voltage1.2V)
.
They are not suitable
for this product, can damage the monitor and will cause inaccurate
readings to be obtained.
★Remove the batteries if the monitor will not be used for six months or
longer to avoid damage from the possibility of leaking batteries.
★All the measurements will remain in the memory should the batteries
become drained, removed or replaced.
M
MON
ONI
ITOR
TOR C
CO
OM
MP
PON
ONE
ENTS
NTS
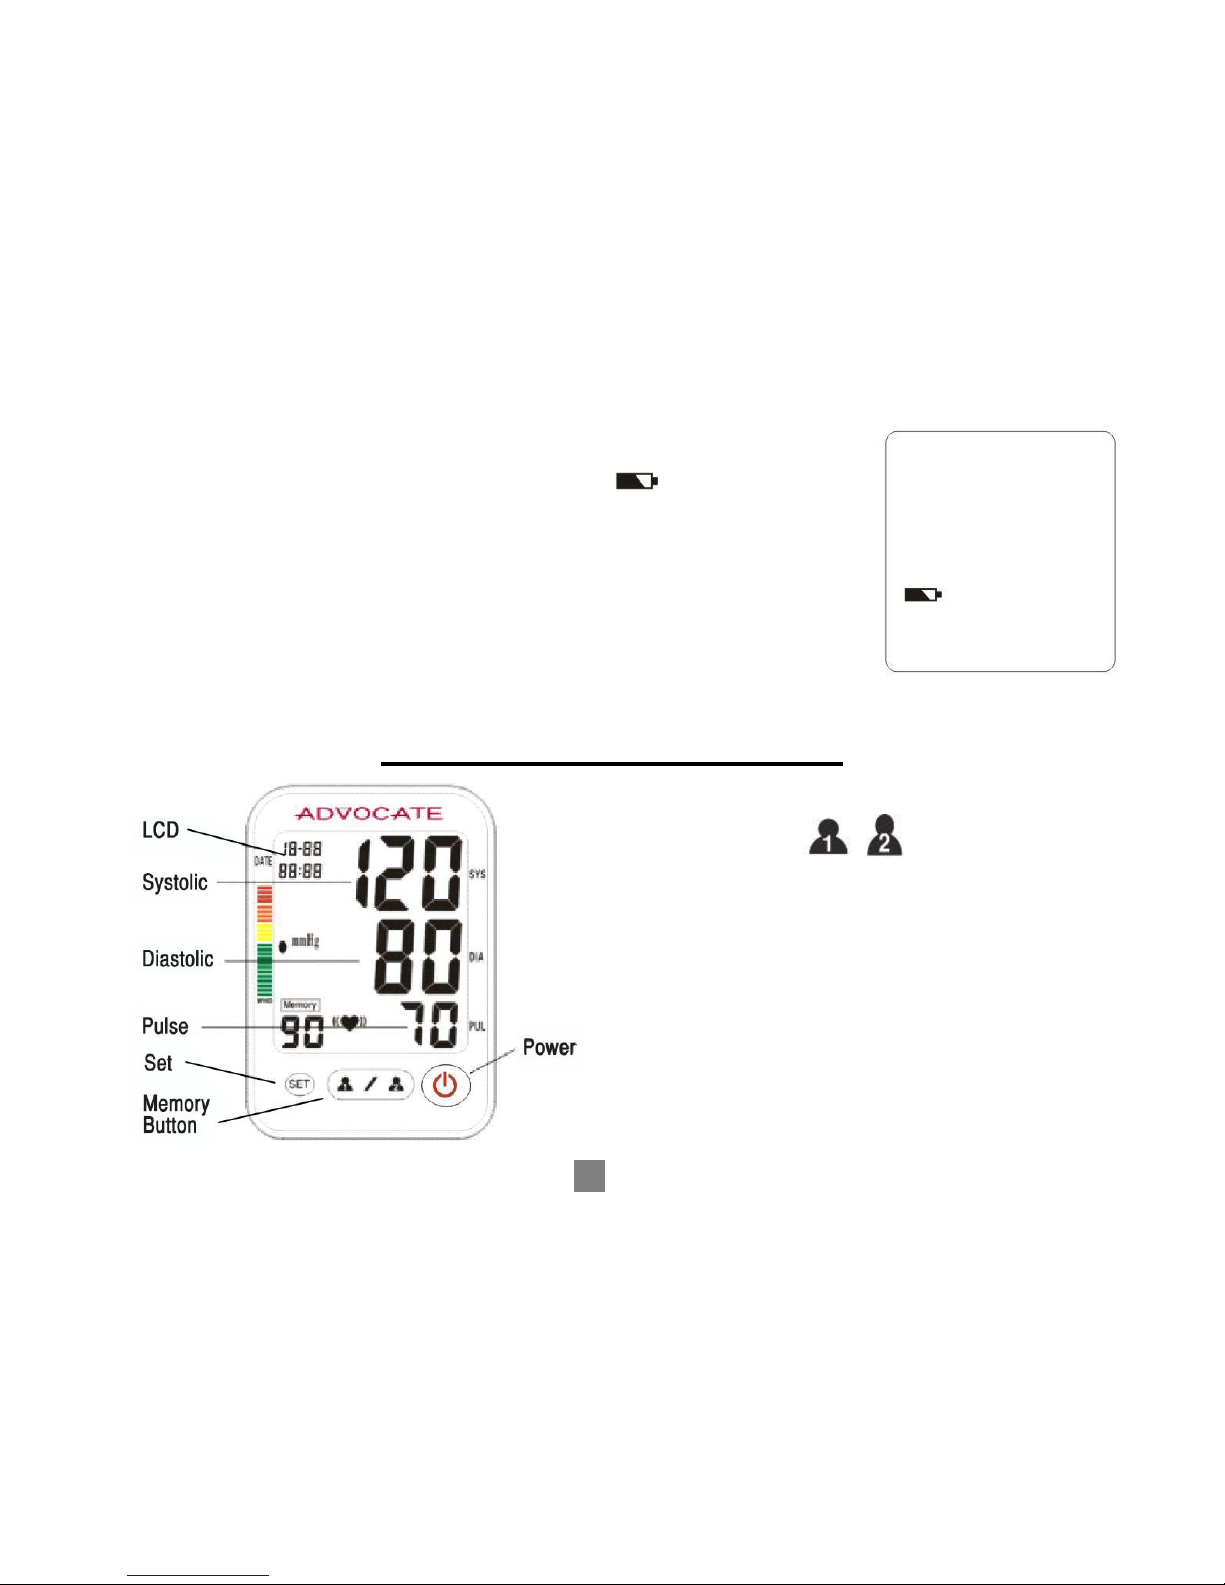
★“MEMORY” Button /Clock Setting
★“ ” Button /Measured Result
Recall/Clock Number Adjusting
★
POWER
Button
★LCD Display
★Systolic Indicator
★Diastolic Indicator
★Pulse Indicator
6
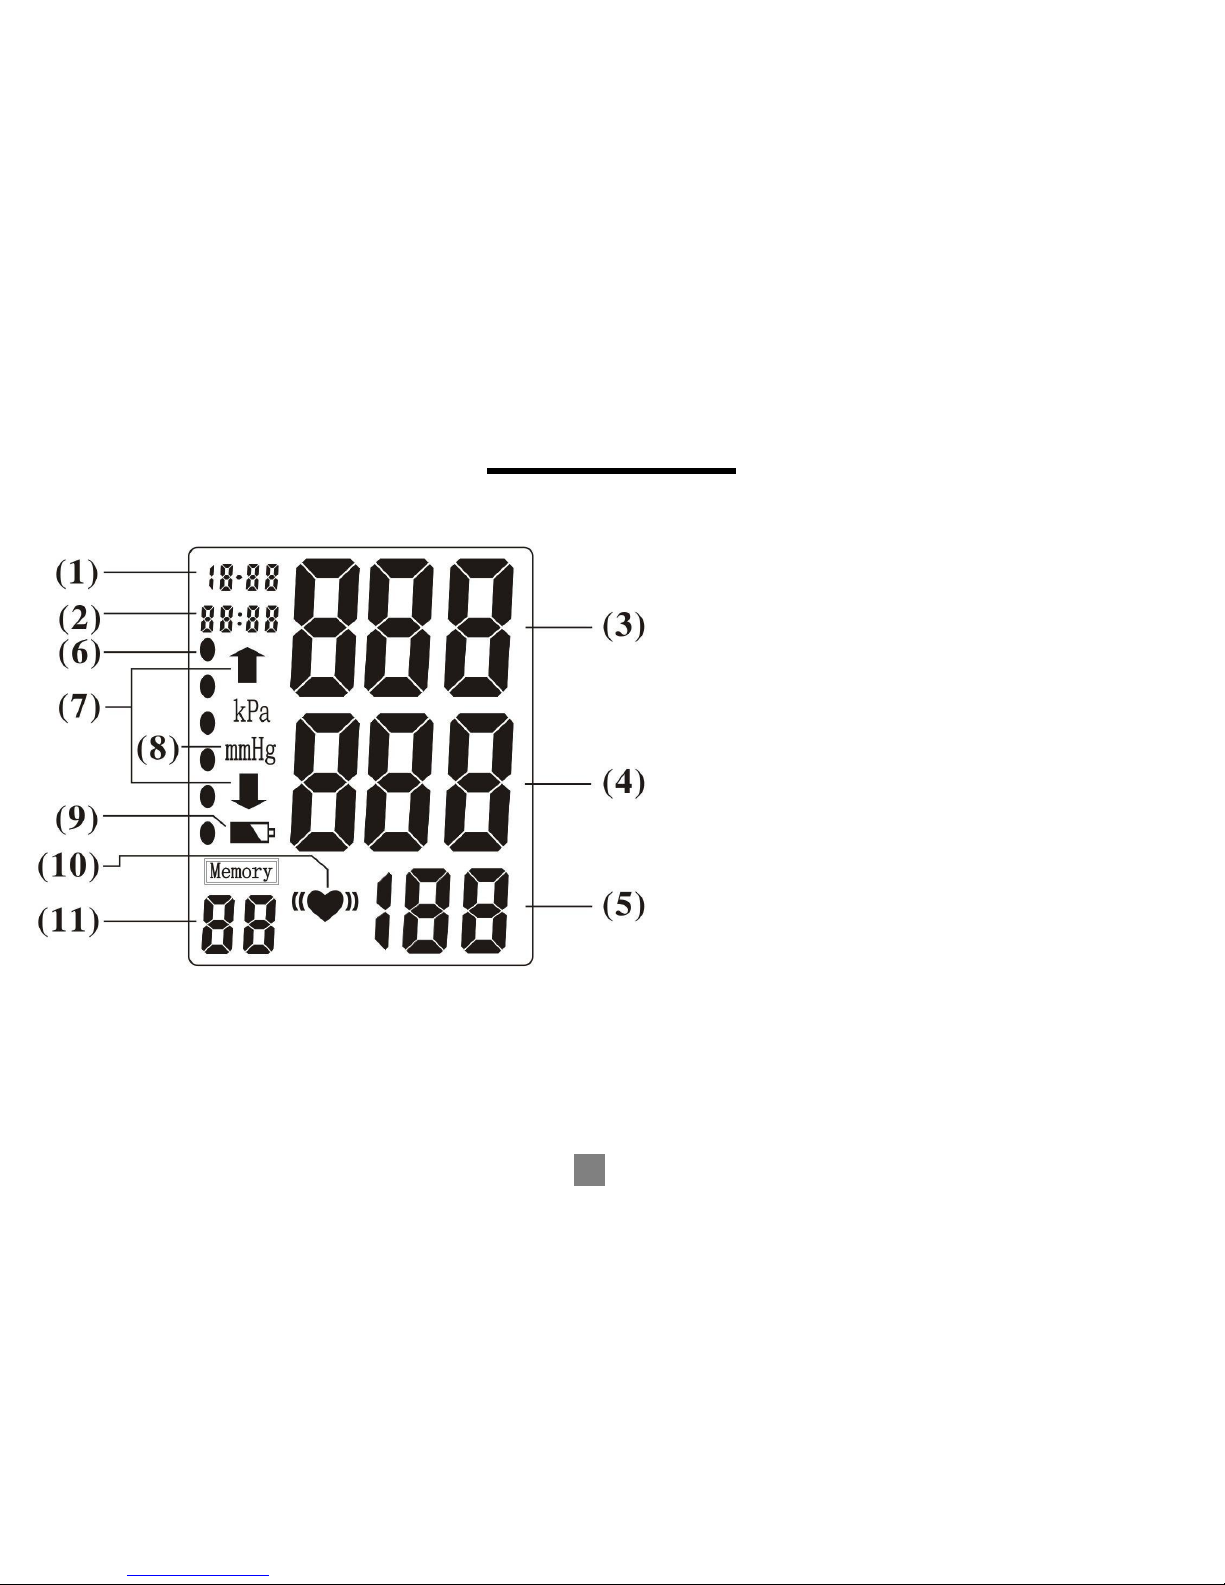
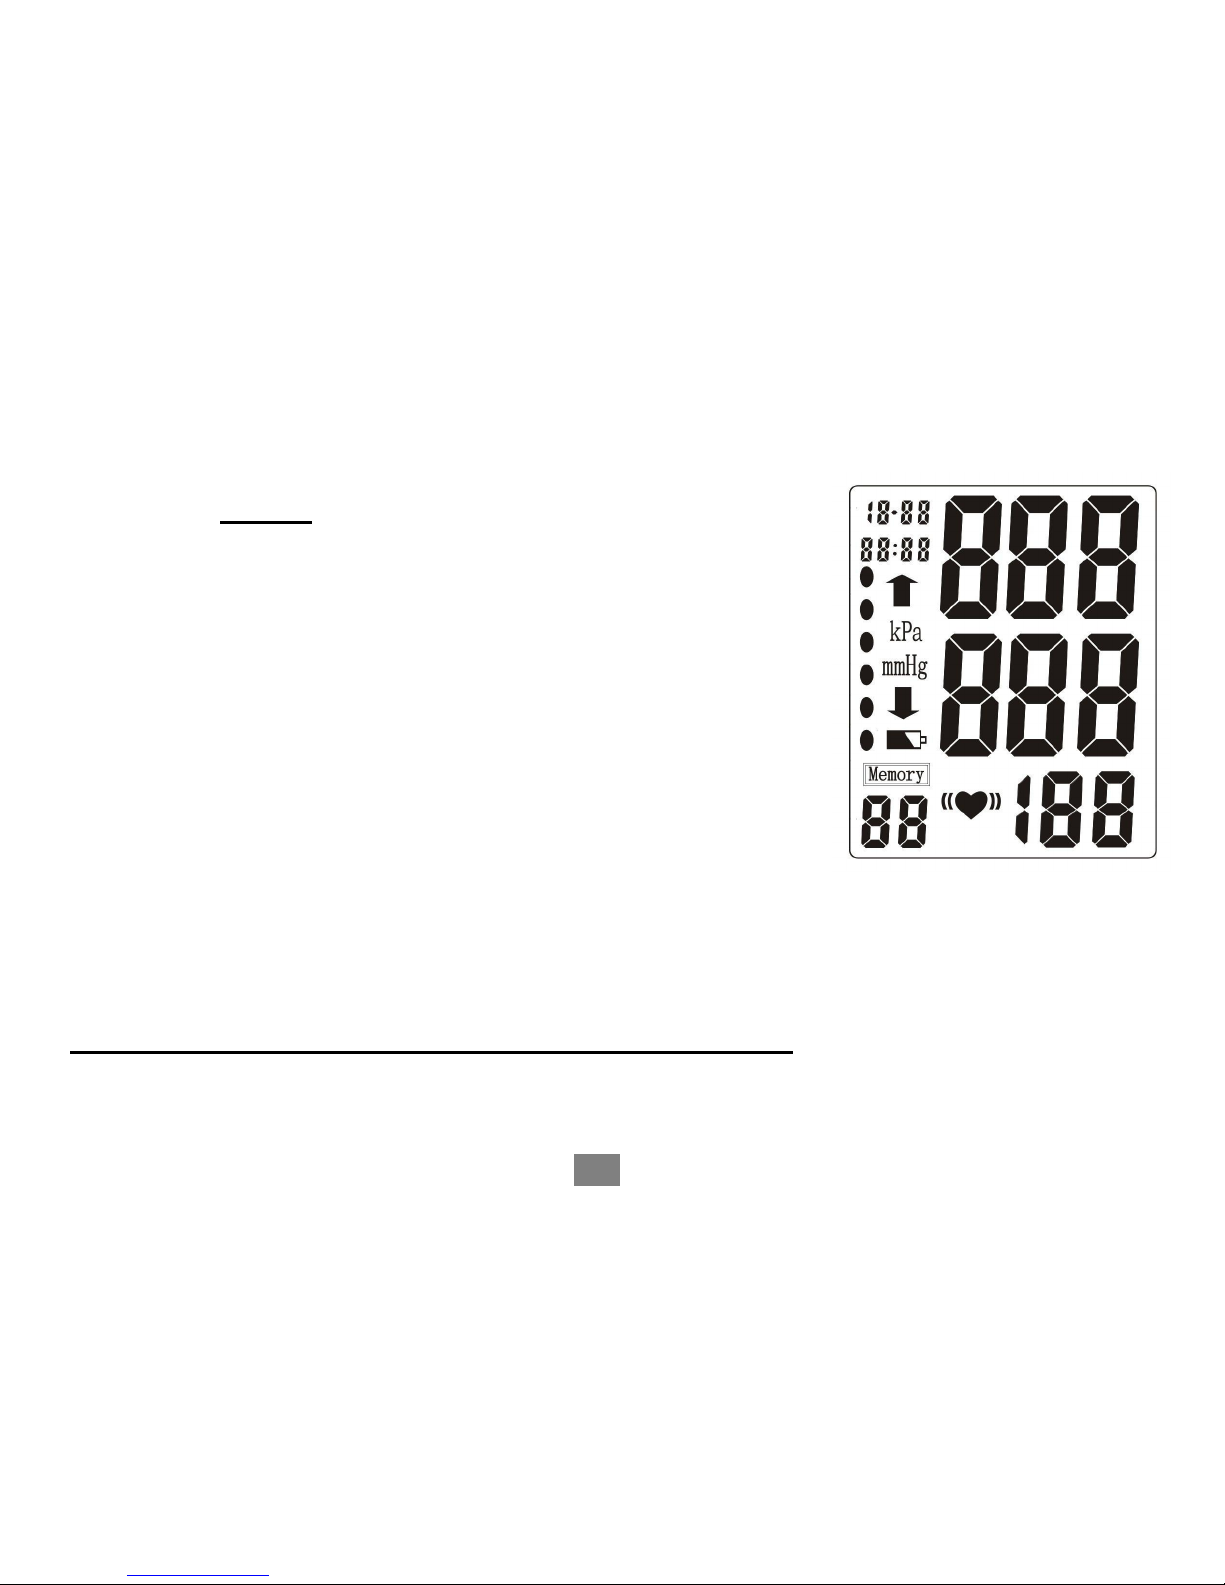
LCD DISPLAY
Mode for LCD display:
(1) Date: Month - Day
(2) Time: Hour – Minute
(3) Systolic Blood Pressure
(unit: mmHg)
(4) Diastolic Blood Pressure
(unit: mmHg)
(5) Pulse (unit: beat/minute)
(6) WHO BP Classification Indicator
(7) Inflation / Deflation Indicator
(8) Blood Pressure Measurement Unit
(9) Low Battery Indicator
(10) Irregular Heartbeat Indicator
(11) Memory Record Number
7

TIPS FOR BLOOD PRESSURE MONITORING
★Relax for about 5 minutes before measurement.
★Do not smoke or ingest caffeine at least 30 minutes prior to measurement.
★Remove any constricting clothing and place the cuff on a bare arm.
★Keep still and do not talk until the measurement is complete.
★The cuff must be neither too tight nor too loose. Using a little force, you should be able
to place two fingers between the cuff and your arm.
TAKING A MEASUREMENT
(1) POSTURE FOR TAKING BLOOD
PRESSURE
★Make yourself comfortable and sit-up
straight
★Place your arm with cuff in front of you
on the table with your palm facing up.
★Cuff should be at the same height as
your heart.
8
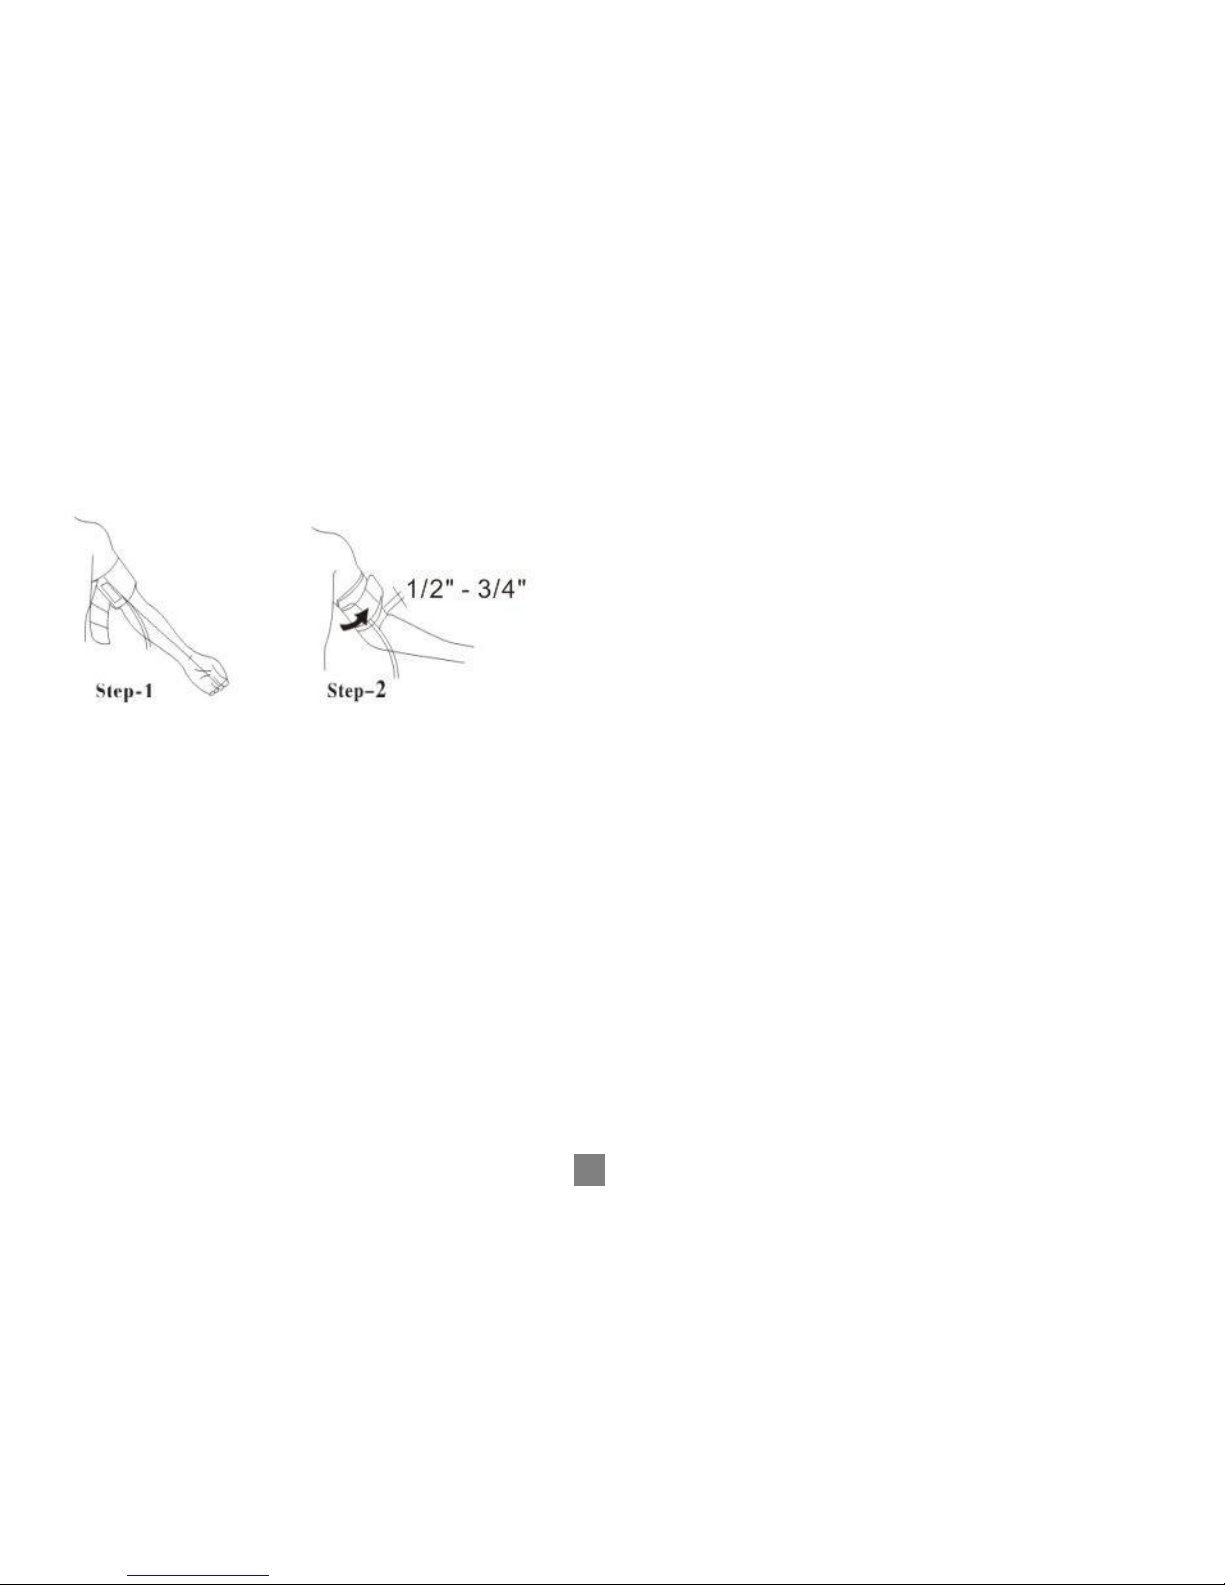
HOW TO WRAP THE CUFF ON YOUR ARM:
1. REFER TO THE DIAGRAM
★Place the cuff around a bare arm ½” to ¾”’
above the elbow joint. The pressure tube should
be oriented to run down the center of the inside
of your arm.
(Refer to diagram
on cuff for proper
placement.)
★Keep the cuff at approximately the same level
as your heart.
★Unless your physician recommends
otherwise, always use the left arm to measure
your blood pressure.
★The cuff should be snug but not too tight. You
should be able to insert two fingers between the
cuff and your arm.
PRINTED ON THE CUFF FOR PROPER PLACEMENT.
2. FOR ACCURATE READINGS, THE CUFF/PRESSURE MUST BE ORIENTED
CORR ECTLY
AND
ALIGNED WITH THE ARTERY.
9
NOTE:
”
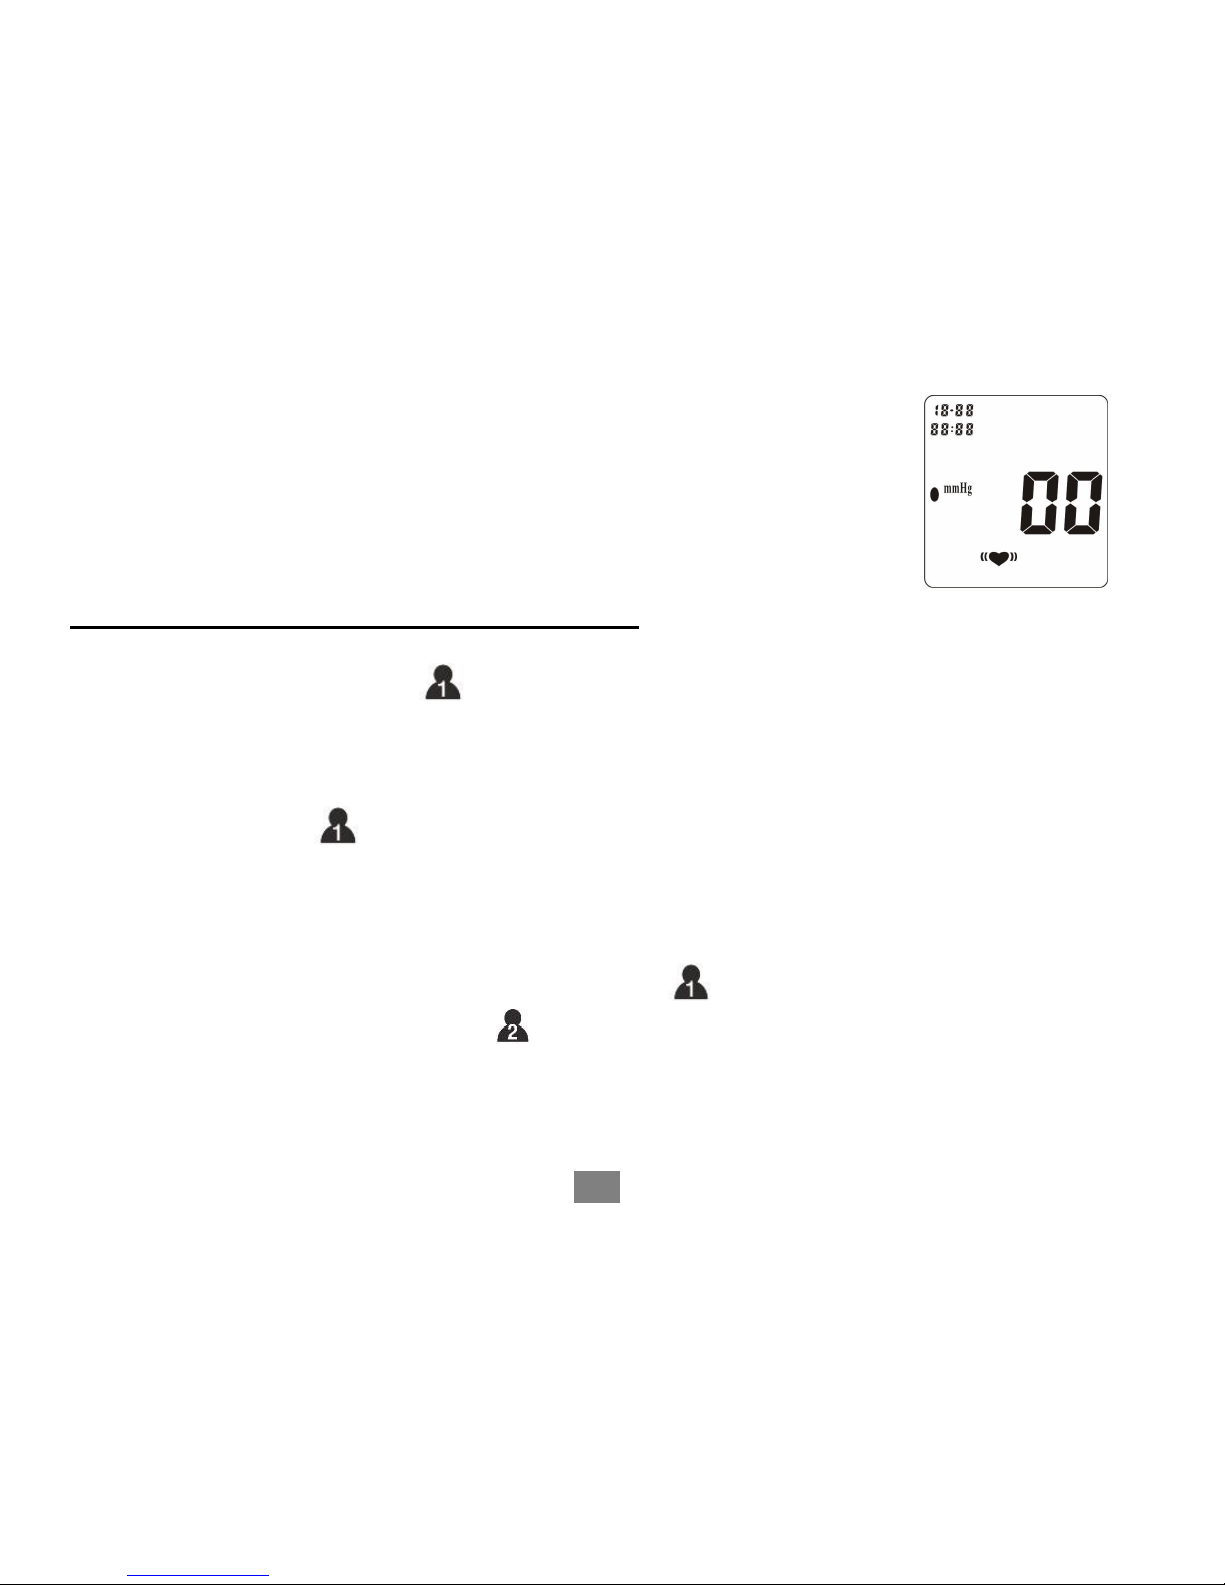
STEPS TO TAKE A BLOOD PRESSURE
MEASUREMENT After you are in a comfortable position, press
the “ON/OFF” button. The device will verify itself showing all “8s”,
then LCD will show “00.” The cuff will inflate, then deflate, the results
will then be displayed.
PROGRAMMING DATE AND
TIME ★Press the “SET” button for 5
seconds while the device is turned off, the number of the YEAR will begin to blink on
the LCD display. Press the “ ” button to advance the YEAR displayed. When you
have reached the correct year, press the “SET” button and release. (Do not hold
the “SET” button down during programming.) When the “SET” button is pressed
and released, the YEAR will stop blinking and the MONTH will begin to blink. Press
and release the “ ” button until the desired month is reached. Repeat this
process to set the DAY, HOUR, MINUTES.
NOTE: When the number that you wish to set – i.e. YEAR, MONTH, DAY, HOUR, MINUTE - is
blinking, each time you press and release the “ ” button, the number will increase by
one. Each time you depress the “ “ button, the number will decrease by one. ***Time is
displayed using a 24 hour clock. AM/PM are not displayed.
10
10
10
★After you have set the YEAR, MONTH, DAY, HOUR
and MINUTE press the “SET” button. The monitor will turn off.
2-PERSON MEASUREMENTAND RESULTS
STORAGE
This model has a 2-person memory bank with 90 memories storage capacity for each
person.
To set the monitor for Person 1: With the monitor off, press and release the “P1” button.
“P1” will show in the lower left corner along with the current Average of Person 1’s last 3
readings as indicated by “AVG” on the display. If there are no previous readings for
Person 1, “NO” will appear in the display. Press the “On/Off” button and the display will
go blank. The monitor is now set for Person 1.
To Set the monitor for Person 2: Follow the above steps pressing and releasing the
“Person 2” button instead of the “Person 1” button.
IRREGULAR HEARTBEAT
INDICATOR
If an irregular heartbeat is detected, the Irregular Heartbeat symbol will appear and
blink in the display window.
11
1
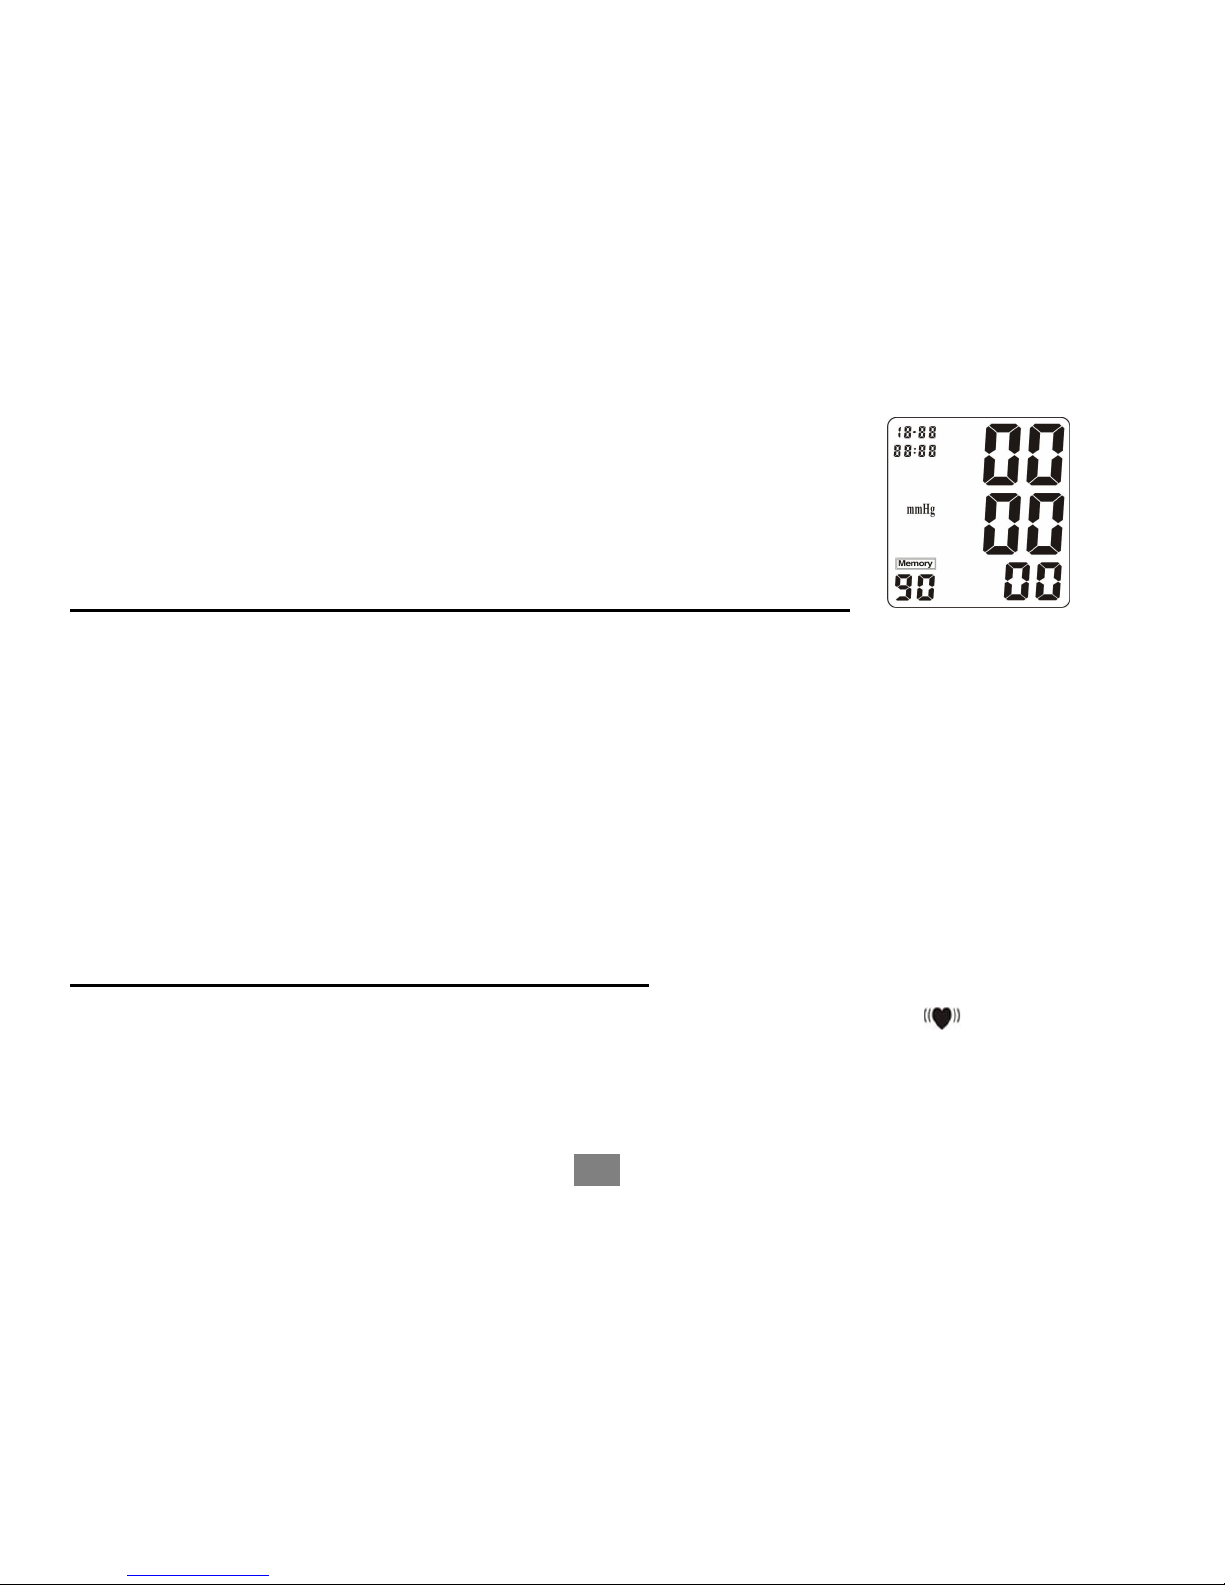
DISPLAYING AVERAGE OF THREE MOST
RECENT RESULTS AND ALL MEMORY
RESULTS (AUg) When the monitor is turned off, press
and release the P1 or P2 button. The “AUG” will show in
the upper left corner of the display along with the average of
the most recent results. P1 or P2 will show in the lower left
corner, indicating which person the average is for. If P1 is
displayed, pressing P2 will show the average for person 2,
and vice versa.
Pressing P1 or P2 again will display the most recent result
for that person, accompanied by the date and time the result
was obtained. The lower left will display alternately the
Person (i.e, P1) and which result is displayed (i.e., “01” for
the most recent result). Press the Person button again and
the 2nd most recent result will show. Press it again and
the 3rd most recent result will show, etc.
Press the Power button to turn the monitor off
DELETING MEASUREMENTFROM THE
MEMORY
Press and hold the P1 or P2 BUTTON until a number is displayed in the bottom
right hand corner, indicating the previous results have all been deleted.
12
12
12
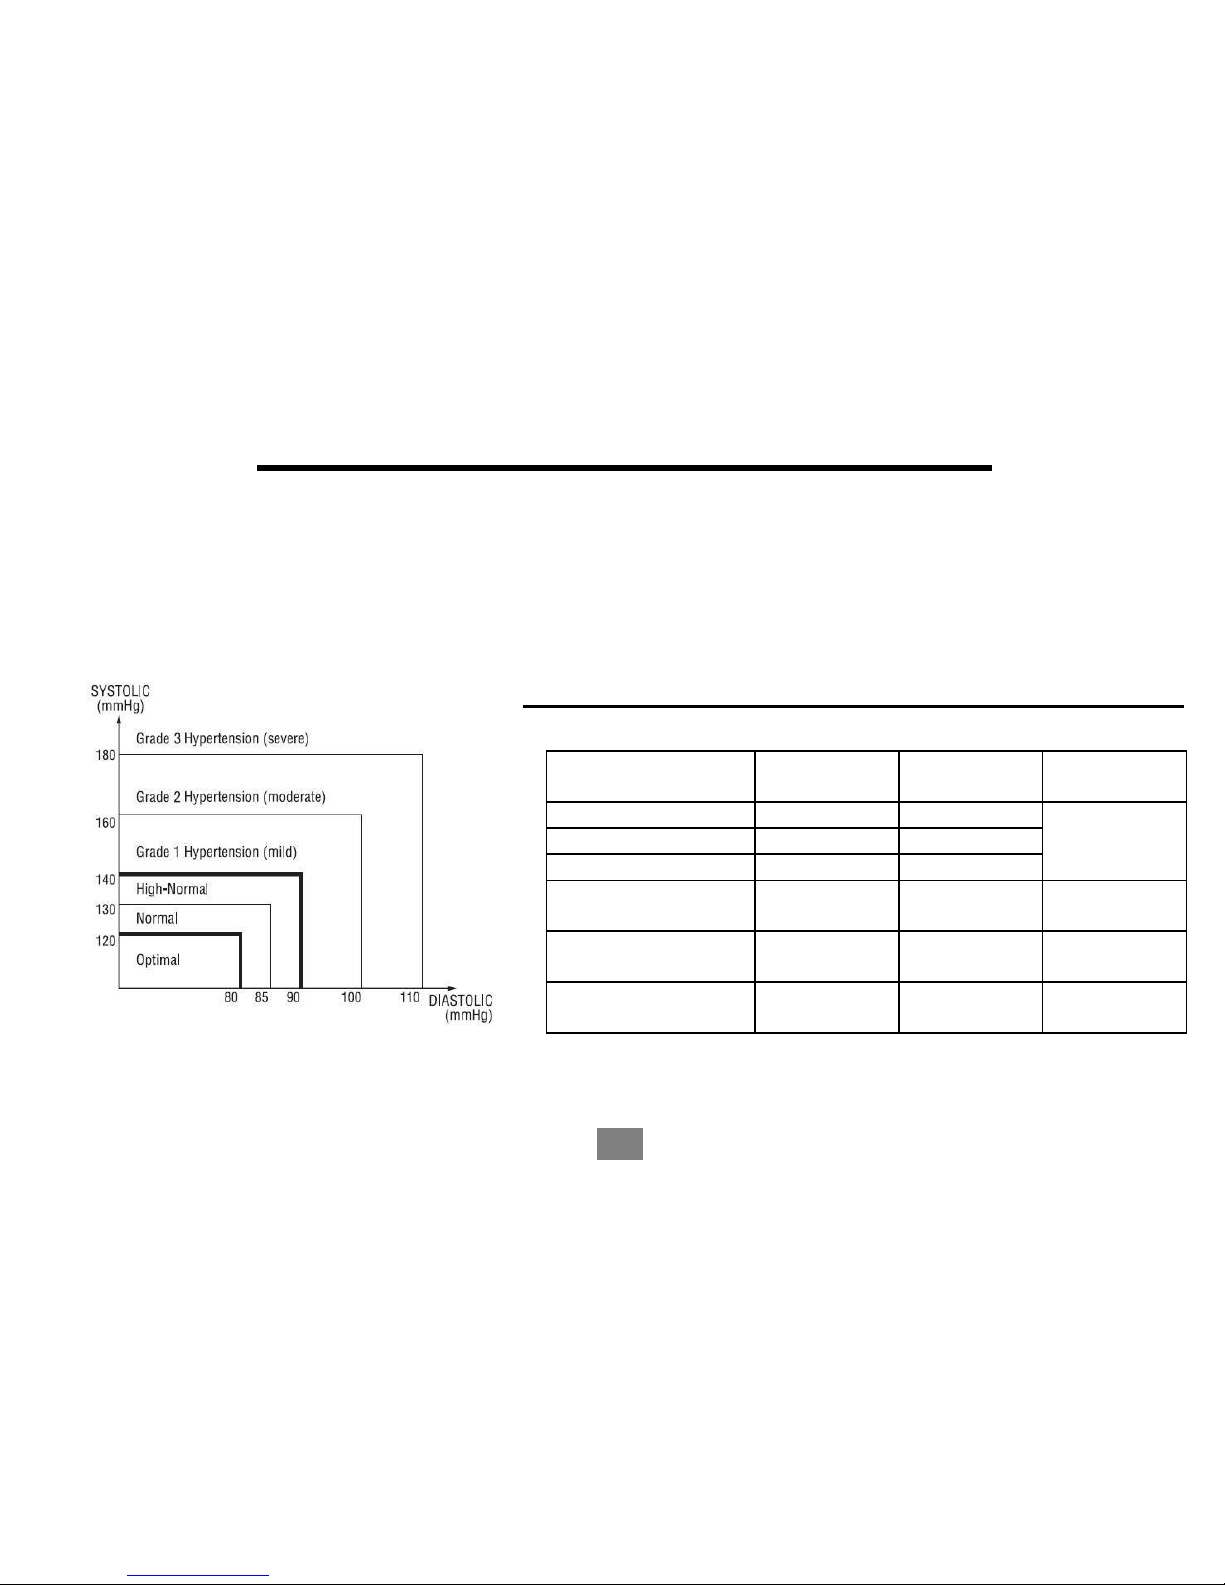
ASSESSING BLOOD PRESSURE FOR
ADULTS
The following standards for assessing high blood pressure (without regard to age or
gender) have been established as a guide according to WHO (World Health Organization).
Please note that other risk factors (e.g. diabetes, obesity, smoking, etc.) need to be taken
into consideration and may affect these figures. Always consult with your physician or
other health care professional for accurate assessment.
WHO CLASSIFICATION OF BLOOD PRESSURE
Blood Pressure
Classification
SBP
(mmHg)
DBP
(mmHg)
COLOR
INDICATOR
Optimal
<120
<80
GREEN
Normal
120-129
80-84
High-Normal
130-139
85-89
Stage 1
Hypertension
140-159
90-99
YELLOW
Stage 2
Hypertension
160-179
100-109
ORANGE
Stage 3
Hypertension
≥180
≥110
RED
13
13

SPECIFICATIONS
Model No.: SPBP-04 Operation Environment: Temperature: 41~104°F
------------------------------------- Humidity: < 85%RH
Type: Oscillometric; Automatic air ----------------------------------------
inflation by air pump and Storage Environment: Temperature: -68~140°F
automatic deflation Humidity: < 95%RH
Classification: Class II, type B
------------------------------------- ----------------------------------------
Measurement Pressure: 40~280mmHg Cuff Circumference: S/M: 8.66” ~ 14.17” (+/- .1875”)
Range: Pulse: 30~160 Pulses L: 8.66” ~ 18.9” (+/- .1875”)
XL: 12.6” ~ 20.5” (+/- .1875”)
------------------------------------- Memory: ----------------------------------------
Accuracy: Pressure: within ±5mmHg 90 x 2 memory banks
Pulse: within ±5% measurements including date and
Power Supply: 6V DC (4 “AA” batteries) time
------------------------------------- Dimensions: ----------------------------------
Battery Life: Approx. 250 times (180mmHg, 150.0mm (5.9 inches)------(L)
once /day, 71.6°F) 105.0mm (4.2inches) -----(W)
73.0mm (2.8 inches) -----(H)
Weight: ----------------------------------------
535g (1.18 LB)
14
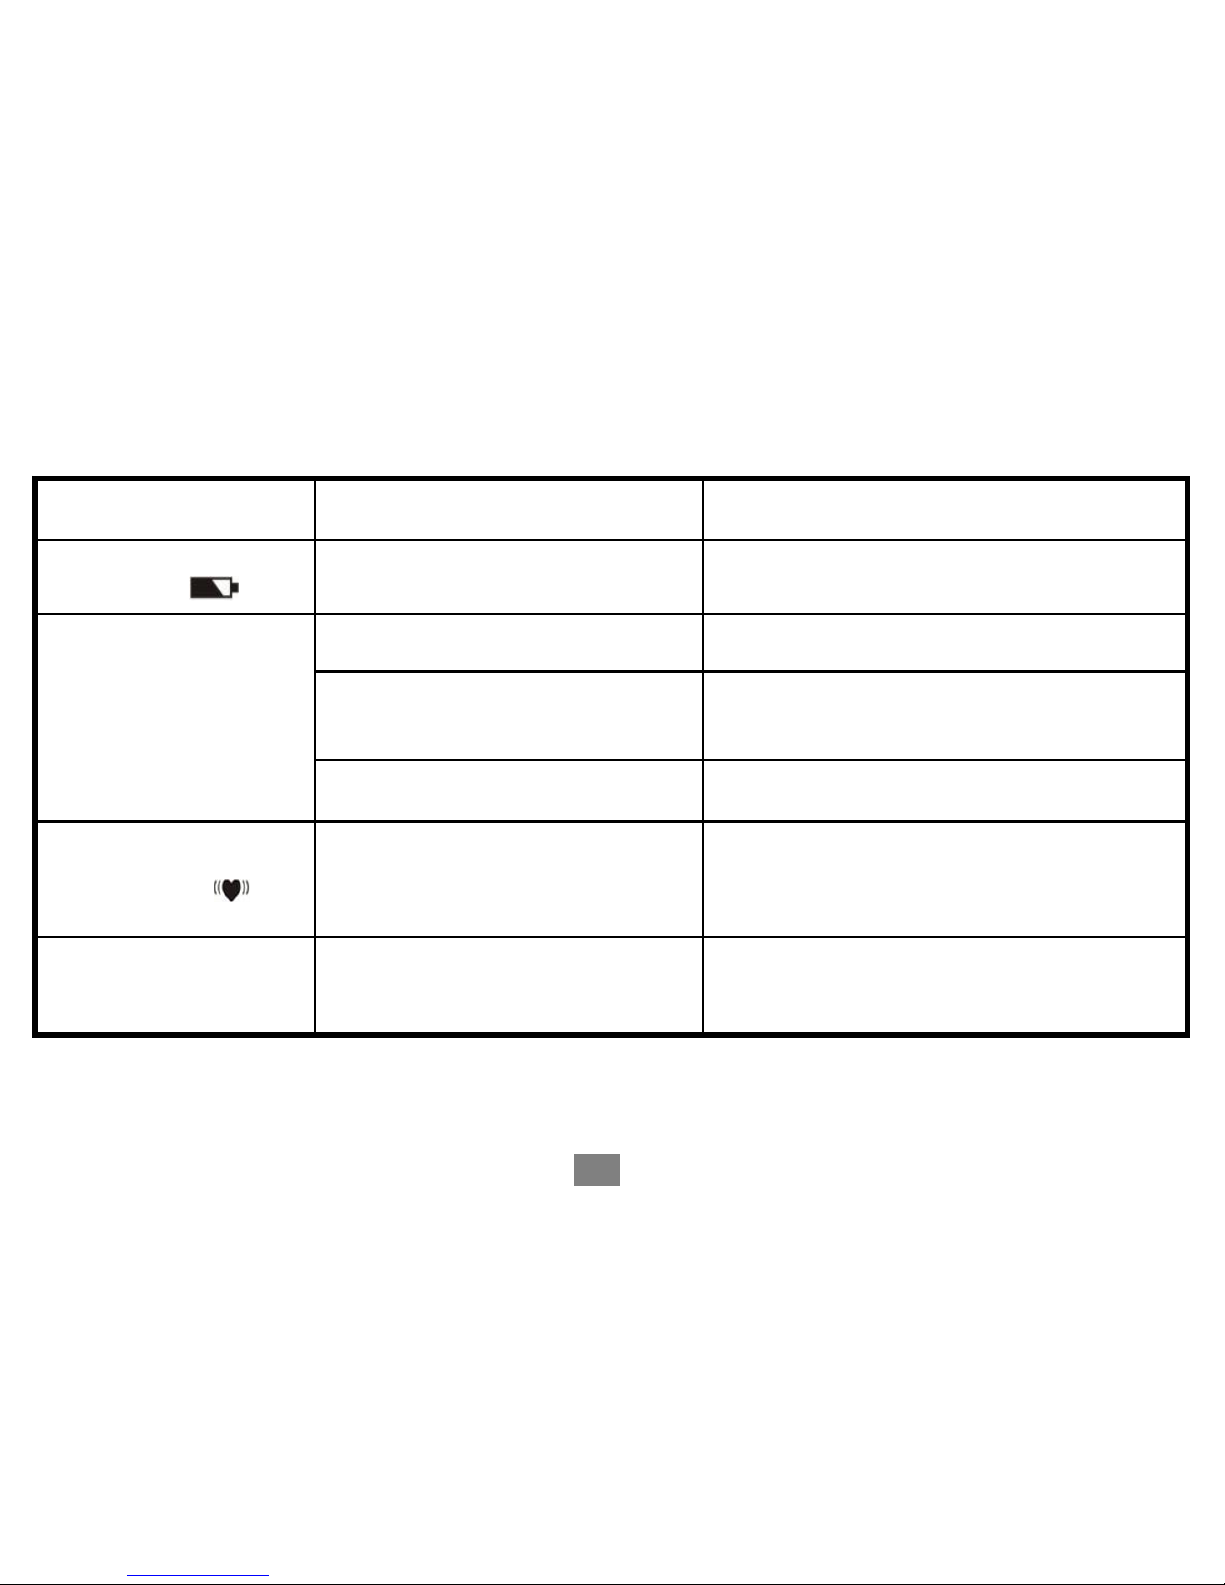
TROUBLE SHOOTING (1)
Abnormality
Probable Reason
Corrective action
LCD shows Low Batter
symbol
Batteries are low.
Install new batteries.
The unit does not
measure. Readings are
too high or too low.
Pneumatic system blocked or cuff
is too tightly wrapped.
Make certain the cuff is wrapped around
your arm correctly and re-measure.
Pressure system was unstable
before measurement.
Measure again. Stay calm. Do not move or
speak during measurement.
The cuff position is not correct.
Sit comfortably and still. Make sure the cuff
is at the same level at your heart.
An irregular heartbeat
symbol
occurs.
Irregular heartbeat
Relax for about 5 minutes and measure
again. If the symbol appears again, consult
your physician or other health care
professional.
Incorrect operation
Some interference in inflation or
wrong operation during measuring
Refer to the inflation step in “Taking blood
pressure” and process again.
15

TROUBLE SHOOTING (2)
Abnormality
Reason
Checkout
LCD shows “Er
U”
Insufficient inflation
Wait for 5 minutes and re-measure.
If
operation is still abnormal,
contact
manufacturer or agent (see the last
page).
LCD shows “Er
H”
Inflation over 305 mmHg
LCD shows “Er
1”
Pulse is undetectable
LCD shows “Er
2”
Radiation interference
Move away from radiation source.
LCD shows “Er
3”
Measured result appears wrong
Measure
again.
16

LIMITED WARRANTY POLICY
Diabetic Supply of Suncoast, Inc. warrants to the original purchaser that this instrument will be free from
defects in materials and workmanship for a period on one (1) year from the date of purchase (except as
noted below). The warranty is not transferable.
This warranty is subject to the following exceptions and limitations.
1. This warranty is valid only if the Warranty Registration is completed online within 14 days from the
date of purchase of your monitor. You will need to have the date of purchase, model number and
serial number of your monitor to complete registration. The model and lot numbers are found on
the silver information sticker located on the bottom of your monitor. Refer to the inside front cover
of this manual for instructions on how to register your new Advocate online.
2. This warranty is limited to replacement due to defects in parts and workmanship.
3. This warranty does not apply to the performance of this product that has been damaged due to
abuse, accident, alteration, misuse, neglect, maintenance by someone other than Diabetic
Supply of Suncoast or failure to operate the instrument in accordance with instructions. Further,
Diabetic Supply of Suncoast assumes no liability for malfunction or damage caused by the use
of reagents other than reagents manufactured or recommended by Diabetic Supply of
Suncoast.
4. Diabetic Supply of Suncoast reserves the right to make changes in design of this
instrument without obligation to incorporate such changes into previously manufactured
instruments.
17
Manufactured for: Diabetic Supply of Suncoast, Inc., PO Box 2102, Vega Alta, PR 00692
Toll Free: 1-866-373-2824, www.advocatemeters.com
Tech Support: 1-866-373-2824; [email protected]; www.advocatemeters.com;
Manual Version V1.0

BLOOD PRESSURE
RECORD
Name: Age: Weight:
Date:
AM
SYS/DIA
PULSE
PM
SYS/DIA
PULSE
Note: By monitoring and controlling high blood pressure, you can lower your risk of stroke, heart
attack, heart failure and kidney disease
18

STATEMENTS AND DECLARATIONS:
1. Arm Blood Pressure Monitor needs special precautions regarding EMC and needs to be installed and put into
service according to the EMC information provided in the ACCOMPANYING DOCUMENTS
2. Wireless communications equipment such as wireless home network devices, mobile phones, cordless
telephones and their base stations, walkie-talkies can affect this equipment and should be kept at least a distance
d = 3,3 m away from the equipment.
(Note. As indicated in Table 6 of IEC 60601-1-2:2007 for ME EQUIPMENT, a typical cell phone with a maximum
output power of 2 W yields d = 3,3 m at an IMMUNITY LEVEL of 3 V/m)
3. The manufacturer are available for request of circuit diagrams, component part lists, descriptions ,calibration
instructions ,or other information that will assist service personnel to repair those parts of the device
4. Changes or modifications not expressly approved by the party responsible for compliance could void the user’s
authority to operate the equipment. This equipment has been tested and found to comply with the limits for a Class
B digital device, pursuant to Part 15 of the FCC Rules. These limits are designed to provide reasonable protection
against harmful interference in a residential installation. This equipment generates, uses and can radiate radio
frequency energy and, if not installed and used in accordance with the instructions, may cause harmful interference
to radio communications. However, there is no guarantee that interference will not occur in a particular installation.
If this equipment does cause harmful interference to radio or television reception, which can be determined by
turning the equipment off and on, the user is encouraged to try to correct the interference by one or more of the
following measures:
-- Reorient or relocate the receiving antenna.
-- Increase the separation between the equipment and receiver.
-- Connect the equipment into an outlet on a circuit different from that to which the receiver is connected.
-- Consult the dealer or an experienced radio/TV technician for help.
19

Guidance and manufacturer’s delclaration
Guidance and manufacture’s declaration –electromagnetic emission
The Arm Blood Pressure Monitor is intended for use in the electromagnetic environment specified below. The
customer of the user of the Arm Blood Pressure Monitor should assure that it is used in such an environment.
Emission test
Compliance
Electromagnetic environment –guidance
RF emissions
CISPR 11
Group 1
The Arm Blood Pressure Monitor use RF energy
only for its internal function. Therefore, its RF
emissions are very low and are not likely to cause
any interference in nearby electronic equipment.
RF emission CISPR 11
Class B
Harmonic emissions
IEC 61000-3-2
Not applicable
Voltage fluctuations/ flicker
emissions IEC 61000-3-3
Not applicable
20
Other manuals for SPBP-04
1
Table of contents
Other Advocate Blood Pressure Monitor manuals


