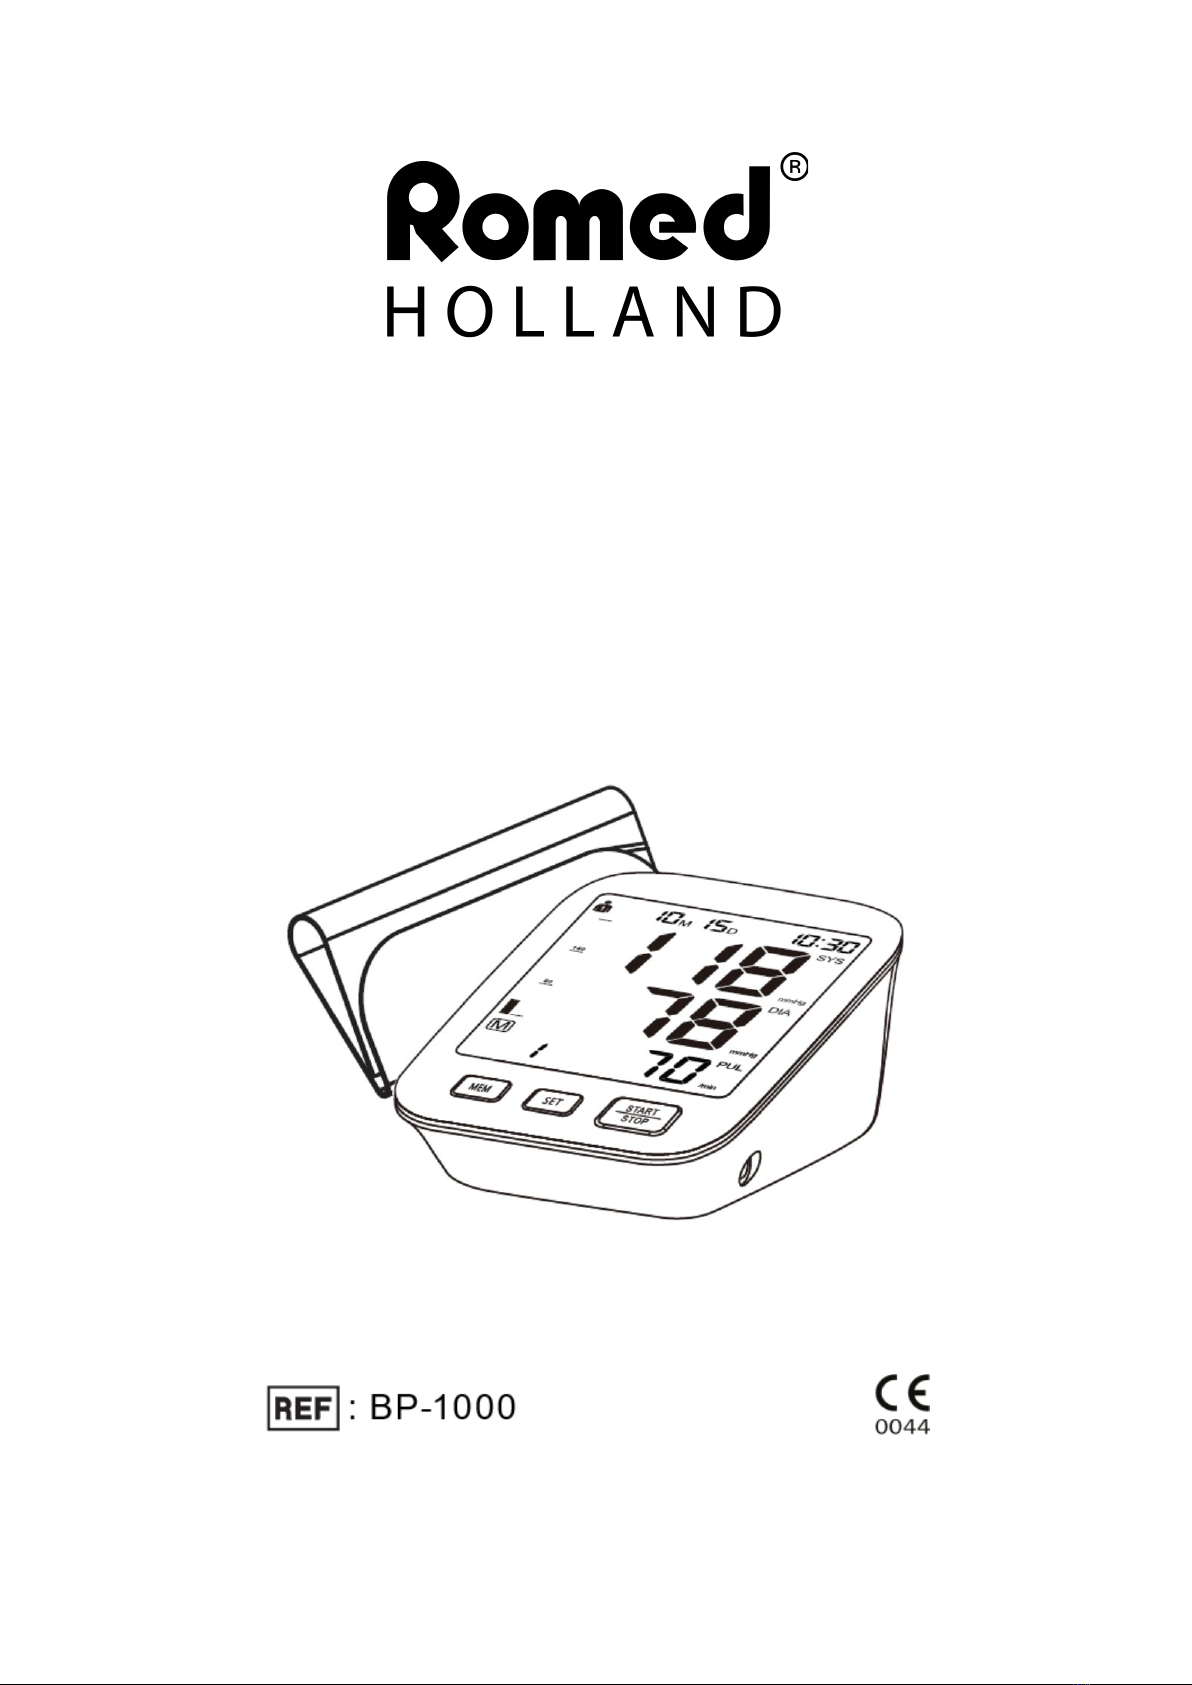
Romed-Holland BP-1000 User manual

Blood Pressure Meter
User Manual
Model: BP-1000

Table of contents
Introduction 3
Safety information 4
Product structure 8
Battery installation 9
Setting mode 10
Proper use of the unit 12
-Pre-measurement 12
-Common factors of wrong measurement 12
-Fitting the cuff 13
-Measuring procedure 14
-Discontinuing a measurement 14
-Memory-recall of measurements 14
-Read memory record 15
-Memory-clear of measurements 15
About blood pressure 15
Exceptional situations 17
Care and maintenance 18
Specification 19
Warranty information 20
EMC Declaration 21

3
Introduction
▲
Your new digital blood pressure monitor uses the oscillometric method of
blood pressure measurement. This means the monitor detects your blood’s
movement through your brachial artery and converts the movements into a
digital reading. An oscillometric monitor does not need a stethoscope, so the
monitor is simple to use.
▲Intelligent inflation will reduce the uncomfortable feeling due to incorrect
inflation, shorten the measurement time and prolong the cuff's usage lifetime.
▲2x90 sets of memory function, each measurement result will be displayed
on the screen and automatically stored. This unit has a blood classification
index, which makes it easy to check your blood pressure.
Please read the manual carefully before you use the unit and keep the manual
well after using.
INTENDED USE
This automatic blood pressure monitor intends to measure the systolic
pressure, diastolic pressure and pulse rate through the upper arm. It is
intended to be used at home or in the hospital and intended for people over 12
years old.
Contraindication
This product cannot be used by patients with severe heart insufficiency to
avoid suffocation and death.
This product is not suitable for infants and children.

4
Safety information
▲To assure the correct use of the product, basic safety measures should
always be followed including the warnings and the cautions listed in the
instruction manual:
Symbol descriptions
The following symbols may appear in this manual, on the label, on the device,
or on its accessories. Some of the symbols represent standards and
compliances associated with the device and its use.
WARNING: This alert identifies hazards that may cause serious personal
injury or death.
CAUTION: This alert identifies hazards that may cause minor personal
injury, product damage, or property damage.
Type BF applied part
Manufacturer SN Specifies serial number
CE Mark: conform the essential requirements of the Medical Device
Directive 93/42/EEC.
DISPOSAL: Do not dispose this product as unsorted municipal waste.
Separate collection of such waste for special treatment is necessary.
Direct current
Follow instructions for use
CAUTION: Consult accompanying documents

5
Safety information
Those who have arrhythmia, diabetes, blood circulation or apoplexy
problems, please use the product under the physician's instruction.
Contact your physician for specific information about your blood
pressure. Self-diagnosis and treatment with use of measured results may be
dangerous. Follow the instructions of your physician or licensed healthcare
provider.
Please place the product on a high place where children cannot touch
it.
No modification of this equipment is allowed.
Do not modify this equipment without authorization of the manufacturer.
If this equipment is modified, appropriate inspection and testing must
be conducted to ensure continued safe use of equipment.
The cuff hose around the neck may cause suffocation.
The swallowing of small parts like packing bag, battery, battery cover
etc. may cause suffocation.
Please don't use a dilution agent, alcohol or petrol to clean the unit.
Please don't hit the product heavily or let the product fall down from a high
place. Use the right cuff, otherwise it cannot work.
Never leave any low battery in the battery compartment as they may
leak and cause damage to the unit.
Please take off the battery if you won’t use it within 3 months.
Replace the new batteries if the unit displays a low battery symbol.

6
Safety information
Consecutive blood pressure measurements should be repeated after 1
minute pause or after the arm has been held up in order to allow the
accumulated blood to flow away.
If the arm circumference size is beyond the measuring range of the CUFF,
it can’t be measured and used, because it will prevent the blood from flowing
smoothly and it causes wrong measurement data.
Don’t kink the connection tube during use, otherwise the cuff pressure
may increase continuously which can prevent the blood flow and result in
harmful injury to the PATIENT.
Too frequent measurements can cause injury to the PATIENT, due to blood
flow interference.
Don’t apply the CUFF over a wound, as it can cause further injury to the
PATIENT.
The device is not suitable for use on neonatal patients, pregnant women,
patients with implanted electronic devices, patients with pre-eclampsia,
premature ventricular beats, atrial fibrillation, peripheral arterial disease and
patients undergoing intravascular therapy or arterio-venous shunt or people
who received a mastectomy.
Please consult your doctor prior to using the unit if you suffer from illnesses.
When using this device, please pay attention to the following situation
which may interrupt the blood flow and influence the blood circulation of patient,
thus cause harmful injury to the patient: the connection tube kinking too
frequent; the application of the cuff and its pressurization on any arm where
intravascular access or therapy or an arterio-venous (A-V) shunt is present;
inflating the cuff on the side of a mastectomy.
Do not inflate the cuff on the same limb where other monitoring ME
equipment is applied around simultaneously, because this could cause
temporary loss of function of those.
Please check that operation of the device does not result in prolonged
impairment of the patient’s blood circulation.

7
Safety information
Do not mix the old and new batteries.
Do not use a cellular phone near the unit. It may result in operational
failure.
Please avoid using in a high radiation area in order to make your
measuring data correctly.
Do not use the equipment where flammable gas (such as anesthetic gas,
oxygen or hydrogen) or flammable liquid (such as alcohol) is present.
WARNING:
Do not dispose of electrical appliances as unsorted municipal waste, use
separate collection facilities. Contact your local government for information
regarding the available collection systems. If electrical appliances are
disposed of in landfills or dumps, hazardous substances can leak into the
groundwater and get into the food chain, damaging your health and well-being.
Classification
1. Internally powered equipment;
2. Type BF applied part;
3. Protection against ingress of water or particulate matter IP21;
4. Not category AP / APG equipment;
5. Mode of operation: Continuous operation;
The user must check that the equipment functions safely and see that it
is in proper working condition before being used.

8
Product structure
Body
Air socket
Memory button
AC/DC socket
Setting button START/STOP button
Display
User Year/Month/Date/Time
Blood pressure Systolic blood pressure
classification
Diastolic blood pressure
Memory symbol Irregular heart beat
Memory times Pulse rate
Low battery Pulse
Cuff size and connection
The accessory cuff is M size, for upper arm circumference 22-32cm use. The
cuff is treated as the applied part.
Insert the connector with cuff tube into the hole which is on the left side of the
device as pictured. (Only the provided cuff can be used, you can not change to
any other cuff brand).

9
Battery installation
Remove the battery cover from the
battery compartment, insert the
battery.
a) Remove the battery cover as
shown on the picture.
b) Insert 4 AAA powerful batteries
into the compartment and ensure
each battery is in the proper
direction.
Low battery and replacement
When power is on, the low battery symbol will display once the unit
starts to work and you must replace with new batteries, otherwise the unit can’t
work.
Battery type and replacement
Please use 4pcs AAA identical 1.5V alkaline batteries.
Do not use the batteries after their expiry date.
Please remove the batteries if you do not need to use for long time.
WARNING:
Dispose of the battery in accordance with all federal, state and local laws. To
avoid fire and explosion hazard, do not burn or incinerate the battery.

10
Setting mode
Note:
·When using an AC adapter, the power of battery won't be consumed.
·When the measurement suddenly stops (e.g. the plug is from the outlet by
carelessness), you must reinsert the plug into the unit, and restart the
measurement.
How to set
1. User setting
Press button SET when power is off. The screen will display or . Press
button MEM and it will change between and . Press button SET when
you confirm the user. Then it will enter into the year setting mode.
2. Year setting
Following the above step, the screen will display and flash 20XX. The last digit
of the year will increase with 1 when pressing button MEM each time. You can
choose from 2001 to 2099. Press button SET when you confirm the year, then
it will enter into the month and date setting mode.
Year setting

11
Setting mode
3. Month and date setting
Following the above step, the screen will display xxMxxD and xxxx and keep
flashing on month. The digit will increase with 1 when pressing button MEM
each time. You can choose from 1 to 12. Press button SET when you confirm
the month, then it will set the date. Same as the month setting, each time you
press button MEM, the digit will keep changing from 01 to 31. Press button
SET when you confirm the date, then it will enter into the time setting mode.
Month setting Date setting
4. Time setting
Following the above step, the screen will display xxMxxD and xx:xx and keep
flashing on the digits of hour. The digit will increase with 1 when pressing
button MEM each time. You can choose from 0 to 23. Press button SET when
you confirm the hour, then the digits of minute start to flash. Same as the hour
setting, each time you press button MEM, the digit will keep changing from 00
to 59. Press button SET when you confirm the minute, then the total setting
mode is completed.

12
Proper use of the unit
Measurement
Pre-measurement
▲Relax for about five to ten minutes prior to the measurement. Avoid eating,
drinking alcohol, smoking, exercising and bathing for 30 minutes before taking
a measurement.
All these factors will influence the measurement result.
▲Remove any garment that fits closely to your upper arm.
▲Always measure on the same arm (normally left).
▲Take measurement regularly at the same time of every day, as blood
pressure changes even during the day.
Common factors of wrong measurement
▲All efforts by the patient to support their arm can increase blood pressure.
▲Make sure you are in a comfortable, relaxed position and do not activate
any of the muscles in the measurement arm. Do not cross your legs, keep the
feet flat on floor, back and arm supported during measurement. Use a cushion
for support if necessary.
▲If the arm artery lies lower or higher than the heart, a false reading will be
obtained.
Note:
▲Only use clinically approved cuffs!
▲A loose cuff or an exposed bladder causes false reading.
▲With repeated measurements, blood accumulates in the arm which can
lead to false reading.
Consecutive blood pressure measurements should be repeated after 1 minute
pause or after the arm has been held up in order to allow the accumulated
blood to flow away.

13
Proper use of the unit
Fitting the cuff
1). Put the cuff flatly on a table with the velcro side down.
Pass the end of the cuff through the metal loop so that a
circle is formed. The velcro closer will now face outwards
(ignore this step if the cuff has already been prepared).
2). Push the cuff over the left upper arm so that the tube
points in the direction of the lower arm.
3). Wrap the cuff around the arm as shown in the picture.
Make sure that the distance between the cuff trachea turret
and the elbow joint is about 2-3cm.
4). Tighten the free end of the cuff and close the cuff by
affixing the velcro.
5). The cuff should snug on your upper arm so that you can
fit 2 fingers between the cuff and your upper arm. Any piece
of clothing restricts the arm and must be taken off.
6). Secure the cuff with the velcro closer in such a way that it
lies comfortably and not too tight. Lay your arm on a table
(palm upwards) so that the cuff is at the same height as the
heart. Do not bend the tube.
Note:
If it is not possible to fit the cuff to your left arm, it can also
be placed on the right. However, all measurements should
be made using the same arm.

14
Proper use of the unit
Measuring procedure
After the cuff has been positioned appropriately, the measurement can begin:
1). Press the START/STOP button, all symbols appear on the display, then the
pump begins to inflate the cuff, the rising pressure in the cuff is shown on the
display.
2). After the suitable pressure has been reached, the pump stops and the
pressure gradually falls. The cuff pressure is displayed. In case the inflation is
not sufficient, the device automatically re-inflates to a higher pressure.
3). When the device detects the signal, the heart symbol on the display
starts to flash.
4). When the measurement has been completed, the systolic, diastolic and
pulse rate will appear on the display.
5). The measurement readings remain on the display until you switch off the
device. If no button is pressed for a period of 3 minutes, the device switches off
itself in order to save the power.
Note:
•This symbol will be displayed along with the reading if an irregular
heartbeat is detected during the measurement.
Discontinuing a measurement
If it is necessary to interrupt a blood pressure measurement for any reason
(e.g., the patient feels unwell) the START/STOP button can be pressed at any
time. The device immediately decreases the cuff pressure automatically.
Memory recall of measurements
This blood pressure monitor automatically stores 2x90 sets measurement
value, the oldest record will be replaced by the latest measurement value
when there are more than 90 sets each user.

15
Proper use of the unit
Read memory record
Press the button MEM when the power is off, the latest 3 times average value
will be shown. Press the button MEM again, the latest measurement value will
be shown, as well as subsequent measurements can be displayed one after
the other by pressing the button MEM each time.
Memory clear of measurements
If you are sure that you want to remove all stored memories permanently,
press the button SET for 7 times until CL appears. When power is off, press
the START/STOP button, CL will flash for 3 times to clear all the memories.
After this, press button MEM, and “no” will be shown on the display which
means that there is no memory in store.
About blood pressure
Blood pressure is the pressure exerted on the arteries.
The systolic blood pressure value represents the blood pressure produced by
contraction of the heart muscle.
The diastolic blood pressure value represents the blood pressure produced by
relaxation of the heart muscle.
Systolic blood pressure Diastolic blood pressure

16
About blood pressure
According to the blood pressure classification by the WHO/ISH.
SYS lower than 100mmHg(13.3kPa) is considered as hypotension.
Blood pressure type
Optimal blood pressure Normal blood pressure High normal value
Mild hypertension Moderate hypertension Severe hypertension

17
Exceptional situations
Error indicators
The following symbols will appear on the display when measuring
abnormal.
Trouble removal
Problem
Check
Cause and solutions
No power Check the battery power Replace new one
Check the polarity position Place the polarities in a proper way.
No inflation Check whether the plug inserts Insert into the air socket tightly
Check whether the plug is broken or
leak
Change a new cuff
Err and stop
working
Check whether you move the arm
when inflating
Keep the body calm
Check whether you are chatting when
measuring
Keep quiet when measuring
Cuff leak Check whether the cuff wrap is too
loose
Wrap the cuff tightly
Check whether the cuff is broken Change a new cuff
Please contact the distributor if you can’t solve the problem, do not disassemble the unit by
yourself!
Symbol Cause Correction
-1 Weak signal or pressure change
suddenly.Out of range indicates HI.
Wrap the cuff properly.
Remeasure in correct way.
-2 External strong disturbance When near a cell phone or other high radiant
device, the measurement will fail.
Keep quiet and no chatting when measure.
-3 Error appears during the process of
inflating
Wrap the cuff properly.
Make sure that the air plug is properly
inserted in the unit.
Remeasure.
-5 Abnormal blood pressure Repeat the measurement after relaxing for
30mins, if you get unusual readings 3 times,
please contact your doctor.
Low battery Replace all the worn batteries with new ones.

18
Care and maintenance
Care for the main unit and blood pressure monitor cuff
. Keep the unit in the storage case when
not using.
. Clean the unit with a soft dry cloth. Do not use any
abrasive or volatile cleaners.
. Never immerse the unit or any component in water.
. Prior to cleaning, make sure the monitor is off. A mixture of distilled
water and 10 percent bleach could be used.
. Using a spray bottle, moisten a soft cloth towel with the bleach or
detergent mix until it is fully saturated. Squeeze any excess moisture
from the cloth to avoid any dripping or potential supersaturation of the
cuff.
. Wipe all surfaces of the blood pressure monitor cuff thoroughly, making
sure to clean the inside and outside of the cuff. Be cautious not to get any
moisture in the main unit.
. Using a dry cloth, gently wipe away any excess moisture that may
remain on the blood pressure cuff. Lay the cuff flat in an unrolled position
and allow the cuff to dry in the air.
Maintenance
Do not clean the body and cuff with
naphtha, thinner or gasoline etc.
Do not wet the cuff or attempt to clean the
cuff with water.
Store the unit in a clean and dry location.
Do not subject the unit to extreme hot or
cold temperature, humidity and direct
sunlight.
Remove the batteries if the unit will not be
used in 3 months or longer.
* We will not be responsible for any quality problem if you don't care and maintain
the product as instructed.

19
Specification
Description
Automatic upper arm blood pressure monitor
Display
Color LCD digital display
Measuring principle
Oscillometric method
Measuring location
Upper arm
Measurement range
Pressure
0~299 mmHg
Pulse
40~199 pulses/min
Accuracy
Pressure
±
3mmHg
Pulse
±
5% of reading
LCD indication
Pressure
3 digits display of mmHg
Pulse
3 digits display
Symbol
Memory/ Heartbeat/ Low battery
Memory function
2x90 sets memory of measurement values
Power source
4pcs AAA alkaline battery DC. 6V or AC adapter
Automatic power off
In 3 minutes
Main unit weight
Approx. 230g (batteries not included)
Main unit size
L124mm x W95mm x H52mm
Main unit lifetime
10,000 times under normal use
Battery life
Could be used for 300 times under normal condition
Accessories
Cuff, instruction manual
Operating environment
Temperature
5~40
℃
Humidity
15%~93%RH
Air pressure
86kPa~106kPa
Storage environment
Air pressure: 86kPa~106kPa
Temperature: - 20℃~55℃, Humidity: 10%~93%
Avoid crash, sun burn or rain during transportation.

20
Warranty information
Statement
The intended use: the unit is intended to be used by adults at home or
medical center to measure blood pressure and pulse rate from the upper arm.
The unit satisfies the requirements of EN ISO81060-1 Part 1 Non-invasive
sphygmomanometers, EN 1060-3:1997+A2:2009 Non- invasive
sphygmomanometers, IEC80601-2-30 Part 2 Non-invasive
sphygmomanometers.
Blood pressure measurements determined with this device are equivalent
to those obtained by a trained observer using the cuff/stethoscope
auscultatory method, within the limits prescribed by the American National
Standard, manual, electronic, or automated sphygmomanometers.
The risk of patient and user can be lowered to acceptable level.
Warranty information
The unit is guaranteed to be free of defects in workmanship and materials
under normal use for a period of two years from the date listed on the purchase
record.
For repair under this warranty. Our authorized service agent must be
advised of the fault within the period of the warranty. This warranty covers
parts and labor only under normal operations. Any defect resulting from natural
causes, e.g., flood, hurricane etc., is not within this guarantee. This guarantee
does not cover damage incurred by use of the unit not in accordance with the
instructions, accidental damage or if it has been tampered with or serviced by
unauthorized service agents.
Monitor subjected to misuse, abuse and neglect of these manual content,
non-instructional purposes, unauthorized repair or modifications will be
excluded from this warranty.
The device requires no calibration.
The device is not repairable and contains no user serviceable parts.
Other manuals for BP-1000
1
Table of contents
Other Romed-Holland Blood Pressure Monitor manuals