AEG AFNDA18B User manual


2
2
Important!
It is essential that you read the instructions in this manual
before operating this machine.
Subject to technical modifications.

33
A - Belt clip
B - Depth of drive adjustment
C - Jam release
D - Workpiece contact
E - No-mar pad
F - Air pressure lever
G - Trigger
H - LED Button
I - Release button
J - Pusher
K - Angled magazine
L - No-mar pad replacement
A-
B- No-mar pad
Workpiece contact
A- Depress latches to remove
battery pack
B - To install
C- Battery pack
A- Magazine B- Nails
B- Release button
A- Pusher
A
Fig. 1
Fig. 2 Fig. 3
Fig. 5
Fig. 6
Fig. 4
65 mm
(2½”)
25 mm
(1”)
Nail diameter
.069 in.
A
B
C
B
H
G
F
I
J
K
A
B
A
A
B
C
B
D
E
L

4
4
BC
A- Trigger
B- Workpiece contact
A- Jam release
B- Latch
A- Drive depth adjustment dial
B- To decrease pressure
C- To increase pressure
A - Depth of drive adjustment
B- To increase depth
C- To decrease depth
A- Trigger mode selector
(for AFNDA18B only)
B- Full sequential actuation mode
C- Contact actuation mode
(for AFNDA18B only)
Fig. 8
Fig. 12Fig. 9Fig. 7
Fig. 10
A
B
C
B
A
A
A- Pusher
Fig. 11
A
A
A
B
B
B C
A- Elevation screw
B- Screwdriver
C- Elevation screw cover
Fig. 13 A
C

55
WARNING
Read all safety warnings and all instructions.
Failure to follow the warnings and instructions may result in electric
shock, re and/or serious injury.
Save all warnings and instructions for future reference.
NAILER SAFETY WARNINGS
Always assume that the tool contains fasteners. Careless
handling of the nailer can result in unexpected ring of fasteners
and personal injury.
Do not point the tool towards yourself or anyone nearby.
Unexpected triggering will discharge the fastener causing an injury.
Do not actuate the tool unless the tool is placed rmly against
the workpiece. If the tool is not in contact with the workpiece, the
fastener may be deected away from your target.
Disconnect the tool from the power source when the fastener
jams in the tool. While removing a jammed fastener, the nailer may
be accidentally activated if it is plugged in.
Use caution while removing a jammed fastener. The mechanism
may be under compression and the fastener may be forcefully
discharged while attempting to free a jammed condition.
Do not use this nailer for fastening electrical cables. It is
not designed for electric cable installation and may damage the
insulation of electric cables thereby causing electric shock or re
hazards.
Hold power tool by insulated gripping surfaces, when
performing an operation where the nail may contact hidden
wiring. Nails contacting a “live” wire may make exposed metal parts
of the power tool “live” and could give the operator an electric shock.
Know your power tool. Read operator’s manual carefully. Learn
its applications and limitations, as well as the specic potential
hazards related to this tool. Following this rule will reduce the risk of
electric shock, re, or serious injury.
Always wear eye protection with side shields. Everyday glasses
have only impact resistant lenses. They are not safety glasses.
Following this rule will reduce the risk of serious personal injury.
Eye protection provides protection against ying particles
both from the FRONT and SIDE should ALWAYS be worn by the
operator and others in the work area when loading, operating
or servicing this tool. Eye protection is required to guard against
ying fasteners and debris, which could cause severe eye injury.
Additional safety protection will be required in some
environments. For example, the working area may include
exposure to noise level which can lead to hearing damage. The
employer and user must ensure that any necessary hearing
protection is provided and used by the operator and others in
the work area. Some environments will require the use of head
protection equipment. When required, the employer and user must
ensure that head protection is used.
Keep ngers away from trigger when not driving fasteners to
avoid accidental ring.
Use safety equipment. Always wear eye protection. Dust mask,
nonskid safety shoes, hard hat, or hearing protection must be used
for appropriate conditions.
Protect your lungs. Wear a face or dust mask if the operation
is dusty. Following this rule will reduce the risk of serious personal
injury.
Protect your hearing. Wear hearing protection during extended
periods of operation. Following this rule will reduce the risk of
serious personal injury.
Battery tools do not have to be plugged into an electrical
outlet; therefore, they are always in operating condition. Be
aware of possible hazards when not using your battery tool or
when changing accessories. Following this rule will reduce the
risk of electric shock, re, or serious personal injury.
Do not place battery tools or their batteries near re or heat.
This will reduce the risk of explosion and possibly injury.
Do not crush, drop or damage battery pack. Do not use a
battery pack or charger that has been dropped or received a
sharp blow. A damaged battery is subject to explosion. Properly
dispose of a dropped or damaged battery immediately.
TECHNICAL DATA 15GA ANGLE FINISH NAILER AFNDA18B AFNDA18BNZ
Rated voltage 18 V 18 V
Fastener type 15 gauge DA type
34 degree finish nails
15 gauge DA type
34 degree finish nails
Cycle rate 1 / second 1 / second
Magazine capacity 100 nails 100 nails
Fastener range 25 to 65mm 25 to 65mm
Weight - not including battery pack 3.5 kg 3.5 kg
BATTERY AND CHARGER
Compatible battery pack
(not included)
Compatible charger
(not included)
L1815R
L1820R
L1825R
L1830R
L1840R
L1850R
L1860R
AL1218G
BL1218
BLK1218
BL18DP-X5
Use AEG 18V battery and charger only

6
6
Batteries can explode in the presence of a source of ignition,
such as a pilot light. To reduce the risk of serious personal injury,
never use any cordless product in the presence of open ame. An
exploded battery can propel debris and chemicals. If exposed, ush
with water immediately.
Do not charge battery tool in a damp or wet location. Following
this rule will reduce the risk of electric shock.
For best results, your battery tool should be charged in a
location where the temperature is more than 10°C but less than
38°C. Do not store outside or in vehicles.
Under extreme usage or temperature conditions, battery
leakage may occur. If liquid comes in contact with your skin,
wash immediately with soap and water. If liquid gets into your
eyes, ush them with clean water for at least 10 minutes, then
seek immediate medical attention. Following this rule will reduce
the risk of serious personal injury.
Use the tool only for its intended use. Do not discharge fasteners
into open air.
Use the tool only for the purpose for which it was designed.
Use only the fasteners recommended for this tool. Use of the
wrong fasteners could result in poor fastener feeding, jammed
fasteners, and nails leaving the tool at erratic angles. If fasteners
are not feeding smoothly and properly, discontinue their use
immediately. Jammed and improperly feeding fasteners could result
in serious personal injury.
Never use this tool in a manner that could cause a fastener to
be directed toward anything other than the workpiece.
Do not use the tool as a hammer.
Always carry the tool by the handle.
Do not alter or modify this tool from the original design or
function without approval from the manufacturer.
Always be aware that misuse and improper handling of this
tool can cause injury to yourself and others.
Never clamp or tape the trigger or workpiece contact in an
actuated position.
Never leave tool unattended if the battery is installed.
Do not operate this tool if it does not contain a legible warning
label.
ADDITIONAL SAFETY WARNINGS
Do not use tool if trigger does not actuate properly. Any tool
that cannot be controlled with the trigger is dangerous and must
be repaired.
Check operation of the workpiece contact mechanism
frequently. Do not use the tool if the workpiece contact mechanism
is not working correctly as accidental driving of a fastener may
result. Do not interfere with the proper operation of the workpiece
contact mechanism.
Do not use a tool that does not work correctly.
Always assume that the tool contains nails.
Do not carry the tool from place to place holding the trigger.
Accidental discharge could result.
Always handle the tool with care:
• Respect the tool as a working implement.
• Never engage in horseplay.
• Never pull the trigger unless nose is directed toward the work.
• Keep others a safe distance from the tool while tool is in
operation as accidental actuation may occur, possibly causing
injury.
Choice of triggering method is important. Check manual for
triggering options.
The nailer is designed for single-hand use. Do not hold the tool
by the front of the magazine. Do not put hands, head, or other parts
of your body near the bottom of the magazine where the nail exits
the tool, as serious personal injury could result.
Do not point the tool toward yourself or anyone whether it
contains nails or not.
Do not actuate the tool unless you intend to drive a fastener
into the workpiece.
Always ensure that the workpiece contact is fully positioned
above the workpiece. Positioning the workpiece contact only
partially above the workpiece could cause the fastener to miss the
workpiece completely and result in serious personal injury.
Do not drive nails near edge of material. The workpiece may split
causing the nail to ricochet, injuring you or a co-worker. Be aware
that the fastener may follow the grain of the wood, causing it to
protrude unexpectedly from the side of the work material or deect,
possibly causing injury.
Keep hands and body parts clear of immediate work area. Hold
workpiece with clamps when necessary to keep hands and body out
of potential harm. Be sure the workpiece is properly secured before
pressing the fastener against the material. The workpiece contact
may cause the work material to shift unexpectedly.
Keep face and body parts away from back of the tool cap when
working in restricted areas. Sudden recoil can result in impact to
the body, especially when nailing into hard or dense material.
During normal use the tool will recoil immediately after
driving a fastener. This is a normal function of the tool. Do not
attempt to prevent the recoil by holding the nailer against the work.
Restriction to the recoil can result in a second fastener being driven
from the nailer. Grip the handle rmly, let the tool do the work and
do not place second hand on top of tool or near exhaust at any time.
Failure to heed this warning can result in serious personal injury.
Do not drive fasteners on top of other fasteners or with the
tool at an overly steep angle as this may cause deection of
fasteners which could cause injury.
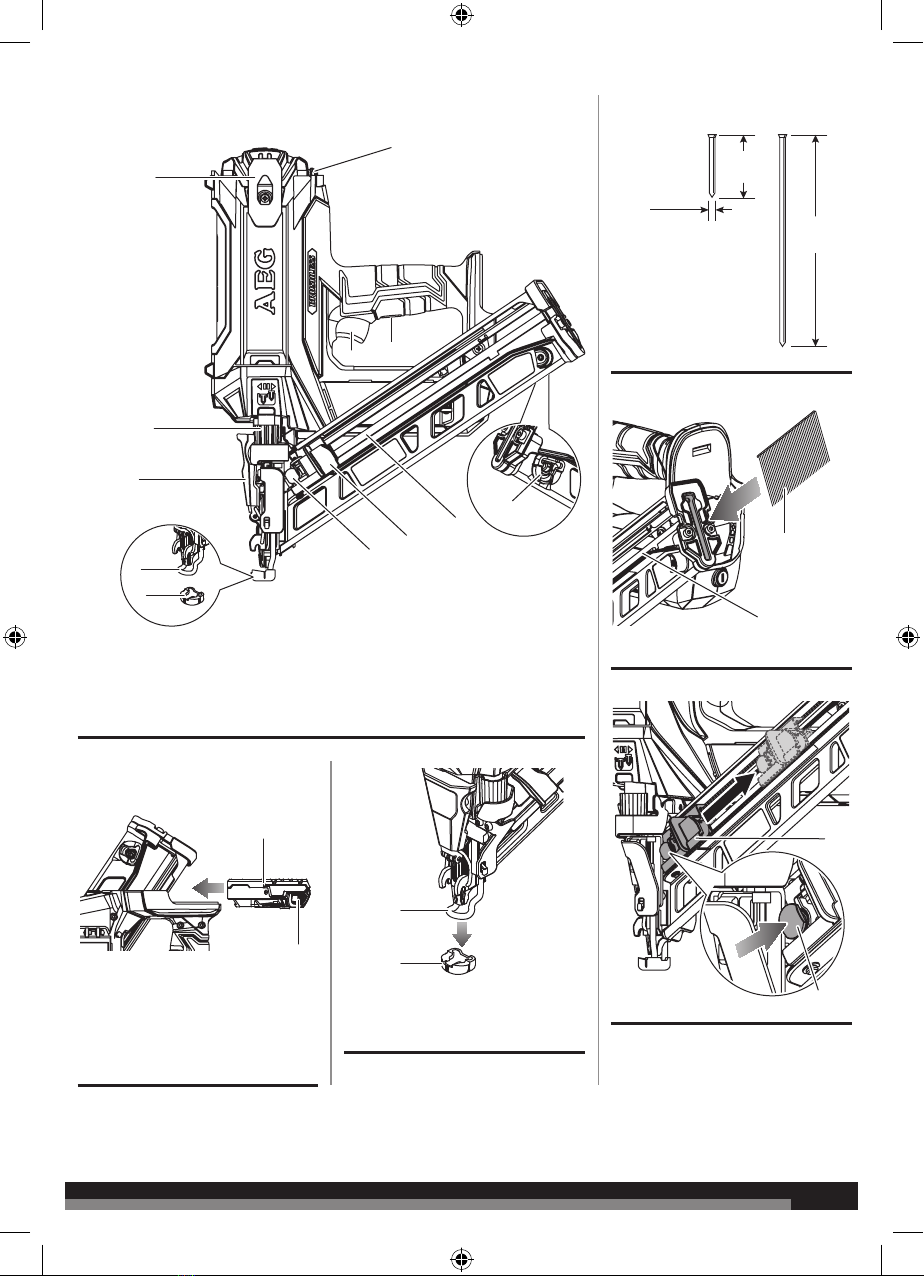
LOADING TOOL
Do not load the product with fasteners when any of the operating
controls is activated.
When loading the product:
■Never place a hand or any part of body in fastener discharge
area of the product.
■Never point the product at anyone.
■Do not pull the trigger or depress the workpiece contact as
accidental actuation may occur, possibly causing injury.
SAVE THESE INSTRUCTIONS
Refer to them frequently and use them to instruct others who may
use this product. If you loan someone this product, loan them these
instructions also.

77
ASSEMBLY
WARNING
Do not use this product if it is not completely assembled or if any
parts appear to be missing or damaged. Use of a product that
is not properly and completely assembled or with damaged or
missing parts could result in serious personal injury.
WARNING
Do not attempt to modify this product or create accessories or
attachments not recommended for use with this product. Any
such alteration or modication is misuse and could result in a
hazardous condition leading to possible serious personal injury.
OPERATION
WARNING
Do not allow familiarity with products to make you careless.
Remember that a careless fraction of a second is sufcient to
inict severe injury.
WARNING
Always remove battery pack from the product when you are
assembling parts, making adjustments, cleaning, or when not in
use. Removing battery pack will prevent accidental starting that
could cause serious personal injury.
WARNING
Always wear eye protection with side shields. Failure to do so
could result in objects being thrown into your eyes, resulting in
possible serious injury.
APPLICATIONS
You may use this product for the purposes listed below:
●Finish and trim (interior and exterior)
●Door & window casing
●Door jambs
●Baseboard
●Crown molding
●Cabinetry
●Cap and shoe molding
●Molding
●Staircases
●Door and window trim
●Chair rail
●Brickmold
●Hardwood flooring
●Panelling
●Furniture
TO INSTALL BATTERY PACK
See figure 2.
Place battery pack in the product. Align raised rib on battery pack
with the groove inside the product.
Make sure the latches on the back of the battery pack snaps in
place and battery pack is secured in the product before beginning
operation.
CAUTION
When placing battery pack in the product, be sure raised rib on
battery pack aligns with the bottom of the product and latches
into place properly. Improper installation of the battery pack can
cause damage to internal components.
TO REMOVE BATTERY PACK
See figure 2.
Locate latches on both sides of the battery pack and depress to
release the battery pack from the product.
WARNING
Battery tools are always in operating condition. Therefore, switch
should always be locked when not in use or carrying at your side.
NO-MAR PAD
See figure 3.
The no-mar pad attached to the nose of the product helps prevent
marring and denting when working with softer woods.
WARNING
Remove the battery pack from the product before removing or
replacing the no-mar pad. Failure to do so could result in serious
personal injury.
The pad can be removed by pulling it down and away from the nose.
To replace the pad, t it into place over the nose and push up at the
back to reseat.
On-board storage for the pad is located on the magazine of the
product. An extra no-mar pad is provided in the on-board storage
area.
LOADING THE PRODUCT WITH NAILS
See figures 4 - 6.
■Remove the battery pack from the product.
■Slide the pusher all the way to the rear of the magazine until it
locks in place.
■With the nose of the product pointed away from you, feed a
strip of nails into the magazine. Be sure the nails are pointed
downward and at the angle shown.
NOTE: The tip of the nails should be parallel to the bottom edge
of the magazine.
NOTE: See gure 4, for acceptable nail sizes.
WARNING
Keep the product pointed away from yourself and others when
loading nails. Failure to do so could result in possible serious
personal injury.
■Slide the nail strip as far forward in the magazine as possible.

8
8
■Press the release button and allow the pusher to push the nails
up to the driving mechanism. The pusher will stop when it rests
against the end of the nail strip.
NOTE: Do not allow the pusher to snap back into place.
WARNING
Use only the nails recommended for use with this product. The
use of any other nails can result in tool malfunction, leading to
serious injuries.
WARNING
Never load nails with the workpiece contact or trigger activated.
Doing so could result in possible serious personal injury.
USING THE MODE SELECTOR SWITCH (FOR AFNDA18B
ONLY)
See figures 7 - 8.
WARNING
Never wedge or hold back the workpiece contact mechanism
during operation of the product. Doing so could result in possible
serious injury.
This product is shipped from the factory with the trigger mode
selector set in the single sequential actuation mode. The trigger
mode selector can also be set for contact actuation mode.
Full sequential actuation mode
Full sequential actuation provides the most accurate fastener
placement.
■Remove the battery pack from the product.
■Slide the trigger mode selector to (for AFNDA18B only).
■Reinstall the battery pack.
■Grip the product firmly to maintain control. Position the nose of
the product onto the work surface.
■Push the product against the work surface to depress the
workpiece contact.
■Squeeze the trigger to drive a fastener.
■Always remove your finger from the trigger after the nail has
been driven.
■Allow the product to recoil away from the work surface as the
fastener is driven.
NOTE: The trigger must be depressed within 3 seconds of placing
the nose of the product against the workpiece. If depressing the
trigger does not drive a fastener, lift the product away from the
workpiece, then replace and try driving the fastener again.
Contact actuation mode (for AFNDA18B only)
Contact actuation allows very fast repetitive fastener placement.
■Remove the battery pack from the product.
■Slide the trigger mode selector to .
■Reinstall the battery pack.
■Grip the product firmly to maintain control.
■Squeeze and hold the trigger. Push the product against the work
surface to depress the workpiece contact and drive a fastener.
■Allow the product to recoil away from the work surface as the
fastener is driven.
NOTE: In contact actuation mode, the product may also be
operated by depressing the workpiece contact against the surface
and squeezing the trigger. The nose of the product must be pressed
against the workpiece within 3 seconds of depressing the trigger.
If pressing the nose to the workpiece does not drive a fastener,
release the trigger, depress the trigger again, then try driving the
fastener again.
WARNING
During normal use the product will recoil immediately after
driving a fastener. This is a normal function of the product. Do
not attempt to prevent the recoil by holding the nailer against
the work. Restriction to the recoil can result in a second fastener
being driven from the nailer. Grip the handle rmly, let the
product do the work, and do not place second hand on top of
product at any time. Failure to heed this warning can result in
serious personal injury.
WARNING
When used in the contact actuation mode do not carry the
product with the trigger depressed as this will cause a fastener
to discharge if the workpiece contact accidentally bumps against
an object. Failure to observe this warning can result in serious
personal injury.
SETTING THE AIR POWER
See figure 9.
The amount of air power required will depend on the size of the nail
and the workpiece material.
Begin testing the depth of drive by driving a test nail into the same
type of workpiece material used for the actual job.
■Remove battery pack from the tool.
■Move power adjustment lever to the right to increase air power
or to the left to decrease air power.
It may be possible to achieve the desired depth with air power
adjustments alone. If ner adjustments are needed, use the depth
of drive adjustment.
DRIVE DEPTH ADJUSTMENT
See figure 10.
The driving depth of the nail may be adjusted by moving the dial to
the left to decrease or right to increase the depth the nail is driven. It
is advisable to test the depth on a scrap workpiece to determine the
required depth for the application and to drive a test nail after each
adjustment until the desired depth is set.
REMOVING NAILS FROM THE PRODUCT
See figure 11.
Remove the battery pack from the product.
WARNING
Remove the battery pack from the product before removing nails.
Failure to do so could result in serious personal injury.
To remove a strip of nails from the product, hold the nailer by the

99
handle with your right hand, and rest your left hand underneath the
product with your left thumb on the pusher.
Slide the pusher all the way to the rear of the magazine until it locks
in place.
NOTE: Always keep ngers clear of nail track of magazine to
prevent injury from unintended release of the pusher.
Slide the nails toward the back of the magazine and remove.
CLEARING A JAMMED FASTENER
See figure 12 - 13.
WARNING
Remove the battery pack from the product before clearing
a jammed fastener. Failure to do so could result in serious
personal injury.
Driving too deeply into the material, excess debris, or jammed nails
may lead to the driver mechanism being stuck at its bottom position.
The driver mechanism can usually be returned to its operating
position by depressing the work contact element against a scrap
piece of wood and squeezing the trigger.
If this does not automatically return the driver mechanism into the
tool, the tool may be jammed.
If a nail or fastener becomes jammed in the tool, remove the battery
pack and keep the tool pointed away from you while clearing the
jam.
■Remove the battery pack from the tool.
■Remove fasteners from the tool.
■Pull up on the latch and open the jam release.
■Locate and remove the elevation screw cover using a flat blade
screwdriver.
■Turn the elevation screw clockwise to move the driving
mechanism back and free the nail jam.
■Remove the bent nail.
■Close the jam release and latch.
■Reinstall nails.
■Reinstall battery and activate the tool by pressing the worklight
grip switch.
BATTERIES
New battery packs reach full loading capacity after 4 - 5 chargings
and dischargings. Battery packs which have not been used for
some time should be recharged before use.
Temperatures in excess of 50°C (122°F) reduce the performance
of the battery pack. Avoid extended exposure to heat or sunshine
(risk of overheating).
The contacts of chargers and battery packs must be kept clean.
For an optimum life-time, the battery packs have to be fully charged,
after used.
To obtain the longest possible battery life remove the battery pack
from the charger once it is fully charged.
For battery pack storage longer than 30 days:
• Store the battery pack where the temperature is below 27°C
and away from moisture.
• Store the battery packs in a 30% - 50% charged condition.
• Every six months of storage, charge the pack as normal.
TRANSPORTING LITHIUM BATTERIES
Lithium-ion batteries are subject to the Dangerous Goods
Legislation requirements.
Transportation of those batteries has to be done in accordance with
local, national and international provisions and regulations.
■The user can transport the batteries by road without further
requirements.
■Commercial transport of Lithium-Ion batteries by third parties is
subject to Dangerous Goods regulations. Transport preparation
and transport are exclusively to be carried out by appropriately.
trained persons and the process has to be accompanied by
corresponding experts.
When transporting batteries:
■Ensure that battery contact terminals are protected and
insulated to prevent short circuit.
■Ensure that battery pack is secured against movement within
packaging.
■Do not transport batteries that are cracked or leak.
Check with forwarding company for further advice
BATTERY PACK PROTECTION
The battery pack has overload protection that protects it from being
overloaded and helps to ensure long life. Under extreme stress the
battery electronics switch off the battery-lamp automatically. To
restart, switch the battery-lamp off and then on again. If the battery-
lamp does not start up again, the battery pack may have discharged
completely. In this case it must be recharged in the battery charger.
MAINTENANCE
The ventilation slots of the machine must be kept clear at all times.
Use only AEG accessories and AEG spare parts. Should
components need to be replaced which have not been described,
please contact one of our AEG service agents (see our list of
guarantee/service addresses).
If needed, an exploded view of the product can be ordered. Please
state the Article No. as well as the machine type printed on the label
and order the drawing at your local service agents or directly at:
Techtronic Industries (Australia) Pty. Ltd.
PO Box 1065
Mount Waverley VIC 3149
Tel. no. 1300 361 505
Australia
Techtronic Industries N.Z. Ltd.
PO Box 12-806
Penrose AUCKLAND 1642
Tel no. 0800 279 624
New Zealand
SYMBOLS
Safety alert
Regulatory Compliance Mark (RCM). Product
meets applicable regulatory requirements.

10
10
Please read the instructions carefully before
starting the machine.
Always wear goggles when using the machine
Keep hands away
Do not dispose of electric tools together with
household waste material. Electric tools and
electronic equipment that have reached the end of
their life must be collected separately and returned
to an environmentally compatible recycling facility.
TROUBLESHOOTING
PROBLEM POSSIBLE CAUSE SOLUTION
Work-contacting element does not depress
fully - tool does not operate.
Nails are low.
Work-contacting element is jammed.
Replenish the nails.
Remove the battery and clear the debris.
Tool operates properly, but fasteners are not
driven fully.
Air pressure is too low.
Depth of drive is not deep enough.
Nail is too long for wood hardness.
Increase the air pressure.
Adjust the depth of drive.
Use nails of the length that is appropriate for
the wood.
Tool operates properly, but fasteners are driven
too deep.
Air pressure is too high.
Depth of drive is too deep.
Decrease the air pressure.
Adjust the depth of drive.
Tool jams frequently. Nails are incorrect.
Nails are damaged.
Magazine is loose.
Magazine is dirty.
Verify that the size of nails is correct.
Replace the nails.
Tighten the screws.
Clean the magazine.
Tool stops and LED work lights flash rapidly. Battery is low or has no charge.
Tool is hot.
Recharge the battery.
Allow tool to cool.
Tool has charged battery and LED work lights
flash slowly.
Tool has malfunctioned. Take tool to the nearest authorised repair
centre.

11 11

Techtronic Industries GmbH
Max-Eyth-Straße 10
71364 Winnenden
Germany
Techtronic Industries (Australia) Pty. Ltd.
31 Gilby Road,
Mount Waverley VIC 3149,
Australia
Techtronic Industries N.Z. Limited
2 Landing Drive, Mangere,
Auckland, New Zealand 2022
961096260-01B
This manual suits for next models
2
Table of contents
Other AEG Nail Gun manuals