AEG BOB35002XV User manual

USER
MANUAL
EN User Manual
Oven
BOB35002XV

CONTENTS
1. SAFETY INFORMATION......................................................................................2
2. SAFETY INSTRUCTIONS.................................................................................... 4
3. INSTALLATION.....................................................................................................7
4. PRODUCT DESCRIPTION...................................................................................8
5. BEFORE FIRST USE............................................................................................8
6. DAILY USE........................................................................................................... 9
7. USING THE ACCESSORIES..............................................................................10
8. ADDITIONAL FUNCTIONS.................................................................................10
9. HINTS AND TIPS................................................................................................11
10. CARE AND CLEANING.................................................................................... 18
11. TROUBLESHOOTING......................................................................................20
12. ENERGY EFFICIENCY.....................................................................................21
13. ELECTROLUX / AEG MAJOR APPLIANCES - WARRANTY CONDITIONS... 21
14. ENVIRONMENTAL CONCERNS......................................................................23
FOR PERFECT RESULTS
Thank you for choosing this AEG product. We have created it to give you
impeccable performance for many years, with innovative technologies that help
make life simpler – features you might not find on ordinary appliances. Please
spend a few minutes reading to get the very best from it.
Visit our website to:
Get usage advice, brochures, trouble shooter, service and repair information:
www.aeg.com/support
Register your product for better service:
www.registeraeg.com
Buy Accessories, Consumables and Original spare parts for your appliance:
www.aeg.com/shop
CUSTOMER CARE AND SERVICE
Always use original spare parts.
When contacting our Authorised Service Centre, ensure that you have the
following data available: Model, PNC, Serial Number.
The information can be found on the rating plate.
Warning / Caution-Safety information
General information and tips
Environmental information
Subject to change without notice.
1. SAFETY INFORMATION
Before the installation and use of the appliance, carefully
read the supplied instructions. The manufacturer is not
www.aeg.com2

responsible for any injuries or damage that are the result
of incorrect installation or usage. Always keep the
instructions in a safe and accessible location for future
reference.
1.1 Children and vulnerable people safety
•This appliance can be used by children aged from 8
years and above and persons with reduced physical,
sensory or mental capabilities or lack of experience
and knowledge if they have been given supervision or
instruction concerning the use of the appliance in a
safe way and understand the hazards involved.
Children of less than 8 years of age and persons with
very extensive and complex disabilities shall be kept
away from the appliance unless continuously
supervised.
•Children should be supervised to ensure that they do
not play with the appliance.
•Keep all packaging away from children and dispose of
it appropriately.
•WARNING: Keep children and pets away from the
appliance when it operates or when it cools down.
Accessible parts become hot during use.
•If the appliance has a child safety device, it should be
activated.
•Children shall not carry out cleaning and user
maintenance of the appliance without supervision.
1.2 General Safety
•Only a qualified person must install this appliance and
replace the cable.
•Do not use the appliance before installing it in the
built-in structure.
•Disconnect the appliance from the power supply
before carrying out any maintenance.
•If the mains power supply cable is damaged, it must
be replaced by the manufacturer, its Authorised
ENGLISH 3

Service Centre or similarly qualified persons to avoid
an electrical hazard.
•WARNING: Ensure that the appliance is switched off
before replacing the lamp to avoid the possibility of
electric shock.
•WARNING: The appliance and its accessible parts
become hot during use. Care should be taken to avoid
touching heating elements.
•Always use oven gloves to remove or put in
accessories or ovenware.
•Do not use a steam cleaner to clean the appliance.
•Do not use harsh abrasive cleaners or sharp metal
scrapers to clean the glass door since they can
scratch the surface, which may result in shattering of
the glass.
2. SAFETY INSTRUCTIONS
2.1 Installation
WARNING!
Only a qualified person must
install this appliance.
• Remove all the packaging.
• Do not install or use a damaged
appliance.
• Follow the installation instructions
supplied with the appliance.
• Always take care when moving the
appliance as it is heavy. Always use
safety gloves and enclosed footwear.
• Do not pull the appliance by the
handle.
• Install the appliance in a safe and
suitable place that meets installation
requirements.
• Keep the minimum distance from
other appliances and units.
• Before mounting the appliance, check
if the oven door opens without
restraint.
• The appliance is equipped with an
electric cooling system. It must be
operated with the electric power
supply.
Cabinet minimum
height (Cabinet under
the worktop minimum
height)
590 (600) mm
Cabinet width 560 mm
Cabinet depth 550 (550) mm
Height of the front of
the appliance
598 mm
Height of the back of
the appliance
579 mm
Width of the front of
the appliance
594 mm
Width of the back of
the appliance
558 mm
Depth of the appli‐
ance
561 mm
Built in depth of the
appliance
540 mm
Depth with open door 1007 mm
www.aeg.com4

Ventilation opening
minimum size. Open‐
ing placed on the bot‐
tom rear side
560x20 mm
Mains supply cable
length. Cable is
placed in the right
corner of the back
side
1100 mm
Mounting screws 4x25 mm
2.2 Electrical connection
WARNING!
Risk of fire and electric
shock.
• All electrical connections should be
made by a qualified electrician.
• The appliance must be earthed.
• Make sure that the parameters on the
rating plate are compatible with the
electrical ratings of the mains power
supply.
• Always use a correctly installed
shockproof socket.
• Do not use multi-plug adapters and
extension cables.
• Make sure not to cause damage to
the mains plug and to the mains
cable. Should the mains cable need to
be replaced, this must be carried out
by our Authorised Service Centre.
• Do not let mains cables touch or
come near the appliance door or the
niche below the appliance, especially
when it operates or the door is hot.
• The shock protection of live and
insulated parts must be fastened in
such a way that it cannot be removed
without tools.
• Connect the mains plug to the mains
socket only at the end of the
installation. Make sure that there is
access to the mains plug after the
installation.
• If the mains socket is loose, do not
connect the mains plug.
• Do not pull the mains cable to
disconnect the appliance. Always pull
the mains plug.
• Use only correct isolation devices: line
protecting cut-outs, fuses (screw type
fuses removed from the holder), earth
leakage trips and contactors.
• The electrical installation must have
an isolation device which lets you
disconnect the appliance from the
mains at all poles. The isolation
device must have a contact opening
width of minimum 3 mm.
• This appliance is supplied only with a
main cable.
Cable types applicable for installation
or replacement for Europe:
H07 RN-F, H05 RN-F, H05 RRF, H05 VV-
F, H05 V2V2-F (T90), H05 BB-F
For the section of the cable refer to the
total power on the rating plate. You can
also refer to the table:
Total power (W) Section of the ca‐
ble (mm²)
maximum 1380 3 x 0.75
maximum 2300 3 x 1
maximum 3680 3 x 1.5
The earth cord (green / yellow cable)
must be 2 cm longer than phase and
neutral cables (blue and brown cables).
2.3 Use
WARNING!
Risk of injury, burns and
electric shock or explosion.
• This appliance is for household
(indoors) use only.
• Do not change the specification of this
appliance.
• Make sure that the ventilation
openings are not blocked.
• Do not let the appliance stay
unattended during operation.
• Deactivate the appliance after each
use.
• Be careful when you open the
appliance door while the appliance is
in operation. Hot air can release.
• Do not operate the appliance with wet
hands or when it has contact with
water.
ENGLISH 5

• Do not apply pressure on the open
door.
• Do not use the appliance as a work
surface or as a storage surface.
• Open the appliance door carefully.
The use of ingredients with alcohol
can cause a mixture of alcohol and
air.
• Do not let sparks or open flames to
come in contact with the appliance
when you open the door.
• Do not put flammable products or
items that are wet with flammable
products in, near or on the appliance.
WARNING!
Risk of damage to the
appliance.
• To prevent damage or discoloration to
the enamel:
– do not put ovenware or other
objects in the appliance directly
on the bottom.
– do not put aluminium foil directly
on the bottom of cavity of the
appliance.
– do not put water directly into the
hot appliance.
– do not keep moist dishes and
food in the appliance after you
finish the cooking.
– be careful when you remove or
install the accessories.
• Discoloration of the enamel or
stainless steel has no effect on the
performance of the appliance.
• This appliance is for cooking
purposes only. It must not be used for
other purposes, for example room
heating.
• Always cook with the oven door
closed.
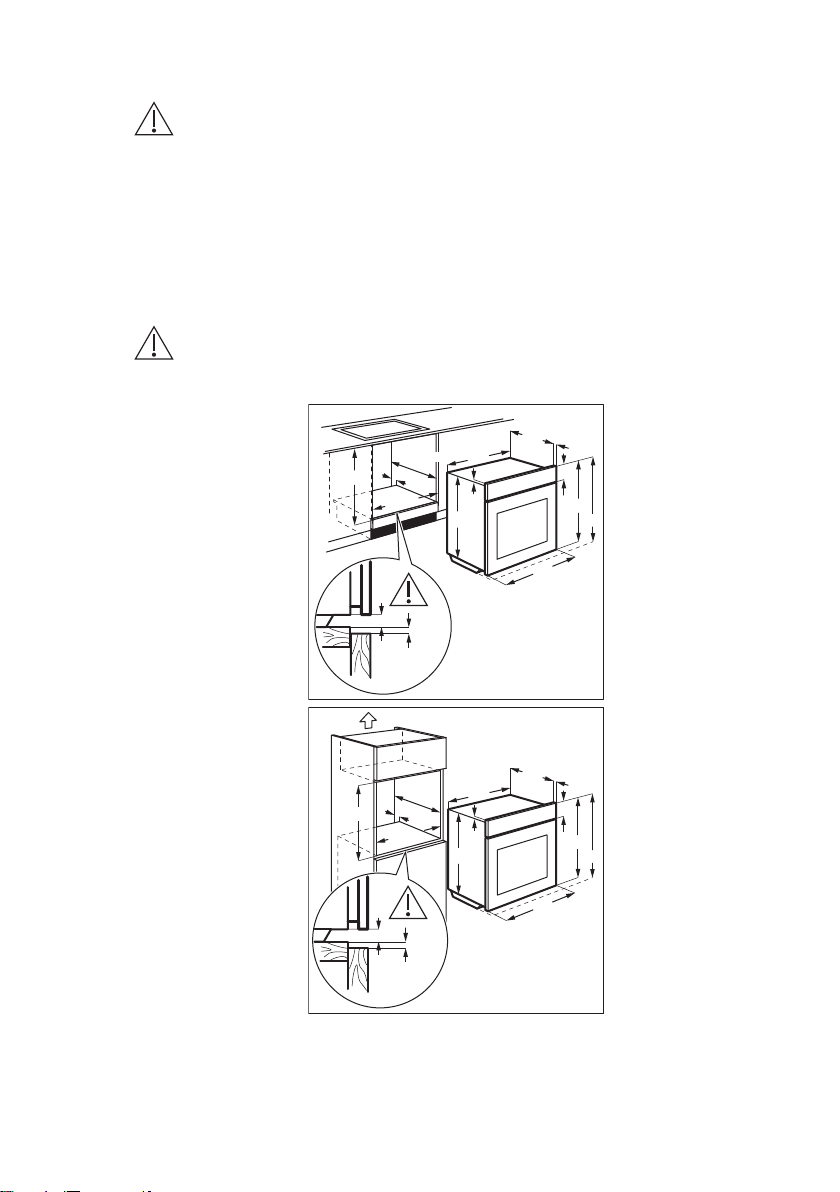
• If the appliance is installed behind a
furniture panel (e.g. a door) make
sure the door is never closed when
the appliance operates. Heat and
moisture can build up behind a closed
furniture panel and cause subsequent
damage to the appliance, the housing
unit or the floor. Do not close the
furniture panel until the appliance has
cooled down completely after use.
2.4 Care and cleaning
WARNING!
Risk of injury, fire, or
damage to the appliance.
• Before maintenance, deactivate the
appliance and disconnect the mains
plug from the mains socket.
• Make sure the appliance is cold.
There is the risk that the glass panels
can break.
• Replace immediately the door glass
panels when they are damaged.
Contact the Authorised Service
Centre.
• Be careful when you remove the door
from the appliance. The door is
heavy!
• Clean regularly the appliance to
prevent the deterioration of the
surface material.
• Clean the appliance with a moist soft
cloth. Use only neutral detergents. Do
not use abrasive products, abrasive
cleaning pads, solvents or metal
objects.
• If you use an oven spray, follow the
safety instructions on its packaging.
2.5 Internal lighting
WARNING!
Risk of electric shock.
• Concerning the lamp(s) inside this
product and spare part lamps sold
separately: These lamps are intended
to withstand extreme physical
conditions in household appliances,
such as temperature, vibration,
humidity, or are intended to signal
information about the operational
status of the appliance. They are not
intended to be used in other
applications and are not suitable for
household room illumination.
• Use only lamps with the same
specifications.
2.6 Service
• To repair the appliance contact the
Authorised Service Centre.
• Use original spare parts only.
www.aeg.com6

2.7 Disposal
WARNING!
Risk of injury or suffocation.
• Contact your municipal authority for
information on how to dispose of the
appliance.
• Disconnect the appliance from the
mains supply.
• Cut off the mains electrical cable
close to the appliance and dispose of
it.
• Remove the door catch to prevent
children or pets from becoming
trapped in the appliance.
3. INSTALLATION
WARNING!
Refer to Safety chapters.
3.1 Building in
589
598
594
114
19
21540
570
558
min. 550
20
600
min. 560
3
9
min. 550
20
590
min. 560 589
598
594
114
19
21540
570
558
3
9
ENGLISH 7

3.2 Securing the oven to the
cabinet
4. PRODUCT DESCRIPTION
4.1 General overview
6
7
8
9
10
4
3
2
1
11
21 3 4 5
1Control panel
2Power lamp / symbol
3Knob for the heating functions
4Control knob (for the temperature)
5Temperature indicator / symbol
6Air vents for the cooling fan
7Heating element
8Lamp
9Fan
10 Cavity embossment
11 Shelf positions
4.2 Accessories
•Wire shelf
For cookware, cake tins, roasts.
•Baking tray
For cakes and biscuits.
5. BEFORE FIRST USE
WARNING!
Refer to Safety chapters.
5.1 Before first use
The oven can emit an odour and smoke during preheating. Make sure that the room is
ventilated.
www.aeg.com8

Step 1 Step 2
Clean the oven Preheat the empty oven
1. Remove all accessories from the oven.
2. Clean the oven and the accessories
with a soft cloth, warm water and a mild
detergent.
1. Set the maximum temperature for the
function: .
Time: 1 h.
2. Set the maximum temperature for the
function: .
Time: 15 min.
Turn off the oven and wait until it is cold. Place the accessories in the oven.
6. DAILY USE
WARNING!
Refer to Safety chapters.
6.1 How to set: Heating
function
Step 1 Turn the knob for the heating
functions to select a heating
function.
Step 2 Turn the control knob to select
the temperature.
Step 3 When the cooking ends, turn
the knobs to the off position to
turn off the oven.
6.2 Heating functions
Heating
function
Application
Off position
The oven is off.
Light
To turn on the lamp.
Heating
function
Application
Fan Cook‐
ing
To roast or roast and bake
food with the same cooking
temperature on more than
one shelf position, without
flavour transference.
Conven‐
tional
Cooking
To bake and roast food on
one shelf position.
Grill
To grill thin pieces of food
and to toast bread.
Moist Fan
Baking
This function is designed to
save energy during cooking.
When you use this function,
the temperature in the cavity
may differ from the set tem‐
perature. The heating power
may be reduced. For more
information refer to "Daily
Use" chapter, Notes on:
Moist Fan Baking.
ENGLISH 9

6.3 Notes on: Moist Fan
Baking
This function was used to comply with
the energy efficiency class and
ecodesign requirements according to EU
65/2014 and EU 66/2014. Tests
according to EN 60350-1.
The oven door should be closed during
cooking so that the function is not
interrupted and the oven operates with
the highest energy efficiency possible.
For the cooking instructions refer to
"Hints and tips" chapter, Moist Fan
Baking. For general energy saving
recommendations refer to "Energy
Efficiency" chapter, Energy Saving.
7. USING THE ACCESSORIES
WARNING!
Refer to Safety chapters.
7.1 Inserting accessories
Wire shelf:
Push the shelf between the guide bars
of the shelf support and make sure that
the feet point down.
Baking tray:
Push the tray between the guide bars of
the shelf support.
8. ADDITIONAL FUNCTIONS
8.1 Cooling fan
When the oven operates, the cooling fan
turns on automatically to keep the
surfaces of the oven cool. If you turn off
the oven, the cooling fan stops.
8.2 Safety thermostat
Incorrect operation of the oven or
defective components can cause
dangerous overheating. To prevent this,
the oven has a safety thermostat which
interrupts the power supply. The oven
turns on again automatically when the
temperature drops.
www.aeg.com10

9. HINTS AND TIPS
Refer to Safety chapters.
9.1 Cooking
recommendations
The oven has four shelf positions.
Count the shelf positions from the bottom
of the oven floor.
Your oven may bake or roast differently
to the oven you had before. The below
tables provide you with the standard
settings for temperature, cooking time
and shelf position.
If you cannot find the settings for a
special recipe, look for the similar one.
The oven has a special system which
circulates the air and constantly recycles
the steam. With this system you can
cook in a steamy environment and keep
the food soft inside and crusty outside. It
decreases the cooking time and energy
consumption.
Baking cakes
Do not open the oven door before 3/4 of
the set cooking time is up.
If you use two baking trays at the same
time, keep one empty level between
them.
Cooking meat and fish
Leave the meat for approximately 15
minutes before carving so that the juice
does not seep out.
To prevent too much smoke in the oven
during roasting, add some water into the
deep pan. To prevent the smoke
condensation, add water each time after
it dries up.
Cooking times
Cooking times depend on the type of
food, its consistency, and volume.
Initially, monitor the performance when
you cook. Find the best settings (heat
setting, cooking time, etc.) for your
cookware, recipes and quantities when
you use this appliance.
9.2 Baking and roasting
CAKES
Conventional
Cooking
Fan Cooking
(min)
(°C) (°C)
Whisked recipes 170 2 165 2 (1 and
3)
45 - 60 Cake mould
Shortbread
dough
170 2 160 2 (1 and
3)
20 - 30 Cake mould
Buttermilk
cheesecake
170 1 165 2 70 - 80 Cake mould, Ø
26 cm
Strudel 175 2 150 2 60 - 80 Baking tray
Jam tart 170 2 160 2 (1 and
3)
30 - 40 Cake mould, Ø
26 cm
Fruit cake 170 2 155 2 50 - 60 Cake mould, Ø
26 cm
ENGLISH 11

CAKES
Conventional
Cooking
Fan Cooking
(min)
(°C) (°C)
Christmas cake 170 2 160 2 50 - 60 Cake mould, Ø
20 cm
Plum cake, pre‐
heat the empty
oven
170 2 165 2 20 - 30 Bread tin
Biscuits, pre‐
heat the empty
oven
150 3 140 3 (1 and
3)
30 - 35 Baking tray
Meringues 100 3 115 3 35 - 40 Baking tray
Buns, preheat
the empty oven
190 3 180 3 80 - 100 Baking tray
Choux pastry,
preheat the
empty oven
190 3 180 3 (1 and
3)
15 - 20 Baking tray
Plate tarts 180 3 170 2 25 - 35 Cake mould, Ø
20 cm
Rich fruit cake 160 1 150 2 110 - 120 Cake mould, Ø
24 cm
Victoria sand‐
wich
180 1 or 2 170 2 45 - 70 Cake mould, Ø
20 cm
Preheat the empty oven.
BREAD
AND PIZZA
Conventional
Cooking
Fan Cooking
(min)
(°C) (°C)
White bread, 1 -
2 pieces, 0.5 kg
each
190 1 195 1 60 - 70 -
Rye bread, pre‐
heating is not
needed
190 1 190 1 30 - 45 Bread tin
Bread rolls, 6 - 8
rolls
190 2 180 2 (1 and
3)
25 - 40 Baking tray
www.aeg.com12

BREAD
AND PIZZA
Conventional
Cooking
Fan Cooking
(min)
(°C) (°C)
Pizza 190 1 190 1 20 - 30 Deep pan
Scones 200 3 190 2 10 - 20 Baking tray
Use the cake mould.
FLANS
Conventional Cook‐
ing
Fan Cooking
(min)
(°C) (°C)
Pasta flan 180 2 180 2 40 - 50
Vegetable flan 200 2 200 2 45 - 60
Quiches 190 1 190 1 40 - 50
Lasagne 200 2 200 2 25 - 40
Cannelloni 200 2 200 2 25 - 40
Yorkshire pudding, 6
pudding moulds, preheat
the empty oven
220 2 210 2 20 - 30
Use the wire shelf.
MEAT
Conventional Cook‐
ing
Fan Cooking
(min)
(°C) (°C)
Beef 200 2 190 2 50 - 70
Pork 180 2 180 2 90 - 120
Veal 190 2 175 2 90 - 120
English roast beef,
rare
210 2 200 2 44 - 50
English roast beef,
medium
210 2 200 2 51 - 55
ENGLISH 13

MEAT
Conventional Cook‐
ing
Fan Cooking
(min)
(°C) (°C)
English roast beef,
well done
210 2 200 2 55 - 60
MEAT
Conventional Cook‐
ing
Fan Cooking
(min)
(°C) (°C)
Pork shoulder, with
rind
180 2 170 2 120 - 150
Pork shin, 2 pieces 180 2 160 2 100 - 120
Leg of lamb 190 2 190 2 110 - 130
Whole chicken 200 2 200 2 70 - 85
Whole turkey 180 1 160 1 210 - 240
Whole duck 175 2 160 2 120 - 150
Whole goose 175 1 160 1 150 - 200
Rabbit, cut in pieces 190 2 175 2 60 - 80
Hare, cut in pieces 190 2 175 2 150 - 200
Whole pheasant 190 2 175 2 90 - 120
FISH
Conventional Cook‐
ing
Fan Cooking
(min)
(°C) (°C)
Trout / Sea bream, 3 -
4 fish
190 2 175 2 (1 and 3) 40 - 55
Tuna / Salmon, 4 - 6
fillets
190 2 175 2 (1 and 3) 35 - 60
9.3 Grill
Preheat the empty oven.
Use the third shelf position.
www.aeg.com14

Set the temperature to 250 °C.
GRILL
(kg) (min)
1st side
(min)
2nd side
Fillet steaks, 4 pieces 0.8 12 - 15 12 - 14
Beef steak, 4 pieces 0.6 10 - 12 6 - 8
Sausages, 8 - 12 - 15 10 - 12
Pork chops, 4 pieces 0.6 12 - 16 12 - 14
Chicken, half, 2 1 30 - 35 25 - 30
Kebabs, 4 - 10 - 15 10 - 12
Chicken breast, 4 pieces 0.4 12 - 15 12 - 14
Burgers, 6 0.6 20 - 30 -
Fish fillet, 4 pieces 0.4 12 - 14 10 - 12
Toasted sandwiches, 4 - 6 - 5 - 7 -
Toast, 4 - 6 - 2 - 4 2 - 3
9.4 Moist Fan Baking - recommended accessories
Use the dark and non-reflective tins and containers. They have better heat absorption
than the light colour and reflective dishes.
Pizza pan Baking dish Ramekins Flan base tin
Dark, non-reflective
28 cm diameter
Dark, non-reflective
26 cm diameter
Ceramic
8 cm diameter,
5 cm height
Dark, non-reflective
28 cm diameter
9.5 Moist Fan Baking
For the best results follow suggestions
listed in the table below.
ENGLISH 15

(°C) (min)
Sweet rolls, 12
pieces
baking tray or dripping
pan
180 2 35 - 40
Rolls, 9 pieces baking tray or dripping
pan
180 2 35 - 40
Pizza, frozen,
0.35 kg
wire shelf 220 2 35 - 40
Swiss roll baking tray or dripping
pan
170 2 30 - 40
Brownie baking tray or dripping
pan
180 2 30 - 40
Soufflè, 6 pieces ceramic ramekins on
wire shelf
200 3 30 - 40
Sponge flan base flan base tin on wire
shelf
170 2 20 - 30
Victoria sandwich baking dish on wire
shelf
170 2 35 - 45
Poached fish, 0.3
kg
baking tray or dripping
pan
180 3 35 - 45
Whole fish, 0.2 kg baking tray or dripping
pan
180 3 35 - 45
Fish fillet, 0.3 kg pizza pan on wire shelf 180 3 35 - 45
Poached meat,
0.25 kg
baking tray or dripping
pan
200 3 40 - 50
Shashlik, 0.5 kg baking tray or dripping
pan
200 3 25 - 35
Cookies, 16
pieces
baking tray or dripping
pan
180 2 20 - 30
Macaroons, 20
pieces
baking tray or dripping
pan
180 2 40 - 45
Muffins, 12 pieces baking tray or dripping
pan
170 2 30 - 40
Savory pastry, 16
pieces
baking tray or dripping
pan
170 2 35 - 45
Short crust bis‐
cuits, 20 pieces
baking tray or dripping
pan
150 2 40 - 50
www.aeg.com16

(°C) (min)
Tartlets, 8 pieces baking tray or dripping
pan
170 2 20 - 30
Vegetables,
poached, 0.4 kg
baking tray or dripping
pan
180 3 35 - 40
Vegetarian ome‐
lette
pizza pan on wire shelf 200 3 30 - 45
Mediterranean
vegetables, 0.7 kg
baking tray or dripping
pan
180 4 35 - 40
9.6 Information for test
institutes
Tests according to IEC 60350-1.
(°C) (min)
Small
cakes, 20
per tray
Convention‐
al Cooking
Baking
tray
3 170 20 - 30 -
Apple pie,
2 tins Ø20
cm
Convention‐
al Cooking
Wire
shelf
1 170 80 - 120 -
Sponge
cake,
cake
mould
Ø26 cm
Convention‐
al Cooking
Wire
shelf
2 170 35 - 45 -
Short
bread
Convention‐
al Cooking
Baking
tray
3 150 20 - 35 Preheat the oven
for 10 minutes.
Toast, 4 -
6 pieces
Grill Wire
shelf
3 max. 2 - 4 minutes
first side; 2 - 3
minutes sec‐
ond side
Preheat the oven
for 3 minutes.
ENGLISH 17

(°C) (min)
Beef bur‐
ger, 6
pieces,
0.6 kg
Grill Wire
shelf and
dripping
pan
3 max. 20 - 30 Put the wire shelf
on the third level
and the dripping
pan on the sec‐
ond level of the
oven. Turn the
food halfway
through the cook‐
ing time.
Preheat the oven
for 3 minutes.
10. CARE AND CLEANING
WARNING!
Refer to Safety chapters.
10.1 Notes on cleaning
Cleaning
Agents
Clean the front of the oven with a soft cloth with warm water and a mild
detergent. Clean and check the door gasket around the frame of the cavi‐
ty.
Use a cleaning solution to clean metal surfaces.
Clean stains with a mild detergent.
Everyday Use
Clean the cavity after each use. Fat accumulation or other residue may
cause fire.
Moisture can condense in the oven or on the door glass panels. To de‐
crease the condensation, let the oven work for 10 minutes before cook‐
ing. Do not store the food in the oven for longer than 20 minutes. Dry the
cavity with a soft cloth after each use.
Accessories
Clean all accessories after each use and let them dry. Use a soft cloth
with warm water and a mild detergent. Do not clean the accessories in a
dishwasher.
Do not clean the non-stick accessories using abrasive cleaner or sharp-
edged objects.
www.aeg.com18

10.2 How to remove and install: Door
The oven door has two glass panels. You can remove the oven door and the internal
glass panel to clean it. Read the whole "Removing and installing door" instruction
before you remove the glass panels.
CAUTION!
Do not use the oven without the glass panels.
Step 1 Open the door fully and hold
both hinges.
Step 2 Lift and turn the levers fully
on both hinges.
Step 3 Close the oven door halfway
to the first opening position.
Then lift and pull forward and
remove the door from its
seat.
Step 4 Put the door on a soft cloth
on a stable surface and re‐
lease the locking system to
remove the internal glass
panel.
Step 5 Turn the fasteners by 90°
and remove them from their
seats.
Step 6 First lift carefully and then re‐
move the glass panel.
90°
12
Step 7 Clean the glass panels with water and soap. Dry the glass panels carefully.
Do not clean the glass panels in the dishwasher.
Step 8 After cleaning, install the glass panel and the oven door.
ENGLISH 19

When installed correctly the door trim
clicks.
Make sure that you install the internal
glass panel in the seats correctly.
A
10.3 How to replace: Lamp
WARNING!
Risk of electric shock.
The lamp can be hot.
Before you replace the lamp:
Step 1 Step 2 Step 3
Turn off the oven. Wait until
the oven is cold.
Disconnect the oven from
the mains.
Put a cloth on the bottom of
the cavity.
Back lamp
Step 1 Turn the glass cover to remove it.
Step 2 Clean the glass cover.
Step 3 Replace the lamp with a suitable 300 °C heat-resistant lamp.
Step 4 Install the glass cover.
11. TROUBLESHOOTING
WARNING!
Refer to Safety chapters.
11.1 What to do if...
In any cases not included in this table
please contact with an Authorised
Service Centre.
Problem Check if...
The oven does not
heat up.
The fuse is blown.
Problem Check if...
The door gasket is
damaged.
Do not use the
oven. Contact an
Authorised Service
Centre.
The lamp does not
work.
The lamp is burnt
out.
11.2 Service data
If you cannot find a solution to the problem yourself, contact your dealer or an
Authorised Service Centre.
www.aeg.com20
Table of contents
Other AEG Oven manuals

AEG
AEG BE4003001 User manual

AEG
AEG Competence 5212 BU User manual

AEG
AEG BE2003021 User manual

AEG
AEG BBP9000B User manual

AEG
AEG BE5003001M User manual

AEG
AEG COMPETENCE 5310 B User manual

AEG
AEG BE5304001 User manual

AEG
AEG BPE742720M User manual

AEG
AEG KMK721880M User manual

AEG
AEG BPE74222FB User manual
Popular Oven manuals by other brands

Angelo Po
Angelo Po 1S1FBEV manual

Petromax
Petromax ft18 user manual

Thermoline Scientific
Thermoline Scientific TD Series User manual & setup guide

Bosch
Bosch CMG633B 1B Series User manual and installation instructions

TurboChef
TurboChef NGC-1007 Service manual

Moffat
Moffat Turbochef C3 Specification sheet