AEG X89491BH1 User manual

X89491BH1 EN USER MANUAL 2
DE GEBRAUCHSANLEITUNG 8
FR MANUEL D’UTILISATION 14
NL GEBRUIKSAANWIJZING 20
ES MANUAL DE USO 27
PT LIVRO DE INSTRUÇÕES
PARA UTILIZAÇÃO. 34
IT LIBRETTO DI USO 41
SV ANVÄNDNINGSHANDBOK 47
NO BRUKSVEILEDNING 53
FI KÄYTTÖOHJEET 59
DA BRUGSVEJLEDNING 65
RU
РУКОВОДСТВО ПО
ЭКСПЛУАТАЦИИ 71
ET KASUTUSJUHEND 78
LV LIETOŠANAS PAMĀCĪBA 84
LT NAUDOTOJO VADOVAS 90
UK ІНСТРУКЦІЯ ЗЕКСПЛУАТАЦІЇ 96
HU HASZNÁLATI ÚTMUTATÓ 102
CS NÁVOD K POUŽITÍ 108
SK NÁVOD NA POUŽÍVANIE 114
RO MANUAL DE FOLOSIRE 120
PL INSTRUKCJA UŻYTKOWANIA 126
HR KNJIŽICA S UPUTAMA 132
SL NAVODILO ZA UPORABO 138
EL ΟΔΗΓΊΕΣ ΧΡΉΣΗΣ 144
TR KULLANIM KITAPÇIĞI 152
BG
РЪКОВОДСТВО НА
ПОТРЕБИТЕЛЯ 158
KK ПАЙДАЛАНУШЫ
НҰСҚАУЛЫҒЫ 165
MK УПАТСТВО ЗА КОРИСНИК 171
SQ UDHËZUES PËR
PËRDORIMIN 178
SR КОРИСНИЧКО УПУТСТВО 184
195 AR

www.aeg.com
2
FOR PERFECT RESULTS
Thank you for choosing this AEG product. We have created it to give you impeccable
performance for many years, with innovative technologies that help make life simpler
– features you might not find on ordinary appliances. Please spend a few minutes reading to
get the very best from it.
Visit our website to:
Get usage advice, brochures, trouble shooter, service information:
www.aeg.com
Register your product for better service:
www.aeg.com/productregistration
Buy Accessories, Consumables and Original spare parts for your appliance:
www.aeg.com/shop
ENVIRONMENT CONCERNS
Recycle the materials with the symbol . Put the packaging in applicable containers to
recycle it. Help protect the environment and human health and to recycle waste of electrical
and electronic appliances. Do not dispose appliances marked with the symbol with the
household waste. Return the product to your local recycling facility or contact your municipal
office department for household waste or the shop where you purchased this product.
CUSTOMER CARE AND SERVICE
We recommend the use of original spare parts.
When contacting Service, ensure that you have the following data available.
The information can be found on the rating plate. Model, PNC, Serial Number.
Warning / Caution-Safety information.
General information and tips
Environmental information.
Subject to change without notice.
EN USER MANUAL

3
ENGLISH
1. SAFETY INSTRUCTIONS
Caution!Closely follow the instructions
set out in this manual. All responsibility,
for any eventual inconveniences,
damages or fires caused by not
complying with the instructions in this
manual, is declined. The extractor hood
has been designed exclusively for
domestic use.
Caution!Do not connect the appliance
to the mains until the installation is
fully complete. Before any cleaning or
maintenance operation, disconnect
hood from the mains by removing
the plug or disconnecting the mains
electrical supply.
Always wear work gloves during the
maintenance, installation and lighting
operations. The appliance is not intended
for use by children or persons with impaired
physical, sensorial or mental faculties,
or if lacking in experience or knowledge,
unless they are under supervision or have
been trained in the use of the appliance
by a person responsible for their safety.
This appliance is designed to be operated
by adults, children should be monitored
to ensure that they do not play with the
appliance. This appliance is designed to
be operated by adults. Children should not
be allowed to tamper with the controls or
play with the appliance. Never use the hood
without effectively mounted grating! The
hood must NEVER be used as a support
surface unless specifically indicated. The
premises where the appliance is nstalled
must be sufficiently ventilated, when the
kitchen hood is used together with other
gas combustion devices or other fuels. The
ducting system for this appliance must not
be connected to any existing ventilation
system which is being used for any other
purpose such as discharging exhaust
fumes from appliances burning gas or other
fuels. The flaming of foods beneath the
hood itself is severely prohibited. The use
of exposed flames is detrimental to the
filters and may cause a fire risk, and must
therefore be avoided in all circumstances.
Any frying must be done with care in order
to make sure that the oil does not overheat
and ignite.
Caution!Accessible parts of the hood
may became hot when used with
cooking appliance.
With regards to the technical and safety
measures to be adopted for fume
discharging it is important to closely follow
the regulations provided by the local
authorities. The hood must be regularly
cleaned on both the inside and outside (AT
LEAST ONCE A MONTH).
This must be completed in accordance
with the maintenance instructions provided
in this manual). Failure to follow the
instructions provided in this user guide
regarding the cleaning of the hood and
filters will lead to the risk of fires. Do not
use or leave the hood without the lamp
correctly mounted due to the possible risk
of electric shocks. We will not accept any
responsibility for any faults, damage or fires
caused to the appliance as a result of the
non-observance of the instructions included
in this manual.
Warning!Failure to install the screws or
fixing device in accordance with these
instructions may result in electrical
hazards.
2.USE
The hood serves to aspirate the fumes and
vapors resulting from cooking.
The attached installation manual indicates
the version to be used depending on the
model you have, the suction version with
external evacuation or filtering with
internal recirculation .
3.INSTALLATION
The mains power supply must correspond
to the rating indicated on the plate situated
inside the hood. If provided with a plug
connect the hood to a socket in compliance
with current regulations and positioned in
an accessible area, after installation. If it not
fitted with a plug (direct mains connection)
or if the plug is not located in an accessible
area, after installation, apply a double
pole switch in accordance with standards
which assures the complete disconnection
of the mains under conditions relating to
over-current category III in accordance with
installation instructions.
Warning!Before re-connecting the hood
circuit to the mains supply and checking
the efficient function, always check that
the mains cable is correctly assembled.

www.aeg.com
4
Attention! Also make sure that the
reset key is pressed.
Warning! Specialised personnel must
carry out the installation.
The hood must be connected to the mains
supply by qualified and trained technicians.
When installing the product, it is
recommended to keep a minimum distance
of 400mm between the worktop and any
components laid on top of the hood.
This is to let the suction panel move
upwards (opening) and downwards
(closing) without any obstacles, and to
facilitate access to the hood controls on the
panel.
WARNING: Put the metal box contain-
ing the electronic components at a
distance not shorter than 65 cm from
the gas hob or 65 cm from the hood
suction point.
RECOMMENDATION: We recommend
you to install the metal box containing the
electronic components at a distance of at
least 10 cm from the ground and sufficiently
from all the sources of heat (e.g.: side of an
oven or hob).

5
ENGLISH
The down draft models are suitable to be used together with gas hobs in accordance with
the following details (See the drawing below for reference).
Details considered for the first type of gas
hob
- The total power of the gas hob must be
lower or equal to 11,3kW.
- The layout of the gas hob must
maintain a power not greater than
4750W for the front side burners.
- The max power allowed for a single hob
on the front side must not be higher
than 3000W.
- The minimum distance between the
border of the down draft and the border
of the gas hob must be 50mm.
- The minimum distance between the
border of gas hob and the nearest
burner must not be less than 65mm.
50
65
Details considered for the second type of
gas hob:
- The total power of the hob must be
lower or equal to 16,2kW of which 12,6
kW produced burning gas and 3,6 kW
from electric supply
- The layout of the gas hob must
maintain a power not greater than
12,6kW for the front side burners and
- The max power allowed for a single hob
on the front side must not be higher
than 4200W.
- The minimum distance between the
burners of gas hob not be less than
165mm - The minimum distance
between the border of the down draft
and the border of the gas hob must be
60mm.
- The minimum distance between the
border of gas hob and the nearest
burner must not be less than 95mm.
- It is important to fix the box containing
the electric devices in such a way
that a potential gas leakage does
not compromise the safety of the
appliance.
- When down draft is combined with gas
hob, it is recommended to install gas
hobs equipped with gas sensor.
6095
If the instructions for installation for the gas hob specify a greater distance, this must be
adhered to.
Max.
power
single
burner
1750W
Max. power front side burners
4750W
DOWNDRAFT
Max. 4200WMax. 4200W Max. 4200W
DOWNDRAFT
Max. 11,3 KW
Max. 16,2 KW
Max. 12,6 KW
Max. 3,6 KW
Max.
power
single
burner
1750W

www.aeg.com
6
4. MAINTENANCE
ATTENTION! Before performing any
maintenance operation, isolate the
hood from the electrical supply by
switching off at the connector and
removing the connector fuse.
Or if the appliance has been connected
through a plug and socket, then the plug
must be removed from the socket.
The cooker hood should be cleaned
regularly (at least with the same frequency
with which you carry out maintenance of the
fat filters) internally and externally. Clean
using the cloth dampened with neutral liquid
detergent. Do not use abrasive products.
DO NOT USE ALCOHOL!
Warning! Failure to carry out the basic
cleaning recommendations of the
cooker hood and replacement of the
filters may cause fire risks. Therefore,
we recommend observing these
instructions.
The manufacturer declines all responsibility
for any damage to the motor or any
fire damage linked to inappropriate
maintenance or failure to observe the above
safety recommendations.
4.1 Grease filter - The grease filter must
be cleaned once a month using non
aggressive detergents, either by hand or
in the dishwasher, which must be set to a
low temperature and a short cycle. When
washed in a dishwasher, the grease filter
may discolour slightly, but this does not
affect its filtering capacity.
4.2 Charcoal filter - The saturation of the
charcoal filter occurs after more or less
prolonged use, depending on the type of
cooking and the regularity of cleaning of the
grease filter.
In any case it is necessary to replace the
cartridge at least every four mounths.
The charcoal filter may NOT be washed or
regenerated.
5. CONTROLS
Warning!When using or handling the
hood, do not leave hands within the
range of action of the suction panel
(pull-out drawer).
1 2 3 4 5
1 - Delays hood switching off timing the
speed set for some minutes.
By such function, when the timing is
elapsed, the hood switches off.
The timing is divided as follows:
• suction speed (power) 1: 20 minutes
• suction speed (power) 2: 15 minutes
• suction speed (power) 3: 10 minutes
• suction speed (power) 4: 5 minutes
N.B.: when the Timer is activated at
suction speed 4 (power), the hood
could switch to speed 3 before going
off, since speed 4 already has a preset
timing when the speed is reduced.
When keys 2 and 3 are pressed, the
hood leaves the timed function and
the suction speed (power) increases
or decreases according to the key
pressed. During the timing phase the
LED related to the corresponding
speed flashes.

7
ENGLISH
2 - Decreases the active suction speed
(power) (4→3→2→1→OFF).
The speed is displayed through the
LED related to the corresponding
speed.
Key
2 has no effect on the opening/
closure of the suction panel.
3 - Increases the active suction speed
(power) (1→2→3→4).
The speed is displayed through the
LED related to the corresponding
speed.
Note: suction speed 4 (power) is timed
for 6 minutes, after which the hood will
automatically switch to suction speed 3
(power).
Note: If the panel is closed (hood is
off) key 3 activates the opening of the
suction panel first and then sets the
hood to the suction speed (power) 1.
4 - Switches on the light
Note: If the suction panel is closed
(hood is off) key 4 activates the
opening of the suction panel first and
then switches on the light.
5 - Opens (Lifts) and closes (lowers) the
suction panel.
With the hood switched off and the
panel closed, key 5 opens the suction
panel first and then sets the hood to the
suction speed (power) 1.
With the hood switched on (at any
speed) and the panel open, key 5
switches off the hood first (and, if they
are on, it switches off the lights as well)
and then closes the suction panel.
Additional operating information
During the removal of the front panel due
to cleaning and maintenance operations,
all the electronic functions of suction and
movement are locked.
Anti-pinch safety: if an obstacle obstructs
the closure of the Downdraft, the closure is
stopped and the trolley goes up.
Grease Filter saturation signal.
Every 40 hours of use the hood signals the
need for maintenance of the grease filter.
The signal is by making all the
suction speed LEDs (powers) flash
contemporaneously.
Reset of the grease filter signal
After carrying out the maintenance of the
grease filter, press key 1 for more than 3"
in order to reset the signal.
Note: The signal is not displayed with
hood switched off (OFF), regardless of the
position of the suction panel.
Use the high suction speed in cases
of concentrated kitchen vapours. It is
recommended that the cooker hood suction
is switched on for 5 minutes prior to cooking
and to leave in operation during cooking
and for another 15 minutes approximately
after terminating cooking.
6. LIGHTING
Warning! Prior to touching the light
bulbs ensure they are cooled down.
To replace the neon proceed as indicated
bellow:
1. Lift the panel (extractible drawer).
2. Disconnect the hood from the
electricity.
3. Remove the screws that secure the top
front and lift it up.
4. Remove the damaged neon and
replace it with one having identical
characteristics (Mod. T5 14W 860).

www.aeg.com
8
FÜR PERFEKTE ERGEBNISSE
Danke, dass Sie sich für dieses AEG Produkt entschieden haben. Wir haben es geschaffen,
damit Sie viele Jahre von seiner ausgezeichneten Leistung und den innovativen
Technologien, die Ihnen das Leben erleichtern, profitieren können. Es ist mit Funktionen
ausgestattet, die in gewöhnlichen Geräten nicht vorhanden sind. Nehmen Sie sich ein paar
Minuten Zeit zum Lesen, um seine Vorzüge kennen zu lernen.
Besuchen Sie uns auf unserer Website, um:
Anwendungshinweise, Prospekte, Fehlerbehebungs- und Service-Informationen zu
erhalten:
www.aeg.com
Ihr erworbenes Produkt zu registrieren, um den besten Service dafür zu
gewährleisten:
www.aeg.com/productregistration
Zubehör, Verbrauchsmaterial und Original-Ersatzteile für Ihr Gerät zu erwerben:
www.aeg.com/shop
UMWELTTIPPS
Recyclen Sie Materialien mit dem Symbol . Entsorgen Sie die Verpackung in den
entsprechenden Recyclingbehältern.
Recyclen Sie zum Umwelt- und Gesundheitsschutz elektrische und elektronische Geräte.
Entsorgen Sie Geräte mit diesem Symbol nicht mit dem Hausmüll. Bringen Sie das
Gerät zu Ihrer örtlichen Sammelstelle oder wenden Sie sich an Ihr Gemeindeamt.
REPARATUR- UND KUNDENDIENST
Bitte verwenden Sie ausschließlich Original-Ersatzteile für Ihre Produkte.
Halten Sie folgende Angaben bereit, wenn Sie sich an den Kundendienst wenden
(diese Informationen finden Sie auf dem Typenschild): Modell, Produktnummer (PNC),
Seriennummer.
Warnungs-/ Sicherheitshinweise.
Allgemeine Informationen und Empfehlungen.
Informationen zum Umweltschutz.
Änderungen vorbehalten.
DE GEBRAUCHSANLEITUNG

9
DEUTSCH
1. SICHERHEITSHINWEISE
Vorsicht!Die Instruktionen, die in
diesem Handbuch gegeben werden,
müssen strikt eingehalten werden. Es
wird keinerlei Haftung übernommen
für mögliche Mängel, Schäden oder
Brände der Dunstabzugshaube, die auf
die Nichtbeachtung der Vorschriften
in diesem Handbuch zurückzuführen
sind. Die Dunstabzugshaube ist
ausschliesslich zum Einsatz im privaten
Haushalt vorgesehen.
Achtung!Das Gerät nicht an das
Stromnetz anschließen, solange die
Installation noch nicht abgeschlossen
ist.
Vor Beginn sämtlicher Reinigungs-
oder Wartungsarbeiten muss das
Gerät durch Ziehen des Steckers oder
Betätigen des Hauptschalters der
Wohnung vom Stromnetz getrennt
werden.
Bei der Durchführung von Wartungs-,
Installations- und Beleuchtungstätigkeiten
müssen immer Arbeitshandschuhe
getragen warden.
Kinder nicht mit dem Gerät spielen lassen.
Erwachsene und Kinder dürfen nie
unbeaufsichtigt das Gerät betreiben,
– wenn sie körperlich oder geistig dazu
nicht in der Lage sind,
– oder wenn ihnen Wissen und Erfahrung
fehlen, das Gerät richtig und sicher zu
bedienen. Die Dunstabzugshaube niemals
ohne korrekt montiertes Gitter in Betrieb
setzen! Die Dunstabzugshaube darf
NIEMALS als Abstellfläche verwendet
werden, sofern dies nicht ausdrücklich
angegeben wird. Der Raum muss über
eine hinreichende Belüftung verfügen,
wenn die Dunstabzugshaube mit
anderen gas- oder brennstoffbetriebenen
Geräten gleichzeitig verwendet
wird. Bei gleichzeitigem Betrieb der
Dunstabzugshaube im Abluftbetrieb und
Feuerstätten darf im Aufstellraum der
Feuerstätte der Unterdruck nicht größer als
4 Pa (4 x 10⁻⁵ bar) sein. Die angesaugte
Luft darf nicht in Rohre geleitet werden, die
für die Ableitung der Abgase von gas- oder
brennstoffbetriebenen Geräten genutzt
werden. Es ist strengstens verboten, unter
der Haube mit offener Flamme zu kochen.
Eine offene Flamme beschädigt die Filter
und kann Brände verursachen, daher ist
dies in jedem Fall zu vermeiden. Das
Frittieren muss unter Aufsicht erfolgen, um
zu vermeiden, dass das überhitzte Öl Feuer
fängt.
Vorsicht!Zugängliche Teile können
beim Gebrauch mit Kochgeräten heiss
werden.
In Bezug auf technische und
Sicherheitsmaßnahmen für die Ableitung
der Abluft sind die Vorschriften der
zuständigen örtlichen Behörden
strengstens einzuhalten. Die Haube muss
regelmäßig innen und außen gereinigt
werden (MINDESTENS EINMAL IM
MONAT, diesbezüglich sind in jedem
Fall die ausdrücklichen Angaben in der
Wartungsanleitung dieses Handbuchs
zu beachten). Eine Nichtbeachtung der
Vorschriften zur Reinigung der Haube
sowie zur Auswechselung und Reinigung
der Filter führt zu Brandgefahr. Um
das Risiko eines Stromschlages zu
vermeiden, darf die Dunstabzugshaube
ohne richtig eingesetzte Lampen nicht
betrieben werden. Es wird keinerlei
Haftung übernommen für Fehler, Schäden
oder Brände des Gerätes, die durch
Nichteinhaltung der in diesem Handbuch
aufgeführten Anweisungen verschuldet
wurden.
Warnung!Erfolgt die Installation der
Schrauben oder Befestigungsvorr
ichtungen nicht entsprechend den
vorliegenden Anweisungen, führt dies
zu Gefahr durch Stromschlag.
2.BEDIENUNG
Der Dunstabzug dient zum Absaugen der
beim Kochen entstehenden Dämpfe.
In dem mitgelieferten Montagehandbuch ist
angegeben, ob Sie Ihre Haube als Abluft-
oder Umluftversion betreiben.
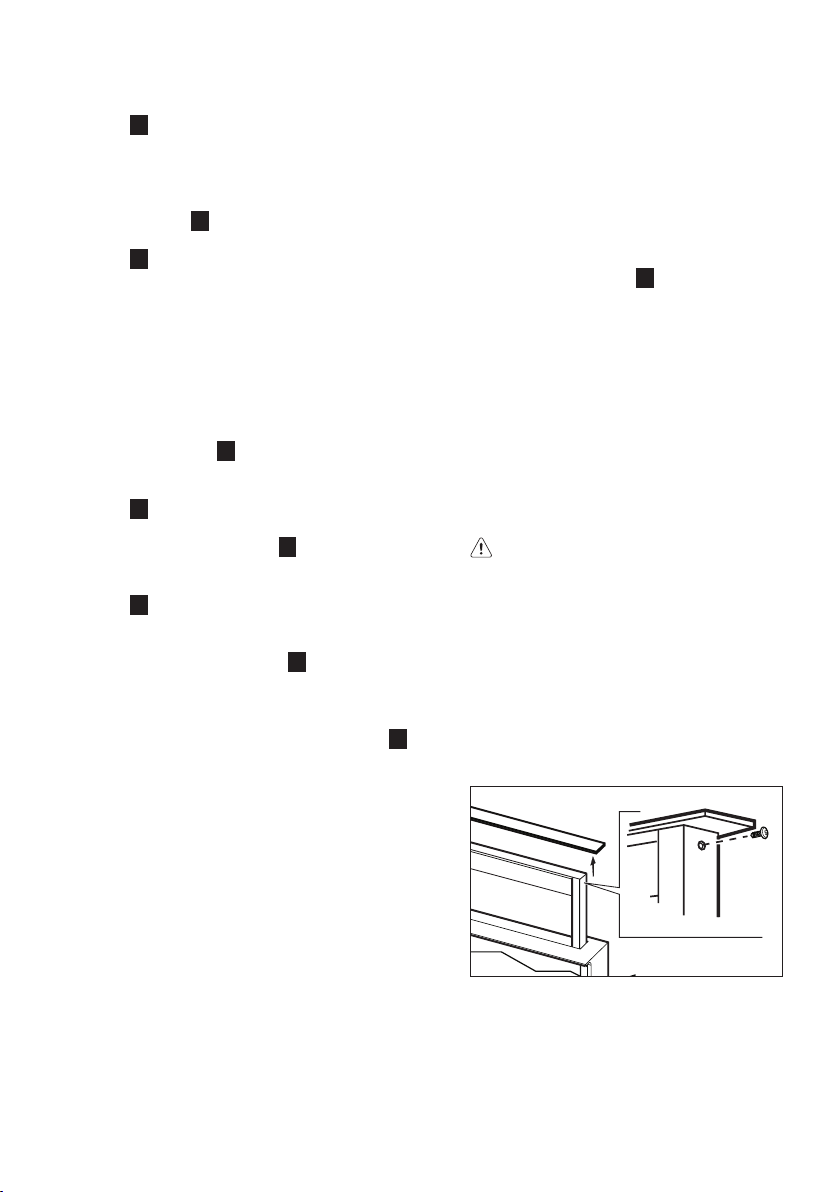
3.BEFESTIGUNG
Die Netzspannung muss der
Spannung entsprechen, die auf dem
Betriebsdatenschild im Innern der Haube
angegeben ist. Sofern die Haube einen
Netzstecker hat, ist dieser an zugänglicher
Stelle an eine den geltenden Vorschriften
entsprechende Steckdose auch nach der
Montage anzuschließen. Bei einer Haube
ohne Stecker (direkter Netzanschluss) oder
falls der Stecker nicht zugänglich ist, ist ein
normgerechter zweipoliger Schalter auch
nach der Montage anzubringen, der unter
Umständen der Überspannung Kategorie
III entsprechend den Installationsregeln ein
vollständiges Trennen vom Netz garantiert.
Hinweis!Vor der Inbetriebnahme
muss sichergestellt sein, dass
die Netzversorgung (Steckdose)
ordnungsgemäß montiert wurde.

www.aeg.com
10
Achtung! Außerdem kontrollieren, ob
die Reset-Taste gedrückt ist.
Achtung! Die Installierung darf nur von
Fachpersonal ausgeführt werden.
Der Anschluss der Abzugshaube an
das Stromnetz muss vom Fachpersonal
durchgeführt werden.
Bei der Befestigung der Abzugshaube
sollte der Abstand zwischen der Kochfläche
und den Elementen, die sich oben an der
Dunstabzugshaube befinden könnten, 400
mm nicht unterschreiten, um den Hub nach
oben (Öffnen) und nach unten (Schliessen)
des Abzugspaneels nicht zu hemmen und
den Zugang zu den Bedienelementen an
dem Bedienfeld zu vereinfachen.
HINWEIS: das Metallgehäuse mit
den elektronischen Bauteilen muss
mindestens 65 cm von dem Gasherd
oder von der Saugöffnung der Haube
installiert werden.
VORSICHT: das Metallgehäuse mit den
elektronischen Bauteilen muss mindestens
10cmüberdemBodenundinausreichendem
Abstand von allen Hitzequellen (z.B.:
Seitenwand des Backofens, Herdplatte)
installiert werden.

11
DEUTSCH
Im Fall der Verwendung mit einem Gasherd, müssen die folgende Anforderungen nach den
folgenden zwei Konfigurationen (siehe Grafiken unten) respektiert werden:
Konfiguration 1
- Die Gesamtleistung der Kochplatte
muss weniger als oder gleich 11,3 kW
betragen.
- Die Anordnung der Gasbrenner sollte
so sein, dass die Gesamtleistung
desselben in der Nähe des
Fallstroms nicht größer als 4750W
beträgt.
- Die maximale Leistung des vorderen
Gasbrenners vom Fallstrom darf nicht
mehr als 3000W betragen.
- Der Mindestabstand zwischen dem
Rand des Fallstrom und dem Rand der
Gasbrenner muss 50 mm betragen.
- Der Mindestabstand zwischen dem
Rand des Gasbrenners und dem Rand
des nächstgelegenen
Gasbrenners darf nicht weniger als 65
mm betragen.
50
65
Konfiguration 2
- Die Gesamtleistung der Kochplatte
muss weniger als oder gleich 16,2 kW
betragen, und davon
12,6kW vom Gasbrennern und 3,6
kW durch elektrisches Feuer erzeugt
werden.
- Die Anordnung der Gasbrenner sollte
so sein, dass die Gesamtleistung
desselben in der Nähe des
Fallstroms nicht größer als 12,6 kW ist.
- Die maximale Leistung des einzelnen
Gasbrenners vom Fallstrom darf nicht
mehr als 4200W betragen.
- Der Mindestabstand zwischen den
Gasbrennern muss mind. 165mm
betragen.
- Der Mindestabstand zwischen dem
Rand des Abwinds und dem Rand der
Gasbrenner muss 60 mm betragen.
Der Mindestabstand zwischen dem
Rand des einen Gasbrenner und dem
anderen Gasbrenner muss 95 mm
betragen.
- Es ist wichtig, den Kasten der
elektrischen Geräte in eine Position
zu stellen, in der kein Gas-Leck die
Sicherheit des Gerätes gefährden
kann.
- Bei der Verwendung von Abwind für die
Gas-Kochfelder, ist es empfehlenswert,
den Kocher mit einem Gassensor zu
installieren.
6095
Wenn die Installationsanweisungen des Gaskochgeräts einen größeren Abstand vorgeben,
ist dieser zu berücksichtigen.
Max.
Leistung
der
Einzelfeuer
1750W
Max.
Leistung
der
Einzelfeuer
1750W
Max. Leistungskraft des Feuers
nahe dem Fallstrom 4750W
DOWNDRAFT
Max. 4200WMax. 4200W Max. 4200W
DOWNDRAFT
Max. 11,3 KW
Max. 16,2 KW
Max. 12,6 KW
Max. 3,6 KW

www.aeg.com
12
4. WARTUNG
Hinweis! Vor jeder Reinigung und
Pflege ist die Dunstabzugshaube
durch Ziehen des Netzsteckers oder
Ausschalten der Sicherung stromlos zu
machen.
Die Dunstabzugshaube muss sowohl innen
als auch außen häufig gereinigt werden (etwa
in denselben Intervallen, wie die Wartung der
Fettfilter). Zur Reinigung ein mit flüssigem
Neutralreiniger getränktes Tuch verwenden.
Keine Produkte verwenden, die Scheuermittel
enthalten. KEINEN ALKOHOL VERWENDEN!
Hinweis! Nichtbeachtung dieser
Anweisungen zur Reinigung des
Gerätes und zum Wechsel bzw. zur
Reinigung der Filter kann zum Brand
führen. Diese Anweisungen sind
unbedingt zu beachten!
Der Hersteller übernimmt keine Haftung
für irgendwelche Schäden am Motor oder
Brandschäden, die auf eine unsachgemäße
Wartung oder Nichteinhaltung der oben
angeführten Sicherheitsvorschriften
zurückzuführen sind.
4.1 Fettfilter
Der Metallfettfilter muss einmal monatlich
gewaschen werden. Das kann mit
einem milden Waschmittel von Hand,
oder in der Spülmaschine bei niedriger
Temperatur und Kurzspülgang erfolgen.
Der Metallfettfilter kann bei der Reinigung
in der Spülmaschine abfärben, was seine
Filtermerkmale jedoch in keiner Weise
beeinträchtigt.
4.2 Aktivkohlefilter - Je nach der Benet-
zungsdauer des Herdes und der Häufigkeit
der Reinigung des Fettfilters tritt nach einer
mehr oder weniger langen Benutzungs-
dauer die Sättigung des Aktivkohlefilters
auf. Auf jeden Fall muß der Filtereinsatz
mindestens alle 4 Monate ausgewechselt
werden. Er kann NICHT gereinigt oder
erneut aktiviert werden.
5. BEDIENELEMENTE
Achtung! Wenn die Haube benutzt
oder transportiert wird, die Hände nicht
innerhalb des Arbeitsbereiches des
Absaugspaneels (herausnehmbaren
Faches) halten.
1 2 3 4 5
1 - Aktiviert eine Schaltuhr, so dass die
Haube sich nach einer eingestellten
Zeit abschaltet.
Nachdem die eingestellte Zeit
vergangen ist, schaltet sich die
Dunstabzugshaube aus.
Die Schaltuhr ist so geteilt:
• Geschwindigkeit 1: 20 Minuten
• Geschwindigkeit 2: 15 Minuten
• Geschwindigkeit 3: 10 Minuten
• Geschwindigkeit 4: 5 Minuten
NB: Wenn der Timer mit der
Sauggeschwindigkeit (Leistung) 4
aktiviert wird, könnte die Haube vor
dem Ausschalten in Geschwindigkeit 3
übergehen, da die 4. Geschwindigkeit
für die Drosselung der Geschwindigkeit
bereits eine Zeitsteuerung vorsieht.
Wenn man die Tasten 2 und
3 drückt, wird die Funktion der

13
DEUTSCH
Uhreinstellung beendet und die
Geschwindigkeit wird erhöht bzw.
verringert.
Bei aktiver Schaltuhr fängt die Led der
Geschwindigkeit an zu blinken.
2 - Verringert die aktive
Geschwindigkeit (4→3→2→1→OFF).
Die entsprechende Led fängt an zu
blinken.
Die Taste 2 wirkt nicht auf das Öffnen/
Schliessen des Absaugpaneels.
3 - erhöht die aktive Geschwindigkeit
(1→2→3→4).
Die entsprechende Led fängt an zu
blinken.
Hinweis: die Sauggeschwindigkeit
(Leistung) 4 wird für 6 Minuten
zeitgesteuert, wonach die
Haube automatisch auf die
Sauggeschwindigkeit (Leistung) 3
wechselt.
Hinweis: Wenn das Absaugpaneel
geschlossen ist (ausgeschaltete
Haube) und die Taste 3 gedrückt
wird, wird das Absaugpaneel zuerst
geöffnet und dann die Haube auf
Geschwindigkeit 1 eingestellt..
4 - schaltet das Licht ein
Hinweis: Wenn das Absaugpaneel
geschlossen ist (ausgeschaltete
Haube) und die Taste 4 gedrückt wird,
wird das Absaugpaneel zuerst geöffnet
und dann das Licht eingeschaltet.
5 - öffnet (hebt) und schliesst (senkt)
das Absaugpaneel.
Bei ausgeschalteter Haube und
geschlossenem Absaugpaneel wird
das Absaugpaneel durch Drücken der
Taste 5 geöffnet und die Haube in die
Geschwindigkeit 1 eingestellt.
Bei eingeschalteter Haube (in jeder
Geschwindigkeit) und geöffnetem
Absaugpaneel wird die Haube durch
Drücken der Taste 5 ausgeschaltet
(sowie die Beleuchtung) und das
Absaugpaneel geschlossen.
Weitere Funktionen
Beim Entfernen des vorderen Paneels
zwecks Reinigung und Wartung sind
alle elektronischen Ansaug- und
Antriebsfunktionen gesperrt.
Antiklemmvorrichtung: Wenn die Downdraft
nicht geschlossen werden kann, wird der
Schliessvorgang unterbrochen und der
Abzug läuft wieder nach oben.
Fettfiltersättigungsanzeige.
Nach 40 Betriebsstunden der Haube
wird am Bedienfeld die Sättigung des
Fettfilters durch Blinken aller Leds der
Geschwindigkeit angezeigt.
Rücksetzen der Fettfiltersättigungsanz
eige
Nach erfolgter Wartung des Fettfilters
die Taste 1 länger als 3” gedrückt
halten, um die Fettfiltersättigungsanzeige
rückzusetzen.
Hinweis: die Meldung wird bei
ausgeschalteter Haube (OFF) nicht
angezeigt unabhängig von der Stellung des
Absaugpaneels.
Bei starker Dampfentwicklung die höchste
Betriebsstufe einschalten. Es wird empfohlen,
die Dunstabzugshaube schon fünf Minuten
vor Beginn des Kochvorganges einzuschalten
und sie nach dessen Beendigung noch
ungefähr 15 Minuten weiterlaufen zu lassen.
6. BELEUCHTUNG
Hinweis! Vor berühren der lampen sich
vergewissern, dass sie abgekühlt sind.
Um die Neonlampen zu wechseln, gehen
Sie wie folgt vor:
1. den Wrasenschirm ausziehen.
2. Das gerät vom stromnetz nehmen.
3. die Schrauben entfernen, welche die
Frontleiste am Wrasenschirm befesti-
gen und diese heben.
4. die beschädigte Neonlampe entfernen
und durch eine Neue mit gleichen
Eigenschaften (Mod. T5 14W 860)
ersetzen.

www.aeg.com
14
POUR DES RÉSULTATS PARFAITS
Merci d’avoir choisi ce produit AEG. Nous l’avons conçu pour qu’il vous offre des
performances irréprochables pour longtemps, en intégrant des technologies innovantes qui
vous simplifient la vie grâce à des caractéristiques que vous ne trouverez pas forcément
sur des appareils ordinaires. Veuillez prendre quelques instants pour lire cette notice afin
d’utiliser au mieux votre appareil.
Visitez notre site Internet pour :
Obtenir des conseils d’utilisation, des brochures, de l’aide, des informations :
www.aeg.com
Enregistrer votre produit pour obtenir un meilleur service :
www.aeg.com/productregistration
Acheter des accessoires, consommables et pièces de rechange d’origine pour
votre appareil :
www.aeg.com/shop
EN MATIÈRE DE PROTECTION DE L’ENVIRONNEMENT
Recyclez les matériaux portant le symbole . Déposez les emballages dans les
conteneurs prévus à cet effet. Contribuez à la protection de l’environnement et à votre
sécurité, recyclez vos produits électriques et électroniques. Ne jetez pas les appareils
portant le symbole avec les ordures ménagères. Emmenez un tel produit dans votre
centre local de recyclage ou contactez vos services municipaux.
SERVICE APRÈS-VENTE
N’utilisez que des pièces de rechange d’origine.
Avant de contacter le service, assurez-vous de disposer des informations suivantes :
Vous trouverez ces informations sur la plaque signalétique. Modèle, PNC, numéro de série.
Avertissement/Attention : consignes de sécurité.
Informations générales et conseils.
Informations en matière de protection de l’environnement.
Sous réserve de modifications.
FR MANUEL D’UTILISATION

15
FRANÇAIS
1. CONSIGNES DE SÉCURITÉ
Attention! Suivre impérativement
les instructions de cette notice.
Le constructeur décline toute
responsabilité pour tous les
inconvénients, dommages ou incendies
provoqués à l’appareil et dûs à la
non observation des instructions de
la présente notice. La hotte a été
conçue exclusivement pour l’usage
domestique.
Avertissement! Ne pas raccorder
l’appareil au circuit électrique avant
que le montage ne soit complètement
terminé. Avant toute opération de
nettoyage ou d’entretien, débrancher
la hotte du circuit électrique en retirant
la prise ou en coupant l’interrupteur
général de l’habitation.
Toujours porter des gants lors des
opérations de maintenance, d’installation et
d’intervention sur le dispositif d’éclairage.
L’appareil n’est pas destiné à une utilisation
par des enfants ou des personnes à
capacités physiques, sensorielles ou
mentales réduites et sans expérience et
connaissance à moins qu’ils ne soient sous
la supervision ou formés sur l’utilisation de
l’appareil par une personne responsable de
leur sécurité.
Les enfants doivent être surveillés afin
qu’ils ne jouent pas avec l’appareil. Ne
jamais utiliser la hotte sans que la grille ne
soit montée correctement!
La hotte ne doit JAMAIS être utilisée
comme plan pour déposer quelque chose
sauf si cela est expressément indiqué.
Quand la hotte est utilisée en même temps
que d’autres appareils à combustion de
gaz ou d’autres combustibles, le local doit
disposer d’une ventilation suffisante.
L’air aspiré ne doit jamais être envoyé
dans un conduit utilisé pour l’évacuation
des fumées produites par des appareils
à combustion de gaz ou d’autres
combustibles. Il est formellement interdit
de faire flamber les aliments sous la
hotte. L’utilisation de flammes libres peut
entraîner des dégâts aux filtres et peut
donner lieu à des incendies, il faut donc les
éviter à tout prix. La friture d’aliments doit
être réalisée sous contrôle pour éviter que
l’huile surchauffée ne prenne feu.
Attention! Les pièces accessibles
peuvent se réchauffer de façon
importante quand elles sont utilisées
avec des appareils pour la cuisson.
En ce qui concerne les mesures techniques
et de sécurité à adopter pour l’évacuation
des fumées, s’en tenir strictement à ce qui
est prévu dans les règlements des autorités
locales compétentes. La hotte doit être
régulièrement nettoyée, aussi bien à
l’intérieur qu’à l’extérieur (AU MOINS UNE
FOIS PAR MOIS, respecter néanmoins les
instructions relatives à l’entretien fournies
dans ce manuel). La non observation de
ces normes de nettoyage de la hotte et
du changement et nettoyage des filtres
comporte des risques d’incendie. Ne pas
utiliser ou laisser la hotte sans que les
ampoules soient correctement placées
pour éviter tout risque de choc électrique.
La société décline toute responsabilité
pour d’éventuels inconvénients, dégâts
ou incendies provoqués par l’appareil
et dérivés de la non observation des
instructions reprises dans ce manuel.
Attention! Ne pas installer les vis et
les éléments de fixation conformément
à ces instructions peut entraîner des
risques électriques.
2.UTILISATION
La hotte est utilisée pour aspirer les fumées
et les vapeurs causés par la cuisine.
Le manuel d’installation attaché indique la
version d’utiliser pour votre modèle, soit
la version avec aspiration et évacuation
externe ou la version avec filtration et
recirculation interne .
3.INSTALLATION
La tension électrique doit correspondre à la
tension reportée sur la plaque signalétique
située à l’intérieur de la hotte. Si une prise
est présente, branchez la hotte dans une
prise murale conforme aux normes en
vigueur et placée dans une zone accessible
également après l’installation. Si aucune
prise n’est présente (raccordement direct
au circuit électrique), ou si la prise ne
se trouve pas dans une zone accessible
également après l’installation, appliquez
un disjoncteur normalisé pour assurer
de débrancher complètement la hotte
du circuit électrique en conditions de
catégorie surtension III, conformément aux
règlementations de montage.
Attention! Avant de rebrancher le circuit
de la hotte à l’alimentation électrique
et d’en vérifier le fonctionnement
correct, contrôlez toujours que le câble
d’alimentation soit monté correctement.

www.aeg.com16
Attention ! Contrôler en outre que la
touche reset soit pressée.
Attention! L’installation doit être ef-
fectuée par du personnel qualifié.
Le raccordement électrique de la hotte au
circuit électrique doit être effectué par du
personnel technique qualifié et spécialisé.
Lors de l’installation du produit, il est con-
seillé de maintenir une distance minimale
de 400mm entre le plan de cuisson et
d’éventuels composant placés au-dessus
de la hotte.
Ceci pour enlever les obstacles de la
course vers le haut (ouverture) et vers le
bas (fermeture) du panneau d’aspiration, et
pour faciliter l’accès aux commandes de la
hotte placées sur le panneau.
AVERTISSEMENT: Placer la boîte
métallique contenant les composants
électroniques à une distance non
inférieure à 65 cm du plan de cuisson
à gaz ou cependant à 65 cm du point
d’aspiration de la hotte.
RECOMMANDATION: Nous vous recom-
mandons d’installer la boîte métallique
contenant les composants électronique à
au moins 10 cm du sol et à une distance
suffisante de toutes les sources de chaleur
(ex : à côté d’un four ou d’un plan de cuis-
son).

17
FRANÇAIS
En cas d’utilisation avec des plaques de cuisson à gaz il faut répondre aux exigences
suivantes selon les deux configurations suivantes (voir dessins ci-dessous):
Configuration 1
- La puissance totale de la plaque de
cuisson doit être inférieure ou égale à
11,3 kW.
- La disposition des brûleurs à gaz doit
être telle que leur puissance totale
à proximité de la hotte à courant
descendant ne doit pas être supérieure
à 4750W.
- La puissance maximale du brûleur
individuel devant la hotte à courant
descendant ne doit pas être supérieure
à 3000W.
- La distance minimale entre le bord de
la hotte à courant descendant et le
brûleur à gaz doit être de 50 mm.
- La distance minimale entre le bord
d’un brûleur à gaz et le bord du brûleur
à gaz le plus proche ne doit pas être
inférieure à 65mm.
50
65
Configuration 2
- La puissance totale de la plaque de
cuisson doit être inférieure ou égale à
16,2 kW, dont 12,6 kW produit par des
brûleurs à gaz et 3,6 kW produits par
les brûleurs électriques.
- La disposition des brûleurs à gaz doit
être telle que leur puissance totale
à proximité de la hotte à courant
descendant ne doit pas être supérieure
à 4200W.
- La distance minimale entre les brûleurs
à gaz doit être de 165mm.
- La distance minimale entre le bord de
la hotte à courant descendant et le bord
du brûleur à gaz doit être de 60mm.
- La distance minimale entre le bord d’un
brûleur à gaz et le bord du brûleur à
gaz le plus proche doit être de 95mm.
- Il est important de fixer la boîte
contenant les dispositifs électriques
dans une position telle que les fuites de
gaz ne compromettent pas la sécurité
de l’appareil.
- Quand la hotte à courant descendant
est utilisée avec les tables de cuisson
à gaz, il est recommandé d’installer les
tables de cuisson avec capteur de gaz.
6095
Si les instructions d’installation du dispositif de cuisson au gaz spécifient une plus grande
distance, il faut en tenir compte.
puissance
max. du
brûleur
1750W
Puissance totale à proximité
de la hotte 4750 W
DOWNDRAFT
Max. 4200WMax. 4200W Max. 4200W
DOWNDRAFT
Max. 11,3 KW
Max. 16,2 KW
Max. 12,6 KW
Max. 3,6 KW
puissance
max. du
brûleur
1750W

www.aeg.com18
4. ENTRETIEN
Attention! Avant toute opération de
nettoyage ou d’entretien, débrancher la
hotte du circuit électrique en enlevant
la prise ou en coupant l’interrupteur
général de l’habitation.
La hotte doit être régulièrement nettoyée
à l’intérieur et à l’extérieur (au moins à la
même fréquence que pour l’entretien des
filtres à graisse). Pour le nettoyage, utiliser
un chiffon humidifié avec un détergent
liquide neutre. Ne pas utiliser de produit
contenant des abrasifs. NE PAS UTILISER
D’ALCOOL!
Attention! Il y a risque d’incendie si
vous ne respectez pas les instructions
concernant le nettoyage de l’appareil
et le remplacement ou le nettoyage du
filtre.
La responsabilité du constructeur ne
peut en aucun cas être engagée dans le
cas d’un endommagement du moteur ou
d’incendie liés à un entretien négligé ou
au non respect des consignes de sécurité
précédemment mentionnées.
4.1 Filtre anti-graisse - Le filtre anti-
graisse doit être nettoyé une fois par mois
avec des détergents non agressifs, à la
main ou dans le lave-vaisselle à faibles
températures et cycle rapide. Le lavage
du filtre anti-graisse au lave-vaisselle peut
en provoquer la décoloration. Toutefois,
les caractéristiques de filtrage ne seront en
aucun cas modifiées.
4.2 Filtre à charbon actif - La satura-
tion du charbon actif se constate aprés
un emploi plus ou mois long, selon la
fréquence d’utilisation et la régularité du
nettoyage du filtre à graisses. En tout cas, il
est nécessaire de changer le filtre aprés, au
maximum, quatre mois.
IL NE PEUT PAS être nettoyé ou régénéré.
5. COMMANDES
Attention! Quand on utilise ou on dé-
place la hotte, ne pas laisser les mains
dans le rayon d’action du panneau
d’aspiration (tiroir extractible).
1 2 3 4 5
1 - Retarde la coupure de la hotte en
temporisant la vitesse réglée de
quelques minutes.
Cette fonction prévoit que, à la fin de la
temporisation, la hotte s’éteint.
La temporisation est subdivisée ainsi:
• vitesse (puissance) d’aspiration 1: 20
minutes
• vitesse (puissance) d’aspiration 2: 15
minutes
• vitesse (puissance) d’aspiration 3:
10 minutes
• vitesse (puissance) d’aspiration 4: 5
minutes
NB : si l’on active la minuterie à la
vitesse (puissance) d’aspiration 4, la
hotte pourrait passer à la vitesse 3
avant de s’éteindre, étant donné que la
vitesse 4 prévoit déjà une temporisation
propre, sur la réduction de la vitesse
même.

19
FRANÇAIS
En appuyant sur les touches 2 et 3 ,
la hotte sort de la fonction temporisée
et la vitesse (puissance) d’aspiration
augmente ou diminue sur base de la
touche enfoncée. Durant la phase de
temporisation, le led relatif à la vitesse
correspondante clignote.
2 - Diminue la vitesse (puissance)
d’aspiration active (4→3→2→1→
OFF).
La vitesse est affichée à travers
l’allumage du led relatif à la vitesse
correspondante.
La touche 2 n’a aucun effet sur
l’ouverture/fermeture du panneau
d’aspiration.
3 - Augmente la vitesse (puissance)
d’aspiration active (1→2→3→4).
La vitesse est affichée à travers
l’allumage du led relatif à la vitesse
correspondante.
Remarque : la vitesse (puissance)
d’aspiration 4 est temporisée
pendant 6 minutes, ensuite la hotte
passe automatiquement à la vitesse
(puissance) d’aspiration 3.
Note: Si le panneau est fermé (hotte
éteinte), la touche 3 actionne d’abord
l’ouverture du panneau d’aspiration
et règle ensuite la hotte à la vitesse
(puissance) d’aspiration 1.
4 - Allume la lumière
Note: Si le panneau est fermé (hotte
éteinte), la touche 4 actionne d’abord
l’ouverture du panneau d’aspiration et
allume ensuite la lumière.
5 - Ouvre (Lève) et ferme (abaisse) le
panneau d’aspiration.
A hotte éteinte et panneau fermé, la
touche 5 ouvre d’abord le panneau
d’aspiration et règle ensuite la hotte à
la vitesse (puissance) d’aspiration 1.
A hotte allumée (à n’importe quelle
vitesse) et panneau ouvert, la touche
5 éteint d’abord la hotte (et, si
allumée, éteint aussi les lumières)
ensuite ferme le panneau d’aspiration.
Informations de fonctionnement
supplémentaires
Durant l’enlèvement du panneau
antérieur pour les opérations de
nettoyage et d’entretien, toutes les
fonctions électroniques d’aspiration et de
déplacement sont bloquées.
Sécurité anti-pincement: si cet obstacle
empêche la fermeture du Downdraft, la
fermeture s’interrompt et le chariot remonte.
Signal de saturation du filtre anti-
graisses.
Toutes les 40 heures d’utilisation, la hotte
signale la nécessité d’effectuer l’entretien
du filtre anti-graisses.
Le signal se fait en faisant clignoter en
même temps tous les leds des vitesses
(puissances) d’aspiration.
Reset du signal de saturation des filtres.
Après avoir effectué l’entretien du filtre anti-
graisse, appuyer sur la touche 1 pendant
plus de 3" afin de remettre à zéro le signal.
Note: Le signal n’est pas affiché à hotte
éteinte (OFF), indépendamment de la
position du panneau d’aspiration.
Utiliser la puissance d’aspiration maximum
en cas de concentration très importante
des vapeurs de cuisson. Nous conseillons
d’allumer la hotte 5 minutes avant de
commencer la cuisson et de la faire
fonctionner encore pendant 15 minutes
environ après avoir terminé la cuisson.
6. ÉCLAIRAGE
Attention! Avant de toucher les
lampes, assurez-vous qu’elles soient
froides.
Pour remplacer le néon, procédez comme
suit:
1. Soulevez le panneau (tiroir amovible).
2. Débrancher l’appareil du réseau
électrique.
3. Retirez les vis qui fixent la partie fron-
tale supérieure et soulevez-la.
4. Retirez le néon endommagé et
remplacez-le par un autre avec des
caractéristiques identiques (Mod. T5
14W 860).

www.aeg.com20
VOOR PERFECTE RESULTATEN
Bedankt dat u voor dit AEG product heeft gekozen. Dit apparaat is ontworpen om vele jaren
uitstekend te presteren, met innovatieve technologieën die het leven gemakkelijker helpen
maken – functies die gewone apparaten wellicht niet hebben. Neem een paar minuten de
tijd om het door te lezen zodat u er optimaal van kunt profiteren.
Ga naar onze website voor:
Advies over gebruik, brochures, het oplossen van problemen en
onderhoudsinformatie:
www.aeg.com
Registreer uw product voor een betere service:
www.aeg.com/productregistration
Koop accessoires, verbruiksartikelen en originele reserveonderdelen voor uw
apparaat:
www.aeg.com/shop
MILIEUBESCHERMING
Recycle de materialen met het symbool . Gooi de verpakking in een geschikte
verzamelcontainer om het te recyclen. Help om het milieu en de volksgezondheid te
beschermen en recycle het afval van elektrische en elektronische apparaten. Gooi
apparaten gemarkeerd met het symbool niet weg met het huishoudelijk afval. Breng het
product naar het milieustation bij u in de buurt of neem contact op met de gemeente.
KLANTENSERVICE
Wij raden altijd het gebruik van originele onderdelen aan.
Zorg er als u contact opneemt met de klantenservice voor dat u de volgende gegevens bij
de hand hebt.
De informatie staat op het typeplaatje. Model, productnummer, serienummer.
Waarschuwing - Belangrijke veiligheidsinformatie.
Algemene informatie en tips
Milieu-informatie.
Wijzigingen voorbehouden.
NL GEBRUIKSAANWIJZING
Table of contents
Languages:
Other AEG Ventilation Hood manuals