AEL Slim Star 1500 User manual

1
HEATING SOLUTIONS
ELECTRIC RADIATORS
Slim Star
1500 &1800
The most efficient Electric
radiators in the UK
Installation &
Operation
Manual

2
HEATING SOLUTIONS
CONTENTS
Warnings and R comm ndations .......................................................................... 3
Complianc D clarations .......................................................................................4
Rang and Siz s .........................................................................................................4
El ctricity Supply .........................................................................................................4
Installation .................................................................................................................4
Instructions for Uninstalling th Radiator .....................................................................5
Instructions for us ............................................................................................ 6-10
Maint nanc ......................................................................................................... 11
Guarant ............................................................................................................. 12
Disposal ................................................................................................................ 13
Possibl Probl ms .................................................................................................. 13
T chnical Charact ristics ....................................................................................... 13
3
HEATING SOLUTIONS
WARNINGS AND RECOMMENDATIONS
or must be installed in actadiahe rT
en must be super. Childrortadiathe r
esponsiblegh a person r
ed or lackeduce rarillssk
or must not be used btadiahe rT
y doubts about ite ansolv
sheet and supplied manual
o use other kbidden t
or
tly f
for
ics str’tI
or th
tion manual f
o
ucstr
tadiahen using the rW
egula. r.Ee with I.Edancorcor must be installed in ac
der they donvised in oren must be super
e or instruceillancv
, sur
y
y, sur
etof their safesponsible
, unlesswledgeno, keiencxperof eed or lack
en included) whose(childry peopleor must not be used b
.y doubts about it
esero be pre tv, both of them hasheet and supplied manual
tion thama
or
ind of inf
for
o use other k
or
, f
for an
tduco
e of the pr
e lif
e
tiror the en
tions fucw only the instrollo
, f
or
r, f
t
ol panels can not betron, the ctionsegula
.ortadiay with the rt pla’der they don
ning the the use oferonctions ceor instruc
throm,taken benet frevthey ha, unless
ial or men, sensorsicalyphen included) whose
adiaing the use of the red durveser
ollo
e not included in the f
f
t artion tha
tion.onsultather cy furor an
eep this in.Kound in this manualtions f
ol panels can not be
ning the the use of
-outhr
talial or men
oor tt
wingollo
-eep this in
t least 50 cm of space aveaL
o modify or tous tt is dangerI
oncor has been ctadiahe rT
lease r. P
essional
of
fessional
lied pr
tions without the plug assembled bonnecor the cF
y III.egortca
ch which assuromnipolar swit
ibution neter distrwn the poI
er plugwely under a potdia
om a person inside the shoouched frused or t
or and antadiaeen the rwe bett least 50 cm of spac
tadiay the ray wer in ano alto modify or t
t must not be adoptoom. It a ro heaed teivonc
olors of the cables ft the cespeclease r
y the manufactions without the plug assembled b
ruption of curerte inompletes cch which assur
e with the installadancorc, in ackorwibution net
.er plug
ther or bawom a person inside the sho
tsy inammable objecor and an
.isticsertacor char
.or other usesed ft must not be adopt
tion.onnecor the colors of the cables f
o a quaess ter , please addrtury the manufac
oltagevervonditions of otin cenrruption of cur
vided ao, must be prtion rulesewith the installa
, and must not be installed immetubth
-o a qua
oltage
vided a
-, and must not be installed imme
ials in the apprertse these ma
the
or
f
for
usedialsertmaheT
e ant or placo not inserD
, it is dangereethands and f
o not lean against or climb on the rD
, dis
etailer
r, distr
our rt ytaconc
or if the ctadiao not use the rD
o ader tt in ore assistanvic
damagedisdorcicaltrelecthefI
t least 50 cm of space aveaL
.e disposal unittiaoprials in the appr
rearortadiartheofingagpackthe
.ortadiaem inside the ry ite an
.y
et
our saf
fet
or y
ous f
f
, it is danger
or and do not ttadiao not lean against or climb on the r
.or or installeribut, distr
y) is damaged; in case of tol panel (displatronor if the c
.isky rt anervo a
theybedeplacrbemustit,damaged
or and antadiaeen the rwe bett least 50 cm of spac
dispootommendedecristI.clableyec
et or dampor with wtadiaouch the ror and do not t
oblems ,echnical pry) is damaged; in case of t
edizauthoranorerturmanufacthe
.tsy inammable objecor and an
-dispo
et or damp
oblems ,
-sered
4
HEATING SOLUTIONS
1
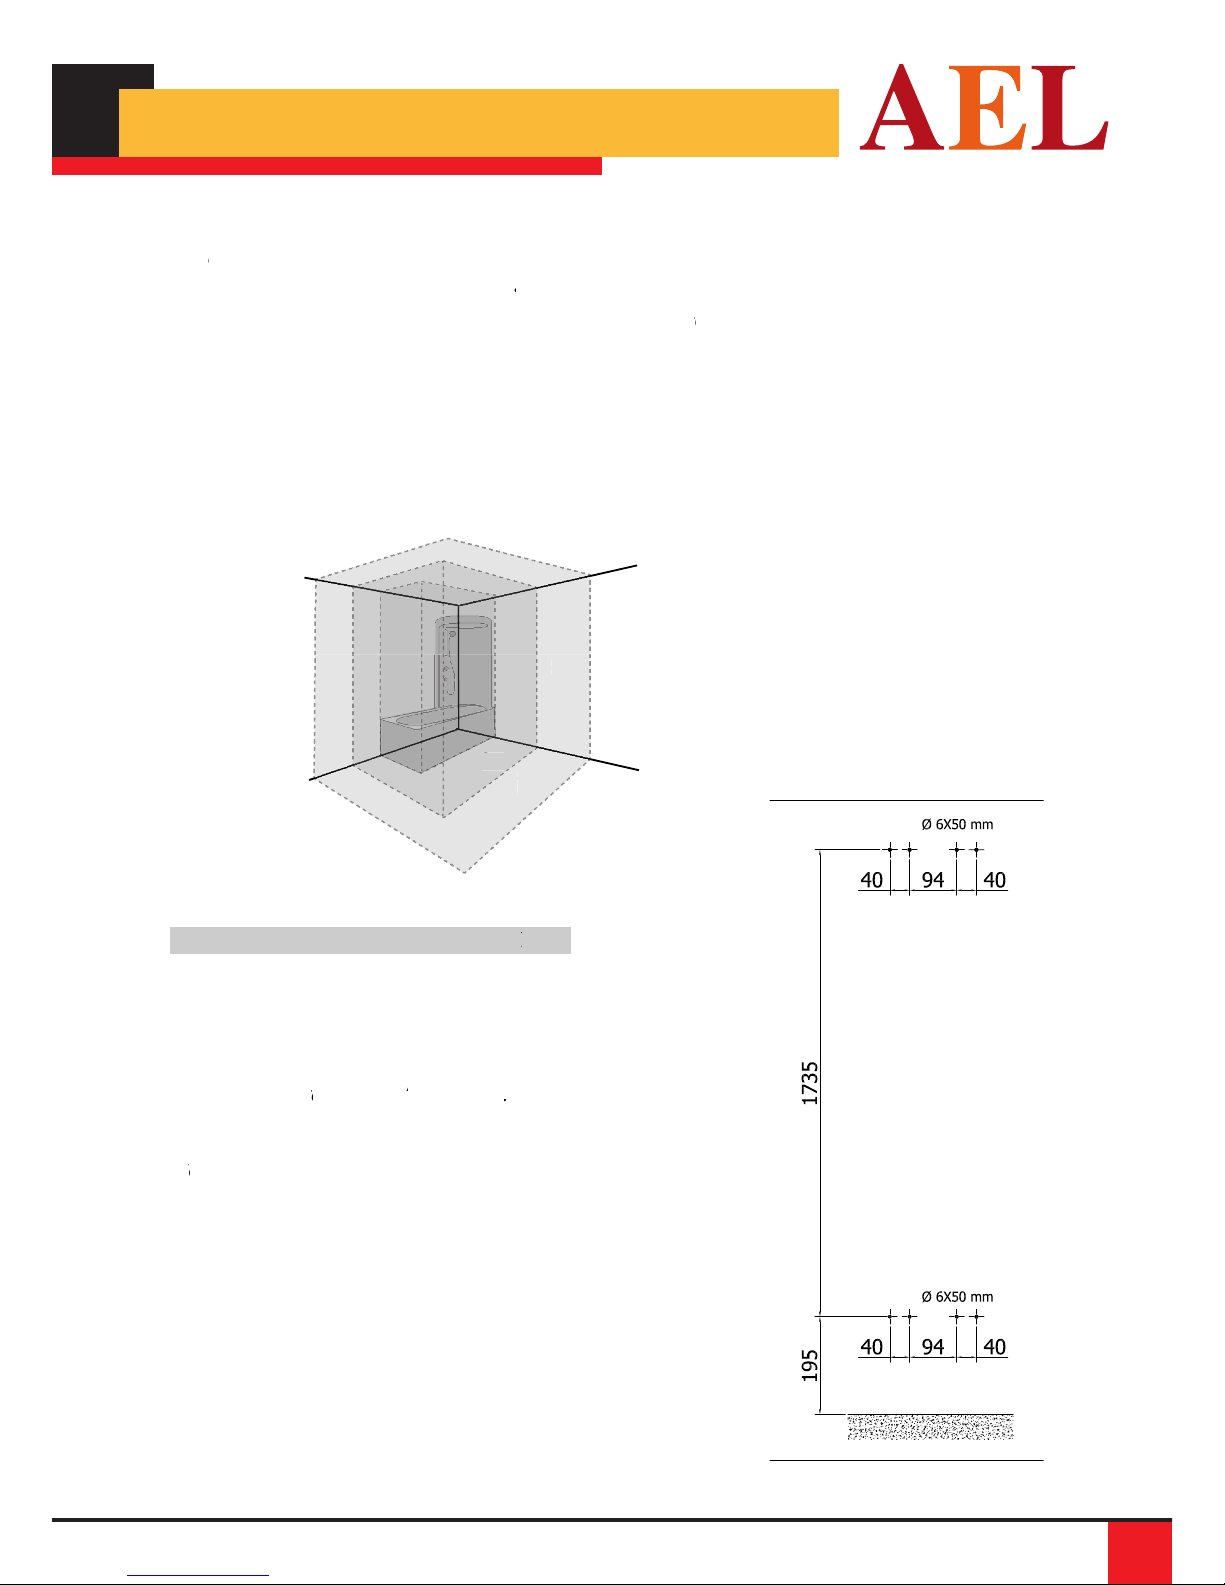
90cm 240cm
2
3
WALL
FLOOR
4 HOLE
4 HOLE
ones 2 and 3 of a bading z
or is double insulatadiahis rT
tricito the eleced ttonnecc
efaution: becy pr
et
af
e
S
y com aned freroom, sheltthrones 2 and 3 of a ba
efe thered class II, applianctor is double insula
or must btadiahe rT
.
y supply
.
tricit
tion, make and during the installaoref
. 1). Ier (see gtat with wtacony c
ooms incluecan be installed in all r
or
f
for
.allyticere installed vor must b
or is nottadiat the rethaesurtion, mak
n full. 1). I
-ooms inclu
or is not
or must be positioned atadiahe rT
y side obstacle (shelvom anfr
or can not be installed abotadiahe rT
ony so as the casuch a w
xisting re with eompliancc
ding z
tal distancont a frt least aor must be positioned a
…).c, etenitur, furesy side obstacle (shelv
t and must be positioned aer poinwe a povor can not be installed abo
om aneach frol panel is out of rtron
e (NF C15-100), the rancrtions in Fegulaxisting r
y coom, shelt
niturts or fury objecom aneof 50 cm fr
t least 15 cmt and must be positioned a
.erwtub or shothone in the bayom an
or must be positioned intadiae (NF C15-100), the r
. 1). Ier (see gyc
.enitur
t least 15 cm
or must be positioned in
. 1). I
POSITIONING
. 1igF
TORRECC
OR
90
cm
2
3
240
cm
1
T
RADIA
AT
EHTFO
4 HOLE
acketstaining 4 bronit ck
or istadiaour rytion,installa
ed on the rt
oltage indica
V
Voltage indica
t the home ve thaged in. Ensur
tion ensurthe installaingurD
or if it
adiat
o not use the r
radiat
D
tion.taansporing trr
er cable hawor and its potadiar
ene as pryrstusing the poly
or and plactadiaUnpack the r
ew anchors,8 plastic scrsew, 8 scrackets
tionequipped with an installaor is
or easy). For (220V – 240Vtadiaed on the r
o theesponds troroltage ct the home v
-not plugisortadiathe rte thation ensur
.
s damaged
d.
’
’s damaged
or if it
-enot been damaged duver cable ha
t thee thaake surtion. Mecotene as pr
oundrefully on the geit caror and plac
.
tion
or easy
o the
-
-
t the
,
ALLW
.acketser brwthe lo
n this phase do not tigh. Isewen scrivg
wix the upper and loF
2.
.o the holestchors in
5ofdepthminimum
igill the 8 holes (FDr1.
ompletlyen up ctn this phase do not tigh
, using thealltthe wackets aer brw
-anewscrplasticthetnserIcm.5
of 6 mm ander.2) with a diamet
. 2igF
ompletly
, using the
-
of 6 mm and
4 HOLE
OORFL
5
INSTALLATION
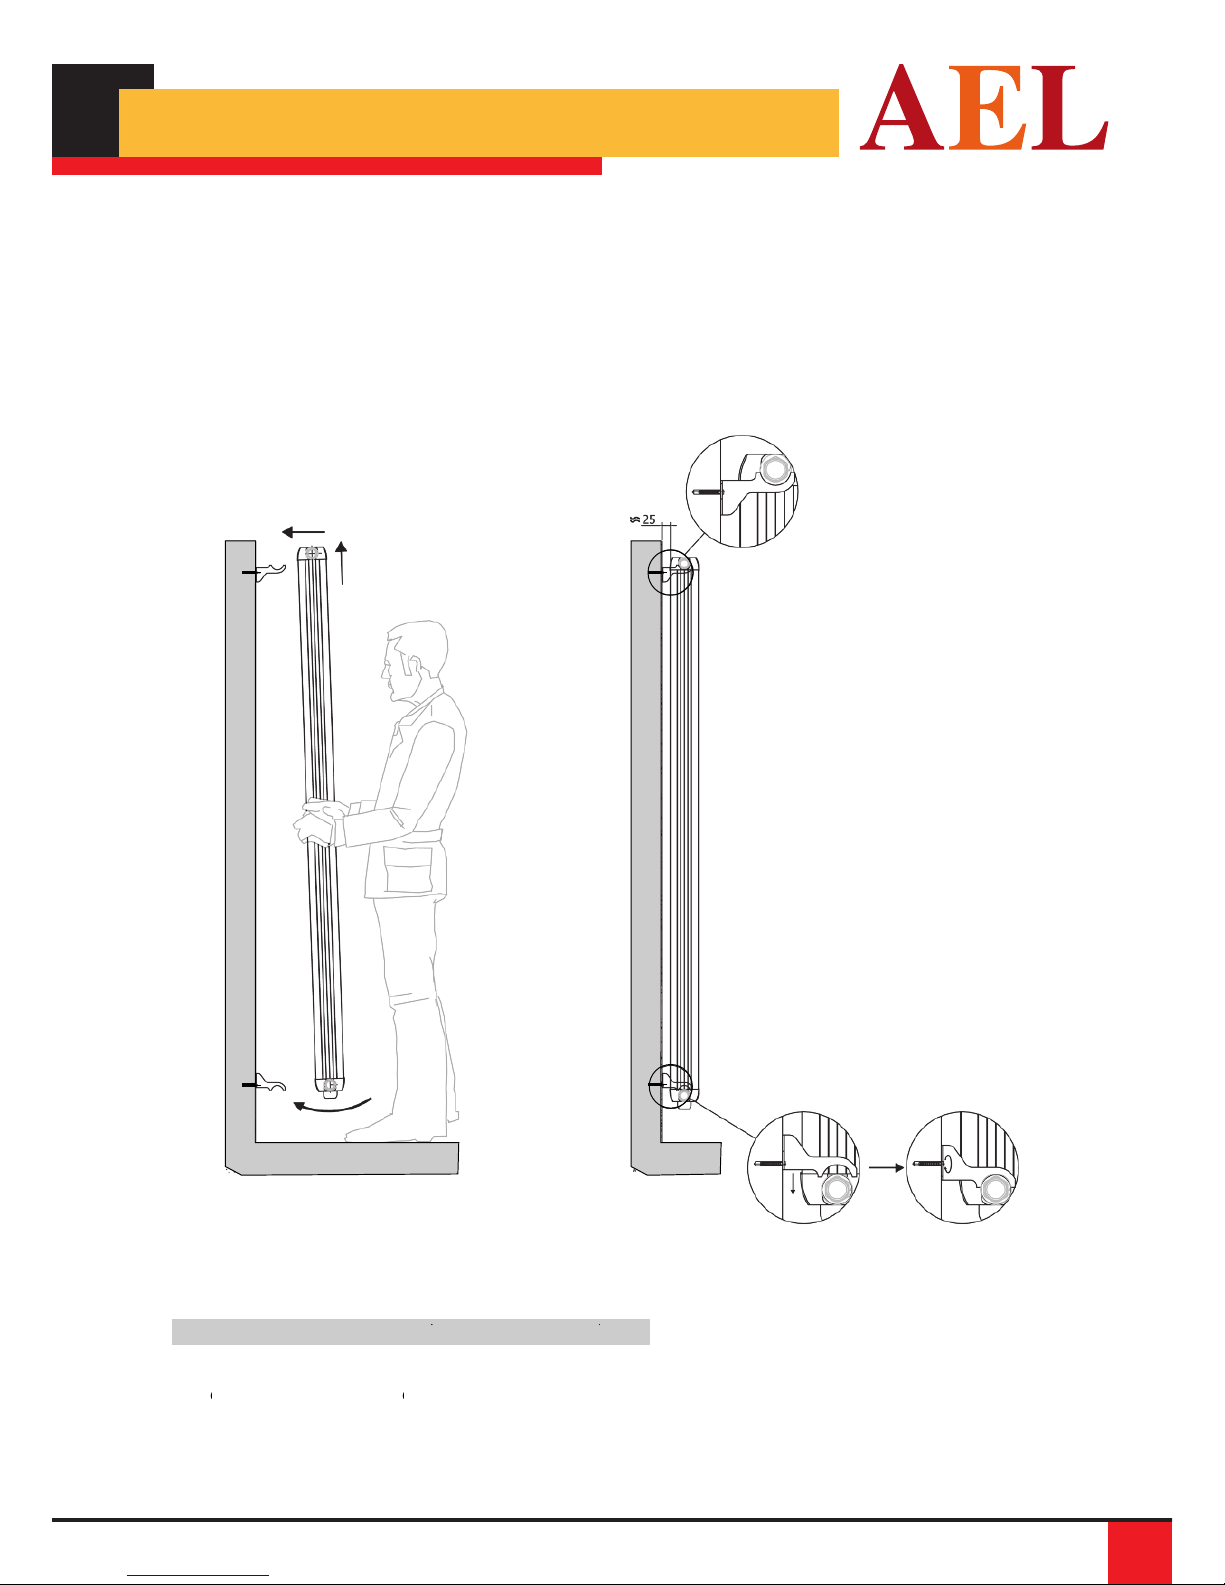
5
HEATING SOLUTIONS
oit(gstewandxthe scr
orshiftadiaBlockther
4.
otheoor (getdenc
or and rtadiaosition the rP
3.
.4).o it (g
ds the loarwoackets ter brwting the loor shif
.3)o the oor (g
ackets vest it on the upper bror and r
t with the hubtacontil the cw unds the lo
esponrory and cifying the stabiliterackets v
t with the hub
-espon
. 3 FigF
. 4ig. 3 F
UNINST
om the los frewUnloose the scr
tricito the eleced ttnec
efbaution:ecpry
et
af
e
S
ORFTIONSINSTRUC
OR
ackets and take out the rer brwom the lo
.y supplytricit
,
or
r,
tadiartheuninstallinge
or
ef
o
T
RADIA
AT
EHT
ALLING
INST
TALLING
.acketsom the bror frtadiaackets and take out the r
notisortadiartheesuremak
-oncnot
UNINSTALLING THE RADIATOR

6
HEATING SOLUTIONS
POWER ON THE RADIATOR
To start the radiator, plug the radiator in.
WORKING MODES
Pilot Wire Mode: Heater is controlled by pilot wire
Stand-by Mode: Heater is o.
Comfort Mode:
Heater is maintaining room temperature set by the user, range 7-32 °C.
Night Mode: Heater is maintaining room temperature 3.5
°
C lower than comfort tem-
perature.
Frost Protection Mode: Heater is maintaining room temperature 7
°
C.
Timer Mode: Heater is controlled by time program set by the user.
2 Hours Boost: Heater is ON for 2 hours.
INSTRUCTION THROUGH REMOTE CONTROL
The radiator and the control unit can be connected through the remote control (black cable). In
this conguration the control unit can activate controller modes.
The radiator functioning by means of the remote control is possible only on the Auto mode ( ).
In other modes (I.e. Comfort, Night, etc) the signals from the remote control are not received.
The commands by remote control always have the priority over the manual setting used on
each single radiator.
CBA
DI
G
E
J
H
K
F
A -- IR Window B -- Top Cover
C -- Bottom Cover D -- Mode Key
E-- Clock Key F --Standby Key
G-- Decrease Key H -- Increase Key
I -- Display J -- Operation Door
K --Assembly Door
INSTRUCTIONS FOR USE

7
HEATING SOLUTIONS
INSTRUCTIONS FOR USE
Standby Mode - Push on Power Switch, the 1st mode showing on Display is Standby with a“ . “
in the central of Display.
Initial Standby
Mode Change - Push Mode key to change Mode setting (Timer- Pilot Wire - Comfort- Night- Frost
Protection- 2H- Standby).
Pilot Wire mode can be selected with 6 controllers modes:
Clock Pilot Wire Comfort
Frost Protection 2H
Night
Comfort
Eco-1 Eco-2 Standby
Night Frost Protection

8
HEATING SOLUTIONS
1. Standby Mode
Heater is o.
2. Comfort Mode
Heater is maintaining room temperature set by the user, range 7-32
°
C.
3. Night Mode
Heater is maintaining room temperature 3.5
°
C lower than comfort temperature.
4. Frost Protection Mode
Heater Maintains room temperature at 7 °C.
5. Eco-1
Heater is maintaining room temperature 1°C lower than comfort temperature.
6. Eco-2
Heater is maintaining room temperature 2°C lower than comfort temperature.
Comfort Temperature Setting
Push Mode key to enter into Comfort mode, then press the”+”or “-” key to adjust the temperatu-
re. Push on either“+” or “-”key for 5 seconds, the temperature could be changed fast and conti-
nuous.
Night Temperature Setting
Temperature setting on Night mode could be adjusted as the way of Comfort mode. Default
temperature is less than 3.5°C of Comfort.
Frost Protection: Heater is maintaining room temp 7°C
Push "+"or "-" key Push on "-" key for 5 seconds.
Push eiher "+"or "-" key. Push on "+" key for 5 seconds.
INSTRUCTIONS FOR USE

9
HEATING SOLUTIONS
2H Boost
Forced heating boost for two hours. Entering into Stanby automatically after the
heating up process is completed.
Heating Up Mechanism
When the room temperature is 0.5° C” lower than setting temperature, the device starts
to heat up. And symbol “ “ appeared on Display. When the room temperature is 0.5°C higher
than the setting temperature, the device stops heating up. And symbol “ “ disappears.
DAILY TEMPERATURE PROGRAMMING
Time & Date Setting
Timer mode can be used to program the working mode based on daily/hourly setting. You could
select either Comfort or Night mode to be the working mode for a dedicated hour.
First set Date and Time. Entering into Clock mode, then push either“+” or “-“ key to select a
week day. Push Mode key to enter the selection of Hour, Use“+” and “-”key to change Hour
setting. Push “mode” key again to set the current minutes. Pushing “+” and “-”key to set the
current minutes. If you push Mode key whiling entering into Timer mode, the temperature
programming can be started by pushing either “+” or “-” key for selecting working
mode(Comfort/Night). Pushing Mode key again to jump into next Hourly working mode setting
until you completed all the week. Push on “ “ key to enter into Clock mode.
2H Standby
Then push "+" or "-" key to select current week day.
INSTRUCTIONS FOR USE

10
HEATING SOLUTIONS
Temperature Programming
Push Mode key in Clock mode to program working mode for each Hour. Use “+”or “-” key for
selecting working mode(Comfort or Night). Use Mode key to jump into next Hourly setting until
you. Completed whole week programming.
Button lock
Push Mode and “+” key at same time for 3 seconds, symbol “ “ appears on display and the
function of all buttons will be locked. Push Mode and “+” key at same time for 3 seconds again,
this will unlock all functional keys and symbol “ “ disappears.
Then push Mode key to set current hour. Using “+” or “-“ key to change figure.
Then push Mode key to set current minute. Using "+" or"-" key to change figure.
INSTRUCTIONS FOR USE

11
HEATING SOLUTIONS
In order to maintain the correct radiator functioning and performance as guaranteed by the
manufacturer, it is advised to regularly check the airows inside the radiator, they have to be free
from any kind of object or material not part of the radiator itself.
Don’t use alcohol, solvents or any abrasive materials.
MAINTENANCE

12
HEATING SOLUTIONS
The manufacturer guarantees the radiator, in compliance with the European Directive 1999/44/
CE.
The body of the radiator is guaranteed for 15 years, electrical and electronic parts (including
accessories connected to these) are guaranteed for 2 years.
The warranty gives the client the right to the repair of the defective product or its replacement,
in the case that the radiator can not be repaired, on the discretion of the manufacturer.
The warranty is valid only if:
t*OTUBMMBUJPOTUBOEBSETBTXFMMBTXBSOJOHTBOESFDPNNFOEBUJPOTGPVOEJOUIJTNBOVBMBSFSF-
spected.
t5IFSFBSFNBOVGBDUVSJOHEFGFDUTXIFOUIFQSPEVDUJTTPMEOPUFEXJUIJOZFBSTGSPNUIFQVS-
chase date.
The warranty is not valid if:
t5IFSFBSFEFGFDUTDBVTFECZVTFTPGUIFQSPEVDUPUIFSUIBOUIPTFTQFDJöFEJOUIF8BSOJOHTBOERecommendations contained in the instruction manual.
t5IFSFBSFFWJEFOUEFGFDUTDBVTFECZBDDJEFOUBMCSFBLBHFPSOFHMJHFODFt5IFSBEJBUPSIBTCFFOSFQBJSFEPSEBNBHFECZOPOBVUIPSJ[FEQFSTPOOFMt5IFSBEJBUPSIBTCFFOEBNBHFEEVSJOHUIFUSBOTQPSUt5IFSBEJBUPSIBTOPUCFFODPOOFDUFEQSPQFSMZUPUIFQPXFSTVQQMZt5IFSBEJBUPSIBTCFFOPQFOFEBOEUIFFMFNFOUTIBWFCFFOTFQBSBUFEThe manufacturer declines all responsibility for any damage to persons, animals or objects, cau-
sed directly or indirectly as a consequence of not following the instructions indicated in this
manual and also to the indications that concern the installation and placement of the radiator.
To require the warranty, the Client has to contact the distributor or the installer and the Client
needs to show the sale receipt given by the retailer and where it is possible to see the purchase
date of the radiator.
GUARANTEE

13
HEATING SOLUTIONS
ecdisposed in a specic r
or is no longer in usetadiaf the rI
2002/96/EC.
oper disposal of the pr
or pr
tions f
for pr
nstrucI
or the disposal of
e f
f
trencling cyec
wwn ao, it cannot be thror is no longer in use
omplianct in coducoper disposal of the pr
es (Ronic devictric and electror the disposal of elec
, but it must beeasty with domestic wa
ecopean Dirure with the Eomplianc
AEE)es (R
, but it must be
etivec
eseneprw rhe symbol beloT
.escesoural rturand na
er it helps tveoorand health. M
ed wtting the sorSuppor
ning these reronction cmaoror infF
etailer to the rned teturor r
ecdisposed in a specic r
o be used ftainer not tonash cts a tresen
ials thaertage the mao salver it helps t
oducic prtrtion of elecollece casted w
, please cestrencling cyecning these r
.ed with a new oneeplaco be retailer t
or the disposal of
e f
f
trencling cyec
.or such disposalo be used f
ving ener
, sa
or
r, sa
tadiaompose the rtcials tha
onmenvirt the enecoto prts helps toduc
.ouncilour local ct ytacon, please c
.
es (Ronic devictric and electror the disposal of elec
gyving ener
tonmen
AEE)es (R
OBLEMS
hasortadiarthetthaifyerv
eeps heatin
or k
keeps heating:
adiat
he r
T
The r
xnot been positioned ne
turaempert the tify thaerv
t heat:’esnor doadiat
he r
T
The r
PRPOSSIBLE
oldcainpositionedbeennothas
eeps heating:
ake sur. Mtes of heaco other sourt tx
oom te set up is higher than the rtur
t heat:
settingtmostaertthetthaorblast
.erwor has potadiat the re thaake sur
or hastadiat the re and thaturaemperoom t
hassetting
or has
TERISTICS
C orTRIAer outlet:wo- P
tion pregulaonic rtr- Elec
e: -20 a +50°Cturaemperage tort-S
t: IP 24onmenvir- En
tible with Class II in compa: cy
et
af
f
- S
V ~ 50 Holtage: 220 – 240V-
CARAHCNICALHTEC
.not been changed
ify
TERISTICS
ommutable po
, c
er
r, c
wt 0 poed ader
.alregttionally inoportion pr
e: -20 a +50°C
e with EN60335-1, EN60335-2-30omplianctible with Class II in c
zV ~ 50 H
positioned
.erwommutable po
e with EN60335-1, EN60335-2-30
setting
DISPOSAL - TECHNICAL CHARACTERISTICS

Plate Heat
Exchanger
Packages
Gas fired
Condensing
Boilers
Cast Iron
Sectional
Boilers
High Output
Aluminium
Radiators
ubular
Steel
Radiators
Designer
Bathroom
Radiators
Corgi
Approved
Engineers
AEL reserve the right to alter designs and specifications without prior notice
European Standard EN442 was brought into force to define “heat measurement sampling” for hot water radiators in all European
countries, a positive step forward to ensuring radiators tested and approved will provide the stated heat output required and also give a
guarantee that the product will be fit for purpose. EN442 provides a guarantee that the stated output of radiators from reputable man-
ufacturers is correct and highlights and deters the use of poor quality untested radiators in European installations.
HEAD OFFICE: 4 Berkeley Court, Manor Park,
Runcorn, Cheshire, WA7 1 Q
el: 01928 579068 Fax: 01928 579523
e-mail: [email protected]
HEATING SOLUTIONS
HEATING SOLUTIONS
Slim Star
1500 &1800
The most efficient Electric
radiators in the UK
ELECTRIC RADIATORS
This manual suits for next models
1
Table of contents
Popular Heater manuals by other brands


Sears, Roebuck and Co.
Sears, Roebuck and Co. 583.90700 Assembly, operating instructions and parts list

CORONA
CORONA SX-B22A owner's manual

wallas
wallas 1300 Operation and installation instructions

Heylo
Heylo K 120 operating instructions

Rinnai
Rinnai Arriva 750 installation guide

Silvercrest
Silvercrest 113364 operating instructions


