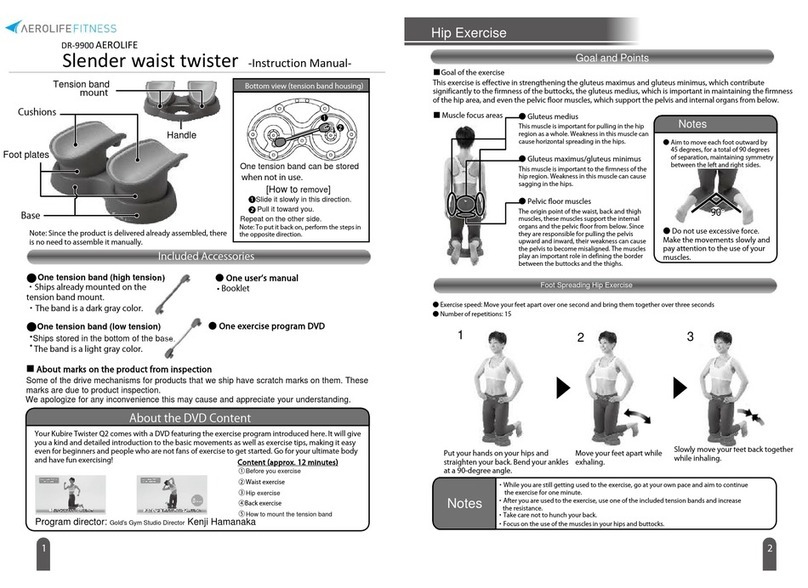
AeroLife Motion Navi User manual

1
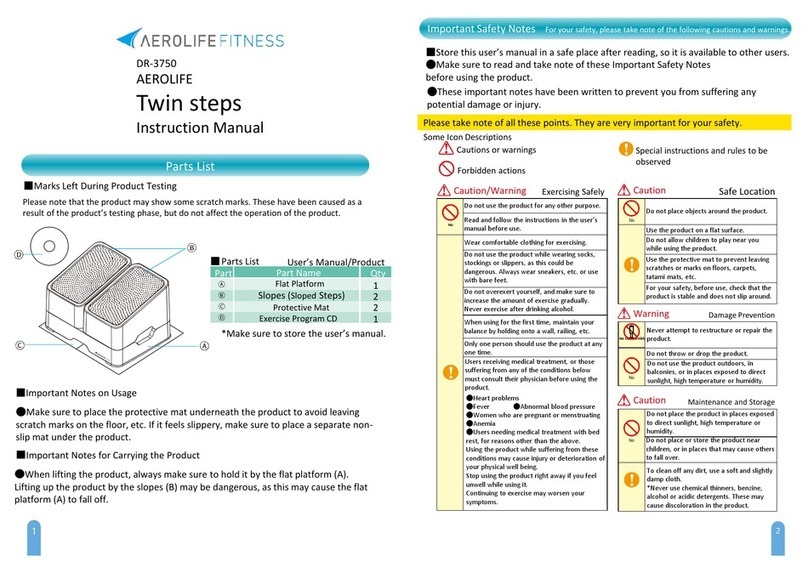
■Marks Left During Product Testing
Please note that the product may show some scratch marks around the moving parts. These were caused as a result of
the product’s testing phase, ut do not affect the operation of the device.
■Important Notes on Usage
・Make sure to place the protective mat underneath the device to avoid leaving scratch marks on the floor, etc. If this
were to feel slippery, please make sure to place a non-slip mat instead (non-slip mat not included).
・Bolts, nuts and screws may ecome loose due to vi ration caused y exercise. Make sure to check their safety y
tightening all olts, nuts and screws efore us. Make sure to tighten the screws underneath the foot plates as well.
Main Body
*This user’s manual.
*Please store the user’s manual
together with the mini stepper.
●User’s Manual
●Protective Mat x 1
Accessories
Par
t
Part
Name
Qt
y
Foot Plate
Lock Lever
Guide Frame
Main Body Frame
Cushion
A
B
C
D
E
2
1
2
1
2
Parts List
E
B
C
A
Dトータルエクササイズ*The mini stepper is shipped so that it is
ready to use.
No assem ly required.
DR-3830
AEROLIFE
Motion Navi
Instruction Manual
2
■Modes
The Motion Navi provides a lue lock lever, located in the middle of the
device, to switch etween two modes.
Exercise Mode: Do stepping exercises y moving the foot plates freely.
Stretch Mode: Lock the foot plates to perform stretching exercises.
*The product is delivered to you in Stretch Mode with the foot
plates locked. Follow the steps elow to release the lock efore
doing exercises with the device.
Releasing the Lock Lever (Exercise Mode)
Hold the flat area of the
lock lever and flip it
toward you.
The lock lever pulled
toward you (the yellow
sticker is visi le).
1
.
2
.
Open out the foot plates
to the left and right. The
lock lever then moves
toward you.
4
.
Check that the foot plates are
a le to move freely.
Open out the foot plates
to the left and right once
more, and move the lock
lever ack down away
from you, toward the toe
area.
Lock Lever
Exercise Mode = lock lever released
1. Can the foot
plates move freely?
2. Is the lock lever
all the way down,
touching the main
ody frame?
Switched to
Exercise
Mode
3
.
Foot Plates
Switching Mode

3
■How to Switch to Stretch Mode
To perform stretches, use the lock lever to affix the foot plates in place.
Switching Mode (Stretch
Mode)
Switching Mode
2. Use your left hand to
open out the foot plate and
press down slightly. Affix
the foot plate on the
stopper located slightly
elow the lock lever.
4. Hold the flat area of the
lock lever and flip it away
from you, toward the toe
area.
1. Use your right hand to hold
the flat area of the lock lever,
and lift it up toward the foot
plates.
3. Switch hands to hold the
flat area of the lock lever
with your left hand.
Similarly, set the right foot
plate on the stopper elow
the lock lever. The lock
lever will then e set in
position at a 25° angle.
30°
25°
S
t
o
p
p
e
r
4
Up and Down Step Exercise 1
■Important Notes Before Exercising
■Set up the Device
1. Sit on a chair and place the device
y your feet.
Step Exercises for Beginners
Place device y your feet.
Less load on the muscles. 〈上級者〉〈初心者〉Place device slightly in front of you.
More load on the muscles.
*The foot plates should e a le to move freely.
Performed in Exercise Mode (see page 2).
2. Place your feet on the foot plates,
making sure that your toes are
overhanging at the top.
3. Press down with each foot, alternating
etween the left and right feet.
Start y pressing down lightly, gradually
pressing down more strongly.
4. Once you feel comforta le with the
exercise, press down with oth feet.
Start y pressing down lightly, gradually
pressing down more strongly.
Pressing down lightly Pressing down strongly
・Perform this exercise at a sedate pace, so that you are a le to hold a conversation comforta ly.
・Use your hands to hold on to the chair to help you generate more strength.
・Perform this exercise while seated.
Pressing down lightly Pressing down strongly
Key Points ●Perform this exercise at your own pace, doing as many repetitions as you like, for as long
as you like, depending on your physical condition.
●Perform this step exercise y focusing on the muscles used.
Muscles used: thighs, shins, and calves.
●In addition to the effect on your legs, maintaining good posture while performing this
exercise can also e effective for working your a dominal muscles.
●The load on the muscles can e adjusted y arranging the device in different positions (see
page 7).

Step Exercises
5
Up and Down Step Exercise 2
■Exercise Instructions
1. Up and down step exercise. Place the
device ack-to-front on the floor, and
then sit down on a chair. Place the
arches of your feet on the top of the foot
plates, making sure that your heels are
overhanging at the ack.
2. Press down with each foot, alternating
etween the left and right feet. Press
down with enough strength so that the
cushion stops just efore it hits the main
ody frame.
3. Once you feel comforta le with the
exercise, press down with oth feet.
Press down with enough strength so
that the cushion stops just efore it hits
the main ody frame. 上下ステップ運動3ここがポイント*The foot plates should e a le to move freely.
Performed in Exercise Mode (see page 2).
■Important Notes Before Exercising
・Perform this exercise at a sedate pace, so that you are a le to hold a conversation comforta ly.
・Use your hands to hold on to the chair to help you generate more strength.
・Perform this exercise while seated.
Key Points ●Perform this exercise at your own pace, doing as many repetitions as you like, for
as long as you like, depending on your physical condition.
●Perform this step exercise y focusing on the muscles used.
Muscles used: thighs, shins, and calves.
●The load on the muscles can e adjusted y arranging the device in different
positions (see page 7).
6
■Important Notes Before Exercising
・Perform this exercise at a sedate pace, so that you are a le to hold a conversation
comforta ly.
・Use your hands to hold on to the chair to help you generate more strength.
・Perform this exercise while seated.
Side Step Exercise
Step Exercises
Key Points ●Perform this exercise at your own pace, doing as many repetitions as you like, for as long as
you like, depending on your physical condition.
●Perform this step exercise y focusing on the muscles used.
Muscles used: uttocks, thighs, shins, and hips.
●The load on the muscles can e adjusted y arranging the device in different positions (see
page 7).
●Rotate the foot plate until it is completely closed, then pause riefly. Repeat this rotating
movement over and over. If you do not focus on the muscles used, the foot plate will close y
itself due to the strength of the spring. Concentrate on controlling the spring to work out the
muscles.
■Exercise Instructions
1. Sit on a chair and place oth feet
on the foot plates.
2. Swivel your feet in and out.
Start with small movements,
gradually making igger movements.
3. Once you feel comforta le with
the exercise, rotate your feet y
drawing a semi-circle, moving oth
inward and outward. ■Moving inward ■Moving
outward
*The foot plates should e a le to move freely.
Performed in Exercise Mode (see page 2).

Stretching Exercises
8
*Performed in Stretch Mode (see page 3) with
locked foot plates.
■ Important Notes Before Stretching・Do not hold your reath while stretching. Aim to exhale as you stretch your muscles.
・Extend your knees slowly until you feel a mild ache in your muscles. This is the perfect position.
・Do not stretch in a position that causes strong pain to your muscles.
*This can cause damage to your muscles or nerves.
■ How to Perform Stretching ExercisesTo ensure your safety, make sure to perform stretching exercises for 30 to 60 seconds per pose (on oth legs), efore using the
device. Using the device without prior stretching can cause damage to your muscles or nerves.
・Rotate oth ankles (inward and outward).
・Stretch oth calves.
3. Bend your knees to
get on the device.
4. Extend your knees
gradually.
5. Once you feel
comforta le, straighten your
knees fully.
*Getting on the device
with straight knees can
cause people with tight
calves to experience pain
and ecome una le to
stand up. Make sure to
end your knees efore
getting on the device.
*Extend your knees
gradually, without forcing
the movement.
*The perfect position is
when you experience a
mild ache in your muscles.
Do not hold a position
that causes you strong
pain.
*Once you are a le to
stand up straight, take
your hands off the wall.
2. Place your hands on the
wall, and slowly put one
foot at a time on the
device.
Standing Stretches
1. Check that the foot
plates are locked.
*Use the lever to lock the device in place.
(not enough inclination)
°52
(too much inclination)
°03
Key Points ●Start at an angle of 25°, then change it to 30° once you have ecome used to the stretch.
●Gradually increase the length of time of the stretch.
7
Adjusting the Load on the Muscles
The main ody of the device does not provide a function for adjusting the resistance. However, the load
on the muscles can e varied y using the device in different was.
Place the device y your feet.
This position creates a low
load on the muscles.
Place the device some distance in
front of your feet.
This position creates a high load on
the muscles.
●Device and Chair Position
●Feet Position
The closer your heels are to the
C guide frame, the greater the
load on the muscles.
●Foot Press Depth and Speed
The deeper and faster the foot
presses down, the stronger the
load on the muscles.
In addition to the effect on your
legs, this can also e effective
for working your a dominal
muscles.
●Sitting Forward without Leaning Back
Maintain Good Posture
Aim to maintain a good posture, keeping
the upper ody as still as possi le.
C Guide Frame
High LoadLow Load
Close
Far
Pressing down lightly Pressing down strongly
Maintain Good Posture
The further away the device
is from your chair, the
greater the load on the
muscles.
Sales Agency
〒111-0052 2-19-8,Yanagi ashi,Taito-ku,Tokyo,Japan
TEL:+810338615361
This manual suits for next models
1
Table of contents
Other AeroLife Fitness Equipment manuals
Popular Fitness Equipment manuals by other brands

Calibre Fitness
Calibre Fitness CSL-7008 owner's manual

Weider
Weider 2250 user manual

Balanced Body
Balanced Body Tower on the Allegro 2 Installing

XMark Fitness
XMark Fitness XM-7603 owner's manual

COMPOUND
COMPOUND PLATINUM CPL-DAF-1027 Assembly instructions

Lifetime
Lifetime PRO COURT 41223 Assembly instructions and owner's manual