Aetertek AT-215D User manual
R
Owner’s Manual for Professional Remote Dog Trainer AT-215D
AT-215D
Manuel d’utilisation du collier de dressage AT-215D

System Components------------- ----------------------------1
Quick Start--------------------------------------------------------2,3
Trouble Shooting----------------------------------------------- 4,5
Training Tips--------------------------------------------------6
Safety Guide---------------------------------------------------7
Information on Terms of Use & Limitation of Liability--------8
Warranty Card--------------------------------------------------9,10
Manuel d’utilisation du collier de dressage AT-215D---------
14,23
-

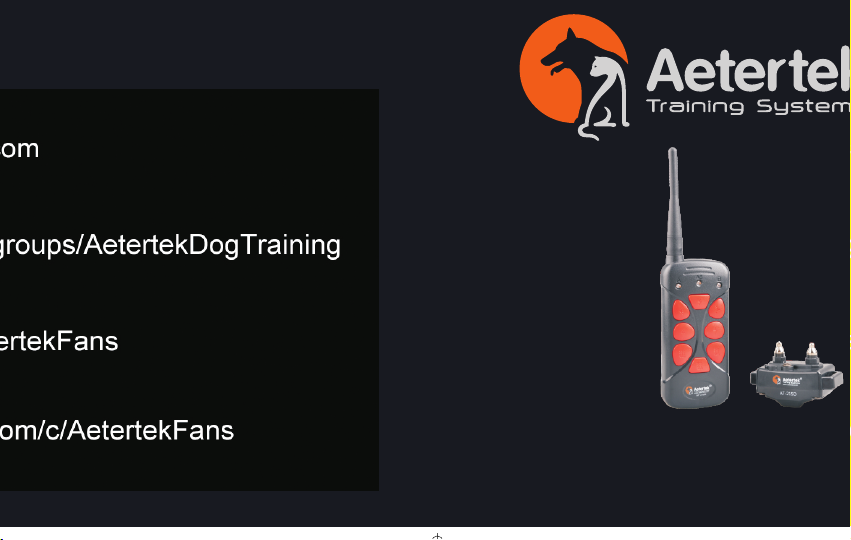
Receiver
Transmitter Antenna
prongs
Test Kit
Collar Charger
Transmitter
Antenna
Receiver
Prongs
Test Kit
Collar
Charger
AT-215D System Components
-01-
R
Professional Dog Trainer
AT-215D

Quick Start
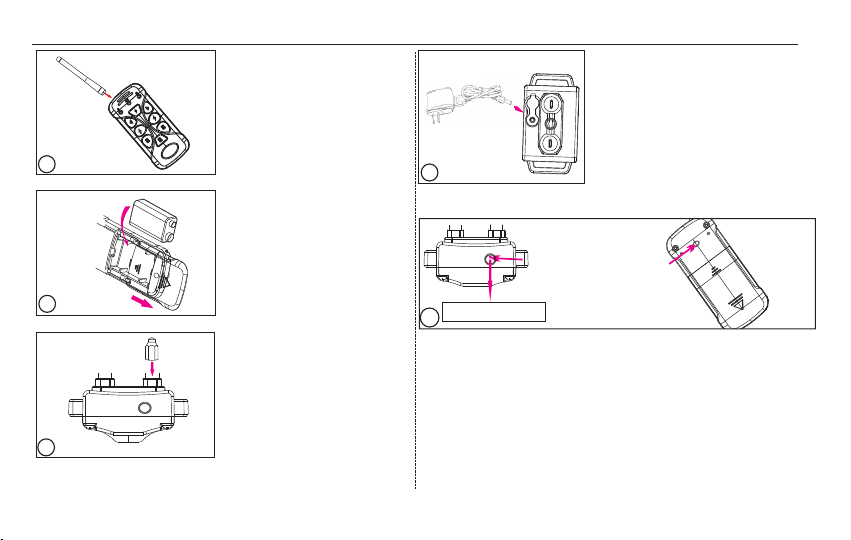
Step 1: Screw the antenna tightly
onto the transmitter.
Step2:Open the transmitter's
battery cover, and install the 9V dry
battery into the transmitter. Match
the + and - on battery to the diagram
inside.
a
b
Step 3: Screw the metal prongs onto the
receiver till the prongs are securely attached.
Normally, they are assembled in the factory.
4
Tip 1: Tip 1: It is recommend to charge the transmitter and receiver for up to 3 hours
for the first 3 times.
Place the magnet on the
transmitter near to the
magnet switch on the
receiver until the receiver
vibrates. The red light will
be on, indicating that the
receiver is started.
5
Tip 2: To do a self-test, place the magnet on the transmitter near to the
ON/OFF area on the receiver for 3 times, and the receiver will vibrate or
shock with the blue light on, indicating the receiver works normally.
-02-
1
3
Step 4:
LED light of the receiver will be on while the
receiver is charging. When the receiver is
fully charged, the BLUE LED will be on. Once
you unplug the charger, the RED LED light
will stay solid on-waiting for sync. At the
same time, the Blue LED light will go off.
Charge the receiver. The RED
Step 5: Turn the receiver on/off. Bring the magnet on the
transmitter near to the magnet switch on the receiver until
the receiver vibrates. At that time, the red light will be on/off,
indicating that the receiver is started/off. If you just finish
charging, unplug the charger, and the receiver is on already.
ON/OFF area
2

Quick Start
Step 8: Start to train the dogs. Put the collar into the
receiver and wear the receiver around dog's neck. Remember
to leave one finger place between the collar and the neck,
and then you can train the dogs.
-03-
Tip 3: The duration for pressing the vibrate or shock button will
lead to difference on the length of the vibration or shock time.
The 1st dog
The 2nd dog
Both dogs
Tip 4:After 3 minutes of inactivity, transmitter will go into sleep
mode. You can wake it up by pressing any function keys.
6
7
Step 7: Check the button function. Push the beep
button, the receiver will produce beeping sound and
similarly, push the vibrate button, it will cause
vibration. Cap the shock test kit on the metal prongs,
push the shock button. If the bulb lights up, the shock
function is ok.
Step 6: Match the receiver and transmitter. Press the
three buttons under dog A mode, the first receiver will be
paired along with red light turns off and blue light starts
flash; If you have another receiver, turn it on and press
the three buttons under dog B mode, the second receiver
will be paired; If you need to train2 dogs simultaneously,
press two buttons under dog AB mode, both receivers will
be controlled.

Trouble Shooting
-04-
R
Professional Dog Trainer
AT-215D
A:The Transmitter /Receiver runs out of batteries quickly.
1:Make sure the charger and Transmitter/Receiver are securely connected.
2:Charge the Transmitter/Receiver for 3 hours or above.
B:The Transmitter doesn't work.
1: Replace the 9v dry battery with a new one or recharge the Transmitter.
2: For 919C and 216C, you can check whether you can lock the transmitter. If yes, you can unlock it by pushing both buttons on the right
side. Or you can push the reset button to restart your remote.
C:The Transmitter can't match the Receiver successfully.
1:Make sure the intensity level is not on ZERO.
2:Check whether the antenna is installed correctly.
3:Ensure the receiver is turned on and in sync waiting status.
D:The Receiver doesn't respond to the Transmitter.
1:Make sure the intensity level is not on ZERO.
2:Make sure the Receiver has been synced with the Transmitter and the Transmitter is in the correct dog system. Never change the
dog system after the system has been synced!
3:Make sure the Receiver and Transmitter have enough power.
E:The training system has no effect on my dog.
1:Make sure the Receiver is working and the shocking prongs touch dog's skin closely.
2:Try increasing the intensity level.
F:The Transmitter can't remotely control 1-2 or 1-3 Receivers.
1:Make sure you sync different Receivers separately.
2:Only in the correct dog system, can you operate the corresponding receiver or dog.
3:Whenever the Receiver/Transmitter is out of power and recharged, you need to sync them once again.
G:The training system is only available in short range.
1:Check whether the antenna is installed correctly.
2:Make sure there is no strong signal interference from your surroundings. The Transmitter's control range could fluctuate subject to
surroundings, obstacles, or even the weather.
3:As for the AT-919, make sure the collar has been put through the antenna pole in the back side of the Receiver.

Trouble Shooting
R
Professional Dog Trainer
AT-215
Trouble Shooting
-05-
R
Professional Dog Trainer
AT-215D
H: What is the function of the rubber cap outside the charging port?
It prevents dust or water from coming into the charging port effectively. You need to plug the cap into the
charging port tightly when charging is completed.
I:How to turn on/off the anti bark feature?
For 218/C, press and hold on the Flashlight button, then quickly press down Beep button, and the anti bark feature will be turned off;
For 219, press and hold the microphone button for three seconds, and the anti bark feature will be turned on/off;
For 918C, press and hold on dog selection button on the side of Transmitter, and the anti bark feature will be turned on/off;
For 919C, quickly press the Flashlight button on the back side of the Transmitter, and the bark feature will be turned off;
J:The Receiver beeps, vibrates or shocks by itself constantly or occasionally.
1:Make sure the anti bark feature is turned off. For 219, the default status of the auto anti bark feature is on while that of the 218/918C/
919C is off. After auto mode feature had been turned off, for 218 and 918C, the auto mode LED light will go off; for 219, auto mode icon
MICROPHONE will disappear; for 919C, auto mode icon (SPEAKER) will be hollowed;
2:Make sure the Receiver has enough power, because the Receiver will alarm when it runs out of power.
3:Make sure any button of the Transmitter has not been touched.
4:Sync the Receiver with the Transmitter once again.
K:When buying individual Receiver or Transmitter, why do I need to double-check the version?
Aetertek updated all machine frequency from 433.92 MHz to 915 MHz, so every time you need to buy individual Receiver or Transmitter,
you must know the frequency you actually need; otherwise they will not be compatible.
L:After you unplug charger, the red LED light in the Receiver stays in solid to wait for sync, however it can never be synced with
Transmitter.
Please turn off your Receiver and re-sync it.
M:My Receiver seems to work by itself without the operation of the Transmitter.
Check whether the auto anti bark function is on. If Yes, turn it off.
N:The Auto anti bark feature is not working properly.
1: Make sure the auto anti bark feature had been turned on, then you can test the function by scratching the shocking prongs on the surface
of a desk, and the qualified Receiver will start to beep and vibrate.
2: Do an auto anti bark feature test on www.aetertek.com. (http://www.aetertek.com/pages/Auto-anti-bark-feature-test.html).

Training Tips
-06-
R
Professional Dog Trainer
AT-215D
This product is intended to support behavioral training and is not designed to be used without
necessary interaction. Always praise your dog for good behavior. Verbal commands with
positive reinforcement will contribute to success of your training and will achieve the
fastest and most desirable results possible.
The recommended age for training is a minimum of 6 months, provided that dog has the attention span and capability
to learn basic commands. And it should not be used on aggressive or elderly animals in poor health or animals
otherwise unable to withstand the stimulus.
Use verbal commands first, and supplement with a corrective stimulus only as needed. Be consistent with your verbal
commands, using the same words every time. Work with your pet on one behavior at a time to avoid confusion and
frustration. Use as little stimulus as possible and only to reinforce verbal commands when necessary. Do not over
correct your dog.
For example, use the beeps as warning by pressing Beep button. The dog will become conditioned to the beep
preceding the corrective stimulus and will soon learn to recognize the beep as a warning along with your verbal
command. Do not rely on this product solely to train your dog. Some dogs will not respond to this product. Aetertek
cannot guarantee the effectiveness of this or any trainer on your dog. If your dog shows signs of growling, snarling,
biting or aggression while using the collar, discontinue use immediately and contact a professional trainer for advice.

-07-
Safety Guide
R
Professional Dog Trainer
AT-215D
1. It is forbidden to open the receiver in case of breakage of the machine or harm the waterproof
Feature; otherwise it will violate warranty rules.
2. In order to guarantee submersible feature, the waterproof rubber charging lid should be plugged in tightly.
3. Only use the supplied adaptor to charge the receiver, otherwise the receiver will probably be damaged.
4. Users are NOT suggested to touch the mental prongs on the receiver, otherwise it will harm human body in case of
shocking operation. To test shock correction, please use the supplied test kit.
5.If there is water in the charging hole, please dry it before charge the receiver
6. Any collar worn for extended periods can cause a condition similar to bedsores, know as Pressure Necrosis. To reduce
the possibility, you must do the followings(VERY IMPORTANT):
a. Never leave the collar on dog for more than 12 hours per day;
b. Examine the dog’s neck daily for any signs of a rash or sore;
c. Supervise your dog during the first 2 days of training;
d. Check the fit to prevent excessive pressure. you should be able to insert one finger between the collar strap and your
dog’s skin;
e. Wash the dog’s neck area and the correction poles as often as needed to keep the area and poles clean.
If signs of skin irritation are noticed, immediately discontinue use and apply antibiotic ointment to help and sooth the area.

Information on Terms of Use & Limitation of Liability
-08-
R
Professional Dog Trainer
AT-215
R
Professional Dog Trainer
AT-215D
1. Terms of Use
This product is offered to you conditioned upon your acceptance without modification of the
terms, conditions, notices contained herein. Usage of this product implies acceptance of all
such terms, conditions, and notices.
2. Proper Use
This product is designed for use with dogs where training is desired. The specific temperament of your dog may not
work with this product. We recommend that you not use this product if your dog is less than 8 pounds or if your dog is
aggressive. If you are unsure whether this is appropriate for your dog, please consult your veterinarian, certified
trainer or contact our customer support.
3. No Unlawful or Prohibited Use
This product is designed for use with dogs only. This dog training device is not intended to harm, injure, or provoke.
Using this product in a way that is not intended could result in violation of Federal, State or local laws.
4.Limitation of Liability
In no event shall Aetertek be liable for any direct, indirect, punitive, incidental, special or consequential damages, or
any damages whatsoever arising out of or connected with the use or misuse of this product. Buyer assumes all risks
and liability from the use of this product.
5. As agreed by related parts, the seller is responsible for after-sale service, and Aetertek only provide technical
support. So if you have any problems related to quality warranty, please contact the seller.
6. Modification of Terms and Conditions
Aetertek reserves the right to change the terms, conditions, and notices under which this product is offered.
For Aetertek to Fill in:
Series No:
Authorized distributor/reseller’s signature:
For original purchaser to Fill in:
Name: Date purchased:
Address: Tel No:
Authorized distributor/reseller you purchased from:
Item No:
Model NO.(e.g. AT-216C)
Warranty Card
Statements for Warranty:
1: Please fill in the following form carefully. Information and signature of authorized distributor/reseller you
purchased from are also required.
-09-
Thank you for purchasing our dog trainer, one of the best training systems available for training your dog. Aetertek
warrants the product to be free from defects in material and workmanship, arising under normal use for a period of 1
year from the date of original purchase when brand new. Misuse, loss or improper handling is not covered. Aetertek
will not pay for transport/insurance costs incurred in returning the product to our authorized Reseller, such as loss of
time, inconvenience, loss of use of your product, loss of your product and any incidental or consequential damages.
To be entitled for 1 year international limited warranty of our dog trainer, please fill in the warranty card and keep it
safe together with your proof of purchase. Failure to provide documentation will void warranty. This warranty extends
only to original purchaser and is non-transferable.
2. If defected machine has been proven out of warranty for following reasons, we will charge maintenance/repair
fee:
A: Warranty time expires.
B: Damages caused by injudicious operation or some irresistible external forces (such as : flood, fires,
earthquakes,
lighting, typhoon, etc.).
C: Damages caused by not abiding by the clauses for operation, maintenance or storing the product in accordance
with the user manual.
D: Repaired, re-assembled, or changed components or circuits by user.
E: Opened the collar receiver or torn up the series number sticker or altered the warranty card's clauses by user
F: Other misuse or improper handling.
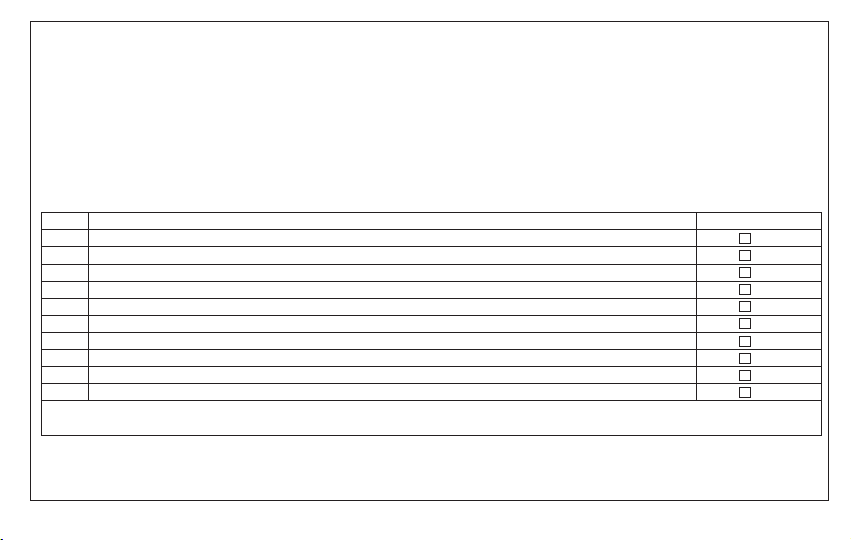
To help us solve the problems, please tick the relevant box/boxes:
Appearance damage, need to replace shell or other components
Receiver cannot be turned on
LED light does not turn on
Shock correction is not working properly, intensity level is not strong enough
Vibration correction is not working properly, intensity level is not strong enough
Beep correction is not working properly, intensity level is not strong enough
LCD display cannot be turned on, back light cannot be turned on
Buttons on transmitter do not work properly
Collar cannot be charged properly
Receiver cannot communicate with transmitter, transmitter does not send out signal
Please Tick
Descriptions of Defects
Yes
NO
If not listed above, please state here:
As agreed by related parts, the seller is responsible for after-sale service, and Aetertek only provides technical support. So if you have
any problems related to quality warranty, please contact the seller. We reserve the rights to alter or cancel the warranty procedure at
any time without prior notice.
Yes
Yes
Yes
Yes
Yes
Yes
Yes
Yes
Yes
1
2
3
4
5
6
7
8
9
10
-10-

Sy stè m es i ncl u s- - --- --- - --- - - --- - --- --- - --- --- - --- --- - --1 4
Démarrage rapide------------------------------------------15,16
Dépannage-------------------------------------------- 17,18
Conseils de dressage--------------------------------------------19
Guide de sécurité-------------------------------------------------20
Termes d’utilisation & Limitation de responsabilité-------21
Carte de Garantie---------------------------------------------21,23
-

-14-
Émetteur
Récepteur
Points de contacts
Testeur
Collier
Chargeur
Points de contact
Récepteur
Testeur Chargeur
AT-215D Systèmes Inclus R
Professional Dog Trainer
AT-211D
Collier
Émetteur
Démarrage rapide
Étape 1: Vissez l’antenne sur
l’émetteur.
Étape2:
de la batterie de l’émetteur et
installer la batterie 9V dans
l’émetteur. Aligner le + et - de
la batterie dans la prise de
l’émetteur.
Ouvrir le couvercle
a
b
Étape 3: Vissez les points
de contacts sur le récepteur
jusqu’a que les points sont
installés sécuritairement.
Normalement, ils sont déjà
installés par l’usine.
4
Conseil 1: Il est recommandé de charger le récepteur et le transmetteur 3 heures les
3 premières charges.
Placer l’oeil magique de
l’émetteur sur l’oeil
magique du récepteur
attendre jusqu’a que le
récepteur vibre. La lumière
rouge va s’allumer, pour
indiquer que le récepteur
est en fonction
5
Conseil 2: Pour tester l’appareil, placer l’émetteur sur l’oeil magique du
récepteur 3 fois de suite et le récepteur va vibrer et donner un choc. La
lumière bleu s’allumera brièvement pour indiquer que le récepteur
fonctionne normalement.
-15-
1
3
Étape 4:Charger le récepteur. Le DEL Rouge
est activé est en cours de charge. Lorsque la charge
est terminé, le DEL bleu s’allume. Une fois que vous
débranchez le chargeur, le DEL rouge reste allumé
en attente de la synchronisation, en même temps
le DEL bleu s’éteint.
Étape 5: Pour allumer le récepteur, coller l’oeil magique de
l’émetteur sur le récepteur jusqu’a ce que le récepteur vibre.
A ce moment la, une lumière rouge s’allumera pour indiquer
que le récepteur est en fonction. Si vous venez tout juste de
débrancher le récepteur de la charge, le récepteur sera déja
allumé.
Marche/arrêt
2

Démarrage rapide
Étape 8: Commencez a dresser votre chien.Mettez le collier
a travers le récepteur et puis mettez le collier (avec le récepteur)
autour du cou du chien. N’oubliez pas de laisser un espace de doigt
entre le collier et le cou du chien. Maintenant le chien est prêt
a être entraîné
-16-
Conseil 3.La durée de la correction est déterminé par le nombre
de temps que vous appuyez sur vibration ou choc. Plus vous tenez
longtemps, plus longtemps sera émis la correction.
1er chien
2eme chien
Chien 1 et 2
Conseil 4:Après 3 minutes d’inactivité, le transmetteur va se mettre en
mode veille. Vous pouvez l’allumer en appuyant sur n’importe quel fonction
6
7
Étape 7: Vérifiez la fonction du bouton. Pressez le bouton
bip, celui-ci produira un signal sonore, et de même, pressez
le bouton vibration, celui produira des vibrations. Mettez le
testeur sur les points de contacts et appuyez sur le bouton
choc. Si l’ampoule s’allume, le bouton choc est ok.
Étape 6: Synchroniser le récepteur et l’émetteur.
Appuyez sur un des 3 boutons sous le mode chien A, le 1er
chien sera synchronisé ainsi la lumière rouge éteint et la
lumière bleu commencera a clignoté. Si vous avez un autre
récepteur, allumez le et appuyez sur un des 3 boutons sous le
mode chien B, le 2eme récepteur sera synchronisé. Si vous
avez besoin d’entraîner 2 chiens en même temps, appuyez
2 boutons chien AB, les 2 récepteur sera synchronisé.

Dépannage
-17-
A: L’émetteur / récepteur est à court de batteries rapidement.
1: Assurez que le chargeur et l’émetteur / récepteur sont correctement connectés.
2: Chargez-le jusqu'à 3 heures ou plus.
B: Le transmetteur ne fonctionne pas.
Remplacez la pile 9v sec par une nouvelle ou rechargez l'émetteur.
2: For 919C and 216C, you can check whether you can lock the transmitter. If yes, you can unlock it by pushing both buttons on the right
side. Or you can push the reset button to restart your remote.
C: L’émetteur ne peut pas être synchronisé avec le récepteur.
1: Assurez que le niveau d'intensité n'est pas sur ZÉRO.
2: Vérifiez si l'antenne est installée correctement.
3: Vérifiez que le récepteur est activé et en état d'attente de synchronisation.
D: Le récepteur ne répond pas à l'émetteur.
1: Assurez que le niveau d'intensité n'est pas sur ZÉRO.
2: Assurez que le récepteur a été synchronisé avec l'émetteur et l'émetteur est sur le bon canal.
Ne changez pas le canal après la synchronisation.
3: Assurez que le récepteur et l'émetteur ont assez de puissance.
E: Le système de dressage n'a aucun effet sur mon chien.
1: Assurez que le récepteur fonctionne et que les points de contact de choc touchent à la peau du chien.
2: Essayez un niveau d'intensité plus élevé.
F: L’émetteur ne peut pas contrôler à distance 1-2 ou 1-3 récepteurs.
1: Assurez que vous avez séparément synchronisé les récepteurs.
2: Vous pouvez utiliser le récepteur ou dresser le chien seulement dans le bon canal correspondant au chien.
3: Après la recharge du récepteur/émetteur, vous avez besoin de les synchroniser à nouveau.
G: Le système de dressage est uniquement disponible à courte distance.
1: Vérifiez si l'antenne est installée correctement.
2: Assurez vous qu'il n'y a pas une forte interférence du signal dans votre entourage.
3: La portée de la télécommande pourrait être influencée par le voisinage, des obstacles, ou le climat.
4: Pour le AT-919, assurez que la pôle de l'antenne sur le dos du récepteur, traverse le collier.
R
Professional Dog Trainer
AT-211D

Dépannage
-18-
R
Professional Dog Trainer
AT-215D
H: A quoi sert le bouchon en caoutchouc sur le trou du chargeur?
Il empêche efficacement la poussière ou l'eau d'entrer dans le trou du chargeur. Vous devez brancher le
bouchon dans le trou après la charge.
I: Comment j'active / désactive le mode automatique anti-aboiement?
Pour 218, appuyez le bouton lampe de poche pour quelques secondes, puis appuyez rapidement le bouton Bip pour activer / désactiver
la fonction automatique anti-aboiement;
Pour 219, appuyez le bouton microphone pendant trois secondes pour activer / désactiver la fonction automatique anti-aboiement;
Pour 918, appuyer le bouton sélection de chien sur le côté de l'émetteur pour quelques secondes va activer / désactiver la fonction
automatique anti-aboiement;
Pour 919, appuyez rapidement le bouton lampe de poche sur la face arrière de l'émetteur va activer / désactiver la fonction
automatique anti-aboiement;
J: Bip / vibration / choc par lui-même du récepteur tout le temps ou de temps en temps.
1: Assurez que la fonction automatique anti-aboiement est éteinte. Après que le mode automatique a été désactivé, pour 218 et 918,
le LED mode automatique s'éteint; Pour 219, l’icône mode automatique (MICRO) va disparaître; Pour 919, l’icône mode automatique
(haut-parleur) est creux ; Pour AT219, la fonction auto anti-aboiement est allumée par défaut;Pour 218/918/919, la fonction auto
anti-aboiement est éteinte par défaut.
2: Assurez que le récepteur a assez de puissance, car le récepteur déclenche une alarme quand il est à court de puissance.
3: Assurez que aucun bouton de l'émetteur n’est touché.
4: Synchronisez le récepteur avec l'émetteur de nouveau.
K: Lors de l'achat du récepteur ou transmetteur individuel, pourquoi ai-je besoin de revérifier l'édition?
1.Aetertek met à jour toutes les machines ayant fréquence de 433,92 MHz à 915 MHz. Donc, chaque fois que vous achetez un
recepteur/émetteur, il vaut mieux vérifier la fréquence dont vous avez réellement besoin. Sinon, ils ne seront pas compatibles.
L: Après le débranchement du chargeur, le voyant rouge du récepteur est fixement allumé en attente de la synchronisation, mais il ne
peut jamais être synchronisé avec l'émetteur.
1.Veuillez éteindre votre récepteur et re-synchronisez.
M: Il semble que mon récepteur fonctionne lui-même sans l’opération de l'émetteur.
Vérifiez si le mode automatique anti-aboiement est en marche. Si oui, vous pouvez l’éteindre.
N: Auto anti-aboiement ne fonctionne pas correctement.
1.Assurez que la fonction automatique anti-aboiemen est activée. Vous pouvez tester la fonction en grattant les griffes de choc sur la
surface d’un bureau, et le récepteur qualifié commence à émettre des bips et vibrations.

Conseils de dressage
-19-
Ce produit est destiné au dressage du comportement de chien et à l’utilisation nécessitant
l’interaction nécessaire. N’hésitez pas à récompenser votre chien pour une bonne conduite. Les ordres
verbales avec l’encouragement contribueront au dressage et permettront d'acquérir le plus rapidement le résultat
que vous voulez.
L'âge minimum recommandé du chien pour le dressage est de 6 mois. Assurez vous que le chien a la capacité de se
concentrer et d’obéir aux ordres. Le dressage ne devrait pas être fait sur les animaux âgés ou en mauvaise santé,
autrement ils seraient incapables de résister à la stimulation .
Utilisez les ordres verbales d'abord, et complétez les ordres avec un stimulus de correction en cas de besoin. Dressez
votre chien continuellement en utilisant chaque fois les mêmes mots. Dressez votre chien seulement sur un
comportement chaque fois pour éviter la confusion et la frustration. Utilisez le moins de stimulation que possible.
Ne pas trop corriger votre chien.
Par exemple, utilisez le bip comme alerte en appuyant le bouton Bip. Le chien sera habitué au bip et va bientôt
apprendre à reconnaître le signal sonore d'avertissement avec votre commande verbale. Ne comptez pas uniquement
sur ce produit pour dresser votre chien. Certains chiens ne répondent pas à ce produit. Aetertek ne peut pas garantir
l'efficacité de tous les dressages sur votre chien. Si votre chien commence à grogner, gronder, aboyer, mordre ou
agresser quand vous utilisez le collier, cessez immédiatement de l'utiliser et communiquez avec un dresseur
professionnel.

-20-
Guide de sécurité
1. Il est interdit d'ouvrir le récepteur en cas d’endommagement de la machine ou abîmer la fonction “résistant à l'eau ”.
Sinon, la garantie sera invalide.
2. Pour garantir la fonctionnalité submersible, le couvercle de chargement en caoutchouc doit être solidement branché.
3. Utilisez uniquement le chargeur fourni pour charger le récepteur, sinon le récepteur sera probablement endommagé.
4. Il n’est pas recommandé de toucher les griffes de correction métalliques sur le récepteur, sinon elles nuiront au corps humain en mode Choc. Pour tester
la fonction Choc, veuillez utiliser le kit de test fourni.
5. S’il y a de l'eau dans le trou de charge, veuillez sécher le récepteur avant de le charger.
6. Tout collier porté trop longtemps pourrait provoquer une affection d’escarre, comme la Nécrose de pression. Pour réduire les risques, veuillez suivre les
conseils suivants:
a. Ne laissez pas le collier sur votre chien pendant plus de 12 heures par jour;
b. Examinez le cou du chien tous les jours les signes d'une éruption cutanée ou une plaie;
c. Surveillez votre chien pendant les 2 premiers jours du dressage;
d. Ajustez le collier pour éviter une pression excessive et assurer la possibilité d'insérer un doigt entre le collier et la peau de votre chien;
e. Lavez le cou du chien et les griffes de correction souvent pour assurer la propreté.
Si l’irritation de la peau se produit, arrêtez immédiatement d'utiliser le collier et appliquer une pommade antibiotique pour soulager l’irritation .
Table of contents
Languages:
Other Aetertek Pet Care Product manuals

Aetertek
Aetertek AT-216F User manual

Aetertek
Aetertek AT-215C User manual

Aetertek
Aetertek AT-118 User manual

Aetertek
Aetertek AT-919C User manual

Aetertek
Aetertek AT-211D User manual

Aetertek
Aetertek AT-215 User manual

Aetertek
Aetertek AT-219 User manual

Aetertek
Aetertek AT-216 User manual

Aetertek
Aetertek AT-216F User manual

Aetertek
Aetertek AT-216 User manual


