Aetertek AT-216F User manual

www.aetertek.com
AT-216F
0-50 Diameters
User’s Manual for Aetertek Wireless
Dog/Cat Fence System AT-216F R
AT-216F(2013.01.19) _A1
2013121 11:37:06

Additional Information for Terms of Use and Limitation of Liability
1. Terms of Use
This product is offered to you conditioned upon your acceptance without modification of the
terms, conditions, notices contained herein. Usage of this product implies acceptance of all such
terms, conditions, and notices.
2. Proper Use
This product is designed for use with dogs where training is desired. The specific temperament of
your dog may not work with this product. We recommend that you not use this product if your dog
is less than 8 pounds or if your dog is aggressive. If you are unsure whether this is appropriate for
your dog, please consult your veterinarian, certified trainer or contact our customer support.
3. No Unlawful or Prohibited Use
This product is designed for use with dogs only. This dog training device is not intended to harm,
injure, or provoke. Using this product in a way that is not intended could result in violation of
Federal, State or local laws.
4.Limitation of Liability
In no event shall Aetertek be liable for any direct, indirect, punitive, incidental, special or
consequential damages, or any damages whatsoever arising out of or connected with the use or
misuse of this product. Buyer assumes all risks and liability from the use of this product.
5. Modification of Terms and Conditions
Aetertek reserves the right to change the terms, conditions, and notices under which this product is
offered.
For parts and warranty, contact with authorized dealer shown in warranty card
AT-216F(2013.01.19) _A1
2013121 11:37:06

-01-
Hardware Included -------------------------------------------------------------------------------------02
Illustration for Transmitter---------------------------------------------------------------------------03
illustration for Receiver---------------------------------------------------------------------------04
Quick Start ------------------------------------------------------------------------------------------05-06
Transmitter Setting , Safe&Danderour Zone--------------------------------------------------07-08
Training Tips --------------------------------------------------------------------------------------09-10
Safety ---------------------------------------------------------------------------------------------------11
Common Problems & Fixes-----------------------------------------------------------------------12-13
Safety Guidance----------------------------------------------------------------------------------------14
Warranty , Terms & Conditions , compliance--------------------------------------------------15-16
Additional Information for Terms of Use and Limitation of Liability----------------------------17
AT-216F(2013.01.19) _A1
2013121 11:37:06

AT-216F
R
Wireless Dog/Cat Fence System
AT-216F
Shock Metal Prongs
(gold-plated screw)
Shock Metal Prongs
(gold-plated screw)
Small Receiver
OR
R
R
R
R
Flags
-02-
AT-216F(2013.01.19) _A1
2013121 11:37:09

Manua l
Antenna
Diameter level
Signal Icon
Will flash in emitting
Up Arrow
Increase Diameter
Down Arrow
Reduce Diameter
Main Supply Port
Diameter Covered
Battery Remained
Menu button
Enter & Quick program setting
Quick press menu button once
will enter Beep setting, it also can
go cycle from beep,vibration to shock setting
by quick press Left or Right arrow buttons. you
can turn on or turn off Beep, Vibrate or Shock by
Up or Down button. under shock function,
there have auto or manual mode, you can go
Cycle from auto mode to manual 00-10 manual
by up or down arrow button . then
one more quick press menu button will save the
program.
Left Arrow Button
Decrease Beep,
Vibrate, Shock levels
or switch Auto or
Manual mode In programming
Right Arrow Button
Increase Beep, Vibrate, Shock Level
Or switch Auto Or Manual Mode in programming
Beep Icon
Vibrate Icon
Shock Icon
Auto Mode
Manual Mode
Illustrations For Transmitter R
Wireless Dog/Cat Fence System
AT-216F
-03-
AT-216F(2013.01.19) _A1
2013121 11:37:10

Charging Port
Blue light
Red Light
Strap Port
Shock Prongs
Test Kit
ON/OFF Button
Illustrations For Receiver R
Wireless Dog/Cat Fence System
AT-216F
-04-
AT-216F(2013.01.19) _A1
2013121 11:37:11

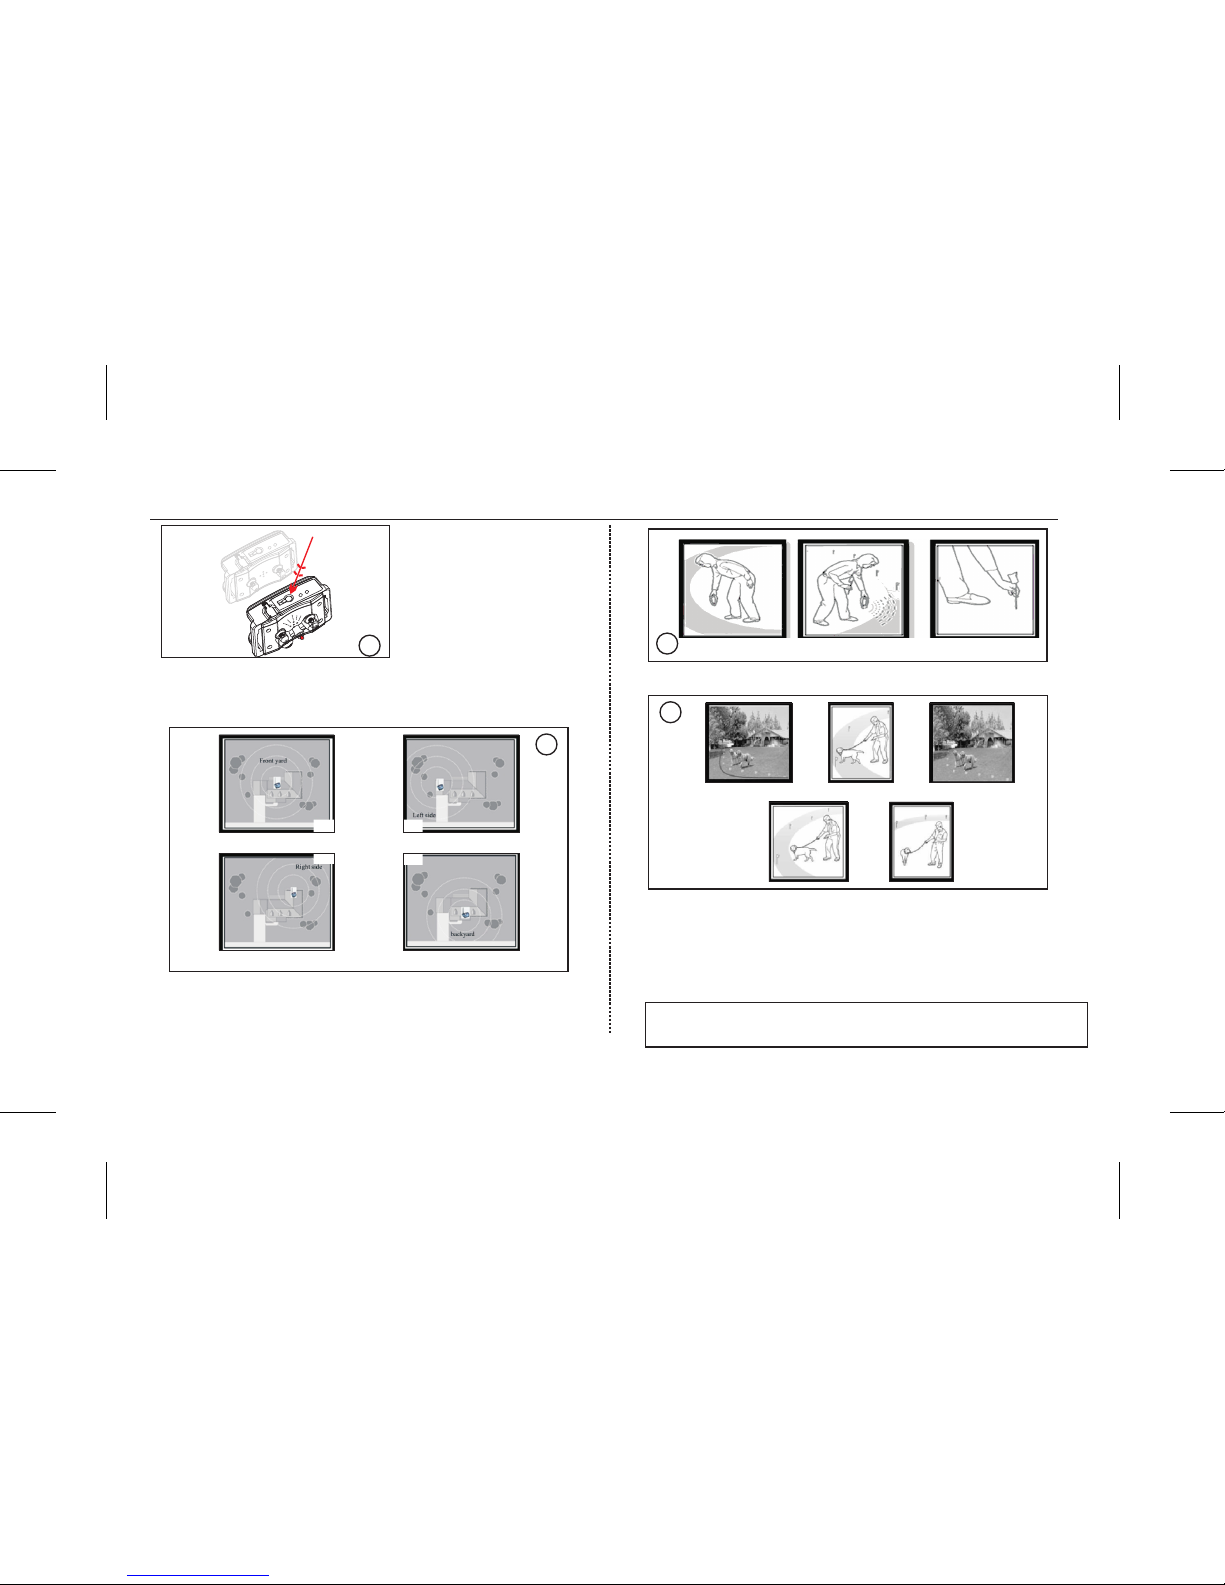
Step 1 Install the antenna onto the transmitter. Make sure the
antenna is securely attached.
1
2
Step 3: Screw the metal prongs onto the receiver till securely attached.
3
4
Step 5: Sync the receiver and transmitter.
Unplug the charger, the red Led light is solid and receiver
is waiting for sync ;
Note:if receiver had been turned off and still have power
remained,press and hold on the On/Off button until the red
Led light to be solid, then the receiver is waiting for sync.
As soon as the receiver pairs with the transmitter, the RED
LED light turns off and BLUE LED light flashes every 10 seconds.
Press and hold
on On/Off
button until the
red LED light to
be solid.
Note:if receiver just
charged, the red LED
light is solid and receiver
is waiting for sync, so no
need to do this
5
Quick Start
-05-
Step 2 Plug the charger into the DC hole of the master controller
Step 4 Charge the receivers.
A RED LED light of the receiver is on during charging. When
charging is over, the red LED light will be off with the
BLUE LED light on. Full battery charge takes about 3 hours.
Tips: Recommend to charge the receiver upto 4 hours
for the first 3 times .
within 1 meter
R
Wireless Dog/Cat Fence System
AT-216F
AT-216F(2013.01.19) _A1
2013121 11:37:13
68
Start to train:
Put the collar into the receiver, wear the receiver around dog ’s neck, leave one finger place between the collar and the neck, then it’s
ready to train.
Quick Start
-06-
Step 7 Place the master controller
The master controller should be placed somewhere that
will send the signals within the desirable zone
7
Step 6 Receiver self-exams
Short press the power button of the receiver by three times,
the receiver will Beep , Vibrate and Shock by one time .
A B
CD
The emission covers the front yard signal The emission signal covers the left yard
The emission covers the right side signal The emission cover the back yardsignal
Step 8 Test the signals and mark the border to set the wireless fence
Detect the strength of
the signals
Mark the place when the red
LED light flashes
The flags marks the border
Step 9 Train your pet to understand the warnings and stay inside
the control zone
After certain training by leash or remote control training system
with beep/vibration/shock mode, your dog/cat will associate
the signs(flags) with the the signals(beeps,vibration or shocks).
They will learn to better stay away from the flags. Otherwise
the unpleasant stimulous(vibration/shocks) will follow.
Very Important Note:
The signal maybe influenced by surroundings, weather or other wireless,
so t he boundary should be observed and adjusted slitely now and then.
9
AT-216F(2013.01.19) _A1
2013121 11:37:15
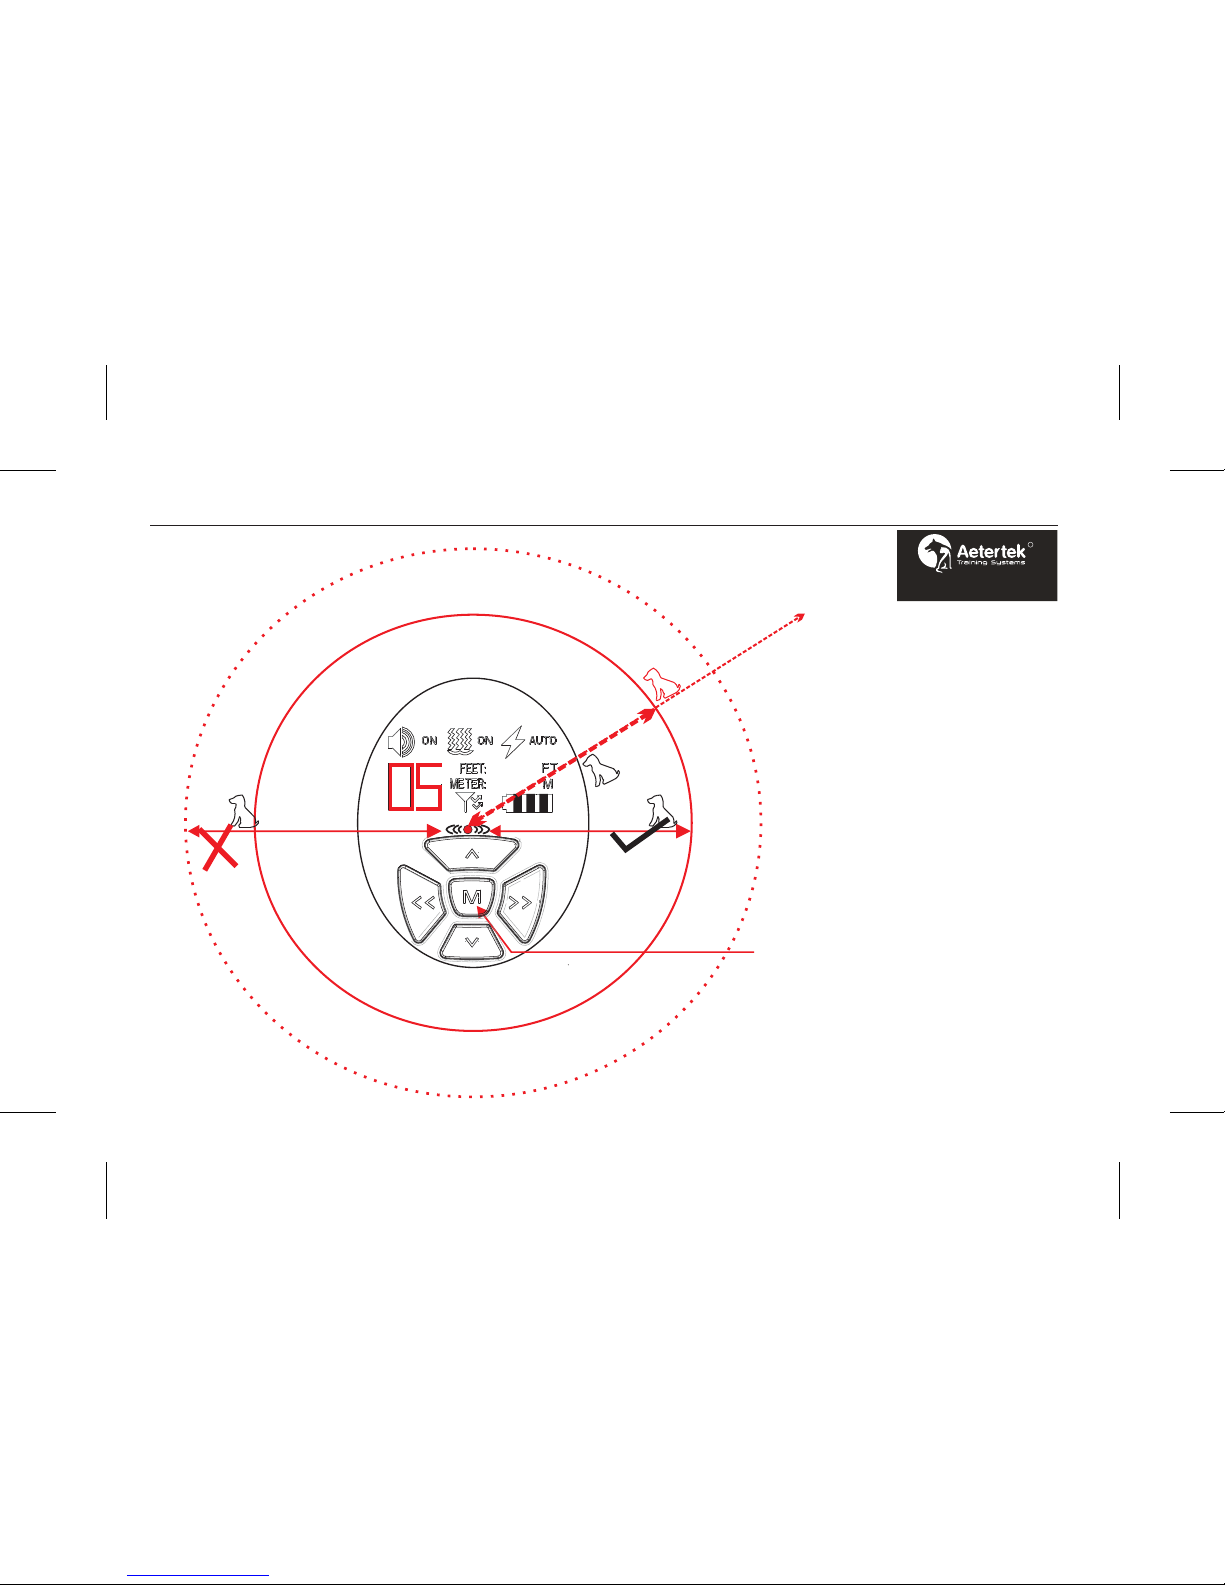
Transmitter Setting & Saf / Dangerous Zonee
25M26M
066-002
20.0-25.0
the current boundary
is 25 diameter,you must set the
whole system within 25 diameter,
if dog is going to 26 diameter,
whatever you set in transmitter,
recei verwill not response.
Safe
Dangerous
Take Level 5 for example:
Within 25 diameter zone,
dog is safe;
outside 25 diameter
boundary, dog is
dangerous.
-07-
R
Wireless Dog/Cat Fence System
AT-216F
AT-216F(2013.01.19) _A1
2013121 11:37:15

Turn on & off Beep
and vibration,Set
Shocking Level:
Press down Mbutton
by one time,
theSound Icon will
flash, then press up
or down button will
turn on or turn off
beep sound; then
press down Mbutton
once again to
confirm the setting;
or press Right
button to save the
setting and
Vibration Icon will
flash, in the same
method to turn on & off vibration;
To press Right button again to save the setting
and Shocking Icon will flash, then press down Up
or Down button, shocking levels will go a cycle
from Manual 00 to 10 and auto mode.
Transmitter Setting(Continue)
066-002
20.0-25.0
A
00 10
Adjust the diameter range :
Press up or down button time by time,
the diameter range will go a cycle
from 00-10, at the same time, the approximate
range both in feet and meter will be displayed
along with the current diameter range.
R
Wireless Dog/Cat Fence System
AT-216F
-08-
066-002
20.0-25.0
B
1
2
1
2
22
AT-216F(2013.01.19) _A1
2013121 11:37:16
R
Wireless Dog/Cat Fence System
AT-216F
-09-
AT-216F(2013.01.19) _A1
2013121 11:37:17

Aetertek
R
Wireless Dog/Cat Fence System
AT-216F
-10-
AT-216F(2013.01.19) _A1
2013121 11:37:17

AT-216F
R
Wireless Dog/Cat Fence System
AT-216F
-11-
AT-216F(2013.01.19) _A1
2013121 11:37:18

No beep, vibration or shock
R
Wireless Dog/Cat Fence System
AT-216F
-12-
AT-216F(2013.01.19) _A1
2013121 11:37:19
R
Wireless Dog/Cat Fence System
AT-216F
-13-
AT-216F(2013.01.19) _A1
2013121 11:37:19
Aetertek AT-216
R
Wireless Dog/Cat Fence System
AT-216F
-14-
AT-216F(2013.01.19) _A1
2013121 11:37:20
Aetertek
R
Wireless Dog/Cat Fence System
AT-216F
-15-
AT-216F(2013.01.19) _A1
2013121 11:37:20
Aetertek
Warranty, Terms & Conditions,
Compliance(continued)
R
Wireless Dog/Cat Fence System
AT-216F
-16-
AT-216F(2013.01.19) _A1
2013121 11:37:21

Additional Information for Terms of Use and
Limitation of Liability
1. Terms of Use
This product is offered to you conditioned upon your acceptance without modification of the
terms, conditions, notices contained herein. Usage of this product implies acceptance of all such
terms, conditions, and notices.
2. Proper Use
This product is designed for use with dogs where training is desired. The specific temperament of
your dog may not work with this product. We recommend that you not use this product if your dog
is less than 8 pounds or if your dog is aggressive. If you are unsure whether this is appropriate for
your dog, please consult your veterinarian, certified trainer or contact our customer support.
3. No Unlawful or Prohibited Use
This product is designed for use with dogs only. This dog training device is not intended to harm,
injure, or provoke. Using this product in a way that is not intended could result in violation of
Federal, State or local laws.
4.Limitation of Liability
In no event shall Aetertek be liable for any direct, indirect, punitive, incidental, special or
consequential damages, or any damages whatsoever arising out of or connected with the use or
misuse of this product. Buyer assumes all risks and liability from the use of this product.
5. Modification of Terms and Conditions
Aetertek reserves the right to change the terms, conditions, and notices under which this product is
R
Wireless Dog/Cat Fence System
AT-216F
-17-
AT-216F(2013.01.19) _A1
2013121 11:37:21
Other manuals for AT-216F
1
Table of contents
Other Aetertek Pet Care Product manuals

Aetertek
Aetertek AT-919A User manual

Aetertek
Aetertek AT-918 User manual

Aetertek
Aetertek AT-216 User manual

Aetertek
Aetertek AT-211SW User manual

Aetertek
Aetertek AT-216 User manual

Aetertek
Aetertek AT-216C User manual

Aetertek
Aetertek AT-215D User manual

Aetertek
Aetertek AT-218C User manual

Aetertek
Aetertek AT-211D User manual

Aetertek
Aetertek AT-216F User manual


