Aethra StarBridge EB1030 Product information sheet

1
StarBridge
Aethra ADSL Modem/Router line
EB1030: Ethernet
EB1040: Ethernet & USB
Easy Start
Version 1.0

2

3
INTRODUCTION 4
MINIMUM SYSTEM REQUIREMENTS 4
ADSLMODEM/ROUTERPACKAGE 5
ADSL MODEM/ROUTER OVERVIEW 6
1. CONNECTING THE ADSL MODEM/ROUTER TO YOUR COMPUTER/NOTEBOOK 8
2. CONFIGURING YOUR ETHERNET NETWORK CARD - INSTALLING YOUR USB
DEVICE 13
2.1 CONFIGURING THE ETHERNET CARD 13
2.2 INSTALLING YOUR USB DEVICE 17
3. CONFIGURING YOUR WEB BROWSER 21
4. CONNECTING TO THE INTERNET 22
FREQUENTLY ASKED QUESTIONS 25

4
Introduction
ThankyouforyourpurchaseoftheADSLModemRouter! TheADSLModemRouter
providesyou withahigh-speedbroadband Internetconnectionusingyour existing
phoneline that atthesame time allowsyouto make phonecalls.
The ADSL Ethernet & USB Modem Router can be connected to any computer/
notebook with a USB Port or 10/100 Base-T Ethernet card. For multiple users
connection,you may connectyourcomputers/notebooksto both theEthernetPort
andUSBPortontheADSLRouteratthesametimeorexpandtheEthernetconnection
of the ADSL Router with an Ethernet Hub / Switch.
This documentation assumes that you have already installed an Ethernet card on
yourcomputer/notebook.
Minimum System Requirements
•Pentium®MMX233MHz
•A CD-ROM Drive
•Ethernetcard installed withTCP/IPProtocol(required only ifyouareconnecting
tothe ETHERNET port ofyourADSLModem/Router)
Or
•USBPort (required only ifyou are connecting tothe USB Port ofyour ADSL
Modem/Router)
•HostOperatingSystemssupportforEthernetandUSBports:
Windows®98/98SE
Windows®2000
Windows®Me
Windows®XP
•HostOperatingSystemssupportonlyforEthernetport:
Windows®NT
Machintosh®
Linux® and UNIX
•WebBrowsersupport:
MicrosoftInternetExplorer4.0(orlaterversions)
Netscape®Navigator3.02(orlater versions)
5
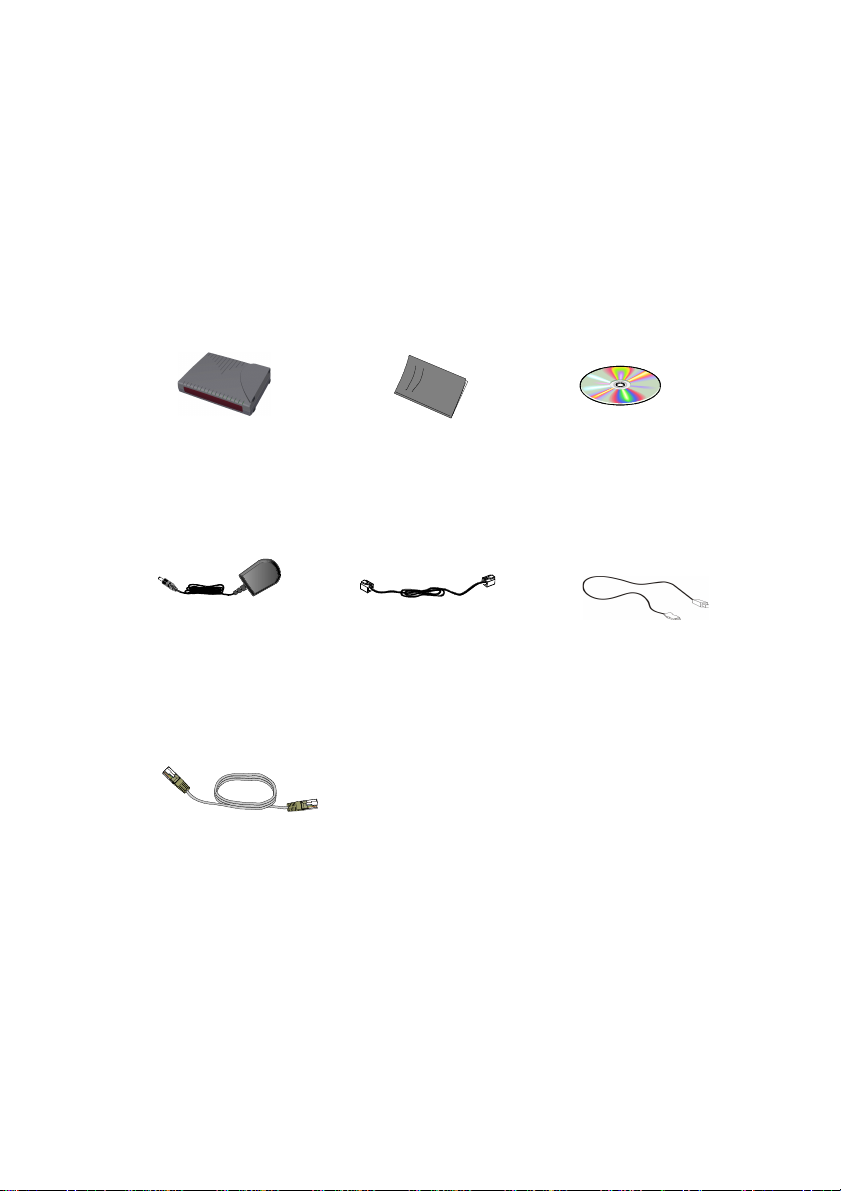
ADSL Modem/Router Package
Telefonico Cable
(RJ-11) USB Cable
(only EB1040)
(blu)
Power Adapter
(DC12V)
Ethernet Cable
(yellow)
UTP CAT-5 (RJ-45)
ADSL Modem/Router
Ethernet & USB
installazion CDEasy Start
Manual
6
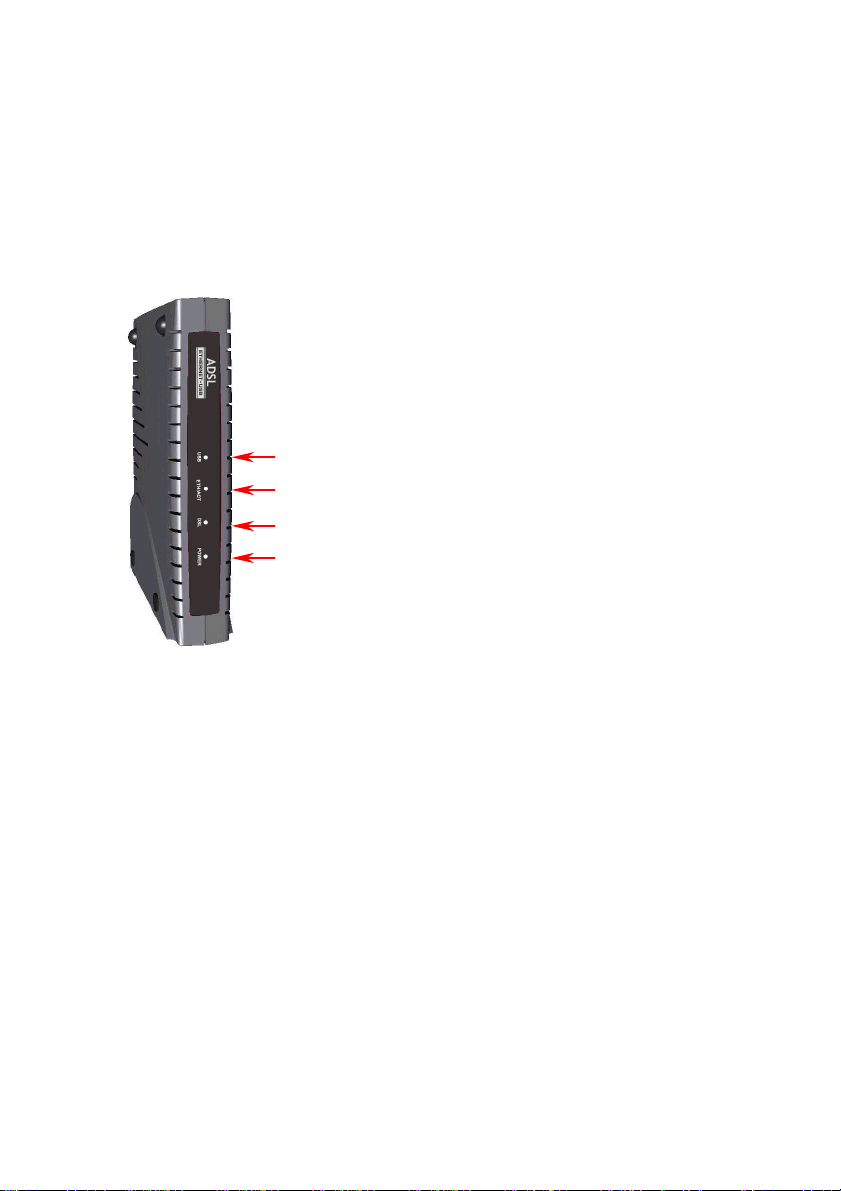
ADSL Modem/Router Overview
FrontIndicators
1
2
3
4
1) USB (only EB1040)
Lights up when the USB device driver is
successfullyinstalledinyourComputer/Notebook
2) ETH/ACT
Lights up when the Ethernet cable is properly
connectedfrom your ADSLModem/Routerto the
EthernetCard.
Flickers whenthe ADSL is transmitting/receiving
data.
3) DSL
Lights up when the ADSL connection is
established.
Flickers whenthe ADSL Modem/Router is trying
to establish a connection with the ADSL Service
Provider.
4) POWER
Lights up when power is supplied to the ADSL
Modem/Router.

7
BackPanel 1) LINE
Telephone jack (RJ-11) to connect to your
Telephone Wall Socket (ADSL line).
2) USB (only EB1040)
USB port to connect to the USB port on your
computer/notebook.
3) RESET
To reset your ADSL Router to factory default
settings.(Allcustomized settingsthatyou have
saved will be lost!) Please refer to the below
footer1on how to activate the reset function.
4) ETHERNET
10/100 Base-T Ethernet jack (RJ-45) to
connect to your Ethernet Network card or
Ethernet Hub / Switch.
5) DC IN
To connect the Power Adapter that comes
with your package.
6) SWITCH (Optional)
Switch of the low voltage DC power.
1Toactivatetheresetfunction:
- Ensure that your ADSL Router is powered on.
-Use a paper clip or a pencil tip to depress the reset button and release. At this point, the DSL indicator
light will go off, followed by the USB and ETHERNET indicators. The reset is in progress.
-When the DSL indicator starts blinking, it means that the reset process is completed. The default settings
arenowrestored.
- ADSL line is established once the DSL indicator lights up.

8
1. Connecting the ADSL Modem/Router to
Your Computer/Notebook
Power off your Computer/Notebook or/and any connected devices
before connecting to the ADSL Router!
Toconnecttoyour ADSLModem/Router,youneedtohaveeitheranEthernet Portor
aUSB Port presentonyour Computer/Notebook.
(Seethenote on the following page ifyouarenotsureof how the Ethernet and
USBPort lookslike)
1.1.1 For Single User Connection
Thefollowingshowsatypicalsingle-user connection.
Checkif yourComputer/Notebookhas anEthernetPort.
-If an Ethernet Port is present, please proceed to section 1.1.2(a) Connecting
to the Ethernet.
-IfanEthernetPortisnotpresent,locatetheUSBPortonyourComputer/Notebook
and proceed to section 1.1.2(b) Connecting to the USB.
1.1.2 For Multiple-Users Connection
Youmayconnect one computer/notebook to theEthernetPortandanotherone to
the USB Port on the ADSL Modem/Router at the same time. Refer to both section
1.1.2(a) Connecting to the Ethernet and section 1.1.2(b) Connecting to
the USB for the connections
For more than 2 Computers/Notebooks connections, you may also expand the
Ethernetconnection byconnectingthe ADSLModem/Routerto anEthernetSwitch/
Hub.

9
Seethe followingillustration.
For details on the connection and types of Ethernet Network cable to use with the
EthernetSwitch/Hub,pleaserefertothedocumentationthatcomeswithyourEthernet
Switch/Hub.
Proceed to 1.2.
NOT SURE HOW THE ETHERNET/USB PORT LOOKS LIKE?
Thefollowing are some tipstohelpyou locate yourEthernetandUSB
PortsonyourComputer/Notebook. Alternatively, youmayreferto the
documentationthatcomeswithyourComputer/Notebook.
Locating the Ethernet Port on your Computer/Notebook
MostComputers/NotebookshavelabelsdescribingthePorts.For
Ethernet Port, you will see either ETHERNET, ETH or RJ45 labeled
nearthe Port. If yourComputer/Notebookdoesnot have such
descriptions,trythefollowing:
- Picture A gives the illustration of an Ethernet Port. All Ethernet Ports
have8conductors on it. Do not mistaken with theLINEPort(PictureB)
thathasonly 6 conductors.
-TheEthernet Port is slightly bigger thantheLINEPort.
LOCATING THE USB PORT ON YOUR COMPUTER/NOTEBOOK
TheUSB Port onyourComputer/Notebookcan often beidentifiedbythe
labelUSBor the icon:
A. ETHERNET: B. LINE:
10
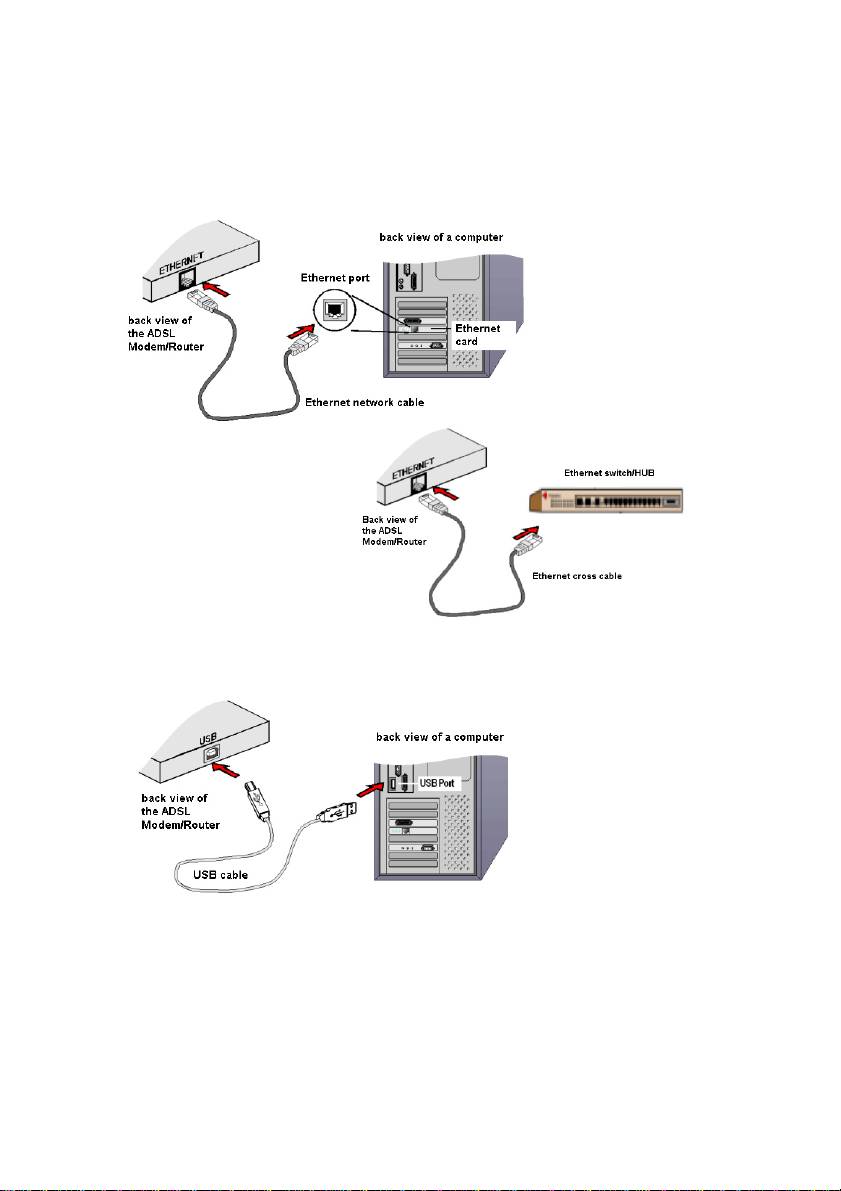
1.1.2(A) Connecting to the Ethernet
(Thisconnection is notrequiredif you areconnectingto an EthernetSwitch/Hub
formultiple-usersconnection).
Forsingle-user
connection.
Formulti-user
connection.
1.1.2(B) Connecting to the USB
You may now proceed to1.2
Forsingle-user
connection.
You may now proceed to1.2
11
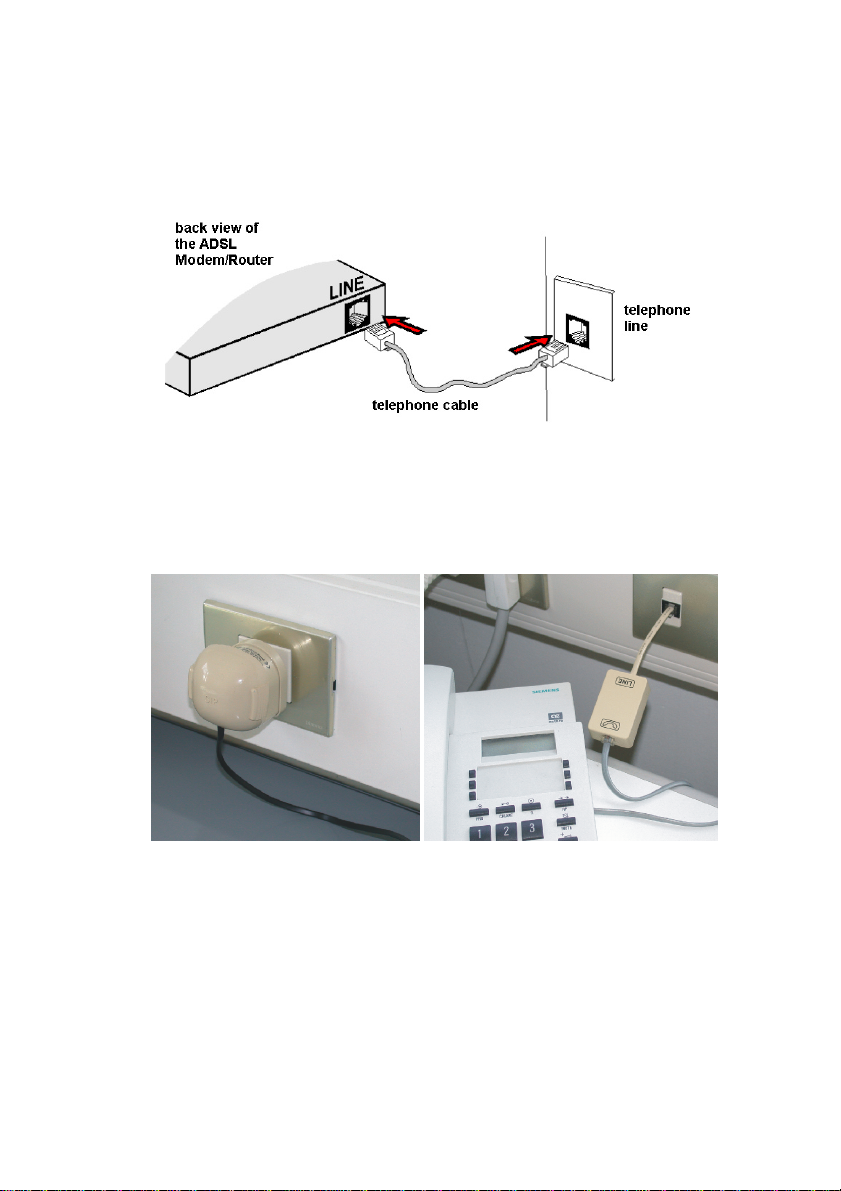
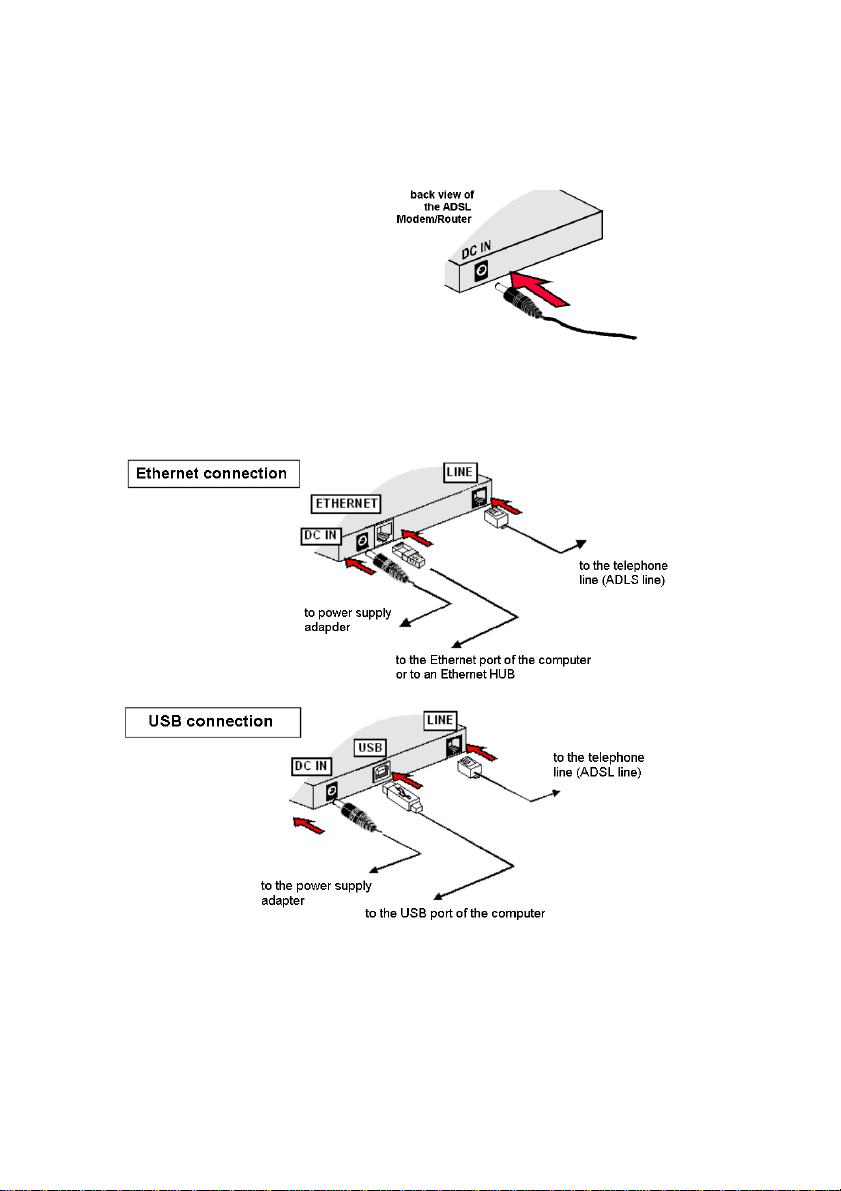
1.2 Connecting to the ADSL Line
ConnectyourADSLRoutertotheADSLlinewiththetelephonecable.
ATTENTION The user is advised to connect each telephone set to the wallet
socket,throughanADSL microfilter,according to the examples illustratedbelow.
12
1.5 Powering On
-Poweron the Power Outletthatisconnectedto your ADSL Modem/Router.
-PoweronyourComputer(s)/Notebook(s).
Pleaseproceedto2.
1.4 Checking Your Connections
Pleasecheckyourconnectionsbeforeproceeding.
1.3 Power Supply of the Modem/Router
ConnectyourADSLModem/Router
tothePowerOutletvia the Power
adapter(thatcomeswith your
ADSLRouter package).
13
2: Configuring Your Ethernet Network Card
- Installing Your USB Device
If your computer/notebook is connected to the Ethernet Port of the ADSL
Modem/Router, proceed with section 2.1. If your computer/notebook is
connectedtotheUSB Portofthe ADSLModem/Router,proceedwithsection
2.2 .
2.1 Configuring the Ethernet Card
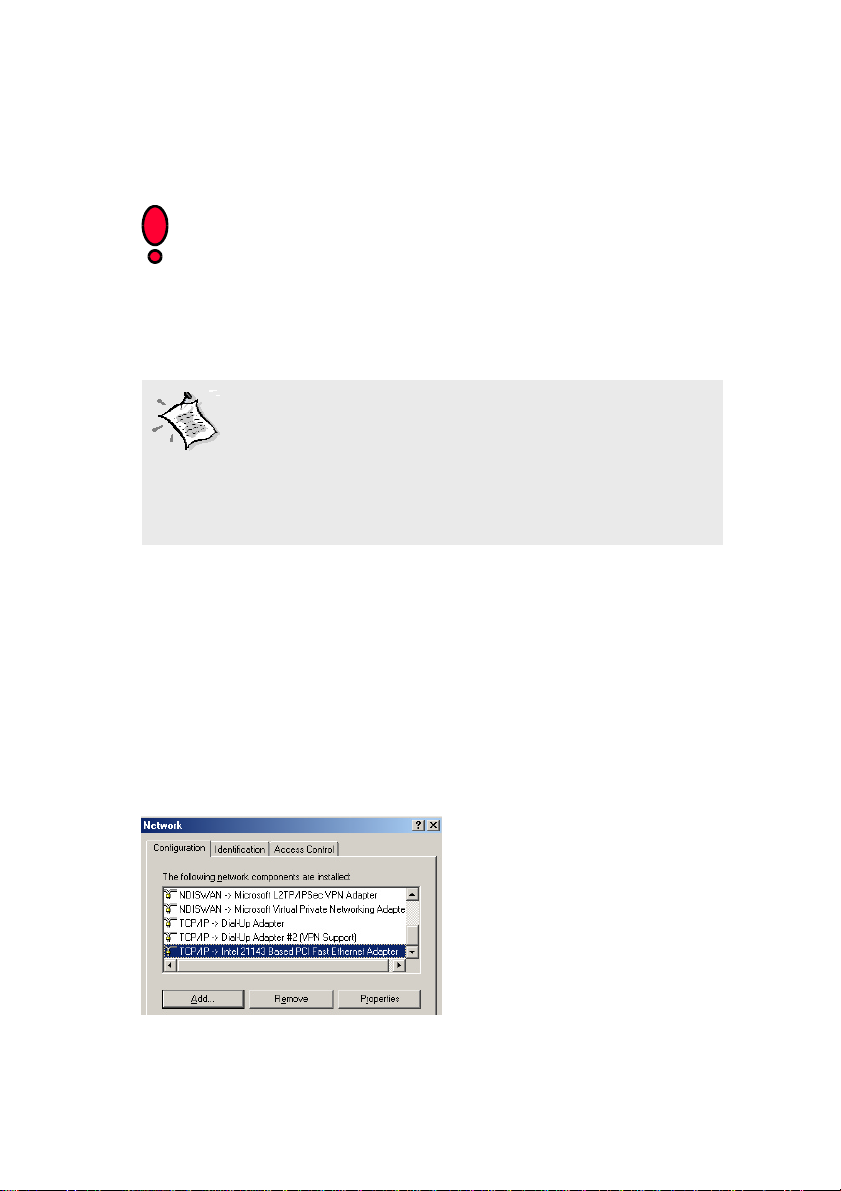
2.1.1 For Windows®98 and Windows®ME
iFrom your Windows desktop, right-click on the icon My Network Places and
selectProperties.
Or, from the menu Start->Settings->Control Panel, double click on the icon
Network.
ii From the tab Configuration, select TCP/IP-> xxx where xxx refers to the
modelof yourEthernetCard thatisconnected toyourADSL Modem/Router.
Click Properties.
1.Proceed with this section ONLY if your computer/notebook
is connected to the Ethernet Port of your ADSL Modem/
Router!
2. The following illustrated screen shots serve only as
examples. For any dissimilarities, please follow closely the
instructions prompted on your Computer.
(Thisscreen shotusesthe
Intel 21143 card model
asanexample)
14
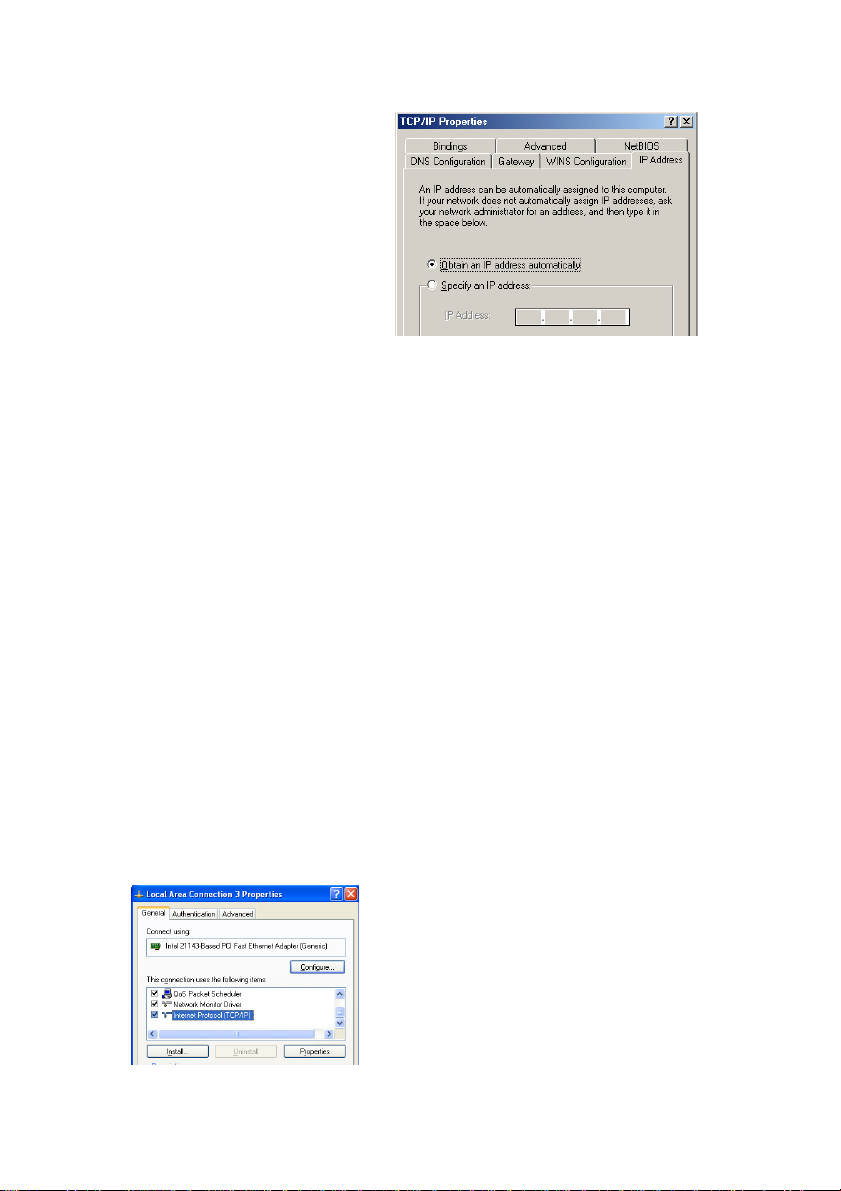
iii Click the IP address tab. Select the
option Obtain an IP address
automatically and click OK.
Click OK again to save the settings.
Ensure that your ADSL Modem/
Router is powered on. Restart your
system.
Proceed to section 3.
2.1.2 For Windows®2000 / Windows® XP
i. Windows®2000:
a) From your Windows desktop, right-click on the icon My Network Places
and select Properties.
b) Or from the menu Start->Settings->Control Panel, double click on the
icon Network and Dial-up Connections, right-click on the Local Area
Connection icon and select Properties
Windows®XP:
(Instructionsarebasedon defaultStartmenuoption)
a) From your Windows desktop, click Start > All Programs > Accessories
> Communications > Network Connections.
b) Right-click on the Local Area Connection icon that reflects the model of
yourEthernetCardthat is connected to your ADSL Modem/Router and click
Properties.
ii. Ensure that the field Connect Using indicates the model of your Ethernet
Cardthatisconnected toyourADSLModem/Router.(Thisis important
especially if you have more than one Local Area Connection icons
displayed at the Network and Dial-up Connections / Network
Connections window. Ensure that you have selected the correct one.)
Select Internet Protocol (TCP/IP) and click Properties.
(Thisscreenshot use an
Intel 21143 Fast Ethernet
cardmodelas an example )
15
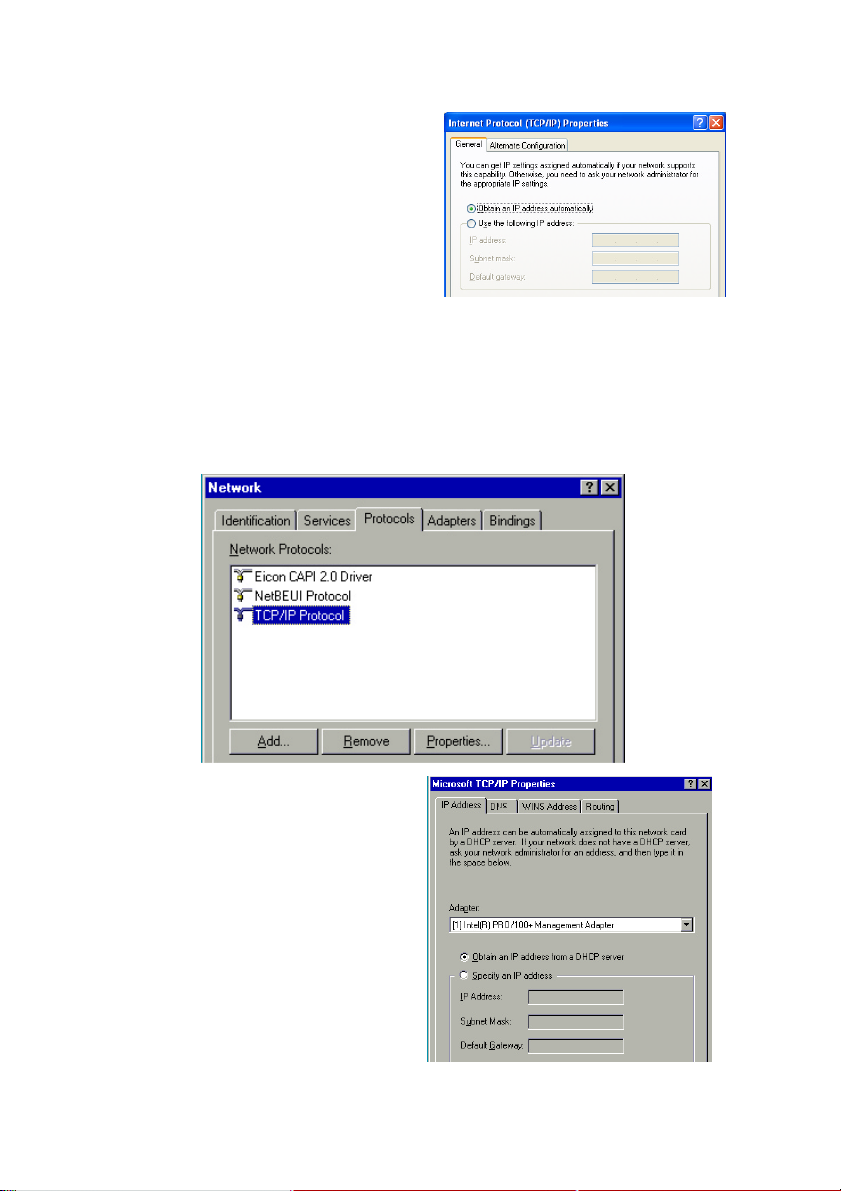
iii. Select the option Obtain an IP
address automatically and click
OK.
ClickOKagain to close.
Ensurethatyour ADSL Modem/Router
ispoweredon.Restartyoursystem.
Proceed to3.
2.1.3 For Windows®NT 4.0
iFrom your Windows desktop, right click on the icon Network Resources.
Select Properties.
ii From the tab Protocols, select TCP/IP. Click on Properties.
iii. Select the option Obtain an IP
address from a DHCP server
than click OK. Click OK again to
close.
Ensurethat yourADSLRouteris
poweredon.Restartyoursystem.
Proceed to 3.

16
2.1.3 Per MAC®OS X
iFrom the Apple menu, click on Apple->System Preferences -> Internet.
ii Ensure that in the field Show the Integrated Ethernet, connected to the
Modem/Router ADSL is selected. In the field Configure select Use of DHCP
than click on Apply now to save the new system configuration.
Ensurethat your ADSL Modem/Routerispoweredon.
Restartyoursystem.
Proceed to 3.

17
2.2 Installing Your USB Device
2.2.1 Installing the USB Driver - For Windows®98 and
Windows®98SE
i. Poweron your computer tostartWindows.
ii. Place the Installation CD into your CD-ROM Drive.
iii. Select Search for the best driver for your device (Recommended)
option and click Next.
1. Proceed with this section ONLY if your computer/notebook is
connected to the USB Port of your ADSL Modem/Router!
2. The following screen shots illustrated serve only as examples.
For any dissimilarities, please follow closely the instructions
prompted on your Computer/Notebook.
3. For Windows® 98 SE users, you may be prompted for your
Windows CD-ROM. Have it ready by your side.
iv. Click CD-ROM drives option and
click Next.
18
v.Click Next to proceed installationwiththeindicated driver.
vi. Click Finish to complete the USB driver installation.
vii.Restartyoursystem whenprompted.
Proceed to3.
Dependingon your systemconfigurations,youmay beprompted
foryourWindowsCD-ROMduringinstallation. At theprompt,
replacethe Installation CDin yourCD-ROMDrivewithyour
Windows CD-ROM andclickOK.
Atthe Copying Files dialogbox,enter the pathofyour Windows
CD-ROMandclickOK.
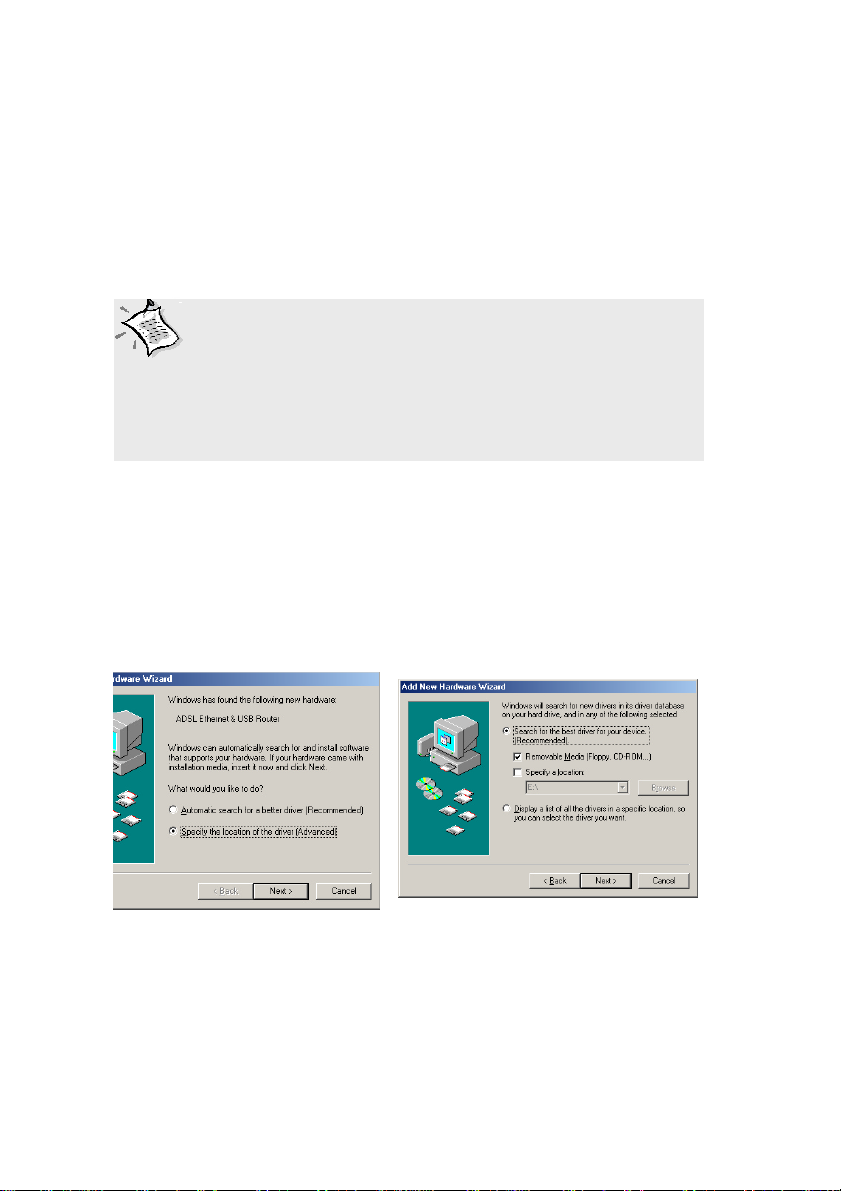
2.2.2 Installing the USB Driver For Windows®Me
i. Poweron your computer tostartWindows.
ii. Place the Installation CD into your CD-ROM Drive.
iii. At the following prompt, select Specify the location of the driver
(Advanced) option and click Next.
iv. Click Removable Media option and click Next.
v. ClickNext againto proceed installation with theindicated driver.
vi. Click Finish to complete the USB driver installation.
vii. Restartyour system when prompted.
Proceed to 3.
19
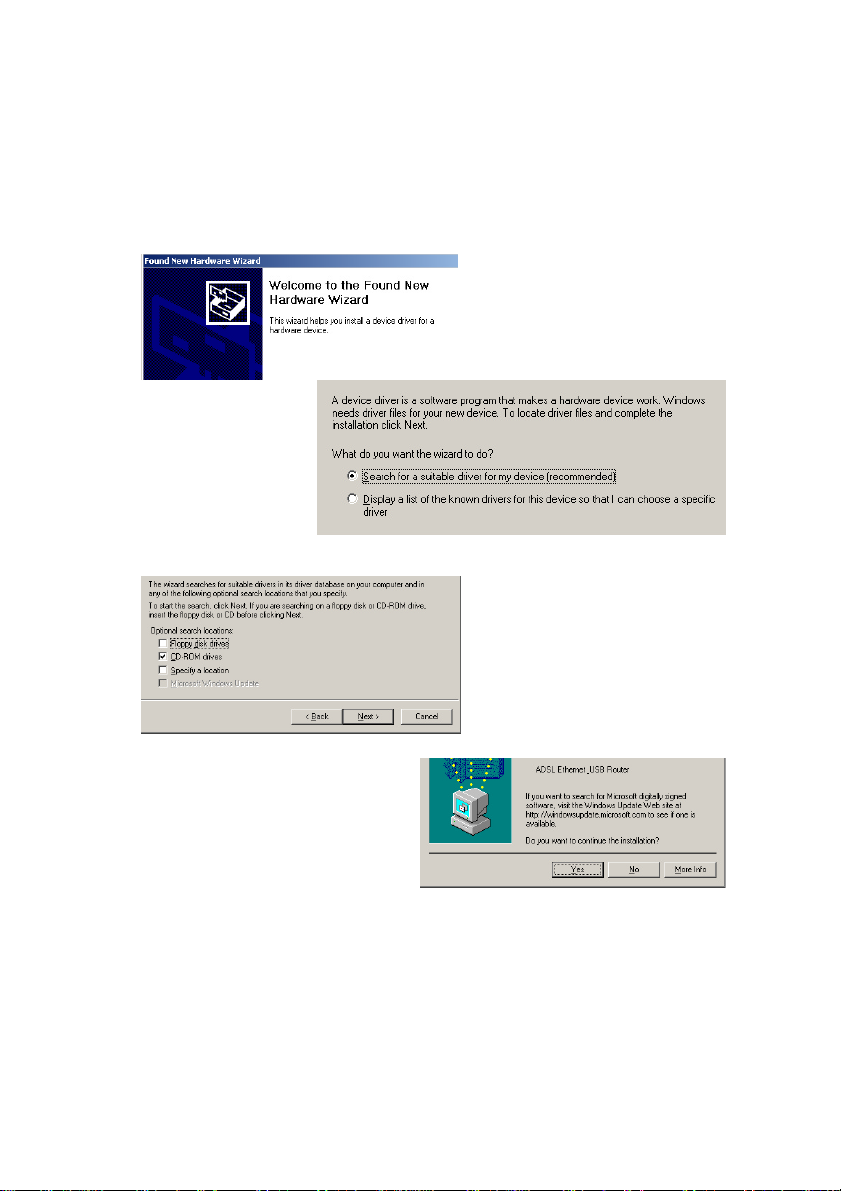
2.2.3 Installing the USB Driver For Windows®2000
i. Poweronyour computer to start Windows.
ii. Place the Installation CD into your CD-ROM Drive.
iii. At the following prompt click Next.
iv. Select Search for a suitable
driver for my device
(recommended) then click
Next.
v. Select CD-ROM drives then click Next.
vi.At the following promptclick
Next, to proceed to the
installationof
theindicateddriver.
vii.You may be prompted with digital
signaturedialogbox.(Thishappens
whenWindowsdetectsyourdriver
as a new version). ClickYes to
proceedwiththeinstallation).
viii. Click Finish when prompted.
Proceed to 3.
20
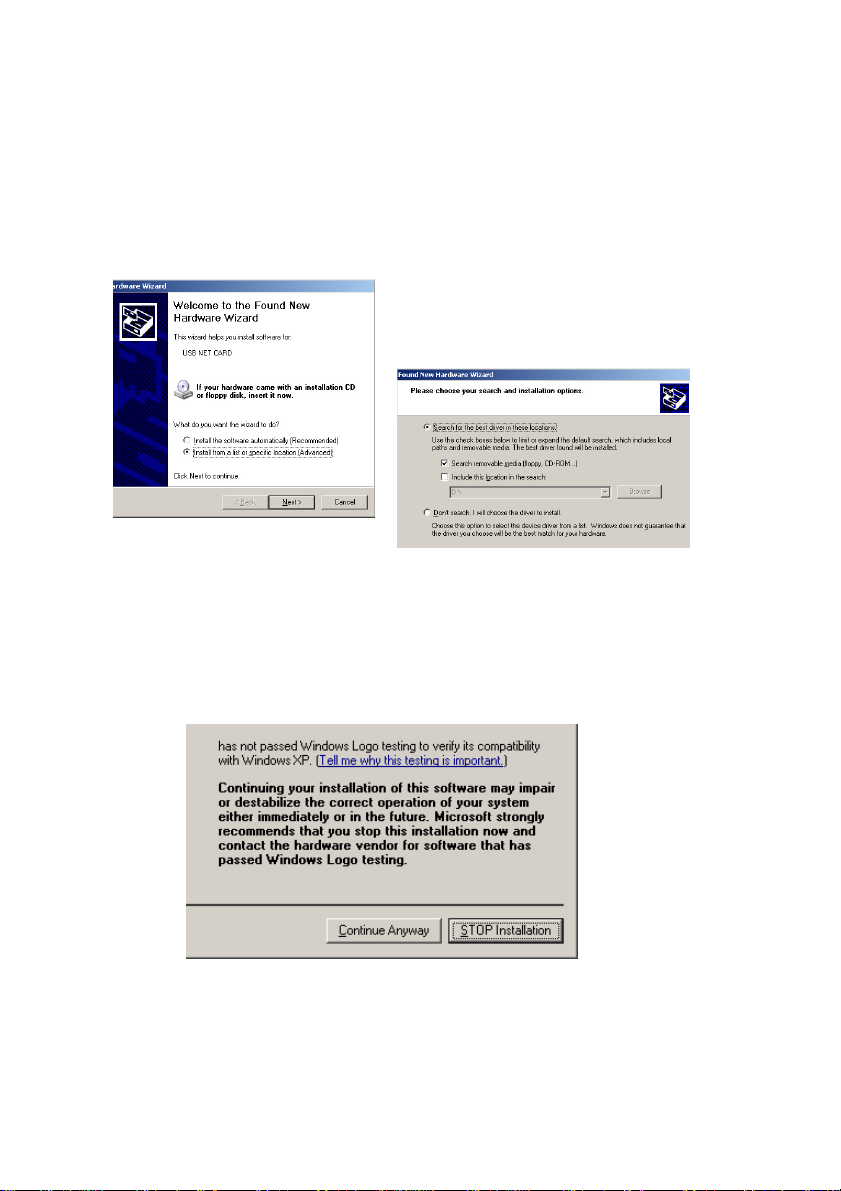
2.2.4 Installing the USB Driver For Windows®XP
i. PoweronyourcomputertostartWindows.
ii. Place the Installation CD into your CD-ROM Drive.
iii. At the following prompt Install from a list or specific location
(Advanced) option and click Next.
iv. Click Search removable media
option and click Next.
v. ClickFinish to complete the first stage of the USB driver installation.
vi. Ripeat steps ii e iii.
vii. You may be prompted with Hardware Installation dialog box. (This
happenswhenWindowsdetects yourdriveras anewversion).Click
Continue Anyway to proceed with the installation.
viii. Click Finish when prompted.
Proceed with 3.
This manual suits for next models
1
Table of contents
Popular Modem manuals by other brands


Abocom
Abocom USB ADSL Modem UA600GS Specification sheet

Sony Ericsson
Sony Ericsson MD300 user guide

Etisalat
Etisalat iModem quick start guide

Moxa Technologies
Moxa Technologies oncell G2100 Series user manual

Sierra Wireless
Sierra Wireless AirCard 580 WAN install guide

Patton electronics
Patton electronics NetLink 1082/I user manual