Afinia 3D H440 User manual

Visit "www.ania.com/support/manuals-guides/" to download the latestuser manuals.
V1.0
Quick Start Guide
Support: support@ania.com Web: http://www.ania.com
@Ania3DPrint @Ania @Ania3DPrint
¥
Support Phone: 952-279-2643

Machine Structure
Unboxing
Software and Connect Printer
Install Filament Spool
Load and Print Models
WIFI Setup Guide
Machine Structure
Table of Contents
Touchscreen
Top Lid
Front Door
Print Board
1
1
2
3
4
5/6
7
Filament Spool
Filament Spool Holder
Filament Detecting Switch
USB Socket
Power Outlet
Power Switch
SD Card Socket
WARNING: This 3D printer - when used with styrene
filament (ABS / HIPS / PC-ABS) - can expose you and
others in the same room to styrene, a chemical known
to the State of California to cause cancer.
www.P65Warnings.ca.gov
ALWAYS OPERATE THIS PRODUCT IN A
WELL-VENTILATED AREA.

Software and Connect PrinterUnboxing
①Click the Initialize button to initialize the printer.
②Click the calibration button to enter the nozzle
calibration interface.
③Click the Auto button to start the automatic
nozzle height calibration.
1\ Download the operation software Ania
Studio 2.X from https://www.ania.com/support/
downloads/choose-product/ and install it on
your computer.
2\ Turn on the power switch at the
back of the printer.
4\ Perform an automatic Calibration.
1\ Open the package and remove the printer and accessories. Remove the foams
and zip tights in the machine. Check whether the accessories are complete.
Ziptight
Foam
2\ Insert the lament spool holder
into the spool bracket on the back of
the machine.
2 3
Material Print Calibrate
Information Cong Initialize
InitializeCongInformation
Material Print Calibrate
Ania Studio
Power Switch
199.8mmNozzle Height
3\ Install the print plate, close the top lid
and close the front door.
Push the print plate
forward in the direction
of the arrow, and make
sure the print plate stick
to the side slots on the
print board.
SURFACE.
WARNING:HOT
OPERATION!
DO NOT
TOUCH
DURING
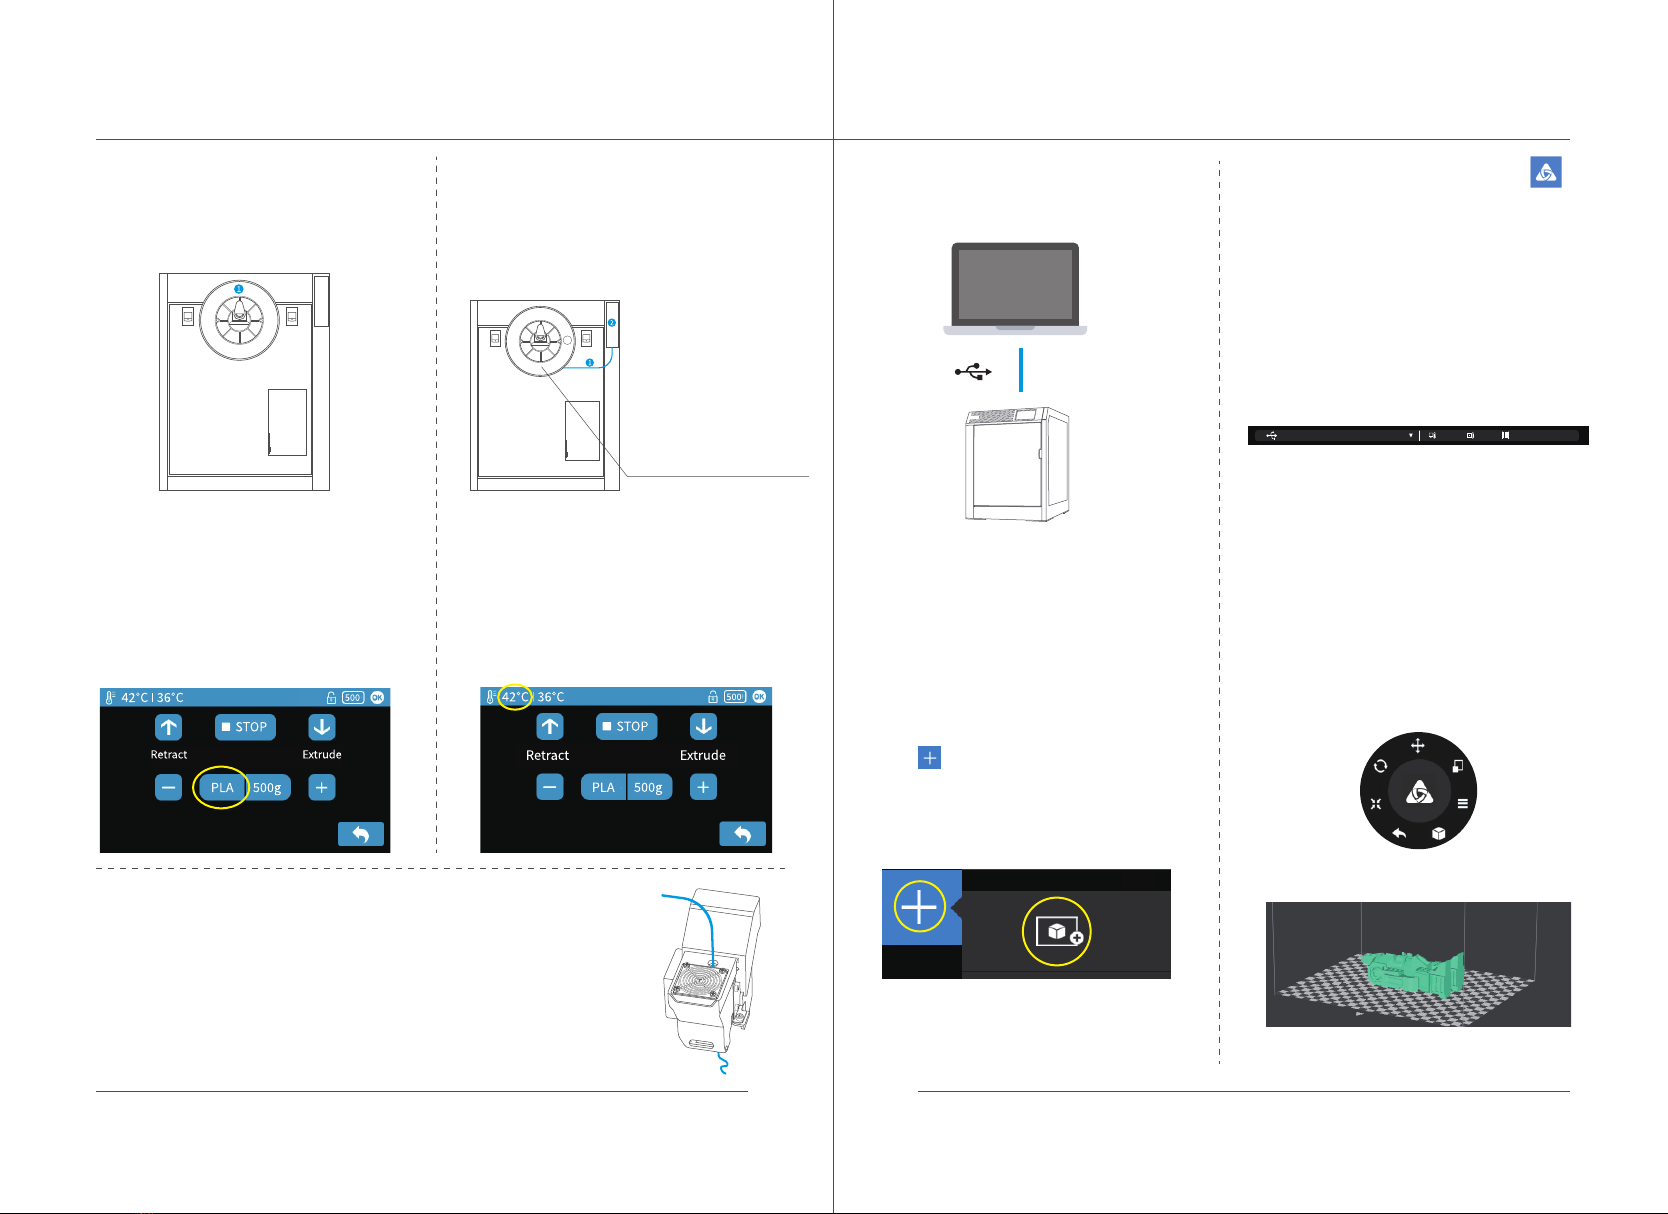
Install Filament Spool
1\ Put one spool of lament on the spool
holder ①at the back of the printer.
2\ Pull one end of the lament, feed the
lament through the lament feeding system ②
on the upper right at the back of the printer,
and pull the lament close to the extruder.
3\ In the "Material" interface of the
touchscreen, click the material button in
the circle switching among dierent types
of Filaments. Choose the lament that you
would like to use.
4\ After material selection, click the Extrude
button in the Material interface. The nozzle
starts being heated, and the heating progress
will be displayed on the upper left of the status
bar.
5\ Gently press the end of the lament into the extruder inlet and
push it to the end. When the temperature of the nozzle reaches
the preset temperature, the printer will beep and the extruder will
automatically grab the lament, and pull it in and extrude it through
the nozzle.
4 5
Note : When pulling the
wire, make sure that
the lament spool turns
counterclockwise.
Load and Print Models
1\ Connect the printer to a computer
via USB.
Connect the power cord and turn on the
power switch on the back of the printer.
2\ Start the Ania Studio2.X software.
One the top area, the software shows
the Serial Number of the machine, nozzle
temperature, print bed temperature, and
material type.
4\ Use the Print Navigator to adjust the
3D model.
PLA(Afinia)38.18420860 36.58
3\ Click the "Build" button on the main
menu to open the print interface, then
click to load the STL.

WIFI Setup Guide
1\ Click the“Cong”button. 2\ Make sure the Wi-Fi option is
“ON”, then click the Wi-Fi button
in the upper right corner.
8\ Users can turn the toggle button
“Private” on and set a password for
the printer to prevent unauthorized
access to the printer.
Wi-Fi not connected Wi-Fi connected
7\ Click the “Connect” button to nish.
If successful, the disconnected Wi icon on
the top status bar will change to connected.
6\ Input the password, then press
“return”.
4\ In the network list, choose the Wi-Fi
network that your computer is on.
5\ Click the Password eld to enter a
Wi-Fi password.
3\ Click the search button on the top
right corner, and search for Wi-Fi.
6 7
5\ Click the "Print" button and set print
parameters.
6\ Click “Print” to start transferring
the model data to the printer. Once the
transmission nishes, the software will
prompt the estimated printing time and
material consumption. At this time, the
printer can be disconnected from the
computer.
7\ After the data transmission is completed, the nozzle starts to heatup, and the model starts
to printafter the nozzle reaches the system set temperature.
PLA(Afinia)210.92420860 54.88
Preview Print Reprint
Print: 2H 49M 2S
Material: 32.13g
OK
My Network
My Network
My Network 1
My Network 2
My Network 3
My Network 4
My Network 5
My Network 6
My Network
Other Afinia 3D 3D Printer manuals


Popular 3D Printer manuals by other brands

Createbot
Createbot Mini I Operation manual

Flashforge
Flashforge Inventor quick start guide

FLASHFORGE 3D PRINTER
FLASHFORGE 3D PRINTER Adventurer 4 Series user guide

Uniz
Uniz SLASH Getting started

Ultimaker
Ultimaker S5 Material Station Installation and user manual

Snapmaker
Snapmaker Artisan quick start guide


