Dolomite MITOS P-PUMP Series User manual

MITOS P-PUMP RANGE
USER MANUAL

SHPT-487168127-329_v.2.0 Page 2 of 60
Product name
Product picture
Product description
Mitos P-Pump
(Part No. 3200016)
The Mitos P-Pump provides pulseless liquid
flow with a precise pressure driven pumping
mechanism. It operates over a wide pressure
range (0-10bar) with excellent response time
and accuracy.
Mitos P-Pump Basic
(Part No. 3200175)
The Mitos P-Pump Basic provides pulseless
liquid flow with a precise pressure driven
pumping mechanism. Connecting to a PC via
RS232 serial interface allowing data logging
and control using free PC software.
Mitos P-Pump Remote
(Part No. 3200176)
The Mitos P-Pump Remote provides pulseless
liquid flow operating over a wide pressure
range (0 - 10bar) with excellent response time
and accuracy. The design allows users to
connect to Dolomite Remote Chambers or
custom chambers with a push-click action.
Mitos P-Pump
Remote Basic
(Part No. 3200177)
The Mitos P-Pump Remote Basic connects to
a PC allowing data logging and control using
free PC software. The design allows users to
connect to Dolomite Remote Chambers o
custom chambers with a push-click action.
All four pumps in the Mitos P-Pump range provide pulseless liquid flow with a precise
pressure driven pumping mechanism. The pumps operate over a wide pressure range
(0-10bar). Please note the Basic versions of the pumps will not work without PC
control.
Mitos P-Pump range

SHPT-487168127-329_v.2.0 Page 3 of 60
Note: The Mitos P-Pump should not be used for prolonged periods with acetone.
After being used with acetone, the chamber lid should be removed to allow the
pressure chamber to be ventilated. Acetone must never be stored in the Mitos P-
Pump.
For more information on the Mitos P-Pump product range please visit our website
http://www.dolomite-microfluidics.com/webshop and download our technical datasheets.
Closed-loop Flow Control for the Mitos P-Pump
Please see separate Mitos P-Pump Flow Control user instructions for details on how to
operate using closed-loop flow control.
Closed-loop flow control is an enhancement to the Mitos P-Pump system for improved
control of flow rates from 70 nl/min to 5 ml/min. It requires that a Mitos Flow Rate Sensor
(Part No. 3200096 –3200100) is connected in-line between the pump and the microfluidic
device. Once the pump detects that a flow rate sensor is connected, the flow control
menu options are enabled. A target flow rate can then be set on the P-Pump and the
pump pressure is automatically adjusted to meet the target flow rate.
System for Flow Control: Mitos P-Pump (Part No. 3200016) with Mitos Sensor Display
(Part No. 3200095) and Mitos Flow Rate Sensor (Part No. 3200096 –3200100)

SHPT-487168127-329_v.2.0 Page 4 of 60
The key benefits of closed-loop flow control are:
•Control flow rates instead of pressure making experiments easier to set-up and
optimise.
•Improved flow rate precision: even better control over introduction of micro-scale
reagent volumes.
•Ideal for droplet generation: higher long-term droplet monodispersity in flow
control mode compared with pressure control mode.

SHPT-487168127-329_v.2.0 Page 5 of 60
Table of Contents
1Important Information 7
2Getting Started 8
3Understanding Pressure Driven Flow 9
3.1 The Basics 9
3.2 General Theory 10
4Mitos P-Pump (Part No. 3200016) 12
4.1 Features 12
The following accessories are supplied with the Mitos P-Pump: 13
User to supply the following: 13
4.2 Fluidic Connection 13
4.2.1 Opening Chamber 13
4.2.2 Inserting Fluid Vial 14
4.2.3 Closing Chamber 14
4.2.4 Adjusting Dip Tube (Part No.3200143) 15
4.3 Pneumatic Connection 15
4.4 Power Connection 16
4.5 Mitos Sensor Unit Electrical Connection 16
5Mitos P-Pump Basic (Part No. 3200175) 17
5.1 Features 17
The following accessories are supplied with the Mitos P-Pump Basic: 18
User to supply the following: 18
5.2 Pneumatic Connection 18
5.3 Power Connection 19
5.4 USB to RS232 Connection 19
5.5 Mitos Sensor Unit Electrical Connection 20
6Mitos P-Pump Remote (Part No. 3200176) 21
6.1 Features 21
The following accessories are supplied with the Mitos P-Pump Remote: 22
User to supply the following: 22
6.2 Pneumatic Connection 22
6.3 Power Connection 23
6.4 Connection to Remote Chamber 23
6.5 Mitos Sensor Unit Electrical Connection 24
7Mitos P-Pump Remote Basic (Part No. 3200177) 25
7.1 Features 25
The following accessories are supplied with the Mitos P-Pump Remote Basic: 26
User to supply the following: 26

SHPT-487168127-329_v.2.0 Page 6 of 60
7.2 Pneumatic Connection 26
7.3 Power Connection 27
7.4 USB to RS232 Connection 27
7.5 Connection to Remote Chamber 28
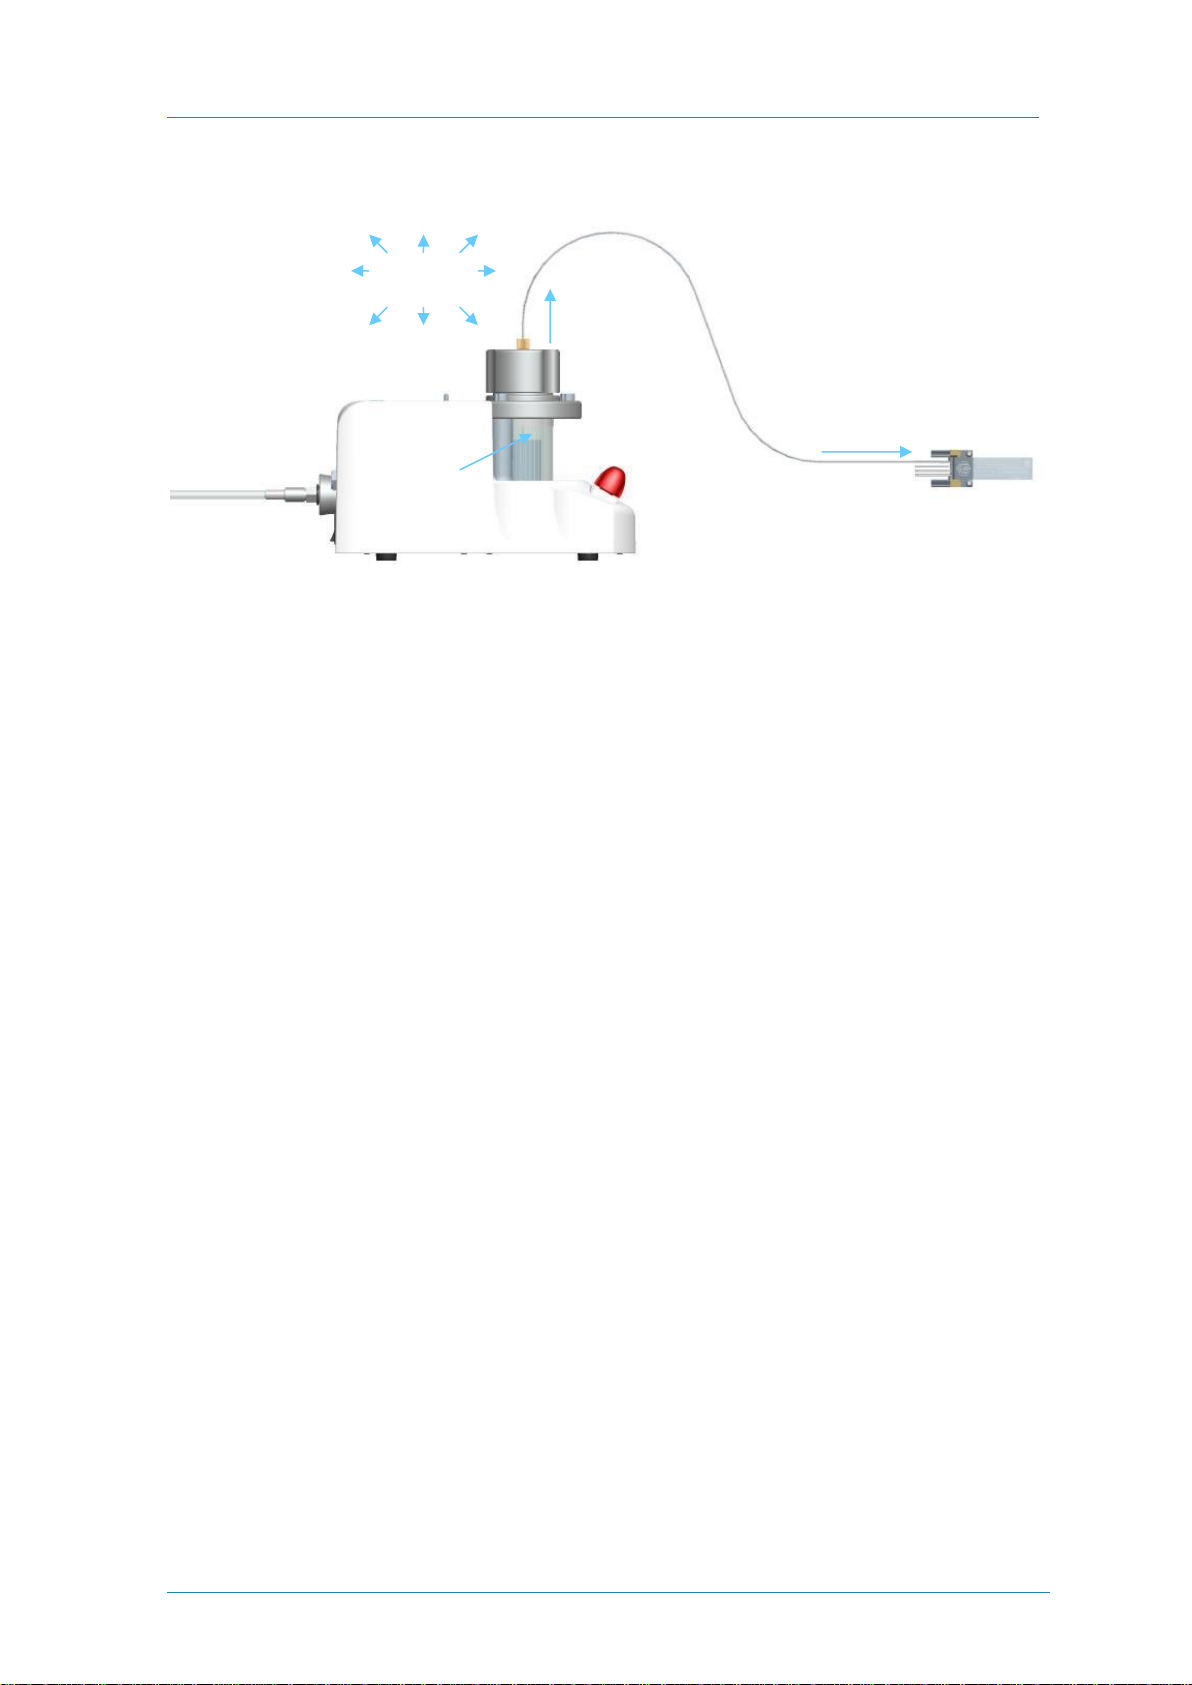
7.6 Mitos Sensor Unit Electrical Connection 28
8Mitos Sensor Units Connection 29
8.1 Standalone device 29
8.2 Connection to the top of the Mitos P-Pump 30
8.3 USB Connection 30
8.4 Electrical Connection 31
9Controlling the pumps 32
10 Manual User Control 33
Manual Control Functions 33
10.1 Pressure Control 33
10.2 User Controls 34
10.3 Menu Option: Tare 35
10.4 Menu Option: Timer 36
10.5 Menu Option: Configuration –Units 36
10.6 Menu Option: Configuration –Mode 37
10.7 Menu Option: Configuration –Resolution 37
10.8 Menu Option: Error Log 38
10.9 Menu Option: USB Data Export 39
10.10 Menu Option: Screensaver 40
10.11 Menu Option: Information 40
11 PC Software User Control 41
11.1 Detect devices 41
11.1.1 USB connection 41
11.1.2 Connection via a serial cable 41
11.2 Using the PC software 42
12 Using Flow Resistors 44
12.1 Flow Resistors 44
12.2 Flow Rate Calibration 47
13 Accessories 48
Dolomite offers a broad range of accessories including flow resistors, vessel holders
and starter kits. 48
13.1 Accessories compatibility 50

SHPT-487168127-329_v.2.0 Page 7 of 60
14 FAQ 51
15 Power consumption specification 54
16 CE Declaration of Conformity 54
1 Important Information
Overpressure Warning
Do not connect a pressure supply over 11 bar gauge to the Mitos P-Pump
range. This may result in failure of the Mitos P-Pump range and injury to
the user.
Glass Pressure Chamber Warning
If the glass pressure chamber is scratched or cracked, do not continue to
use the Mitos P-Pump. This may result in failure of the Mitos P-Pump and
injury to the user. Please contact Dolomite for replacement of the glass
vessel.
Maintenance Advice
Maintenance should only be attempted by qualified service personnel.
Removal of the back panel may invalidate any warranty. Please contact
Dolomite for further information.
General Advice on Use of Pressure Equipment
Care must be taken when the Mitos P-Pump is pressurised to ensure that
the unit is not dropped or damaged in any way.
Use of Oxygen and flammable gases
P-Pump should not be used with Oxygen or flammable gases
Eye Protection
Safety glasses should be worn at all times when using a Mitos P-Pump.
This is due to the use of pressurised equipment and is especially important
when hazardous liquids are used.

SHPT-487168127-329_v.2.0 Page 8 of 60
2 Getting Started
The Mitos P-Pump range delivers fluid by a pressure driven pumping mechanism. The
user sets the chamber pressure (gauge pressure), which determines the flow rate of liquid
from the chamber. When the user vents the chamber (or when the Mitos P-Pump range is
switched off) the pressure inside the chamber returns to atmospheric and flow stops.
Gauge pressure: The pressure relative to atmospheric pressure (ambient air)
Absolute pressure: The pressure relative to a perfect vacuum
liquid flow
liquid
flow
chamber
pressure
atmospheric
pressure

SHPT-487168127-329_v.2.0 Page 9 of 60
3 Understanding Pressure Driven Flow
The pressure driven flow concept applies to all pumps within the Mitos P-Pump range,
whether the pressure chamber is part of the pump module, i.e Mitos P-Pump and Mitos
P-Pump Basic or is connected to the pump via a pneumatic connection, i.e Mitos P-Pump
Remote and Mitos P-Pump Remote Basic.
3.1 The Basics
long tube,
small bore
If the short section of tube is replaced with a
very long section of tube with a very small
internal diameter, the water flow rate will slow
down considerably. Microfluidic channels are
equivalent to a tube with a very small internal
diameter.
long tube,
small bore
If the water is replaced with honey, then the
flow rate will slow down even further (if it flows
at all). This is due to the high viscosity of
honey.
If the Mitos P-Pump range is set to 5bar
pressure and water is pumped out through a
short section of tube, the water will be pumped
out at a high flow rate.
short tube,
large bore

SHPT-487168127-329_v.2.0 Page 10 of 60
The following table show the effect of tube length, tube bore and viscosity on flow rate.
Effect of tube length
on flow rate
Effect of tube
internal
diameter on flow rate
Effect of viscosity on flow rate
Tube
length
Flow rate
Tube ID
Flow rate
Viscosity
Flow Rate
0.01m
Q
1000µm
Q
1cP water
Q
0.1m
Q / 10
100µm
Q / 104
10cP salt solution
Q /10
1.m
Q / 100
10µm
Q / 108
100cP light machine oil
Q /100
10m
Q / 1000
1µm
Q / 1012
1000cP corn syrup
Q /1000
100m
Q / 10000
0.1µm
Q / 1016
10000cP thick honey
Q /10000
3.2 General Theory
When using the Mitos P-Pump range, it is important to be aware that the flow rate
generated at a chosen pressure is dependent on the flow resistance of the system that
you connect to and the viscosity of the fluid. This is illustrated in the diagram below.
Flow rate dependence on flow resistance
Mitos P-Pump
P = 0-10 bar
connected system
flow resistance
Rs= ƒ(d,L)
fluid flow
Q = _P_
Rs.µ
Key
P: pressure set by user (bar)
Rs: flow resistance (mm-3)
d: tube internal diameter (mm)
L: tube length (mm)
Q: flow rate (µl/min)
µ: viscosity (cP)

SHPT-487168127-329_v.2.0 Page 11 of 60
The flow resistance of a length of tube (or circular channel) is a function of the internal
diameter and length. A long tube with small internal diameter gives a high flow resistance.
This can be calculated with the following formula and used to calculate the flow rate in the
system when pumping at a selected pressure.
Formulae for flow rate calculation
For more information on using flow resistors with the Mitos P-Pump range please see
section 10.
Rs= 6.79x10⁻⁹._L_
d4
Q = _P_
Rs.µ
flow resistance of
tube or channel
flow rate generated by
a selected pressure
Insert into formula
Please note the correct units must be used as defined above

SHPT-487168127-329_v.2.0 Page 12 of 60
4 Mitos P-Pump (Part No. 3200016)
4.1 Features
Dip tube (liquid outlet)
Pressure chamber lid
Twist and click
control knob
Cancel button
Display screen
Glass pressure
chamber
Flow sensor
module dock
Pressure supply
connection
USB B connection
(from PC)
USB A connection x 2 (for data
download) Mitos Sensor Units
connection
Not used
ON / OFF switch
Power supply
connection
Mitos Sensor Units
electrical connection

SHPT-487168127-329_v.2.0 Page 13 of 60
The following accessories are supplied with the Mitos P-Pump:
•Pneumatic supply cable
•Tubing FEP 250µm ID, 1/16” OD, 2m length
•Power supply unit
•Mains IEC lead
User to supply the following:
•Vessel containing sample liquid
oLiquids to be pumped must always be placed in a suitable vial within the
glass chamber. Never place any liquid directly in the glass chamber!
•Compressed air / gas supply
4.2 Fluidic Connection
4.2.1 Opening Chamber
Locked symbol aligned
Two stage opening process
1) push down & rotate
anticlockwise
2) pull upwards, slight turn
anticlockwise & pull upwards
to open
Unlocked symbol aligned
LOCKED
UNLOCKED
PUSH DOWN & ROTATE

SHPT-487168127-329_v.2.0 Page 14 of 60
4.2.2 Inserting Fluid Vial
The fluid to be pumped must always be placed inside a small vial and not directly
into the chamber!
4.2.3 Closing Chamber
Insert fluid vial
•place fluid vial (smaller than
Ø30 x H88mm) into chamber
•use vessel holder for small
fluid vials
Connect dip tube
•insert 1/16” OD tube into
chamber lid
•leave length of tube
protruding and tighten fitting
Guide dip tube into vial
•as the chamber lid is put in
position, ensure that the dip
tube is guided into the fluid
vial
Unlocked symbol aligned
Two stage closing process
1) push down, slight turn
clockwise and push down
2) rotate clockwise until lid
clicks into position
Locked symbol aligned
LOCKED
UNLOCKED
PUSH DOWN & ROTATE

SHPT-487168127-329_v.2.0 Page 15 of 60
4.2.4 Adjusting Dip Tube (Part No.3200143)
Adjust dip tube
•ensure dip tube is below
surface of the liquid
Dip tube free (unsafe)
•in this state the dip-tube may
be ejected at high pressures
Dip tube retained (safe)
•to ensure safety, retain dip
tube by inserting into cleat
4.3 Pneumatic Connection
To connect pneumatic supply:
•use pneumatic supply cable (included) to link
compressed air / gas supply to the Mitos
P-Pump
To disconnect pneumatic supply:
•turn off compressed air / gas supply first
•push in sleeve of pressure supply connector to
release
SAFE
UNSAFE
TIGHTEN
CONNECT TO PORT
PUSH IN TO RELEASE

SHPT-487168127-329_v.2.0 Page 16 of 60
4.4 Power Connection
Insert power cable
•only use the power supply unit provided
Press switch to turn on
•1 indicates ON and 0 indicates OFF
4.5 Mitos Sensor Unit Electrical Connection
To connect to Mitos Sensor Unit:
•use electrical cable supplied with the Mitos
Sensor Unit
•The Mitos Sensor Units can also connect to the
Mitos P-Pump range via a fluidic connection for
more information please see section 8.
For more information on Dolomite’s Mitos Sensor Units please visit our website
www.dolomite-microfluidics.com/webshop
PUSH IN TO TURN ON

SHPT-487168127-329_v.2.0 Page 17 of 60
5 Mitos P-Pump Basic (Part No. 3200175)
The Mitos P-Pump Basic connects to a PC via RS232 serial interface allowing data
logging and control using free PC software or your own applications. A PC is required to
use this pump.
5.1 Features
Dip tube (liquid
outlet)
Pressure chamber
lid
On/Off switch
Glass pressure
chamber
Flow sensor
module dock
Pressure supply
connection
RS232 serial connection
to a PC
Power supply
connection
Mitos Sensor Units
electrical connection

SHPT-487168127-329_v.2.0 Page 18 of 60
The following accessories are supplied with the Mitos P-Pump Basic:
•Pneumatic supply cable
•Tubing FEP 250µm ID, 1/16” OD, 2m length
•Power supply unit
•Mains IEC lead
User to supply the following:
•Suitable Windows ™ PC
•Vessel containing sample liquid
oLiquids to be pumped must always be placed in a suitable vial within the
glass chamber. Never place any liquid directly in the glass chamber!
•Compressed air / gas supply
For information regarding fluidic connection to the Mitos P-Pump Basic
please see 4.2.
5.2 Pneumatic Connection
To connect pneumatic supply:
•use pneumatic supply cable (included) to link
compressed air / gas supply to the Mitos
P-Pump Basic
•either port can be used
To disconnect pneumatic supply:
•turn off compressed air / gas supply first
•push in sleeve of pressure supply connector to
release
CONNECT TO PORT
PUSH IN TO RELEASE

SHPT-487168127-329_v.2.0 Page 19 of 60
5.3 Power Connection
Insert power cable
•only use the power supply unit provided
Press button to switch on
•front of the pump press the button to switch ON
5.4 USB to RS232 Connection
The Mitos P-Pump Basic connects to a PC via RS232 serial interface allowing data
logging and control using free PC software. For PCs that do not support an RS232 serial
interface, Dolomite offer a USB adapter cable (Part No. 3200197).
Insert RS232 connector
•connect USB to PC

SHPT-487168127-329_v.2.0 Page 20 of 60
5.5 Mitos Sensor Unit Electrical Connection
To connect to Mitos Sensor Unit:
•use electrical cable supplied with the Mitos
Sensor Unit
•The Mitos Sensor Units can also connect to the
Mitos P-Pump range via a fluidic connection for
more information please see section 8.
For more information on Dolomite’s Mitos Sensor Units please visit our website
www.dolomite-microfluidics.com/webshop
This manual suits for next models
8
Table of contents
Other Dolomite 3D Printer manuals