AG Neovo TX-32P User manual

TX-32P LED-Backlit Touch Display
User Manual

2| « Table Of Contents »
Table Of Contents
SAFETY INSTRUCTIONS...................................... 3
WHAT’S IN THE BOX............................................. 4
Package Contents .............................................................................4
MOVING THE DISPLAY.......................................... 5
Carrying the Display.........................................................................5
Setting Down the Display ...............................................................5
Placing the Display ............................................................................5
MOUNTING THE DISPLAY ................................... 6
Adjusting Directions.........................................................................6
Wall Mount Specifications...............................................................7
Flat Wall Installation .........................................................................8
SETTING UP THE DISPLAY .................................. 9
Connectors ........................................................................................9
Control Buttons............................................................................. 10
Connecting the Power Cable...................................................... 11
Using the Touch Screen ................................................................ 12
CONNECTING TO THE DISPLAY ...................... 13
Connecting External Equipment:Video Devices..................... 13
Connecting to External Equipment:A PC ................................ 14
THE REMOTE CONTROL.................................... 16
Remote Control Buttons............................................................. 16
Using the Remote Control ......................................................... 17
OSD Setting Menu......................................................................... 18
MAINTENANCE.................................................... 20
Reducing Image Burn-in................................................................ 20
PRODUCT SPECIFICATIONS............................. 21
TROUBLESHOOTING.......................................... 22

« SAFETY INSTRUCTIONS » | 3
SAFETY INSTRUCTIONS
Please carefully read through and keep the following instructions for future reference before using
the display.
• Please follow the display’s user manual’s instructions.
• Make sure to check that the local power supply complies with the display’s power requirements
• Do not block the ventilation pores on the rear of display and ensure there is enough space around the display to
allow for heat dissipation.
• Do not open the rear cover. Damage caused by improper use is not covered by warranty.
• Our company’s software products are copyrighted. Do not copy without authorization.
• Overexposure to direct sunlight can cause damage over time and a strong reflection will disturb the user’s
experience when viewing content on the display.
• Do not install near any heat source, such as radiators, heaters, stoves or any other products that may generate
heat (including sound amplifiers).
• Do not install the display on platforms or carts that are unstable, slanted or shaky. It may cause the display to fall,
injuring people around it and damaging the display itself.We suggest consulting with professionals in the securing
of the display.
• Always comply with all warnings and instructions labels on the display.
• Do not install the display in a confined environment.
• If you wish to mount the display in a recessed TV wall mount, make sure to leave enough space around the display
to ensure good ventilation and to avoid operation at an abnormal temperature.
• Avoid excessive pressure or temperature changes as special liquid-crystal material in the display may result in
cracks, scratches or damage.
• When the display’s power is on, do not cover or block any of the display’s ventilation pores. It is suggested to
periodically clean the display’s ventilation pores to ensure heat dissipation.
• Keep candles or other flammable items away from the display to avoid risks of fire.
• Do not stick your finger or other objects in-between the display and its stand base or its neighboring area in
order to avoid harming yourself or damaging the display.
• Do not press upon the display with too great a force so as to avoid damaging the product.
• ONLY USE accessories specified by the manufacturer.
• Never attempt to repair or open the display by yourself. Opening and removing the covers may expose you to
dangerous voltage or other hazards. Failure to follow this WARNING may result in death or serious injury. Please
contact your dealer or a service technician for assistance.
• Hold the display by the sides firmly with two people when carrying the display out of the box. Do not grasp the
touch screen.
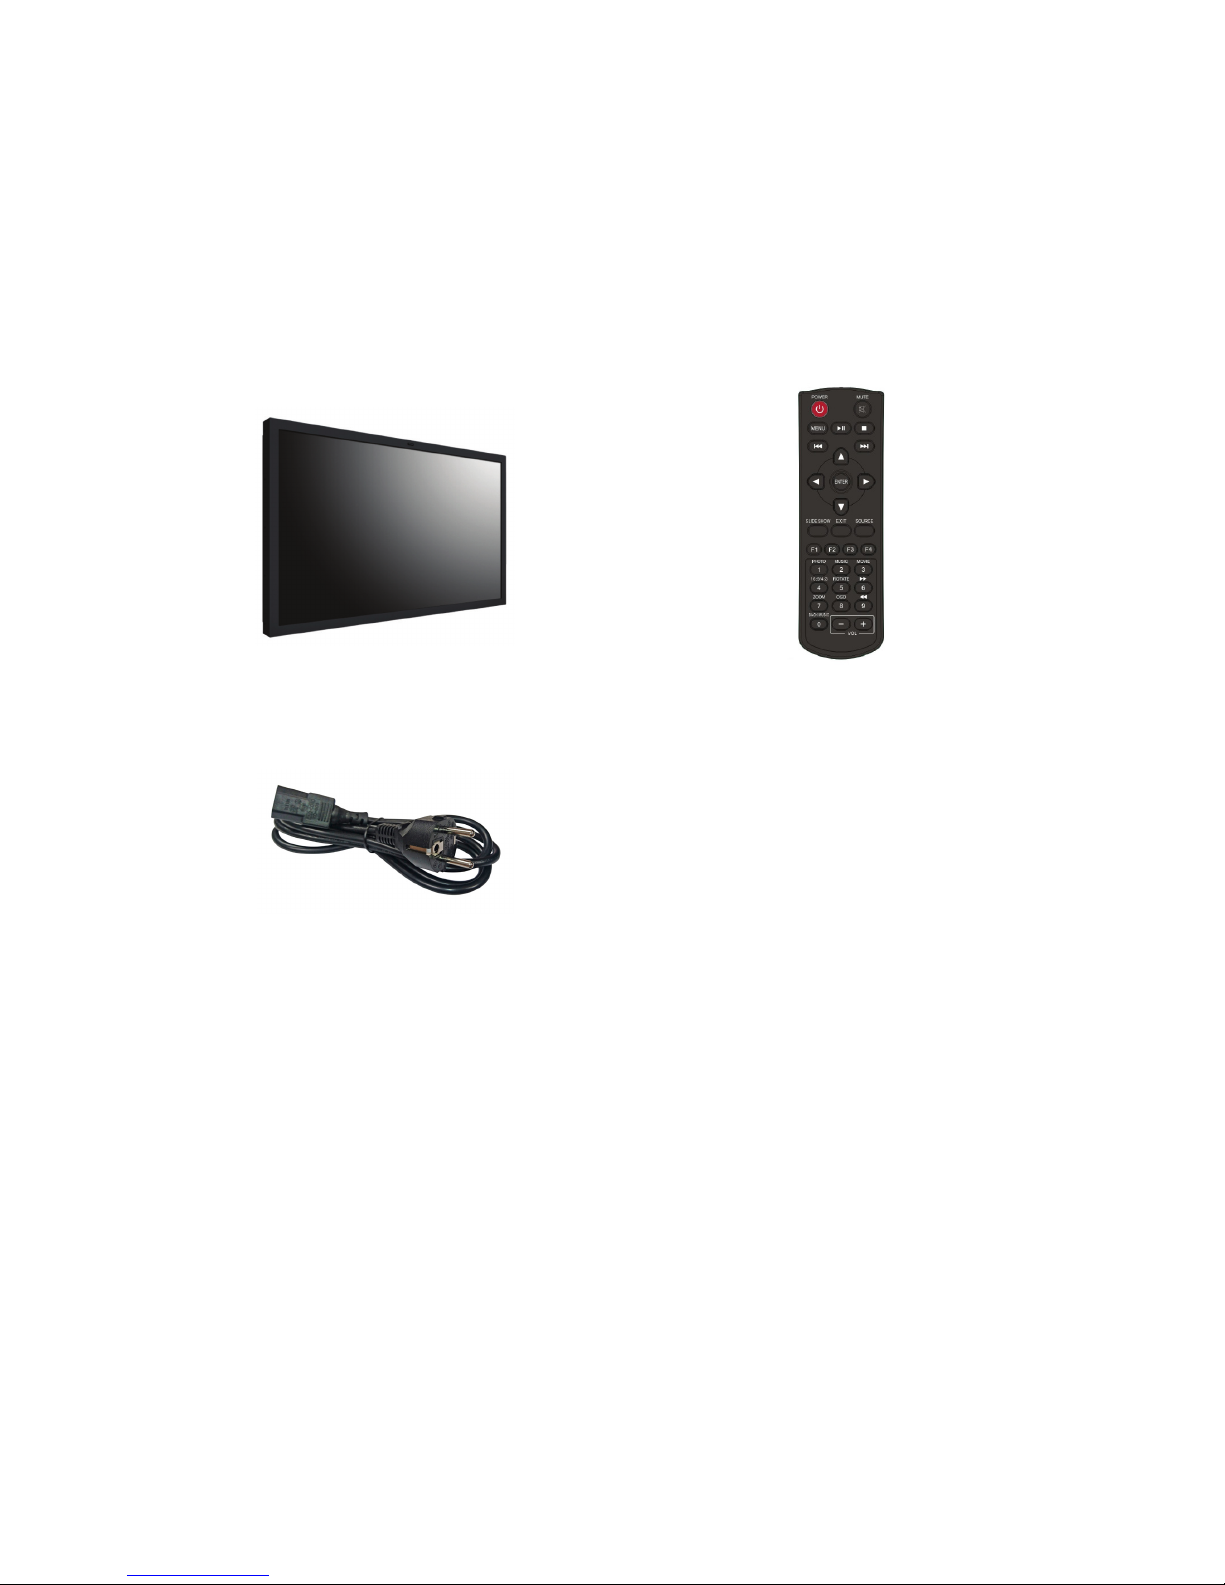
4| « WHAT’S IN THE BOX »
WHAT’S IN THE BOX
Package Contents
Check your product box for the following items. If there are any missing accessories, contact the
local dealer where you purchased your display.The illustrations in this manual may differ from the
actual product and item.
Display Remote Control
Power Cord
« MOVING THE DISPLAY » | 5
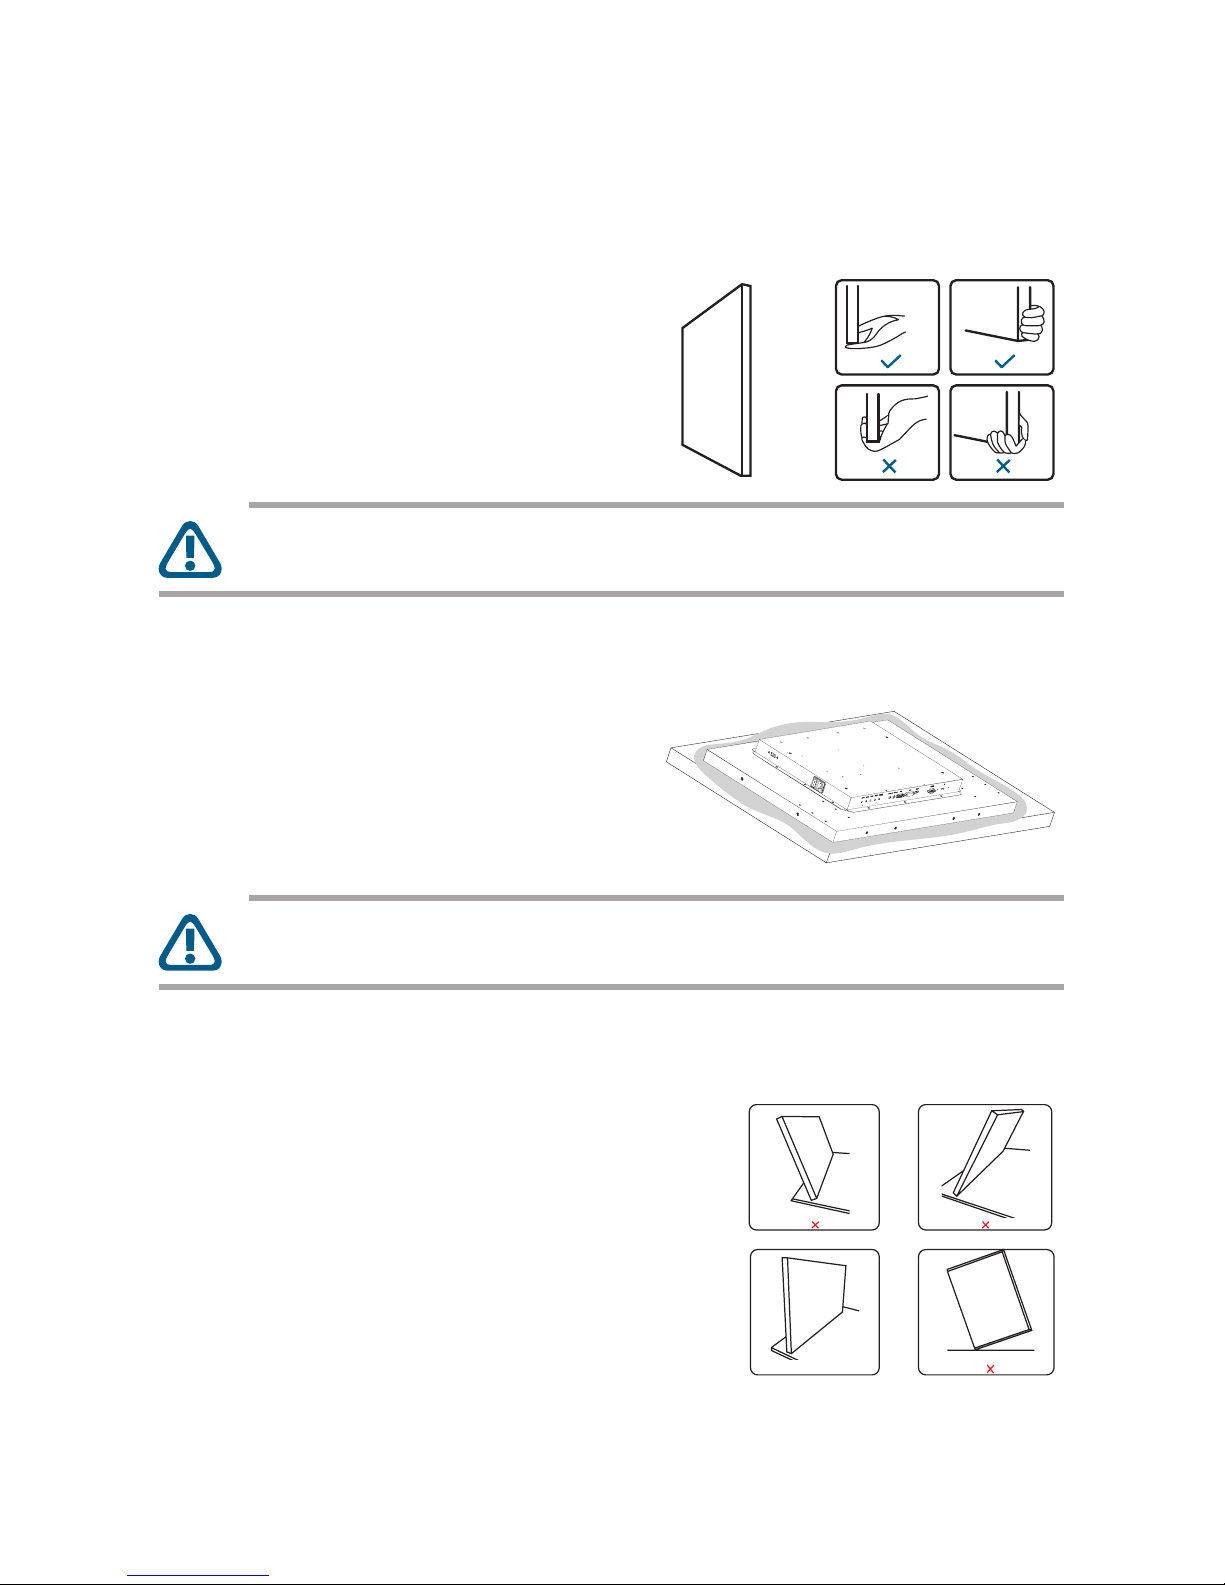
MOVING THE DISPLAY
Carrying the Display
When carrying the display, always hold it at the
right and left sides. Make sure the touch screen
faces forward and hold it with both hands when
lifting the display.
CAUTION: Avoid touching and applying stress with force using sharp objects on the
LCD panel at all times.
Setting Down the Display
When setting the display down, place the screen
face down on a flat and stable surface covered by
a protective sheet and a table cushion as shown
in the illustration provided.
CAUTION: Never press or place anything on the back cover.This may damage the
internal parts of the display.
Placing the Display
When placing the display, keep the display upright.
Never tilt the display towards the left, right or
balanced on a single corner of the frame.

6| « MOUNTING THE DISPLAY »
MOUNTING THE DISPLAY
Adjusting Directions
To avoid injuries, follow the installation instructions to safely install the display onto a wall.
It is recommended to allow a certified installation company conduct the wall mounting operation.
CAUTION: Dropping the display may cause injuries to people around it.
NOTE: A wall mount may be purchased separately for easier installation.
If you wish to use the display vertically or horizontally, adjust the display such that the main power
switch on the back of the display is pointing leftward or downward (as illustrated below), if the
display is not mounted in such a way the display may not function properly.
Horizontal usage Vertical usage
NOTE: Before mounting, make sure there is space to connect your devices. See
“CONNECTING TO THE DISPLAY” on page 13”

« MOUNTING THE DISPLAY » | 7
Wall Mount Specifications
VESA MOUNTING
The back of the display is equipped with four screw-holes and matching taped holes, with aVESA
dimension of 400mm x 200mm. Firmly secure aVESA mount onto the display using 4 M6 screws
(maximum length: 10mm, maximum torque: 18 kgf.cm).
400.00mm
200.00mm

8| « MOUNTING THE DISPLAY »
CUSTOM DESIGNED MOUNTING
This display also supports custom designed mounts with twelve screw-holes designed for custom
designed mounts instead of the standard mounts. Firmly secure six screws on the left side and
six screws on the right side onto the display using M4 screws (maximum length: 10mm, maximum
torque: 12 kgf.cm).
NOTE: Custom designed mounts are sold separately.You can obtain additional
accessories from your local dealer.
Flat Wall Installation
Installation on a Flat Wall (Minimum Distance: 40mm)
When installing the display on a wall face, there has to be at least 40mm of
space between the display and the wall for ventilation purposes.
NOTE: To prevent glare when used in a location with strong sunlight, it is recommended
to add a cover over the display.

« SETTING UP THE DISPLAY » | 9
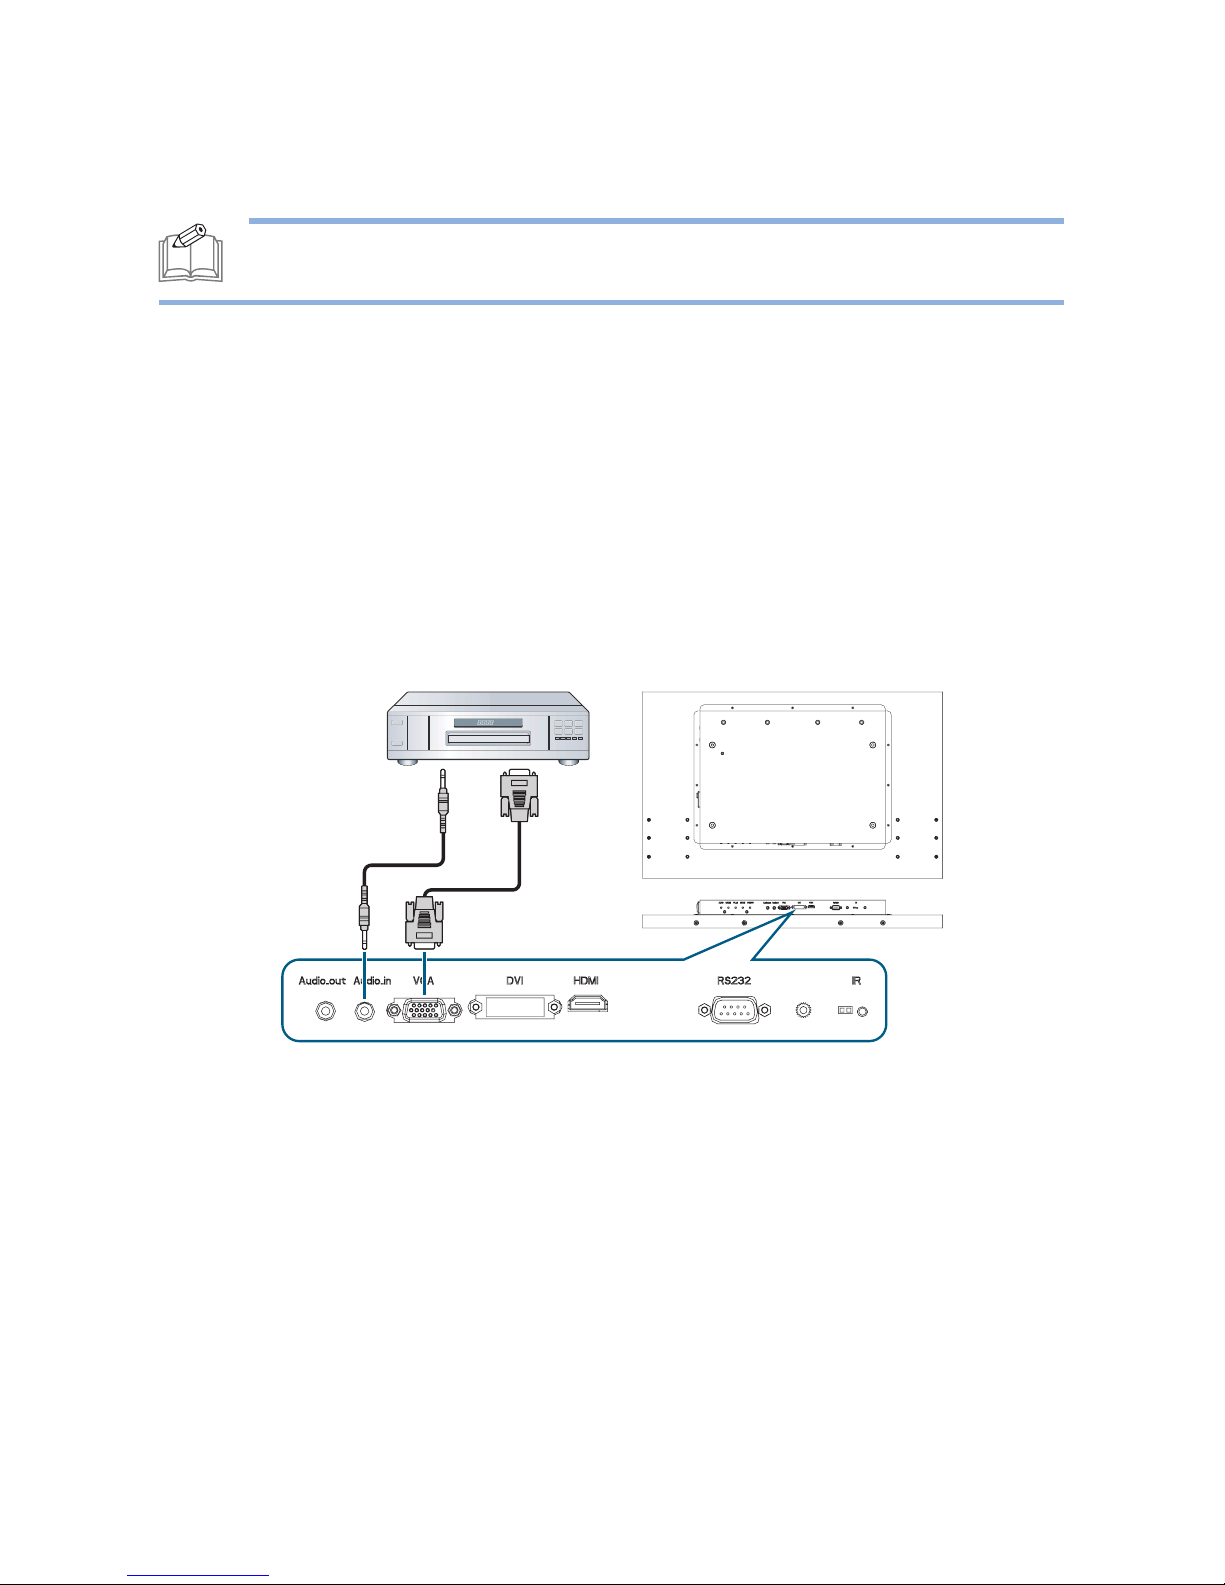
SETTING UP THE DISPLAY
Connectors
The following image and table show the location of the connectors and the different connections
available.
4
1
2
3
6 7 8 9 105
Item Description
1USB Touch Port Connects with a host computer using a USB cable for touch screen
support.
2Power Switch Switches the main power on/off.
3AC-IN Connects with the supplied power cord.
4Audio Out Outputs the audio that is supplied by the video source.
Connects with an external audio amplifier, etc.
NOTE: Headphones and earphones are not supported.
5Audio In Connects with the audio out connector of a video source such as a
computer,VCR, or DVD player when the display is connected to the
source via the VGA or DVI connector.
6VGA Connects with the analog video output (VGA) of a computer.
7DVI Connects with the digital video output of a computer, etc.
8HDMI Connects with devices supporting audio/video data using the HDMI
interface.
9RS232 Connects with the serial IO connector of another device.
10 IR Sensor Receives the signal from the remote control.

10 | « SETTING UP THE DISPLAY »
Control Buttons
The following image and table identifies the functions of the control buttons. You can also control
the display via the remote control buttons. See “THE REMOTE CONTROL” on page 16.
1234 5
Item Description
1AUTO Automatically selects the video input source when the OSD menu is
off, or exits the current menu when the OSD menu is on.
2MINUS Decreases the display’s volume.
3PLUS Increases the display’s volume.
4MENU Displays the On Screen Display (OSD) menu.
5POWER Turns the power on/off.
NOTE: This button does not work when the power
switch is off.

« SETTING UP THE DISPLAY » | 11
Connecting the Power Cable
1. Connect the power cord to the display.
2. Fully insert the plug into the power outlet socket.
CAUTION: Loose connections may cause noise. Do not plug and unplug the power
cord repeatedly in a short period of time.
NOTE: The supplied power cord varies depending on the country where you purchased
this apparatus. For all cases, use a power cord that matches the AC voltage of the power
outlet and has been approved by and complies with the safety standard of your country.
3. Turn on the Power Switch.
Power switch
CAUTION: When disconnecting the AC power cord, be absolutely sure to first
disconnect the plug from the outlet socket.

12 | « SETTING UP THE DISPLAY »
Using the Touch Screen
LCD display has touch screen functionality which allows you to connect a computer to the display
and control the computer’s interface via touch gestures on the display. To use this touch screen
function, connect the USB cable to the USB port of the display and a computer. After completing
the driver installation, you can operate the computer by tapping, swiping, or scrolling the display.
NOTE: The touch driver will be installed automatically for the systems running
Microsoft Windows 7,Windows 8,Windows 10, Linux 2.6/3.6, Mac OS, OSX, and Android
(2.3 or above).
NOTE: Certain touch gestures, such as zoom-in, zoom-out and rotate, may not work
depending on the application or software your computer supports.
NOTE: This USB port works only for the touch screen functionality and does not
support the external USB devices, such as MP3, printer, and hard drive etc.
« CONNECTING TO THE DISPLAY » | 13
CONNECTING TO THE DISPLAY
NOTE: Before making connections, make sure that the power for all the connected
equipment is off.
Connecting External Equipment:
Video Devices
ANALOG CONNECTION
1. Connect a D-SUB cable to the VGA connector and connect an audio cable to the AUDIO IN
connector.
2. Press the [SOURCE] button of the remote control to select the video input source (D-SUB).
Once selected, the audio input setting will automatically switch to [PC].

14 | « CONNECTING TO THE DISPLAY »
DIGITAL CONNECTION
1. For HDMI connections: Connect an HDMI cable to the HDMI connector.
For DVI connections: Connect a DVI cable to the DVI connector and connect an audio cable
to the AUDIO IN connector.
2. Press the [SOURCE] button on the remote control to select the video input source (HDMI
or DVI). Once selected, the audio input setting will automatically switch to the correct audio
source for the video connection.
Connecting to External Equipment:
A PC
USING THE HDMI PORT

« CONNECTING TO THE DISPLAY » | 15
USING THE DVI PORT
USING THE VGA PORT
NOTE: Once connected, press the [SOURCE] button to set the video input according
to the type of connection made.

16 | « THE REMOTE CONTROL »
THE REMOTE CONTROL
Remote Control Buttons
The remote control is the primary way to access and control the display.The following table
identifies the functions of the remote control buttons.
Button Description
1POWER Switches the power on/off.When
the power indicator is not lit, no
controls will work.
1
5
6
7
2
3
4
2MENU Displays the OSD menu.
(See “OSD Setting Menu” on
page 18).
3[] / [] / [] / []
UP/DOWN/LEFT/
RIGHT
Moves the selection in the OSD
menu.
4EXIT Exits the current Menu
5ENTER Accepts the settings made in the
OSD menu.
6SOURCE Switches the video input source.
Use the [] or [] buttons to
directly select [HDMI], [DVI],
[VGA].
7VOLUME Adjusts the display’s volume.
[+] increase [–] decrease

« THE REMOTE CONTROL » | 17
Using the Remote Control
Point the infrared remote control toward the display’s remote control sensor when operating the
remote control. Ensure the remote control is aimed at the correct location where the IR sensor is
located. Use the remote control within a distance of less than 3m/9.84ft from the IR sensor, and a
horizontal and vertical angle of less than 30 degrees.
30°30°
NOTE: The display’s remote control sensor is located at the rear of the display.
NOTE: Even when the remote control is pointed at the front of the display and within
the correct range of the sensor, there is a chance that environmental conditions may
affect the proper functioning of the remote control.
NOTE: If the remote control is not working, replace the batteries with new ones and
make sure that they are correctly inserted: Place two 1.5V AAA batteries matching the (+)
and (–) signs to the (+) and (–) indications of the battery compartment.

18 | « THE REMOTE CONTROL »
OSD Setting Menu
This LCD display is equipped with an OSD (On Screen Display) menu
for easy adjustment of the display’s settings.
The OSD menu can be accessed by using the remote control.
1. Press the [MENU] button to display the OSD menu.
2. Press the [] or [] button to choose the sub-menu items and
press the [ENTER] button.
3. In the sub-menu, press the [] or [] button to select the settings
you want to adjust. If there is a sub-list under the sub menu, press
the [ENTER] button again to enter the sub-list.
4. Press the [EXIT] button to return to the previous menu, or press
the [MENU] button to exit the OSD menu.
Color
Image Setting
OSD Menu
Signal Source
Audio
Special
1920 x 1080 60Hz
The tables below list the initial OSD functions in the main menu screen. For more detailed options,
check the on-screen menu provided by the display.
MAIN MENU:
• COLOR (Adjusts the display color settings)
Contrast Adjusts the contrast of the display (0/100)
Brightness Adjusts the brightness of the display (0/100)
Color Adjust Adjusts the color of the display (Red/Green/Blue)
Color Temp Adjusts the color temperature of the display
(9300 /6500/5800/sRGB/USER)

« THE REMOTE CONTROL » | 19
• IMAGE SETTING (Adjusts the display image settings)
Clock Adjusts the time of the internal clock
Phase Adjusts the frequency phase of the display (0/100)
Sharpness Adjusts the picture sharpness of the display (0/4)
H Position Adjusts the picture along the horizontal axis (0/100)
V Position Adjusts the picture along the vertical axis (0/100)
• OSD MENU (Adjusts the OSD Menu parameters)
OSD H Pos. Moves the position of the OSD Menu horizontally (0/100)
OSD V Pos. Moves the position of the OSD Menu vertically (0/100)
OSD Timer Changes the OSD Menu timer settings (0/30) where the
number selected for this setting equals the number of seconds
the OSD menu is displayed before it automatically closes (if 0 is
selected the OSD menu will not automatically close)
Language Chooses the OSD Menu language from the following options:
English / French / German / Spanish / Traditional Chinese /
Simplified Chinese / Japanese
Anti Burn In Triggers the screen saver function (if ON is selected the display
will automatically turn off for 30 minutes and turn back on for
30 minutes)(ON/OFF)
• SIGNAL SOURCE (Adjusts the signal input of the display)
D-SUB Selects to connect the display to the D-SUB
DVI Selects to connect the display to the DVI
HDMI Selects to connect the display to the HDMI
Auto Search Auto searches for a signal connection to the display (ON/OFF)
• AUDIO (Adjusts the sound settings)
Volume Adjusts the volume from (0/16)
Mute Mutes or unmutes the audio (ON/OFF)
Audio Select Chooses an audio source (HDMI/PC)
• SPECIAL (Designates screen parameters)
Aspect Ratio Adjusts the aspect ratio of the display
(OFF = Original size / ON = Full Screen)
Reset Resets the display to its factory default
Auto Automatically resets the horizontal position, vertical position,
frequency and phase for VGA source
Monitor Id Sets a unique 2-digit number for the display (1/16)
20 | « MAINTENANCE »
MAINTENANCE
Reducing Image Burn-in
When a static image is displayed on the screen for a long uninterrupted period of time, image burn-
in might occur causing the image quality of the display to be degraded.
To reduce burn-in damage to the screen, it is recommended that either enable the screen saver
function, or turn off the display when it is not in use for long period of time.The screen-saver
function works by displaying a set of dots on a random region of the screen for several seconds
then switching the position of the dots, and then repeating this process for 30 minutes.
To enable the screen saver function, use the remote control to access the Main Menu and select
OSD Menu > Anti Burn In > On.
NOTE: When the screen saver function is enabled, the function will work a continuous
30-minute on-then-off loop until it is disabled.
Table of contents
Other AG Neovo Touch Panel manuals


Popular Touch Panel manuals by other brands

Graff
Graff Aqua-Sense Manual instruction

AMX
AMX Modero NXD-1500VG Dimension Guide

Avalue Technology
Avalue Technology OFP-15W38 Quick reference guide

Oxford PRECISION
Oxford PRECISION OXD-331 IDM Operator's manual

Arbor Technology
Arbor Technology P1215 Quick installation guide

ZKTeco
ZKTeco ZK55 Series user manual

Guangzhou Video-Star Intelligent
Guangzhou Video-Star Intelligent CHTF-05/01.2.22 installation manual

Indumicro
Indumicro IMP-A157 user manual

ICOP Technology
ICOP Technology PPC-150T-APL Series user manual

AllSee Technologies
AllSee Technologies Freestanding Infrared Multi Touch Screen... user manual

Harman
Harman AMX MXD-2001-PAN quick start guide

Contec
Contec PT-S959SDLX Series user manual


