Agrilight AGRILED 3 Series User manual

AGRILED® 3 Series
Luminaire
Installation and user manual
Original manual V1.0
© Agrilight b.v. 2020

Please read and understand the contents of this manual carefully. Failure to read the
manual can result in serious damage, injury or death. Keep this manual. Make sure that all
operators of the AGRILED® 3 Series luminaire have read and understand the contents of
this manual.
Always work safe and comply with procedures, regulation and local standards.
Copyright © Agrilight b.v. 2020
This language version of the manual is verified by the manufacturer (Original manual).
Agrilight b.v. reserves the right to change specifications and/or spare parts without prior notice.
The content of this manual may also be changed without prior notice.
For information about settings, maintenance and repairs not provided for in this manual, please contact the technical department of your dealer.
Agrilight b.v. accepts no liability for damage and/or problems arising from the use of spare parts not supplied by Agrilight b.v..
This manual has been compiled with all possible care. Agrilight b.v. assumes no responsibility for any errors in this manual and/or the consequences of an
erroneous interpretation of the instructions.
All rights reserved. No part of this publication may be reproduced, stored in computerised databases, or made public, in any form or by any means, either
electronic, mechanical, through photocopying, recording or otherwise, without the prior written consent of Agrilight b.v.. This also applies to the associated
drawings and diagrams.

Preface
Thank you for purchasing the AGRILED® 3 Series. This manual is intended for the end user and
installer. The manual contains all the information you need to install and use your AGRILED®
3 Series. Furthermore, the manual contains instructions for preventing possible accidents and
serious harm while the product is running. Read this information carefully!
Applicable devices
This manual applies to the following devices:
• AGRILED® 3 pro red
• AGRILED® 3 pro
• AGRILED® 3 red
• AGRILED® 3
• AGRILED® 3 eco
Registration sticker
The registration sticker is attached to the AGRILED® 3 Series luminaire. Always include the
type number of your luminaire when you contact your local Agrilight dealer or order spare parts.
Additionally, this information can be found on the registration sticker:
AGRILED® 3 pro red
220-240VAC / 50-60Hz
Ptot = 240W / Ta 30ºC
144 LED, NW-230W - 1,05 Amp.
012 LED, RD - 10W - 0,05 Amp.
40-2020 / Class 1 / IP65
Agrilight®, Vlotlaan 643, 2681 TZ, Monster, The Netherlands
1
2
3
4
5
6
7
8
1. Product name
2. Power supply / frequency
3. Total power luminaire / maximum
ambient operating temperature
4. Amount of White LEDs, NW =
Neutral White - power - current
5. Amount of Red LEDs, RD = Red
- power LED - current
6. Production week / year, Class 1
protection / Ingress Protection
rate
7. For markings, see manual
8. Legal manufacturer
Limitations of the document
The English language version is the original version. This language version of the manual is
verified by the manufacturer (Original manual). All other language versions are translations of the
original English language version.
Agrilight b.v. reserves the right to modify the construction and/or configuration of its products at
any time without any obligation to modify products which have been previously supplied. The

data provided in this manual is based on the most recent information. This data may be subject to
change at a later date, without prior notification.
The information in this document concentrates solely on use of the product as intended by the
manufacturer. In the event that the products, parts of the products or procedures are applied in
any way other than that described in this manual, then confirmation must be obtained as to the
correctness and suitability of that use. No rights may be derived from this manual or from the
documentation supplied together with the product. The supplier is bound by no agreement other
than the order confirmation.
This manual contains useful and important information on the correct operation of the product. We
have taken all possible steps to make this manual as correct and as complete as possible. Should
you discover any errors or omissions, please bring this to the attention of Agrilight b.v., so that we
can make amendments. This will enable us to improve our documentation.
Manufacturer details
If you need any assistance, or still have questions after reading this manual, we would encourage
you to contact your dealer.
We appreciate all advice, feedback and suggestions from our customers. Please contact:
Agrilight b.v.
Vlotlaan 643
2681 TZ Monster
The Netherlands
+31 (0)174 287 287
www.agrilight.com
Trademarks
All trademarks stated in this manual are registered trademarks of Agrilight b.v..
Storing the manual
The Installation and user manual is a part of your product. Store the manual in the immediate
vicinity of the product. Always present a copy of the manual to operators as they work with the
AGRILED® 3 Series.

Symbols used
The following marking conventions are used in this manual and on the luminaire to draw attention
to specific topics or actions:
Warns of a situation that could result in death or serious physical injury and/or may
cause material damage if one does not obey the safety instructions.
Warns of a situation that could result in minor or moderate physical injury and/or may
cause material damage if one does not follow the safety instructions.
Risk of electric shock.
Provides additional information that is helpful to do a task or to avoid problems.
This is the CE logo, which indicates that the product meets the legal requirements.
The temperature of the luminaire will not exceed 90 °C
The symbol on the material, the accessories or packaging indicates that this product
may not be treated as domestic waste.
Photo biological safety Risk group 1.
Illustrations
It is not always possible to show the exact configuration of your luminaire. The illustrations in
this manual are for description and instruction purposes only and show a regular version of the
luminaire.
Recommissioning
If the product is resold, make sure this manual is always available to the buying customer.

Liability
Agrilight b.v. is not liable for any damages caused by failure to comply with the installation
instructions in accordance with the legislation in your country, or any provisions assigned to
function as substitutes thereof and the above assembly instructions.
Agrilight b.v. additional General terms and conditions of sale and delivery are exclusively
applicable to all deliveries. You can also find these General terms and conditions of sale and
delivery on our website: www.agrilight.com.
Warranty
Agrilight b.v. offers a warranty of five (5) years on the AGRILED® 3 pro red, AGRILED® 3 pro,
AGRILED® 3 red and AGRILED® 3.
Agrilight b.v. offers a warranty of three (3) years on the AGRILED® 3 eco.
Refer to the General terms and warranty conditions for further information.
Version history
During the lifetime of the AGRILED® 3 Series, engineering improvements may result in the need
to revise this manual. It is then at the discretion of Agrilight b.v., if a revision/new version of this
manual is required.
The following table describes the main changes for each document version of this manual.
Version Date Changes
1.0 August 2020 Initial version
The information in this document concentrates solely on the installation and use of the AGRILED®
3 Series as intended by Agrilight b.v.. In the event that the products, parts or procedures are
applied in any way other than that described in this manual, then confirmation from Agrilight b.v.
must be obtained as to the correctness and suitability of that use.
Supplements to the manual
Please visit www.agrilight.com for the latest version of the manual.
Terms used
Luminaire AGRILED® 3 Series
Installer Person qualified to install the AGRILED® 3 Series

Contents
Preface...............................................................................................................................................3
Applicable devices........................................................................................................................ 3
Registration sticker........................................................................................................................3
Limitations of the document..........................................................................................................3
Manufacturer details......................................................................................................................4
Trademarks....................................................................................................................................4
Storing the manual........................................................................................................................4
Symbols used................................................................................................................................5
Illustrations.................................................................................................................................... 5
Recommissioning.......................................................................................................................... 5
Liability...........................................................................................................................................6
Warranty........................................................................................................................................ 6
Version history...............................................................................................................................6
Supplements to the manual..........................................................................................................6
Terms used....................................................................................................................................6
1 Introduction................................................................................................................................... 8
2 Description.................................................................................................................................... 9
2.1 Main components................................................................................................................... 9
2.2 Technical specifications.......................................................................................................... 9
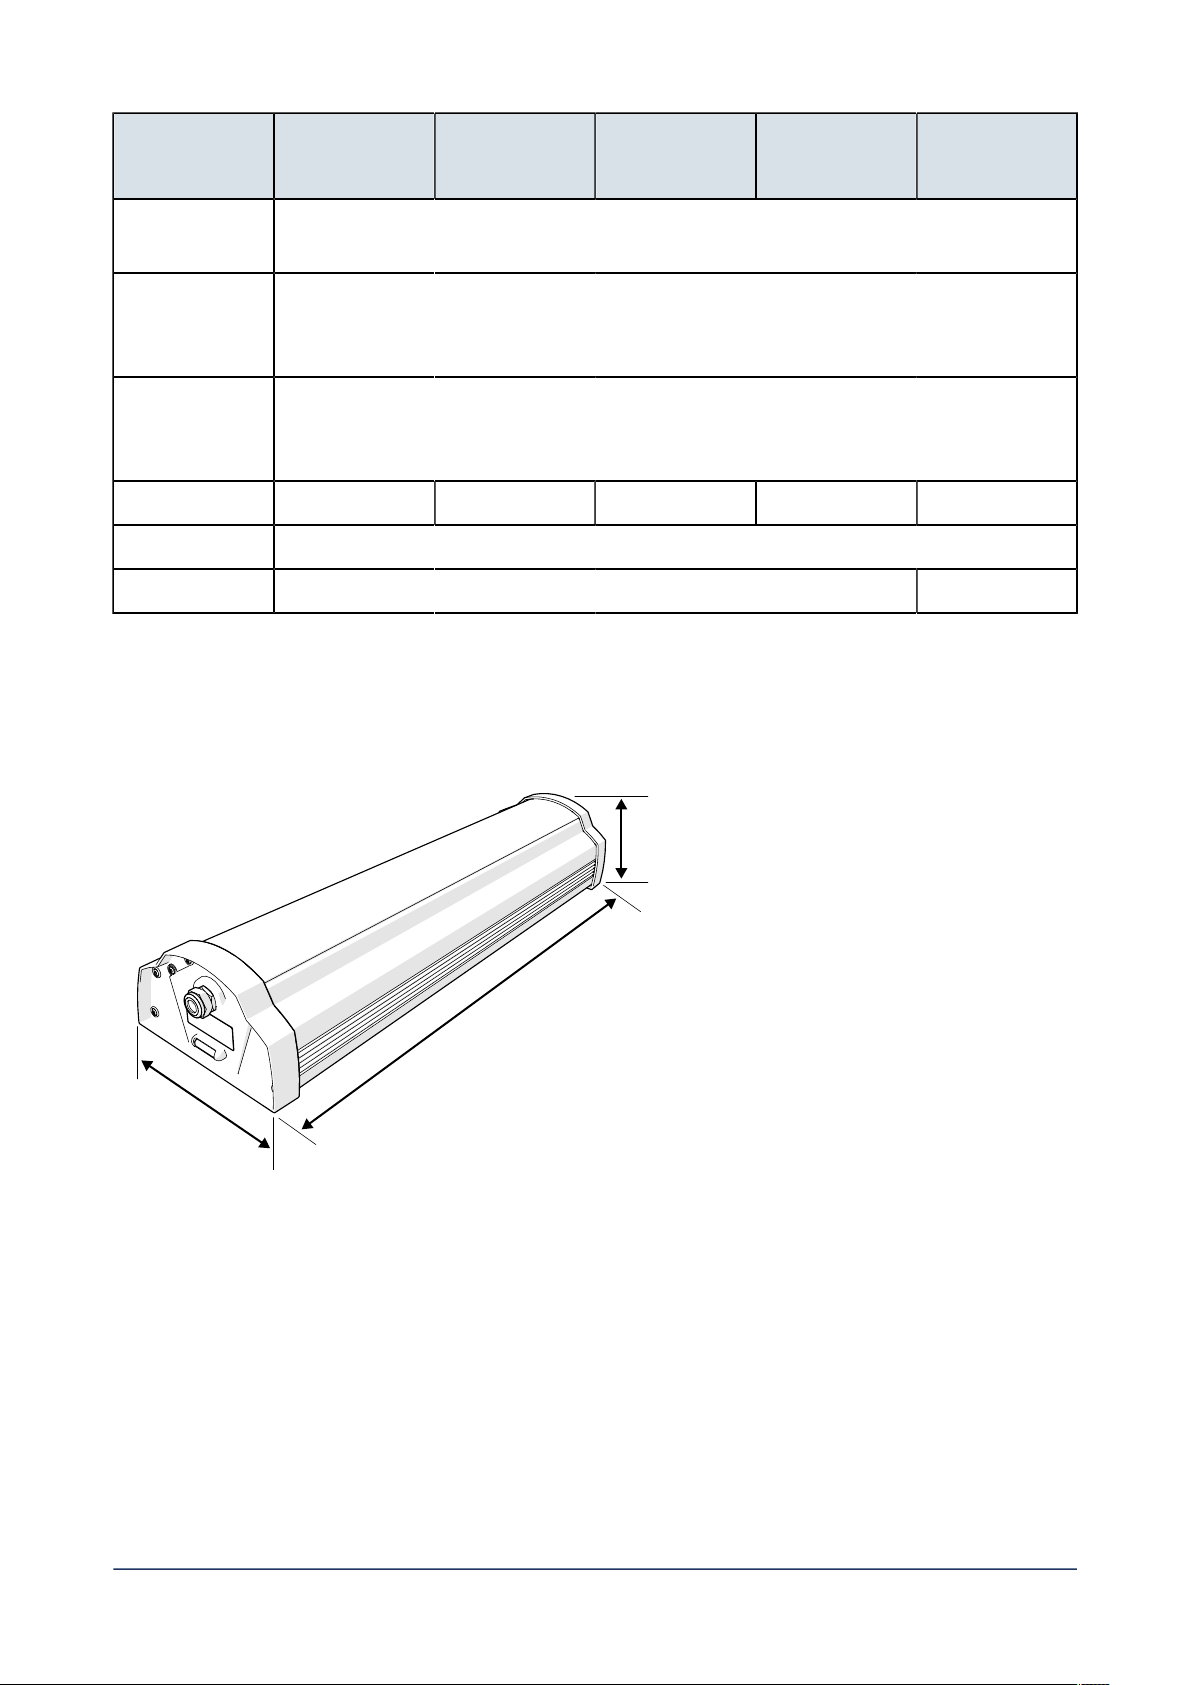
2.3 Dimensions........................................................................................................................... 10
3 Safety........................................................................................................................................... 11
4 Transport and storage............................................................................................................... 12
5 Installation................................................................................................................................... 13
5.1 Physical installation.............................................................................................................. 13
5.2 Electrical installation............................................................................................................. 16
6 Commissioning........................................................................................................................... 19
7 Operation..................................................................................................................................... 20
7.1 Operating the luminaire........................................................................................................ 20
8 Maintenance................................................................................................................................ 21
8.1 Cleaning................................................................................................................................ 21
9 Troubleshooting.......................................................................................................................... 22
9.1 Questions and Answers........................................................................................................22
9.2 Repair procedures................................................................................................................ 22
10 Disposal..................................................................................................................................... 25
11 Declaration of Conformity....................................................................................................... 26
AGRILIGHT B.V.
Contents 7

1 Introduction
The AGRILED® 3 Series is intended as a luminaire for lighting livestock and agricultural buildings
and halls.
Any use other than the approved intended use described above is considered unintended use.
Agrilight b.v. cannot be held responsible for possible (consequential) damage caused by improper,
incorrect or inadvisable use.
The AGRILED® 3 Series is referred to as the "luminaire" in this manual. This manual includes all
versions of the luminaire.
AGRILIGHT B.V.
Introduction 8

2 Description
2.1 Main components
The luminaire consists of the following components:
1
2
3
5 4
1. Mounting brackets (4x)
2. AGRILED® 3 Series luminaire
3. Registration sticker
4. Spirit level
5. Power supply cable
2.2 Technical specifications
AGRILED® 3
pro red
AGRILED® 3
pro
AGRILED® 3
red
AGRILED® 3 AGRILED® 3
eco
Mains voltage 220-240V AC, 50 / 60Hz
Input current 1,05A 0,53A
Red LED
current
0,03A 0,03A
White LED
power
240W +/- 5% 140W +/- 5%
Red LED
power
10W 10W
Power factor > 0,98
Dimmable Yes (DALI) No
Photo
biological
safety
RG1
IP/IK rating IP65 / IK08
AGRILIGHT B.V.
Description 9

AGRILED® 3
pro red
AGRILED® 3
pro
AGRILED® 3
red
AGRILED® 3 AGRILED® 3
eco
Ambient
temperature
-20 °C / + 30°C
Dimensions
luminaire (L ×
W × H)
805 × 214 × 130mm
Dimensions
box (L × W ×
H)
925 × 230 × 150mm
Weight 8,3 kg 8,3 kg 8,1 kg 8,1 kg 7,9 kg
Lifetime 100.000 L90 B50
Warranty 5 years 3 years
2.3 Dimensions
Dimensions of the luminaire:
W
L
H
Length: 805mm
Width: 214mm
Height: 130mm
AGRILIGHT B.V.
Description 10

3 Safety
• The product may only be installed by an installer.
• Product installation must satisfy the current applicable standards.
• Switch off the power supply before commencing installation or maintenance work.
• Do not open or disassemble the product. Opening the product can prove hazardous and
will void the warranty.
• If connected, the product or its components are powered by a 230V power supply.
• Never look directly into the light source.
• Wait at least 30 minutes after switching off the luminaire before you replace any
components, e.g. the gear tray. The parts can be hot.
• Never suspend a luminaire by its power cord or power cable.
• Do not plug or unplug a lamp cord/cable while the luminaire is switched on.
• Do not plug this system into a supply voltage other than indicated on the luminaire label.
• The end user is responsible for the proper installation and product use. An incorrect
installation may result in product damage or shortcomings. The warranty will become
void, if the product and/or electronic components are damaged due to an incorrect
installation.
AGRILIGHT B.V.
Safety 11

4 Transport and storage
Always transport the luminaire with care, in its original packaging which is delivered with the
product.
If the product is to be stored, it must be kept in a dry, clean environment with an ambient
temperature between 0°C and 40°C.
AGRILIGHT B.V.
Transport and storage 12

5 Installation
• The product may only be installed by an installer.
• The end user is responsible for a correct and safe installation.
• Make sure that the wiring is according to the requirements as described in the
specifications.
• For the electrical connection, refer to Electrical installation on page 16.
• Always comply with the local legal connecting conditions.
5.1 Physical installation
Gather the equipment for mounting the luminaire and consult the lighting plan before you start the
installation. The luminaire can be mounted in two different ways:
1. With a roof bracket system
2. With a suspension system
Choose the correct mounting method for your situation. Both mounting systems must be ordered
separately from Agrilight.
Disconnect the power.
AGRILIGHT B.V.
Installation 13

1. Remove the luminaire and brackets from the protective packaging.
2. Mount the two sets of brackets on the luminaire and slide the brackets together. Keep a distance
of 550 mm between the two sets.
550 mm
AGRILIGHT B.V.
Installation 14

3. Mounting with suspension system
Mount the threaded ends in the centre of both bracket sets with the hardware provided. Mount the
eye nuts on both sides and tighten the nuts. Mount the luminaire to the roof or ceiling using chains.
(not provided).
550 mm
4. Mounting with a roof bracket system
a. Mount the mounting strips to the brackets and tighten the bolts and nuts.
b. Mount the roof bracket to the roof or ceiling.
c. Mount the luminaire with strips to the roof bracket and tighten the bolts and nuts.
A+B C
AGRILIGHT B.V.
Installation 15

d. If necessary, connect two mounting strips together, using two extra sets of bolts, nuts and
washers (not provided):
5.2 Electrical installation
To prevent water ingress, make sure there is a loop in the cable, as shown in the image
below:
AGRILIGHT B.V.
Installation 16

Connections 230V & Dali
Cable for AGRILED® 3 eco:
L
PE
N
Function Wire Wire colour
Phase L Brown
Earth connection PE Yellow/green
Neutral N Blue
Cable for AGRILED® 3 and AGRILED® 3 pro:
L
PE
N
DA+
DA-
Function Wire Wire colour
Phase L Brown
Earth connection PE Yellow/green
Neutral N Blue
DALI + DA+ Black
DALI - DA- Grey
AGRILIGHT B.V.
Installation 17

Cable for AGRILED® 3 red and AGRILED® 3 pro red:
1L
2L
PE
N
DA+
DA-
Function Wire
Phase (white light) 1L
Phase (red light) 2L
Earth connection PE
Neutral N
DALI + DA+
DALI - DA-
The cable for AGRILED® 3 red and AGRILED® 3 pro red uses five black wires and one
yellow/green wire. The wire functions are indicated on the wires.
Connections LED
Function Connector Wire colour
White led + 1 White
White Led - 2 Blue
Red LED + 3 Red
Red Led - 4 Black
The number of wires depends on the type of luminaire.
AGRILIGHT B.V.
Installation 18

6 Commissioning
When all cables are connected, switch on the power supply.
Consult the DALI controller manual for information about operating the luminaire.
AGRILIGHT B.V.
Commissioning 19

7 Operation
• The luminaire has been developed for the agricultural sector.
• When the luminaire is switched on, the ambient temperature should not exceed
86°F/30°C and the relative humidity should not exceed 70%.
• Maximum concentration NH3 (ammonia) 20ppm.
7.1 Operating the luminaire
• The power supply 230V must be connected.
• The light level (1-100%) can be adjusted using a DALI controller.
• If no DALI controller is connected, the luminaire will switch on at 100%.
AGRILIGHT B.V.
Operation 20
This manual suits for next models
5
Table of contents
Popular Lantern manuals by other brands

olympia electronics
olympia electronics GR-2110 quick start guide

Sealey
Sealey LED3607G quick start guide

Panasonic
Panasonic EY37C2 Service manual

LIVARNO home
LIVARNO home 398633 2107 Instructions for use

olympia electronics
olympia electronics BAU LIGHT Series quick start guide

InoTec
InoTec LED J-SV Operating instruction