EnglishDeutsch
 logo
Brands
  1. Home
  2. •
  3. Brands
  4. •
  5. Agua
  6. •
  7. Ventilation Hood
  8. •
  9. Agua HERCULES-ISL-BK-30 User manual

Agua HERCULES-ISL-BK-30 User manual

Other Agua Ventilation Hood manuals

Agua HAMLET-BS User manual

Agua

Agua HAMLET-BS User manual

Agua HERCULES-ISL User manual

Agua

Agua HERCULES-ISL User manual

Agua CW500 User manual

Agua

Agua CW500 User manual

Popular Ventilation Hood manuals by other brands

Haier CXW-219-D67 null

Haier

Haier CXW-219-D67 null

emmeti RECUPA MED A-140 Installation and use manual

emmeti

emmeti RECUPA MED A-140 Installation and use manual

Nibe F135 user manual

Nibe

Nibe F135 user manual

Zephyr Spruce AK9834BS Use, care and installation guide

Zephyr

Zephyr Spruce AK9834BS Use, care and installation guide

Kuppersberg INTRO 60 Technical Passport

Kuppersberg

Kuppersberg INTRO 60 Technical Passport

Hisense MH6INBG manual

Hisense

Hisense MH6INBG manual

Miele DA 1255 Operating and installation instructions

Miele

Miele DA 1255 Operating and installation instructions

Broan 46000 Specification sheet

Broan

Broan 46000 Specification sheet

GE Profile PV977 Owner's Manual & Installation Instructions

GE

GE Profile PV977 Owner's Manual & Installation Instructions

FALMEC FFRIA24W5FS Instruction booklet

FALMEC

FALMEC FFRIA24W5FS Instruction booklet

Whirlpool RH2600XL-1 SERIES installation instructions

Whirlpool

Whirlpool RH2600XL-1 SERIES installation instructions

ETNA AV360RVS Instructions for use

ETNA

ETNA AV360RVS Instructions for use

JUNO JDF603E6 installation manual

JUNO

JUNO JDF603E6 installation manual

Miele DA 6708 D Operating and installation instructions

Miele

Miele DA 6708 D Operating and installation instructions

Tricity Bendix LE 150 Installation & operating instructions

Tricity Bendix

Tricity Bendix LE 150 Installation & operating instructions

AEG X68163BV1 user manual

AEG

AEG X68163BV1 user manual

AEG 125 D operating instructions

AEG

AEG 125 D operating instructions

Smeg KSEV97X instruction manual

Smeg

Smeg KSEV97X instruction manual

https://manuals.online logo
https://manuals.online logoBrands
  • About & Mission
  • Contact us
  • Privacy Policy
  • Terms and Conditions

Copyright 2026 Manuals.Online. All Rights Reserved.

HERCULES-ISL-BK-30
Hotte de cuisinière îlot
HERCULES-ISL-BK-30
Island canopy range hood
AVANT TOUT / BEFORE EVEYTHING
SPECIFICATIONS
12
FRANCAIS
l. Installer des conduits de dimensions adéquates, des
coudes et un capuchon de toit ou de mur selon le type
d’installation choisi. La distance minimale entre le bas
de la hotte et la surface de cuisson est de 30 po
(36 po au-dessus d'une cuisinière à gaz).
ENGLISH
l. Install ducts of adequate dimensions, elbows and a roof
or wall cap depending on type installation chosen. The
minimum distance between the bottom of range hood
and cooking surface is 30'' (36 ”above a gas stove).
FRANCAIS
2. Installez des traverses entre les solives de plafond
selon les dimensions indiquées. Installer la prise dans
l’espace qui sera couvert par le conduit décoratif.
S’assurer qu’elle n’interfère pas avec l’emplacement de
fixation du support de montage ou avec le conduit
décoratif. Cet appareil doit être relié à une mise à la
terre.
ENGLISH
2. Install cross members between ceiling joists accor-
ding to the dimensions indicated. Install the socket in the
space that will be covered by the decorative duct. Make
sure that it does not interfere with the location of fixing
the mounting bracket or with the duct decorative. This
device must be connected to a ground Earth.
DÉBIT D’AIR / AIR FLOW
-500 pi3min / 500 CFM
NIVEAU SONORE / SOUND LEVEL
- 0,7 sone à basse vitesse / 0,7 sones at minimum speed
- 9 sone à Haute vitesse / 9 sones at maximum speed
VITESSE DU VENTILATEUR / FAN SPEED
-1254 Tours par minutes / 1254 RPM
DESCRIPTION
-Cheminée télescopique pour plafond de 8 à 9 pieds /
Telescopic chimney for 8' to 9' ceiling
-Commande à effleurement 4 vitesses /
4-speed tap-touch control
-Quatres modules à DEL pour un éclairage uniforme de la surface de cuisson /
Four built-in LED modules provide an even lighting over the cooktop
-Trois filtres en aluminium ultra-efficaces faciles à nettoyer, pour une captation optimale des graisses /
Three ultra efficiency aluminum filters, easy to clean, for optimal grease removal
GRADE D’ACIER INOXYDABLE / STAINLESS STEEL GRADE
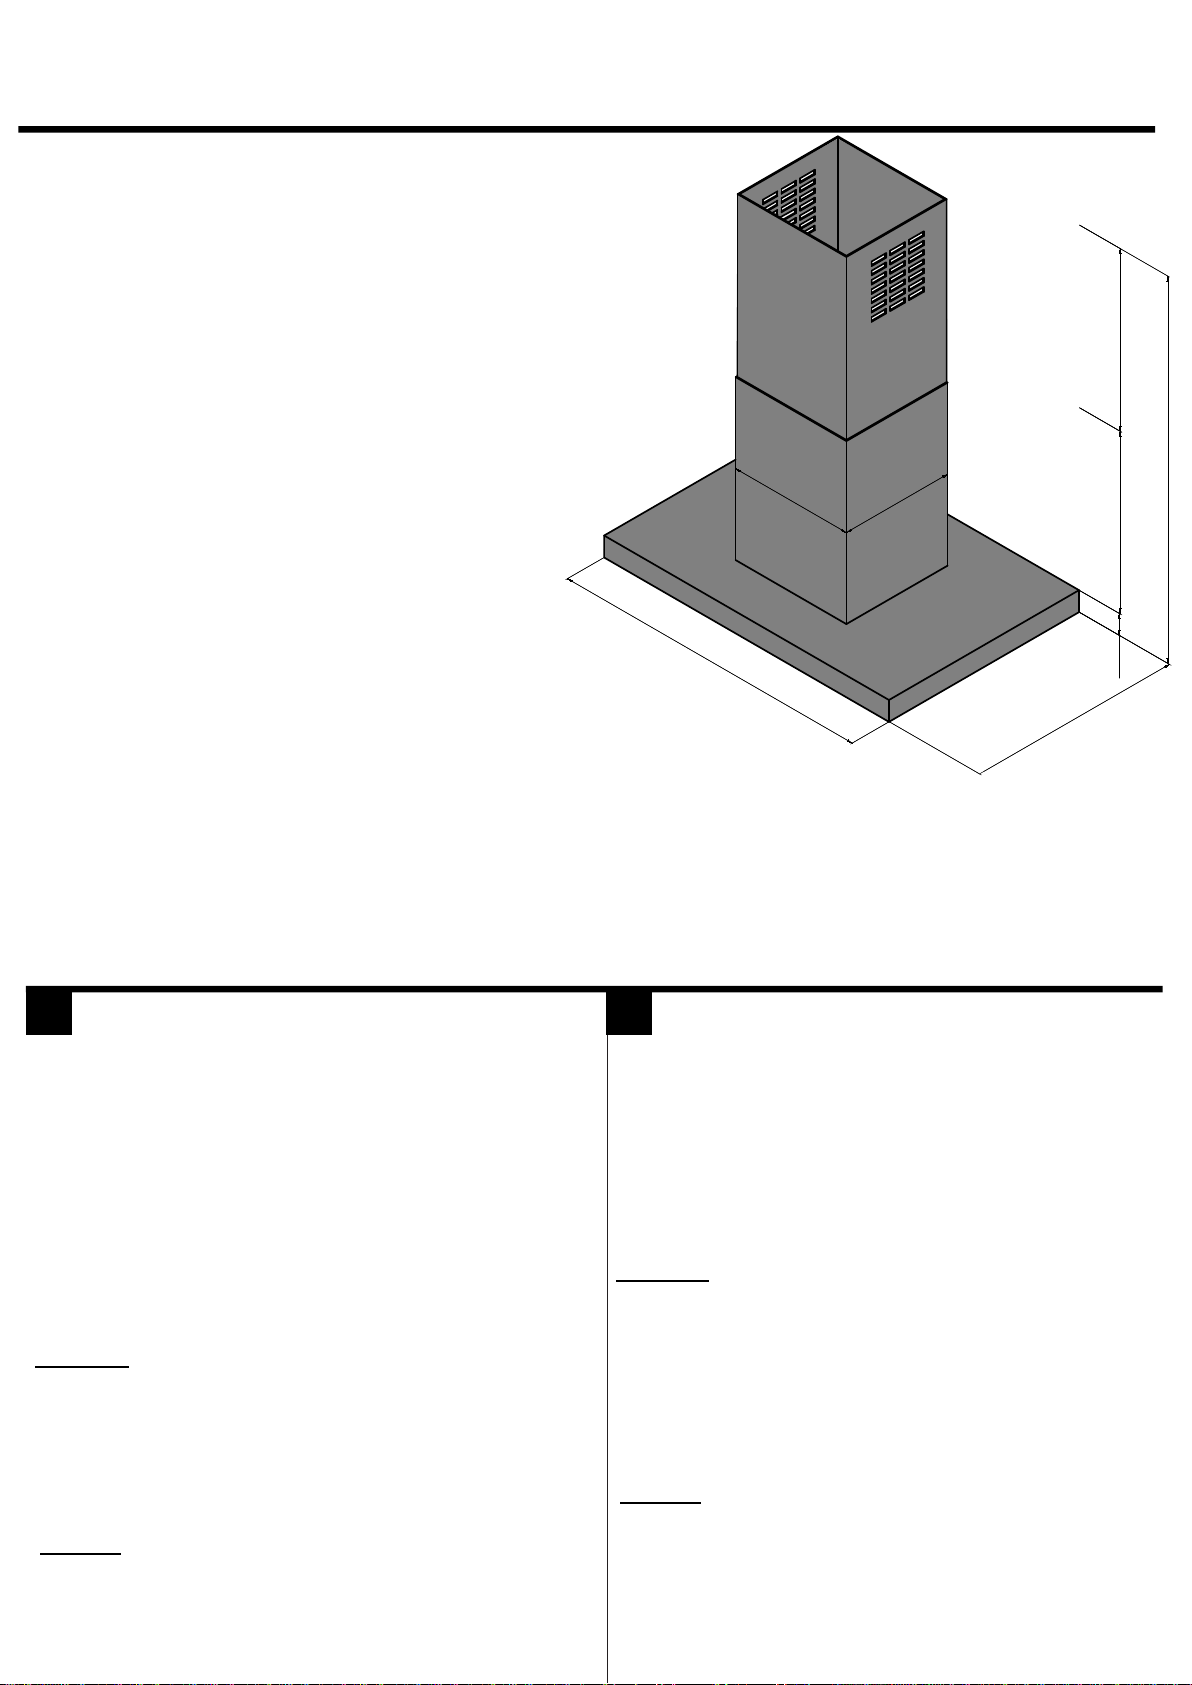
19-11/16’’
500 mm
19-11/16’’
500 mm
MAX 41-3/4’’
MAX 1060 mm
2-3/8’’
60 mm
23-5/8’’
600 mm
29 1/2’’
749 mm
13-25/32’’
350 mm
12-5/8’’
320 mm
1INSTALLATION
2
34
FRANCAIS
l. Déterminez et marquez la ligne centrale sur le
plafond où la hotte de cuisinière sera installée.
FRANCAIS
2. Fixer la charpente suspendue à l’emplacement voulu.
Régler à la bonne hauteur et fixer les supports de fixation
à la charpente suspendue. Fixer Le conduit décoratif à la
charpente suspendue.
ENGLISH
l. Determine and mark the center line on the ceiling
for the range hood to be installed.
ENGLISH
2. Secure the suspended frame in the desired location.
Adjust to the correct height and fix the mounting
brackets to the suspended frame. Fix the decorative
duct to the suspended frame..
FRANCAIS
3. Allonger le boyau de la charpente suspendue et
fixer le corps de la hotte au support. Sceller
hermétiquement le joint à l’aide de ruban adhésif
de métal. Ne pas mettre le ruban adhésif trop
serrer, cela pourrait empêcher le bon fonctionne-
ment du volet. Brancher le cordon d’alimentation
de la hotte dans la prise.
ENGLISH
3. Extend the duct of the suspended frame and fix
the hood body to the support. Seal hermetically
seal with adhesive tape metal. Do not put the
adhesive tape too tight, this could prevent the
shutter from functioning properly. Plug the hood's
power cord into the sucket.
FRANCAIS
4. Positionner le conduit décoratif à sont emplacement.
Retirer par la suite le film protecteur de
plastique recouvrant le conduit décoratif et la hotte.
ENGLISH
4. Position the decorative duct at its location. Then
remove the protective film from plastic covering the
decorative duct and the hood.
Réglage d’horlorge
Lorsque le ventilateur (moteur) ne fonctionne pas, appuyez et maintenez la touche POWER durant 3 secondes pour entrer en mode horloge.
Ajuster l'heure souhaitée en appuyant sur les touches augmentation ou diminution. Ce paramètre sera enregistré immédiatement.
Clock setting
When the fan (motor) is not running, press and hold the POWER button for 3 seconds to enter clock mode.
Adjust the desired time by pressing the increase or decrease buttons. This setting will be saved immediately.
aguacanada.com
833 689-2482
Siege social / Head office
2732 Étienne Lenoir, Laval
Québec, H7R 0A3, Canada
SERVICE@AGUACANADA.COM
FRANCAIS
Agua Canada garantit ses produits contre tout défaut de matériel ou de fabrication dans des conditions normales
d’utilisation et d’entretien. La garantie peut varier en fonction du type de produit.
Agua Canada procédera à sa discrétion à la réparation ou au remplacement de pièces, ou de produits trouvés
défectueux pour un usage domestique normal pour lequel ils ont été conçus.
Agua Canada n’est aucunement responsable des frais de main-d’œuvre ou tous les autres frais reliés à l’installa-
tiod’un produit, sa réparation ou son remplacement ainsi que pour tout dommage ou incident, dépense, perte
directe ou indirecte.
ENGLISH
Agua Canada warrants all its products against material or workmanship defects under normal conditions of use
and maintenance. The warranty period may vary depending on the type of product.
Agua Canada will, at its discretion, repair or replace parts or products that are found defective for the normal
home use for which they were designed.
Agua Canada is not responsible in any way for costs related to labour or any other costs related to a product’s
installation, repair or replacement, nor for any damage, incident, expense, or direct or indirect loss.
HOTTE / HOOD FAN
Garantie de 5 ans contre les défauts de fabrication en ce qui concerne les pièces.
(les ampoules et les filtres d'aluminium) ne sont pas couvertes par cette garantie. / 5 years warranty against
manufacturing defects in the parts. Consumable parts (bulbs and aluminum filters) are not covered
by this warranty
GARANTIE / WARRANTY