manuals.online logo
Brands
  1. Home
  2. •
  3. Brands
  4. •
  5. aguri
  6. •
  7. Automobile Accessories
  8. •
  9. aguri WIND 32 User manual

aguri WIND 32 User manual

ROOF BOX
WIND 32, WIND 43
BOX ASSEMBLY
Fig. 1
ACTUATOR - 2PCS
ASSEMBLY PARTS
50502 WIND 32 BLACK, 50500 WIND 32 GREY, 50501 WIND32 SILVER
50508 WIND 43 BLACK, 50506 WIND 43 GREY, 50507 WIND 43 SILVER
KNOB BRACKET - 8PCS
PIN HINGE - 3PCS
MOUNTING BRACKET - 4PCS
MOUNTING PRESSURE - 4PCS
LUGGAGE STRAP 2,5M - 2PCS
1. Remove the box from the cardboard. All mounting parts are located in the bag placed at the base of the box.
2. Position the bottom of the box on a flat surface and place the cover on top of the box.
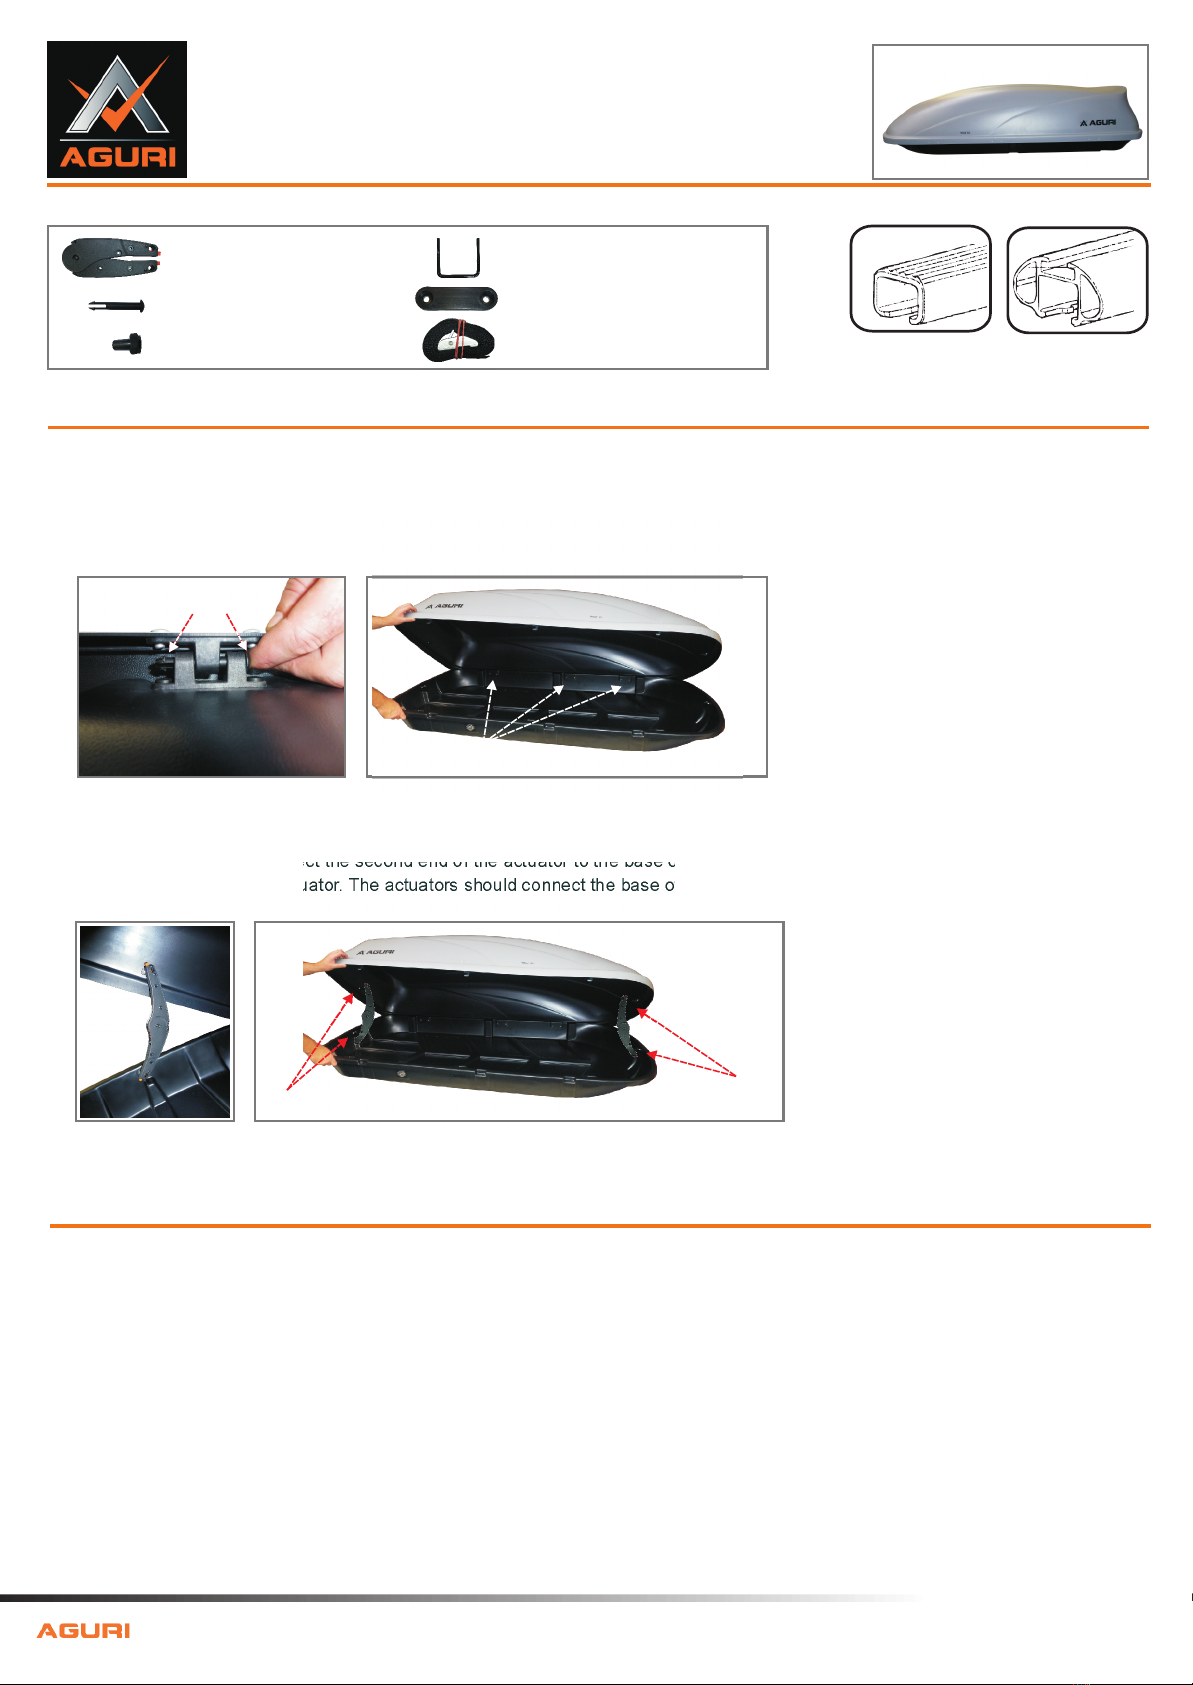
3. Prepare the hinge pins. Use the pins to connect the lid hinges with the base of the box in three spots (fig. 1).
Note the correct push pins.
.
!
Hinges 3X
4. Extend the arms of the actuator. Press the orange actuator latch lock and place the hook on the spindle in the base.
Release the orange lock. Connect the second end of the actuator to the base of the box in the same way (fig 3).
Repeat this with the second actuator. The actuators should connect the base of the box with the cover (fig. 4).
Fig. 2
The box can be mounted on
rectangular and T-shaped racks.
Fig.3 Fig. 4
CAR ASSEMBLY
1. If you have a black or silver metallic box remove the protective foil.
2. Put the box on the car roof. Make sure you alight the box correctly (Fig. 5).
The base of the box contains 4 holes (Fig. 6). Place the box so that the beam is located between two of them. Given the length of the
box and the roof of the car, choose which hole to use when connecting the beam. This applies to both beams. Remember that the box
should not protrude beyond the roof of the car.
3. Install the mounting brackets starting with the bottom of the base, putting the brackets around the beam and placing the ends inside the
holes at the base of the box (Fig. 7). Apply pressure and tighten the knob to fix the bracket (Fig. 8). Repeat these steps for all 4 mounting
points (Fig. 9).
4. Insert the baggage strap in the oblong hole inside the fixing clamp (Fig. 10) in order to prevent the luggage from shifting while driving.
Remember the correctly alight the load inside the box (Fig. 14).
Tighten the lid and lock the box (Fig. 11 - 13).
ACTUATOR ACTUATOR
COMFORTABLE TRAVELING
Fig.6 Fig.7
Fig.10
Fig.8 Fig.9
Fig.11
1
234
ADDITIONAL FIXING OPTIONT-SHAPED BARSASSEMBLY SET 50 582 SOLD SEPARATELY
Fig.12
YES NO
Fig.5
Fig.13
1/4 1/4
1/2
MAX 50 KG
Fig.14
The roof box
should not
protrude from
the boundaries
of the vehicle's roof.
1/4
Usage information:
1 After every installation of the box, make sure that all connections are tightened correctly.
2 When mounting the box follow the enclosed instructions.
3 The roof box and other accessories can be used only on a properly fitted roof rack.
4 Do not modify the mounting kits.
5 Do not overload the box and the rack exceeding the vehicle manufacturer's recommendations.
6 The box has a maximum weight capacity of 50 kg.
7 The load must be correctly distributed inside the box - Fig. 14.
8 Remember that the roof box increases the vehicle's height.
9 Make sure that the load is properly secured and that the roof box is locked.
10 When using an automatic car-wash facility, the roof box and roof bars must first be removed.
11 The roof box may prevent you from opening the car's sunroof.
12 Remember about the proper distribution of the load inside the roof box.
13 When not in use, the roof box should be removed.
14 Keep the roof box clean and be sure to properly lubricate the box's locks and hinges.
15 The speed driven must be suited to the load to be transported. Remember that the load inside the roof box may affect driving
conditions, especially during cornering, braking, and acceleration.
16 After mounting the box and travelling for several kilometers, check that the roof box is firmly fixed to the roof bars.
Repeat this after 50 km.
17.Note: Maintenance method: Dry cloth usage for roof box with glossy metallic finish may lead to permanent surface damage.
Please use wet cloth with detergent in the first place, then dry the box surface afterward.
www.aguri.eu
SAFETY
CERTIFICATE
ART. 50582
!Roof box
with a glossy
finish maintenance
wet cloth use only,
dry cloth never
can be used
in the first place
!

This manual suits for next models

7

Popular Automobile Accessories manuals by other brands

Kargo Master 40813 quick start guide

Kargo Master

Kargo Master 40813 quick start guide

Air Lift 1000 installation guide

Air Lift

Air Lift 1000 installation guide

BOSSCO LDV T90 user manual

BOSSCO

BOSSCO LDV T90 user manual

Response AR-3129 user manual

Response

Response AR-3129 user manual

Front Runner TRCA010 Operation manual

Front Runner

Front Runner TRCA010 Operation manual

LCI Gooseneck Connect Installation and owner's manual

LCI

LCI Gooseneck Connect Installation and owner's manual

Setma E12PE27000 instruction manual

Setma

Setma E12PE27000 instruction manual

Metra Electronics JP-RGBKT-1 manual

Metra Electronics

Metra Electronics JP-RGBKT-1 manual

Subaru H001ssC800 installation instructions

Subaru

Subaru H001ssC800 installation instructions

Jole spin 360 GT instruction manual

Jole

Jole spin 360 GT instruction manual

Hama Power-Cap01 manual

Hama

Hama Power-Cap01 manual

Safe Fleet PRIME DESIGN VBR-TC21B manual

Safe Fleet

Safe Fleet PRIME DESIGN VBR-TC21B manual

Dometic 9500E installation instructions

Dometic

Dometic 9500E installation instructions

Whispbar K350W Fitting instructions

Whispbar

Whispbar K350W Fitting instructions

Kolpin Outdoors 2781 Assembly & owners manual

Kolpin Outdoors

Kolpin Outdoors 2781 Assembly & owners manual

Helm P32 manual 

Helm

Helm P32 manual 

Yakima SpaceCadet quick guide

Yakima

Yakima SpaceCadet quick guide

gdw 1217 manual

gdw

gdw 1217 manual

manuals.online logo
manuals.online logoBrands
  • About & Mission
  • Contact us
  • Privacy Policy
  • Terms and Conditions

Copyright 2025 Manuals.Online. All Rights Reserved.