Ahlborn ALMEMO 500 User manual

- 1 –
Produktpräsentationsbild mit grünen, schrägen Balken links
ALMEMO
®
500
Connection to a WiFi
network as
relay bridge
Supplementary
Instruction
Manua
l
WLAN
V7-Technology
English
V2.4
24.01.2018
Produktpräsentationsbild mit grünen, schrägen Balken links
www.ahlborn.com
network as
WLAN

- 2 –
1 Table of Contents
1
Table of Contents ......................................................................................2
2
Explanation of Symbols............................................................................3
3
How to reset the access point to its factory setting..............................4
4
How to configure the access point..........................................................5
4.1
Open the configuration page.................................................................5
4.2
Check the OPKG setting.......................................................................5
4.3
Set the distribution feeds.......................................................................6
4.4
Install required supplementary programs..............................................7
4.5
Choose WiFi network and connect .......................................................8
4.6
Generate an Interface BRIDGE ............................................................9
4.7
Set the WWAN firewall........................................................................11
4.8
Restart the data logger........................................................................12
4.9
Deactivate the DHCP server...............................................................12
5
Information regarding the subsequent login to the app .....................14

2 Explanation of Symbols
Notice
Result
3 Reference referring to the global overview
of the data
logger (page 2)
Back
Text displayed within a software
- 3 –
of the data

3
How to reset the access point to its
factory setting
!No Ethernet cable shall
be connected to the data logger.
1. Switch the data logger on
and wait until the device is ready for operation.
See Instruction Manual ALMEMO
®
500.
2.
Press a navigation key until the menu “1) Network Conf.” is displayed on the
status display.
3. Press and hold the right one of the navigation keys.
The menu “WLAN Module” will open.
4. Press the left one of the navigation keys to confirm
with “YES”.
The access point will be reset.
The reset process may take several minutes
The status display of the data l
ogger will show the message “Press any
key”.
5. Switch the data logger off and then
on again in order to reboot it
- 4 –
How to reset the access point to its
be connected to the data logger.
and wait until the device is ready for operation.
Press a navigation key until the menu “1) Network Conf.” is displayed on the
with “YES”.
ogger will show the message “Press any
on again in order to reboot it
.

- 5 –
4
How to configure the access point
4.1 Open the configuration page
!
The data logger must be connected to the PC via Ethernet.
1. Open an Internet browser.
2. Enter the IP address of the access point of the ALMEMO
®
factory to 192.168.1.1) into the address line of the
Internet browser
3. Tap on ENTER.
The Login screen of the
access point will open.
4. Enter the user name (set
by the factory to root) in
the field next to
Username
.
6. Enter the password (set by the factory to Ahlborn2016
) in
Password
.
8. Click on the button.
The configuration page of the access point will open.
4.2 Check the OPKG setting
1. Click on System.
2. Click on Software.
3. Click on the tab
Configuration.
4. Check whether the paths in section
OPKG-
Configuration
following paths:
How to configure the access point
The data logger must be connected to the PC via Ethernet.
®
500 (set by the
Internet browser
.
) in
the field next to
Configuration
contain the
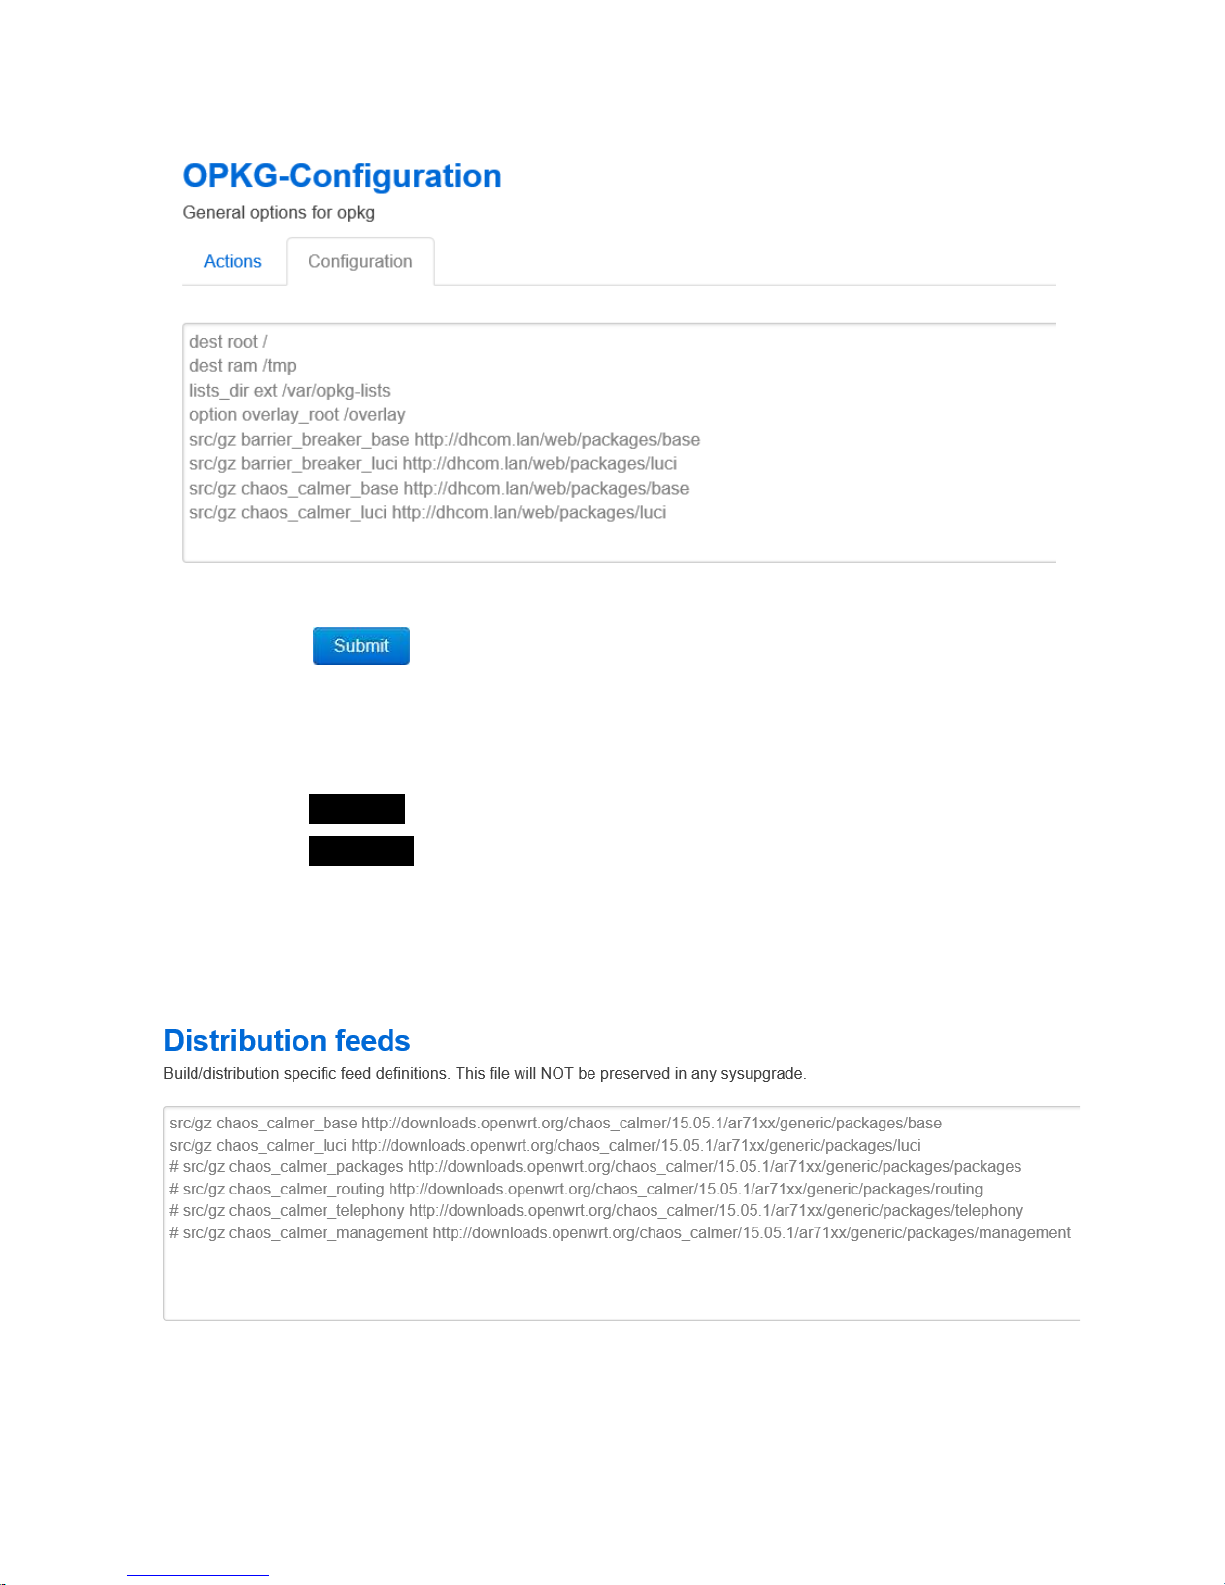
4 How to configure the access point
- 6 –
6. Correct the paths if necessary.
7. Click on .
4.3 Set the distribution feeds
1. Click on System.
2. Click on Software.
3. Click on the tab
Configuration.
4. Scroll down to the section
Distribution feeds.
The following distribution feeds will be listed:
5. Delete the first two rows.
The following distribution feeds shall be displayed:
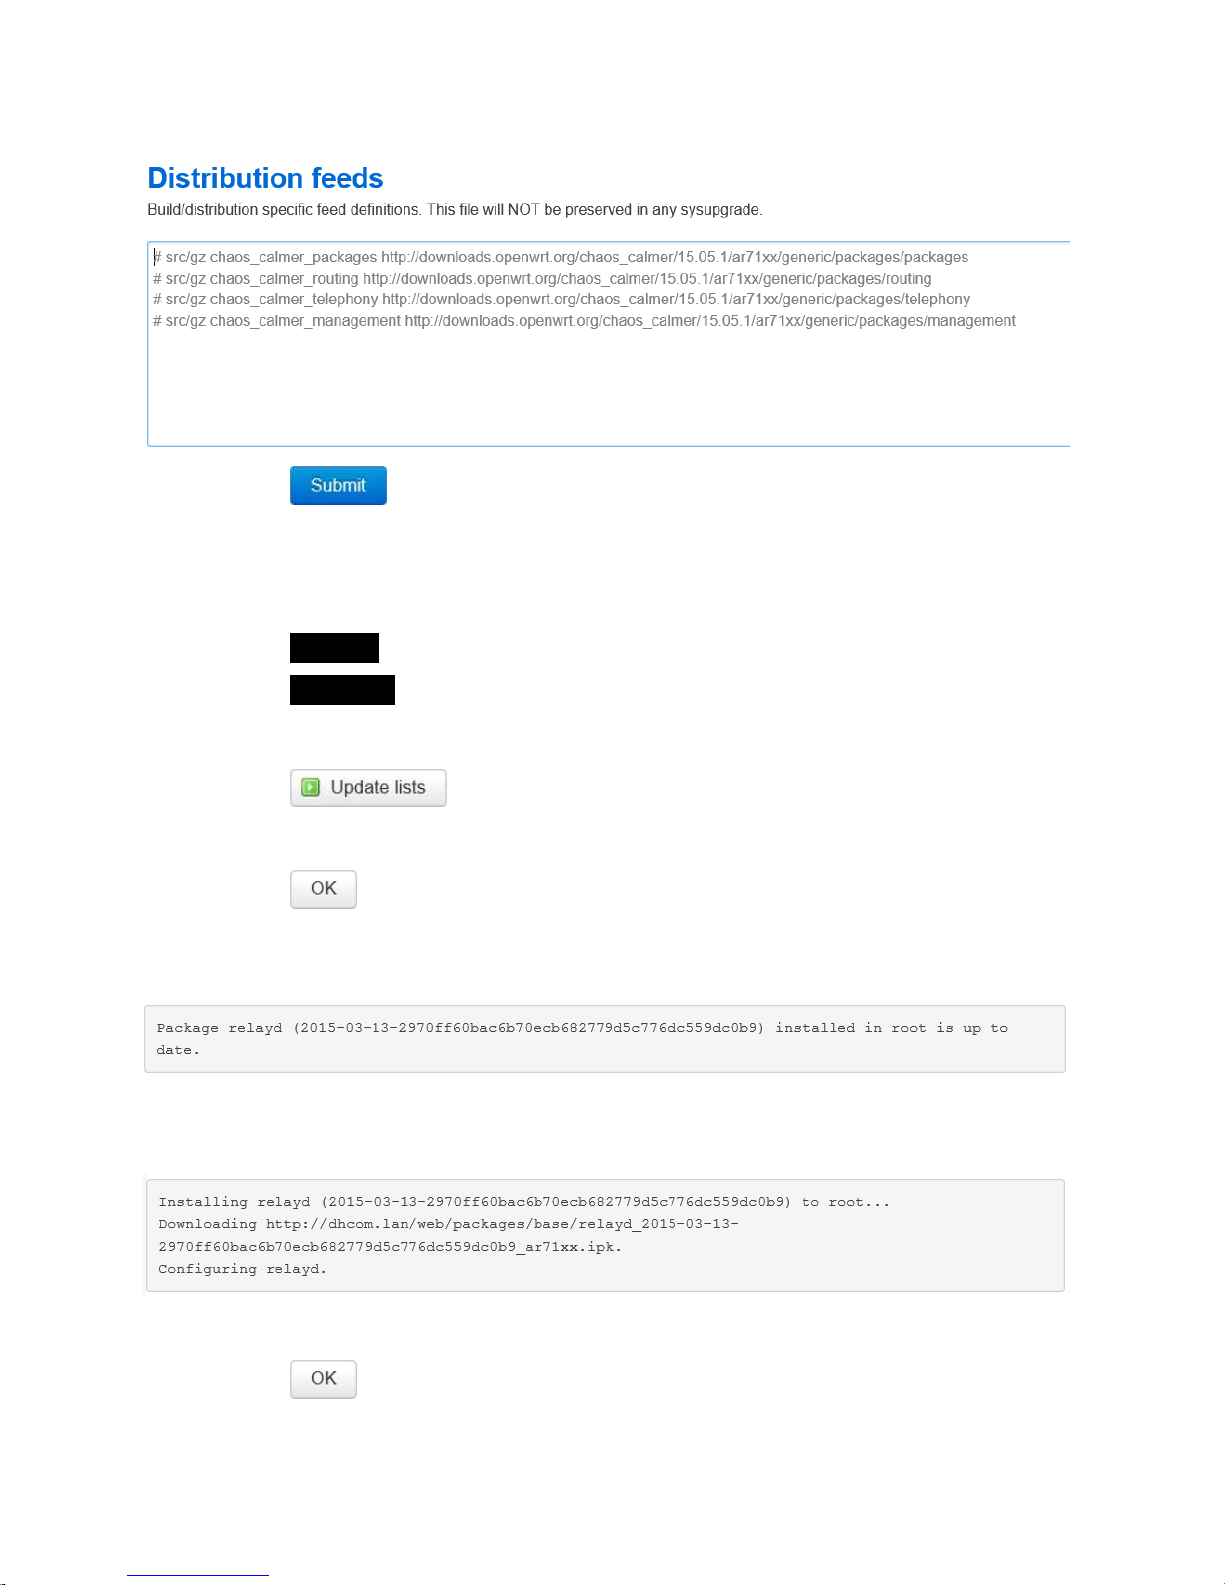
4 How to
configure the access point
6. Click on .
4.4 Install required supplementary programs
1. Click on System.
2. Click on Software.
3. Click on the tab
Actions.
4. Click on .
5. In the field
Download and install packages
, enter the
text
6. Click on .
The supplementary program “relayd”
has already been installed if the
following message appears:
The supplementary program “relayd”
is being installed if the following
message appears:
7. In the field
Download and install package
, enter the text
8. Click on .
configure the access point
- 7 –
text
rela d
.
has already been installed if the
is being installed if the following
, enter the text
luci-proto-rela
.

4 How to configure the access point
- 8 –
The supplementary program “luci-proto-relay”
has already been installed if
the following message appears::
The supplementary program “luci-proto-relay”
is being installed if
following message appears:
4.5 Choose WiFi network and connect
1. Click on Network.
2. Click on Wifi.
3. Click on .
All available WiFi networks will be displayed.
4. Next to the desired WiFi network, click on
5. Enter the password of the WiFi network in the field
next to
passphrase
.
7. In the section
Create / Assign firewall-zone
, click on
LAN.
8. Click on .
9. Click on Network.
10. Click on Interfaces.
has already been installed if
is being installed if
the
.
next to
WPA
LAN.
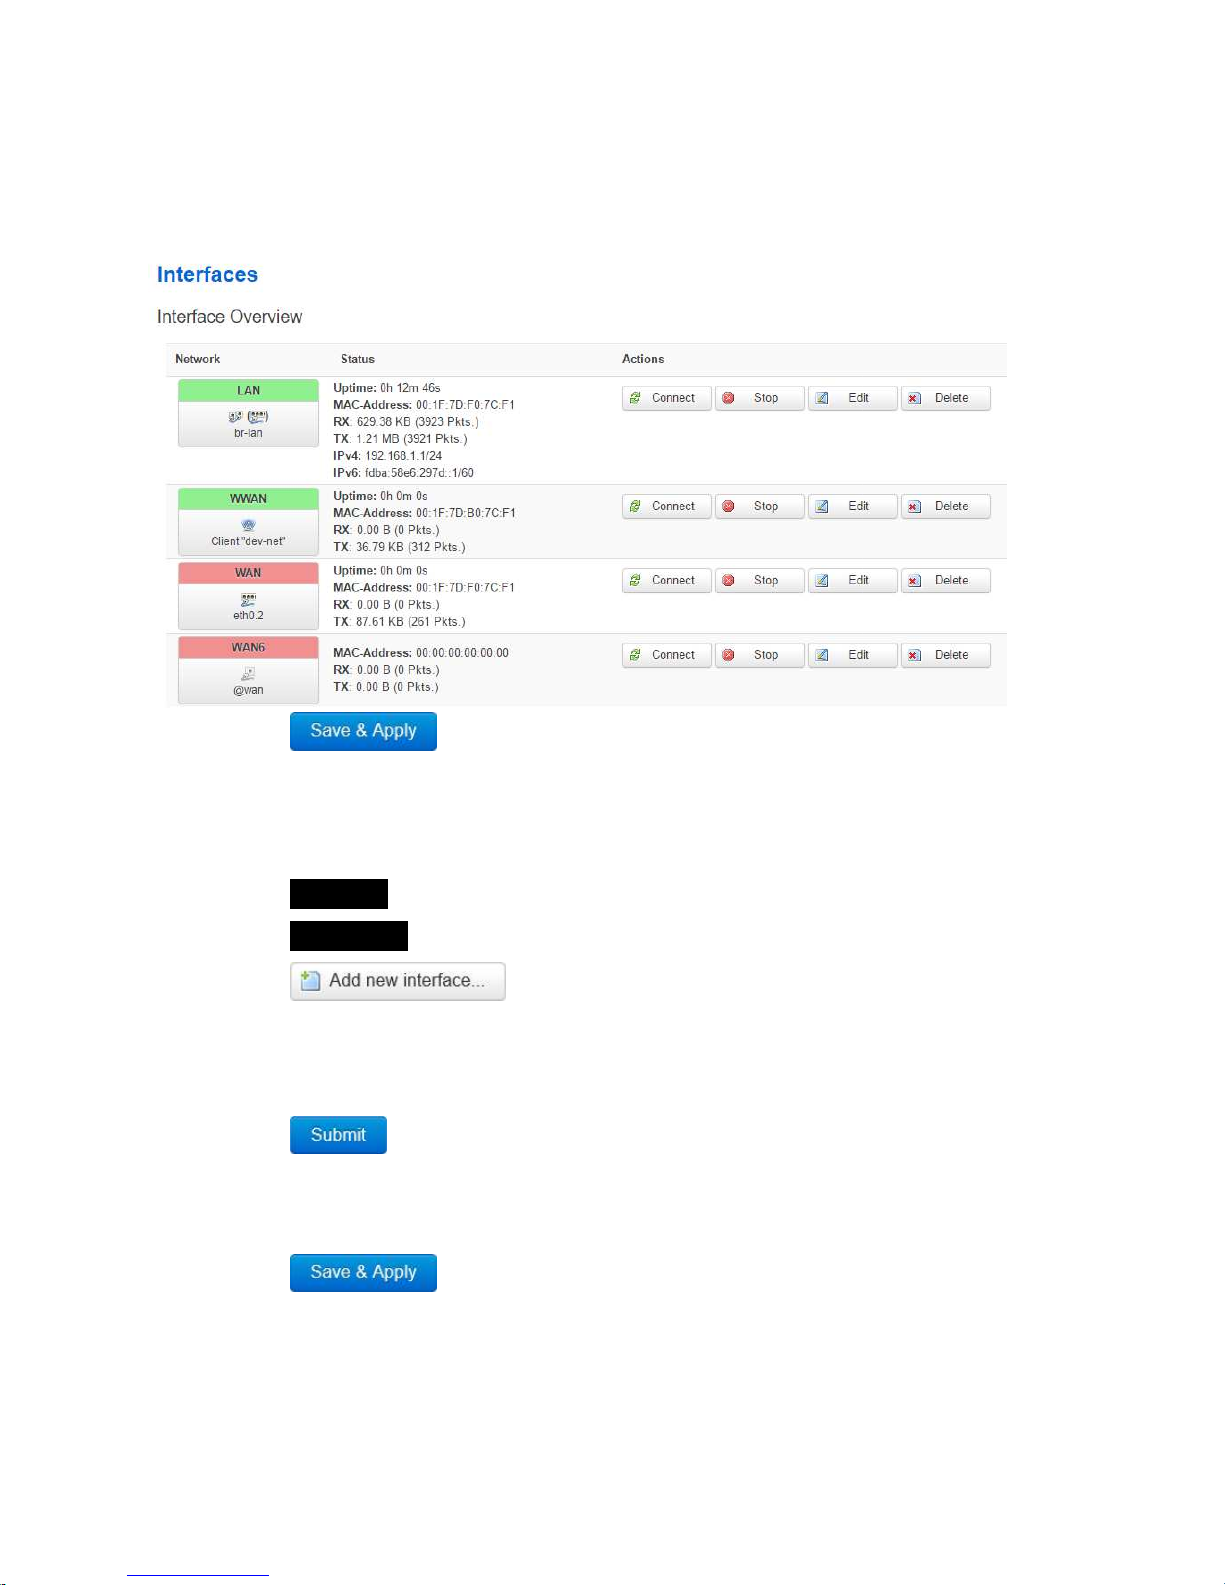
4 How to
configure the access point
In the section Interface Overview, the LAN und WWAN
will be displayed in
green.
11. Click on .
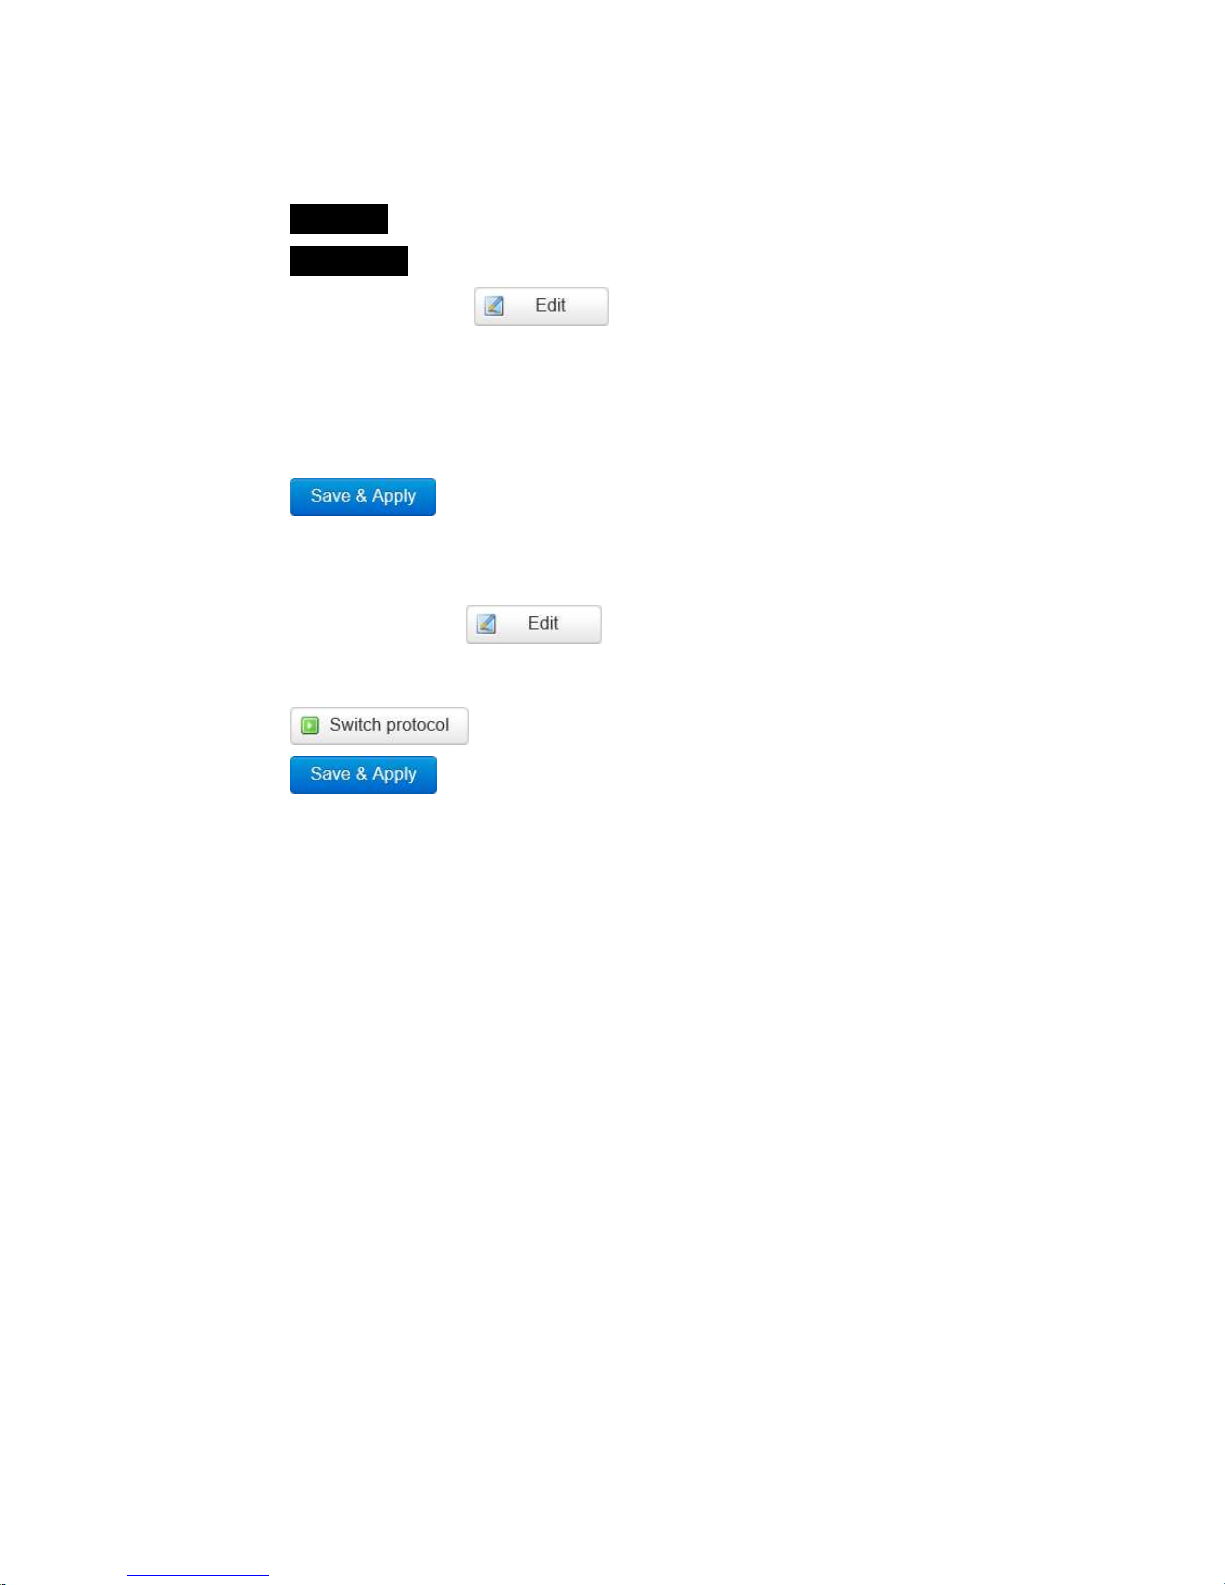
4.6 Generate an Interface BRIDGE
1. Click on Network.
2. Click on Interfaces.
3. Click on .
4. In the field next to
Name of the new interface
, enter the text
5. In the field next to
Protocol of the new interface,
choose
6. Click on .
7. In the tab General Setup next to
Rela between networks
next to LAN and WWAN.
8. Click on .
configure the access point
- 9 –
will be displayed in
, enter the text
BRIDGE
.
choose
Rela bridge.
Rela between networks
tick the boxes

4 How to configure the access point
- 10 –
The changes will be saved and the Interface BRIDGE will be displayed in
green in the Interface Overview.
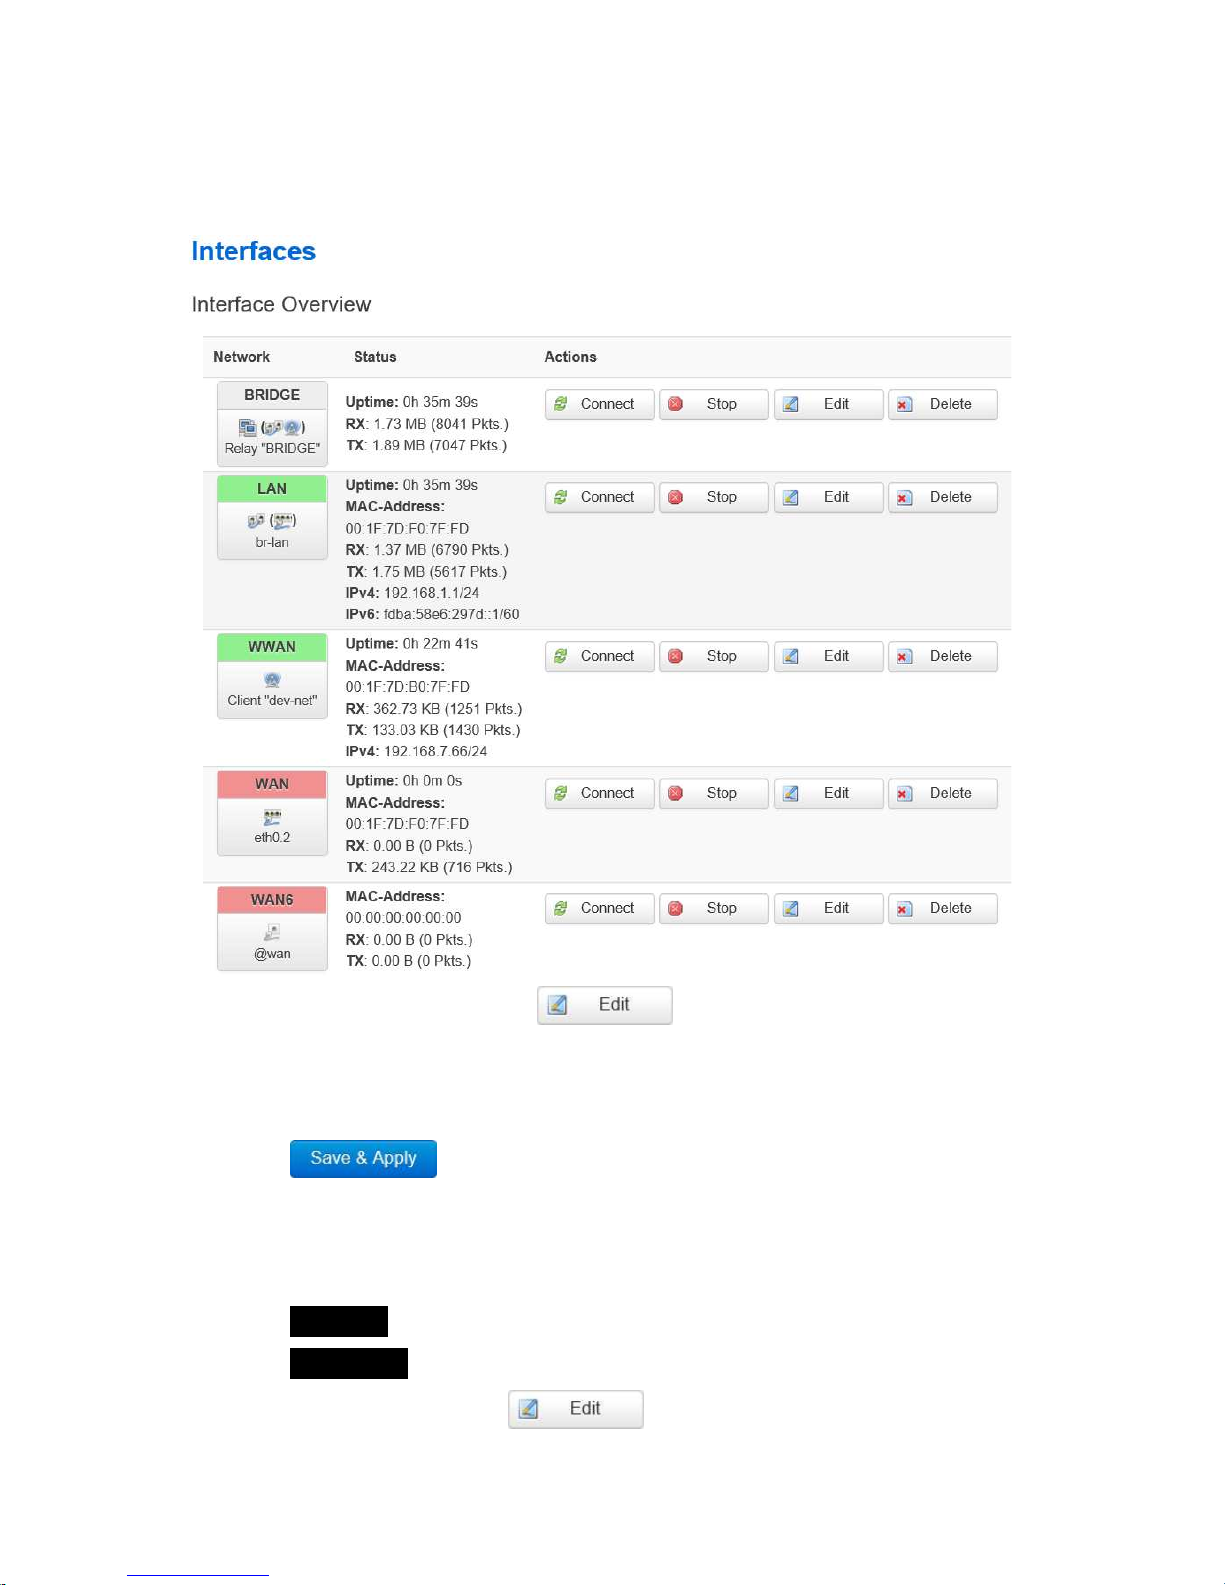
4 How to
configure the access point
The changes will be saved and the Interface Bridge will be
Interface Overview.
9. In the line BRIDGE, cklick on .
10. Click on the tab
Firewall Settings.
11. In the section
Create / Assign firewall-zone
, click on
LAN.
12. Click on .
4.7 Set the WWAN firewall
1. Click on Network.
2. Click on Interfaces.
3. In the line WWAN, click on .
configure the access point
- 11 –
The changes will be saved and the Interface Bridge will be
displayed in the
LAN.

4 How to configure the access point
- 12 –
4. Click on the tab
Firewall Settings.
5. In the section
Create / Assign firewall-zone
, click on
LAN.
6. Click on .
4.8 Restart the data logger
1. Switch the data logger off.
2.
Switch the data logger on and wait until the device is ready for operation.
See Instruction Manual ALMEMO
®
500.
In the menu “1) Network Conf
.”, the status display lists an IP address that
has been assigned by the DHCP server of the chosen WiFi network.
4.9 Deactivate the DHCP server
1.
Enter the IP address of the access point of the data logger in
line of the Internet browser.
Refer to your system administrator for the IP address of the access
point. The IP address is assigned by the DHPC server of the WiFi
network the data logger is connected to.
2. Tap on ENTER.
The Login screen of the
access point will open.
3. Enter the user name (set
by the factory to root) in
the field next to
Username
.
4. Enter the password (set by the factory to Ahlborn2016
) in
Password
.
5. Click on .
LAN.
Switch the data logger on and wait until the device is ready for operation.
.”, the status display lists an IP address that
has been assigned by the DHCP server of the chosen WiFi network.
Enter the IP address of the access point of the data logger in
to the address
Refer to your system administrator for the IP address of the access
point. The IP address is assigned by the DHPC server of the WiFi
) in
the field next to
4 How to
configure the access point
The configuration site of the access point will open.
6. Click on Network.
7. Click on Interfaces.
8. In the line LAN, click on .
9. Scroll down to the section DHCP server.
10. In the tab
General Setup
, tick the check box next to
Disable DHCP for this
interface
.
11. Click on .
The DHCP server of the access point of the ALMEMO
®
500
assign IP addresses.
12. In the line LAN, click on .
13. In the tab
General Setup
next to
Protocol
,
select the protocol
14. Click on .
15. Click on .
configure the access point
- 13 –
Disable DHCP for this
500
will no longer
select the protocol
DHCP Client.

- 14 –
5 Information regarding the
subsequent
login to the app
The tablet must be connected to the same WiFi network
the data
logger is connected to.
The data logger will now receive an IP address from the DHCP
server of the connected network. Note down the IP
address from the
status display and enter the IP address -
after starting the app
the network settings in the field IP address (see Instruction Manual
ALMEMO
®
500).
subsequent
the data
The data logger will now receive an IP address from the DHCP
address from the
after starting the app
– in
the network settings in the field IP address (see Instruction Manual

- 15 –
Despite greatest diligence, the possibility of
incorrect information cannot be excluded.
Subject to technical modifications without prior notice.

You will find the present and further Instruction Manuals, as well as the
ALMEMO
®
Manual on www.ahlborn.com under the tab SERVICE on
DOWNLOADS.
© Ahlborn Mess- und Regelungstechnik GmbH 2017
All rights reserverd.
Ahlborn Mess- und Regelungstechnik GmbH,
Eichenfeldstraße 1-3, D-83607 Holzkirchen,
Phone +49(0)8024/3007-0, Fax +49(0)8024/300710
PLEASE KEEP THIS INSTRUCTION MANUL FOR
FURTHER REFERENCE
Other manuals for ALMEMO 500
9
Table of contents
Other Ahlborn Other manuals


