AI Synthesis AI002 User manual

AI Synthesis AI002 Mixer:
Build Guide
ThisistheBuildGuidefortheAI002Mixer,youcanpurchaseitbygoingto:
http://aisynthesis.com/product/eurorackaudioandcvmixer/.
TableofContents:
1.Resources
2.AbouttheMixer
3.ToolsNeeded
4.BOM
5.BuildSteps
1.Resources
1. Schematic
2.AbouttheMixer

IfyouarenewtoDIYelectronics,thisisthesecondmoduleyoushouldbuild.Thefirstmodule,the
AI001Multipleisidealforbeginners,asitteacheshowtosolder,andfamiliarizesthebuilderwiththe
conceptsofsignalandground,thebasisofelectronics.Ifyousuccessfullybuiltthemultiple,this
mixerkitwillfamiliarizeyouwiththeothercomponentsyou’llbeseeing:resistors,capacitors,ICs,
andpower.
TheAI002Mixerisanactivesignalmixer.Thismixercanoperateon+/12or+/15voltswithno
adjustments.ThismixerisaDCmixer,meaningitcanbeusedtocombineaudioand/orcvsignals.
Thismixercouldbeusedtofeedmultipleoscillatorsintoafilter,ortofeedmultiplecvsourcesinto,
forinstance,thecvinofafilter.
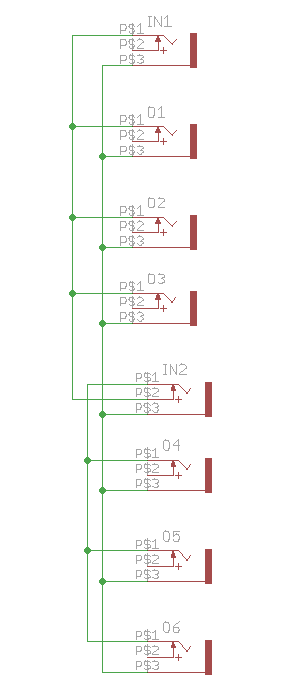
Thecircuititselfisquitesimple,andusestwoOperationalamplifiersinaunitygaininverting
configuration.TheP14potsattenuatetheinputsignalthenfeeditthrough100kresistorsfor
protectionintothefirstopamp,whichmixesthesignal.The5thpotcontrolsfeedbackintothe
opamp,inordertocontrolmasteroutputofthemixedsignal.Theoutputistheninverted.The
secondopampisasimpleinverter,thatthenprovidesanoninvertedoutput.Inaudiomixing,an
invertedsignalisessentiallyirrelevant,butforCV,youtypicallywantanoninvertedsignal.
Otherwise,yourenvelopewillbeinverted.

3.ToolsNeeded
● SolderingIron(CheaporNice)
●Solder
●SolderingTipCleaner
●DiagonalCutters
●MicroShears
●PrecisionScrewdriverSet (slottedscrewdriver)
4.BOM
Category
Part
Quantity
Capacitor
47pf
2
Capacitor
.1uF
2
Hardware
3.5mmThonkiconnJack
4
Hardware
JackNuts
4
Hardware
5pinHeader
2
Hardware
8PINSocket
1
Hardware
Panel
1
Hardware
PCB
1

5.BuildSteps
Thereisafullbuildguideforthisvideolocatedat:https://youtu.be/k0QHaJ3EWU4
1. Asalways,thefirststepistogatheryourparts.
2. Ingeneralwithdiyelectronics,wewanttobuild“lowtohigh.”“LowtoHigh”meanssoldering
itemsinreverseorderofheight,asitiseasiertomanipulatesmalleritemswhentherearen’t
tallerthingstogetintheway.Inthiscase,itmeansstartingwiththeresistors.Startby
solderingthe330Rresistor,andthefive100kresistors.
Thereisavideotutorialhere:https://youtu.be/Z0h_qFoOGc
Resistorsareprettynearindestructible,sotakeyourtime.Heattheconnectionforabouthalf
asecondbeforeyouapplysolder.Thispreheatingwillpreventthemoltensolderfromhitting
coldmetalandcoolingtoofast.Thisresultsinwhat’scalleda‘coldsolderjoint’,whichisa

looseconnectionwherethesolderdidnotadheretothemetal.Thesecanbeveryfrustrating,
asatacasualglancewilltheywilloftenappeartobegoodconnections,andonlyuponclose
examinationwilloneseethecracks,Thetechnique(whichbecomesautomaticafterawhile)
istoputthetipontheconnectionfirst,andthenapplythesolder.Oncethesolderisonthe
joint,youholdtheironthereforanotherhalfsecond,andpulltheironaway.Ifthesolder
doesn’tfloweasily,perhapsyouhaven’tallowedyourirontowarmup,oryouneedtoclean
yourirontip.Ilikeatemperatureofabout550degreesFahrenheit(287Celcius)forleaded
solder.
3. Let’smoveontotheICSocket(nottheIC!).WeusesocketsbecausesomeICsare
susceptibletodamagefromheat.Thesocketservesasasimple“plug”fortheIC.Besureto
alignthenotchinthesocketwiththeoneonthesilkscreen.Wesolderthesocketin,and
thenlaterwe’lljustinserttheIC.ThisnotonlyprotectstheICfromheatfromsoldering,it

alsomakestheICveryeasytoreplaceshoulditgobad.InserttheIC,andbendthetipson
therearofthepcbtoholditinmyplacewhileyousolder.
4. Withtheresistorsandsocketinplace,we’llsolderinthecapacitors.Startwiththe.1ufcaps.
TherewasanissuewiththePCBprinting,andthecapvalueswerenotprinted.Thiswillbe

correctedinfuturebuilds,andwedeeplyregrettheerror.

5. Thisimageshowswhichpairofcapsgowhere.Solderthetwo.1uFcaps.

6. Thensolderinthe47pFcaps.

7. Solderinthe4jacks.Theyonlyfitinoneway.
8. Timeforthepotentiometers.Theseareyourknobs,andwillalsomountthePCBtothepanel
alongwiththejacks.Beforeyousolderthem,useryourcutterstosnipoffthetabthatcomes
onthepot:

Youwantthepotentiometerstorestascloseto90degreesfromthePCBasyoucan,butthe
pinsareabitflexible,sotheycanbefudged.Don’tfudgetoomuchthough,orthepinswill
break,andyou’llneedanewpot!ThesepotsareallA100k,soitdoesn’tmatterwhichpot

goeswhere,theyareallthesame.
9. FinallyinserttheIC.Makesureitisintheresnugly,andflushagainstthesocket,withthe
blackdotnear,andtotheleftofthesocketnotch.
10. Solderinthetworowsof5pinsintothesolderholes.Thisiswhereyouwillapplypowerto
themodule–don’tdoityetthough!Youmaywanttoinsertthetwoheaderrowsintothe

powercabletohelpyousoldertheseinstraight.
11. Beforeyouputonthepanel,let’stestthemodule.Withoutapplyingpower,ensurethatthere
isnocontinuitybetweenthepositive,ground,andnegativevoltagepowerpinsusingadigital
multimeter.Assumingthereisnocontinuitythere,youaregoodtoapplypower.Eurorack,
tragically,hasnouniversalpowerconnectorformat.Thishasresultedinfartoomanyblown
upmodules.AIsynthesismodulesfollowthemostcommonformat,inwhichthereisawhite
stripenexttothenegativeendofthepowerconnector,andthisistypicallywherethered
stripeofthepowercableshouldbealigned,butcheckyourpowersupplyfordetails.

Iliketogiveafreshlypoweredmoduleafewsecondstoensurethatnothingsmokesand
thereisnodangeroffire.Thisiswhyitisnicetohaveabenchpowersupplytotesta
moduleapartfromyourEuroracksystem.Ifeverythinglooksgood,youaregoodtotestprior
toapplyingthepanelandfinishingup.
12. Thethreepotsontherightareallpassiveattenuators,theydon’tboostsignal,theyjustlower
them.Fullyclockwise,theyletalloftheinputsignalin,asyoumoveitcounterclockwise,
attenuationisappliedtothesignal,anditislowered.Thelower,centerpotregulates
feedbackresistanceoftheIC.Atcenter,thesignalisroughlyatunity(thesamevolumeas
comingin–minusthe100kinputprotectionresistors).Pastunity,turningthisknobupwill
eventuallycausedistortionanderraticsignal.Thiscanbefun.Insertasignalfroman
oscillatorormp3playerintoaninputwiththelower,centeredmixpotat12′oclock.Withthe
inputvolumeknobfullyclockwiseyoushouldhearthesignalintheoutput(viaheadphones
orotherspeaker).Repeatthistestwitheachoftheinputs.Ifeverythingworks,youaregood
toputonthepanelandfinishup.

13. Peeltheprotectivefilmfromthealuminumpanel,andplaceitoverthejacksandpots.Apply
theknobwashersandnutstothepots,andthejacknutstothejacks.Nowcarefullytighten
thenuts.Youcanuseanutdriver,oryourwirestrippersifyouarecareful.
14. Placetheredknobsonthepots.Youwillprobablywanttoloosenthesetscrewstoputthem
on,andthenadjustthem.Iliketoputthemonwiththeknobsturnedfullycounterclockwise,
butyoucandoithoweveryoulike.Potentiometersareonlypreciseto=/120%,soit’snot
overlycritical.Oncetheyareon,whereyouwantthem–tightenthesetscrews.Testagain,
andenjoyyournewmixer!
15. ShareyourbuildonFacebook!
https://www.facebook.com/AISynthesis1123432724366073/?fref=ts!
16. Ifyouarehavinganyissuesatall,pleasecontactusat:http://aisynthesis.com/contact/.
Table of contents