AICOOK VS5115 User manual

VACUUM SEALER
INSTRUCTION MANUAL
VS5115
READ THIS MANUAL THOROUGHLY
BEFORE USING AND SAVE IT FOR FUTURE REFERENCE
3197750
Shenzhen Danni Industrial Co., Ltd.
longgang district, buji street, liangmao industrial park,
3 building, No.c shenzhen guangdong
Facebook Page: https://www.facebook.com/Aicook-144643912909738/
Website: www.aicook.cc
HOUSEHOLD USE ONLY

- 1 - - 2 -
1.
Vacuum&seal / Cancel: This button has two functions depending on the machine
status:
•
At stand-by condition, it starts the automatic operation of vacuuming the bag and
then automatically seals the bag when vacuum is complete;
•
At working (vacuuming or sealing operations) condition, it stops the machine.
2. Manual Seal : This button provides two functions:
•
To seal the open end of a bag without vacuuming air suction, used to make a bag
from a bag roll;
•
When the automatic “Vacuum &seal” function is in operation, this button stops the
motor pump and immediately starts to seal the bag so that less vacuum pressure
inside the bag can be controlled by the operator to avoid crushing for delicate items.
CONSTRUCTION AND FUNCTION
When using this electrical appliance, safety precautions should
always be observed, including the following:
READ ALL INSTRUCTIONS
CAUTION:
SAVE THESE INSTRUCTIONS FOR HOUSEHOLD USE ONLY
1MIN PER CYCLE
17. This appliance is not intended for use by persons (including
children) with reduced physical, sensory or mental capabilities, or
lack of experience and knowledge, unless they have been given
supervision or instruction concerning use of the appliance by a
person responsible for their safety.
18. Close supervision is required when this product is used near
children.
19. If the supply cord is damaged, It must be replaced by the
manufacturer, its service agent or similarly qualified persons in
order to avoid a hazard.
20. cleaning and user maintenance shall not be made by children
without supervision
21.
To reduce the risk of electric shock, this product has a polarized
plug (one blade is wider than the other). This plug is intended to
fit in a polarized outlet only one way. When the plug does not fit
fully in the outlet, reverse the plug. When it still does not fit, contact
a qualified electrician to install the proper outlet. Do not change
the plug in any way.
Before plugging cord into wall outlet, or disconnecting, make sure the
control is OFF, and unplug from outlet when not in use or before cleaning
2.
This appliance is not a toy, when used by or near children close
attention is necessary, and store this appliance to a safe place, out
of the reach of children.
3. Do not use any attachments not recommended or appointed, and
don’t use this appliance for other purpose except its intended use.
4. Stop using the machine immediately if the cord is damaged and
have it replaced by a professional.
5. Keep away from moving parts.
6. Do not try to repair this appliance by yourself.
7.
Do not use the appliance if it has fallen or if it appears to be damaged.
8. Avoid to do the following: pull or carry by the cord, use cord as a
handle, close a door on cord, or pull cord around sharp edges or
corners. Do not operate appliance over cord or cord / plug is wet.
9.
Keep away from hot gas, heated oven, electric burner or any other
hot surfaces.
10. It’s better not to use an extension cord with this unit. However, if
one is used, it must have a rating equal to or exceeding the fating
of this appliance.
11.
When disconnect, to avoid any injury, please unplug by grasp the
plug, not the cord.
12.
Before plugging appliance in or operating, make sure your hands
are dry and safe to do the actions.
13.
When it In “ON” or working position, always be on a stable surface,
such as table or counter.
14.
It’s no need to use any lubricant, such as lubricating oils or water,
on this appliance.
15. When cleaning, do not immerse this appliance in water or any
other liquid.
16. Do not use this appliance outdoors or on a wet surface, it’s
recommended for household, indoor use only.
IMPORTANT SAFEGUARDS

- 3 - - 4 -
•
Press both sides to open the cover;
•
Release the vacuum pressure inside the machine.
3.Pulse vacuum :
Press this button, and the device starts vacuuming; undo, it will stop. This process can
be repeated. Then press “manual seal” when meet desired pressure, turn to seal. Different
pressure according to different type of foods can be chosen.
4. Sealing time :Three setting for choosing the best bag sealing time.
• Dry button : for dry bags and items without moisture, with a shorter heat sealing time;
• Moist button: for wet bags or foods with a little moisture, with an moist heat sealing time.
5. Sealing strip: Place the bag to be sealed over this strip. Clean and dry or replace
it when distorted or broken.
6. Upper gasket:
Keep air away by forming vacuum chamber with lower gasket. Clean
and dry or replace it when distorted or broken.
7.Bag Cutter:
Press and slide in one direction or another to cut bags to a desired size.
8. Cutter rack: Support the cutter to slide along
9. Lower gasket: Keep air away by forming vacuum chamber with upper gasket in
the vacuum chamber. Clean and dry or replace it when it is distorted
or broken.
10.Vacuum chamber: Position the open end of the bag inside the chamber, draws
air out of bag and catches any liquid overflow from the bag.
11. Release Button: This button provides two functions:
12. Sealing element: Teflon-coated heating element which is hot and seals the bag.
13. Air intake:
Air intake connects with vacuum chamber and pump. Do not cover this
intake when placing bag for vacuum&Seal operations.
13. Air intake:
Air intake connects with vacuum chamber and pump. Do not cover this
intake when placing bag for vacuum&Seal operations.
14. Safety switch: to cut off the heating circuit when cover is open
Default setting is Normal setting for dry bags and shorter sealing time.
1. Open the top cover . Fig.1
2. Make sure the bag cutter is on one end
of the cutter rack, Then put the cutter
rack to the back– Fig.2
OPERATING INSTRUCTIONS
I. Making a bag with bag roll
56
8
9
10
11
12
13
14
7
Fig.2
Fig.1

- 5 - - 6 -
3. Pull out the bag to the suitable
length you want– Fig.3
4. Put down the cutter rack and make sure it
is on the right place of the bags, then slide
the cutter from one end to the other end to
cut the bag– Fig.4
II. Vacuum packaging with a bag
Fig.3
7. Press “ Manual seal ” button to start
sealing the bags -Fig.7
8. Press the release button to open the cover
and take the bag out of the machine. The
bag is then done and is ready for vacuum
sealing -Fig.8
1.
Put the items inside the bag. Use only the special designed vacuum bags supplied
by us with vacuum channels.
2.
Clean and straighten the open end of the bag, make sure no dust, wrinkle or ripples.
3. Place the open end of the bag within the vacuum
chamber area. – Fig. 1
4. Put the cover down on both sides using both hands
until click sounds are heard on both sides- Fig.2
Fig.7
Fig.8
Fig.1
Fig.2
Fig.4
5. Put one end of the bag on top of the sealing
element into the bag fixture– Fig.5
6. Close the top cover and press tightly till you
hear it click in place on both sides– Fig.6
Fig.5
Fig.6

- 7 - - 8 -
HINTS FOR BEST VACUUMING PERFORMANCE
5. Then press “ Vacuum&seal/Cancel ”button,
the unit start to vacuum and will seal the bag
automatically - Fig 3
6. The vacuum packaging is done. Press the
release button to open the cover and take
out the packed bags – Fig. 4
1.Put the power cord into the storage box when not use
the machine which is in the bottom of the machine. Do
not wrap the cord around the appliance.
Fig.3
NOTE: This product provides very high vacuum pressure during vacuum packaging
with a bag, in order to avoid crushing of the delicate item by the high vacuum
pressure, observe the status of the vacuum pressure inside the bag and switch
the “ Manual seal ” button immediately when the desired vacuum pressure is
achieved. The pump will stop and change to heat-seal the bag.
1. Do not put too much stuff inside the bag: leave enough empty space in the open
end of the bag so that the bag can be placed in the vacuum chamber area without
creating wrinkles or ripples;
2.
Do not wet the open end of the bag. Wet bags will cause difficulty to heat-seal tightly.
3. Clean and straighten the open end of the bag before sealing. Make sure nothing is
left on the open area of the bag, no wrinkle or creased lines should appear on the
open panel, foreign objects or creased bag may cause difficult to seal tightly.
4.
Do not leave too much air inside the bag. Press the bag to allow extra air to escape
from the bag before vacuuming it. Too much air inside the bag increases the vacuum
pump loading and may cause the motor insufficient power to draw away all the air
inside the bag.
5. Do not vacuum packaging objects with sharp points like fish bones and hard shells!
Sharp points may penetrate and tear the bag! You may want to use a container
instead of a bag to store such stuff.
6.
Suggest to vacuum seal one bag within 1 minute, to let the appliance resume enough.
7. If it’s not reach the required vacuum for some unknowable reason, the vacuum
system will shut automatically after 60 seconds, in this situation, please check if the
bag is leak, or not placed properly or any other reasons.
8. Make sure there is no crack or deformation, or small particles resting on the foam
gaskets around the vacuum chamber. When this happens, take it out and wash and
dry it thoroughly, or replace with a new one.
9. During bag vacuum packaging process, small amounts of liquids, crumbs or food
particles can be inadvertently pull into the vacuum chamber, clogging the pump and
damaging your appliance. To avoid this, freeze moist and juicy foods first before
sealing bags or place a folded paper towel near the inside top of the bag. For powdery
o
r fine-grained foods, avoid overfilling bags. You may also place a coffee filter inside
before vacuum packaging.
10. Pre-freeze fruits and blanch vegetables before vacuum packaging for best results.
11. Liquids need to be cooled before vacuum packing. Hot liquids will bubble up and
over the top of the jar when vacuum packed. Note: A jar attachment is necessary
for sealing jars.
12. Store perishable foods in the freezer or refrigerator. Vacuum packing extend the
shelf life of foods, but do not preserve them.
13. Fill a bag about 2/3 full with water, seal the end (don't vacuum). Freeze the bag
and use for ice in the cooler, or ice packs for sports injuries.
14. Many foods are sold pre-packed in commercial vacuum bags such as cheese and
deli meats. Now, you can maintain the taste and freshness of these foods, by
re-packaging with the vacuum sealer bags after the commercially packed bags have
been opened.
15. Panty items such as flour, rice, mixed for cakes and pancakes, all stay fresher
NOTE:
•
For best sealing effect, it is better to let the appliance cool down for 1 minute before
using it again. Wipe out any excess liquid or food residue in the vacuum chamber
after each bag packaged.
•
Do not seal one after another continuously to avoid overheat of the sealing element.
The machine will reject if this “seal” button is activated within 15 seconds of the last
activation.
•
Your appliance can work only on the specific bags provided by us. Do not attempt
to use other bags not intended for vacuum packaging.
•
Cut the bag straight across with scissors to open a sealed bag.
Ⅳ.Cord storage box

- 9 - - 10 -
Washing all vacuum accessories in warm water with a mild dishwashing soap, but do
not immerse cover in water.
1. Canister bases (not lids) are top rack dishwasher safe. But canister cover should
be wiping down with a damp cloth.
2. Ensure the accessories to be dry thoroughly before reusing.
3. Canister and cover is not allowed to use in microwave or freezer.
CLEANING AND MAINTENANCE
FOOD PRESERVATION GUIDELINES
Note: After finished the vacuum work, please always let the machine cover open,
don’t fasten the cover, it will deform the form gaskets and affect the machine
function.
Note: The foam gaskets around the vacuum chamber should be dried thoroughly
before re-assembling, when re-assembling, is careful to prevent any damage,
and assemble as original position to ensure no vacuum leaking.
1. Wash bags in warm water with a mild dishwashing soap.
2. When wash bags in dishwasher, turn bags inside out and spread them over top
rack of dishwasher, so entire surface is exposed to the washing water.
3. Dry thoroughly before reusing.
longer when vacuum packed. Nuts and condiments maintain their flavor while
rancidity is kept out.
16. For objects with sharp points and edges, such as bones or dried pasta, pad the
edges with paper towels to keep them from puncturing the bag.
17. There are many non-food uses for vacuum packing. Keep camping supplies such
as matches, first aid kits and clothing, clean and dry. Keep flares for auto emergencies
ready. Keep silver and collectibles untarnished. 1. The main function of this appliance
is to store a wide kind of foods for freshness, longer, flavor and convenience. In
general, vacuum packaging keeps food fresh up to three times as long as other
traditional food storage methods. Once this appliance as an indispensable part of
your life, it will less food spoilage and save more money.
18. It’s ideal to prepackage ingredients as well as individual portions for the health-
conscious, such as weight-conscious or those on diets or nutritional regimes with
special requirements.
19. This system can also be used to store and protect other items: valuable items,
such as photos, important documents, stamp collections, book collections, jewellery,
cards, comics etc.; hardware items, such as screws, nails, studs and bolts;
medicines, band-aids and other first-aid items, etc..
1. Always unplug the unit before cleaning.
2. Do not immerse in water or any other liquid.
3. Avoid using abrasive products or material to clean the unit, for they will scratch the
surface.
4. Use a mild dishwashing soap and a warm, damp cloth to wipe away food residue
or around components.
5. Dry thoroughly before using again.
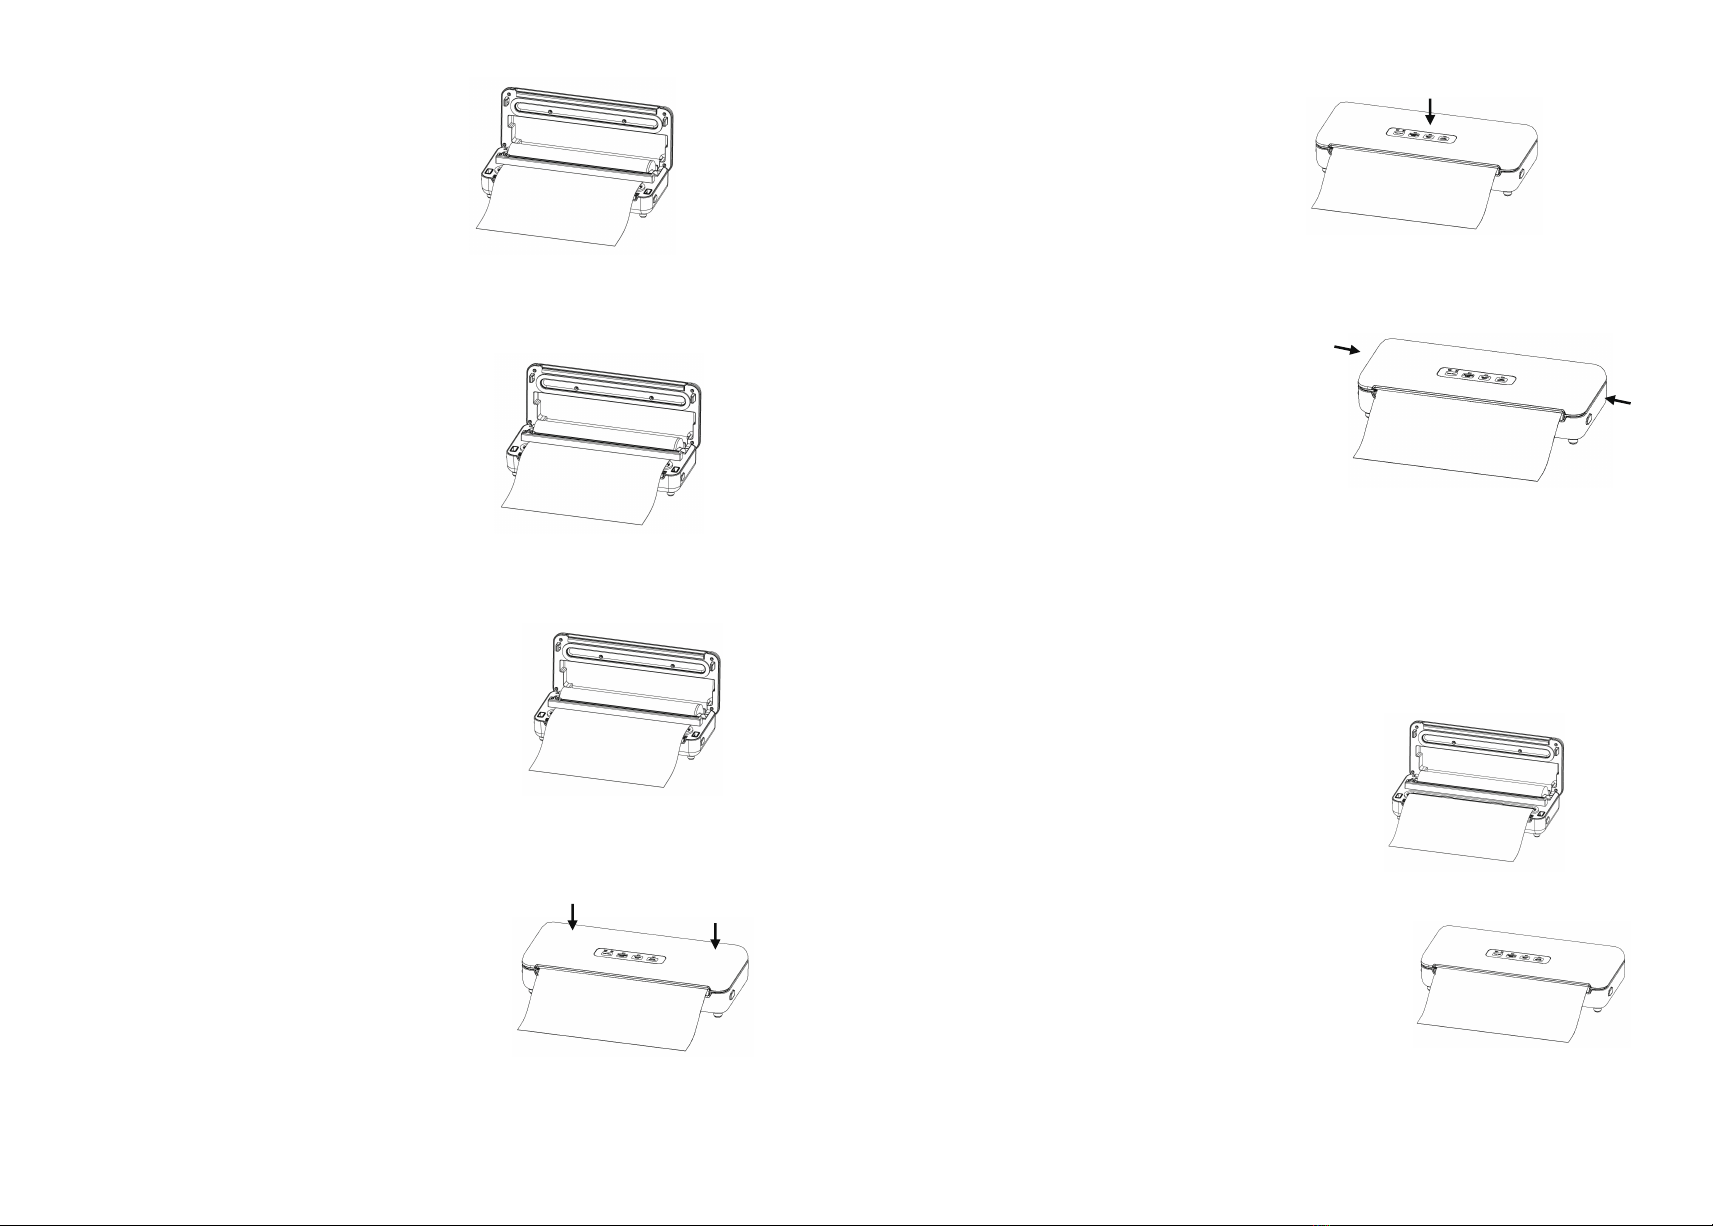
a).
Cook in advance to vacuum seal and store individual portions or entire meals. This
vacuum bag is not recommended for microwave or boil-in-bag cooking, please use
the general cooking method to re-heat the vacuum-sealed foods.
b). Prepare foods in advance for picnics and camping trips or barbecues.
c). Eliminate freezer burn.
d). Package foods, such as meat, fish, poultry, seafood and vegetables to freeze or
refrigerate.
e). Package dry foods, such as beans, nuts, and cereals to store longer.
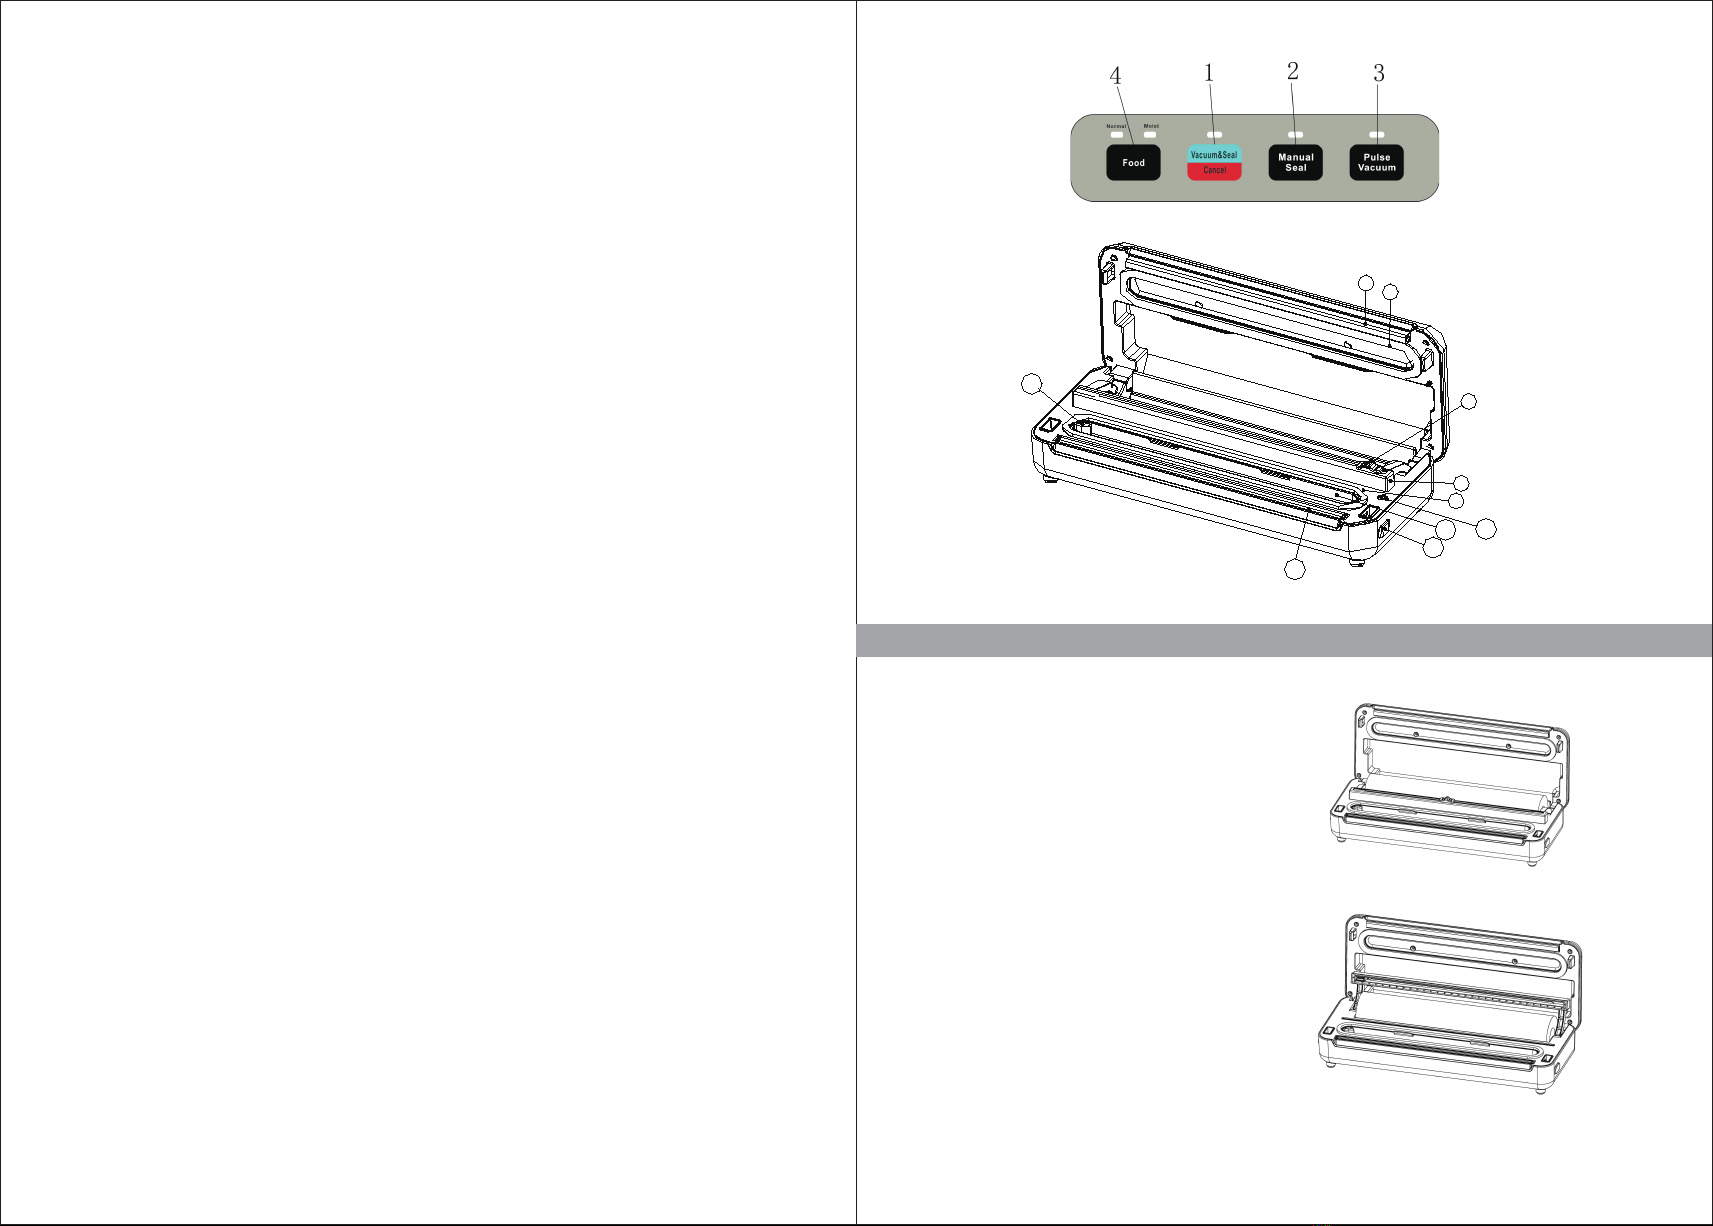
1. Vacuum sealer
3. Accessories
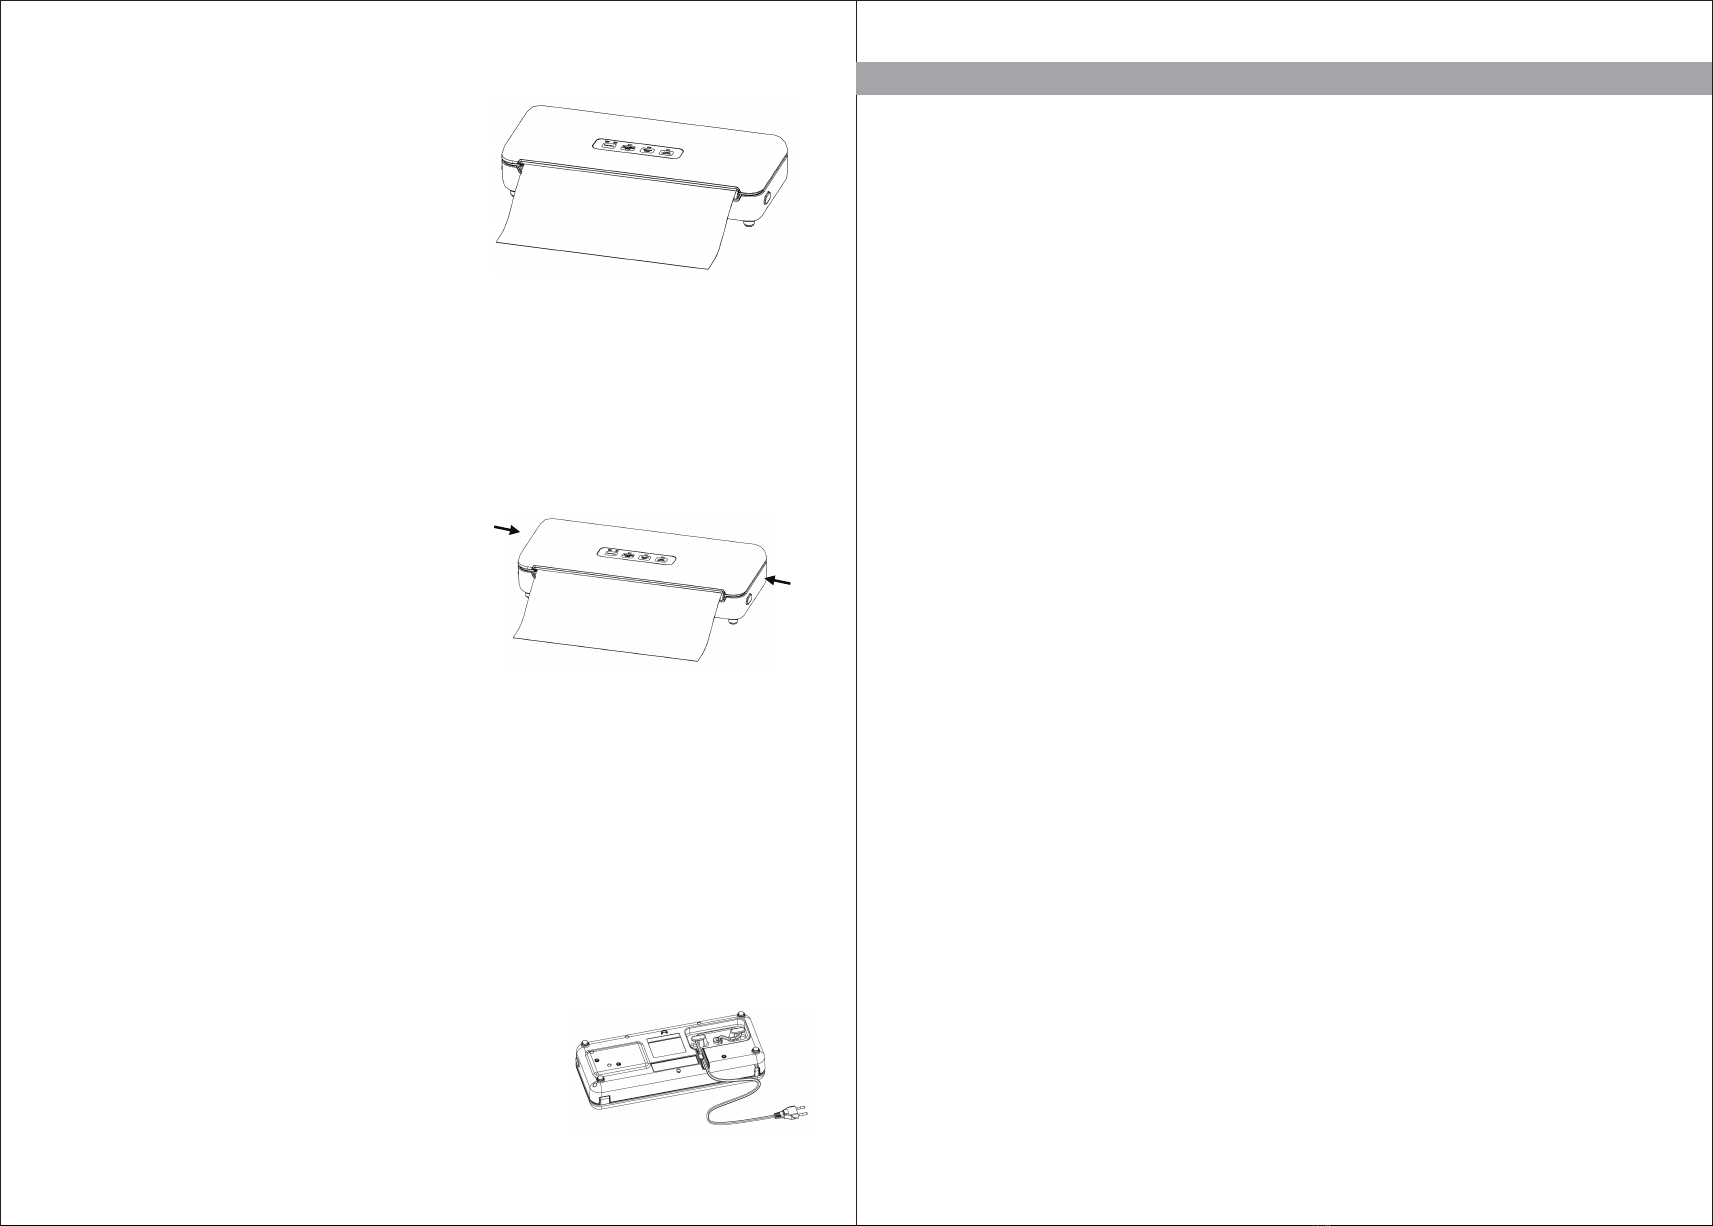
1. Keep the unit in a flat and safe place, out of the reach of children.
2. Do remember to make sure the lid of appliance is unlocked when not in use and in
storage. Keep the cover locked will distort the foam gaskets causing leaking.
Classification
Refrigerant
Frozen
Fresh Raw Meat 5±3℃2~3days 8~9days
4~5days
10~14days
7~10days
14~20days
30~50days
>1yeas
>1yeas
1~3days
4~6days
3~5days
5~7days
10~15days
3~5months
3~5months
5±3℃
5±3℃
5±3℃
5±3℃
5±3℃
-16~-20℃
-16~-20℃
Fresh Fish/ Sea Food
Cooked Meat
Vegetables
Fruit
Eggs
Meat
Fish
Food Items Temperature Normal
Preservation
Vacuum
Preservation
Storing Your Vacuum Sealer:
2. Vacuum bags
IMPORTANT:
To avoid possible illness, do not reuse bags after storing raw
meats, raw fish or greasy foods. Do not reuse bags that have been
microwaved or boiled.

- 11 - - 12 -
Normal
condition
Sea Food -16~-20℃3~5months >1yeas
6~8days
>1yeas
>1yeas
>1yeas
>1yeas
>1yeas
1~2days
4~6months
3~6months
3~6months
3~5months
5~6months
25±2℃
25±2℃
25±2℃
25±2℃
25±2℃
25±2℃
Bread
Biscuit
Rice/ Flour
Peanut/Legume
Medical Material
Problem
Vacuuming but not
turn to Seal
automatically
Cann’t vacuuming
but Seal function
is good
Cann’t vacuuming
but Seal function
is good
Reasons Caused
Check if the lower gasket is deformed ?
if deformed, replace it and try again.
Check if the edge of bag covered the suction hole ?
If yes, please put the bags into the correct postion.
Check if the foods is too much in the bags so that the machine
cover locked the foods ?
If yes, take out some foods and clean the bags edge, try again.
Check if the bags is break so that it leaking ?
If yes, Use a new bag and try again.
Check if the bags is placed into the vacuum chamber?
If no, please put the edge of bags into the vacuum chamber.
Check if the edge of bag covered the suction hole ?
If yes, please put the bags into the correct postion.
1. The symbol on the product or on its packaging indicates that this product may not be treated as
household waste. Instead it should be handed over to the applicable. Collection point for the recycling
of electrical and electronic equipment.
2. By ensuring this product is disposed of correctly, you will help prevent potential negative consequences
for the environment and human health, which could otherwise be caused by inappropriate waste handling
of this product .For more detailed information about the recycling of this product, Please contact your
local council office or your household waste disposal service.
Check if the edge of bags has wrinkled ?
If yes, please take out some foods so that the bags have enough space
for sealing, and smooth the bag mouth and try again.
Check if the packed foods with sharp edge?
Please use the food safety paper pack the sharp edge foods firstly
before put into the vacuum bags.
Check if packed food is belong to easy corrosion food ?
All the easy corrosion food are need to be frozen or refrigerated after
vacuuming so that it can prolong it’s shelf life.But vacuuming doesn’t
guarantee the foods will never spoil.
Check if you packed the fresh vegetables or friut and seed food ?
All fresh vegetables,fruit and seed are not suitable to storage under room
temperature after vacuumed, They have photosynthesis and respiration.
Suggest to storage them in refrigerated.
Tea
TROUBLESHOOTING
ENVIRONMENT PROTECTION FIRST
DISPOSAL OF THE DEVICE
PROTECTION OF THE ENVIRONMENT
At the end of the life of your product, it should go to a specially adapted
waste-recycling centre.
Table of contents
Other AICOOK Kitchen Appliance manuals
Popular Kitchen Appliance manuals by other brands

Duronic
Duronic POP50 manual

Berlinger Haus
Berlinger Haus BH-9049 instruction manual

Bunn
Bunn TB3 Installation and operating manual

mastro
mastro ACE0003 Instructions for installation, use and maintenance

Cuppone
Cuppone Pizzaform PZF/30DS User and installation manual

Nostalgia
Nostalgia SOS600NATYG Instructions and recipes

Back to Basics
Back to Basics Smoothie Jr. A user guide

Indesit
Indesit K6G32/G Instructions for installation and use

Oster
Oster FPSTMC6613A-L user manual

Parkinson Cowan
Parkinson Cowan CSIG 501 Owner's and installation guide

Bestron
Bestron FUNCOOKING ASM8010 instruction manual

Robot Coupe
Robot Coupe R 301 user manual