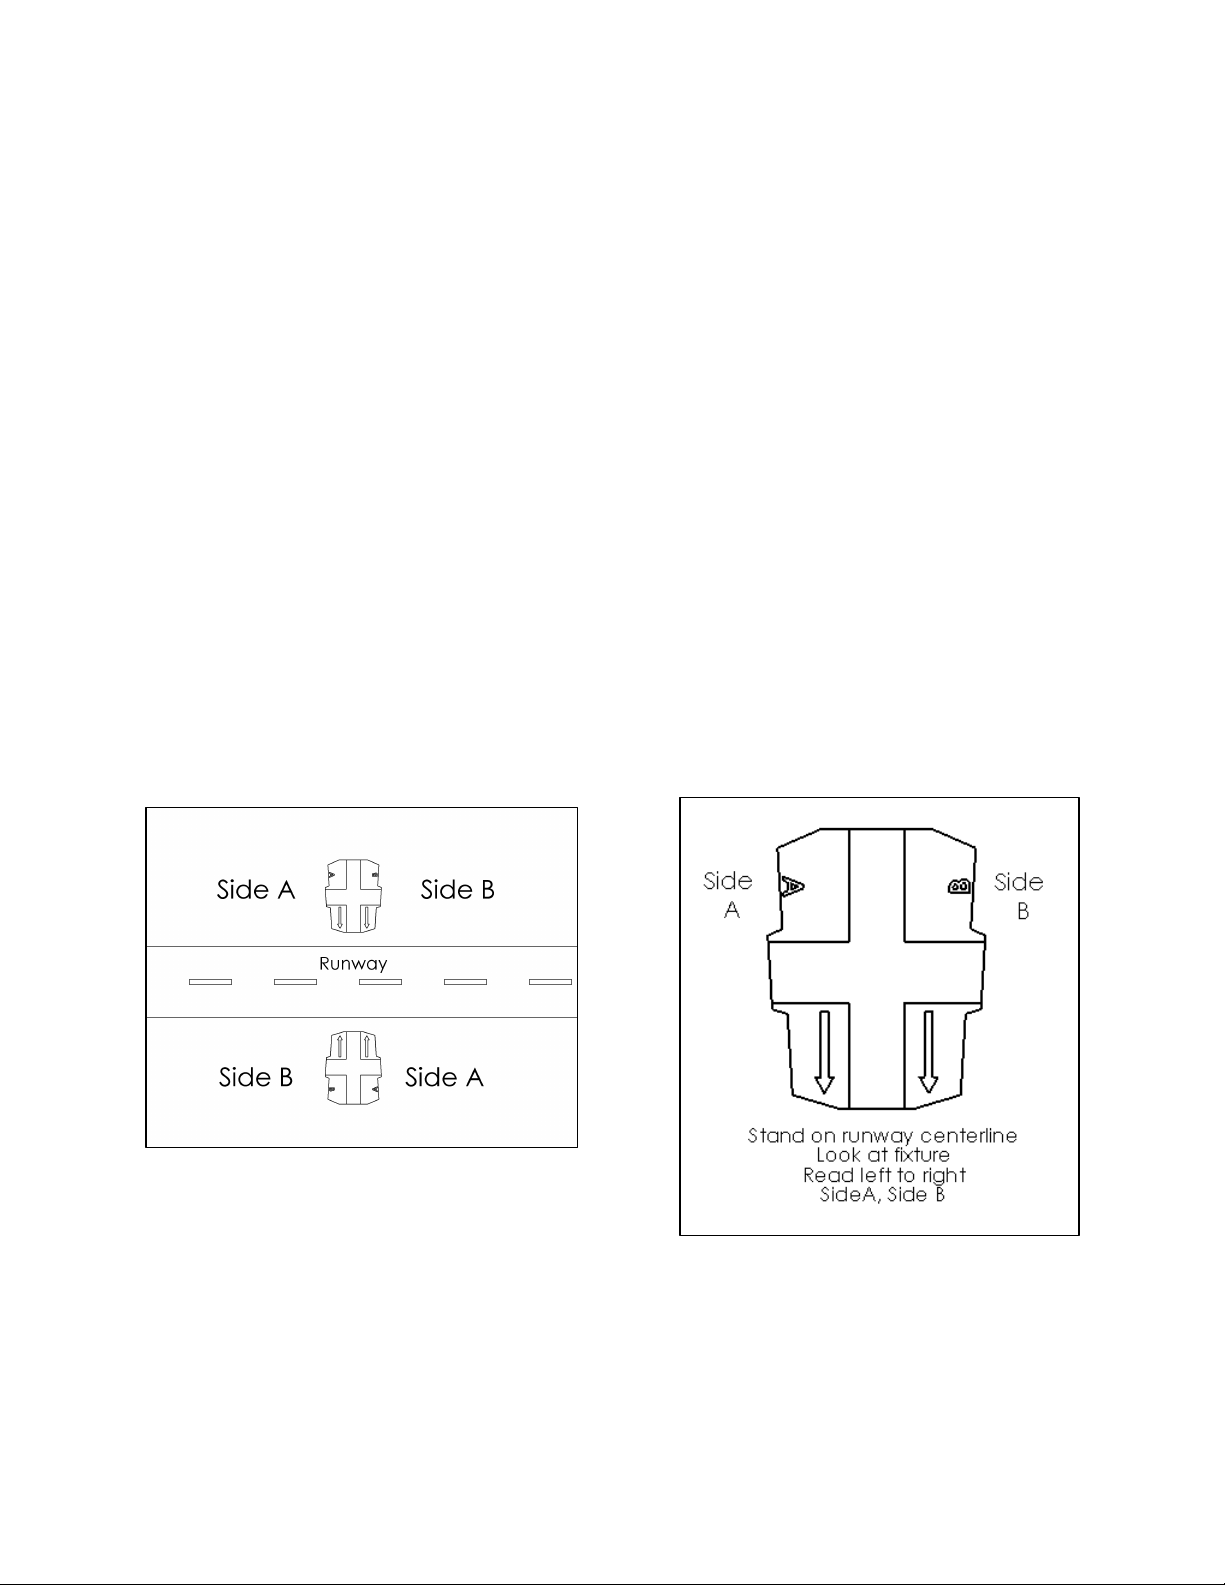
Airport L-861SE User manual

ESEL, Elevated Special End Light
Type: L-861SE
LED Runway Threshold/End Light
Instruction Manual
Revision 1.0
02/01/2021
MAN-FX03
In accordance with:
FAA
Advisory Circular AC-150/5345-46
Engineering Brief 67
Airport Lighting Company
108 Fairgrounds Drive
Manlius, New York 13104
(315) 682-6460

1
Warranty –LED Light Source Products FAA EB67D
Products manufactured by Airport Lighting Company (ALC) which use LEDs as a light source are warranted
against mechanical and physical defects in design or manufacture for a period of 2 years from date of
installation per the applicable FAA Advisory Circular and against electrical defects in design or manufacture of
the LED or LED specific circuitry for a period of 4 years per FAA EB67D. ALC will correct such defects by repair
or replacement, at its option, provided the products have been properly handled and stored prior to
installation, properly installed and operated after installation, and provided further that the Buyer has notified
ALC in writing within the warranty period and within a reasonable time after notice of such defects. Refer to
handling, storage, installation and operational instructions for proper procedural guidance that must be
followed to maintain warranty provisions.
This warranty is in effect for the specified term as long as the equipment, in ALC's judgment, has not been
altered in such a way as to affect the equipment adversely, subject to accident, negligence, improper storage,
and has been operated and maintained in accordance with accepted FAA guidelines as described in AC
150/5340-26 and ALC’s published operational guidelines.
ALC reserves the right to examine products about which a claim has been made. Equipment must be presented
in the same condition as when the defect was discovered. ALC also reserves the right to require the return of
equipment to establish any claim.
Disclaimer: ALC's obligation under this warranty is limited to repair or replacement of defective equipment sold
by ALC at no cost to Buyer. This does not include any other costs such as the cost of removal, shipping, or
installation of the defective part or repaired or replaced product, including labor or any consequential damages
of any kind. Warranty services provided under this agreement do not assure uninterrupted operations of LED
illuminated equipment. ALC shall not be liable for any indirect or consequential damages.
ALC's liability under no circumstances will exceed its sales price of the products claimed to be defective. All
transportation costs under this warranty are the responsibility of the purchaser. Replacement parts and/or
equipment provided under this warranty are covered under the same terms until the expiration of the original
warranty period that began upon the first installation of the equipment.
This is ALC's sole and exclusive warranty with respect to the equipment sold to the Buyer. There
are no express or implied warranties of fitness for any particular purpose or any implied warranties other than
those made expressly herein.
ALC shall not be liable to the purchaser of this product or third parties for indirect or consequential damages, or
for damages arising from the use of any options or parts other than those designated by ALC as approved
products. Damage caused by lightning, flood and other natural or manmade causes are outside the scope of
this warranty.

2
Changes from last Revision
•Initial Release

3
Contents
1.0 Safety......................................................................................................................................... 5
2.0 Description ................................................................................................................................ 5
2.1 Catalog Ordering Information............................................................................................... 6
2.2 Fixture Loads and Required Transformer ............................................................................. 7
2.3 Dimensions............................................................................................................................ 7
2.4 Storage. ................................................................................................................................. 7
3.0 Installation................................................................................................................................. 8
3.1 FAA References and Siting Requirements............................................................................. 8
3.2 Installation............................................................................................................................. 8
3.2.1 Tools Required for Installation....................................................................................... 8
3.2.1 Tools Required for Maintenance. .................................................................................. 8
3.2.2 Installation Precautions. ................................................................................................ 8
3.2.3 Proper Transformer. ...................................................................................................... 8
3.2.4 Pre-Assembly of Fixture................................................................................................. 8
3.2.5 Final Assembly................................................................................................................ 9
3.3 Aim Fixture............................................................................................................................ 9
3.4 Level Fixture ........................................................................................................................ 10
3.5 Torque Bolts........................................................................................................................ 11
4.0 Operation ................................................................................................................................ 12
4.1 Plug and Know LED Circuit .................................................................................................. 12
4.2 Multiple Light Devices......................................................................................................... 12
5.0 Maintenance ........................................................................................................................... 13
5.1 Daily Maintenance .............................................................................................................. 13
5.2 Monthly Maintenance......................................................................................................... 13
6.0 Trouble Shooting..................................................................................................................... 14
6.1 Tech Support ....................................................................................................................... 14
6.2 Troubleshooting.................................................................................................................. 14
6.3 Removing Electronic Parts. ................................................................................................. 15
6.4 Replacing Electronic Parts................................................................................................... 16
6.5 Replacing the LED Light Engine........................................................................................... 17
6.5.1 Replacing the LED Light Engine Assembly.................................................................... 17

4
6.5.2 Replacing the Light Engine, Lens and Gasket............................................................... 17
7.0 Parts ........................................................................................................................................ 18
List of Figures
Figure 1: Side A, Side B.................................................................................................................... 6
Figure 2: Light Placement................................................................................................................ 6
Figure 3: Fixture Dimensions........................................................................................................... 7
Figure 4: Fixture Aiming. ................................................................................................................. 9
Figure 5: Leveling, Front View....................................................................................................... 10
Figure 6: Leveling, Side View......................................................................................................... 10
Figure 7: Electronic Component Assembly ................................................................................... 15
Figure 8: How to Remove Ferrule. ................................................................................................ 16
Figure 9: Lens Assembly................................................................................................................ 17
Figure 10: Parts Diagram............................................................................................................... 19
Figure 11: ESEL Wiring Diagram.................................................................................................... 21
List of Tables
Table 1: PF and VA .......................................................................................................................... 7
Table 2: Torque ............................................................................................................................. 11
Table 3: Troubleshooting .............................................................................................................. 14
Table 4: Light Engines.................................................................................................................... 18
Table 5: Columns and Cords.......................................................................................................... 18
Table 6: Bill of Materials ............................................................................................................... 20

5
1.0 Safety
It is not safe to work on a constant current power system when the power is on. Make sure
the power is off before installing a runway light fixture. A lock out, tag out, procedure
should be used. An additional safety measure is to test that the circuit is off by using a
clamp-on ammeter. By using a clamp-on ammeter, clamped over the primary cable of the
isolation transformer, the installer can confirm that the circuit being worked on is off by
verifying that no current is flowing thru the primary cable.
2.0 Description
The High Intensity LED Runway Lights are elevated bi-directional and uni-directional runway
lights. The High Intensity LED Runway Light operate on a 2.8 - 6.6 Amp series runway
circuit.
FAA, certified to Advisory Circular 150/5345-46 (Current Edition): This product line meets
the requirements for L862 and L862E

6
2.1 Catalog Ordering Information
ESEL- __ __ - __ __
Color: Height
RG = Red / Green 14 = 14” (36cm)
GO = Green / Obscure 20 = 20” (51cm)
OG = Obscure / Green 24 = 24” (61cm)
30 = 30” (76cm)
Other heights available
Example: ESEL-RG-24 is 24” high with red on side A and green on side B.
Figure 1: Side A, Side B
Figure 2: Light Placement

7
2.2 Fixture Loads and Required Transformer
Table 1: PF and VA
Fixture
Load
Iso Tran
Load
VA
PF
Red / Green
(largest load)
30.4
14.3
44.7
0.948
Green unidirectional
(smallest load)
24.4
14.3
38.7
0.959
A 30/45-Watt isolation transformer is specified for all fixtures referenced in this manual.
2.3 Dimensions
Height, head assembly: 6.8 inches, (173mm)
Height, w/ slip fitter: 8.9 inches, (226mm)
Width: 5.5 inches, (140mm)
Length: 5.2 inches, (132mm)
Weight: 5 pounds, (2.3kg)
The L861SE LED Runway Light
fixtures can ship in a single box.
(9 1/8 x 7 x 5 ¾ inches) or (232 x 178 x 146mm)
9 fixtures can ship in a box.
(17 x 16 ½ x 10 inches) or (432 x 420 x 254mm)
2.4 Storage.
The Elevated High Intensity fixtures should be stored indoors and kept dry.
Storage Temperature: -55C (-67F) to +55C (131F).
Figure 3: Fixture Dimensions

8
3.0 Installation
3.1 FAA References and Siting Requirements
The requirements for siting of high intensity runway edge lights are explained in FAA
advisory circular 150/5340-30J.
The L862E fixtures, bidirectional red/green and red/red, and unidirectional red or green will
come with red and/or green lens retainers to provide daytime recognition.
3.2 Installation
3.2.1 Tools Required for Installation.
7/16 wrench.
1 ½ inch wrench.
3.2.1 Tools Required for Maintenance.
7/16 wrench.
1 ½ inch wrench.
Torx T20 driver.
3.2.2 Installation Precautions.
It is not safe to work on a constant current power system when the power is on. Make
sure the power is off before installing a light fixture. A Lock Out Tag Out procedure is
strongly recommended. An additional safety measure is to test circuit by using a clamp on
current meter. By clamping over the primary cable in the fixture can, the installer has
performed an additional safety check by checking the circuit they are working on is off. At
the vault make sure the Constant Current Regulator powering the circuit is off and has been
tagged out. At the fixture, place a clamp-on ammeter over the primary cable and verify
that the current measures zero amps.
3.2.3 Proper Transformer.
It is recommended to use the specified transformer to power the L861SE (L). A smaller
transformer will not allow the fixture to work properly. An oversized transformer can be
used but will not work as efficiently. A 30/45-Watt isolation transformer is specified for all
fixtures referenced in this manual.
3.2.4 Pre-Assembly of Fixture.
Apply an anti-seize compound to the frangible coupling threads. Install frangible
coupling to the baseplate. Fasten the column to the fixture. Pass the L-823 plug thru the
frangible coupling and baseplate. Fasten the bottom of the column to the frangible
coupling.

9
3.2.5 Final Assembly.
Connect the secondary of the isolation transformer to the fixture. Apply anti-seize
compound to the 3 screws that will secure the secondary plug. Secure the secondary plug
to the baseplate with the 3 screws and plug retainer. Place the baseplate gasket in position.
Position the baseplate over the can so that the arrows on the fixture point towards the
runway centerline. Secure the baseplate to the can.
3.3 Aim Fixture
The arrows on the fixture cap should be pointed towards the runway centerline. The
shorter cross on top of the cap is used to sight the fixture for alignment with the row of
edge lights, the longer member of the cross can be used to align with the threshold lights.
Figure 4: Fixture Aiming.

10
3.4 Level Fixture
Place a level on top of the cap and level the fixture. If a torpedo level is used, level in both
directions of the cross. A bull’s eye level can be used at the cross intersection.
Figure 5: Leveling, Front View.
Figure 6: Leveling, Side View.

11
3.5 Torque Bolts
Once the fixture has been aimed and leveled, torque the ¼-20 fasteners to 64 inch-pounds
(5.3 foot-pounds). Recheck the level of the fixture.
Table 2: Torque
Inch-pounds
Foot-pounds
Newton-meters
#8
18.4
1.5
2.1
¼-20
63.6
5.3
7.2
1 ½
na
50
68
2
na
50
68

12
4.0 Operation
The ESEL LED product line is designed to work on a constant current electrical supply that
delivers current from 2.8 amps to 6.6 amps. The fixture measures the input current and
automatically adjusts the light intensity. The fixture contains an input power board, a
controller, and light engine(s). The fixture senses which color will be emitted by the light
engine and adjusts its power accordingly. Change of light engine to a different color
requires no user adjustments.
Inspect that the fixture is properly installed and connected to the correct isolation
transformer. Turn on the fixture and the LEDS come on. Step the current level and the light
intensity will adjust to the correct intensity. When stepping current, allow a few seconds
for the intensity to readjust.
4.1 Plug and Know LED Circuit
The ESEL light engines use a 6-pin connector. 2 of the 6 pins provide power to the LEDs.
The remaining 4 pins are used to identify the light engine. When a light engine is connected
to the fixture, the fixture knows which light engine has been connected. This allows the
circuit to properly drive each light engine to its correct intensity.
4.2 Multiple Light Devices
The green light engine is made up of multiple LEDS. FAA requires the light engine to shut
off if 25% of the LEDs fail. The circuit is constantly looking at the LEDs. When 25% or more
fail, the circuit will power down within 2 minutes and a minute later it will shut the green
light engine off. If the fixture is off, do not touch the fixture. There is still power going to
the fixture. If a fixture appears to be off, cycle the power off and on. Observe the light
engines. Replace the light engine that does not have all the LEDs working. The red light
engine uses a single LED and does not adhere to the Multiple Light Devices rule. If the red
is off, the LED has failed, the fixture has failed or the red light engine has become
disconnected

13
5.0 Maintenance
5.1 Daily Maintenance
Check that all lights are working. Check that all lights have similar light output. Check that
the lenses are clean.
5.2 Monthly Maintenance
Check that all fixtures are aimed properly. Check that all fixtures are level on 2 axes. Check
that the fixture is secure, and all fasteners are tight. Check that all LEDs are illuminated.
Clean the lenses.

14
6.0 Trouble Shooting
6.1 Tech Support
Outside of aiming, leveling, and cleaning, the ESEL fixture should require very little
maintenance. The end user has the option to use this manual to perform advanced
maintenance, to call tech support at Airport Lighting Company at (866) 212-1060 or to
6.2 Troubleshooting
Table 3: Troubleshooting
Problem
Cause
Solution
Light output too low
Glass is dirty
Clean lens
Wrong current level
Check current on CCR
Isolation transformer too
small
Install the proper sized
transformer
LED light engine is failing
Replace light engine
Controller is failing
Replace controller
Only one side of fixture has
light output
Multiple Light Device
test feature is activated
See 4.2 Multiple Light
Devices
LED light engine is
disconnected
Check light engine
connection
LED light engine has failed
Replace light engine
Controller has failed
Replace controller
Both sides of fixture, no
light output
Multiple Light Device
test feature is activated
See 4.2 Multiple Light
Devices
Connection failed
Check all connections
LED light engine(s) failed
Replace light engine(s)
Controller failed
Replace controller
Power input board failed
Replace power input board

15
6.3 Removing Electronic Parts.
When the light is out the cause can be in a few areas. The way to isolate the problem is to
start with a known good fixture. Test each part from the inoperable fixture in the known
good fixture, one at a time, until the problem is isolated. Then replace the defective part.
Figure 7: Electronic Component Assembly
Note which side is side A and which side is side B.
Remove the 4 screws that hold the cap in place.
Remove the cap.
Carefully pull the connector board upward to disconnect.
Remove the 2 screws that hold the side A lens retainer in place.
Remove side A LED light engine.
Remove the 2 screws that hold the Side B lens retainer in place.
Remove side B LED light engine.
Pull the controller board upward and out of the fixture.
Mark the top of the extruded body with tape.
Remove the 4 screws holding the bottom to the body.

16
Figure 8: How to Remove Ferrule.
Insert a small blade screwdriver into the openings next to the ferrules to release the
ferrules.
Remove the 2 screws holding the input board to the bottom.
6.4 Replacing Electronic Parts.
Connect the input board to the bottom with 2 screws.
Push the ferrules into the input board terminal block until the ferrules are flush with the top
of the terminal block.
Position the controller board into the input board.
Slide the controller board into the body from the bottom, making sure the board is in the
grooves correctly.
Connect the bottom to the body with 4 screws.
Install the connector board to the controller.
Use the cap to determine Side A and Side B.
Slide Side A light engine into the connector board.
Place the lens retainer over the light engine.
Make sure the top edges of the lens retainer and body are flush.
Install the 2 lower screws to fasten the lens retainer.
Slide Side B light engine into the connector board.
Place the retainer over the light engine.
Make sure the top edges of the lens retainer and body are flush.
Install the 2 lower screws.
Place the cap in position and apply a downward pressure while installing 4 screws.

17
6.5 Replacing the LED Light Engine.
Figure 9: Lens Assembly
It is recommended to purchase the light engine as an assembly with a new glass lens. If the
lens is broken and the light engine still works properly, the glass lens can be replaced. And
if the lens is good, the light engine can be replaced.
6.5.1 Replacing the LED Light Engine Assembly
Remove the 4 screws that hold the cap in place.
Remove the cap.
Remove the 2 screws that hold the lens retainer in place.
Slide the LED light engine down to disconnect from the connector board.
Slide the new LED light engine into the connector board.
Place the lens retainer over the LED light engine.
Make sure the top edges of the lens retainer and body are flush.
Install the 2 lower screws to fasten the lens retainer.
Place the cap in position and apply a downward pressure while installing 4 screws.
6.5.2 Replacing the Light Engine, Lens and Gasket
Remove the LED light engine.
Cut the gasket with a box cutter.
Separate the two parts.

18
Peel the gasket off the parts that are going to be reused.
Use an adhesive cleaner to remove any remaining adhesive.
(Goo Gone, or De-Solv-It work well)
Use alcohol to clean the surface for the new gasket.
Clean the lens.
Peel and stick the new gasket to the lens.
Peel and stick the gasket and lens to the light engine.
7.0 Parts
High Intensity Runway Light LED Light Engines
There are 5 different light engines to choose from. There is 1 white, 1 yellow, 1 red and 2
green light engines. Each light engine meets a specification or multiple specifications. All
specifications are met when the fixture is aimed properly. Table 4 shows the available light
engines. All light engines work on either side of a fixture.
Table 4: Light Engines
Color
Order
Code
Light Engine
w/ Lens
Light Engines
LEDs
FAA
Red
R
262-1205
62-3035
1
L861SE
Green
G
262-1206
62-3036
4
L861SE
Table 5: Columns and Cords
Column and Cords part numbers
Fixture Height
Column part number
Cord PN
14 inches (36cm)
77
262-1100
20 inches (51cm)
78
262-1101
24 inches (61cm)
78-16
262-1102
30 inches (76cm)
79
262-1103

19
Figure 10: Parts Diagram
Table of contents
Other Airport Lighting Equipment manuals