AirSelfie AIR PIX User manual

INSTRUCTION MANUAL

In the Box - contents

3
Getting to know your AirSelfie
LED Legend
Red Light Solid = Charging
Red Light Off = Fully Charged
Blue Light Solid Fly = Status Normal
Blue Light Flash once = Take a picture
Blue Light Flash slowly = Recording

4
The AirSelfie App
Developed exclusively for AirSelfie, the AirSelfie app
allows users to control the flight path of the device and
its camera. Users can also download pictures and
videos directly from the device and share them
instantaneously on Social Media platforms.
Get the app
The AirSelfie app is available for free download on
both the App Store and Google Play.
The AirSelfie App supports all versions of Android 4.0 and
above and all versions of iOS 8.0 and above.
GOOGLE PLAY
APPLE STORE

5
General settings before your
AirSelfie’s first flight
Camera
•Camera time delay function:
3sec / 5sec / 10sec
Use this function to delay the shot by 5 or 10
seconds. This will allow you to put your smartphone
away before posing for the picture.
•Multiple shot:
3pics / 5pics / 10pics
(use this function to take multiple shots at the same
time).
Flying Para’
•Flying Speed:
Slow / Medium / Fast
Select the flight speed you feel
comfortable with.
About
•Check the firmware version

6
App Icons
Home
Wi-Fi Connected
Wi-Fi Signal Weak
Wi-Fi Disconnected
Remaining Memory
Fully Charged
Battery Low
Start/Stop Recording
Take a Picture
Emergency/Power off

7
Optimal operating conditions
Outdoors
•
Do not operate under bad weather
conditions (raining, snowing, wind etc).
•
Do not fly device over crowded areas or motor
traffic.
•
Fly the AirSelfie in plain sight, and away
from obstructions or water.
•
It is advisable to not operate the device from
over 20 metres of distance away.
Indoors
•
The AirSelfie uses visual positioning
technology for optimal hovering performance.
For maximum stability, it is advised to fly the
device over flat and multicoloured surfaces.
•
Ensure there is sufficient lighting whenever using
the device indoors.
•
Avoid flying the device over surfaces which
absorb sound, such as rugs or carpets.
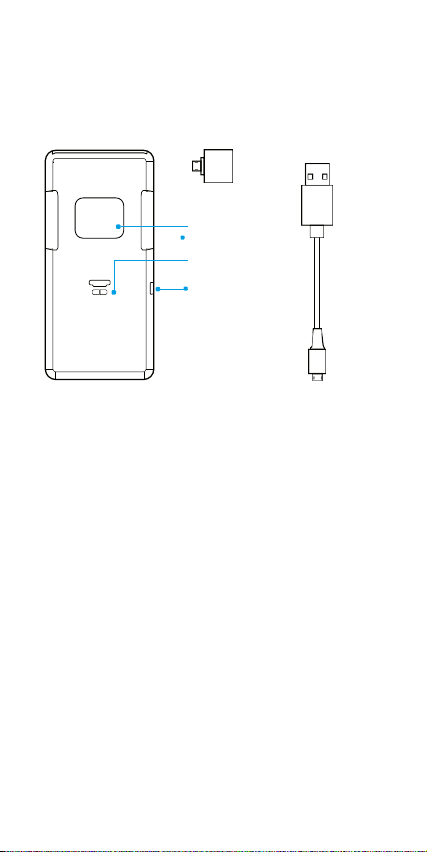
Memory
There is a built-in 4GB memory card for storing
photos and videos. Photos and videos can be
downloaded to your PC, Mac or smartphone using
either the USB cable provided or a Wi-Fi connection.
The USB port can be used for data transfer via a PC
or a Mac only when the AirSelfie is switched on.

8
Battery & Charging
We highly recommend charging your AirSelfie using
the power case or power bank chargers provided in
the product kit.
Power Case Specs
LED Indicator
Adaptor
USB 2.0
USB Port
USB Cable
Capacity: 1800 mAh
Charging: 5V/2A or 5V/1A
Discharging: 5V/2.4A/12W
Charging Tim e: 5V/2A
Adaptor > 1hr 5V/1A
Adaptor > 2hr
Micro USB
Introduction of LED indicator
Green LED: Indicate current capacity of battery
Flash once: 0~25% capacity
Flash twice: 25~50% capacity
Flash 3 times: 50~75% capacity
Flash 4 times: 75~100% capacity
Solid light up: 100% capacity, battery fully
Red LED: Discharging
Attention
Use 5V qualified charger charging
Power Case. Avoid use charger with
nominal v oltage above 5V.
Duration charging AirSelfie or other
electrical products, discharging LED
quenching means Power Case fully
discharged, please charge P ower Case.

9
Battery & Charging
Power Bank Specs
Adapter
USB 2.0
Logo Display
LED Indicator
USB Port
USB Cable
Capacity: 12600mAh
Charging: 5V/2A or 5V/1A
Discharging: 5V/2.4A/12W
Charging Tim e:
5V/2A Adaptor >6hr
5V/1A Adaptor >12hr
Micro USB
Introduction of LED indicator
Green LED: Indicate current capacity of battery
Flash once: 0~25% capacity
Flash twice: 25~50% capacity
Flash 3 times: 50~75% capacity
Flash 4 times: 75~100% capacity
Solid light up: 100% capacity, battery fully
Red LED: Discharging
Attention
Use 5V qualified charger charging
Power Bank. Avoid use charger with
nominal voltage above 5V.
Duration charging AirSelfie or other
electrical products, discharging LED
quenching means Power Bank fully
discharged, please charge P ower Bank.

10
Caution!
• PowerCase/PowerBank use Li-ion Battery
• Do not disassemble/reassemble PowerCase/PowerBank.
• Do not place PowerCase/PowerBank into fire or water.
• Do not charge or use PowerCase/PowerBank near heat
concentrated
region.
• Do not pierce or damage PowerCase/PowerBank.
• Do not charge PowerCase/PowerBank with High Voltage Device.
• Do not use leak, smelly, deformed PowerCase/PowerBank and
battery.
• Do not place PowerCase/PowerBank in microwave or high
pressure
vessels.
• Do not expose PowerCase/PowerBank under direct sunlight.
• Do not place PowerCase/PowerBank where child can approach.
Charging the Power Case / Power Bank
Insert the micro-USB end of the cable into the power bank
and the USB 2.0 end into a 5V plug. Your power bank is fully
charged when the LED indicates a green light.
.
Charging the AirSelfie
Insert the AirSelfie into either the power case or power
bank. A red LED light indicates that the device is charging.
Charging your smartphone with the power case/bank
Plug the adaptor onto the USB 2.0 port, inserting the
other side of the adaptor into the power bank.
Insert the micro-USB port into the smartphone that
requires charging. A red LED light indicates that the
device is charging.
charghing port

11
Powering the AirSelfie on
and/or off
To power on or off, push the power button as shown
in the figure below and hold for 1.5 seconds. A blue
LED light and a beep sound will be played when the
device is switched on.

12
First flight
We highly recommend taking your first AirSelfie
flight indoors, using the safety cover included in
the product kit.
Emergency stop
In case of emergency, stop the AirSelfie even in mid-
flight by pressing the button

13
Linking your smartphone to the
AirSelfie
Download the AirSelfie app from the App Store or
Google Play onto your smartphone.
Once the AirSelfie is on
1.
Proceed to the Wi-Fi menu in your smartphone’s
settings
2.
Select the AirSelfie network which will appear on the
screen as “AirSelfie_operating code number”.
3.
The password will be the operating code number,
which is the combination of letters and numbers after
“AirSelfie”.

14
Using the AirSelfie
Control your AirSelfie’s flight through 3 different flight
modes: 1) selfie mode “beginner”, 2) selfie motion
control mode, 3) standard control mode.
The TossFly & the TouchLand
Make sure your AirSelfie has been successfully
linked to the AirSelfie app before tossing the
device into flight; select one of the flight modes to
check that the AirSelfie camera is streaming
images real time to your smartphone.
Starting a flight: the TossFly

15
1.
Place the AirSelfie in your palm, keeping it as flat
and parallel to the ground as possible (if the device
is not properly levelled, an error message might
appear on the screen).
2.
Following the instructions on the screen, slide your
finger over the bar that says “Slide to Take Off”.
This should start the AirSelfie’s propellers, signaling
that the device is ready for take-off.
3.
Gently push the AirSelfie upwards into the air for it to take
flight.
Concluding a flight: the TouchLand
While the AirSelfie is in mid-hover, place your palm beneath
it. The AirSelfie will then land in your palm, stopping its
propellers. Now you are ready to download your AirSelfie
pictures and videos to your smartphone!

16
Selfie Motion control mode
Operation sequence
1. In Selfie Motion Control Mode, in order to prevent
confusing the device during flight, make sure that the
camera is facing you. This ensures that the controls will
not be inverted.
2. Slide to take off
3. Do the TossFly (pg 14)
4. Tapping on any command icon will have the smartphone
take control of the AirSelfie (notifying you with a vibration)
5. Use the following commands to move the drone in the
desired position
Commands
•
Tap and hold the mid button to activate Gravity Mode.
•
Slide mid button
•
Sliding upward brings the device up.
•
Sliding downward brings the device down.
•
Sliding left turns the camera left.
•
Sliding right turns the camera.

17
Type of controlling
VIRTUAL JOYSTICK
•
slide virtual joystick to move AirSelfie (smartphone
position must be levelled)

18
TILT MODE
Tap in the center and tilt the smartphone:
•
to the left to move AirSelfie to the left. (1)
•
to the right to move AirSelfie to the right. (2)
•
away from yourself to move AirSelfie away from
you. (3)
•
towards yourself to move AirSelfie
towards
you. (4)
1
2
34

19
2. Taking a photo or a video
TO TAKE A PICTURE TAP ON THE SCREEN
Use the delay function (pg 5) to
delay the shot by 3, 5 or 10
seconds.
This will allow you to put your
smartphone away before posing
for the picture.
TO RECORD A VIDEO CLICK ON THE ICON
CLICK TO STOP RECORDING
3. Use the commands to return the AirSelfie to you
4. Do the TOUCHLAND
5. Go to Home (click on the icon) to
DOWNLOAD PHOTOS & VIDEOS (pg 26)
FOR EMERGENCY STOP PRESS

20
Selfie mode “beginner”
Operation sequence
1. In Selfie mode “beginner”, in order to prevent
confusing the device during flight, make sure that the
camera is facing you. This ensures that the controls
will not be inverted.
2. Slide to take off
3. Do the TossFly (pg 14)
4. Tapping on any command icon will have the
smartphone take control of the AirSelfie (notifying you
with a vibration
5. Use the following commands to move the drone in the
desired position
Commands
• Tap the screen (live view area) to take a picture
• Tap the varying directions to move the device
accordingly.
• Tap on up arrow or down arrow to move AirSelfie up or
Table of contents
Other AirSelfie Drone manuals