AirTies RT-111 User manual

ADSL2+
4 Port Router
RT-111
USER MANUAL

This manual has been prepared by AirTies Wireless Networks Corporation. All rights reserved.

Manual Overview
This manual guides you through the steps necessary for setting up and configuring your
AirTies device. Please read this manual carefully before beginning the installation process.
The Warranty does not cover failure or damage as a result of not following the instructions
in the manual. AirTies will not be held responsible in such circumstances.
The User anual is an important resource you can refer to for safe and proper use of your
device. Please retain it for future reference.
Safety and Maintenance
In order to prevent damage to your device, be sure to keep it in its original box during
transportation.
The device must be used solely with its original power adapter. Please note that the
adapter is 220V only. Do not use with 110V AC.
Do not insert a PSTN (phone) plug into the LAN port.
If you encounter any problems, do not open or disassemble the device. Call AirTies
Technical Support.
In order to prevent electric shock, do not operate the device in wet or damp areas.
In the event of a gas leak, do not use the device. Do not turn the device on or off. Do not
plug or unplug the power cord.
Avoid using the device in dusty environments. If dust buildup should occur, use a dry cloth
to remove the dust.
To clean the exterior of the device use a dry cloth. Do not attempt to clean the interior.
There are no user serviceable components inside.
For information regarding the installation and configuration of the device consult the
remainder of this manual.

1. INTRODUCTION.....................................................................................1
1.1. Main Features......................................................................................1
1.2. Mini u Syste Require ents..........................................................2
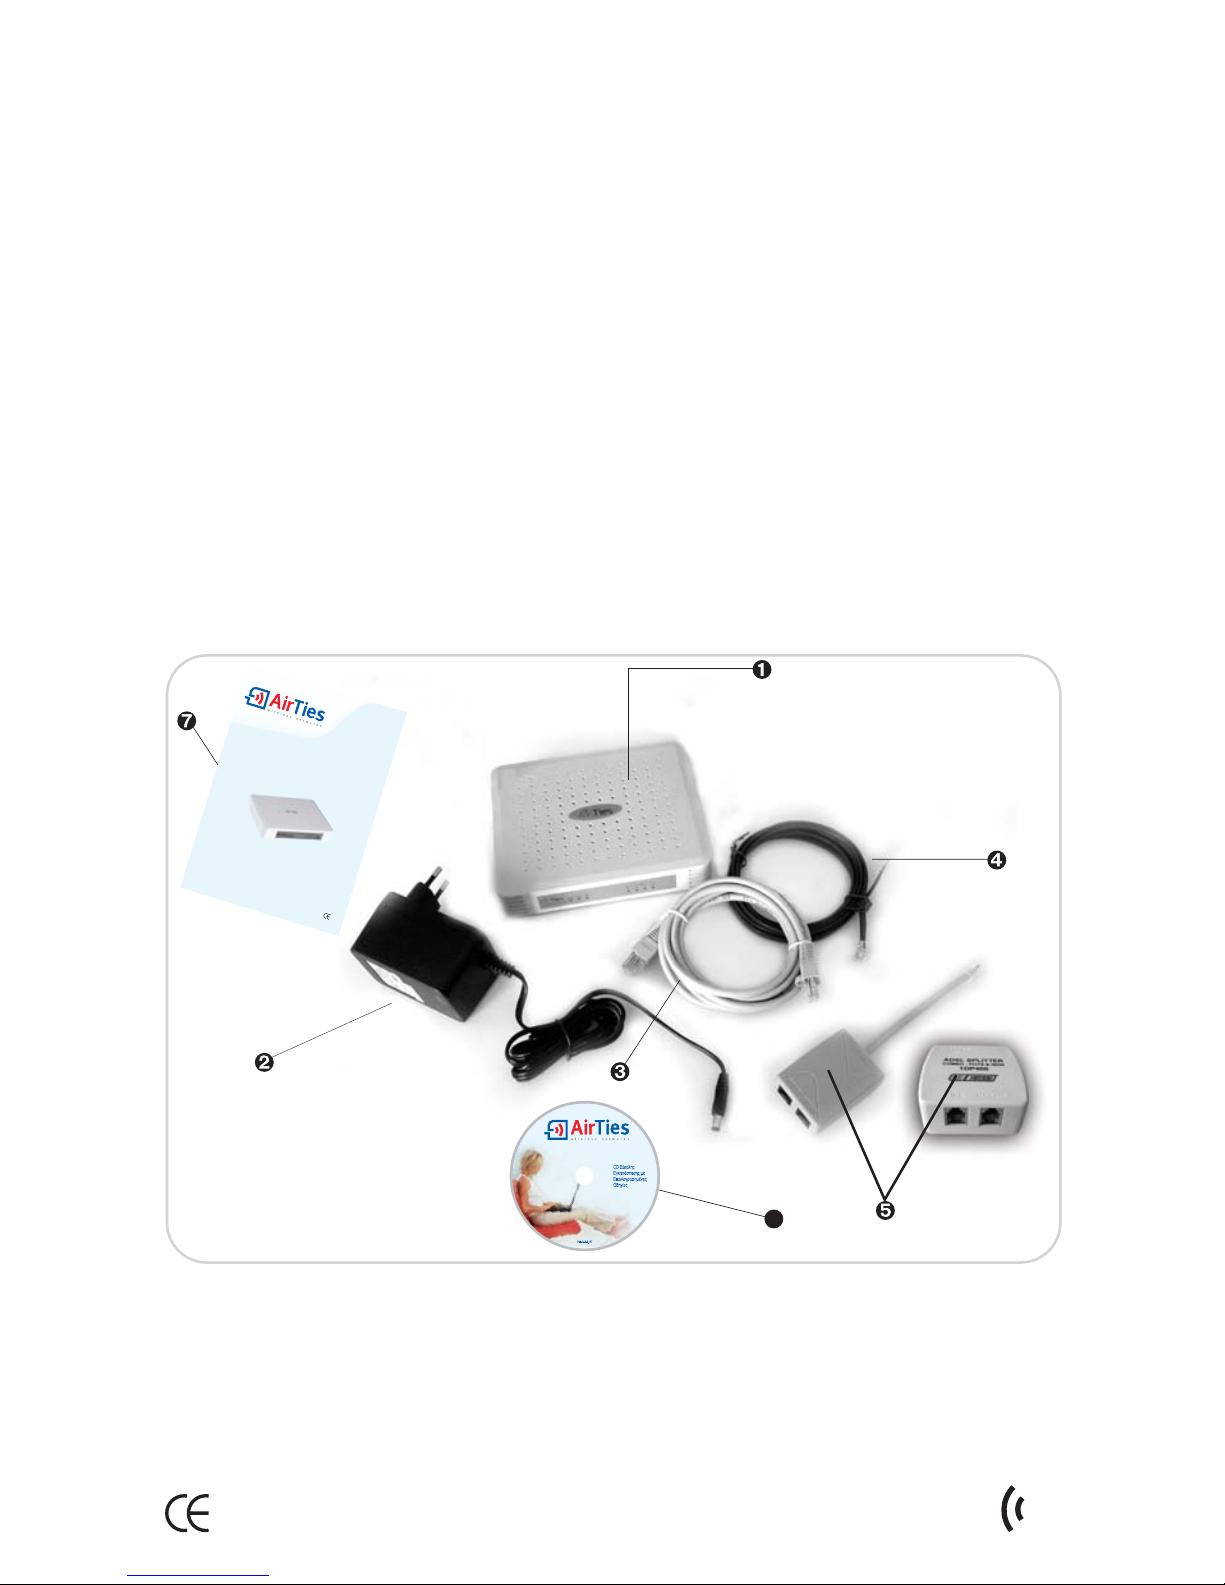
1.3. Package Contents...........................................................................2
1.4. Front Panel..........................................................................................3
1.5. Back Panel............................................................................................3
2. Installation....................................................................................................4
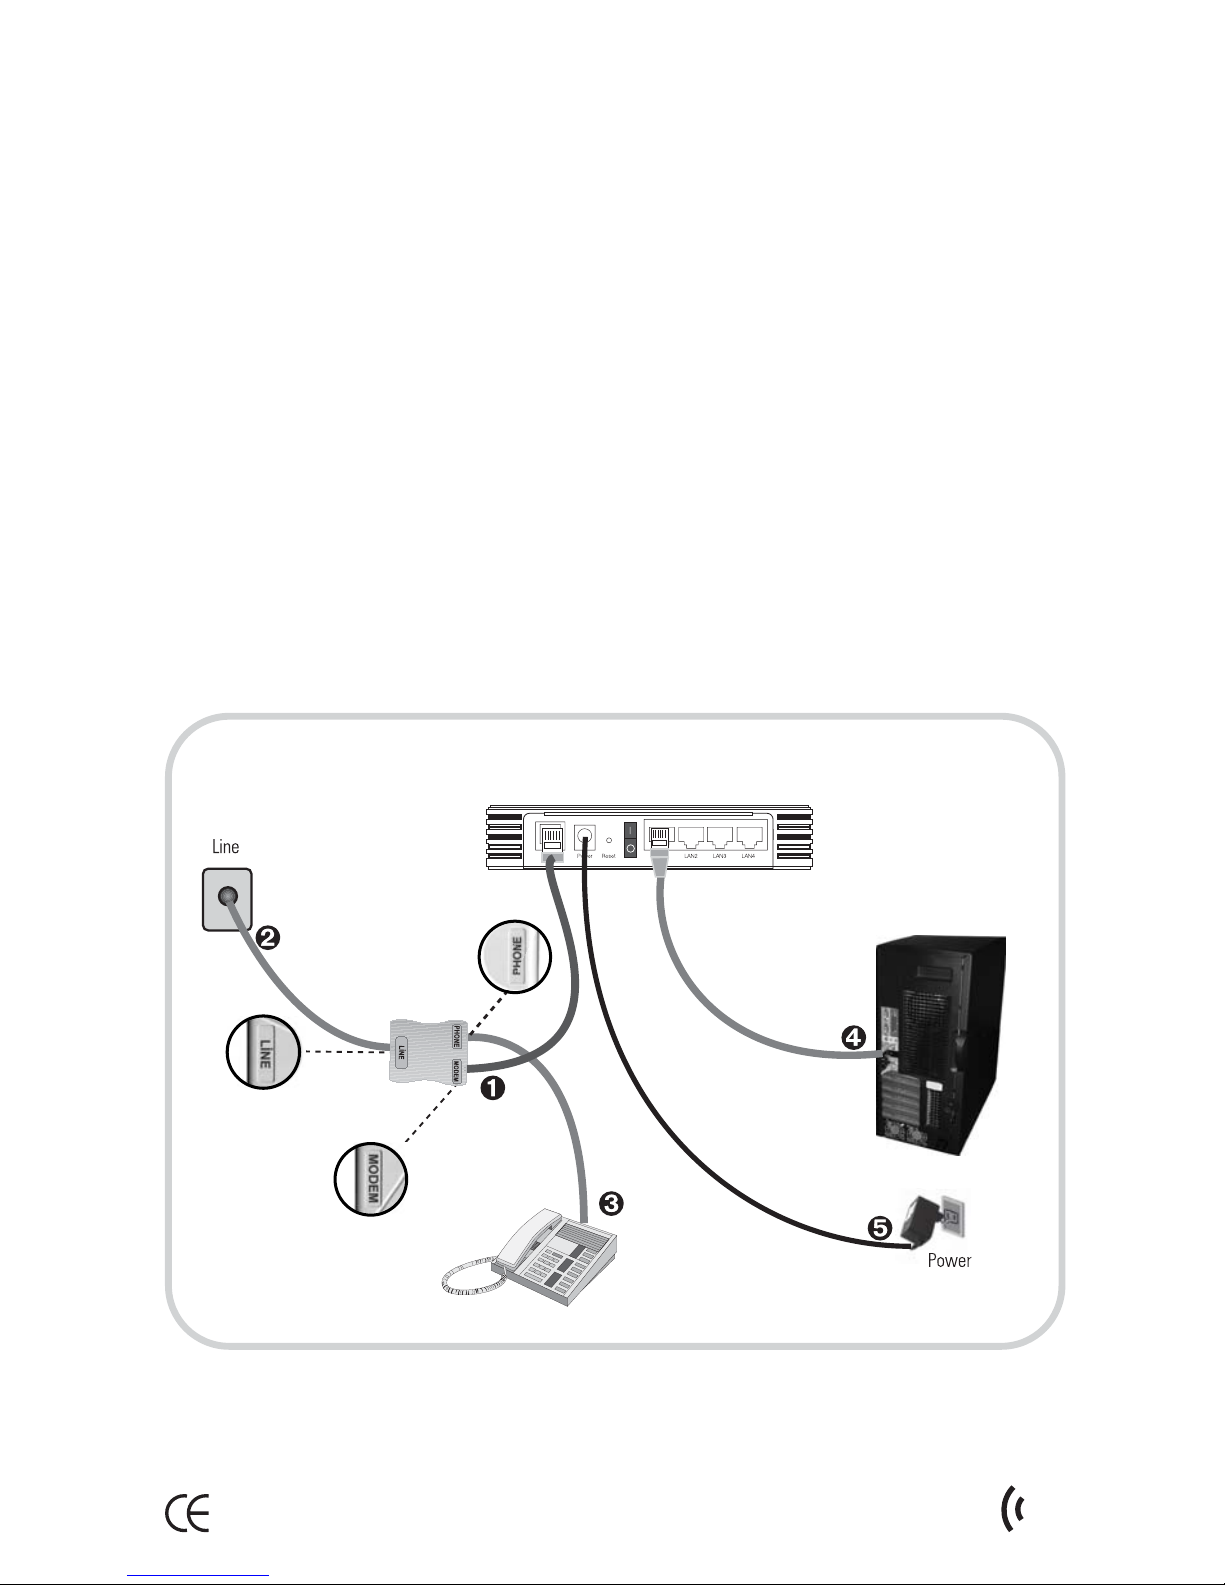
2.1. Basic Cabling Procedure......................................................................4
2.2. Installation Settings............................................................................5
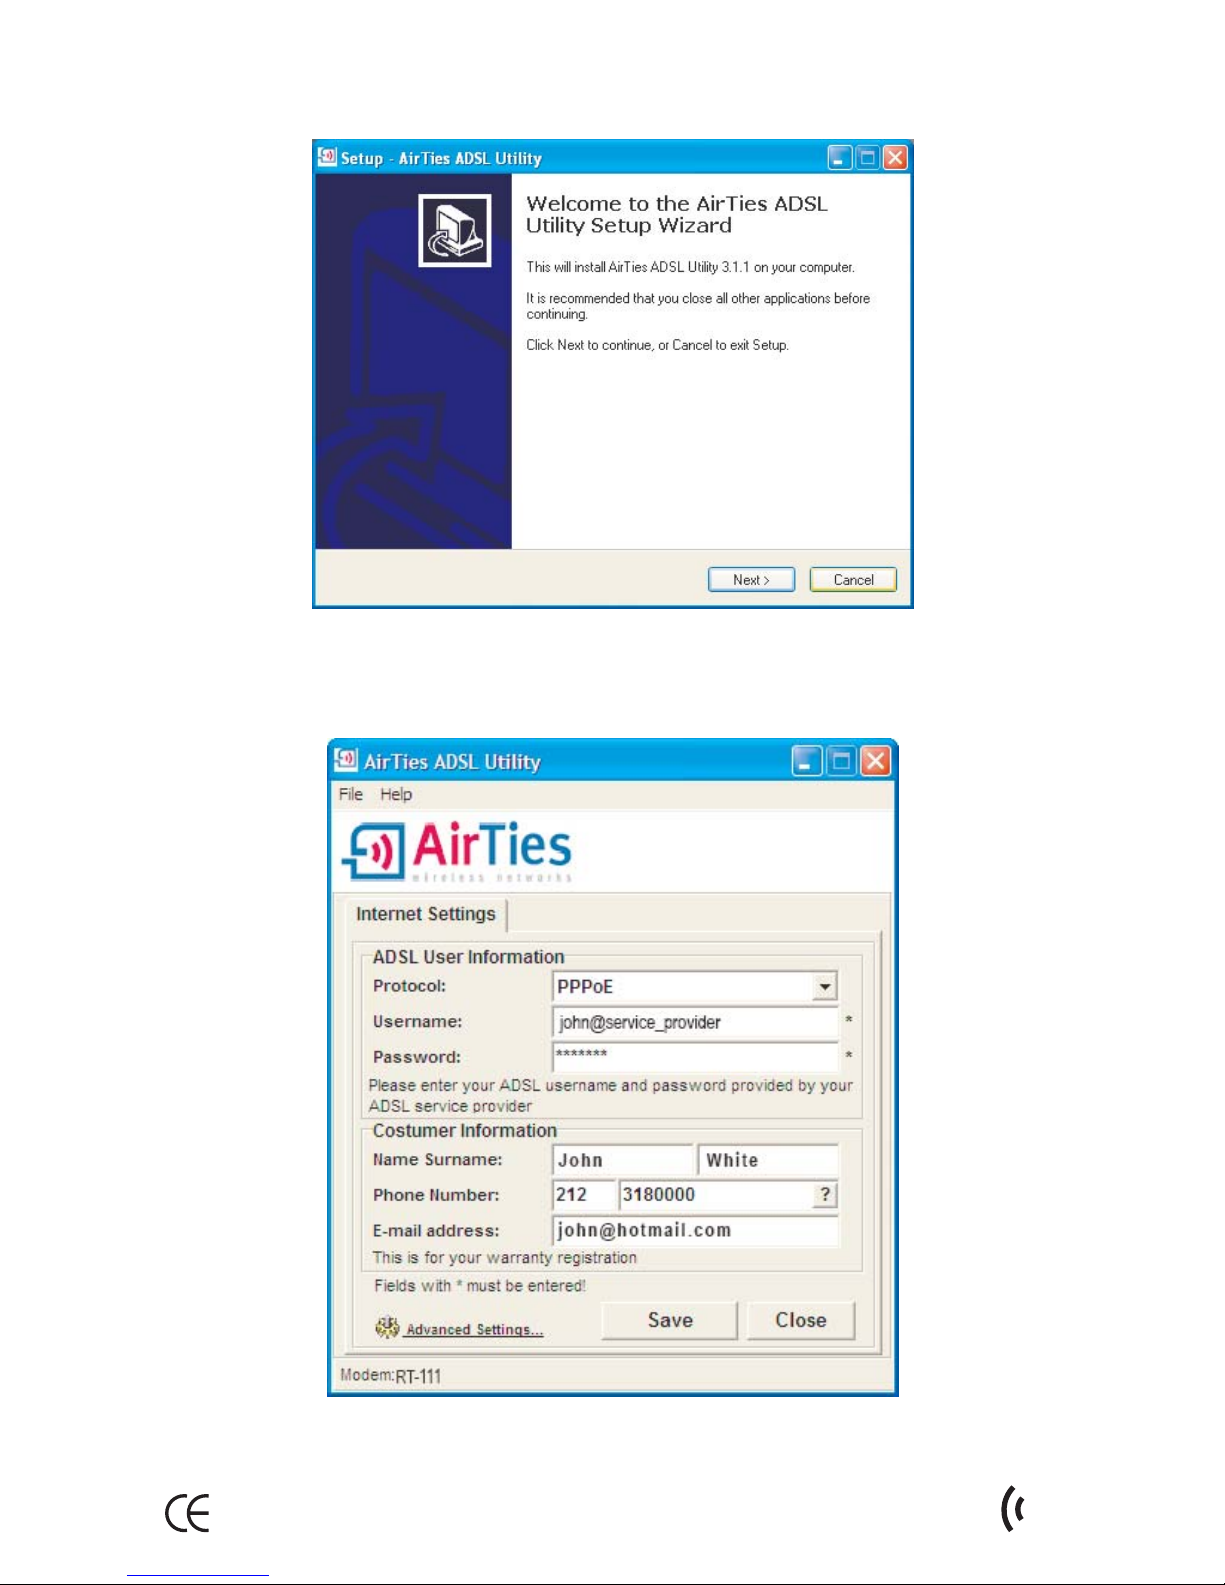
2.2.1. ADSL Settings Using the AirTies Easy Setup CD...........................5
2.2.2. ADSL Settings Using the AirTies RT-1111 Web Interface..............7
3. Other Settings..............................................................................................9
3.1. NAT and Port Forwarding.............................................................9
3.2. FIREWALL Settings...........................................................................10
3.2.1. Access Control..............................................................................10
3.2.2. Applications..............................................................................12
3.2.3. MAC Address Filtering................................................................13
3.2.4. Web Filters....................................................................................13
3.2.5. URL Filters...............................................................................14
3.2.6. DMZ.....................................................................................................15
3.2.7. Anti-DoS.......................................................................................15
3.3. Tools......................................................................................................16
3.3.1. Fir ware Update.........................................................................16
4. How to Use the AirTies ADSL Utility......................................................17
4.1. ADSL Usage Monitor......................................................................17
4.2. Auto Fir ware Updates.......................................................................17
TABLE OF CONTENTS

1.1 Main Features
AirTies RT-111 functions as an advanced ADSL2+ (24 bps download/4 bps upload) router,
firewall, and a 4-port switch. You can setup your local network by connecting up to 4 PCs
directly to its four Ethernet ports. You can increase the number of devices on your network
through the use of switches and share the Internet connection between up to 253 devices.
The RT-111 offers both Annex A and Annex B support. With this patent-pending AirTies
technology, your router works with either traditional PSTN or digital ISDN phone lines.
The Automatic Firmware Upgrade feature informs the user when a new firmware version is
available and, if the user chooses to, automatically upgrades the router with the new
firmware.
1.1 INTRODUCTION
All-in-one solution: ADSL2+ Router, Firewall, 4-port Switch
ADSL2+ Technolog : High speed Internet with 24 bps download and 4 bps upload
speeds
Annex A and Annex B support: works with either the traditional PSTN or digital ISDN phone
lines
Advanced Firewall for maximum securit : Advanced anti-DoS SPI Firewall; URL, IP and
AC address based filtering, D Z
Quick and easy installation with the Eas Setup CD
Automatic Firmware updates: Automatic firmware update support through the AirTies
ADSL Utility
ADSL Usage Monitor: Especially useful for limited quota ADSL subscribers. Reports monthly
total download and upload amounts and current download rate.
DHCP server, advanced router with NAT, NAPT, RIPv1/v2 support
8 Channel PVC support
VPN pass-through
Robust against voltage fluctuations: Specially designed to withstand wide voltage
fluctuations
Wired device support: Connect up to 4 wired devices to your local network via the
10/100 bps Ethernet ports.
Web based user interface
24x7 technical support by a highly trained AirTies support team and backed up by the
AirTies R&D team
3 ear extended warranty
1AirTies RT-111 User anual
Phone Line / DSL RT-111
INTERNET

1.2 Minimum System Requirements
1.3 Package Contents
Please check that the box for your AirTies RT-111 contains all of the items listed below:
AirTies RT-111 ADSL2+ 4-Port Router
Power adapter
Ethernet cable
Standard telephone/ADSL cable (1 long and 1 short)
Splitter
AirTies Easy Setup CD
User anual
2
AirTies RT-111 User anual
6
In order to configure your AirTies router, you will need a PC that runs any version of Windows
or UNIX, Linux, or ac operating systems and has an Ethernet card.
Windows 98/ E/2000/XP/Vista for running the AirTies Utility software
The router does not need to be connected to a PC during normal operation.
ADSL2+
4 Port Router
RT-111
USER MANUAL

1.4. Front Pane
Green
Off
PWR
The AirTies RT-111 is powered ON.
The AirTies RT-111 is OFF.
ADSL connection is established.
An ADSL connection is being negotiated.
No ADSL connection.
nternet connection is established
No nternet connection
LED LIGHT Status
ADSL
PPP
LAN
3AirTies RT-111 User anual
ADSL2+ 4 Port Router
PWR ADSL PPP
LAN
1.5 Back Pane
Green
Green flashing
Off
Green
Off
Green
Green flashing
Off
LAN connection is established and active.
LAN connection is active and data exchange is taking place.
No LAN connection
1 ADSL
Reset
0/1
LAN1-LAN4
ADSL line port. To be connected to the ODE port of the
splitter.
No Interface Function
12 V power port. To be connected to the power adapter.
Button that restarts the device or resets it, i.e. returns it to
default factory settings.
POWER
2
3
4
5
Turns the device ON or OFF.
Switch ports for Ethernet connection

2. Insta ation
2.1. Basic Cab ing Procedure
The following figure shows how to connect your RT-111 using the cables provided.
How to connect the cables is also explained in detail by the animated instructions that
automatically start when you insert the Easy Setup CD into the CD drive of your PC.
1. Using the short telephone/ADSL cable provided, connect the " ODE " port of the splitter
with the "ADSL" port of your router.
2. Connect your ADSL telephone line to the "LINE" port of the splitter provided.
3. Connect your phone to the "PHONE" port of the splitter.
4. Connect your PC to the LAN port of the AirTies RT-111.
5. Plug the power adapter provided into the 220V wall outlet and the other end of the power
cord to your router and turn it on.
4
AirTies RT-111 User anual

2.2 Insta ation Settings
2.2.1. ADSL Settings Using the AirTies Easy Setup CD
You can modify the installation settings of your router either by using the Easy Setup CD with
animated instructions or by using the Web user interface.
The AirTies ADSL Utility Software provides you with the easiest way to complete the installation
of your router.
Once the cabling is completed, insert the Easy Setup CD provided into the CD drive of your
PC. The AirTies ADSL Utility Software Installation program will start automatically. If it does not
start automatically, please run the program "installation.exe" on the CD.
1. A sequence of animated instructions will guide you through the cabling of your router.
Please verify that you have connected the cables as shown in this presentation. You can
skip this animation at any time and proceed with setup by clicking the Setup link in the
upper right hand corner of the window.
2. Once the presentation is finished, click the "SETUP" button. This will launch the AirTies
ADSL Utilit Setup Wizard.
5AirTies RT-111 User anual

. Click "Next>" in the "AirTies ADSL Utility Setup Wizard" window.
4. In the window that appears, enter the ADSL username and ADSL password that was
assigned to you by your service provider. Fill out the Customer Information fields and click
"Next>".
6
AirTies RT-111 User anual

5.Congratulations! You have successfully completed your ADSL configuration.
2.2.2. ADSL Settings Using the AirTies RT-111 Web Interface
Once the cabling of your AirTies router is completed and you have connected your PC to
the router, you can adjust the initial settings with the advanced Web interface using any
Web browser (e.g.Internet explorer, ozilla Firefox, Netscape). You don't need to be
connected to the Internet to do this.
1. Open your Web browser (e.g. Internet Explorer)
2. In the Address bar enter 192.168.2.1, the default IP address of your device. This will launch
the Web interface of your AirTies router.
3. You will be prompted for a password to login. Initially, leave this field blank and continue
by clicking "Submit".
7AirTies RT-111 User anual

4. Go to "ADSL Settings" under the "ADSL" main menu on the left menu bar. Click "vc1" to
proceed with the ADSL configuration.
5. In the window that appears, enter your ADSL Username and Password and click "Save".
If you do not know or do not remember your ADSL username or password, contact your
ADSL service provider to get these values.
Please check with your ADSL service provider to make sure the values for PVC
settings (VPI=8 and VCI=35) are compliant with your ADSL service provider's infrastructure.
Congratulations! You have successfully completed the ADSL settings of your AirTies RT-111.
The PPP LED on the front panel will light up solid green. If you have problems connecting to
the Internet after this, please contact your ADSL service provider.
8
AirTies RT-111 User anual

3. Other Settings
3.1.NAT and Port Forwarding
Network Address Translation (NAT) is a way to map an entire network (or networks) to a single
IP address. NAT allows multiple clients in your local network to access the Internet through
a single global IP address assigned to you by your Internet service provider.NAT is commonly
used together with Port Forwarding. "Port Forwarding" is used in order for a host outside your
local network to access a machine on your local network.
To enable Port Forwarding on a port, go to the "NAT" menu on the left menu bar of the Web
interface of your router and click "Port Forwarding".
In the window that appears;
In the "Application" field, assign a name for the Port Forwarding rule you are creating.
Enter the local IP address of the client that is to be accessible from the Internet in the
"Target IP Address" field.
Select the protocol that the application uses from the list of protocols in the "Protocol"
box. If you are unsure of the protocol, select "TCP&UDP".
Enter the real port number used by the application in the "Wan Ports" field.
Enter the local port number for the application in the "Target LAN Ports" field. (can be the
same as the Real Port)
To forward a range of ports instead of a single port, use a dash (-) sign in between. For
example to forward all ports between 23 and 80, enter "23-80".
Check the "Enable" box.
Click "Save".
9AirTies RT-111 User anual

3.2. FIREWALL Settings
A firewall prevents unauthorized Internet users from accessing your local network and your
computer.
AirTies Firewall has SPI, Stateful Packet Inspection, feature. SPI monitors the protocol and
packet addresses being received to determine if the information should be passed through
the firewall to the connected computers. The Internet addresses that are a source of malicious
attacks are permanently blocked from accessing your network.
You can also limit or block the Internet access of any local user by defining advanced rules
for Internet access. Firewall is activated by default.
The following sections describe the submenus under the FIREWALL menu of the web interface.
3.2.1. Access Contro
You can allow or block Internet access for any computer on your local network through the
Access Control feature. These access restrictions can be based on IP address as well as AC
address. Access Control is activated by default.
Click "New" to define a new access rule.
In the window that appears:
Enter a name for the access rule you would like to define in the "Rule Name" field. Choose
a name that is easy to remember.
In the "Select Client" section enter the IP or AC addresses of the clients whose access
you would like to restrict with this rule. Click the "Add" button next to AC Address or IP
Range.
Access control can be defined based on local IP or AC address (uniquely identifies the
network adapter of the device). If an access rule is defined by AC address, the rule defined
for the device will be valid even if the local IP address changes.
10
AirTies RT-111 User anual

It is possible to enter the AC or IP addresses manually or choose them from the list of client
devices in the local network.
Enter the AC address of the device you'd like to restrict traffic from in "New AC Address"
or IP address of the device in the "New IP Range" field. For a single IP address, enter the same
value in the two boxes that define the range. (e.g. 192.168.2.2 and 192.168.2.2). To restrict
access for all devices in an IP address range, enter the beginning and ending IP addresses
(e.g. 192.168.2.2 and 192.168.2.50).
In the "Select Application" section, specify the applications you would like to restrict access
to for the clients you have specified in the "Select Client" section. You can select the
application from the "Existing Applications" list and click "Add".
You can go to the Applications menu to add a new application to the "Existing Applications"
ist.
11 AirTies RT-111 User anual

3.2.2. App ications
In this window, you can enter port definitions of an application (game, P2P program, service,
etc.) that is to be used in the Access Control menu. You can also edit or remove the definition
of an application.
To define a new application, click the "New" button.
Enter a name for the application you are defining in the "Application Name" field.
Enter the WAN port for the application in the "Real Ports" field.
Enter the internal port number that the application will use in the local network in the "LAN
Ports" field.
Click "Save".
12
AirTies RT-111 User anual

3.2.3.
MAC Address Fi tering
AC Address Filtering allows you to permit network access based on AC addresses. When
this feature is activated, you can specify the AC addresses of the computers that will be
allowed access to the Internet.
Check the "Activate AC Address Filtering" box.
Enter a new AC address or choose one from the list of clients and click "Add".
Click "Save".
3.2.4.
Web Fi ters
Web Filters feature can block some possibly risky web based applications and web browser
features that are open to abuse before they reach the computers in your network. For
example, cookies can reveal personal information that you may enter at a website. You
can deal with these kinds of vulnerabilities at the router level.
In the "Web Filters" window, check the corresponding "Filter On" box for each web application
or browser feature you would like to block (proxy, cookie, java applet, activeX, pop-up).
13 AirTies RT-111 User anual

3.2.5.
URL Fi ters
You can block access of any computer in your local network to the websites you specify.
In this window, you can enter the URL or any keyword that is part of a URL of the websites
you would like to block access to.
To block access of a computer in your local network using URL filters, check "Http with URL
Filters" box for the rule that you created for this computer in the "Access Control" page.
14
AirTies RT-111 User anual

3.2.6.
DMZ
The De ilitarized Zone (D Z) feature opens up all the ports of a single local network host
for unrestricted access from the Internet. Although it's a risky method, you can open and
forward all the ports for a certain client at once with D Z to resolve access problems resulting
from firewall or NAT settings.
WARNING: It is not recommended to keep all the ports open for any client for an extended
period.
To enable D Z, check the "Activate DMZ" box; enter the local IP address of the client that
you would like traffic to be forwarded to in the "Select LAN IP Address" field and click "Save".
3.2.7. Anti-DoS
The Anti-DOS feature prevents "Denial of Service" attacks that aim to disable your router by
flooding it with connection requests. In this window, you can set the maximum number of
connections that will be allowed from the Internet for a specified time interval for each
protocol.
15 AirTies RT-111 User anual

3.3.Too s
In this page you can restart your router or reset it to factory defaults.
The "Restart" button lets you turn your router off and then on remotely.
The "Restore Factory Defaults" button allows you to set your router back to factory defaults
remotely. This will clear all the current settings on your router.
During either operation, the connection to the router will be lost. You can reconnect after
the router comes back up.
3.3.1. Firmware Update
In order to update the software in the router, go to "Firmware Update" under the "TOOLS"
menu. Click "Browse" and locate the most recent router firmware file on your computer in
the pop-up window. (You can download the most recent firmware file from the AirTies
website www.airties.com). Then click "Update".
16
AirTies RT-111 User anual
Table of contents
Popular Other manuals by other brands

Harken
Harken Radial 40 Rewind Installation and maintenance manual

MadgeTech
MadgeTech HiTemp140-M12 user guide

Time Machines
Time Machines TM2000A Installation and operation manual

ATIKA
ATIKA GHB 760 A Assembly and operating instruction sheet

LG
LG Optimus Dynamic L38C user guide

Cardin Elettronica
Cardin Elettronica EL Series instruction manual

Ultrasonic
Ultrasonic Ultra 3200FA Operational Instruction Manual

AusClimate
AusClimate D-025 Operation manual

Sony
Sony KV-13M series Service manual

SEI Industries
SEI Industries Bambi Bucket Series Operation manual

Aquadistri
Aquadistri BlueMarine Skimmer 600 instruction manual

Kalamazoo
Kalamazoo KAL-OL-MB180 brochure