manuals.online logo
Brands
  1. Home
  2. •
  3. Brands
  4. •
  5. Aituo
  6. •
  7. Soldering Gun
  8. •
  9. Aituo AM121 Series User manual

Aituo AM121 Series User manual

SHENZHEN AITUO AUTOMATION DEVICE CO.,LTD
Automatic USB Soldering machine
User manual
Adress:2/F, 4th-Building,Zhaofuda Industry park, Songgang, Bao'an, Shenzhen,
China
Phone:0755-29643712
Email: [email protected]
Website: Http://www.automachines.cn
Shenzhen Aituo Automation Device Co.,Ltd
2
Index
1、Machine
structure······································································································
··········3
(1)Function and
feature·····································································································
·3
(2)Structure and main
parameter························································································4
2、
Workstation ·································································································
······················4
(1)Wire fixing
workstation·······························································································4
(2)Wire Clamp
workstation······························································································5
(3)Pulling,cutting,stripping
workstation···········································································5
(4)Soldering
workstation··································································································
6
3、Control
Panel··········································································································
·············7
(1)Button
function·······································································································
·····7
(2)Touch screen
function··································································································7
4、Operating
instructions···································································································
······13
(1)Prepared before
starting·····························································································13
(2)Operating steps of
starting·························································································13
(3)Operating steps of
stopping·······················································································13
5、Fault analysis and
solutions·······························································································13
(1)How to adjust when the number of rubber core in the feeding pathway is very
little ?········································································································
·······························13
Shenzhen Aituo Automation Device Co.,Ltd
3
(2)How to adjust when the number of rubber core in the feeding pathway is very
little ?········································································································
·······························14
(3)How to adjust when the knife can’t cut the wire on the cutting
workstation? ································································································
·····························15
(4)How to adjust when stripping will harm to the copper wire or can’t strip the outer skin
completely?··································································································
·····························16
(5)How to adjust when the wire be pulled broken on the pulling
workstation?·································································································
·····························16
(6)How to adjust when soldering the inner rubber can not add the solder
wire?··········································································································
·······························16
(7)How to adjust when the dislocation between bottom grippers and top
gripers?·······································································································
······························19
(8)How to adjust when connector stuck at feeding pathway or push material
parts?·········································································································
································20
(9)How to adjust the temperature of the soldering iron
head? ·········································································································
······························21
6、Adjusted accessories and the
methods················································································22
7、Attention
matters········································································································
········22
8、FAQ
summary·····································································································
··············23
9、Cleaning and attention
matters··························································································23
10 、Training
steps···········································································································
·······24
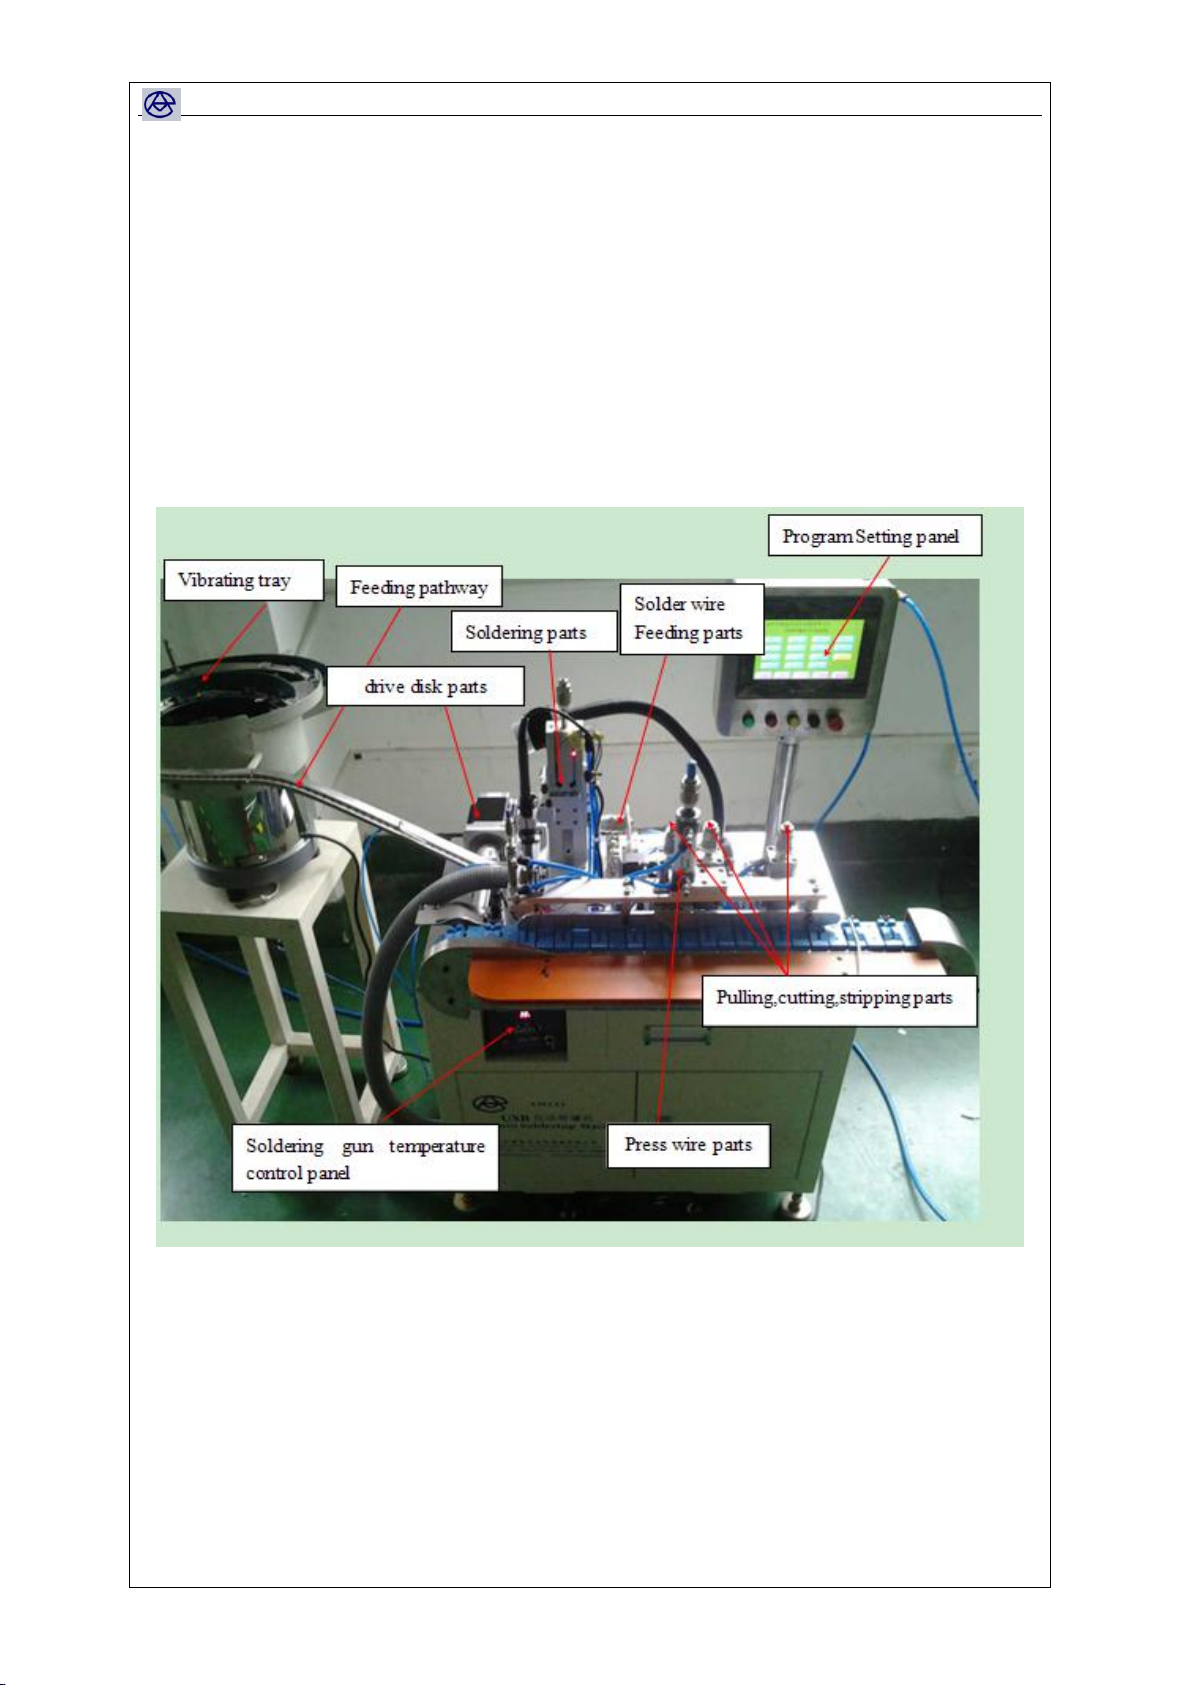
Automatic USB Soldering Machine
Shenzhen Aituo Automation Device Co.,Ltd
4
The USB soldering machine we manufacture is mainly applied to USB A male,USB A
female,MINI 5pin,Micro USB.It can decrease the labor cost,improve the production rate and
create a better operation environment for workers.We have a professional technical research
and developed team,which aims at providing better function and better quality for our
customers.Your satisfaction is our goal.
Machine Introduction
1. Function and feature
The machine mainly apply to automatically soldering between cable with USB
connector.It adopts the vibrating tray to feed connectors automatically and by chain feeding
Shenzhen Aituo Automation Device Co.,Ltd
5
wire.There are five main workstations for wire fixing,pulling,cutting,stripping and soldering.
The machine is compact design,saving much space.Soldering orientation is controlled by
fiber optic sensor.
The machine is high output and precision.Using big power soldering station.the
soldering effect is very stable and high quality.
2.Structure and main parameter
(1)Structure:
Machinery parts: Body frame,Vibrating tray,shift sprocket and chain,pulling parts,cutting
parts,stripping parts,soldering parts.
Electronic parts: PLC,Touching screen,step motor,power switch.
(2)Parameter:
Size:1500(L)×600(W)×1300(H)(MM) Weight:200KG
Voltage:single phase : 220V,10A,50HZ Air Pressure:0.5~0.8Mpa
Temperature:-20℃~ +50℃
Operator:1 people
Productivity:800-1200PCS/H
Workstation
1. wire fixing workstation
Function:this work station is used for fixing wire.
Bottom Wire fixing claw
Shenzhen Aituo Automation Device Co.,Ltd
6
2. Wire Clamp workstation
Function
Clamp board:Avoid the fixed wire dropped,so that the fixed wire can keep good stability
in each working procedure.
Clamp piece:Avoid the stripping station pulling the inside core of the wire.
Clamp upper claw:Leading the wire to the right position for soldering;
Wire detection switch:to detect if there is a wire or the number of inside wire is enough to
soldering.
Solder wire feeding parts:feeding the solder wire;
3. Pulling,cutting,stripping workstation
Clamp pieces
Clamp board
Wire detection switch
Clamp claw
Solder wire feeding part
Shenzhen Aituo Automation Device Co.,Ltd
7
4. Soldering workstation:
Down knife adjusting screw
丝
Forward knife adjusting screw
Down leading adjust
Soldering gun
Soldering station
Down leading adjust
Upper knife adjusting screw
Shenzhen Aituo Automation Device Co.,Ltd
8
Control Panel
1. Button
1RESET :Open the machine,restart machine,must press reset.Servo motion mechanism
back to the origin,then the reset button will light on all the time.
2ON :Machine in the automatic mode, press “on” button and the lights normally on,
which means the machine is in running stat.
3OFF :Press “OFF” button, the machine is in stop state, “ON” button lights
off ,machine stop working.
4AUTO/STEP:Only when the switch on automatic mode, press the start button, the
machine will be in the running state, if the action actuator in manual control, the
switch is required to be on step mode.
5EMERGENCY :When in emergency situation,press this button,machine will be
stopped immediately
2. Touch screen
Start screen:to choose the language,and enter into the Main UI
Shenzhen Aituo Automation Device Co.,Ltd
9
(1)Main UI:the first frame after starting the machine,press the specific button then
will enter into the relevant page.
(2)Auto UI:Press the “Auto UI”,it will enter into the fellow automatic control screen
Shenzhen Aituo Automation Device Co.,Ltd
10
Note:
○
1Cleaning:Clear the current counter and re-count.
○
2Single-step/auto:Set single-step working or auto working.
○
3Status Display:show the state of manual or auto。
○
4Sensor/Pedal switch:control the working speed by hand sensor or foot pedal
○
5Vibrating tray:control the vibrating tray
○
6Start :In the reset mode to press the button,the machine will run automatically, same
function with “on” button
○
7Stop:stop all the action
○
8Reset:clear all the alert and abnormal
⑨USB connector detection:to check whether the connector stuck on incoming material parts
⑩Chain back to origin point:the chain back to original point
(3)Single cycle UI :Press “single cycle UI” button,you will enter into single cycle
control screen.
Shenzhen Aituo Automation Device Co.,Ltd
11
Note:
○
1Semi-automatic stripping:on the manual mode,press semi-automatic stripping,the machine
can finish the pulling ,cutting and striping action automatically.
○
2Semi-automatic soldering: on the manual mode,press semi-automatic soldering,the
machine can automatically finish soldering action and feeding the connectors
○
3Chain shifting:press each time,the chain will move one work station.
(4)Manual UI:Press “Manual UI”,entering into the manual control screen.
Shenzhen Aituo Automation Device Co.,Ltd
12
Note:
In manual control mode,press the blue buttons above,there will be a corresponding
cylinder or motor movements.
(5) Parameters:Press “Parameters”button,entering into parameters setting screen.
Note:
○
1Parameter setting :Set the parameter of every air cylinder and electronic motor,to make
sure the working properly.
○
2Advanced setting:the parameter set have finished by the factory,no need to change.
(6) I/O status display:you can know the machine working status through this screen.
Shenzhen Aituo Automation Device Co.,Ltd
13
Shenzhen Aituo Automation Device Co.,Ltd
14
Operating instructions
1.Prepared before starting the machine
(1)Check whether the lubricant between the moving parts is enough or not
(2)Check whether the voltage and air pressure is normal or not
(3)Check whether there are other things between moving parts or not
(4)Check whether chip material cleaning thoroughly or not
2.Operating steps of starting
(1)To connect air suppliers,and open the regulating valve, set the pressure to 0.4 Mpa。
(2)To connect power suppliers,and open the switch on soldering gun board.and set the
temperature 340℃~350℃,(according to the thickness of solder wire to set the
temperature,before shipping,we have set the temperature already)
(3)Turn the Auto/Manual button which on the operate board to Auto status。
(4)Open operate board,first press“Resets”button,and then press“start”button to start the
machine.
(5)Check whether enough inner rubber into the feeding pathway and vibrating tray
(6)According to the color of wire to put the wire into bottom grippers correctly,and control
the machine working by foot pedal.
3.Operating steps of stopping:
(1)Power off.If long time no use, pls disconnect the power triangle plug connection with
external power。
(2)Shut down air suppliers
Note:The operator must follow the sequence of operating steps, make sure the soldering
tip in the initial position, to avoid risk.
Fault analysis and solutions:
1、Q:How to adjust when the number of rubber core in the feeding pathway is too
little?
A:Due to the power of vibrating tray is set by the electric relay auto control, when the
inner rubber in vibrating tray is too few, to lead the pathway feeding no inner rubbers
and can not meet the soldering demands,the solutions as follow:
1Add enough inner rubber into vibrating tray
2Open the switch on the vibrating tray control screen,and press“Auto UI”.Refer to the
follow steps to solve.(as the follow picture,in the normal situation,this switch status is “OFF”)
Shenzhen Aituo Automation Device Co.,Ltd
15
2、Q:How to adjust when the press wire easy to drop on the stripping workstation?
A:Refer to follow pictures and steps to solve:
1Regarding to the size of wire ,adjust the clamp board nuts to the properly distance between clamp
board and plastic parts.(as follow pictures,put the wire into plastic parts and press.no need to harm
the wire skin)
2First adjust clamp board nuts,to make sure the clamp board press the wire properly,and then tighten
the clamp piece nuts.
Second
steps:Change the
status to “ON”
First step:press“Monitor
UI”
Shenzhen Aituo Automation Device Co.,Ltd
16
3、Q:How to adjust when the knife can’t cut the wire on the cutting workstation?
A:The solution as follow:
1Check the top and bottom knives of cutting parts are broken,if yes,pls change.when fixing the
new knife,make sure the position as the same.
2Refer to the follow picture,check whether a good coincidence between up and down knife of the
cutting face,if no,it needs to add sheet piece to reach the coincidence.
Cables
Adjust clamp
board nuts
Adjust press
wire parts nuts
Adjust clamp
piece nuts
Bottom knife cutting face
Up knife cutting
face
Need to be
coincidence
Shenzhen Aituo Automation Device Co.,Ltd
17
4、Q:How to adjust when stripping will harm to the copper wire or can’t strip the outer skin
completely?
A:The solutions as follow:
1Check whether the top and bottom knives of cutting parts are damaged or not,if yes,pls change
the new knife, and after fixed new knife ,pls make sure the position as the same.
2If the knife is ok ,just only need to adjust the position of top and bottom knives to the proper
distance(as follow picture)。
5、Q:How to adjust when the wire be pulled broken on the pulling workstation?
A:Screw the nuts,to adjust the proper distance between the up and down knives on the closure
status,and then tighten the nuts.
6、Q:How to adjust when soldering the inner rubber can not add the solder wire?
A:As follow solutions:
1Check whether the solder wire on the feeding tin parts is enough.(as the picture1).
Adjust the nut
Top knife
Bottom knife
Knife edge
Adjust the distance to the proper
position to strip the wire
Shenzhen Aituo Automation Device Co.,Ltd
18
Picture 1
2Turn off the solder gun temperature control panel,check the position of solder wire whether
under the bottom center of the solder iron head.(refer to the picture2),If there is any deviation,
you may need to adjust the fixed feeding tin nut, then adjust the position (refer to picture3)
(Note:after debugged,pls according to the third steps,second step,first step to return back,don’t
wrong order,otherwise harm the soldering gun)
Check the solder
wire is enough
First step,press the button to make
the solder station forward.
Second step:Press the
button to make the
gripper move down.
Third step:Press the button
to move the solder station
down,and check the solder
wire position of the bottom
center of solder iron,if not
according to the picture 3.
Shenzhen Aituo Automation Device Co.,Ltd
19
图2
Picture 3
3Check whether the nut on the top of solder iron move down air cylinder is loose or not,if
yes,adjust the air cylinder stroke to the proper position,and then tighten this nut(as follow picture
4)
Picture 4
Adjust the two nuts to make the solder
wire from the feeding tin mouth on the
bottom center of solder iron.
Feeding tin mouth
Adjust the nut
and tighten.
Shenzhen Aituo Automation Device Co.,Ltd
20
4Check whether the solder iron head is oxidation or not,if yes,pls change the new soldering iron
head(it may caused by the solder iron head use too long time ,which can not solder any more)
7、Q:How to adjust when the dislocation between bottom grippers and top gripers?
A:As follow solutions:
1Clean the positioned optical fiber lens with cotton ball,or check whether the positioned optical
fiber lens is loose or not.
2Adjustment the parameters of Manual UI, to make module displacement offset distance to the
right place
Optical fibers lens
Check whether two screws are
loose or not

Popular Soldering Gun manuals by other brands

jbc NANE-B manual

jbc

jbc NANE-B manual

Weller 9400 operating instructions

Weller

Weller 9400 operating instructions

Duratool D03325 quick start guide

Duratool

Duratool D03325 quick start guide

omisa HST 300 Smart user manual

omisa

omisa HST 300 Smart user manual

Edsyn LONER 951SX-230 instruction manual

Edsyn

Edsyn LONER 951SX-230 instruction manual

Edsyn CL1080 LONER manual

Edsyn

Edsyn CL1080 LONER manual

Velleman VTSS20 manual

Velleman

Velleman VTSS20 manual

Fixpoint AP 2 manual

Fixpoint

Fixpoint AP 2 manual

multicomp pro MP740999 manual

multicomp pro

multicomp pro MP740999 manual

Techly I-TOOL-SD-091TY user manual

Techly

Techly I-TOOL-SD-091TY user manual

Weller WMP operating instructions

Weller

Weller WMP operating instructions

Duratool ZD-929B quick start guide

Duratool

Duratool ZD-929B quick start guide

Parkside 90575 Operation and safety notes

Parkside

Parkside 90575 Operation and safety notes

ToAuto FT-80W user manual

ToAuto

ToAuto FT-80W user manual

Steren HER-725NE quick start guide

Steren

Steren HER-725NE quick start guide

Wetekom 28 57 67 instruction manual

Wetekom

Wetekom 28 57 67 instruction manual

Chicago Electric 4328 Assembly and operating instructions

Chicago Electric

Chicago Electric 4328 Assembly and operating instructions

ETC ETC-RW900D user manual

ETC

ETC ETC-RW900D user manual

manuals.online logo
manuals.online logoBrands
  • About & Mission
  • Contact us
  • Privacy Policy
  • Terms and Conditions

Copyright 2025 Manuals.Online. All Rights Reserved.