manuals.online logo
Brands
  1. Home
  2. •
  3. Brands
  4. •
  5. Aiwa
  6. •
  7. Cassette Player
  8. •
  9. Aiwa HS-SP350 User manual

Aiwa HS-SP350 User manual

anua
PRECAUCIONES PRECAUTIONS
OWNER’S RECORD
For your convenience, record the model number(you
will find it on the rear of your set) and the serial
number (you will find it in the cassette holder of your
set) in the space provided below, Please refer to them
when you contact your Aiwadealerin case of difficulty.
IModel No.
HS=SP350W Para mantenerlo en buenas condiciones de
funcionamiento
No utilice en lugares muy calientes, fries, con polvo
ohumedad.
●Especialmente, no deje el aparato:
●en lugares muy humedos, por ejemplo en el barlo
ccerca de la calefaccion
●en un Iugar donde quede expuesto aIos rayos
directos del sol (per ejemplo, dentro de un coche
estacionadocuyo interior puede calentarse mucho)
●No abra el compartimiento de Ias pilas con Ias
manes mojadas.
●Limpie completamente el aparato antes de colocar
Ias pilas.
●No Iave el aparato con agua.
Nota
Limpie completasmente et aparato despues de
utilizarlo.
Pour assurer un bon fonctionnement
Ne laissez pas I’appareil a un emplacement tres
chaud, froid, poussi6reux ou humide.
●En particulier, ne Ie laissez pas:
●~un endroit tres humide, une sane de bains par
exemple
●pres d’un appareil de chauffage
.a un endroit en plein soleil (clans unevoiture garee,
ou la temperature peut considerablement
augmenter).
●N’ouvrez pas Ie Iogement des piles avec des mains
mouillees.
●Essuyez entierement I’appareil avant I’insertion des
piles.
●Ne trempez pas I’appareil clans I’eau.
Remarque
Essuyez completement I’appareil apres I’utilisation.
STEREO RADIO CASSETTE PLAYER
RADIORREPRODUCTOR DE CASSETTE
ESTEREOFONICO
ISerial No.
OPERATING INSTRUCTIONS
INSTRUCCIONES DE MANEJO
MODE D’EMPLOI PRECAUTIONS
To maintain good performance
Do not use the unit in places which are extremely hot,
cold, dusty or humid.
●In particular, do not keep the unit:
●in ahigh humidity area such as abathroom
●near aheater
●in an area exposed to direct sunlight (inside a
parked car, where there could be a considerable
rise in temperature)
●Do not open the battery compartment with wet
hands.
●Wipe the unit thoroughly before inserting batteries.
●Do not soak the unit in water.
Note
Wipe the unit thoroughly after use.
87-HSG-901-01
97031 OAYK-O9
AIWA CO.,LTD. Printed in Malaysia Remarque sur I’ecoute avec Ies ecouteurs
●Ecoutezavolume modere pour evitertout dommage
auditif.
●Ne portez par Ies ecouteurs quand vous conduisez
une voiture ou a bicyclette, Cela pourrait provoquer
un accident.
●N’ecoutezpasa unvolumeelev6 pendant la marche,
en particulier sur Ies passages pour pietons.
●Portezcorrectement lesecouteurs: Lpourlagauche,
Rpour la droite.
Notas para escuchar con IOS auriculares
●No escuche con el volumen alto porque puede
dafiar su capacidad de audici6n.
●No se ponga Ios auriculares cuando conduce un
vehiculo o anda en bicicieta. Puede representar un
peligro para el trdfico.
●No escuche con el volumen alto mientras est~
caminando, especial mente cuando tenga que cruzar
una cane.
QUtilice correctamente: Les para la izquierda yR
para la derecha.
I
Note on listening with the headphones
●Listen at moderate volumes to avoid hearing
damage.
●Do not wear the headphones while driving or cycling.
It may cause atraffic hazard.
●You should use with extreme caution or temporarily
discontinue use in potentially hazardous situations
such as walking, jogging, etc.
●Do not listen at ahigh volume while walking,
especially at pedestrian crossings.
●Wear them properly: Lis left, Ris right.
Cassettes +H
●Verifiez et eliminez tout mou clans la bande avant
I’utilisation, al’aided’un crayon ou d’unobjet similaire
comme indique. Une bande mal enroulee peut se
casser ou s’enrouler clans Ie mecanisme.
●La bande des cassettes C-100 ou plus Iongues est
extr~mement fine et se d4forme ou s’endommage
facilement. L’emploi de ces cassettes n’est pas
recommande sur cet appareil.
Casetes +❑
●Si Ia,cinta estafloja, enrolle con un Iapiz oherramienta
similar, tal como se indica en la figura. Una cinta
fioja puede cortarse oenrollarse en el mecanismo.
●Las cintas C-100 om~s Iangas son muy finas y
pueden deformarse odafiarse f~cilmente. Se
recomienda no usar estas cintas en este aparato.
COLOCACION DE LAS PILAS +❑MISE EN PLACE DES PILES SECHES
-+m
Cassette tapes +❑
●Check and tighten slack tape before use with a
pencil or similar tool as illustrated. Slack tape may
break or get jammed in the mechanism.
●C-100 or longer tapes are extremely thin and easily
deformed or damaged. They are not recommended
for use in this unit.
Abra la caja de Ias pilas ycoloque dos pilas de
tamafioAA (R6) con Ias marcas C) y0correctamente
alineadas. Ouvrez Ie Iogement des piles clans l’appareil, et
inserez-y deux piles format AA (R6), en alignant
correctement Ies marques 0et 0.
Cambio de Ias pilas +❑
Cambie Ias pilas por otras nuevas cuando la cinta se
mueva Ientamente oirregularmente. Replacement des piles+ ❑
Remplacez Ies piles paroles neuves quand la vitesse
de defilement de la bande diminue ou devient
irr6guliere.
Notas sobre Ias pilas
●Con firme que Ias marcas C) yeestan
correctamente alineadas.
cNo mezcle distintos tipos de pilas o una pila vieja
con una nueva,
cNo recargue, caliente odesarme Ias pilas.
●Si no se van autilizar Ias pitas durante mucho
tiempo, saque Ias pilas para evitar que se gasten
inutilmente.
●Si se produce una fuga de Ias pilas, Iimpie
completamente antes de sacarlas.
INSERTING DRY CELL BATTERIES +❑
Open the battery compartment inside the unit and
insert two size AA (R6) batteries with the 0 and 0 Remarques sur Ies piles
●Respectez Ies polarites C) et 0.
●Ne melangez pas different types de pile, ou des
piles neuve et ancienne.
●Ne rechargez pas, ne chauffez pas et ne demontez
pas Ies piles.
●Quand Ies piles ne sent pas utilisees, retirez-les
pour eviter toute usure inutile.
●Si du Iiquide fuit des piles, eliminez-le entierement
en I’essuyant.
marks correctly aligned.
1Battery replacement +E
Replace the batteries with new ones when the tape
speed slows down or becomes uneven.
Note on dry cell batteries
.Make sure that the 0 and 0 marks are correctly
aligned.
●Do not mix different types of batteries, or an old
battery with anew one.
●Never recharge the batteries, apply heat to them or
take them apart.
●When not using the batteries, remove them to
prevent needless wear.
●If liquid leaks from the batteries, wipe thoroughly to
remove.
Utilization de la corriente electrica CA +❑
Conecte solo el adaptador de CA optional AC-620/
AC-302,
IFonctio.nnement sur Ie courant secteur
domestique +❑
Raccordez uniquement un adaptateur secteur Aiwa
AC-620/AC-302.
PREPARATIVES
Utilization del gancho para cinturon +E
Instale el gancho para cinturon incluido, en el aparato
ycuelguelo del cintur6n.
PREPARATIFS
Utilisez une pince pour ceinture +❑
Fixez la pince pour ceinture fournie aI’ppareil, puis ce
dernier avotre ceintre,
Using on AC house current +❑
Connect the optional AC adaptor Aiwa AC-620/AC-
302 only.
Utilization de la correa de mano +E
1Instale la correa de mano en el gancho para
cintur6n,
Encaje la saliente @en el orificio.
2Instale el gancho para cintur6n en el aparato.
3Abroche Iacorrea de mane. Encajefirmemente Ias
salientes en 10sorificios.
II
Utilisation d’une dragonne +E
1Fixez la dragonne ala pince pour ceinture.
lnserez la projection @clans Ie trou.
2Fixez la pince de ceinture aI’appareil.
3Serrez la dragonne. Inserez completement Ies
saillies clans Ies trous.
PREPARATIONS
Using the belt clip +E
Attach the supplied belt clip to the main unit and install
it to your belt. Conexion de Ios auriculares +❑
Conecte 10sauriculares que vienen con el aparato en
la toma PHONES del aparato. Raccordement des ecouteurs +E
Raccordez Ies ecouteurs fournis ala prise PHONES
de I’appareil.
Using the hand strap +E
1Attach the hand strap to the belt clip.
Fit the projection @into the hole.
2Attach the belt clip to the unit.
3Fasten the hand strap. Fit the projections into the
holes completely.
Connecting the headphones +E
Connect the supplied headphones to the PHONES
jack of the unit.
3
II
TAPE PLAYBACK +❑
Connect the supplied headphones to the PHONES
jack.
REPRODUCTION DE LAS CINTAS +QLECTURE DE CASSETTE+ ❑
Raccordez Ies ecouteursfournis~ laprise PHONES.
‘s’O’lc== Conecte 10sauriculares quevienen con el aparato en
la toma PHONES del aparato. 1
2
3
4
5
Tournez Ie Ioquet OPEN vers Ie haut pour
ouvrir Ie Iogement de cassette.
Inserez une cassette.
@Face avant
@Face arribre
Apres I’insertion d’une cassette, verrouillez Ie
support de cassette en appuyant sur Ie Ioquet.
Reglez Ie commutateur RADIO ON/RADIO
OFF aRADIO OFF TAPE.
Appuyez sur 4➤PLAY.
Les deux faces sent jouees de maniere repetee.
Pour changer de face, faites glisser Ie curseur
DIR.
Ajustez Ie volume.
DIR
1
2
3
4
5
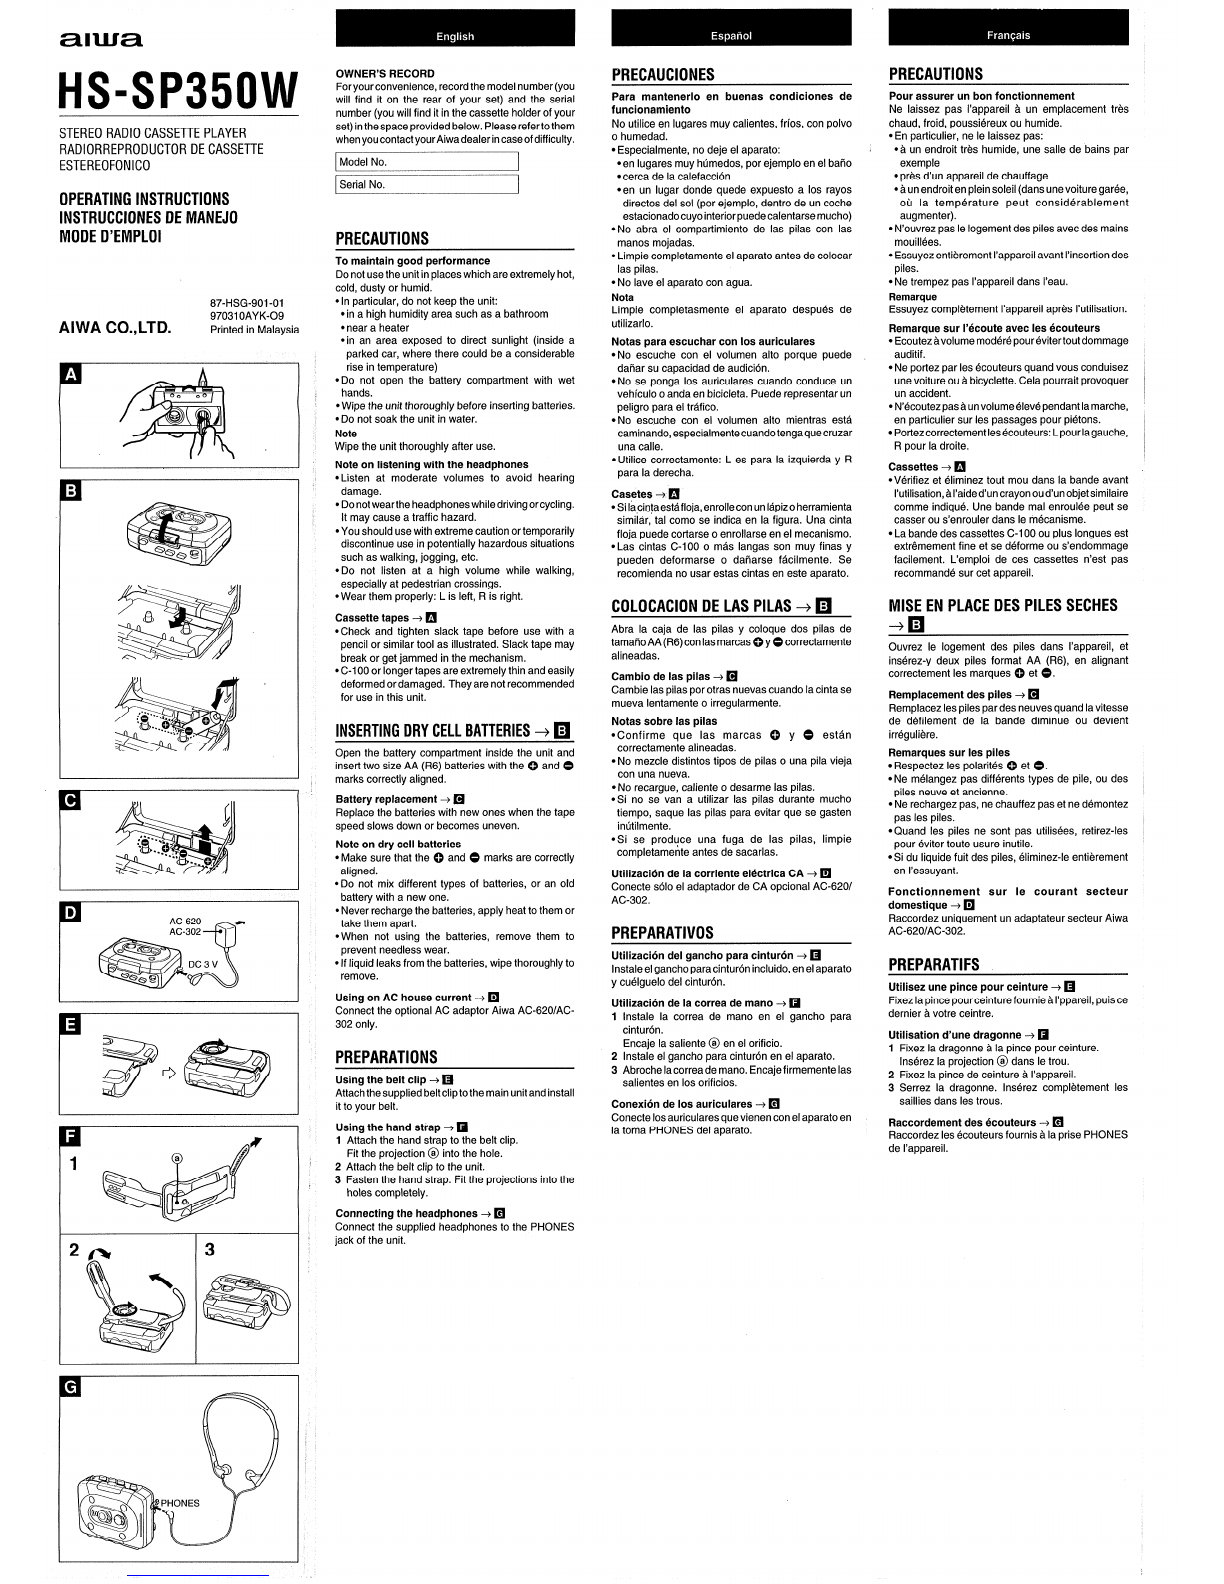
Turn up the OPEN latch to open the cassette
holder.
Insert acassette.
@Front side
@Reverse side
After inserting acassette, lock the cassette holder
by pressing the latch.
Set the RADIO ON/RADIO OFF switch to
RADIO OFF/TAPE.
Press 4> PLAY.
Both sides are played back repeatedly,
To change the playback side, slide the DIR
switch.
Adjust the volume.
1
2
3
4
5
Levante la palanca OPEN para abrir el
compartimiento del casete.
Coloque un casete.
@Cara delantera
@Cara trasera
Despu6s de colocar et casete, cierre el
compartimiento presionando la palanca.
Mueva el interruptor RADIO ON/RADIO OFF a
RADIO OFF/TAPE.
Presione el boton de reproduction
4P PLAY.
Se repiten Ias dos caras continuamente.
Paracambiarel ladoqueseestareproduciendo,
presione el interruptor DIR.
Ajuste el volumen.
1
SUPER BASS
112 (r-%
Operations de base
Appuyez sur Ies touches suivantes.
Pour arri%er IWSTOP
Basic operations
Press the following buttons,
IOperaciones basicas
Presione Ios siguientes botones,
Para ~arar I■STOP
3To stop I■STOP Pour avancer ++ sur la face avant
ra~idement >sur la face arriere
To fast forward !+< on the front side
-on the reverse side Para avanzar I++ la cara delantera
rd~idamente >la cara trasera Pour rebobiner ➤>sur la face avant
+sur la face arriere
To rewind I➤>on the front side
++ on the reverse side Para rebobinar -la cara delantera
+la cara trasera Les touches ++ et ~ne sent pas Iiberees en fin
de bande. Appuyez sur HSTOP pour Ies Iiberer.
The ++ and ➤>buttons are not released at the
end of the tape. Press ■STOP to release the buttons. Los botones ++ y~nose sueltan al final de la
cinta. Presione el bot6n ■STOP para soltar estos
botones.
Super graves
R6glez Ie commutateur SUPER BASS sur S-BASS
ON pour accentuer Ies basses frequencies.
!-’indicateur passe au jaune,
Super bass
Turn the SUPER BASS switch to S-BASS ON to
emphasize low frequencies, Super graves
Mueva el interruptor SUPER BASS aS-BASS ON
para dar mayor enfasis aIos graves. Pour selectionner [e type de cassette+ ❑
Reglez Ie selecteur TAPE/FM MODE aI’interieur de
I’appareil.
NORMAL: pour Ies cassettes de type 1(normal)
HIGH/METAL: pour Ies cassettes de type 11(high/
CrOz) et type IV (metal)
To select the tape type+ ❑
Set the TAPE/FM MODE switch inside the unit.
NORMAL: For Type I(Normal) tape
HIGH/METAL: For Type 11(High/CrOz) and Type IV
(Metal) tapes
Seleccion del tipo de cinta +❑
Mueva el selector TAPE/FM MODE dentro del
aparato.
NORMAL: Para cintas de tipo I(normales)
HIGH/METAL: Para cintas de tipo II (alto/CrOz) y
tipo IV (metal)
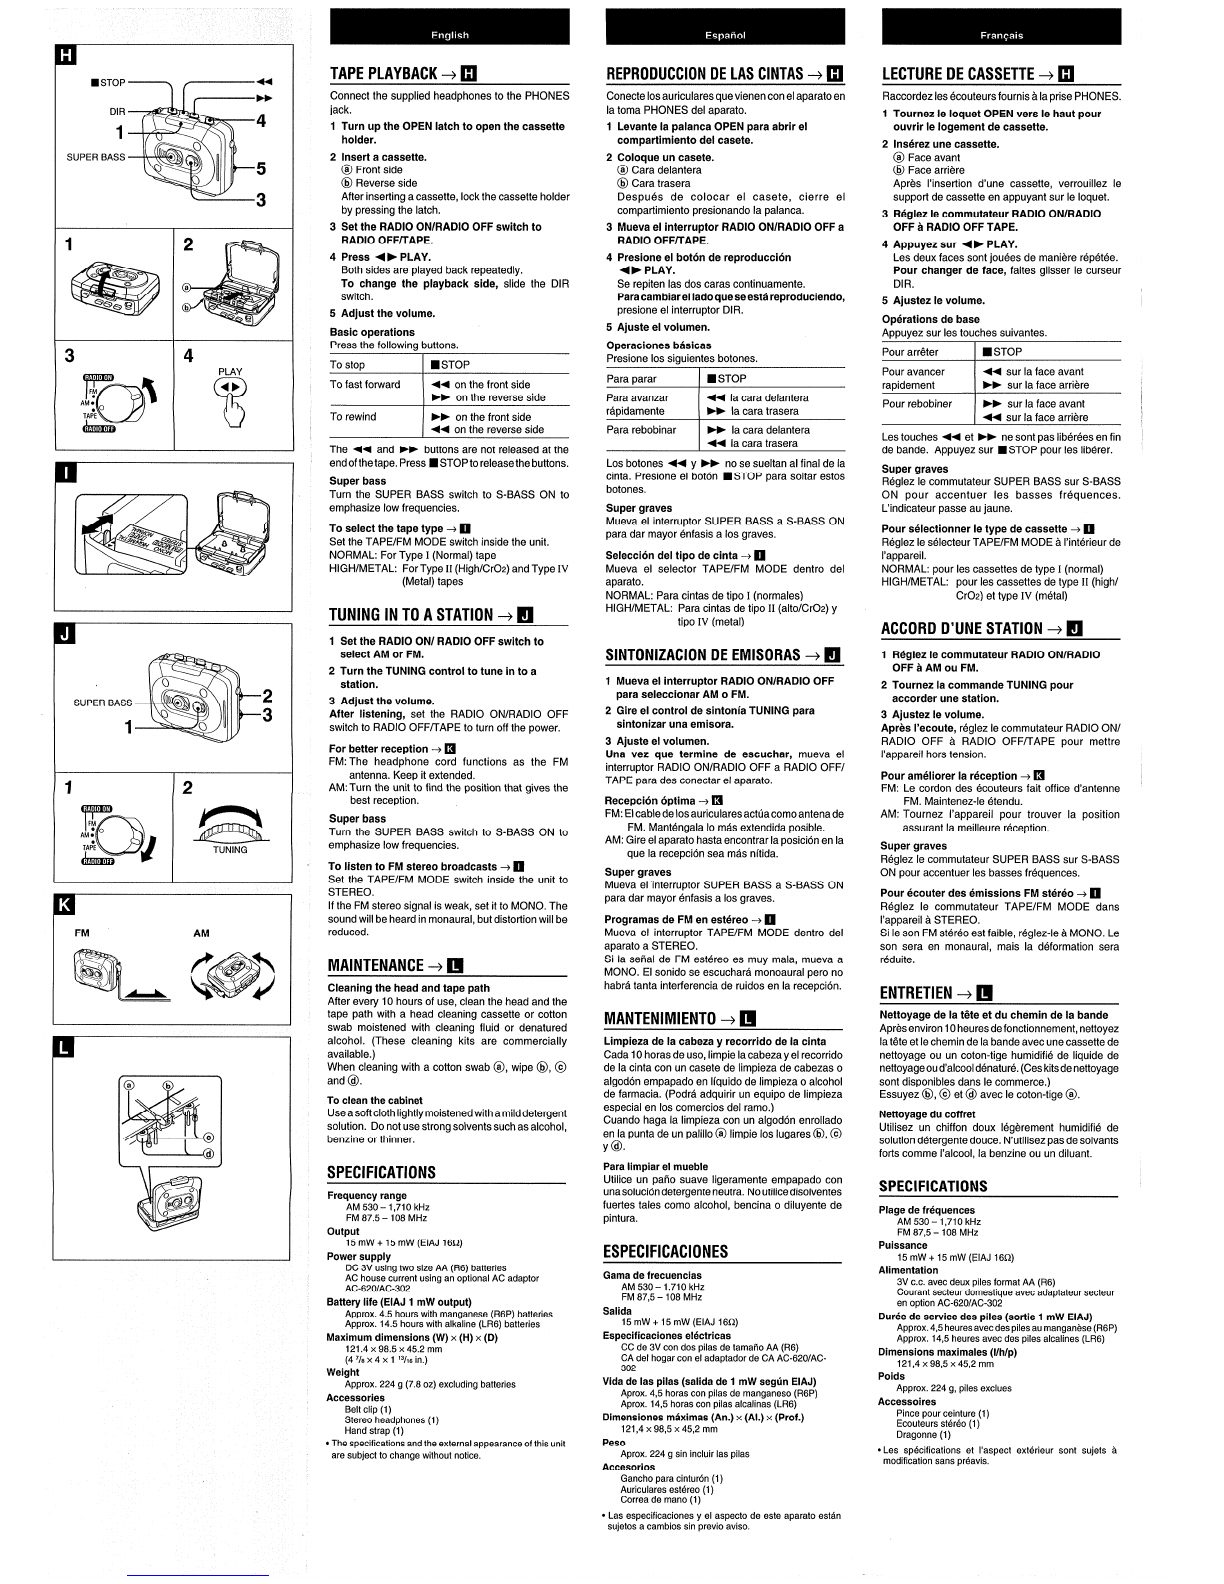
TUNING INTO ASTATION+ ❑
SUPER BASS 2
13
ACCORD D’UNE STATION+ Q
1Set the RADIO ON/ RADIO OFF switch to
select AM or FM.
2Turn the TUNING control to tune into a
station.
SINTONIZACION DE EMISORAS +❑1Reglez Ie commutateur RADIO ON/RADIO
OFF aAM OU FM.
1Mueva el interruptor RADIO ON/RADIO OFF
para seleccionar AM oFM.
2Gire el control de sintonia TUNING para
sintonizar una emisora.
3Ajuste el volumen.
Una vez que termine de escuchar, mueva e!
interruptor RADIO ON/RADIO OFF aRADIO OFF/
TAPE parades conectar et aparato.
2Tournez la commande TUNING pour
accorder une station.
3Adjust the volume.
After listening, set the RADIO ON/RADIO OFF
switch to RADIO OFF/TAPE to turn off the power. 3Ajustez Ie volume.
Apres I’ecoute, reglez Ie commutateur RADIO ON/
RADIO OFF aRADIO OFF/TAPE pour mettre
For better reception -+ ❑
FM: The headphone cord functions as the FM
antenna. Keep it extended.
AM: Turn the unit to find the position that gives the
best reception,
I’appareil hors tension.
Pour ameliorer la reception +❑
FM: Le cordon des ecouteurs fait office d’antenne
FM. Maintenez-le etendu.
AM: Tournez I’appareil pour trouver la position
assurant la meilleure reception.
1I2Recepcion optima+ ❑
FM: El cable de Ios auriculares actuacomo antena de
FM. Mant6ngala 10m~s extendida posible.
AM: Gire el aparato hasta encontrar la position en la
que la recepcion sea mds nitida.
r
-Ill c1
FM
‘o
AM ●
TA;E
(kmm3 4
TUNING
Super bass
Turn the SUPER BASS switch to S-BASS ON to
emphasize low frequencies. Super graves
Reglez Ie commutateur SUPER BASS sur S-BASS
ON pour accentuer Ies basses frequencies.
To listen to FM stereo broadcasts +❑
Set the TAPE/FM MODE switch inside the unit to
STEREO.
If the FM stereo signal is weak, set it to MONO. The
sound will be heard in monaural, but distortion will be
reduced.
Super graves
Mueva el ‘interruptor SUPER BASS aS-BASS ON
para dar mayor enfasis aIos graves. Pour ecouter des emissions FM stereo+ ❑
Reglez Ie commutateur TAPE/FM MODE clans
I’appareil aSTEREO.
Si Ie son FM stereo est faible, reglez-le aMONO. Le
son sera en monaural, mais la deformation sera
reduite.
Programas de FM en estereo +❑
Mueva el interruptor TAPE/FM MODE dentro del
aparato aSTEREO.
Si la sefial de FM estereo es muy mala, mueva a
MONO. El sonido se escuchara monoaural pero no
habr~ tanta interferencia de ruidos en la recepcion.
IFM AM
MAINTENANCE +❑
Cleaning the head and tape path
After every 10 hours of use, clean the head and the
tape path with a head cleaning cassette or cotton
swab moistened with cleaning fluid or denatured
alcohol, (These cleaning kits are commercially
available.)
When cleaning with acotton swab@, wipe (j), @
and @).
ENTRETIEN +❑
Nettoyage de la t6te et du chemin de la bande
Apres environ 10 heuresdefonctionnement, nettoyez
la t6te et Ie chemin de la bande avec une cassette de
nettoyage ou un coton-tige humidifie de Iiquide de
nettoyage ou d’alcool denature. (Ces kits de nettoyage
sent disponibles clans Ie commerce.)
Essuyez @, @et@ avec Ie coton-tige @.
MANTENIMIENTO +❑
Limpieza de la cabeza yrecorrido de la cinta
Cada 10 horas de USO,Iimpie la cabeza yel recorrido
de la cinta con un casete de Iimpieza de cabezas o
algod6n empapado en Iiquido de Iimpieza oalcohol
de farmacia, (Podrti adquirir un equipo de Iimpieza
especial en Ios comercios del ramo.)
Cuando haga la Iimpieza con un algodon enrollado
en la punta de un palilio @Iimpie IOSIugares (@, @
ykj).
To clean the cabinet
Use asoft cloth lightly moistened with amild detergent
solution. Do not use strong solvents such as alcohol,
benzine or thinner.
Nettoyage du coffret
Utilisez un chiffon doux Iegerement humidifie de
solution detergence deuce. N’utilisez pas de solvants
forts comme I’alcool, la benzine ou un diluant.
Para Iimpiar el mueble
Utilice un paho suave Iigeramente empapado con
una soluci6n detergence neutra. No utilice disolventes
fuertes tales como alcohol, bencina odiluyente de
pintura.
SPECIFICATIONS SPECIFICATIONS
Frequency range
AM 530 – 1,710 kHz
FM 87.5 – 108 MHz
output
15mW+15mW (ElAJ16f2)
Power supply
DC 3V using two size AA (R6) batteries
AC house current using an optional AC adaptor
AC-6201AC-302
Battery life (EIAJ 1mW output)
Approx. 4.5 hours with manganese (R6P) batteries
Approx. 14.5 hours with alkaline (LR6) batteries
Maximum dimensions (W) x(H) x(D)
121.4 x98,5x 45.2 mm
(4 7/8X4X 1 ‘3/16 h.)
Weight
Approx. 224 g (7,8 OZ)excluding batteries
Accessories
Belt clip (1)
Stereo headphones (1)
Hand strap (1)
●The specifications and the external appearance of this unit
are subject to change without notice.
Plage de frequencies
AM 530 – 1,710 kHz
FM 87,5 – 108 MHz
Puissance
15mW+15mW (ElAJ16L?)
ESPECIFICACIONES
Alimentation
3V C.C.avec deux piles format AA (R6)
Courant secteur domestique avec adaptateur secteur
en option AC-620/AC-302
Duree de service des piles (sortie 1mW EIAJ)
Approx. 4,5 heures avecdes piles au manganese (R6P)
Approx. 14,5 heures avec des piles alcalines (LR6)
Dimensions maximales (l/h/p)
121,4 x98,5x 45,2 mm
Poids
Approx. 224 g, piles exclues
Accessoires
Pince pour ceinture (1)
Ecouteurs sterdo (1)
Dragonne (1)
Gama de frecuencias
AM 530 – 1.710 kHz
FM 87,5 – 108 MHz
Salida
15mW+15mW(ElAJ16Q)
Especificaciones electrical
CC de 3V con dos pilas de tamaflo AA (R6)
CA del hogar con el adaptador de CA AC-620/AC-
302
Violade Ias pilas (salida de 1mW segun EIAJ)
Aprox. 4,5 horas con pitas de manganeso (R6P)
Aprox. 14,5 horas con pilas alcalinas (LR6)
Dimensioned maximas (An.) x(Al.) x(Prof.)
121,4 x98,5x 45,2 mm
Peso
Aprox, 224 g sin incluir Ias pilas
Accesorios
Gancho para cintur6n (1)
Auriculares est6reo (1)
Correa de mano (1)
●Les specifications et I’aspect exterieur sent sujets a
modification saris preavis.
●Las especificaciones yel aspecto de este aparato estan
sujetos acambios sin previo aviso.

This manual suits for next models

1

Other Aiwa Cassette Player manuals

Aiwa HS-TA303 User manual

Aiwa

Aiwa HS-TA303 User manual

Aiwa CSD-MD30 User manual

Aiwa

Aiwa CSD-MD30 User manual

Aiwa CSD-TD310 User manual

Aiwa

Aiwa CSD-TD310 User manual

Aiwa CS-P55 User manual

Aiwa

Aiwa CS-P55 User manual

Aiwa HS-SP390 User manual

Aiwa

Aiwa HS-SP390 User manual

Aiwa HS-TX386 User manual

Aiwa

Aiwa HS-TX386 User manual

Aiwa CSD-ED27 User manual

Aiwa

Aiwa CSD-ED27 User manual

Aiwa CS-P55 User manual

Aiwa

Aiwa CS-P55 User manual

Aiwa NSX-SZ80HR User manual

Aiwa

Aiwa NSX-SZ80HR User manual

Aiwa CSD-EX180 User manual

Aiwa

Aiwa CSD-EX180 User manual

Aiwa HS-RX490 User manual

Aiwa

Aiwa HS-RX490 User manual

Aiwa RM-67 User manual

Aiwa

Aiwa RM-67 User manual

Aiwa AD-M700H User manual

Aiwa

Aiwa AD-M700H User manual

Aiwa NSX-HMA56 User manual

Aiwa

Aiwa NSX-HMA56 User manual

Aiwa HS-TA383 User manual

Aiwa

Aiwa HS-TA383 User manual

Aiwa HS-RX128 User manual

Aiwa

Aiwa HS-RX128 User manual

Aiwa CSD-TD31 User manual

Aiwa

Aiwa CSD-TD31 User manual

Aiwa CSD-A510 User manual

Aiwa

Aiwa CSD-A510 User manual

Aiwa HS-JS199 User manual

Aiwa

Aiwa HS-JS199 User manual

Aiwa HS-G35MKII User manual

Aiwa

Aiwa HS-G35MKII User manual

Aiwa CSD-TD20 User manual

Aiwa

Aiwa CSD-TD20 User manual

Aiwa TP-VS610 User manual

Aiwa

Aiwa TP-VS610 User manual

Aiwa HS-PX590 User manual

Aiwa

Aiwa HS-PX590 User manual

Aiwa RM-P300W User manual

Aiwa

Aiwa RM-P300W User manual

Popular Cassette Player manuals by other brands

Sony WM-FX521 - Walkman Specifications

Sony

Sony WM-FX521 - Walkman Specifications

Ekars edd-2203 operating manual

Ekars

Ekars edd-2203 operating manual

Alpine 7380M owner's manual

Alpine

Alpine 7380M owner's manual

Vitek VT3470 GY instruction manual

Vitek

Vitek VT3470 GY instruction manual

Sony TC-K611S Service manual

Sony

Sony TC-K611S Service manual

Sony CFM-10 Operating Instructions  (primary... Specifications

Sony

Sony CFM-10 Operating Instructions (primary... Specifications

Hyundai H-1433 instruction manual

Hyundai

Hyundai H-1433 instruction manual

Tascam 130 owner's manual

Tascam

Tascam 130 owner's manual

Emerson HK26 user guide

Emerson

Emerson HK26 user guide

Sony WM-FS555J - Walkman operating instructions

Sony

Sony WM-FS555J - Walkman operating instructions

Sony TCM-R3 Service manual

Sony

Sony TCM-R3 Service manual

Panasonic RQ-SX53 operating instructions

Panasonic

Panasonic RQ-SX53 operating instructions

Rotel RMD-82 owner's manual

Rotel

Rotel RMD-82 owner's manual

Sony Walkman WM-FX465 operating instructions

Sony

Sony Walkman WM-FX465 operating instructions

Sony Walkman WM-FX495 Specifications

Sony

Sony Walkman WM-FX495 Specifications

Sanyo MCD-S660F instruction manual

Sanyo

Sanyo MCD-S660F instruction manual

Technics RS-CH770 Service manual

Technics

Technics RS-CH770 Service manual

Sony TC-KE600S operating instructions

Sony

Sony TC-KE600S operating instructions

manuals.online logo
manuals.online logoBrands
  • About & Mission
  • Contact us
  • Privacy Policy
  • Terms and Conditions

Copyright 2025 Manuals.Online. All Rights Reserved.