Akai Ewi4000s User manual

REFERENCE MANUAL


1
IMPORTANT SAFETY INSTRUCTIONS
1. Before you operate the EWI4000s, read these instructions.
2. Keep these instructions.
3. Heed all warnings.
4. Follow all instructions.
5. Do not use this apparatus near water.
6. Clean only with a dry cloth.
7. Do not block any ventilation openings. Install in accordance with the manufacturer’s instructions.
8. Do not install near any heat sources such as radiators, heat register, stoves, or other apparatus
(including amplifiers) that produce heat.
9. Do not defeat the safety purpose of the polarized or grounding-type plug. A polarized plug has two
blades with one wider than the other. A grounding type plug has two blades and a third grounding
prong. The wide blade or the third prong is provided for your safety. If the provided plug does not fit
into your outlet, consult an electrician for replacement of the obsolete outlet. Where the mains plug or
an appliance coupler is used as the disconnect device, the disconnect device shall remain readily
operable.
10. Protect the power cord from being walked on or pinched particularly at plugs, convenience receptacles,
and the point where they exit from the apparatus.
11. Only use attachment/accessories specified by the manufacturer.
12. Use only the cart, stand, tripod, bracket or table
specified by the manufacturer, or sold with the
apparatus. When a cart is used, use caution when
moving the cart/apparatus combination to avoid injury
from tip-over.
13. Unplug this apparatus during lightning storms or when
unused for long periods of time.
14. Refer all servicing to qualified service personnel.
Servicing is required when the apparatus has been
damaged in any way, such as power-supply cord or
plug is damaged, liquid has been spilled or objects
have fallen into the apparatus, the apparatus has been
exposed to rain or moisture, does not operate
normally, or has been dropped.
15. Do not expose this apparatus to dripping or splashing and ensure that no objects filled with liquids, such
as vases, are placed on the apparatus.
16. Use only with the specified AC adapter.
PORTABLE CART WARNING
S3125A

2
WARNING:
The EWI4000s is designed to be used in a standard household environment. Power requirements for electrical
equipment vary from area to area. Please ensure that your AC adapter supplied meets the power
requirements in your area. If in doubt, consult a qualified electrician or AKAI Professional dealer.
FCC WARNING:
This equipment has been tested and found to comply with the limits for a Class B digital device pursuant to
Part 15 of the FCC rules. These limits are deisigned which are designed to provide reasonable protection
against such interference in a residential installation. There is no guarantee, however, that interference will
not occur in a particular installation. If the unit does cause interference to any radio or television reception,
try to reduce it by one or more of the following means:
a) reposition the other unit and/or its antennae
b) move this unit
c) move this unit and the other unit(s) further apart
d) plug this unit into a different AC outlet so that it is on a different circuit from the other equipment
CAUTION:
yTo prevent electric shock, do not use this polarized AC power plug with an extension cord, receptacle, or
other outlet unless the blades can be fully inserted to prevent blade exposure.
yChanges or modifications not expressly approved by the manufacturer for compliance could void the
user’s authority to operate the euqipment.
yThis appliance is not equipped with a main power switch. Even when the appliance is turned off, the
power supply to the appliance is not completely turned off when the power cord is plugged in. Pull out
the adapter when not using the appliance for long periods.
yThis digital apparatus does not exceed the Class B limits for radio noise emissions from digital apparatus
set out in the Radio Interference Regulations of the Canadian Department of Communications.
AVIS POUR LES ACHETEURS CANADIENS DU EWI4000s:
yAfin d’éviter tout risqué de décharge électrique, n’utilisez pas cette prise polariseé avec une rallonge, une
prise de courant ou autre sortie á moins que les lames puissent être complétement insérées et qu’elles
ne soient plus visibles.
yLe présent numérique n’ément pas de bruits radioélectriques dépassant les limites applicable aux
appareils numériques de la Class B prescrites dans le Règlement sur le brouillage radioélectrique édicté
par le ministère des Communications du Canada.

3
TABLE OF CONTENTS
CHAPTER 1: INTRODUCTION.....................................................................................................................4
FEATURES....................................................................................................................................................4
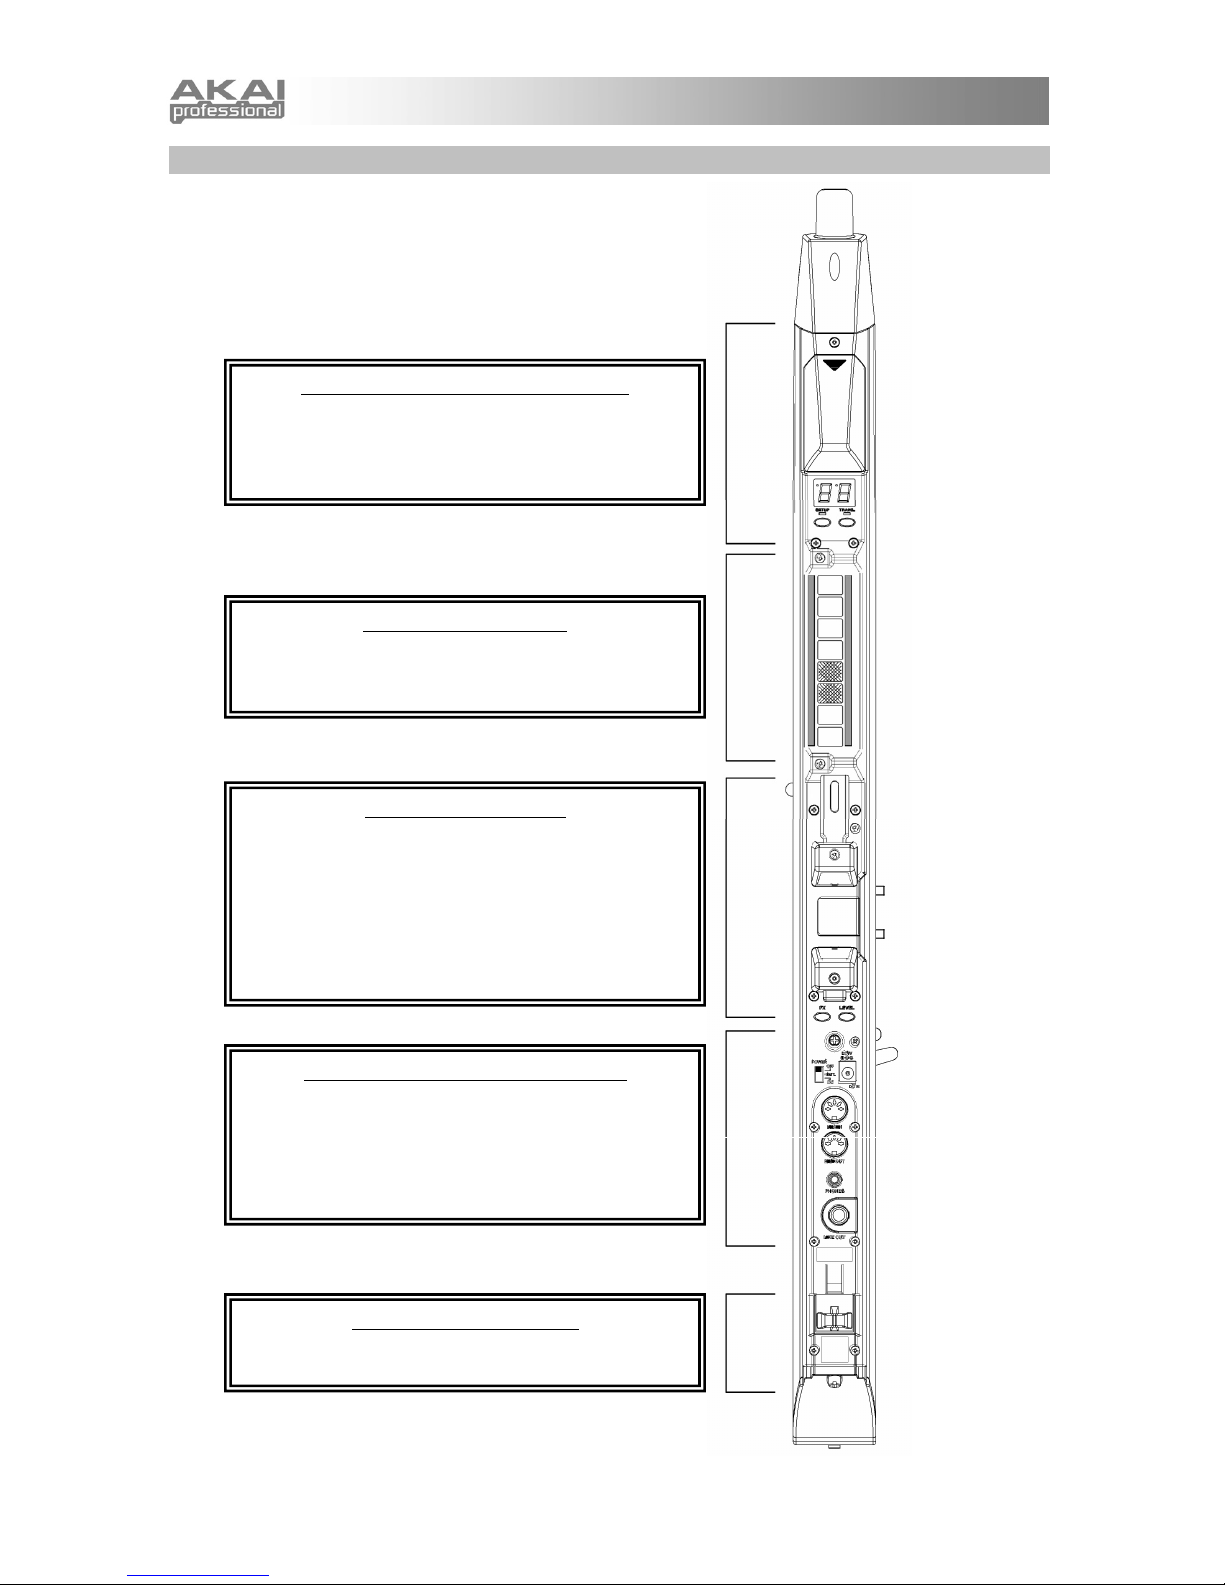
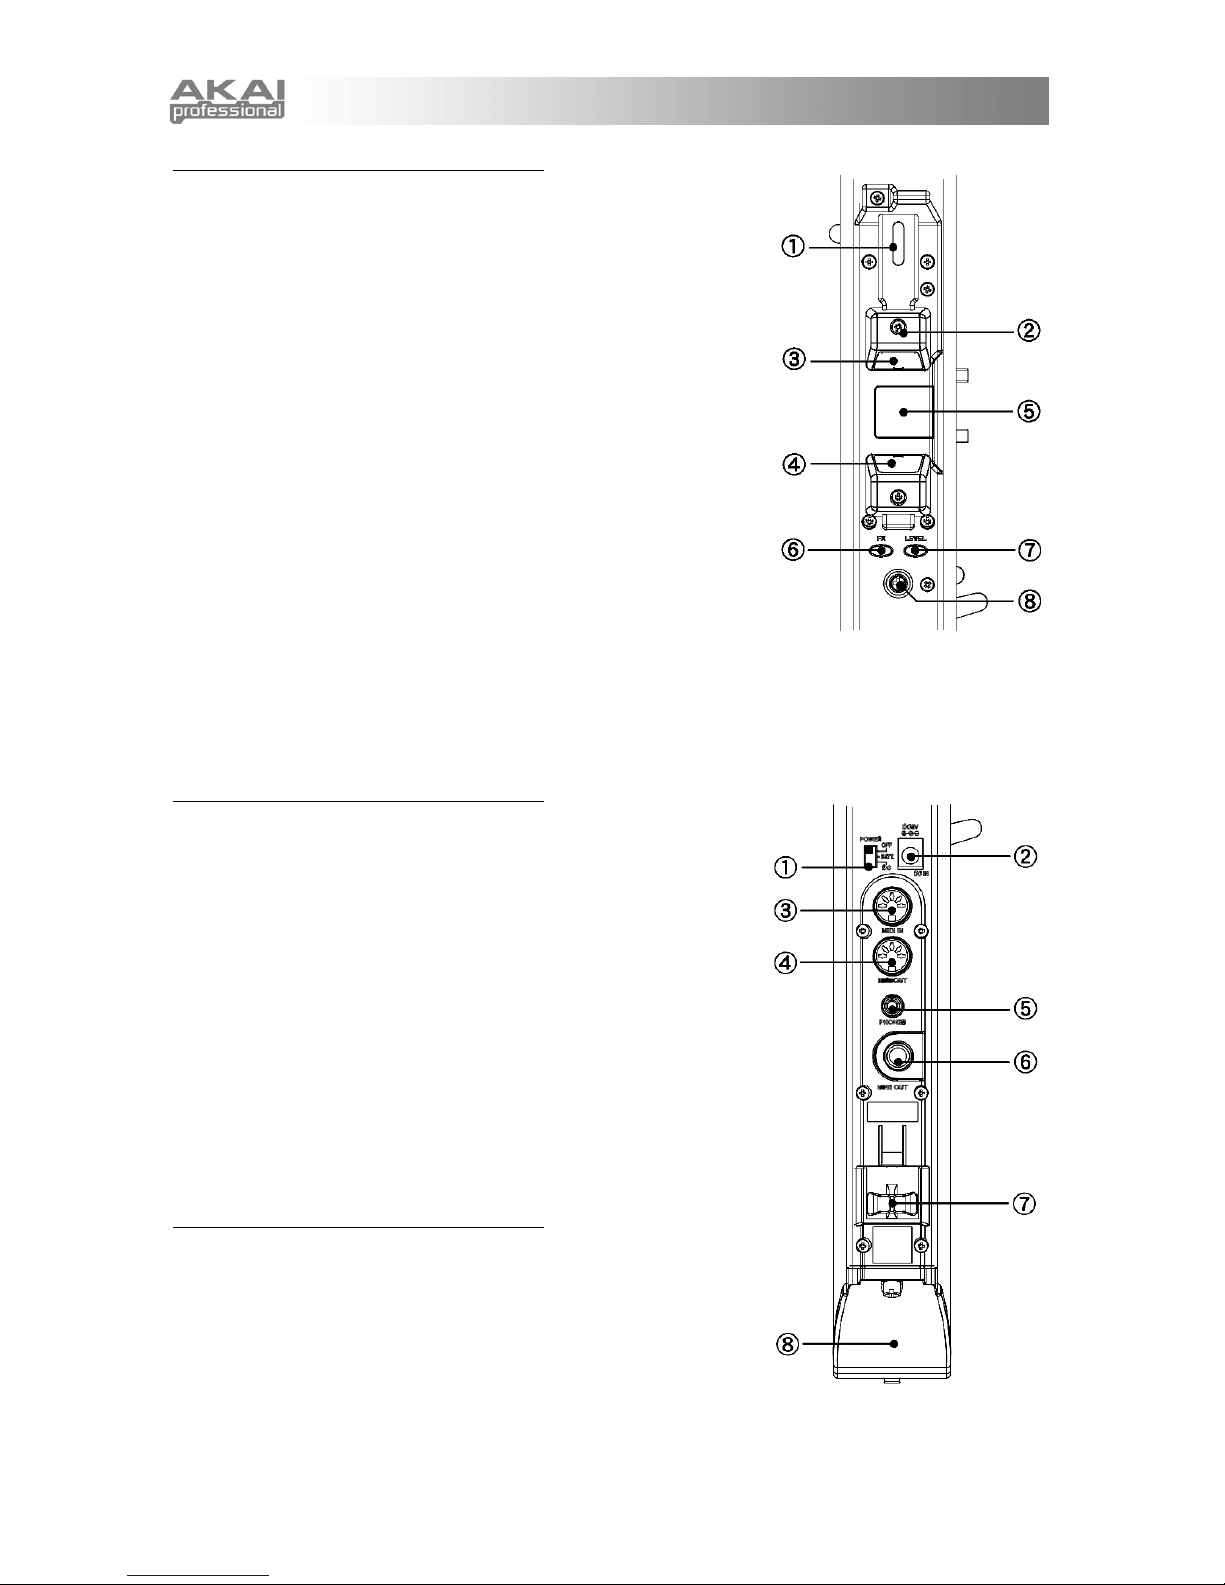
PARTS & FUNCTIONS ................................................................................................................................5
POWER .........................................................................................................................................................9
CONNECTIONS..........................................................................................................................................10
CHAPTER 2: BASIC OPERATION .............................................................................................................11
ABOUT THE EWI4000s ............................................................................................................................11
BASIC OPERATION...................................................................................................................................11
HOW TO HOLD THE EWI4000s.......................................................................................................11
OPERATING THE NOTE KEYS, OCTAVE SHIFT ROLLERS, & GROUNDING PLATES ...............11
USING THE MOUTHPIECE ..............................................................................................................12
USING THE PITCH BEND PLATES, GLIDE PLATES, & HOLD & OCTAVE BUTTONS.................12
ADJUSTING THE SENSITIVITY OF THE SENSORS.......................................................................13
FINGERING MODES ........................................................................................................................17
CHAPTER 3: INTERNAL SOUND...............................................................................................................18
PROGRAM KEY FUNCTIONS...................................................................................................................18
Selecting the Internal Sounds (Program Key) ..........................................................................18
Assigning a Program Number to a Note Key............................................................................18
Setting Program Change Preferences.......................................................................................19
Recalling the Program Number Assigned to a Note Key.........................................................19
ALTERNATE WAY OF SELECTING THE PROGRAM NUMBER...........................................................20
Program Up with the Hold Button .............................................................................................20
Program Down with the Octave Button.....................................................................................20
ADJUSTING THE VOLUMES ....................................................................................................................21
Adjusting the Main Volume........................................................................................................21
Adjusting the Volume of Each Program....................................................................................21
ADJUSTING THE EFFECTS VOLUMES ..................................................................................................21
Adjusting the Reverb Volume....................................................................................................21
Adjusting the Reverb Effect Volume of Each Program............................................................22
Adjusting the Delay Effect Volume of Each Program ..............................................................22
Adjusting the Chorus Effect On/Off on Each Program ............................................................22
OCTAVE BUTTON FUNCTIONS...............................................................................................................23
Assigning Functions to the Octave Button...............................................................................23
Setting the Octave Button’s Continuous Controller Preferences ...........................................24
HOLD BUTTON FUNCTIONS....................................................................................................................24
Assigning Functions to the Hold Button ..................................................................................25
Setting the Hold Button’s Continuous Controller Preferences ...............................................25
PITCH BEND PLATE FUNCTIONS ..........................................................................................................26
Assigning Functions to the Pitch Bend Plates.........................................................................26
GLIDE PLATE FUNCTIONS ......................................................................................................................26
Assigning Functions to the Glide Plate ....................................................................................26
Setting the Glide Effect Time & Rate.........................................................................................27
ADJUSTING THE KEY DELAY .................................................................................................................27
TRANSPOSE FUNCTION (TRANS BUTTON)..........................................................................................28
TUNING .......................................................................................................................................................28
EDITING THE INTERNAL SOUND WITH YOUR COMPUTER ..............................................................28
CHAPTER 4: USING THE EWI4000s AS A MIDI CONTROLLER ...........................................................29
ABOUT MIDI...............................................................................................................................................29
USING THE EWI4000s AS A MIDI CONTROLLER (APPLICATION)....................................................30
RESTORING THE FACTORY PRESETS..................................................................................................33
CHAPTER 5: MISCELLANEOUS NOTES ..................................................................................................34
EVI FINGERINGS .......................................................................................................................................34
SOFTWARE UPDATING............................................................................................................................35
TROUBLESHOOTING................................................................................................................................36
CHAPTER 6: FINGERING CHARTS..........................................................................................................37
MIDI IMPLEMENTATION CHART..............................................................................................................43
MENU STRUCTURE....................................................................................................................................44
SPECIFICATIONS .......................................................................................................................................47

4
CHAPTER 1: INTRODUCTION
We greatly appreciate your purchase of the Akai Professional Electric Wind Instrument EWI4000s. The
EWI4000s is an electric wind controller-equipped sound module. This manual includes detailed explanations
of its functions, features, and operations and will show you how to use them to their fullest extent.
FEATURES
yPlays the same way as a woodwind instrument such as a saxophone
ySensors detect breath intensity and mouthpiece pressure for responsive control of the pitch, tone, and
volume
yTouch plates easily control Pitch Bend or Glide easily while Octave Shift rollers enable you to shift over
an eight-octave range
yAnalog-modeling synthesizer with 2 VCOs and 2 VCFs inside
yEquipped with an internal sound module and internal effects such as Reverb, Delay, and Chorus
y1/4” line output or headphone jack, without need for an external sound/FX module
yCan be powered with 4 AA batteries
yUser-changeable preset sound, output level, and effect level
yCan be used to trigger an external MIDI sound module via MIDI connections
yFree downloadable sound editing software from http://www.akaipro.com, allowing you to edit the
internal preset sounds and effects parameters

5
PARTS & FUNCTIONS
TOP PANEL
MOUTHPIECE
–
Hold the tip of the
MOUTHPIECE and blow to play
(like a traditional woodwind
instrument). You can produce a
vibrato effect by gently biting the
MOUTHPIECE. Do not bite too
hard.
NOTE KEYS
–
Press these keys in
different combinations while
blowing into the MOUTHPIECE to
change the note of the EWI4000s.
The position of the three low keys
can be adjusted by loosening their
screws.
HOLD BUTTON
–
Press this to enter Hold
Mode. This button also functions as a
Program Up button. In this case, pressing
it turns the LED on and enables the
specified function. It also works as “+”
(
Increase
)
button in Ad
j
ust Mode.
OCTAVE BUTTON
–
Activates the Octave
Mode. This button also functions as a
Program Down button. In this case,
pressing it turns the LED on and enables
the specified function. It also works as “–”
(Decrease) button in Adjust Mode.

6
SIDE / REAR PANEL
PROGRAM / DATA DISPLAY SECTION
SENSOR ADJUSTMENT KNOBS
PROGRAM / DATA DISPLAY
TRANS BUTTON
SETUP BUTTON
GLIDE PLATE SECTION
GLIDE PLATE
OCTAVE SHIFT ROLLERS
GROUNDING PLATE
BEND PLATE SECTION
NECK STRAP MOUNT
PROGRAM KEY
PITCH BEND UP PLATE
PITCH BEND DOWN PLATE
GROUNDING PLATE
FX BUTTON
LEVEL BUTTON
TOUCH SENSOR SENSITIVITY ADJUSTMENT KNOB
POWER / MIDI / AUDIO OUT SECTION
POWER SWITCH
DC IN
MIDI IN
MIDI OUT
PHONES
LINE OUT
CABLE CLUTCH SECTION
CABLE CLUTCH
BATTERY CASE COVER

7
Program / Data Display Section
1. SENSOR ADJUSTMENT KNOBS – These seven knobs adjust the
sensors for breath, glide, bend, and vibrato. (See the Sensor
adjustment section for more information.)
2. PROGRAM / DATA DISPLAY – Shows the Program number or the
setting value.
3. TRANS (Transpose) BUTTON – Turns the Transpose function on
or off. The LED is lit if Transpose is on. You can set the
transposition value by pressing the HOLD BUTTON or OCTAVE
BUTTON while holding the TRANS BUTTON down.
4. SETUP BUTTON – Press this button to enter Adjust Mode. The
LED will light up when you are in Adjust Mode.
Glide Plate Section
1. GLIDE PLATE – Touching this plate when a note is being played
produces a “glide” effect, smoothly and continuously sliding the
pitch up or down (known as portamento).
2. OCTAVE SHIFT ROLLERS – Rolling your thumbs up or down
over these rollers shifts the basic range played by the NOTE
KEYS over eight octaves. Always touch these rollers while
playing.
3. GROUNDING PLATE – Always keep a thumb on this plate while
playing.

8
Bend Plate Section
1. NECK STRAP MOUNT – Connect a neck strap (included) to this
mount and to the EWI4000s.
2. PROGRAM KEY – Changes the Program (internal sound). If you
touch this key without touching any NOTE KEYS, the selected
Program number will be shown on the PROGRAM / DATA
DISPLAY. You can then change the Program number by pressing
the HOLD BUTTON or OCTAVE BUTTON.
3. PITCH BEND UP PLATE – Touching this key raises the pitch of
the note being played. You can adjust the position of the plate by
loosening its screw.
4. PITCH BEND DOWN PLATE – Touching this key lowers the pitch
of the note being played. You can adjust the position of the plate
by loosening its screw.
5. GROUNDING PLATE – Always keep a thumb on this plate while
playing.
6. FX (Effects) BUTTON – Pressing this button shows the overall
Reverb level on the PROGRAM / DATA DISPLAY. You can
change the level by pressing the HOLD BUTTON or OCTAVE
BUTTON.
7. LEVEL BUTTON – Pressing this button shows the Main Output
level on the PROGRAM / DATA DISPLAY. You can change the level by pressing the HOLD BUTTON
or OCTAVE BUTTON.
8. TOUCH SENSOR SENSITIVITY ADJUSTMENT KNOB – Adjustment knob for the touch sensor keys.
(See the “Adjusting the Touch Sensor Sensitivity” section to set this up properly.)
Power / MIDI / Audio Out Section:
1. POWER SWITCH – Selects the power source for the EWI4000s.
Select “BATT” when using the batteries, “DC” when using an AC
adapter, or “OFF” when the EWI4000s is not in use.
2. DC IN – Connect an AC adapter (MP-9, Optional) here.
3. MIDI IN – Plug a standard 5-pin MIDI cable from the MIDI OUT of
your computer to this jack to edit the EWI4000s’s internal sounds
with the sound editor software.
4. MIDI OUT – Plug a standard 5-pin MIDI cable from the MIDI IN of
the external sound module to this jack to use the EWI4000s as a
MIDI controller. You can also plug a MIDI cable from the MIDI IN
of your computer to this jack to edit the EWI4000s’s internal
sounds with the sound editor software.
5. PHONES – Connect headphones here with a stereo 1/8” cable.
6. LINE OUT – Connect the EWI4000s to the input of a mixer or
amplifier here.
Cable Clutch Section:
7. CABLE CLUTCH – Clip a cable an audio or MIDI cable here.
8. BATTERY CASE COVER – Loosen the screw of this cover to
install batteries in the EWI4000s.

9
POWER
Before operating the EWI4000s, please be careful of the following:
yDo not bite the MOUTHPIECE too hard as this may damage the vibrato sensor. Use the mouthpiece
cover after using or while carrying the EWI4000s.
yAlways touch the GROUNDING PLATE and OCTAVE SHIFT ROLLERS when playing and editing
sounds. Each of touch sensors uses the performer’s body as the ground.
yKeep the MOUTHPIECE clean before, during, and after using the EWI4000s. You can clean its outer
surface with disinfectant alcohol.
Using Battery Power
yPlease use four (4) AA batteries (alkaline or
rechargeable) only. Be sure to install them with their
poles (+/–) at the proper ends. Refer to the drawing for
correct battery installation.
ySelect “BATT” on the POWER SWITCH when using
batteries. To prolong battery life, select the “OFF”
position on the Power Switch when you’re finished
playing.
yWhen the battery power is low, an LED on the
PROGRAM / DATA DISPLAY will start blinking at which
point you should change the batteries.
yRemove the batteries when you are not going to be
using your EWI4000s for an extended period time.
Don’t use different types of batteries at the same time.
AC adapter
You can use an AC adapter (MP-9) instead of batteries. Connect adapter to the DC IN jack of the EWI4000s
and select DC on the Power Switch.

10
CONNECTIONS
Connection from Line Out of the EWI4000s to a mixer or keyboard amplifier
Connection from Headphone Out of the EWI4000s to the Headphones
Removing the Cable Clutch
The CABLE CLUTCH can be removed (as shown here) if it interferes with using a wireless system.

11
CHAPTER 2: BASIC OPERATION
ABOUT THE EWI4000s
The EWI4000s is a woodwind instrument-type MIDI controller with an internal sound module and built-in
effects. It allows you to perform with the articulation of an acoustic instrument but also with the character of
an electronic instrument with a wide variety of sounds and tonal colorings. The EWI4000s has an internal
sound module and effects, so you can enjoy playing it simply by connecting the EWI4000s to an amplifier or
headphones. To get the most out of your EWI4000s, study this manual to learn about its features and
functions.
The EWI4000s has two modes: Play Mode and Adjust Mode. When you turn the EWI4000s on, it will be in
Play Mode. If you wish to adjust the sensors’ sensitivity or MIDI settings, you can change to the Adjust Mode
by pressing the SETUP BUTTON.
Please take some time to read this Basic Operation section before playing the EWI4000s.
BASIC OPERATION
This section explains the basic operation of the EWI4000s and how to
adjust its settings.
HOW TO HOLD THE EWI4000s
Hold the EWI4000s the same way as you would hold a saxophone or
clarinet. The EWI4000s’s NOTE KEYS are sensors that respond to your
touch. They are useful for playing fast passages, but they are different
from the key action of an ordinary wind instrument. Be sure to use a neck
strap so you can move your fingers freely.
OPERATING THE NOTE KEYS, OCTAVE SHIFT ROLLERS, & GROUNDING PLATES
Note Keys
The NOTE KEYS allow you to produce sound with just a light touch.
The EWI4000s has several different fingerings available, including
saxophone, flute, and oboe. Please refer to the FINGERING CHARTS
section for details. You can also change the EWI4000s’s fingering
configuration, designing your own unique fingerings that could not exist
on an acoustic sound instrument.
Octave Shift Rollers
Place your left thumb on the back side of the EWI4000s, between any
two OCTAVE SHIFT ROLLERS. While playing, keep your left thumb
touching the rollers. The position between the two knurled rollers will
give you standard pitch.
Grounding Plates
There are two GROUNDING PLATES for your right and left hands.
Always keep either of your thumbs on its GROUNDING PLATE while
playing.

12
USING THE MOUTHPIECE
Mouthpiece
Hold the mouthpiece gently in your mouth with your teeth, and exhale so
the breath is passed through both ends of your mouth. The EWI4000s
detects this wind pressure with the breath sensor and expresses the
change in sound volume and character. The EWI4000s unique breathing
structure is designed so that very little breath is required to pass through
the instrument. You can use various breathing techniques to sustain or
shape notes for powerfully expressive performances.
Vibrato
There is a vibrato sensor in the MOUTHPIECE. You can produce a vibrato effect by gently biting the
MOUTHPIECE. Do not bite too hard as this may damage the vibrato sensor or the MOUTHPIECE itself.
Tonguing
You can create small bursts of air by tonguing the mouthpiece for even more expressive control.
Note: Adjust the S (Sense) SENSOR ADJUSTMENT KNOB to create different tonguing nuances.
USING THE PITCH BEND PLATES, GLIDE PLATES, & HOLD & OCTAVE BUTTONS
Pitch Bend Plates
By touching the PITCH BEND UP PLATE or PITCH BEND DOWN PLATE with your
thumb (while also touching a GROUNDING PLATE), you can raise or lower the pitch
of the note being played. Adjust the pitch bend range with the W (Width) SENSOR
ADJUSTMENT KNOB.
Note: Before you get accustomed to using these plates, you may produce
unexpected sounds by touching them accidentally. You can adjust the position of
each plate by loosening its screw.
Glide Plate
By moving your thumb across the OCTAVE SHIFT ROLLERS
while touching the GLIDE PLATE, you can achieve a “glide”
effect, which will smoothly and continuously slide the pitch
being played up or down. This is known as portamento.
Adjust the glide time using the T (Time) knob on the GL
(Glide) section of the EWI4000s.
Note: Before you get used to controlling this plate, you may
produce unexpected sounds by touching them accidentally.

13
Hold Button and Octave Button
Pressing the HOLD BUTTON will engage or disengage the
EWI4000s’s Hold Mode (see the HOLD MODE section) or serve as
a Program Up button while in Play Mode. While in Adjust Mode, the
HOLD BUTTON serves as a “+” (Increase) button.
Pressing the OCTAVE BUTTON will let you engage or disengage
the Octave function (see the OCTAVE FUNCTION section) or serve
as a Program Down button while in Play Mode. While in Adjust
Mode, the OCTAVE BUTTON serves as a “–” (Decrease) button.
ADJUSTING THE SENSITIVITY OF THE SENSORS
To fully use the EWI4000s’s various performance features, you should
properly adjust the breath, glide, bend, and vibrato sensors to your own
performing requirements. Each sensor has been set properly in the factory,
but we recommend adjusting them on your own before playing the
EWI4000s. The SENSOR ADJUSTMENT KNOBS are located under the
cover above the PROGRAM / DATA DISPLAY. Remove the cover as
shown in the drawing.
The function of each knob is shown below:
GL: Glide
A: Glide Sensor Adjustment
T: Glide Time Setting
PB: Pitch Bend
A: Pitch Bend Sensor Adjustment
W: Pitch Bend Width
VB: Vibrato
A: Vibrato Depth Adjustment
BR: Breath
A: Breath Sensor Adjustment
S: Breath Sensitivity
To adjust a sensor’s sensitivity, press the SETUP BUTTON to enter Adjust Mode. The PROGRAM / DATA
DISPLAY will indicate the sensor being adjusted.
Glide
Breath
Bend Down
Bend Up

14
Adjusting the Breath Sensor
The breath sensor translates the strength of your breath into
the volume and character of the note you’re playing. It’s
important to set the sensor’s sensitivity so it suits your style
of playing.
1. Set the “S” (Sensitivity) knob in the “BR” (Breath)
section to the center position, and then turn the “A”
(Adjust) knob clockwise. The “Breath” indicator should
light up on the PROGRAM / DATA DISPLAY. If you
turn the “A” (Adjust) knob counterclockwise, it should
go off.
Note: If the “Breath” indicator is lit, the EWI4000s will
produce sound. Be careful of the volume settings on
any connected equipment while adjusting the breath
sensor.
2. Turn the “A” (Adjust) knob slowly counterclockwise
from the position where the indicator is lighting up, and
set it to the position where the indicator goes off.
3. Blow into the MOUTHPIECE. The breath sensor is properly adjusted if the sound starts when you blow
(and stops when you stop blowing).
4. To adjust the “S” (Sense) knob for breath sensitivity, blow into the MOUTHPIECE with various breath
strengths to confirm that the output sound volume changes depending on your breath strength. To
change this setting, turn the “S” (Sense) knob. For greater sensitivity, turn the knob clockwise. For
less, turn it counterclockwise. At a higher sensitivity, you may have less available articulation but not
need to blow as hard. At a lower sensitivity, you will need to blow harder to produce a sound, but you
can be more expressive with it.
Note: After adjusting the S (Sense) knob, you need to adjust the A (Adjust) knob again.
Adjusting the Pitch Bend Sensors
This section explains how to adjust the sensors for the Pitch
Bend Up and Down functions and sets the width of these
bends.
1. Set the “W” (Width) knob in the “PB” (Pitch Bend)
section to the right-most (fully clockwise) position.
2. While touching your thumb only to the GROUNDING
PLATE (without touching the PITCH BEND UP PLATE
or PITCH BEND DOWN PLATE), adjust the “A”
(Adjust) knob in the “PB” (Pitch Bend) section so that
both the UP and DOWN indicators on the PROGRAM /
DATA DISPLAY turn off.
3. Play the EWI4000s and use the PITCH BEND UP
PLATE and PITCH BEND DOWN PLATE. The bend sensor is properly adjusted if a note’s pitch raises
or lowers (and the upper or lower indicator LED lights up) appropriately when you touch either of the
bend plates. If you still want to adjust the settings, experiment more with the “W” (Width) knob. The
range becomes narrower as you turn it counterclockwise (and wider as you turn it clockwise).
The overall change in pitch varies by how much of the plate your thumb is touching as well how it is touching
the plate. You’ll need to experiment with the bend plates and sensor adjustment for the best results.
Note: After adjusting the W (Width) knob, you will need to adjust the A (Adjust) knob again.

15
Adjusting the Vibrato Sensor
By gently biting on the MOUTHPIECE, you can produce a
vibrato effect. This section explains how to adjust the vibrato
sensor.
1. Set the “A” (Adjust) knob in the “VB” (Vibrato) section to
the center position.
2. While playing a long tone on the EWI4000s, bite the
MOUTHPIECE lightly. The sensor is properly adjusted
if you get the vibrato effect while biting the
MOUTHPIECE.
3. If you feel the vibrato is not set for your particular
playing style, turn the “A” (Adjust) knob clockwise and
try it again.
Note: The vibrato effect is obtained by biting the Mouthpiece many times rather than a single steady bite.
Adjusting the Glide Sensor
This section explains how to adjust the glide sensor.
1. Set the “T” (Time) knob in the “GL” (Glide) section to
the center position. If you turn the “A” (Adjust) knob
clockwise, the Glide indicator should light up. If you
turn the “A” (Adjust) knob counterclockwise, the
indicator should go off.
2. When the Glide indicator’s LED is lit, turn the “A”
(Adjust) knob slightly counterclockwise until the
indicator LED goes off.
3. Play the EWI4000s and move your thumb across the
Glide plate (while touching the OCTAVE SHIFT
ROLLERS). You should hear the glide (or portamento)
effect when you change from one note to another.
4. To confirm the proper glide sensor setting, change the
octave with the OCTAVE SHIFT ROLLERS while
playing. The pitch of the sound should slide slowly, not quickly. If you wish to make the slide time
longer, turn the “T” (Time) knob clockwise. To shorten the slide time, turn it counterclockwise. You can
set the “Time” or “Rate” of the glide’s pitch shift. (See SETTING THE GLIDE EFFECT TIME & RATE
for more information.)
Note: After adjusting the “T” (Time) knob, you will need to adjust the “A” (Adjust) knob again.

16
Adjusting the Touch Sensors
The EWI4000s uses Touch Sensor keys, not mechanical
switches. Typically, there is no need to adjust the Touch
Sensor sensitivity because it is adjusted at the factory. If
there are significant changes in temperature or humidity (or
static electricity), though, the sensors may not respond
correctly (e.g. the PROGRAM / DATA DISPLAY may show
other numbers while in Play Mode instead of showing the
correct Program number). In these cases, you may need to
adjust the touch sensor sensitivity.
1. While in Play Mode, touch the NOTE KEYS K1, K2,
and K3 (see the FINGERING CHART for details), the
GROUNDING PLATE, and the OCTAVE SHIFT
ROLLERS. Do not touch the PROGRAM KEY.
2. If there are numbers shown on the PROGRAM /
DATA DISPLAY, turn the TOUCH SENSOR
SENSITIVITY ADJUSTMENT KNOB clockwise until
the numbers disappear. If there are no numbers on
the PROGRAM / DATA DISPLAY, turn the knob
counterclockwise until numbers are shown, then turn it
clockwise until the they disappear, and then turn it
slightly clockwise again. Be sure that no number is
shown on the PROGRAM / DATA DISPLAY if you
touch several NOTE KEYS simultaneously.
A Note About Adjusting Your Sensors
Though adjusting the sensors is seemingly complicated,
proper key sensitivity is essential to the EWI4000s’s
functionality. Plus, you can play with much more expression
and precision if you adjust the sensors to match your style.
Once you adjust the sensors to your liking, you won’t need to
adjust them every time you play unless its sensitivity is
changed by circumstances such as temperature. In this
case, simply adjust the sensors again.
If you are just beginning with the EWI4000s, you may want
to set the breath sensor lightly (by turning the “S” (Sense)
knob in the clockwise direction) for easier blowing. With
practice, you can set this control at a “heavier” setting for a
more expressive performance. The EWI4000s is a musical
instrument much like other acoustic instruments, so the more
you practice, the better you will play. At first, you may find
playing the EWI4000s challenging, but we believe you will
find it to be a fantastic instrument with unlimited possibilities.
There are no hard and fast rules for playing it, and we encourage you to find your own playing style.

17
FINGERING MODES
The EWI4000s offers several different fingering modes to accommodate different styles of playing. The
following steps explain how to set or change the fingering mode of the EWI4000s to suit your needs.
1. Press and hold the SETUP BUTTON.
2. Press the HOLD BUTTON or OCTAVE BUTTON to scroll through the options until “Fn”
(Fingering) is shown in the PROGRAM DATA / DISPLAY.
3. Release the SETUP BUTTON. The PROGRAM / DATA DISPLAY will display the current mode. Use
the HOLD BUTTON or OCTAVE BUTTON to select any of the following options:
a. “EI” (standard EWI fingering): This is the standard fingering system for the EWI4000s. This is
based on the fingering of conventional woodwind instruments.
b. “SA” (Saxophone fingering): This fingering closely represents the fingerings of a standard
saxophone. (In this mode, the EWI will ignore fingers that are two notes below the highest note.)
c. “FL” (Flute fingering): This fingering closely represents the fingerings of a standard C flute.
There are, however, a couple new fingerings that flutists will have to familiarize themselves with
to properly adapt their performance to the EWI4000s.
d. “Ob” (Oboe fingering): This fingering closely represents the fingerings of a standard oboe.
e. “Ev” (EVI fingering): “EVI” stands for “electric valve instrument.” This fingering may be useful to
players who wish to use fingerings closer to those of a brass instrument.
f. “Er” (EVI fingering with reversed OCTAVE SHIFT ROLLERS): This fingering most closely
duplicates the movement of the left wrist on an actual EVI. We recommend this mode for
experienced EVI players.
4. Press the SETUP BUTTON. The EWI4000s will return to Play Mode.
Please refer to the FINGERING CHARTS section to see the differences between the various fingering
modes.

18
CHAPTER 3: INTERNAL SOUND
PROGRAM KEY FUNCTIONS
Selecting the Internal Sounds (Program Key)
The EWI4000s has 100 internal preset sounds called Programs. You
can switch between Programs by selecting Program numbers.
1. Without touching any NOTE KEYS, press and hold the
PROGRAM KEY. The current Program number is displayed on
the PROGRAM / DATA DISPLAY as you are touching the
PROGRAM KEY. (If you release the PROGRAM KEY, the
PROGRAM / DATA DISPLAY will return to its previous state.)
Note: If you touch any NOTE KEYS, the PROGRAM / DATA
DISPLAY will show the Program number assigned to that
specific NOTE KEY, not the currently selected Program number.
2. While holding in the PROGRAM KEY, you can select a new
Program number by pressing the HOLD BUTTON, which works
as “+” (increase) button, or the OCTAVE BUTTON, which works
as “–” (decrease) button.
3. The sound will change to match the currently displayed Program
number after you release the PROGRAM KEY.
Assigning a Program Number to a Note Key
You can change the Program number directly by touching the NOTE KEYS after assigning a Program
number to the NOTE KEYS. Instead of increasing/decreasing the Program numbers with the HOLD
BUTTON or OCTAVE BUTTON, this feature allows you to access other Programs quickly during live
performances.
1. Select the Program number you wish to assign to the NOTE KEY as described in “Selecting the
Internal Sounds (Program)” section above.
2. While holding in the PROGRAM KEY, press the SETUP BUTTON. The selected Program number will
blink on the PROGRAM / DATA DISPLAY.
3. Touch the NOTE KEY you wish to assign to the selected program.
4. Blow into the MOUTHPIECE. The selected Program will be assigned to the NOTE KEY you are
touching.
This feature can be used a few different ways, which are explained in the SETTING PROGRAM CHANGE
PREFERENCES section below.
Other manuals for Ewi4000s
3
This manual suits for next models
1
Table of contents
Other Akai Musical Instrument manuals
Popular Musical Instrument manuals by other brands

Max Music
Max Music KB12P instruction manual

Schoenhut
Schoenhut 6101 Assembly instructions

National
National SX-4500R operating instructions

BYO Guitar
BYO Guitar Explorer Guitar Kit Assembly instructions

Allen Organ Company LLC
Allen Organ Company LLC ADC 1100 series user manual

Stein Mayer
Stein Mayer DP-220 user manual