Akai 46WF-AK User manual

AFTER SALES SUPPORT
(AU) 1300 886 649 (NZ) 0800 836 761
46 Bottle Wine Fridge
INSTRUCTION MANUAL
MODEL: 46WF-AK
E209

After Sales Support
(AU) 1300 886 649 (NZ) 0800 836 761 | info@tempo.org
2
Contents
Page
03 General Safety Instructions
07 Installation
08 Product Overview
10 Getting Started
11 Instructions
15 Cleaning and Maintenance
16 Door Reversal
18 FAQs and Troubleshooting Guide
19 Other Useful Information

After Sales Support
(AU) 1300 886 649 (NZ) 0800 836 761 | info@tempo.org
3
General Safety Instructions
Pay particular attention to messages that follow this safety alert symbol
or the words DANGER, WARNING or CAUTION. These words are
used to alert you to a potential hazard that can seriously injure you and
others. The instructions will tell you how to reduce the chance of injury
and let you know what can happen if the instructions are not followed.
Refrigerant matters
WARNING: Do not damage the refrigerant circuit! Never use an appliance with a
damaged refrigerant circuit! If the refrigerant circuit becomes damaged, avoid proximity
to open fires and all types of heat and ignition sources. Thoroughly ventilate the room in
which the appliance is located.
The room for installing the appliance must be at least 1m³ per 8g of refrigerant. The
amount and type of refrigerant in the appliance can be found in the technical specifications
on page 19 and on the appliance rating plate.
It is hazardous for anyone other than an authorised service person to service this appliance.
In Queensland, the authorised service person MUST hold a Gas Work Authorisation for hy-
drocarbon refrigerants to carry out servicing or repairs which involve the removal of covers.
READ CAREFULLY AND KEEP FOR FUTURE REFERENCE
Read this manual thoroughly before first use, even if you are familiar with this type of
product. The safety precautions enclosed herein reduce the risk of fire, electric shock and
injury when correctly adhered to. Keep the manual in a safe place for future reference,
along with the completed warranty card, purchase receipt and carton. If applicable, pass
these instructions on to the next owner of the appliance.
This symbol alerts you to take care as the appliance contains flammable
materials: isobutane as refrigerant and cyclopentane as insulation
blowing gas. While isobutane (R600a) is a gas with a high level of
environmental compatibility, it is nevertheless flammable. Do not expose
the appliance to high heat, sparks and open flames. During transport
and installation, ensure that none of the components of the refrigerant
circuit become damaged.
Responsible disposal
At the end of its working life, do not throw this appliance out with your household rubbish.
Electrical and electronic products contain substances that can have a detrimental effect on
the environment and human health if disposed of inappropriately. Observe any local regula-
tions regarding the disposal of electrical consumer goods and dispose of it appropriately
for recycling and recovery of the refrigerant and blowing agent. Contact your municipal
authorities for advice on recycling facilities in your area.
WARNING! This refrigeration appliance contains flammable refrigerants and insulation
blowing gases, which must be removed before disposal. Contact your municipal
authorities for any codes or regulations concerning the disposal of such materials.
DANGER! Risk of child entrapment: When discarding this or another refrigerator, make
sure to take off the door and leave the shelves in place so that children cannot easily climb
in and get trapped inside.

After Sales Support
(AU) 1300 886 649 (NZ) 0800 836 761 | info@tempo.org
4
General Safety Instructions (Cont.)
To reduce the risk of fire, electric shock or injury, always follow basic safety precautions
and accident prevention measures when using this appliance, including the following:
Electrical safety
• Voltage: Before connecting and turning on the fridge, ensure the electrical voltage
and circuit frequency correspond to those indicated on the appliance rating label.
• Power connection: This wine fridge must be connected to an exclusive, properly
grounded 220-240 V~ 50Hz electrical outlet. Do not overload the electrical circuit.
• Plug: The power cord of this wine fridge is equipped with a three-prong plug
for use in standard wall outlets to minimise the possibility of electric shock. Do
not modify the cord and plug provided with the appliance. Improper use of the
grounded plug can result in the risk of electric shock.
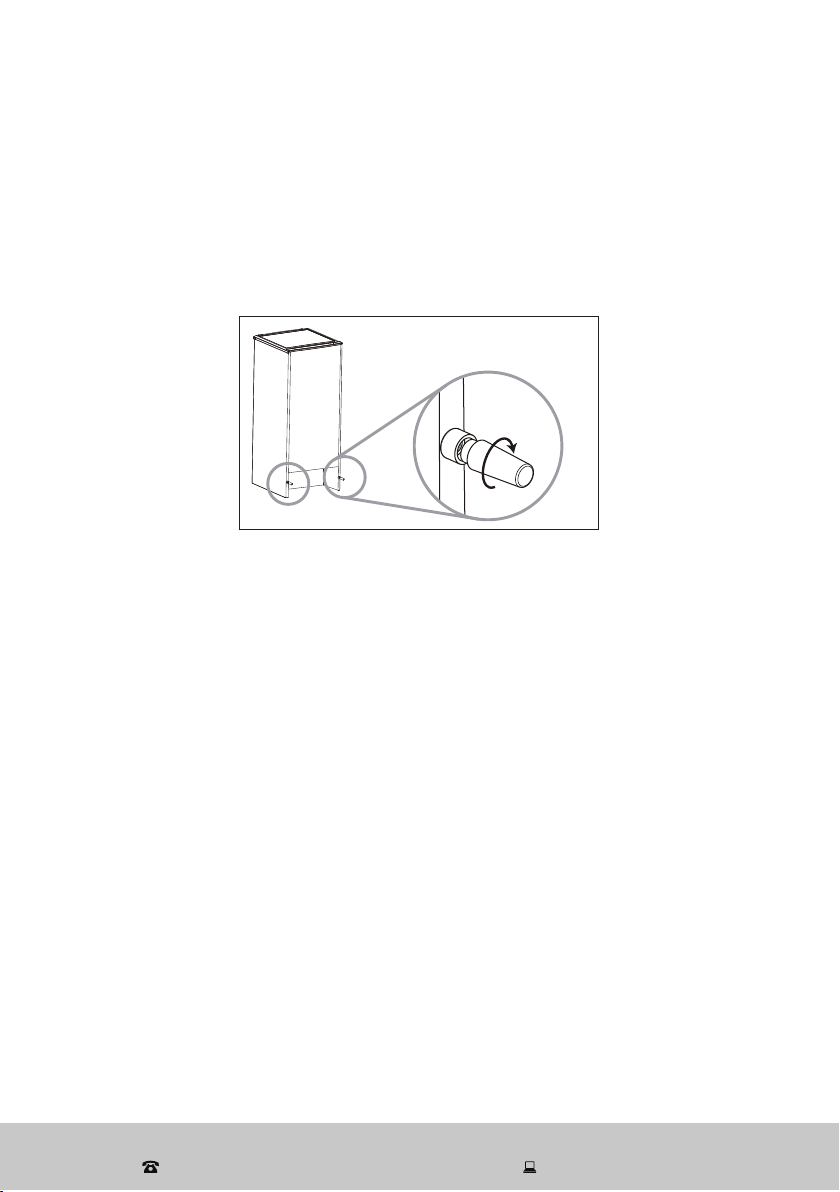
• Power cord: Do not kink or damage the power cord; do not leave it exposed or
dangling. Secure it at the back of the appliance so no one steps on or places
anything on the cord or against it. Keep the cord out of reach of children. When
moving the appliance, make sure not to damage the power cord.
• No inverter, adaptor or extension cord: Do not use an inverter, adaptor or extension
cord. If the cord is too short, have a qualified electrician install an outlet near the
appliance. Use of an extension cord can negatively affect the performance of the unit.
• Damaged cord: Do not use a cord that shows cracks or abrasion damage along
its length or at either end. Any damage to the cord may cause a short circuit, fire
and/or electric shock. If the power cord is damaged, it must be replaced by the
manufacturer or its service agent. Contact the after sales support line for advice.
• Protect from moisture: To protect against the risk of electric shock, do not
immerse the unit, cord or plug in water or spray any other liquids on the appliance
and parts. Do not connect or disconnect the electric plug when your hands are wet.
• WARNING! Never unplug the unit by pulling the cord. Always grip the plug firmly
and pull straight out from the power point.
• Electrical work: If the installation of this appliance requires any electrical work,
make sure it is carried out by a qualified electrician.
Usage conditions and restrictions
• Domestic use only: This appliance is intended for indoor household use only. It is
not intended for commercial, industrial or trade use. Do not use it outdoors. Do not
use it in a recreational vehicle.
• Intended purpose: Do not use this appliance for anything other than its intended
purpose, and only use it as described in this manual. Do not attempt to alter or
modify this appliance in any way.
• Usage restrictions: This appliance is not intended for use by persons (including
children) with reduced physical, sensory or mental capabilities, or lack of
experience and knowledge, unless they have been given supervision or instruction
concerning the use of the appliance by a person responsible for their safety.

After Sales Support
(AU) 1300 886 649 (NZ) 0800 836 761 | info@tempo.org
5
WARNING: This is a wine fridge, this is NOT to be used to preserve or store
fresh food or consumables.
A wine fridge is designed for the storage of bottles at a certain temperature that
is particularly suitable for wine. The temperature maintained in this wine fridge is
too high for safe storage of perishable foods.
• Children: Supervise children to ensure they do not play with the appliance. Close
supervision is necessary when any appliance is used by or near children. Never
allow children to operate, play with or crawl inside the appliance.
• Attachments: The use of attachments not recommended by the appliance
manufacturer/distributor may be hazardous.
• WARNING! Do not use any electrical appliances inside refrigeration appliances,
unless they are approved for this purpose by the manufacturer.
General Safety Instructions (Cont.)
Cleaning and maintenance
• Disconnect: Unplug the appliance before cleaning or servicing. Failure to do so
can result in electric shock, injury or death. Do not connect or disconnect the plug
when your hands are wet.
• Flames: Do not let open flames or ignition sources enter the appliance.
• Flammable/explosive substances: Never clean this appliance with flammable fluids.
Do not store or use volatile, flammable or explosive substances such as aerosol cans
with a flammable propellants in or close to this or any other appliance. The fumes can
create a fire hazard or explosion.
• Solvents: Do not use solvent based cleaning agents or abrasives on the interior as
these may damage or discolour the surfaces of the appliances.
• WARNING! Do not use mechanical devices or other means to accelerate the defrost-
ing process, other than those recommended by the manufacturer.
• Service/repair: Do not attempt to repair, modify or replace any part of the
appliance unless specifically recommended in this manual. Refer all other servicing
to a qualified technician, or contact the after sales support centre for advice.
• Liability: Damage due to improper use, or repairs made by unqualified personnel
will void your warranty. We assume no liability for any eventual damages caused by
misuse of the product or noncompliance with these instructions.

After Sales Support
(AU) 1300 886 649 (NZ) 0800 836 761 | info@tempo.org
6
General Safety Instructions (Cont.)
Important installation precautions
• Heavy: This appliance is heavy, take care when moving it. To avoid back or other
injury, consider a two person lift or mechanical aid when installing it. Failure to do so
can result in back or other injury.
• Freestanding design: This appliance is designed to be freestanding only and
should not be recessed or built in.
• WARNING: Ensure proper ventilation! To ensure proper ventilation, keep any
ventilation openings, in the appliance enclosure or in the built-in structure, clear of
obstructions. Ensure that the ventilation openings are never blocked or covered.
Never cover shelves with aluminum foil or any other material, which may prevent air
circulation.
• Clearances: To allow for adequate air circulation around the appliance and prevent
overheating, leave around 12–13cm of space between the back and sides of the
wine fridge and make sure that the front of the unit is completely unobstructed.
• Where to install the appliance: Install the appliance in an area that meets the
following requirements:
5Ambient temperature: Choose a well ventilated area for the wine fridge with
temperatures ideally between 22°C and 25°C. In ambient temperatures above or
below this range, the unit’s interior temperature may fluctuate.
5Floor surface: The floor must be dry, sturdy, level and strong enough to support
the unit when it is fully loaded.
4For best energy efficiency install the wine fridge in the coolest area of the room.
• Where NOT to install the appliance: Do NOT install the wine fridge in the following
locations/situations:
4In a garage or any other outdoor installation. The appliance must be installed in
an indoor area protected from wind, rain, water spray or drips.
4In an area with excessive moisture and high humidity. Excessive moisture in the
air will cause fast build-up of frost on the evaporator.
4In a recreational vehicle, or for use with an inverter.
4In direct sunlight, near heat sources, next to an open flame, cooking or heating
appliance (stove, heater, radiator, etc.), or near any other source of high heat
Direct sunlight may affect the acrylic coating and heat sources may increase the
unit’s power consumption.
4In an area with extremely cold ambient temperatures.
4In an area where petrol or other explosive and/or flammable liquids or fumes are
used or stored. The fumes can create a fire hazard or explosion.

After Sales Support
(AU) 1300 886 649 (NZ) 0800 836 761 | info@tempo.org
7
Installation
Installation steps
• Keep it upright: Do not tilt the fridge more than 45º from upright when moving it.
• Handle with care: Do not apply force to any part such as the condenser or door.
• Spacers: If installing the wine fridge against a wall, we suggest you attach the two
spacers (supplied in the instruction manual bag) to the back of the appliance in
order to prevent it from touching the wall (see the illustration, below).
• Levelling: It is important for the wine fridge to be level in order to work properly. To
level the unit, adjust the levelling legs at the front of the wine fridge.
• Settling: Before connecting the wine fridge to the power source, let it stand
upright for approximately 2 hours. This will allow any refrigerant gasses that may
have been disturbed during the transportation process to settle and reduce the
possibility of a malfunction in the cooling system from handling during transport.
• Electrical connection: When all installation steps are completed, plug the
wine fridge into a dedicated, properly installed wall outlet. Do not under any
circumstances cut or remove the third (earth) prong from the power cord. Any
questions concerning power and/or earthing should be directed toward a licensed
electrician or our after sales support centre.
CKW-293-A

After Sales Support
(AU) 1300 886 649 (NZ) 0800 836 761 | info@tempo.org
8
Product Overview
3
5
2
1
6
4
Scope of delivery
A Parts list
1 Operation and display panel (in the inner cabinet)
2 Tempered glass door
3 Front levelling legs (2x)
4 Bottom wine rack/basket C
5 Wine bottle shelf B (1x)
6 Wine bottle shelves A (5x)
B Documentation (not shown)
Instruction manual, Warranty certificate
(and 2 spacers for optional use)
NOTE: Due to continued product improvement, images and illustrations in this
manual may vary slightly from the product purchased. All images in this manual are for
reference purposes only. Parts are not necessarily pictured to scale.

After Sales Support
(AU) 1300 886 649 (NZ) 0800 836 761 | info@tempo.org
9
Control panel
The control panel is located at the top of the inner cabinet. Open the door to access it.
Product Overview (Cont.)
LIGHT
ON/OFF
Press this
button to
turn on
the interior
light; press
it again to
turn off the
light.
TEMPERATURE
Press the UP (or
DOWN) button
repeatedly to
raise (warm) or
lower (cool) the
set temperature in
one degree steps.
WINE
Depending
on the
temperature
selected,
these
indicators
illuminate.
LED
DISPLAY
Displays
the current
temperature
inside the
cabinet
(above zero).
°F / °C
Press the °F/°C
button to change
the temperature
display from
degrees
Fahrenheit (ºF)
to Celsius (ºC).
The respective
indicator
illuminates.

After Sales Support
(AU) 1300 886 649 (NZ) 0800 836 761 | info@tempo.org
10
First use
• First cooling down: When you first switch on the appliance, the compressor will
run continuously until the wine fridge reaches a cool enough temperature. During
this period of time, try not to open the door frequently or place bottles inside the
appliance. After about 3–4 hours, you can start loading the wine fridge.
• Odour: You may notice an odour when you first switch on the appliance. This is due
to the parts being new and is no cause for concern. The odour will subside as the
appliance starts to cool.
IMPORTANT!
• When you use the wine fridge for the first time, or restart the appliance after it has
been turned off for a long time, there could be a few degrees variance between
the temperature you select and the one indicated on the LED display. This is
normal and it is due to the length of activation time. Once the wine fridge has
been running for a few hours, everything will be back to normal.
• When loading several bottles of wine at once, it will take longer for the appliance
to cool the individual bottles than when adding a bottle at a time.
• If the unit is switched off or unplugged, you must allow at least 5 minutes before
restarting the appliance or reconnecting it to your mains supply.
Getting Started
Unpacking
• Packaging materials: This product has been packaged to protect it against
transportation damage. Remove all packaging materials from around and inside the
appliance, including the protective foam on the door panels.
Keep the original packaging box and materials in a safe place. It will help prevent
any damage if the product needs to be transported in the future, and you can use
it to store the appliance when it is not in use. In the event that the box is to be
disposed of, please recycle all packaging materials where possible.
Plastic wrapping can be a suffocation hazard for babies and young children, so
ensure all packaging materials are out of their reach and disposed of safely.
• Parts: Check to ensure you have all the parts listed/pictured on page 8.
• Power cord: Unwind the power cord to its full length and inspect it for damage.
Do not use the appliance if the appliance or its cord have been damaged or are
not working properly. In case of damage, contact our after sales support centre for
advice on examination, repair or return of the damaged product.
• Read the manual: Read this manual to familiarise yourself with the appliance. Pay
particular attention to the safety instructions on the previous pages.
• Clean: To remove any dust from transit and storage, clean the interior surfaces of
the wine fridge with lukewarm water and a soft cloth, following the instructions in
the "Cleaning and Maintenance" section. Dry thoroughly.
• Door opening: Your wine fridge has the capability of the door opening from the right
or left side. If your set-up requires reversal of the door swing, follow the instructions
in the "Door Reversal" section. Your new wine fridge is now ready for installation.

After Sales Support
(AU) 1300 886 649 (NZ) 0800 836 761 | info@tempo.org
11
Instructions
Temperature control
This wine fridge enables you to store your wine in a stable temperature environment
and free from light exposure and vibrations. These are most important factors when
it comes to storing wine. A stable, temperature-appropriate environment will help
maintain the quality of your wine and prevent spoilage.
• Selecting the right temperature: You can store your wine at the most appropriate
serving temperature (see the table below). Set the temperature according to the type
of wine that is mostly stored in the wine fridge.
Type of wine Recommended storage
temperature
Red wine 15.5º – 18.5ºC
White wine 10º – 15ºC
Rosé wine 9.5º – 10.5ºC
Sparkling wine 7.2º – 9.5ºC
• Adjusting the temperature: You can adjust the temperature in the cabinet to
anywhere within the cooling range (7ºC – 18ºC).
To set the temperature, press the UP or DOWN button repeatedly. With
every press, the temperature will increase (or decrease) by one degree. The set
temperature is shown on the LED display.
Depending on the temperature selected, the “RED”, “WHITE” or “SPARKLING” wine
indicators illuminate: red for red wine, green for white wine, or amber for sparkling
wine.
• Temperature display: The temperature inside the cabinet can be displayed in
either degrees Fahrenheit (°F) or degrees Celsius (°C). To change the display, press
the °F/°C button. The respective indicator illuminates: red for °F, or yellow for °C.
Temperature variations
• The actual and set temperatures inside the cabinet may fluctuate slightly,
depending on the storage location (lower, middle or upper section), and the
frequency and duration of the interior light being on.
• There is a 4ºC to 6ºC temperature variance between the top and bottom shelves
inside the wine fridge. So, if you are storing mainly red wine at 16ºC, and want
to add a few bottles of white wine, we recommend placing the white wine on the
bottom shelves and the red wine in the upper section.

After Sales Support
(AU) 1300 886 649 (NZ) 0800 836 761 | info@tempo.org
12
Instructions (Cont.)
Shelf configuration
• The shelves may be configured to suit various wine bottle shapes and sizes. If storing
larger bottles, make sure that they do not prevent the door from closing properly.
Before shutting the door, always check that you can close it without bottles falling
down inside the cabinet.
• Place the shelves on the shelf support rails with the curved
and straight shelf wires at the front, as shown on the right
(only the shelf coating is different in the picture, which does
not affect storage capacity).
• For standard size bottles, use every third shelf support rail for
the second to fifth shelf, as shown.
Wine fridge capacity
Your wine fridge holds a maximum of 46 standard (750mL traditional Bordeaux-style)
wine bottles. Storing wine in larger or differently shaped bottles may affect its storage
capacity. Do not overload the cabinet, and only store wine in sealed bottles.
The loading diagram below (side and front view) shows how to fit the maximum number
of wine bottles on the shelves; the photos on the next page give you a close-up view of
the stacked shelves.
Every
3rd rail
This side
to front

After Sales Support
(AU) 1300 886 649 (NZ) 0800 836 761 | info@tempo.org
13
Loading the wine fridge
Top shelf: 6 bottles
At the back: 4 bottles with necks towards the front.
At the front: 2 bottles with necks towards the back.
2nd to 5th shelf: 7 bottles per shelf
At the back: 4 bottles with necks towards the front.
At the front: 3 bottles with necks towards the back.
6th shelf: 5 bottles
At the front: 5 bottles with necks towards the back.
7th shelf (bottom rack/basket): 7 bottles
Three bottles at the bottom, 2 in the middle, 2 at the top, all facing the same
direction, stacked as illustrated in the side view diagram on the previous page.
Instructions (Cont.)

After Sales Support
(AU) 1300 886 649 (NZ) 0800 836 761 | info@tempo.org
14
Instructions (Cont.)
Using the wine fridge
• For efficient operation, do not open the door unnecessarily. Only keep it open for
as long as necessary when removing or adding a bottle.
• For easy access to the bottles stored, pull the shelves approximately one third out
of the cabinet. Make sure the door is fully open when pulling out shelves to prevent
damaging the door gasket.
• For your viewing convenience, the wine fridge has an interior light to help you
check the contents. To activate the light, press the LIGHT ON/OFF button on the
control panel, then press the button again to switch off the light.
• For best wine storage conditions, always leave the interior light off during normal
operation.
Going away?
• Leave the wine fridge operating during vacations of less than three weeks.
• If you are not going to use the appliance for longer periods, remove all items and
unplug the power cord. Clean and dry the interior thoroughly. To prevent odours and
mould growth, leave the door open slightly, blocking it open if necessary.
Moving the wine fridge
• To move the wine fridge, take all items out of the appliance, securely tape down
the shelves and tape the door shut. Turn the levelling legs up to the base to avoid
damage.
• Protect the outside of the wine fridge with a blanket or similar soft material.
• Make sure the wine fridge stays secure in the upright position during transportation.
Power failure
• Most power failures are corrected within a few hours and should not affect the
temperature of your appliance if you minimise the number of times the door is
opened.
• If the power is going to be off for a longer period of time, take proper steps to
protect the contents.

After Sales Support
(AU) 1300 886 649 (NZ) 0800 836 761 | info@tempo.org
15
Cleaning and Maintenance
WARNING!
Before cleaning the appliance, make sure it is disconnected from the power supply.
Failure to do so can result in electric shock or injury.
Cleaning the wine fridge
• Take out any bottles as well as the shelves before cleaning.
• To remove a shelf, grip the shelf, lift it slightly and then pull it straight out of the cabinet,
keeping it flat. To install the shelf at a different level, slide the shelf carefully into the
appropriate groove.
• Wash the inside surfaces with a solution of lukewarm water (1L) and baking soda
(2 tbsp). Use a soft, clean cloth to wipe down the surfaces, then rinse with clean
water and dry with a dry cloth. Do not use soap or detergent for cleaning the
cabinet.
NOTE: Wring excess water out of the cloth when cleaning around the controls or
electrical parts.
• Make sure to keep the door gasket (seal) clean to keep the unit running efficiently.
• Wash the shelves and the outside of the cabinet with a mild detergent solution.
Wipe dry with a clean soft cloth.
• It may also be necessary to periodically wipe the bottom part of the storage areas, as
the wine fridge is designed to retain humidity, and condensation may collect there.
WARNING!
Never clean the unit with an abrasive, acid, oil or solvent based cleaning agent.
Never use flammable fluids or sprays for cleaning as the fumes from these
substances can create a fire hazard or explosion.
Automatic defrosting
The evaporator behind the rear wall of the unit defrosts automatically. The condensate
collects in the drainage channel behind the rear wall of the unit and flows through the
drainage hole into the drip tray by the compressor, where it evaporates.
Manual defrosting or emptying of the drip tray is not necessary.

After Sales Support
(AU) 1300 886 649 (NZ) 0800 836 761 | info@tempo.org
16
Door Reversal
Reversing the door swing
The wine fridge has the capability of the door opening from either the left side or the
right side to suit your individual installation requirements. The unit is delivered to you
with the door opening from the left side (with the hinges on the right). If you want to
reverse the opening direction, follow the instructions below.
Door removal
Make sure the unit is disconnected from the power supply.
Tilt the unit backwards and secure it at an angle of 45 degrees.
Follow the illustration in Fig. 1, below, to remove the door. Keep all parts you remove
from the appliance for installation of the door on the other side.
• Remove the upper hinge cover
(6). Pull it straight up off the
hinge. If it is difficult to remove,
open the fridge door so you can
get a better grip.
• Remove the three screws (1) that
secure the upper hinge (5) (right
side) to the frame, then remove
the upper hinge (5).
• Lift the door, remove it from the
lower hinge and place
it on a padded surface to prevent
damage and scratches.
• Remove the three screws (8) that
hold the lower hinge and the front
leg (2), then remove the lower
hinge and the front leg (2).
• Remove the left front leg (4) and
transfer it to the right side.
WARNING!
• To avoid personal injury to yourself and/or damage to property, it is highly
recommended that someone assist you during the door reversal process.
• Make sure the wine fridge is disconnected from the power supply when changing
the side at which the door opens.
Fig. 1:
Door opening from the left side

After Sales Support
(AU) 1300 886 649 (NZ) 0800 836 761 | info@tempo.org
17
Door Reversal (Cont.)
Door installation
Follow the illustration in Fig. 2, below, to reinstall the door onto the other side, using
the parts you removed earlier.
• Remove the hole cover plate (7)
covering the upper hinge holes.
• Before replacing the lower
hinge (2), remove the bolt pin
(9) and reverse the direction of
the lower hinge (2).
• Install the lower hinge and the
front leg (2) onto the left side of
the lower frame with the three
screws (8).
• Insert the bolt pin (9) to the
lower hinge (2).
• Secure the door onto the lower
hinge.
• Holding the door in the closed
position, secure the upper
hinge (5) on the top left hand
side with the three screws (1).
NOTE: Do not fully tighten the
screws (1) until the top of the
door is level with the top of the
unit.
• Install the upper hinge cover (6)
on the upper hinge.
Fig. 2:
Door opening from the right side

After Sales Support
(AU) 1300 886 649 (NZ) 0800 836 761 | info@tempo.org
18
FAQs and Troubleshooting Guide
If you encounter any problems with your wine fridge, try the suggestions below to see
if you can solve the problem before contacting our after sales support centre. You can
solve many common problems easily, saving you the time of a possible service call.
Problem Possible cause
The wine fridge does
not operate.
• The appliance is not plugged in.
• The home circuit breaker or fuse has tripped.
The wine fridge is not
cold enough.
• Check the temperature control setting. Your external
environment may require a higher setting.
• The door is opened too often, or is kept open for too long.
• The wine fridge has recently been disconnected for a
period of time. Approximately 4 hours are required for the
wine fridge to cool down completely.
• The door is not closed completely.
The compressor turns
on and off frequently.
• The room temperature is hotter than normal.
• A large amount of contents has been added at a time.
• The door is opened too often.
• The door is not closed completely.
• The temperature control is not set correctly.
• The door gasket does not seal properly.
• The wine fridge does not have the correct clearances.
There are vibrations. • Check to ensure that the wine fridge is level.
• If the wine fridge is touching the wall, reposition it.
The door will not close
properly.
• The wine fridge is not level.
• The door was reversed and is not properly installed.
• The gasket is dirty.
• The shelves are out of position.
Moisture forms on the
inside fridge walls.
• The door is slightly open, causing cold air from inside the
wine fridge to meet warm, moist air from outside.
• The door is opened too frequently or kept open too long.
• The door does not seal properly.
Moisture forms on the
outside glass door.
• This may occur in summer or during high humidity, as a
natural result of condensation. Just wipe it dry.
The wine fridge seems
to make too much
noise.
• Some noises are normal, such as a rattling or gurgling
noise, which may come from the flow of the refrigerant.
Contraction and expansion of the inside walls may cause
popping or crackling noises.
• The wine fridge is not level.
The light does not
work.
• The appliance is not plugged in.
• The home circuit breaker or fuse has tripped.
• The bulb has burned out and needs to be replaced.

After Sales Support
(AU) 1300 886 649 (NZ) 0800 836 761 | info@tempo.org
19
Other Useful Information
Service, repair and spare parts
• Do not attempt to alter or modify this appliance in any way. Do not attempt to repair
or replace any part of the appliance unless it is specifically recommended in this
manual. All other servicing should be referred to a qualified technician. Contact our
after sales support centre for advice.
• If the light bulb needs to be replaced, please contact our after sales support centre
to arrange for a service. The bulb must be replaced by appropriately qualified
service personnel.
• Our after sales support centre stocks the following spare parts for the appliance:
Control PCB
Display PCB
Door gasket
Door hinge assembly (upper and lower)
Electrical box
Short adjustable foot
Temperature sensor
Wine shelf A (top to 5th shelf), B (6th shelf), C (bottom rack/basket)
To purchase a part, call the centre on (NZ) 0800 836 761 or email us at
Dimensions 50cm (W) x 59cm (D) x 84cm (H)
Maximum capacity 46 standard 750mL bottles (Bordeaux-style)
Volume 117L gross, 115L net
Weight 32kg
Refrigerant R600a, 24g
Temperature range 7ºC–18ºC
Rated voltage and frequency 220–240V~, 50Hz
Rated current 0.7A
Input power 110W
Compliance
This product has been fully tested and meets all requirements as set out by standards
AS/NZS 60335.1 and AS/NZS 60335.2.24.
Specifications and technical parameters

After Sales Support
(AU) 1300 886 649 (NZ) 0800 836 761 | info@tempo.org
For an electronic copy of this manual, please contact our after sales support centre.
Distributed by Tempo (Aust) Pty Ltd ABN 70 106 100 252
PO BOX 6056 Frenchs Forest, Australia NSW 2086
Customer Helpline:
(AU) 1300 886 649 (NZ) 0800 836 761
Email: [email protected]
V1.0 - July 2018
Warranty returns
Should you for any reason need to return this product for
a warranty claim, make sure to include all accessories with
the product.
Product does not work?
If you encounter problems with this product, or if it fails to
perform to your expectations, make sure to contact our
After Sales Support Centre on (AU) 1300 886 649 or
(NZ) 0800 836 761 for advice.
Table of contents
Popular Wine Cooler manuals by other brands

KitchenAid
KitchenAid KUWS24LSBS Use and care guide

Residentia
Residentia InAlto Classique IWC46 user manual

Avintage
Avintage AVU52TXA Use instruction

Vinotemp
Vinotemp WINE-MATE WM-1500HTD Use & care manual

New Air
New Air NWC056BKD0 owner's manual

WineEnthusiast
WineEnthusiast 259 Bottle Wine Cellar instruction manual