AKG FLEXX GUITARBUG GB 40 User manual

GB 40 FLEXX
guitarbug
BEDIENUNGSANLEITUNG . .S. 2
Bitte vor Inbetriebnahme des Gerätes lesen!
USER INSTRUCTIONS . . . . . . . .p. 10
Please read the manual before using the equipment!
MODE D’EMPLOI . . . . . . . . . . . . . . . .p. 18
Veuillez lire cette notice avant d’utiliser le système!
ISTRUZIONI PER L’USO . . . . .p. 26
Prima di utilizzare l’apparecchio, leggere il manuale!
MODO DE EMPLEO . . . . . . . . . . . .p. 34
¡Sirvase leer el manual antes de utilizar el equipo!
INSTRUÇÕES DE USO . . . . . . . .p. 42
Favor leia este manual antes de usar o equipamento!
GB 40 FLEXX_Hex_Manual_D030828 29.09.2008 13:21 Uhr Seite 1 (Schwarz/Black Auszug)

Seite
1 Sicherheit und Umwelt........................................................................3
1.1 Sicherheit..................................................................................3
1.2 Umwelt .....................................................................................3
2 Beschreibung ......................................................................................3
2.1 Einleitung ..................................................................................3
2.2 Lieferumfang .............................................................................3
2.3
Optionales Zubehör....................................................................3
2.4 Beschreibung ............................................................................3
2.5 Bedienelemente.........................................................................4
3 Inbetriebnahme...................................................................................5
3.1 Batterie einlegen/tauschen und testen ........................................5
3.2 Betrieb mit Akku ........................................................................6
4 Anwendung .........................................................................................7
4.1 Sender befestigen......................................................................7
Seite
4.2 Pegel einstellen .........................................................................7
4.3 Instrumente mit versenkter Ausgangsbuchse...............................7
4.4 Sender stabilisieren ...................................................................8
4.5 Fehlerbehebung.........................................................................8
5 Reinigung............................................................................................8
6 Technische Daten................................................................................9
Inhaltsverzeichnis
2
GB 40 FLEXX guitarbug
GB 40 FLEXX_Hex_Manual_D030828 29.09.2008 13:21 Uhr Seite 2 (Schwarz/Black Auszug)

1 Sicherheit und Umwelt
1.1 Sicherheit
1. Setzen Sie das Gerät nicht direkter Sonnen-
einstrahlung, starker Staub- und Feuchtigkeits-
einwirkung, Regen, Vibrationen oder Schlägen
aus.
1.2 Umwelt
1. Entsorgen Sie verbrauchte Batterien und Akkus
immer gemäß den jeweils geltenden
Entsorgungsvorschriften. Werfen Sie Batterien
oder Akkus weder ins Feuer (Explosionsgefahr)
noch in den Restmüll.
2. Wenn Sie das Gerät verschrotten, entfernen Sie
die Batterien bzw. Akkus, trennen Sie Gehäuse,
Elektronik und Kabel und entsorgen Sie alle
Komponenten gemäß den dafür geltenden Ent-
sorgungsvorschriften.
3. Die Verpackung ist recyclierbar. Entsorgen Sie
die Verpackung in einem dafür vorgesehenen
Sammelsystem.
2 Beschreibung
2.1 Einleitung
Vielen Dank, dass Sie sich für ein Produkt aus dem
Hause AKG entschieden haben. Bitte lesen Sie
die Bedienungsanleitung aufmerksam durch,
bevor Sie das Gerät benützen, und bewahren Sie
die Bedienungsanleitung sorgfältig auf, damit Sie
jederzeit nachschlagen können. Wir wünschen
Ihnen viel Spaß und Erfolg!
2.2 Lieferumfang
• Kontrollieren Sie bitte, ob die Verpackung alle
oben angeführten Teile enthält. Falls etwas fehlt,
wenden Sie sich bitte an Ihren AKG-Händler.
2.3 Optionales Zubehör
• Optionales Zubehör finden Sie im aktuellen
AKG-Katalog/Folder oder auf www.akg.com.
Ihr Händler berät Sie gerne.
2.4 Beschreibung
Der GB 40 FLEXX ist ein Miniatursender der Serie
WMS 40 microtools, der speziell für E-Gitarren und
E-Bässe entwickelt wurde, aber auch für
Keyboards geeignet ist.
Der Sender ist mit einem fix verbundenen, schwenk-
baren 6,3 mm-Klinkenstecker ausgestattet, mit
dem Sie den Sender direkt an die Ausgangsbuchse
Ihres Instruments anstecken können. Eine einge-
baute Feder zieht den Sender zum Instrument und
fixiert ihn dadurch sicher am Instrument. Die Un-
terseite des Senders ist mit einer Auflage aus wei-
chem Kunststoff ausgestattet, der am Instrument
keine Spuren hinterlässt.
3
GB 40 FLEXX guitarbug
L
!
1 Sender
GB 40 FLEXX
1 Adapter-
stecker, lang
1 Batterie
Größe AAA
2 Batterie-
deckel
1 Schrauben-
zieher
1 Klett-
verschluss
GB 40 FLEXX_Hex_Manual_D030828 29.09.2008 13:21 Uhr Seite 3 (Schwarz/Black Auszug)

4
GB 40 FLEXX guitarbug
Das mitgelieferte Klettband ermöglicht Ihnen, den
Sender zusätzlich zu stabilisieren.
Der GB 40 FLEXX arbeitet auf drei schaltbaren,
quarzstabilisierten Trägerfrequenzen innerhalb des
bei der Bestellung gewählten Trägerfrequenzban-
des (Bandbreite 3 MHz) im UHF-Trägerfrequenz-
bereich von 660 bis 865 MHz und ist mit einer fix
montierten flexiblen Antenne ausgestattet.
Sie können den Batteriefachdeckel gegen einen der
beiden mitgelieferten Ersatzdeckel austauschen.
2.5 Bedienelemente (siehe Abb. 1)
1 ON/MUTE/OFF: Dieser Schiebeschalter hat
drei Stellungen:
ON: Die Spannungsversorgung für den Sender
ist eingeschaltet.
M: Das vom Instrument kommende Audio-sig-
nal ist stummgeschaltet, Spannungsversor-
gung und HF-Trägerfrequenz bleiben jedoch
eingeschaltet. Dadurch wird der Empfänger
trotz abgeschaltetem Mikrofon nicht durch
andere Sender gestört.
OFF: Die Spannungsversorgung für den Sen-
der ist ausgeschaltet.
2 Batteriefach für 1 Stk. 1,5 V-Batterie Größe
AAA (mitgeliefert).
3 Kontroll-LED: Diese LED zeigt die Betriebs-
bereitschaft des Senders an.
LED leuchtet grün: Batterie in Ordnung.
LED leuchtet rot: Ab dem Zeitpunkt, wo die
LED auf rot wechselt, reicht die Batteriekapa-
zität noch für maximal 1 Betriebsstunde. Wir
empfehlen, die Batterie sobald wie möglich
gegen eine neue auszutauschen.
4 Eingangspegelregler: Stellt die Empfindlich-
keit des Audioeingangs ein.
5 Klinkenstecker: 6,3 mm-Mono-Klinkenstecker
zum direkten Anschluss des Senders an einen
Klinkenausgang.
6 Flexible Antenne
7 Frequenzwahlschalter: Mit diesem Schiebe-
schalter können Sie den Sender auf eine von
drei verschiedenen Trägerfrequenzen innerhalb
des Trägerfrequenzbandes des Senders ein-
stellen.
Abb. 1: Bedienelemente GB 40 FLEXX
GB 40 FLEXX_Hex_Manual_D030828 29.09.2008 13:21 Uhr Seite 4 (Schwarz/Black Auszug)

8 Trägerfrequenzetikette: An der Rückseite des
Senders ist eine Haftetikette mit der Bezeich-
nung des Trägerfrequenzbandes, dem entspre-
chenden Farbcode und den drei Trägerfre-
quenzen angebracht. Eine Farbcode-Tabelle
finden Sie im Beiblatt ("Manual Supplement")
zur Bedienungsanleitung.
3 Inbetriebnahme
3.1 Batterie einlegen/austauschen und testen
(siehe Abb. 2)
1. Drücken Sie den Schnapphaken am Batterie-
fachdeckel (1) nach unten.
2. Ziehen Sie den Batteriefachdeckel (1) nach un-
ten vom Sender ab.
Wichtig!
Der Schaumstoffpolster an der Innen-
seite des Batteriefachdeckels (1)
fixiert die Batterie in ihrer Position.
Entfernen Sie den Schaumstoff-
polster nicht, da die Batterie anson-
sten nicht richtig im Batteriefach
fixiert ist und Klappergeräusche ver-
ursachen kann.
3. Wenn sich eine leere oder defekte Batterie im
Batteriefach befindet, nehmen Sie diese her-
aus.
GB 40 FLEXX guitarbug
Abb. 2: Batterie einlegen
L
!
5
GB 40 FLEXX_Hex_Manual_D030828 29.09.2008 13:21 Uhr Seite 5 (Schwarz/Black Auszug)

4. Legen Sie die mitgelieferte bzw. neue Batterie
(2) wie in Abb. 2 gezeigt in das Bateriefach ein.
5. Stellen Sie den ON/MUTE/OFF-Schalter (3) auf
ON.
Wenn die Batterie in gutem Zustand ist, blitzt
die Kontroll-LED (4) kurz rot auf und beginnt
danach grün zu leuchten.
Wenn die Kontroll-LED (4) rot zu leuchten
beginnt, ist die Batterie in ca. 60 Minuten er-
schöpft. Tauschen Sie die Batterie möglichst
bald gegen eine frische aus.
Wenn die Kontroll-LED (4) nicht aufblitzt, ist die
Batterie erschöpft. Legen Sie eine neue Bat-
terie ein.
6. Schieben Sie den Batteriefachdeckel (1) gegen
die Pfeilrichtung auf den Sender, bis der Bat-
teriefachdeckel (1) einrastet.
3.2 Betrieb mit Akku
Sie können den Sender anstelle einer normalen
Batterie auch mit einem 1,2 V-Akku betreiben. Wir
empfehlen NiMH-Akkus des Typs SANYO HR-4U
(650 mAh) oder Panasonic Rechargeable PRO+
(550 mAh).
Hinweis: Wenn Sie einen Akku verwenden,
wechselt die LED 15 - 20 Minuten, bevor der
Akku erschöpft ist, auf rot!
GB 40 FLEXX guitarbug
6
GB 40 FLEXX_Hex_Manual_D030828 29.09.2008 13:21 Uhr Seite 6 (Schwarz/Black Auszug)

7
GB 40 FLEXX guitarbug
4 Anwendung
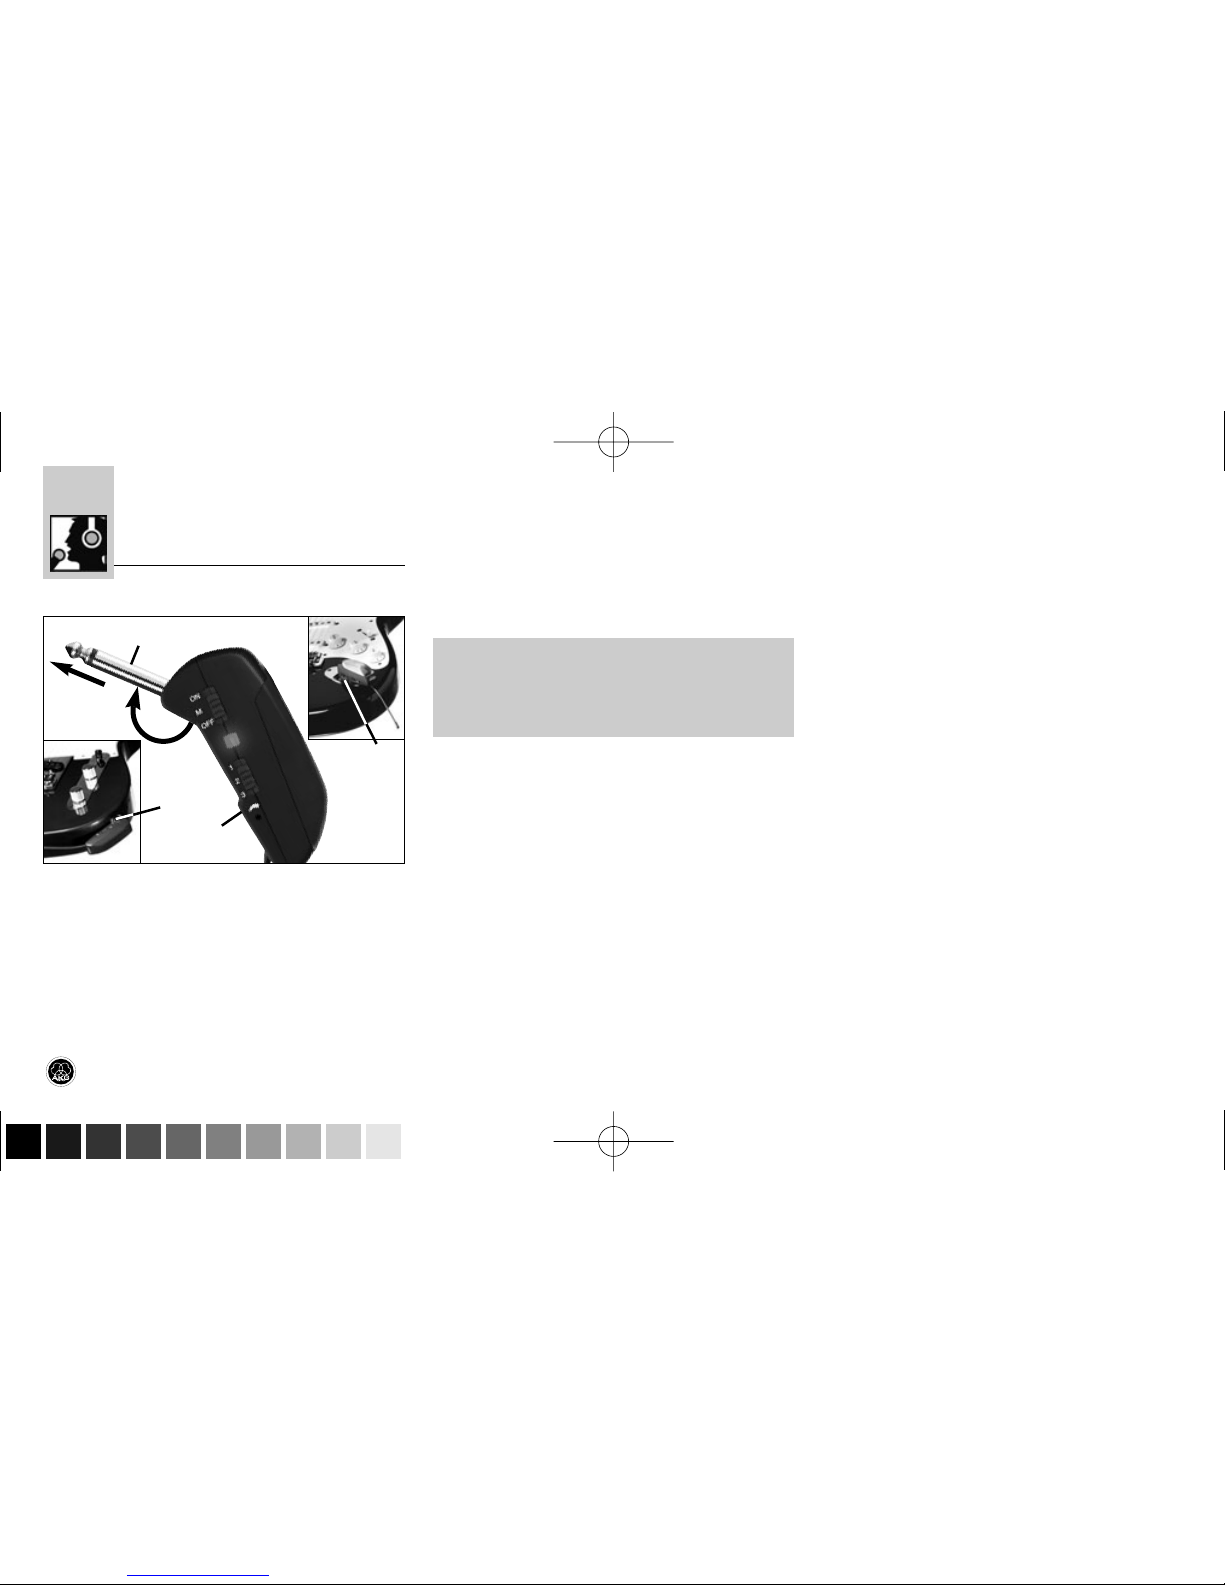
4.1 Sender befestigen (siehe Abb. 3)
1. Schwenken Sie den Klinkenstecker (1) bis zum
Anschlag vom Sender (2) weg.
2. Stecken Sie den Klinkenstecker (1) bis zum
Anschlag in die Klinken-Ausgangsbuchse (3)
Ihres Instruments hinein.
Die im Sender eingebaute Feder fixiert den
Sender sicher am Instrument. Die Auflage aus
weichen Kunststoff an der Unterseite des
Senders hinterlässt keine Spuren an der
Oberfläche des Instruments.
Wichtig!
Um Beschädigungen des Senders zu
vermeiden, legen oder stellen Sie das
Instrument niemals auf den Sender.
4.2 Pegel einstellen (siehe Abb. 1 und Bedie-
nungsanleitung des Empfängers SR 40 FLEXX)
1. Stellen Sie den Frequenzwahlschalter (7) am
Sender und den Frequenzwahlschalter am
Empfänger SR 40 FLEXX auf dieselbe Position
(1 - 1, 2 - 2 oder 3 - 3).
2. Drehen Sie den Eingangspegelregler (4) am
Sender mit dem mitgelieferten Schraubenzie-
her bis zur Mitte zwischen linkem und rechtem
Anschlag auf.
3. Schalten Sie den Sender ein, indem Sie den
ON/MUTE/OFF-Schalter (1) auf ON stellen.
4. Stellen Sie den SQUELCH-Regler am
Empfänger auf Minimum und schalten Sie
den Empfänger und die Audioanlage ein.
5. Drehen Sie den Volume-Regler Ihres Instru-
ments voll auf und spielen Sie einige Takte.
6. Sollte Ihr Instrument verzerrt klingen, drehen
Sie den Eingangspegelregler (4) am Sender so
weit gegen den Uhrzeigersinn zurück, bis Sie
keine Verzerrung mehr hören.
Sollte Ihr Instrument zu leise klingen, drehen
Sie den Eingangspegelregler (4) im Uhrzeiger-
sinn auf. Sobald Ihr Instrument zu verzerren
beginnen, drehen Sie den Eingangspegelregler
(4) wieder zurück, bis die Verzerrung ver-
schwindet.
4.3 Instrumente mit versenkter Ausgangs-
buchse (siehe Abb. 4 auf Seite 8)
Wenn Ihr Instrument eine versenkte Ausgangs-
buchse besitzt, ist der Klinkenstecker am Sender
möglicherweise zu kurz, um den elektrischen Kon-
takt zum Sender herzustellen.
L
!
Abb. 1: Sender am Instrument befestigen
GB 40 FLEXX_Hex_Manual_D030828 29.09.2008 13:21 Uhr Seite 7 (Schwarz/Black Auszug)

8
GB 40 FLEXX guitarbug
Montieren Sie in diesem Fall den mitgelieferten
längeren Adapterstecker:
1. Schrauben Sie den Klinkenstecker (1) vom
Sender (2) ab.
2. Schrauben Sie den Adapterstecker (3) auf den
Gewindestecker (4) am Sender (2) auf.
4.4 Sender stabilisieren (s. Abb. 5)
• Verwenden Sie zum Sabilisieren des Senders
den mitgelieferten Klettverschluss:
1. Ziehen Sie die Schutzfolie von der Rückseite
des einen Teils ab und kleben Sie ihn auf die
Rückseite des Senders.
2. Ziehen Sie die Schutzfolie von der Rückseite
des zweiten Teils ab und kleben Sie ihn auf das
Instrument.
4.5 Fehlerbehebung
Hinweise zur Fehlerbehebung finden Sie in der
Bedienungsanleitung des Empfängers SR 40 FLEXX.
5 Reinigung
• Reinigen Sie das Gehäuse des Senders mit
einem mit Wasser befeuchteten Tuch.
Abb. 4: Adapterstecker anbringen.
Abb. 5: Sender stabilisieren
GB 40 FLEXX_Hex_Manual_D030828 29.09.2008 13:21 Uhr Seite 8 (Schwarz/Black Auszug)

9
GB 40 FLEXX guitarbug
Trägerfrequenz 660 - 865 MHz
Modulation FM
Frequenzstabilität (-10°C bis +50°C): ±15 kHz
HF-Ausgangsleistung typ. 5 mW
Kompander integriert
Audioübertragungsbandbreite 40 - 20.000 Hz
Audio-Eingangsimpedanz 1 MOhm
Max. Audio-Eingangspegel 1100 mV/1 kHz
Klirrfaktor bei 1 kHz typ. 0,8%
Signal/Rauschabstand typ. 103 dB(A)
Spannungsversorgung 1 x 1,5 V-Batterie Größe AAA
Stromaufnahme typ. 75 mA
Betriebszeit >11 h (Batterie), >6 h (Akku)
Abmessungen (BxTxH) 76 x 20 x 28 mm
Nettogewicht (ohne Batterie) 28 g
Dieses Produkt entspricht den in der Konformitätserklärung angegebenen
Normen. Sie können die Konformitätserklärung auf http://www.akg.com oder
6 Technische Daten
GB 40 FLEXX_Hex_Manual_D030828 29.09.2008 13:21 Uhr Seite 9 (Schwarz/Black Auszug)

Page
FCC Statement .....................................................................................11
1 Safety and Environment....................................................................11
1.1 Safety .....................................................................................11
1.2 Environment ............................................................................11
2 Description........................................................................................12
2.1 Introduction .............................................................................12
2.2 Packing List.............................................................................12
2.3
Optional Accessories................................................................12
2.4 Descriptiuon ............................................................................12
2.5 Controls ..................................................................................12
3 Setting Up .........................................................................................13
3.1 Inserting/Replacing and Testing Batteries ..................................13
3.2 Using Rechargeable Batteries...................................................14
Page
4 Operating Notes ................................................................................15
4.1 Attaching the Transmitter .........................................................15
4.2 Setting Gain ............................................................................15
4.3 Instruments with Recessed Output Jacks ..................................15
4.4 Stabilizing the Transmitter ........................................................16
4.5 Troubleshooting .......................................................................16
5 Cleaning ............................................................................................16
6 Specifications....................................................................................17
Table of Contents
10
GB 40 FLEXX guitarbug
GB 40 FLEXX_Hex_Manual_D030828 29.09.2008 13:21 Uhr Seite 10 (Schwarz/Black Auszug)

1 Safety and Environment
1.1 Safety
1. Do not expose the equipment to direct sun-
light, excessive dust, moisture, rain, mechani-
cal vibrations, or shock.
1.2 Environment
1. Be sure to dispose of used batteries as
required by local waste disposal rules. Never
throw batteries into a fire (risk of explosion) or
garbage bin.
2. When scrapping the equipment, remove the
batteries, separate the case, circuit boards,
and cables, and dispose of all components in
accordance with local waste disposal rules.
3. The packaging of the equipment is recyclabe.
To dispose of the packaging, make sure to use
a collection/recycling system provided for that
purpose and observe local legislation relating
to waste disposal and recycling.
11
GB 40 FLEXX guitarbug
This equipment has been tested and found to
comply with the limits for a Class B digital device,
pursuant to Part 74 of the FCC Rules. These lim-
its are designed to provide reasonable protection
against harmful interference in a residential instal-
lation. This equipment generates, uses, and can
radiate radio frequency energy and, if not installed
and used in accordance with the instructions, may
cause harmful interference to radio communica-
tions. However, there is no guarantee that inter-
ference will not occur in a particular installation. If
this equipment does cause harmful interference to
radio or television reception, which can be deter-
mined by turning the equipment off and on, the
user is encouraged to try to correct the interfer-
ence by one or more of the following measures:
• Reorient or relocate the receiving antenna.
• Increase the separation between the equip-
ment and the receiver.
• Connect the equipment into an outlet on a cir-
cuit different from that to which the receiver is
connected.
• Consult the dealer or an experienced radio/TV
technician for help.
Shielded cables and I/O cords must be used for
this equipment to comply with the relevant FCC
regulations.
Changes or modifications not expressly approved
in writing by AKG Acoustics may void the user’s
authority to operate this equipment.
FCC Statement
L
!
GB 40 FLEXX_Hex_Manual_D030828 29.09.2008 13:21 Uhr Seite 11 (Schwarz/Black Auszug)

12
GB 40 FLEXX guitarbug
2 Description
2.1 Introduction
Thank you for purchasing an AKG product. Please
take a few minutes to read the instructions
below carefully before operating the equip-
ment. Please keep the Manual for future refer-
ence. Have fun and impress your audience!
2.2 Packing List
• Check that the package contains all the parts
listed above. If anything is missing, please con-
tact your AKG dealer.
2.3 Optional Accessories
• For optional accessories, refer to the current
AKG catalog or folder, or visit www.akg.com.
Your dealer will be glad to help.
2.4 Description
The GB 40 FLEXX is a WMS 40 microtools Series
miniature transmitter that has been specifically
designed for electric guitars and basses but is also
suited for keyboards.
The transmitter features a permanently attached,
swiveling 1/4" jack plug that allows you to plug the
transmitter directly into the output jack of your
instrument. A built-in spring presses the transmit-
ter against the instrument to hold it securely in
place. The bottom of the transmitter is fitted with a
soft plastic pad that will leave no trace on the
instrument.
The supplied Velcro pads allow you to attach the
transmitter even more firmly to the instrument.
Operating in the 660 MHz to 865 MHz UHF range, the
GB 40 FLEXX provides three selectable, quartz stabi-
lized carrier frequencies within the 3-MHz-wide fre-
quency band you specified at the time of ordering
and
uses a permanently attached flexible antenna.
You can replace the black battery cover with one
of the supplied replacement covers.
2.5 Controls (refer to fig. 1 on page 13)
1 ON/MUTE/OFF: This slide switch provides
three positions:
ON: Power to the transmitter is on.
M: The signal delivered by the microphone is
muted while power and the RF carrier frequen-
cy remain on. This prevents the receiver re-
sponding to interference from other transmit-
ters.
OFF: Power to the transmitter is off.
2 Battery compartment for one 1.5-V AAA size
battery (supplied).
1 GB 40 FLEXX
transmitter
1 long adapter
plug
1 AAA size
dry batery
2 battery com-
partment lids 1 screwdriver
1 pairf of
Velcro pads
GB 40 FLEXX_Hex_Manual_D030828 29.09.2008 13:21 Uhr Seite 12 (Schwarz/Black Auszug)

13
GB 40 FLEXX guitarbug
3 Status LED: Indicates the transmitter's operat-
ing status.
LED lit green: Battery is OK.
LED lit red: From the moment the LED changes
to red, the battery capacity will provide a max-
imum of one operating hour. We recommend
replacing the battery with a new one as soon
as possible.
4 Input Gain: This rotary pot sets the sensitivity
of the transmitter’s audio section.
5 Jack plug: 1/4" TS jack plug for plugging the
transmitter directly into an instrument output
jack.
6 Flexible antenna
7This slide switch tunes the transmitter to one of
three different carrier frequencies within the
transmitter's carrier frequency band.
8 Carrier frequency label: The label on the trans-
mitter rear panel indicates the name of the car-
rier frequency band and the three carrier fre-
quencies of your transmitter. Refer to the Manual
Supplement sheet for a color code table.
3 Setting Up
3.1 Inserting/Replacing and Testing Batteries
(refer to fig. 2 on page 14)
1. Depress the snap hook on the battery com-
partment lid (1).
2. Pull the battery compartment lid (1) down to
remove it from the transmitter.
Important!
The foam pad on the inside of the bat-
tery compartment lid (1) holds the
battery in place. Do not remove the
foam pad. If you do, the battery will
not be held in place properly and may
cause a rattling noise.
3. If there is a dead or defective battery inside the
battery compartment, remove the battery.
4. Insert the supplied or new battery (2) into the
battery compartment as shown in fig. 2.
5. Set the ON/MUTE/OFF switch (3) to ON.
Fig. 1: GB 40 FLEXX controls
L
!
GB 40 FLEXX_Hex_Manual_D030828 29.09.2008 13:21 Uhr Seite 13 (Schwarz/Black Auszug)

14
GB 40 FLEXX guitarbug
As long as the battery is in good condition, the
status LED (4) will flash red momentarily and
will then be lit green constantly.
If the status LED (4) lights red constantly the
battery will be dead within about 60 minutes.
Replace the battery with a new one as soon as
possible.
If the status LED (4) fails to flash momentarily
the battery is dead. Insert a new battery.
6. Slide the battery compartment lid (1) onto the
transmitter against the direction of the arrow to
the point that the lid (1) will click shut.
3.2 Using Rechargeable Batteries)
Instead of dry batteries, you can also use a 1.2-V
rechargeable battery to power the transmitter. We
recommend SANYO HR-4U (650 mAh) or Pana-
sonic Rechargeable PRO+ (550 mAh) NiMH re-
chargeable batteries.
Note: If you use a rechargeable battery, the LED
will switch to red 15 to 20 minutes before the
battery will be dead!
Fig. 2: Inserting a battery.
GB 40 FLEXX_Hex_Manual_D030828 29.09.2008 13:21 Uhr Seite 14 (Schwarz/Black Auszug)

15
GB 40 FLEXX guitarbug
4 Operating Notes
4.1 Attaching the Transmitter (refer to fig. 3)
1. Swivel the jack plug (1) away from the trans-
mitter (2) to the stop.
2. Insert the jack plug (1) all the way into the out-
put jack (3) on your instrument.
The spring inside the transmitter will hold the
transmitter securely in place on the instrument.
The soft plastic pad on the bottom of the trans-
mitter will leave no trace on the instrument sur-
face.
Important!
To avoid damaging the transmitter,
NEVER place the instrument on top of
the transmitter.
4.2 Setting Levels (refer to fig. 1
and SR 40 FLEXX receiver manual)
1. Set the frequency selector (7) on the transmit-
ter and the frequency selector on the SR 40 FLEXX
receiver to the same positions (1 - 1, 2 - 2, or
3 - 3).
2. Use the supplied screwdriver to turn the input
gain control (4) on the transmitter to a position
halfway between the left and right stops.
3. Set the ON/MUTE/OFF switch (1) to ON to
switch power to the transmitter on.
4. Set the SQUELCH control on the receiver to
minimum and switch power to your receiver
and sound system on.
5. Turn the volume control on your instrument all
the way CW and play a few bars.
6. If your instrument sounds distorted turn the
input gain control (4) down CCW to the point
that you will hear no more distortion.
If your instrument sounds too quiet, turn the
input gain control (4) up CW. As soon as your
instrument sound becomes distorted, turn the
input gain control (4) back down CCW to the
point that the distortion will stop.
4.3 Instruments with Recessed Output Jacks
(refer to fig. 4 on page 16)
If your instrument has a recessed output jack, the
jack plug on the transmitter may be too short to
make contact between the instrument and trans-
mitter.
In this case, mount the supplied long adapter plug:
1. Unscrew the jack plug (1) from the transmitter
(2) CCW.
L
!
Fig. 3: Fixing the transmitter on the instrument.
GB 40 FLEXX_Hex_Manual_D030828 29.09.2008 13:21 Uhr Seite 15 (Schwarz/Black Auszug)

16
GB 40 FLEXX guitarbug
2. Screw the adapter plug (3) onto the threaded
plug (4) on the transmitter (2) CW.
4.4 Stabilizing the Transmitter (refer to fig. 5)
• Use the supplied Velcro pads to make the
transmitter sit more securely on your instru-
ment:
1. Remove the backing from one of the pads and
attach it to the transmitter rear panel.
2. Remove the backing from the other pad and
attach it to the instrument.
4.5 Troubleshooting
• For troubleshooting hints, refer to the instruc-
tion manual of your SR 40 FLEXX receiver.
5 Cleaning
• To clean the transmitter case, use a soft cloth
moistened with water.
Fig. 4: Mounting the adapter plug. Fig. 5: Stabilizing the transmitter.
GB 40 FLEXX_Hex_Manual_D030828 29.09.2008 13:21 Uhr Seite 16 (Schwarz/Black Auszug)

17
GB 40 FLEXX guitarbug
Carrier frequency range 660 to 865 MHz
Modulation FM
Frequency stability (-10°C to +50°C) ±15 kHz
RF output typ. 5 mW
Compander integrated
Audio bandwidth 40 to 20,000 Hz
Audio input impedance 1 Mohm
Max. audio input level 1100 mV/1 kHz
T.H.D. at 1 kHz typ. 0.8%
Signal/noise ratio typ. 103 dB(A)
Power requirement single 1.5-V AAA size battery
Current consumption typ. 75 mA
Battery life >11/>6 hours (dry/rechargeable battery)
Size (WxDxH) 76 x 20 x 28 mm (3 x 0.8 x 1.1 in.)
Net weight 28 g (1 oz.)
This product conforms to the standards listed in the Declaration of
Conformity. To order a free copy of the Declaration of Conformity, visit
6 Specifications
GB 40 FLEXX_Hex_Manual_D030828 29.09.2008 13:21 Uhr Seite 17 (Schwarz/Black Auszug)

Sommaire
18
GB 40 FLEXX guitarbug
Page
1 Sécurité et écologie ..........................................................................19
1.1 Sécurité ..................................................................................19
1.2 Ecologie ..................................................................................19
2 Description........................................................................................19
2.1 Introduction .............................................................................19
2.2 Equipement fourni....................................................................19
2.3
Accessoires optionnels.............................................................19
2.4 Description..............................................................................19
2.5 Eléments de commande...........................................................20
3 Mise en service.................................................................................21
3.1 Mise en place/remplacement et essai de la pile ........................21
3.2 Fonctionnement sur accu .........................................................22
4 Mode opératoire................................................................................23
4.1 Fixation de l’émetteur ..............................................................23
Page
4.2 Réglage de niveau ...................................................................23
4.3 Instruments avec prise sortie noyée..........................................23
4.4 Stabilisation de l’émetteur........................................................24
4.5 Dépannage..............................................................................24
5 Nettoyage..........................................................................................24
6 Caractéristiques techniques .............................................................25
GB 40 FLEXX_Hex_Manual_D030828 29.09.2008 13:21 Uhr Seite 18 (Schwarz/Black Auszug)

19
GB 40 FLEXX guitarbug
1 Sécurité et écologie
1.1. Sécurité
1. Ne placez jamais l’appareil à un endroit où il
risque d’être exposé directement au soleil, à
une atmosphère poussiéreuse, à l’humidité, à
la pluie, aux vibrations ou aux secousses.
1.2. Ecologie
1. Conformez-vous aux règlements en vigueur
pour la mise au rebut des piles usées. Ne met-
tez jamais des piles ni au feu (risque d’explo-
sion) ni aux ordures ménagères.
2. Si vous mettez l'appareil à la ferraille, enlevez
les piles ou les accus, séparez le boîtier, l'élec-
tronique et les câbles et éliminez les différents
éléments conformément aux règlements en
vigueur.
3. L'emballage est recyclable. Déposez l'emballa-
ge dans un récipient de collecte prévu à cet
effet.
2 Description
2.1 Introduction
Nous vous remercions d’avoir choisi un produit
AKG. Veuillez lire très attentivement ce mode
d’emploi avant la mise en service de l’appareil.
Conservez soigneusement le mode d’emploi pour
pouvoir le consulter lorsque vous vous posez des
questions. Nous vous souhaitons beaucoup de
succès.
2.2. Equipement fourni
• Contrôlez si le carton contient bien tous les élé-
ments énumérés ci-dessus. Si ce n’est pas le
cas, veuillez contacter votre distributeur AKG.
2.3 Accessoires optionnels
• Vous trouverez la liste des accessoires option-
nels dans le catalogue/dépliant AKG actuel ou
sur www.akg.com. Votre fournisseur se tient à
votre disposition pour vous conseiller.
2.4 Description
Le GB 40 FLEXX est un émetteur miniature de la
gamme WMS 40 microtools ; spécialement conçu
pour la guitare électrique et la basse électrique, il
peut aussi être utilisé pour le clavier.
L’émetteur comporte une fiche jack de 6,35 mm
orientable, à montage fixe, grâce à laquelle vous
pouvez brancher l’émetteur directement sur la prise
sortie de votre instrument. La sécurité de la fixation
est assurée par un ressort incorporé qui tire l’émet-
teur vers l’instrument. La face inférieure de l’émet-
teur est revêtue d’une couche de matière plastique
souple ne laissant aucune trace sur l’instrument.
L
!
1 émetteur
GB 40 FLEXX
1 adaptateur
long
1 pile dimen-
sion AAA
2 couvercles 1 tournevis
2 disques auto-
agrippants
GB 40 FLEXX_Hex_Manual_D030828 29.09.2008 13:21 Uhr Seite 19 (Schwarz/Black Auszug)

20
GB 40 FLEXX guitarbug
Les disques autoagrippants fournis permettent une
fixation plus stable de l’émetteur sur l’instrument.
Dans la plage de fréquences choisie lors de la
commande (plage de 3 MHz), le GB 40 FLEXX dis-
pose de trois fréquences porteuses commutables,
stabilisées par cristal, dans la gamme UHF de 660
à 865 MHz ; il possède une antenne souple mon-
tée à demeure.
Vous pouvez remplacer le couvercle noir par un
des couvercles de rechange fournis.
2.5 Eléments de commande (voir Fig. 1)
1 ON/MUTE/OFF : Ce curseur peut occuper trois
positions :
ON : L’émetteur est sous tension.
M : Le signal audio venant du micro est sur
muet mais l’émetteur reste sous tension et sur
la porteuse HF. Ceci permet de couper le micro
sans que le récepteur ne soit perturbé par
d’autres émetteurs.
OFF : L’émetteur n’est pas sous tension.
2 Compartiment de la pile pour une pile de
1,5 V, dimension AAA (fournie).
3 LED témoin : Ce témoin indique le statut de
disponibilité de l’émetteur.
Le témoin LED s’allume en vert : la pile est
chargée.
Le témoin LED s’allume en rouge : au mo-
ment où le témoin passe au rouge, l’autonomie
de la pile n’est plus que de 1 heure. Il est
recommandé de la remplacer au plus vite par
une pile neuve.
4 Potentiomètre d’entrée : règle la sensibilité
de l’entrée audio.
5 Fiche Jack : Jack mono de 6,3 mm pour le
raccordement direct de l’émetteur sur une sor-
tie Jack.
6 Antenne souple
7 Sélecteur de fréquence : ce curseur permet
de sélectionner pour l'émetteur l’une des trois
fréquences porteuses disponibles dans la
gamme des fréquences porteuses de l'émet-
teur.
Fig. 1 : Eléments de commande sur le GB 40 FLEXX
GB 40 FLEXX_Hex_Manual_D030828 29.09.2008 13:21 Uhr Seite 20 (Schwarz/Black Auszug)
Other manuals for FLEXX GUITARBUG GB 40
2
This manual suits for next models
2
Table of contents
Languages:
Other AKG Transmitter manuals

AKG
AKG Microtools WMS40 User manual

AKG
AKG C 5900M/TM 40 User manual

AKG
AKG SO 40 SNAPON User manual

AKG
AKG HEARO 999 AUDIOSPHERE - User manual

AKG
AKG PT 40 FLEXX User manual

AKG
AKG PT 4000 User manual

AKG
AKG FLEXX GUITARBUG GB 40 User manual

AKG
AKG PT 4500 User manual

AKG
AKG SO 40 SNAPON User manual

AKG
AKG PT 40 User manual