Aktobis WDH-50B User manual

Aktobis AG, Borsigstr. 20, D-63110 Rodgau / Germany
www.AKTOBIS.de
Email: Info@Aktobis.de
Building Dryer WDH-50B
Dear Customer,
You have chosen a high-quality product. To ensure that you get a lot of enjoyment from this product, here are a few
more tips:
In case of any problems:
We hope that the unit meets your expectations! If, despite the greatest possible care, there should ever be cause
for complaint, please contact us briefly, as we are very concerned about your satisfaction and would like to clear up
any misunderstanding.

Aktobis AG, Borsigstr. 20, D-63110 Rodgau / Germany
www.AKTOBIS.de
Email: Info@Aktobis.de
Mounting the castors and the transport handle:
To reduce the volume of a new unit, the transport handle was mounted the wrong way round and the castors
including the axle were removed.
The following accessories are included for castor assembly:
2 x castors
2 x axle
4 x washers
4 x hexagon head screws
2 x axle clamps (split pin)
2 x axle clamps (folding cotter pin)
1 x hexagon spanner
The following accessories are included for the transport handle assembly:
1 x transport handle
4 x hexagon socket screws
1 x hexagon spanner
To assemble, place the building dryer on the front (front panel). To protect the unit, we strongly recommend using a
soft base. This can be e.g. a blanket, towel, polystyrene or similar!
A) The construction dryer has two split axles. First fasten the two axles with two hexagonal bolts each in the
already existing holes on the bottom of the construction dryer (see fig. 2).
B) Now mount one of the small axle clamps (cotter pins) on each side in the inner axle holes before continuing
with the rest of the assembly.
C) Now put a washer on the axle from each side - up to the axle clamp.
D) Now the castors can be attached to the axle on each side.
E) Now put a washer on each side of the axle again - up to the roller.
F) Finally, fix the whole thing in place by again inserting an axle clip (hinged cotter pin) through the top of the
outer axle hole on each side and then bending it upwards to secure it.
G) To assemble the transport handle, you must first dismantle the transport handle that has been mounted the
wrong way round using a hexagonal spanner.
H) Remove the transport handle and align it the right way round. Then mount it on each side with the help of 2
hexagonal screws. DONE !
Fig. 1
Castor
Axle clamp
(cotter pin)
Washers
Fig. 2
Axle clamp
(linch pin)
4x hexagon head
screw

Aktobis AG, Borsigstr. 20, D-63110 Rodgau / Germany
www.AKTOBIS.de
Email: Info@Aktobis.de
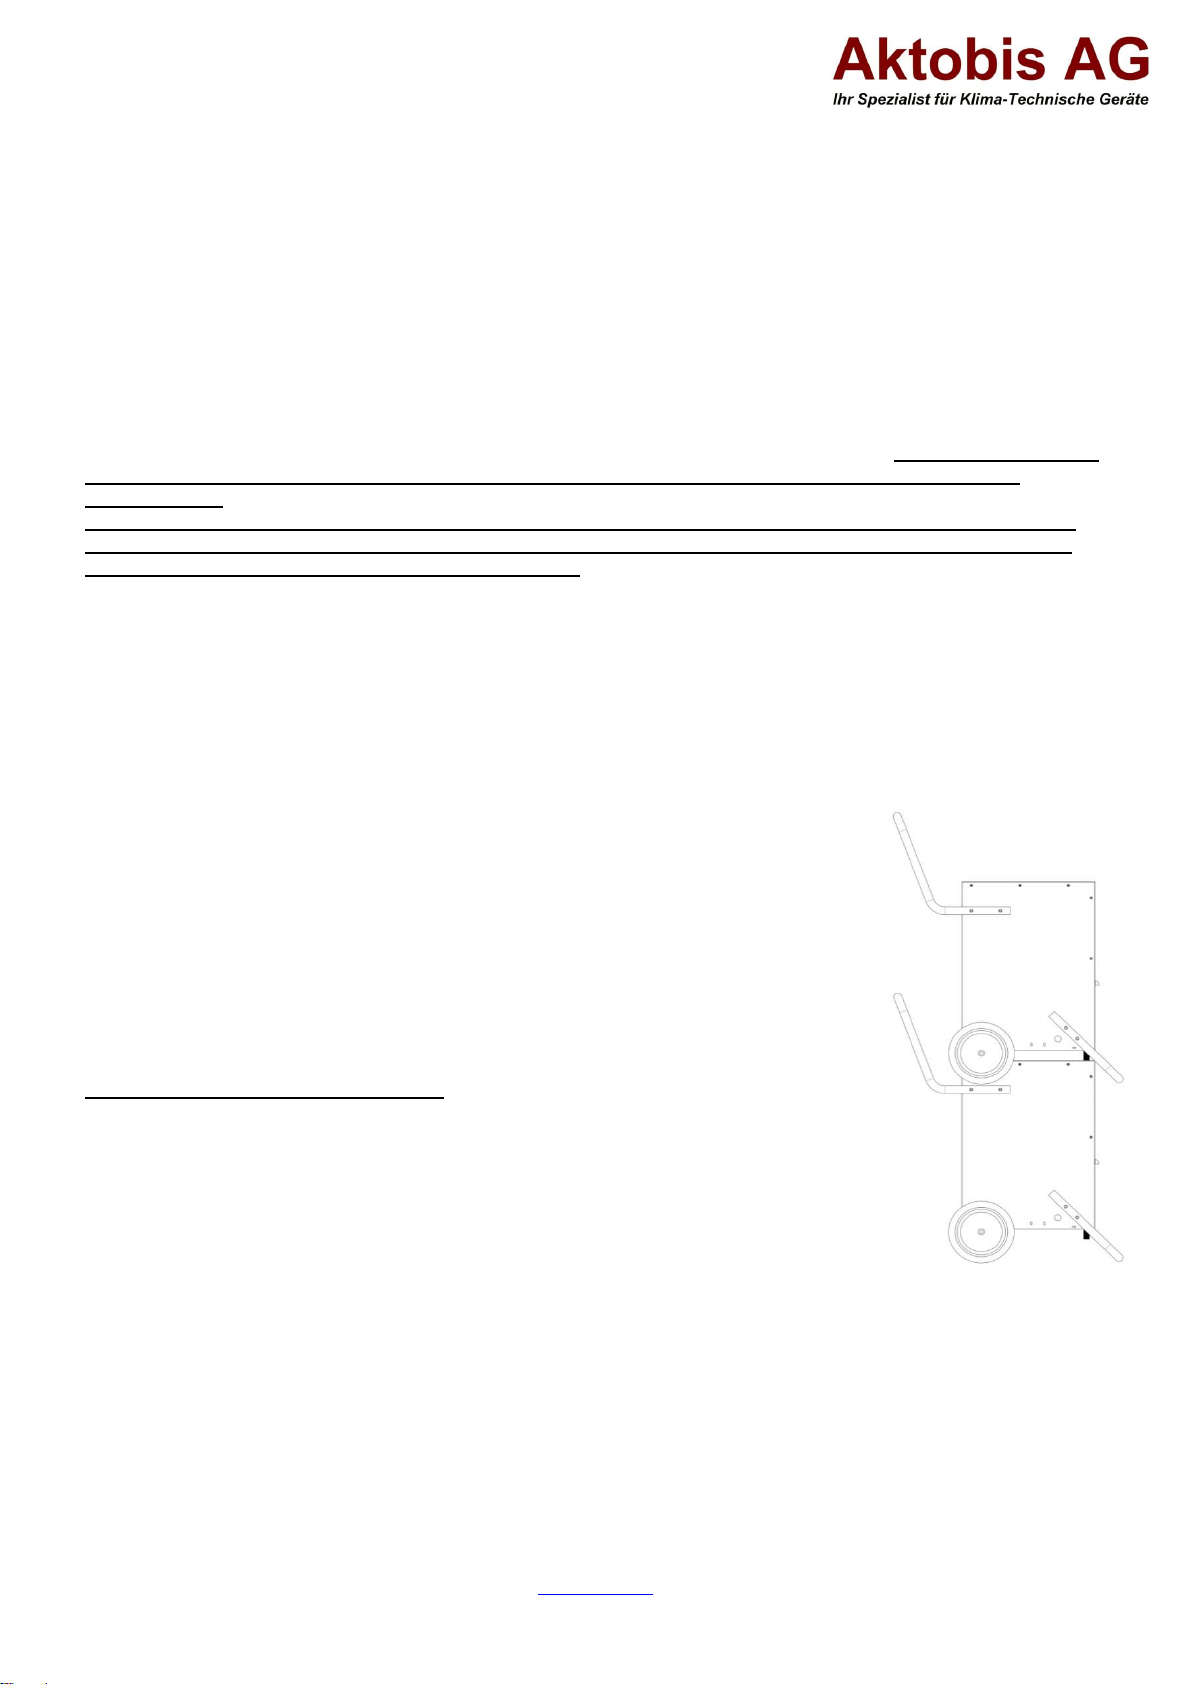
After transport or assembly:
As the unit works with cooling liquid, we ask you to let it stand upright for at least 1 hour before using it for the first
time or after mounting the castors and the transport handle, so that the cooling liquid can settle properly in the unit
again.
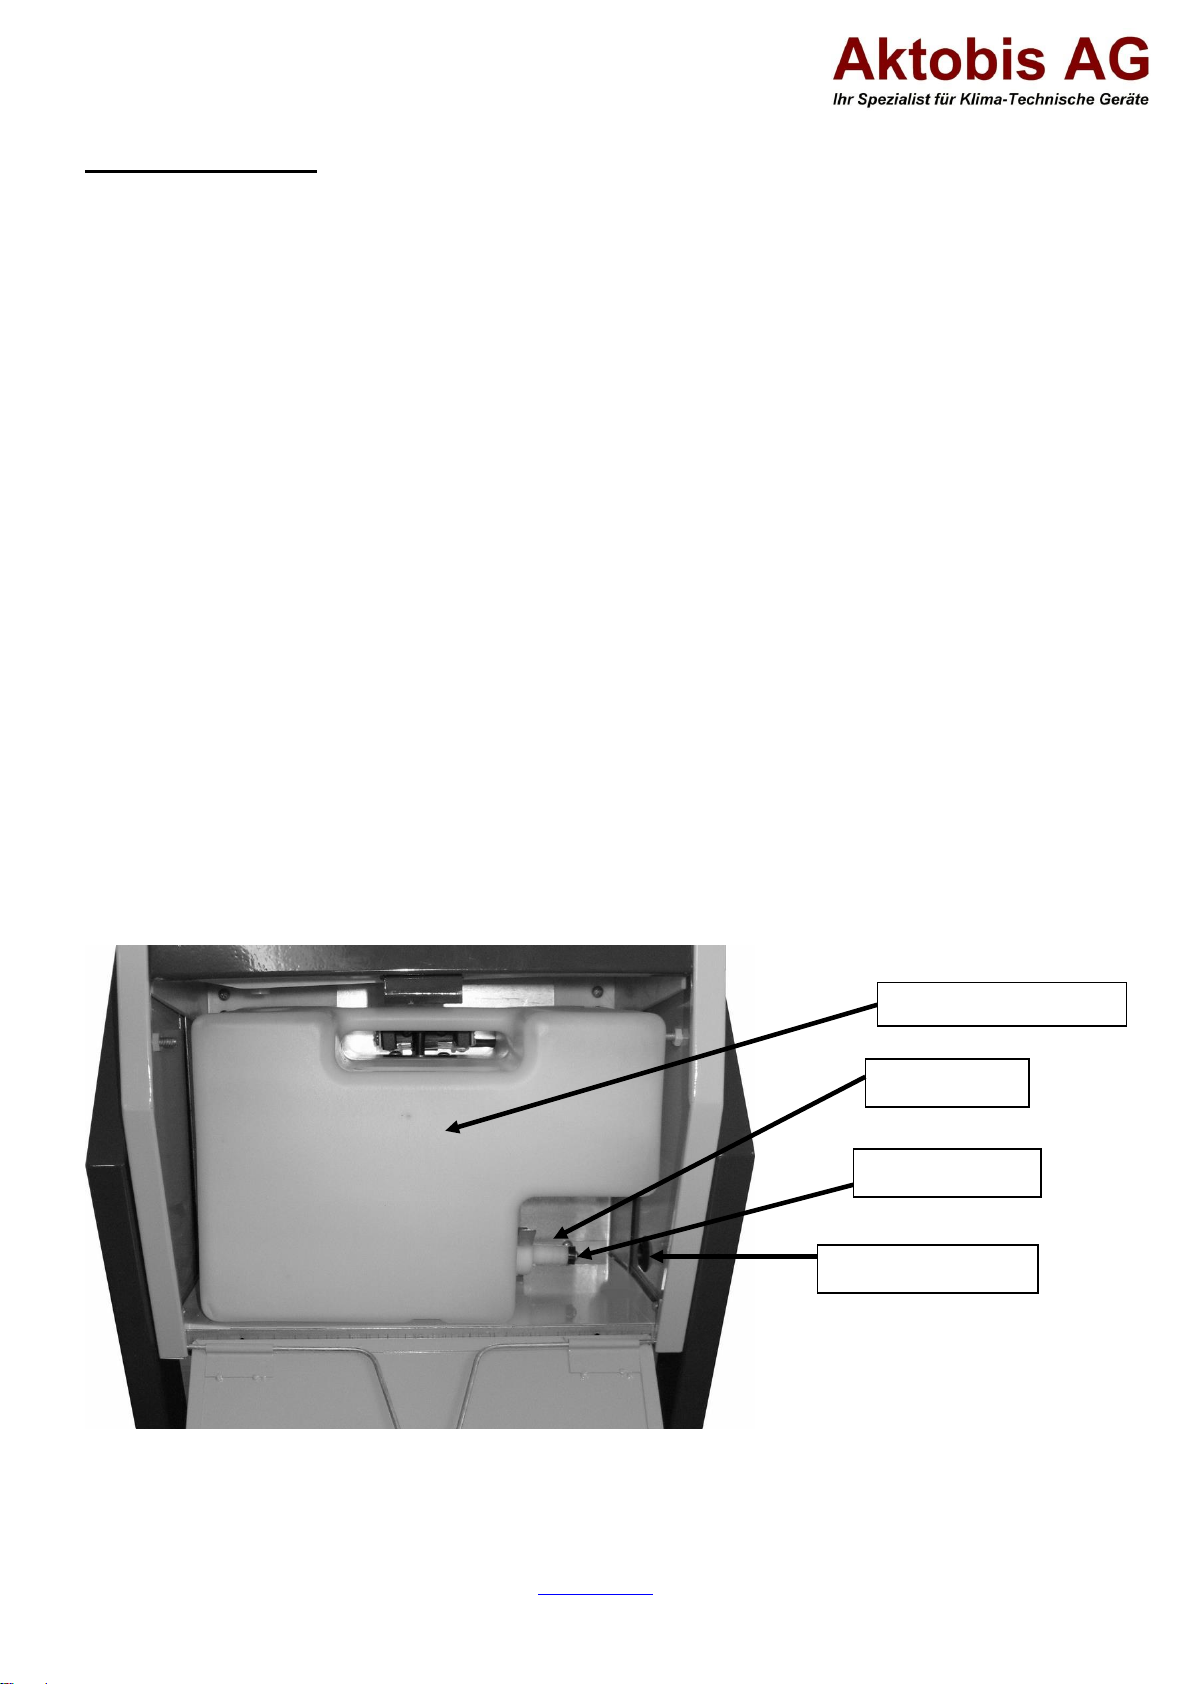
During first operation / hose connection:
If you want to use a hose connection for draining the condensate, make sure that the hose connection is properly
seated and that the condensate (water) can always drain off unhindered! If this is not observed, the water
condensed by the building dryer (up to 50 litres per day) can cause damage to the room!
Room humidity and dehumidification performance:
If you want to check the room humidity and the associated dehumidification performance with your own humidity
meter (hygrometer), please avoid attaching this humidity meter to a wall, as this will falsify the true humidity content
of the room air. See also the explanations under Troubleshooting !!!
Important safety instructions:
- Supervise the building dryer when children are near the unit !
- Watch out for electricity - never walk into or insert objects into the appliance !
- Do not place any objects on the construction dryer !
- Do not block the exhaust and intake louvres of the unit and please ensure sufficient space/clearance at and
around the fan !
- Make sure that there is sufficient air supply to the unit, otherwise it can lead to a reduction in performance and,
in the worst case, to overheating and/or fire ! Please always keep a distance of approx. 20 cm to the wall to
avoid possible overheating of the unit ! Do not use in airtight rooms !
- Only qualified personnel or electricians are allowed to open the unit or carry out repairs !
- Make sure that no moisture gets into or onto the unit !
- Use only the recommended voltage (220V-240V / 50Hz) to operate the appliance !
- Make sure that the power cable is unfolded (untied) before connecting it to the socket !
- Make sure that the plug is cleanly and properly connected to the socket before using the appliance !
- Do not use multiple sockets to operate the building dryer !
- Make sure that highly flammable substances (e.g. gases/oils etc.) are never in the vicinity of the unit !
- Do not use any insect, oil or paint spray etc. near the building dryer. This may cause damage to the unit or
even fire !
- If you are not going to use the unit for a long time, switch it off and disconnect the mains plug !
- Do not disconnect the mains plug by pulling on the power cable !
- Please keep the unit away from heat sources and avoid direct sunlight !
- Always hold and transport the unit in its proper position ! Never place the unit on its side or even upside down !
- Make sure that the unit is properly earthed via the earthed plug supplied !
Please switch off the unit immediately and disconnect it from the mains/power supply if anything
seems to be wrong !!! In this case, please contact a specialist and do not attempt to repair the
unit yourself !!!
Examples: Fan does not run during operation, fuse has blown, there is a funny smell or the compressor rattles
loudly.

Aktobis AG, Borsigstr. 20, D-63110 Rodgau / Germany
www.AKTOBIS.de
Email: Info@Aktobis.de
Important operating and safety instructions regarding the refrigerant R290 in this unit:
Read these instructions carefully and observe them strictly !
The unit operates with the refrigerant R290. This refrigerant is highly flammable and explosive if the safety
instructions are not observed!
The unit should not be stored or operated in a room with burning/heating appliances or open fire !
Please note that the refrigerant is odourless and therefore a leak cannot be detected immediately by an
emerging odour !
Make sure that the outlet of the exhaust air is always ensured and not obstructed by other objects !
Ensure a minimum distance of at least 50 cm from open flames and heating elements !
Set-up, operation and storage of the unit should take place in a room with a minimum size of 10 m2 !
When cleaning, proceed strictly according to the manufacturer's instructions and do not use any additional heat
sources to possibly accelerate the defrosting process of the appliance !
This unit has parts that must not be replaced or repaired !
The refrigerant cannot be renewed or replaced !
Do not carry out any independent repairs or modifications to your unit !

Aktobis AG, Borsigstr. 20, D-63110 Rodgau / Germany
www.AKTOBIS.de
Email: Info@Aktobis.de
Description of the unit parts:
Supply air
Transport handle
Air filter screen
Condensation tank
compartment
Impellers
Exhaust air
"Tank full" signal light
Electricity consumption
meter (kW/h meter)
Main switch
(On/Off)
Rubber buffer for stacking
Stand
bracket

Aktobis AG, Borsigstr. 20, D-63110 Rodgau / Germany
www.AKTOBIS.de
Email: Info@Aktobis.de
Instructions for use:
1. Commissioning
Insert the mains plug properly into the socket.
Switch on the unit with the main switch ( I / O ).
The unit is programmed so that the building dryer runs in continuous operation (continuous dehumidification). This
means that you do not have to make any further settings.
Switch the unit off again with the main switch ( I / O ) if dehumidification is no longer required.
Operating instructions
After switching on the unit, the main switch lights up automatically.
To protect the compressor, the unit should always run for at least 3 minutes or be switched off before you press the
main switch ( I / O ) again!!!
In case of cold ambient temperatures or icing in the unit, a sensor automatically controls a defrosting process.
Meanwhile, the defrost mode automatically controls the air circulation and compressor operation !
2. Connecting a hose
2.1 The connection point for the drain hose is on the right-hand side of the condensation tank (see diagram below).
First remove the black sealing plug there.
2.2 It is best to use a ½ inch plastic hose and pass it through the hole provided on the side and then put the hose
over the plastic tap provided.
2.3 Make sure that it fits properly. For safety, we recommend fixing the hose with a clamp/clip !
2.4 Make sure that the hose does not kink and must always have a slight slope !
Condensation tank
Sealing plug
Plastic tap
Side hose hole

Aktobis AG, Borsigstr. 20, D-63110 Rodgau / Germany
www.AKTOBIS.de
Email: Info@Aktobis.de
3. Cleaning
3.1 Cleaning the housing
Please disconnect the mains plug before cleaning the construction dryer.
Only use mild cleaning agents to clean your construction dryer.
NEVER spray your building dryer (e.g. with water or similar).
3.2 Cleaning the air filter screen
The air filter screen at the front of the air intake filters lint, hair and coarse construction dust. Furthermore, the air
filter ensures that less dust is deposited on the cooling fins, thus ensuring higher efficiency. Too much dust and dirt
in the filter sieve or on the cooling fins reduces the dehumidification performance and can lead to a loss of
efficiency in the
In the worst case, this can even cause damage to your construction dryer, so the following applies in the case of
coarse soiling or in rooms with a lot of construction dust: clean the air filter screen and also the inner evaporator
unit* (*only possible after opening the casing) regularly !
Clean the filter whenever it can be assumed that the air intake is reduced by the dirty air filter screen or that dirt
and dust has been deposited on the cooling fins. (This can sometimes even be the case daily on dusty
construction sites. )
Switch off the unit and disconnect the mains plug !
Now remove the air filter screen by pulling it upwards by the tab.
Wash the dirty sieve well under lukewarm water or vacuum it out thoroughly with a hoover.
Allow the air filter screen to dry and then put it back into its holder from above.
4. Other notes
Do not expose the compressor to temperatures above 45°C. Please do not do this even
if the unit is not switched on/connected. This could damage the compressor !
The exhaust air of the building dryer is approx. 2°C - 3°C warmer than the supply air
(room temperature). In smaller and well-insulated rooms this can lead to greatly
increased room temperatures, this process is quite normal.
For an effective and economical dehumidification operation, please close all doors and
windows in the operating room of the building dryer if possible !
Stacking several units of the same type: If desired, two construction dryers can be
stacked on top of each other. The construction dryer is already shaped accordingly for
this purpose. See the diagram opposite.

Aktobis AG, Borsigstr. 20, D-63110 Rodgau / Germany
www.AKTOBIS.de
Email: Info@Aktobis.de
Technical data
Model name: WDH-50B
Voltage: 220-240V ~ 50Hz
Maximum power consumption: 820 W (3.7 A)
Dehumidification capacity (optimal): 50 ltr./day (35°C / 90% r.h.)
Dehumidification capacity (standard): 42 ltr./day (30°C / 80% r.h.)
Air circulation: Approx. 400 m3/h
Compressor: Rotary compressor
Dimension (H/W/D): 890 x 450 x 740 mm
Weight: 32 kg
Waterproofness: IPx0
Cooling pressure (max.): 2.5 MPa
Vapour pressure (max.): 1.0 MPa
Coolant: R290 (0.23 kg)
Range of use: 5°C - 32°C
For the technical data, deviations are reserved !!!
Troubleshooting
The unit is icing up.
In cold temperatures or long periods of continuous operation, the unit may freeze up despite the defrost sensor. In
this case, we recommend that you manually defrost the unit by switching it off and warming the room slightly.
The unit does not dehumidify enough.
Please remember that the primary aim is not to gain as much condensation water as possible, but to dry and/or
keep dry the room air or ceilings, walls and inventory !
Furthermore, bear in mind that the building dryer can only remove moisture from the air and only indirectly from
materials (screed/plaster). Depending on the condition of the ceilings, walls and fixtures, it can take several weeks
before they release the stored moisture back into the air! For this reason, we also recommend that if you use your
own humidity meter (hygrometer), you place it as freely as possible and somewhat away from walls and ceilings,
because otherwise the determined humidity value of the room air will be falsified!!!
As with all building dryers, the dehumidification performance is decisively influenced by the following factors:
A) Humidity content of the room air and B) Heat/temperature in the room.
For safety's sake, here is an approximate dehumidification table for DURABLE OPERATION:
35 degrees and 90% RH = approx. 50 litres (optimum or maximum capacity).
30 degrees and 80% r.h. = approx. 42 litres and at 60% r.h. = approx. 21 litres
20 degrees and 80% r.h. = approx. 21 litres and at 60% r.h. = approx. 12 litres
15 degrees and 80% r.h. = approx. 15 litres and at 60% r.h. = approx. 8 litres
10 degrees and 80% r.h. = approx. 8 litres and at 60% r.h. = approx. 6 litres
All figures are approximate per day (fluctuation tolerance) when measured directly at the unit inlet and of course
these values only apply if the temperature and moisture content remain constant!

Aktobis AG, Borsigstr. 20, D-63110 Rodgau / Germany
www.AKTOBIS.de
Email: Info@Aktobis.de
Other
Warranty statement:
Notwithstanding the statutory warranty claims, the manufacturer grants a warranty in accordance with the laws of
your country, but at least 1 year (in Germany 2 years for private individuals). The warranty begins on the date of
sale of the appliance to the end user.
The warranty only covers defects that are due to material or manufacturing faults.
are.
Warranty repairs may only be carried out by an authorised customer service. To
To make your warranty claim, please enclose the original sales receipt (with date of sale).
Excluded from the guarantee are:
- Normal wear
- Improper applications, such as overloading the appliance or non-approved accessories.
- Damage due to external influences, use of force or foreign objects
- Damage caused by non-observance of the operating instructions, e.g. connection to an incorrect mains voltage
or non-observance of the assembly instructions.
- Completely or partially dismantled units
Conformity:
The building dryer has been tested and itself and/or parts thereof have been manufactured under the following
(safety) standards:
CE conformity, of course.
CE (LVD) Conformity tested
according to: EN 60335-2-40:2003+A11:2004+A12:2005+A1:2006+A2:2009+A13:2012
EN 60335-1:2012+A11:2014+A13:2017+A1:2019+A2:2019+A14:2019
EN 62233:2008
EMC conformity tested according to: EN 55014-1:2017
EN 55014-2:2015
EN 61000-3-2:2014
EN 61000-3-3:2013
Correct disposal of this product:
Within the EU, this symbol indicates that this product should not be disposed of with household waste.
Waste equipment contains valuable recyclable materials that should be recycled. In addition, the
environment or human health should not be harmed by uncontrolled waste disposal. Therefore,
please dispose of old appliances via suitable collection systems or send the appliance for disposal to
the place where you bought it. They will then recycle the appliance.
I wish you much pleasure with this appliance.
Keep these instructions for use in a safe place !

Aktobis AG, Borsigstr. 20, D-63110 Rodgau / Germany
www.AKTOBIS.de
Email: Info@Aktobis.de
Notes:
_________________________________________________________
_________________________________________________________
_________________________________________________________
_________________________________________________________
_________________________________________________________
_________________________________________________________
_________________________________________________________
_________________________________________________________
_________________________________________________________
_________________________________________________________
_________________________________________________________
_________________________________________________________
_________________________________________________________
_________________________________________________________
_________________________________________________________
_________________________________________________________
_________________________________________________________
_________________________________________________________
Table of contents
Other Aktobis Dryer manuals