Akura SaorView AVT8010 User manual

High Definition
Set Top Receiver
User’s Guide
Customer Help Line : 1 800 88 2390
Website : www.ekey.co.uk
AVT8010

Contents.
1.Safety Information 2
2.Safety Instructions 3
3. Accessories 4
4. User Controls 4
5. Remote Control 5
6. Connections 7
7. Menu System 8
Programme Recording 8
Main menu system 9
Time Shifting 9
Instant Recording 10
Watching Recordings 10
Digital Teletext 10
Main Menu 11
Channel List navigation 11
Moving Channels 11
Deleting Channels 11
Renaming Channels 11
Channel Lock 11
Setting Favourites 12
Programme Guide 12
Recording Timers 12
Timers 13
Recorded Library 13
SETUP 14
Recording 14
Format Disk 14
Setup Configuration 14
INSTALLATION 16
Auto Channel Search 16
Manual Channel Search 16
First Time Installation 16
Media Browser 17
MP3 Playing 17
JPEG Playing 17
Channel Navigation 18
INFO 18
8. Specification 18
9. Trouble Shooting Guide 19
Features.
•DVB and VBI Teletext
•200 Channels.
•DVB 7 days event timer (7 day EPG)
•TV Scart (with RGB and CVBS output)
•Last watched channel memory.
•Automatic Channel search
•Timers for Recording .
•Timer Recording (via EPG)
•Favourite List.
•HDMI output (576p 720p, 1020i).
•USB connection (USB2.0)
•Parental lock. (Options at different levels).
•Input Frequency range. VHFIII ; 174 – 230 Mhz,
7Mhz bandwidth.
•UHF IV, UHF V ; 470 – 862 Mhz, 8Mhz bandwidth.
•Supports 16 and 64 QAM modulation.
•Manual and Automatic search options.
•Video : MPEG2, Pal 4:3 / 16:9
•MPEG 4 H.264/AVC MP@L 3 (SD) Video decoder.
•Audio MPEG-1 layer I/II, MPEG-2 layer II, MPEG-2
AAC. MPEG-4 AAC
•Multi format audio decoder
•Multi language audio support.
•Audio mute and Volume control
•Programme Recording to USB Memory Media
•Time Shifting.

1. Safety Information
2
The lightning flash with arrowhead symbol, within an equilateral triangle, is
intended to alert the user to the presence of un-insulated “dangerous voltage”
within the products enclosure that may be of sufficient magnitude to constitute a
risk of electric shock to the persons.
The exclamation point within an equilateral triangle is intend to alert the user to the
presence of important operating and maintenance (servicing) instructions in the
literature accompanying the appliance.
Correct disposal of this Product
(Waste Electrical & Electronic Equipment (WEEE)
The crossed out “Wheelie bin” is intended to show that this appliance must not be
placed with ordinary household waste at the end of its useful life. To prevent
possible harm to the environment or human health from uncontrolled waste
disposal, please keep separate from other household waste and recycle it
responsibly to promote the sustainable reuse of material resources.
Household users should contact either the retailer where you purchased the
product, or their local government office for details of where and how you can take
this item for environmentally safe re-cycling.
Business users should contact their supplier and check the terms and conditions of
the purchase contract. This product must not be mixed with other commercial
wastes for disposal
This appliance complies with European Safety and Electrical directives
2
2

Unpacking and Handling. Open the carton carefully and remove the packing . Remove the Poly bag
and retain all packaging for future use. Keep all packaging away from small children and animals.
Placing the STB. The STB should be placed on a firm table or shelf.
Connections. When connecting the STB to external sources and the mains supply, do not place wires
that can be tripped over. Do not trap or place heavy objects on the mains lead.
Ventilation and Heat Sources. Do not place material over the ventilation slots, this will cause the STB
to overheat and fail. Do not place the STB in direct sunlight or near heat sources such as radiators or
fires.
Do not allow chains to be dangled into the STB and do not allow objects to be dropped inside the
ventilation slot, this could cause a short circuit and a possible fire.. A serious electrical shock my occur.
Moisture. Do not place the STB in wet or damp conditions, such as steamy kitchens, basements or
other damp places. Do not allow water or other fluids to enter the STB. Do not touch the Mains plug or
adaptor with wet hands. Should moisture enter the STB, disconnect from the supply and call the
customer help line.
Cleaning. Disconnect the STB from the mains supply. Use a soft dry cloth, for stubborn stains use a
soft moist cloth with a dilute mild detergent.. Do NOT use petrol based fluids or abrasive materials.
3
Lightning.
During a thunderstorm or when leaving the appliance for long periods such as holidays, disconnect the
aerial input (if external aerial) and remove the mains plug, This is to prevent power surges damaging the
apparatus
Dis-connection Device. The mains adaptor plug is the Disconnection device and MUST be accessible
at all times.
2. Safety Instructions
3
Candles and Open flames. Do not place lighted candles (“T” Lights) on the top or at the sides of the
STB, or any other naked flame near the STB cabinet.
3
CAUTION. PLEASE READ AND OBSERVE ALL WARNINGS AND INSTRUCTIONS GIVEN IN THIS USER
MANUAL AND MARKED ON THE APPLIANCE. RETAIN THIS BOOKLET FOR FUTURE USE.
This Set Top Box (STB) has been designed and manufactured to assure your personal safety. Improper
use can result in Electric shock or Fire hazard. The safeguards in this appliance will protect you if you
observe the correct procedures for installation, servicing and operation. There are NO user parts inside.
DO NOT REMOVE THE CASE OR OTHER COVERS OR YOU MAY BE EXPOSED TO DANGEROUS
VOLTAGES AND WILL INVALIDATE YOUR WARRANTY. REFER ALL SERVICING TO QUALIFIED
SERVICE PERSONNEL.

3. Accessories
Please check the contents of the contents of
the box before you continue. If any item is
missing please contact your point of purchase.
User Manual
Remote Control
Mains Adaptor
4
4. User Controls.
Standby On/Off. Switches STB to On or Standby mode. Will record programmes when set to standby.
CH- Decrements Channel number by one with each press.
CH + Increments Channel number by one with each press.
LED. Indicates STB status. Led RED, STB in standby. LED Green STB in operation.
Display. Displays Channel number and other status.
I/R Receiver. Receives commands from Remote Control. “Do not block window”.
4
2 x AAA Cells
4
HDMI lead

53
3
5. Remote Control

63
3
1. Open the battery cover
2. Fit two “AAA” batteries (Not supplied). Ensure the battery polarities are correct i.e + to +
and – to -.
3. Replace the battery cover
To prevent injury, do NOT break open or throw exhausted batteries in a fire. Do not
place in the domestic waste, consult your local waste disposal company.
Do not mix batteries, old and new, Carbon or Alkaline.
Do not use re chargeable batteries.
Remove batteries if not using the remote control for long periods to prevent leakage.
If the batteries do leak, clean the compartment with soapy water and scrape any residue
from the contacts. To NOT touch or ingest battery residue.
4. In the event that the remote control does not function, please check that the + VE end of
the battery terminals are in contact with the connection spring. Some batteries have a
smaller + VE terminal and may not reach the spring. You can stretch the spring slightly to
ensure connection
5. Remote Control
Do Not place used batteries in domestic waste, consult your battery retailer or your
local waste disposal company for advice.”.

6. Connections.
IMPORTANT. When making connections ensure the STB is disconnected from the MAINS supply input, and
that the appliance being connected is also disconnected from the mains supply.
Typical connections
77
8
1.Antenna In : Connection to UHF Aerial.
2.Antenna Out. : Aerial signal output to other apparatus.
3.USB. : PVR Hard drive or USB stick connection.
4.Optical. : Optical output to External Audio amplifier. SPDIF encoded Digital Audio
5.HDMI. : Output to High Definition TV display.
6.SCART. : Audio /Video output. (General quality).
7.+12V DC Input. : DC Supply input from Mains Adaptor. (Use only Mains Adaptor supplied)
Antenna.
“External
aerial is
preferred
for best
results”.
External Memory
“not supplied”.
HDMI
Output
To TV SCART
Output
To TV
Note :- Normally just one
connection to the TV is required.
Audio
amplifier
with Optical
input.
12V DC
Mains
Adaptor

83
3
6. Connections
USB Connection.
•You may connect a USB Hard disk drive or Memory stick to your STB by using the USB connection.
This feature allows you to play files or record programmes on the USB memory.
•2.5” and 3.5” (Hdd with external power supply) are supported.
•To record a programme, the HDD or Memory stick must be connected while the STB is turned off. Turn on
the STB and the box will enable the record feature.
•IMPORTANT. To avoid data loss. Ensure any files on the Memory media is “Backed up”. Akura
accepts no responsibility for any data lost on your External Memory, under ANY circumstances.
•It is Possible that certain makes and types of external memory media may not work with this STB, e.g MP3
players.
•IMPORTANT. The STB only supports FAT32 disk format. NTFS is NOT supported. If a NTFS disk is
connected the STB will ask you to format the Memory media.
Any data stored on the Memory media will be lost when the media is formatted in FAT 32.
•To connect a USB Hard drive to the STB it should have a cable as short as possible. USB 2.0 format is
required.
•It is recommended that Disk Drives of 1TB (Terra Byte) or larger should be formatted on a PC in FAT 32
mode. The STB may not format drives over 1TB successfully.
•CAUTION. Do NOT unplug the USB device while the STB is turned on. This may damage the USB
interface on the STB or the Memory media. Do not unplug while playing a file or programme, the data may
be corrupted.
Programme Recording.
Any Memory media must have a minimum capacity of 1GB and a speed of 2.0. If the media is not 2.0 speed
the STB will display an error message.
One hour of recording takes up a space of approximately 2GB.
For more information about recording programmes see sections :- “Instant Recording”, “Electronic Programme
Guide”, “Recordings Library” or “Recording timers”.
Recorded programmes are stored in the directory \DVD\RECS. An .IDX file is created for each recording. This
file includes information such as “Broadcaster”, “Programme” and “Recorded Time”.
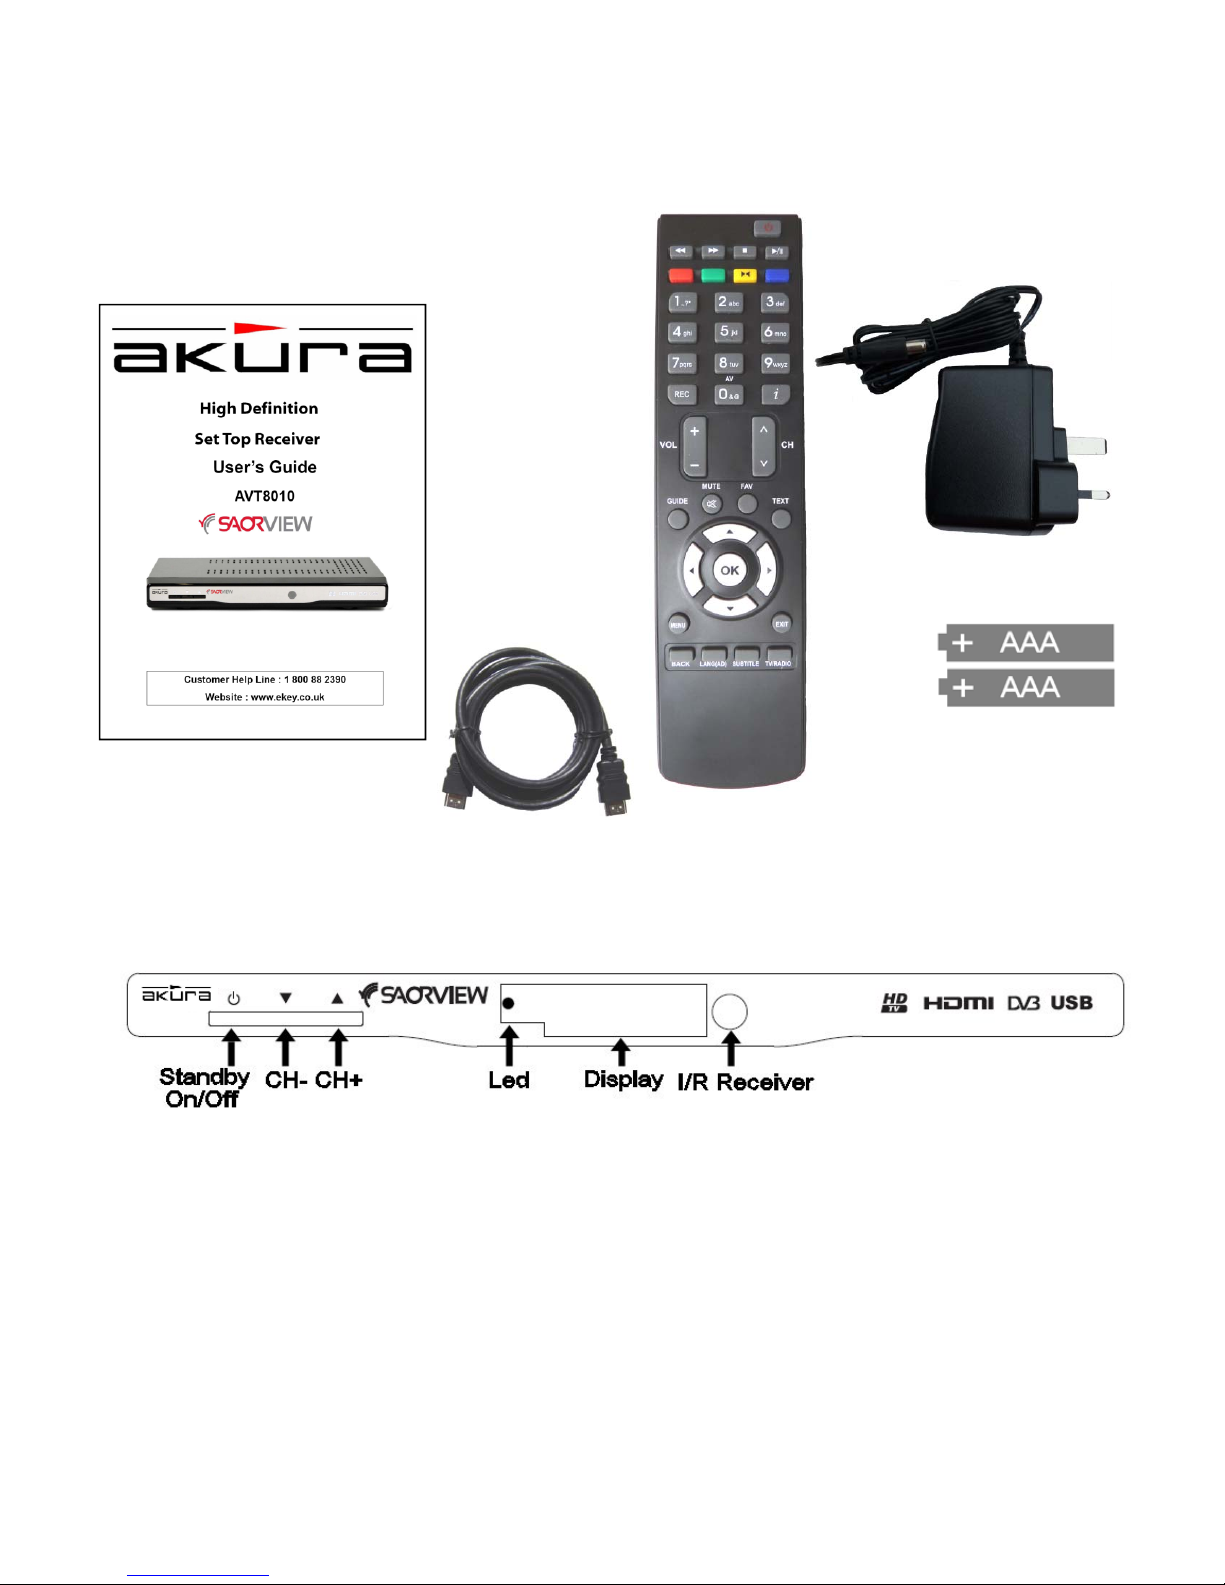
Power Connection.
Connect the leads as required to your TV and Aerial. Insert the DC Input from the Mains adaptor and plug the
Mains adaptor into the supply. A Red LED will illuminate. Wait approximately 10 seconds for the STB to
initialise before turning on by pressing the Standby On/Off button or the Standby button on the remote control.
The LED will now change colour and the display will show Init
Auto Power Down.
This STB will automatically “Power down” to standby if there is no activity for 3 hours. This means that if there
are no Remote functions used.. The factory default setting is “ON”. When the STB is about to go into standby
a message warning the user will appear on the screen, warning that the STB will go to standby in 2 minutes.
If the STB has a recording timer set this must be turned OFF. Enter the Automatic Power Down in the Menu
and turn to OFF

93
3
Main Menu System.
The first time the STB is turned on. There will be no
channels stored.
The First Time Installation Menu is displayed. In the
first window you must set the Language you wish to
use.
The “Active Antenna” menu will be shown. Press the ►/◄
buttons to set On or Off. Note :- Set to ON ONLY if you
have an amplifier attached to the TV aerial. “Default is Off”
Press the ▲/▼buttons to select the language you
want and press OK. The “First Time Installation”
OSD will now be shown.
After setting the Country, you will need to set the TV
type.
The next menu will tell to select the HDMI resolution.
If you intend to use the SCART connector only just
press OK.
Use the ►/◄buttons on the remote control, select
between :- 576P,720p and 1080 i. You MUST check
the resolution supported by your TV before setting.
Press OK to select.
The “Automatic Channel Scan” menu will then be shown.
Select “Yes”, to start the search. The STB will
automatically store all received channels.
Select “Yes”, to start the search. The STB will auto-
matically store all received channels. To exit the process
press the “Menu” button.
Time shifting.
IMPORTANT. To record a programme you must connect
Memory Media to the STB, while the STB is turned off.
Turn the STB on and the Memory Media will be
initialised.
To Time shift, press the Pause button.
The programme will now be stored on your Memory
Media. To view the paused item, press the Pause button
again. You will see the time shift delay in the “info” bar.
Use the Rewind/Forward buttons to move Forward or
Backward in time shift playback. When the end of the
Time shift is reached the STB will revert to “Real time”
play. To stop Time shifting press the Stop Button.
The amount of time allowed for Time shifting is set in the
Recordings Configuration Menu see page 14 , See
section “Recordings” and setting Max Time shift.
Note:- You may not change programmes while a
Recording is taking place. You must stop the recording
first.
7. Menu System

10 3
3
Instant Recording.
IMPORTANT. Ensure a Memory Medium is
connected to the STB before you record a
programme. This must be done with the STB in
Standby.
Press the Record button, the programme will
start to be recorded after a delay of 5 seconds.
The Record OSD will be shown for a short time and
the current event will be recorded.
You can press the record button again to
record the next event on the EPG. The OSD will be
shown as below to indicate another programme has
been added.
Press Stop to cancel an instant recording. The
following OSD will be shown.
Select Yes by using the ►/◄and OK button, to
cancel the recording.
Note :- Switching to a different programme or
viewing the Media Browser is not possible when
recording.
Watching Recorded Programmes.
IMPORTANT. To view the recordings ensure your Memory
media is connected to the STB. This must be done with the
STB Off.
In the Main Menu highlight the Recordings Library using the
▲/▼buttons and press OK to enter. The recordings Library
will then be shown.
Select a recorded item from the list using the ▲/▼
buttons . Press OK to play from the start. Press ►
Play to resume the playback.
Press STOP to stop a playback and return to the
Recording Library.
Digital Teletext.
With SAORVIEW in addition to pictures and sound
you can view digital teletext.
Press the TELETEXT button.
If the station is transmitting teletext the digital text will
appear on the screen.
Use the Coloured buttons, cursor buttons and Ok
button, to operate the function.
The operating method may differ depending on the
contents of the Teletext information.
To return to normal TV press the Teletext button
again.
Normally all programmes will contain Teletext.
However there are some dedicated Teletext
channels. Please see your TV guide for information.
7. Menu System

11 3
3
Main Menu .
The Main Menu is accessed by pressing the MENU
button. The items accessed can be seen below.
Moving the Channels in the Channel list
Re ordering the list can be done by entering the “MOVE”
function using the ►/◄buttons.
Navigate the list using the ▲/▼buttons and to select the
channel and press OK. Enter the New Channel number
where you want to move the channel to and press OK. The
channel will then move to the new location.
RTE transmits a code in each channel to identify the channel
details. The STB detects this and places the channels in the
correct order.
If you wish to move any channel, you may re number from 1
- 999
1. Channel list.
2. Programme guide.
3. Timers
4. Recording Timers
5. Recordings Library
6. Setup
7. Media Browser.
Channel List.
The following operations
can be performed in this
menu.
Navigating the list of channels
Moving channels
Deleted unwanted channels
Renaming channels
Adding locks to channels
Setting a “Favourites” list.
The CHANNEL Table is where the channels are
managed
Channel List Navigation.
In the channel table use the ▲/▼buttons to select
the channel required, and use the Red/Green
buttons to select Page Up/Down.
Press OK to view the channel highlighted. The
name and channel number will be displayed in the
preview window.
If the selected channel is password protected a
message will be displayed. If you enter the correct
password the channel will be shown.
Deleting a Channels in the Channel list
To Delete a channel, use the ▲/▼buttons to select the
required channel, highlight “DELETE” using the ►/◄buttons
and press OK. You will be asked to select “YES” or “NO”. If
you select NO the operation will be halted. Note: When a
channel is deleted you must perform a Retune to re install
that channel.
Renaming Channels.
To Rename a specific channel, the Channel must be
highlighted and then select “EDIT NAME”. Press OK to see
the Edit Name OSD box.
The first character will be highlighted. To change the letter
use the “alpha/Numeric” buttons, each press will scroll
through a number of options until you see the one you
require. To move to the next letter use the ►/◄buttons.
Press OK when completed. Press Menu to exit before or at
the end of the operation.
Channel Lock
Channel locking provides a password-protected access to
channels selected by adults. To set the Lock, select the
channel you require to lock useing the ▲/▼buttons . Select
“LOCK” using the ►/◄buttons and press OK. You will need
to enter your password “0000” factory default.
Press OK and a Lock sign will be shown adjacent to the
Channel name. To remove the lock, press OK again.
If you wish to view the “Locked” channel you will need to
enter the Password.
7. Menu System

12 3
3
Setting Favourites. Green Button. Expands the time line display.
Red Button. Shrinks the time line.
Blue Button. Displays the “Next day” listing. Each press
shows the next day and so on (7 Days).
Yellow Button. Displays the “Previous day” listing. Note
you cannot go back to a day prior to the current day.
Use the ▲/▼buttons to select the channels and the ►/◄
buttons to move across the timeline to select a programme
to record at a future time or to view immediately.
Across the bottom of the Guide are a series of commands
to enable easy use of the guide.
INFO displays details of the programme highlighted.
Note :- If there are boxes with no information, it is that the
programme provider has not provided details.
The FAVOURITE list is an easy way to group
channels in a convenient way to enable fast
selection. To add channels to the favourite list, use
the ►/◄buttons to select FAVOURITES and press
OK. Use the ▲/▼buttons to select the channels
required and press OK to add a “F” to the channel.
To remove the “F” select and press OK again. To
exit the menu press “Menu”, this will store the
settings to memory. To use the Favourites function,
press the FAVOURITES button and then use the
CH + / CH – buttons. To select a non Favourite
channel use the Numeric buttons or press the
Favourite button again and use the CH+/CH-
buttons as normal
Programme Guide.
An Electronic Programme Guide (EPG) is provided.
This allows the user to see a 7 day programme
guide for all the Channels transmitted in your area.
Press the “GUIDE” button on the Remote control, a
listing will be shown as above. The current
programme is highlighted and a Red Cursor line
shows how far the programme has been shown.
Numeric Buttons 1-9 (Jump). Goes to the preferred
channel directly.
Search. Activates the “Guide Search” window.
OK. Views / Records or sets timers for future programmes.
Record/Stop. To select a programme for recording select
the programme in the “time line” and press the Record
button. The programme will be “under scored” with a Red
line. To remove the setting press the button again.
If you have set the recorder via the Timer menu a Yellow
line will be displayed.
>> / << Shifts the time line left and right.
Jumps to the current broadcast.
IMPORTANT: To use the Record function a Media Memory
must be connected. This MUST be done before power is
applied. Note : You cannot switch to another channel while
a recording is in operation.
Recording Timers.
If the programme you need to record is not displayed on the
EPG, you may enter the details in the Recording timers
Menu.
Press the Menu button and select RECORDING TIMERS.
You may add, remove or display any timers that have been
set previously.
7. Menu System

13 3
3
The Green line at the bottom of the screen displays
the available disk space. The Red line denotes
“already used” space.
Adding a Recording Timer.
Press the Yellow button on the remote control.
A list as shown below will be displayed.
Timers.
Channel. Selects a channel for recording.
Record type. Defines recording type.
Date. Starting date is entered using the ►/◄and
numeric 0-9 buttons.
Start. Starting time is entered using the ►/◄and
numeric 0-9 buttons.
End. Ending time is entered using the ►/◄and
numeric 0-9 buttons.
Duration. Displays the recording duration.
Repeat. You may set the timer to be repeated
Once, Daily or Weekly.
Playback. This can be set to Allowed, Disallowed,
or as “Use Parental Settings”. You may be asked
for your PIN number.
Change / Delete. Permits or prohibits changes by
other users. You may be asked for the PIN number.
Press GREEN to Save, Press RED to cancel.
Editing a Recording Timer.
Select a timer in the Recording Timers menu using
the ▲/▼buttons. Press the GREEN button on the
remote control and “Modify Timers” will be shown.
Use the ▲/▼/ ►/◄buttons to modify the required
setting. Press GREEN to save the new setting.
Deleting a Recording Timer.
Select a timer in the Recording Timers menu using
the ▲/▼buttons. Press the RED button on the
remote control to delete. A confirmation message
will be shown. “Delete this Timer”? Select YES to
delete, select NO to cancel.
To display the Timers window, select from the Main
Menu. To ADD a timer press the YELLOW button.
The display as below will be shown.
The functions are identical to the descriptions
opposite.
Recordings Library.
To view a list of the recordings stored on your Memory
Media. Select from the “Main Menu”. Use the ▲/▼
buttons to highlight “Recordings Library” and press
OK. The Recordings Library will then be displayed.
All the recordings are shown as a list in the Recording
Library.
Red Bar. Indicates the amount of memory used.
Green Bar. Indicates the amount of memory available.
Red Button. Deletes the selected recording.
7. Menu System

14 3
3
Green Button. “Edit” Allows changes of the
selected recording.
Blue Button. “Sort”. Allows changes to the order of
recordings in the library. You can select from a wide
range of options.
OK Button. Plays the recording from the start.
(Resume) Pauses and resumes play. Note :-
Viewing main menu and menu items are not
available during playback.
INFO. (Details). Displays the programme details.
SETUP. The adjustments in this menu are as
follows :-
►/II
Recordings.
Select Recordings and press OK. The table below
is shown. This allows you to set your preferences.
Start Early.
You may start recordings earlier than the advertised
time.
End Late. Some recordings may run over time
slightly. Use this setting to adjust your preference.
Note :_ If you have two recordings “End on” the
second recording will start late.
Max Time shift.
You may set the “Time shift” from 5 minutes to 2
hours.
Format Disk.
In certain circumstances the Media Memory may
need “Formatting”. YOU MUST BE CERTAIN.
FORMATTING WILL CLEAR/WIPE ANY
MATERIAL IN THE MEMORY.
Format Disk cont..
When you select Format Disk you will be asked to
confirm your choice.
Select YES if you wish to Format the disk.
AKURA LTD ACCEPTS NO RESPONSIBILITY FOR
ANY DATA LOST UNDER ANY CIRCUMSTANCES.
Media Memory (Hard Disk) Information.
This table shows you the various parameters of the
Media Memory you have attached to the STB. It is
for Information only.
Setup.
The adjustments in the menu below are as follows :-
Configuration.
You can configure the settings of your STB from the
menu on the next page. Select “Configuration” from
the Setup menu and press OK to enter the menu.
Press “EXIT” on the Remote control to exit. To
navigate the menu use the ▲/▼/ ►/◄buttons,
press MENU to confirm and “EXIT” to exit the
menu.
7. Menu System

15 3
3
Configuration. Cont…
Low Power.
Selecting “Yes”, will activate the “low power” mode.
In standby the power will be less than 1W. The front
panel will show no information, except the standby
led.
Favourite Mode.
This function “Enables” or “Disables” the “Favourite
mode”. Use the ►/◄buttons to select.
Channel List.
Use the ►/◄buttons to select the item in the list.
“TV Only”. This will allow you to only view the TV
channels in memory.
“Radio Only”. This will allow you to only view the
Radio channels in memory.
“Text only”. This will allow you to only view the Text
channels in memory.
“View all” Default. This allows you to see all the
items in the memory. Use the PR+/PR- buttons to
navigate the list. To save any changes and Exit
press “MENU”. To exit without saving, press Exit.
Active Antenna.
The setting is “OFF” as default. If you need to use a
“mast head” amplifier to amplify the antenna signal,
this should be turned “ON”. Note :- The STB can
supply 5V DC @ 30 m/a. Do not short circuit the
Antenna connector while activated. This may
damage the STB.
Auto Power Down.
If this is activated and No Function is performed
after 3 hours, the STB will automatically switch to
standby. “No Function” = no Remote control
command or button press.
If the Auto power down is activated and you have
Record Timers set, you MUST turn the Auto Power
Down OFF.
Receiver Upgrade.
To ensure the STB has the most “up to date”
software, ensure the STB is set to “standby”. If an
upgrade is available, at 3am each day a
transmission will take place. The STB will “wake up”
and receive the upgrade automatically. This
normally takes up to 30 minutes.
Configuration. Cont…
If you have a Recording timed for 3am, then turn
the Auto Upgrade Off using the ►/◄buttons.
If you have not upgraded the software for some
time, use the ▲/▼buttons to select “Scan for
Upgrade” and press OK. If there is an upgrade the
STB will download it… note :- this may take up to
30 mins.
Do not forget to re enable the “Auto Upgrade” after
your programme is recorded.
Audio settings
Digital Audio Output.
Use the ▲/▼buttons to select, and the ►/◄
buttons to select PCM or Compressed. The default
is PCM.
If the transmission is in AC3 mode, select this and
turn it ON (Off is default).
Audio Delay.
When using an external Audio amplifier connected
via the “Optical Audio Connection” you may need to
“Delay” the audio to regain “Lip sync”. Select the
delay value to obtain correct lip sync.
Note :- If using PCM/AC3 you must have a suitable
Audio amplifier.
Video settings.
* TV Type.
The Output from your STB may be set to match
your TV type. Older TV’s display a 4 : 3 format,
while modern TV’s are usually 16 : 9 (wide screen).
To change the settings of the STB to match an
alternative TV that has been connected, select
“Video Settings”.
Use the ▲/▼buttons to select the function and the
►/◄buttons to select the required setting.
TV Type. Select from 4 : 3 or 16 : 9
Display Format. Select from Full or Pillarbox.
TV Out. Select from RGB and CVBS. RGB is the
better quality for modern TV’s. CVBS is less quality
for older TV’s.
HDMI Resolution. Select from HDMI 1080i, 720p
560p. Check the resolution of your TV before
choosing.
To save your settings press “Menu” and the STB
will save and exit the settings. To exit without
saving, press Exit.
Parental Control.
Select “Parental Control” and press OK.
You will need to enter your PIN number (0000
default).
Maturity Lock. You may select the age at which a
programme may be viewed. Use the ►/◄buttons
to select the required age, from 4 to 18 years.
7. Menu System

16 3
3
Maturity Lock cont..
If the programme has a recommended level over
the “set level” the programme will not be shown.
Menu Lock.
You may select the Menu system you wish to lock.
This stops un authorised settings of the STB being
changed.
Select from :- all Menu’s, Installation Menu, and
Disabled.
Set Pin.
Select “Set Pin” to change the Default pin number
to your own number.
Press OK and enter your new 4 digit pin number
twice and if identical the message “Pin changed”
will be shown. Note :- Keep the New number safe.
Press Menu or Exit buttons to exit the menu.
Time Setting.
Normally the Time setting will be done in initial
installation. However if you need to change the
Time Zone and do not need to make a New
Installation, Select Time setting and press OK.
Time Zone Setting. Select from “Auto” or “Manual”.
Manual allows you to set the Time Zone.
Select “Manual” and then use the ▼button to select
“Time Zone”. Use the ►/◄buttons to select the
required Time Zone. Press “Menu” to save and exit
the menu.
Language.
In this menu the user can select the preferred
languages.
Language setting Cont…
Preferred. This is fixed and cannot be adjusted.
All the other Languages may be adjusted. Use the
▲/▼buttons to select the required setting and the
►/◄buttons to select to required language.
Press “Menu” to Save and Exit the menu. Press
“Exit” to exit the menu without saving.
Installation.
When the STB is initially installed you will see the
First Installation menu.
However If there is a need to change areas or add
new channels you will need to use the Installation
menu.
Automatic channel search.
Select this and press OK. All the “multiplex’s” are
searched and a Channel Table is created. Any
existing channels will be erased. All channels will
be stored with respect to their channel number.
Manual search.
To add one or two new channels you may wish to
manually add these. Select Manual Search and
press OK.
There are two options “Frequency search” and
“Channel search”. If you are not familiar with either
the Frequency or Channel number, select
Automatic Channel search and let the STB add the
new channels.
Network search and Clear Service.
These features are not available at present.
First time Installation.
If there are too many changes to the TV service, it
may be better to perform a complete Installation.
See page 9.
7. Menu System

17 3
3
Media Browser.
The STB can support Memory Media such as USB
Hard drive or Memory stick. This allows you to play
MP3 Music files, Jpeg pictures stored on these
devices. Media with Separate “Logical” drives are
also supported.
Note :- Some USB devices may not be compliant or
supported with this STB.
Note :- If the USB device is not recognised after it is
connected and the STB is turned on. Unplug the
USB device, and the Power plug on the STB. Re
insert the USB plug, re insert the STB power plug
and turn the STB on.
To select Media Player, Press the MENU button,
select “Media Browser” and press OK.
The “USB Drive 1” will be highlighted, note :- If the
drive is “Partitioned” it will show additional drives.
Press OK and a display similar to the one below will
be displayed.
Playing MP3.
Use the ▲/▼buttons to select the required item.
Play this. Press OK.
Play this + Loop. Plays the selected file repeatedly.
Play + Loop. Plays all the media files, starting with
the selected file repeatedly.
Play + Loop + Shuffle. Plays the files randomly. If
shuffle mode is enabled, previous/next functions will
also jump the tracks randomly.
Play. Plays all the media files in the folder starting with
the selected one.
Pause/Resume. Pause and resume the file playing.
Stop. Stops the file playing.
Previous/Next. Selects the next or previous file to
play.
Viewing JPEG (photos).
Jump. Jump to the required file using the numeric
buttons.
OK. Views the selected picture in full screen.
Viewing Jpeg files cont..
Play / Slideshow. Starts the slide show with all the
files in the folder.
Pause. Pause the slide show.
Continue. Continues the slide show.
Previous/Next. Selects the next or previous file.
Exit. Back to file list.
Shuffle. Shows the files randomly. If during a slide
show the button is pressed the next pictures wil be
shown randomly.
Loop. Slide show continues to play.
Info. Activates the Operation bar.
OSD Messages.
When no signal is received the message below will be
shown. The reason for this is that the Aerial is
disconnected .
When there are no channels stored in the STB, Timer
menu, Channel Table menus are not accessible.
Trying to enter these menus will result in the message
below.
When there is no menu on the screen, you can switch
between the Favourites Lists using the FAV button. If
the favourite list is empty, the following message is
displayed
7. Menu System

18 3
3
Channel Navigation.
Channel CH + and CH – buttons. Pressing CH+ will
increase the channel number by one, and CH- will
decrease the channel number by one with each
press.
Numeric buttons. Pressing a number button will
activate a small window in the upper left of the TV
screen. After a “digit” is entered the box will wait for
another entry. If no more numbers are added the
STB will switch to that selection. If a number that is
greater than the number of memory locations is
entered the box will return to the last channel
entered.
INFO.
Each time a channel is selected a bar is displayed
in the lower screen giving you information about the
programme being shown. This can also be seen
when pressing the “i” button.
When switching to a “Locked” channel, the Lock
Code will be requested. To view that channel you
must enter the correct PIN number. To skip this
channel use the CH+/CH- buttons.
V+ / V- buttons.
When the V+ / V- buttons are pressed a banner is
displayed that represents the volume level
graphically. By pressing the buttons the sound will
be increased or decreased as required
Mute button.
When the mute button is pressed the sound will
cease. The symbol will be shown below for approx
4 seconds. To restore the sound press the mute
button again or the V+ button.
Supply. DC +12V @ 70 m/A (with HDD).
Power Consumption with mains adaptor < 10W
Standby power < 1W
Mains adaptor. 220-240V AC 12V DC output.
Input frequency. 174 Mhz – 862 Mhz.
Active antenna output. 5V @ 50 m/A max.
Operating temperature. 5 deg C to +40 deg C.
Dimensions. 295 x 178 x 40 mm
Weight inc Mains adaptor. 869 g’s.
USB (Optional). 500m/A current limit.
Remote Control. Infrared. Distance 10 metres
Remote Control batteries. 2 x “AAA” batteries.
Digital Standards. DVB-T MPEG2, MPEG 4
Demodulator.
Symbol rate. CODFM with 2K/8K FFT Mode
Modulation. 16 QAM- 64 QAM .
Video . H264 (MPEG-4 Part 10) main and high
profile level 4.1/MPEG-2 MP@HL video decoder.
Output. RGB / CVBS via Scart, Optical Audio
codec.
Audio. MPEG-1 layer 1/11, MPEG2-Layer
11,MPEG – 2AAC, MPEG-4 AAC.
Sampling frequencies supported . 32,44.1 &
48Khz.
TV Scart.
Video Output. Composite video signal 1V PP @
75 ohms.
Audio output. 2V RMS / Z = 10K
Function switching. 4 : 3, 12V DC, 16 : 9 6V DC.
Optical Audio. Infra red .
8. Specifications.7. Menu System

19 3
3
9. Trouble shooting Guide
SYMPTOM POSSIBLE CAUSE REMEDY
Dead. No led lit Power not connected to STB Check power lead and mains
adaptor is connected and
turned on
No Picture. Led lit Red STB in standby. Press Power button on STB or
Power button on remote
control.
No picture. Led is Green Output lead not connected to
TV
Ensure Scart lead or HDMI
lead is connected to TV and
TV has that input selected.
No Signal message displayed STB not tuned in Follow instructions from page
9
TV Picture freezing and
breaking up
Poor aerial signal Have aerial signal checked. If
indoor aerial it may need an
outdoor aerial.
No Remote Control functions Batteries exhausted Replaced batteries.
Object blocking I/R signal Remove obstruction
Not receiving or showing a
certain channel.
Parental lock activated Enter Setup menu and
check/reset locks
Lost Remote Control code “4725"
No Audio in HDMI Mode System crash Unplug TV and STB. Re power
both.
STB not "seeing" Media
Memory
Memory not activated correctly You MUST unplug the DC
input before connecting the
Media Memory. When starting
up the STB should see the
Media memory and display a
message.
Not playing certain types of
Media
Incompattible media Only JPEG and MP3 are
guaranteed to play
Not Recording a TV
programme in Timer mode. Timers incorrectly set
Only ONE timer may be set in
one time segment.
Should you experience difficulties operating this product please consult the guide below before
calling the Customer Help Line.
If you are still having difficulty please call the Technical help line. Ring : 1 800 88 2390(Normal
rates apply).
Opening hours Mon-Fri 8 am – 8pm. Sat 9 am – 4pm. Sun 10am – 4pm “Bank holidays as Sun”
Or try our website :- www.ekey.co.uk (24Hr) Emails should be responded to within 3 - 4 hours
should the consumer have difficulty getting through.
Other manuals for SaorView AVT8010
1
Table of contents
Other Akura TV Receiver manuals